Mar 3, 2020 | Cards, Gallery |
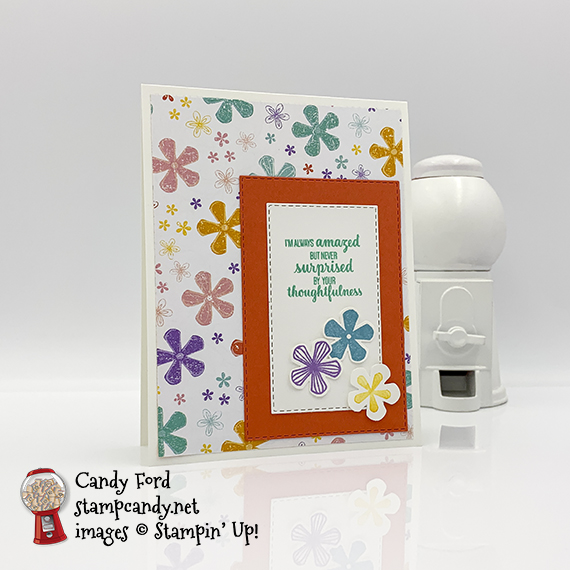
I used the Small Bloom Punch and Thoughtful Blooms stamp set (both from the 2020 Sale-A-Bration brochure) along with the Pleased As Punch Designer Series Paper (from the new Coordination Product Release) and the Stitched Rectangle Dies (from the 2019-2020 Annual Catalog) to create today’s cheerful thank you card.
S small bloom small bloom
Here’s what I made:
S
Here’s what I did:
Cut and scored with my paper trimmer:
- Whisper White Thick card stock (CS) cut to 4-1/4″ x 11″, then scored in half at 5-1/2″
- Pleased As Punch Designer Series Paper (DSP) layer cut to 4″ x 5-1/4″
Stamped with the Thoughtful Blooms stamp set:
- sentiment in Coastal Cabana ink onto a scrap of Whisper White CS
- one flower in Balmy Blue ink onto a scrap of Whisper White Thick CS
- a second flower in Highland Heather ink onto a scrap of Whisper White Thick CS
- a third flower in Daffodil Delight ink onto a scrap of Whisper White Thick CS
Cut using the Small Bloom Punch:
Cut using the Stitched Rectangle Dies:
- sentiment, with the sentiment at the top of the rectangle
- scrap of Calypso Coral CS
Assembled the card:
- burnished the fold in the card base with a Bone Folder
- DSP layer glued onto the front of the card base
- Calypso Coral die cut layer glued onto the DSP layer
- sentiment glued onto the Calypso Coral layer
- 3 flowers adhered onto the sentiment layer using Mini Stampin’ Dimensionals
S
Here are today’s main colors:
You can click on each one to see all the products that come in that color!
S
Here’s what I used:
Click on these images for more details and to purchase. If you are reading this post in email, the product images may not show up. Click here to see the post on my blog.
Click “Supply List” above for a clickable and printable list of the products!
S
Here are some helpful links:
Thanks for stopping by today, and Sweet Stamping!
Mar 2, 2020 | Cards, Gallery |
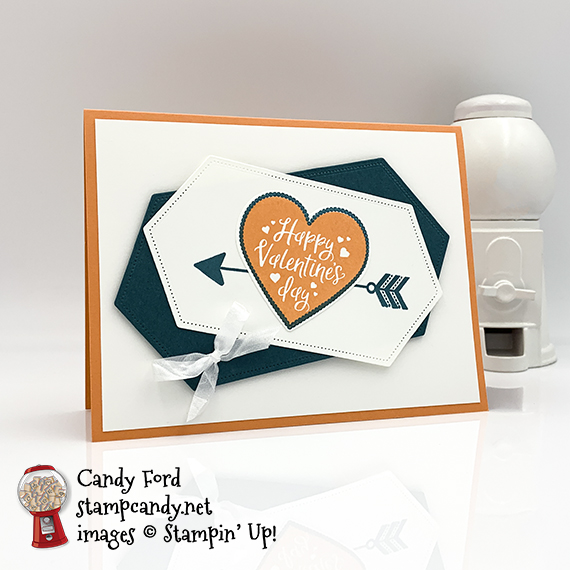
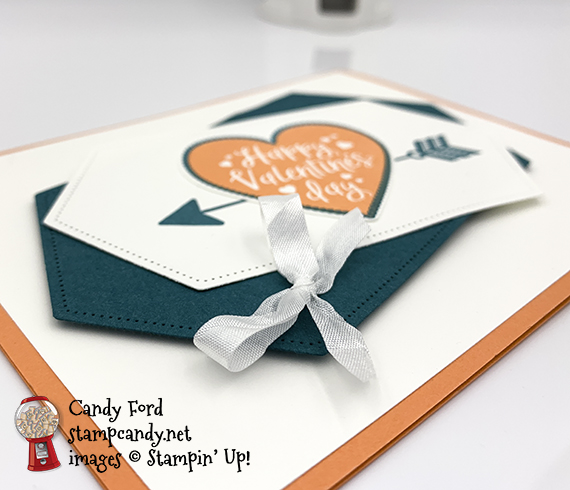
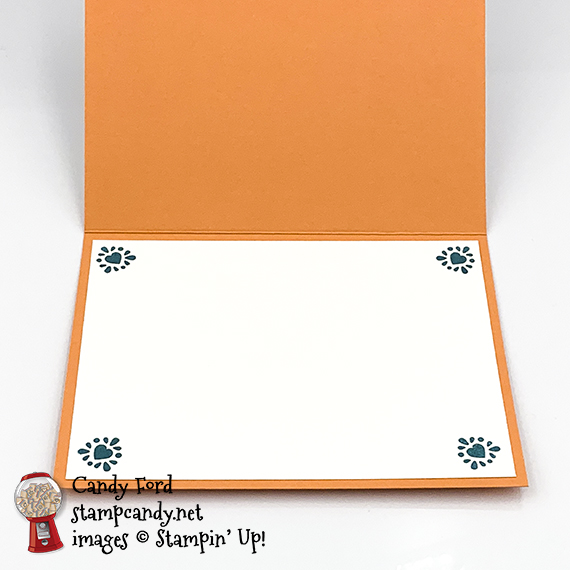
I realized I forgot to post this Valentine before February 14, but I still wanted to share it with you. I used the Heartfelt Bundle (Heartfelt stamp set and Heart Punch Pack) and Stitched Nested Labels Dies to make this card in Grapefruit Grove, Pretty Peacock, and Whisper White. It’s a departure from the usual color scheme, but it still uses some of the same products. You could use any of the other sentiments in the stamp set on this card and use it any time of year.
S Stitched Nested Stitched Nested
Here’s what I made:
S
Here’s what I did:
Cut and scored with my paper trimmer:
- Grapefruit Grove card stock (CS) cut to 5-1/2″ x 8-1/2″, then scored in half at 4-1/4″
- Whisper White CS cut to 5-1/4″ x 4″ (2 pieces)
Stamped with the Heartfelt stamp set:
- arrow in Pretty Peacock ink onto a scrap of Whisper White Thick CS
- sentiment heart in Grapefruit Grove ink onto a scrap of Whisper White CS
- border in Pretty Peacock ink around the heart sentiment
- small heart design in Pretty Peacock ink on all 4 corners of one of the 5-1/4″ x 4″ pieces of Whisper White CS
Cut using the Stitched Nested Labels Dies:
- arrow
- a scrap of Pretty Peacock CS
Cut using the Heart Punch Pack:
Assembled the card:
- burnished the fold in the card base with a Bone Folder
- plain Whisper White CS layer glued onto the front of the card base
- heart sentiment glued onto the arrow
- arrow piece glued onto the Pretty Peacock die cut piece
- Pretty Peacock die cut piece adhered onto the Whisper White CS layer using Stampin’ Dimensionals
- Whisper White ribbon tied into a bow and adhered onto the Pretty Peacock CS die cut using a Mini Glue Dot
- stamped Whisper White CS glued onto the inside of the card base
S
Here are today’s colors:
You can click on each one to see all the products that come in that color!
S
Here’s what I used:
Click on these images for more details and to purchase. If you are reading this post in email, the product images may not show up. Click here to see the post on my blog.
Click “Supply List” above for a clickable and printable list of the products!
S
Here are some helpful links:
Thanks for stopping by today, and Sweet Stamping!
Feb 28, 2020 | Cards, Gallery |
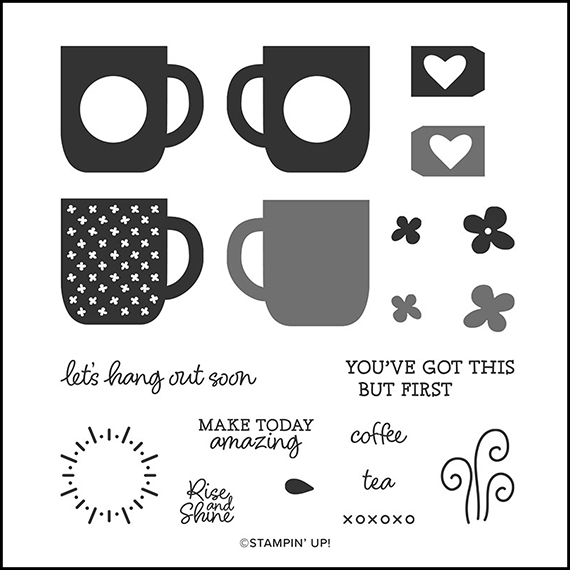
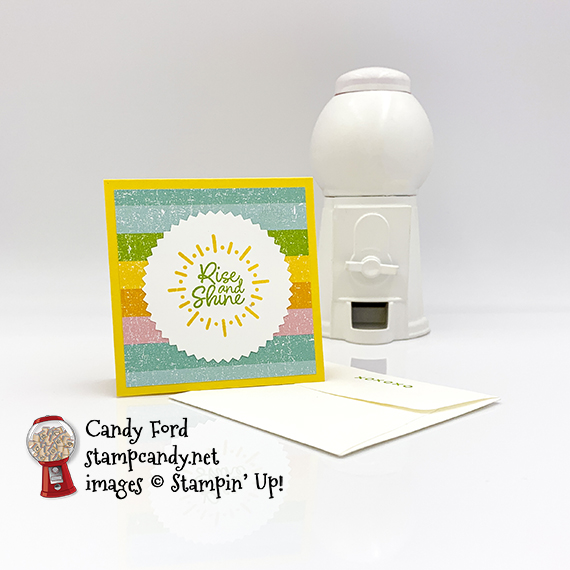
Stampin’ Up! will release a second batch of Sale-A-Bration items on March 3! Today I’m sharing a sneak peek of the Rise & Shine stamp set, which is one of those 2nd Release items. I’ve used it to make a mini card and envelope.
S
Here’s the Rise & Shine Stamp Set:
S
Here’s what I made:

S
Here’s what I did:
Cut and scored with my paper trimmer:
- Daffodil Delight card stock (CS) cut to 3″ x 3″
- Pleased As Punch Designer Series Paper (DSP) layer cut to 2-3/4″ x 2-3/4″
- Optional: Whisper White CS cut to 2-3/4″ x 2-3/4″ for the inside of the card base
Stamped with the Rise & Shine stamp set:
- sentiment in Granny Apple Green ink onto a scrap of Whisper White CS
- sun in Daffodil Delight ink around the sentiment
- xoxoxo in Granny Apple Green ink onto the flap of the envelope
Cut using the Starburst Punch:
Assembled the card:
- burnished the fold in the card base with a Bone Folder
- DSP layer glued onto the front of the card base
- starburst glued onto the DSP layer
- optional: Whisper White CS glued onto the inside of the card base
S
Here are today’s main colors:
You can click on each one to see all the products that come in that color!
S
Here’s what I used:
Click on these images for more details and to purchase. If you are reading this post in email, the product images may not show up. Click here to see the post on my blog.
Click “Supply List” above for a clickable and printable list of the products!
S
Here are some helpful links:
Thanks for stopping by today, and Sweet Stamping!
Feb 27, 2020 | Cards, Gallery, Guest Stamper |
Today I’m sharing a card made by Lisa Graham, a member of my Candy Hearts team She used the Birthday Bonanza and From My Heart Designer Series Papers (DSP) along with the Bonanza Dies and Stitched Be Mine Dies to create this adorable diagonal gate fold card for our February team swap. The swap theme was Love.
If you are reading this in email, some photos may appear blurry, or may not appear at all. Please click here to see the post on my blog.
S Bonanza Bonanza Bonanza
Here’s what she made:


S
Here’s what she did:
Cut and scored with her paper trimmer:
- Real Red card stock (CS) cut to 8-1/2″ x 8-1/2″, then scored in half at 4-1/4″ twice (once horizontally and once vertically,) then cut diagonally from corner to corner only once (This will give you two card bases!)
- From My Heart Designer Series Paper (DSP) layer cut to 3-7/8″ x 3-7/8″, then cut in half diagonally
- Whisper White CS cut to 10″ x 1″ for the belly band
- Whisper White CS cut to 4″ x 4″ for the inside of the card
Cut using the Bonanza Dies:
- koala from a scrap of Birthday Bonanza DSP
Cut using the Stitched Be Mine Dies:
- a plain heart from a scrap of Real Red CS and one from a scrap of Whisper White CS
- lacy heart from a scrap of Real Red CS
Colored using a Sponge Dauber:
- edges of the Whisper White CS belly band in Smoky Slate ink
Assembled the card:
- burnished the folds in the card base with a Bone Folder
- Whisper White CS square glued onto the inside of the card base
- DSP triangles glued onto the two front flaps of the card base
- 2 plain hearts glued together, then the lacy heart glued on top of then
- Koala adhered onto the hearts using Stampin’ Dimensionals
- belly band wrapped around the closed card and the ends glued together
- hearts/koala glued onto the belly band
S
Here are today’s colors:
You can click on each one to see all the products that come in that color!
S
Here’s what she used:
Click on these images for more details and to purchase. If you are reading this post in email, the product images may not show up. Click here to see the post on my blog.
Click “Supply List” above for a clickable and printable list of the products!
S
Here are some helpful links:
Thanks for stopping by today, and Sweet Stamping!
Feb 26, 2020 | Cards, Gallery, Guest Stamper |
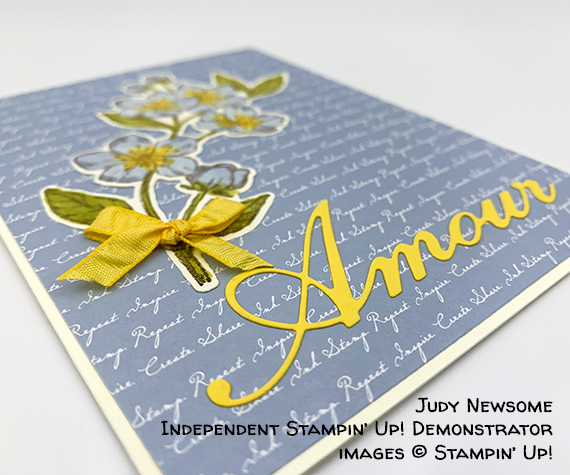
Today I’m sharing a card made by Judy Newsome, a member of my Candy Hearts team, for our February team swap. The theme was Love. She used the Forever Blossoms Bundle (Forever Blossoms stamp set and Cherry Blossoms Dies) and the Parisian Dies (available in a bundle with the Parisian Beauty stamp set) to create this beautiful card.
If you are reading this in email, some photos may appear blurry, or may not appear at all. Please click here to see the post on my blog.
S forever forever forever
Here’s what she made:

S
Here’s what she did:
Cut and scored with her paper trimmer:
- Whisper White card stock (CS) cut to 8-1/2″ x 5-1/2″, then scored in half at 4-1/4″
- 2019-2021 In Color Designer Series Paper (DSP) layer cut to 4-1/8″ x 5-3/8″ (Seaside Spray)
Stamped with the Forever Blossoms stamp set:
- floral image in Tuxedo Black Memento ink onto a scrap of Whisper White CS
Colored using Stampin’ Blends Markers:
- floral image in Seaside Spray, Daffodil Delight, and Old Olive
Cut using the Cherry Blossoms Dies:
Cut using the Parisian Dies:
- “Amour” from a scrap of Daffodil Delight CS
Assembled the card:
- burnished the fold in the card base with a Bone Folder
- DSP layer glued onto the front of the card base
- floral die cut and Amour die cut glued onto the DSP layer
- tied a piece of ribbon in a bow and adhered it onto the floral die cut using a Mini Glue Dot
S
Here are today’s colors:
You can click on each one to see all the products that come in that color!
S
Here’s what she used:
Click on these images for more details and to purchase. If you are reading this post in email, the product images may not show up. Click here to see the post on my blog.
Click “Supply List” above for a clickable and printable list of the products!
S
Here are some helpful links:
Thanks for stopping by today, and Sweet Stamping!
Feb 25, 2020 | Cards, Gallery |
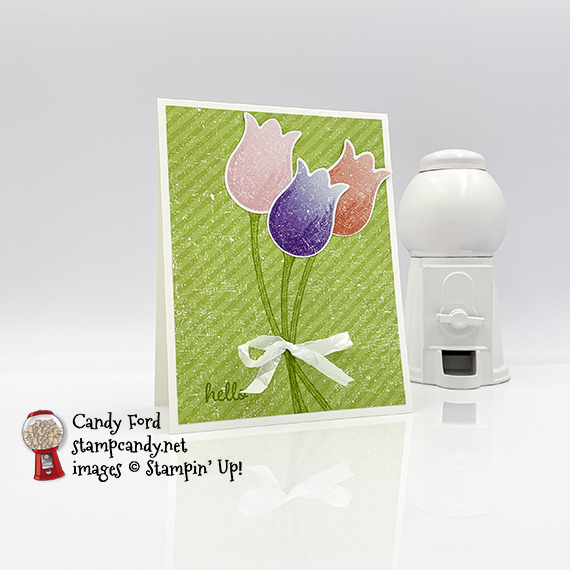
I used the Timeless Tulips Bundle (Timeless Tulips stamp set and Tulip Builder Punch) along with the Pleased As Punch Designer Series Paper to create today’s Hello card. The colors in this paper just scream Springtime.
S tulips tulips
Here’s what I made:

S
Here’s what I did:
Cut and scored with my paper trimmer:
- Whisper White Thick card stock (CS) cut to 4-1/4″ x 11″, then scored in half at 5-1/2″
- Pleased As Punch Designer Series Paper (DSP) layer cut to4″ x 5-1/4″
Stamped with the Timeless Tulips stamp set:
- 3 stems in Granny Apple Green ink onto the DSP layer
- sentiment in Granny Apple Green ink onto the DSP layer
Cut using the Tulip Builder Punch:
- 3 tulips from the tulip pattern of the DSP
Assembled the card:
- burnished the fold in the card base with a Bone Folder
- DSP layer glued onto the front of the card base
- 3 tulips glued onto the DSP layer at the tops of the stems
- ribbon tied into a bow and adhered onto the DSP layer using a Mini Glue Dot
S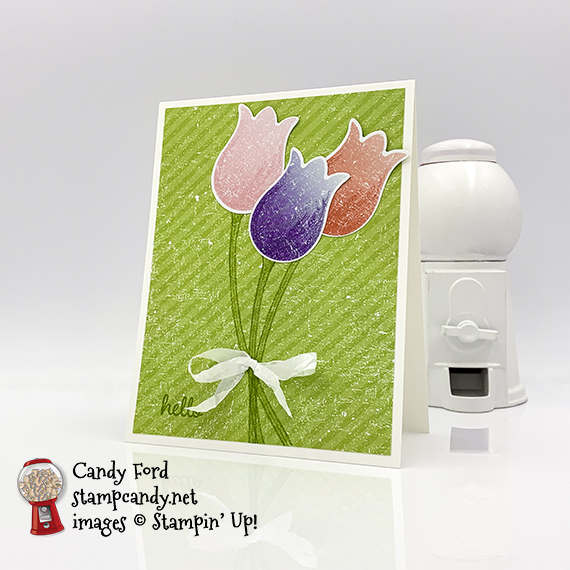
S
Here are today’s colors:
You can click on each one to see all the products that come in that color!
S
Here’s what I used:
Click on these images for more details and to purchase. If you are reading this post in email, the product images may not show up. Click here to see the post on my blog.
Click “Supply List” above for a clickable and printable list of the products!
S
Here are all the Coordination Product Release items and the products they go with:
They’re only available through March 31 or while supplies last, so order soon.
Here are some helpful links:
Thanks for stopping by today, and Sweet Stamping!