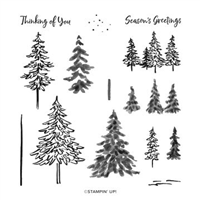
Today I’m sharing an envelope shaker card that we made at my December Stamp Club meeting. We used the In the Pines stamp set, Pine Woods Dies, In Good Taste Designer Series Paper, Sequins for Everything, and a Clear Medium Envelope. You won’t believe how quick and easy it is!
If you are reading this in email, some photos may appear blurry, or may not appear at all. Please click here to see the post on my blog.
S envelope shaker envelope shaker envelope shaker envelope shaker
Here’s what I made:
It looks like a bunch of pine trees growing up against a huge stone wall.
S
Here’s what I did:
Cut and scored with my paper trimmer:
Shaded Spruce card stock (CS) cut to 4-1/4″ x 11″, then scored in half at 5-1/2″
In Good Taste Designer Series Paper (DSP) layer cut to4″ x 5-1/4″
Whisper White CS cut to 4″ x 5-1/4″ for the inside of the card base (Oops! I forgot to photograph the inside.)
Stamped with the In the Pines stamp set:
trees in Shaded Spruce ink onto the DSP layer
sentiment in Shaded Spruce ink onto the Whisper White CS
Cut using the Pine Woods Dies:
3 trees from a scrap of Shaded Spruce CS
Created the envelope shaker:
put the DSP layer in a clear medium envelope, making sure it was snugly down in one corner
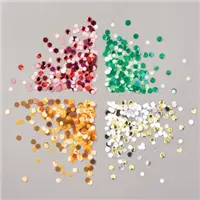
put some Sequins for Everything in the envelope in front of the DSP layer
closed the envelope flap, folding down the envelope to the edge of the DSP layer
folded over the extra envelope to the back and secured with Tear & Tape (Stampin’ Seal or Seal + would work well, too.)
Assembled the card:
burnished the fold in the card base with a Bone Folder
envelope shaker adhered onto the front of the card base using Tear & Tape
3 die cut trees glued together, then adhered onto the front of the envelope using Stampin’ Seal+ (I pulled off the little strips and placed them on the back of the trees where they wouldn’t show
Whisper White CS glued onto the inside of the card base
S
Here are today’s main colors:
You can click on each one to see all the products that come in that color!
The In the Pines stamp set and Pines Woods Dies are retiring. The dies have already sold out, but the stamp set is still available. Click on the images below for more details and to purchase. If you are reading this post in email, the product images may not show up. Please click hereto see the post on my blog.
Supply List. <— Click for a clickable and printable list of the products!
S
Here’s some news: Whisper White is going away
The facility that manufactures Whisper White paper is closing due to COVID-19. But don’t fret. The new Basic White products are in the works! No other colors are affected. The following items are now available while supplies last with an order limit of 2 per item per order.
Cardstock, Whisper White 12″ x 12″ (124302)
Cards & Envelopes, Assorted Memories & More (149710)
Cards & Envelopes, Whisper White Note (131527)
Envelopes, Whisper White 3″ x 3″ (145829)
Cardstock, Whisper White 8-1/2″ x 11″ (100730)
Cardstock, Whisper White 8-1/2″ x 11″ Thick (140272)
Envelopes, Whisper White Medium (107301)
S
Here’s the Year-End Closeout
All retiring items will be available through 4 January 2021, or while supplies last. Click on the image to shop now!
S
Here’s the Curvy Celebrations offering:
Click the image to see it in my online store. The Curvy Christmas stamp set and Classic Christmas Designer Series Paper are available only through January 4, or while supplies last!
S
Here’s the new catalog:
Click the image below to request your January-June 2021 Mini Catalog AND Sale-a-bration Brochure:
Gift Certificates are available in any U.S. dollar amount from me. Contact mefor details.
Have you shopped from me within the past year? Join my private VIP Facebook groupfor exclusive project tutorials and more!
Join my team and enjoy a 20% discount (or more) on all your purchases! You choose $125 in products and pay only $99, and get free shipping! No obligation! No selling required!
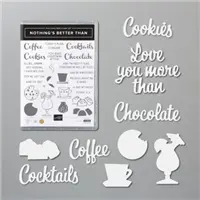
Who do you know who makes everything better? Make this fun card for them. I used the Nothing’s Better Than Bundle (Nothing’s Better Than stamp set & Love You More Than Dies) to make this messy card, complete with “coffee stain.” It’s one of the projects we made in Stamp Club this month.
If you are reading this in email, some photos may appear blurry, or may not appear at all. Please click here to see the post on my blog.
S Love You More Than Love You More Than Love You More Than Love You More Than
Here’s what I made:
S
Here’s what I did:
Cut and scored with my paper trimmer:
Rococo Rose card stock (CS) cut to 5-1/2″ x 8-1/2″, then scored in half at 4-1/4″
Pool Party card stock (CS) layer cut to 5-3/8″ x 4-1/8″
Shimmery White CS layer cut to 5-1/4″ x 4″
Whisper White CS cut to 5-1/4″ x 4″ for the inside of the card base
Stamped with the Nothing’s Better Than stamp set:
sentiment in Pool Party ink onto a scrap of Whisper White Thick CS
cups (2 in Pool Party and 1 in Rococo Rose) onto a scrap of Whisper White Thick CS
steam in Early Espresso ink onto the Shimmery White CS layer just above the top cup
Cut using the Love You More Than Dies:
3 stamped cups
word “Coffee”
Cut using Paper Snips:
separated the words of the stamped sentiment
Watercolored using a Water Painter:
“coffee stain” in Early Espresso ink onto the Shimmery White CS layer
splattered same layer with more water and Early Espresso ink, by tapping the Water Painter on my hand over the layer
Be sure to let the layer dry completely before adhering. You can use a Heat Tool to speed up the drying process.
Assembled the card:
burnished the fold in the card base with a Bone Folder
Pool Party CS layer glued onto the front of the card base
Shimmery White CS layer glued onto the Pool Party CS layer
die cut “Coffee” glued onto the Shimmery White CS layer
3 die cut cups glued together in a stack, then adhered onto the Shimmery White CS layer using Stampin’ Dimensionals
stamped sentiment words adhered onto the Shimmery White CS layer using Mini Stampin’ Dimensionals
Whisper White CS glued onto the inside of the card base
S
Here are today’s colors:
You can click on each one to see all the products that come in that color!
Click on these images for more details and to purchase. If you are reading this post in email, the product images may not show up. Please click hereto see the post on my blog.
Gift Certificates are available in any U.S. dollar amount from me. Contact mefor details.
Have you shopped from me within the past year? Join my private VIP Facebook groupfor exclusive project tutorials and more!
Join my team and enjoy a 20% discount (or more) on all your purchases! You choose $125 in products and pay only $99, and get free shipping! No obligation! No selling required!
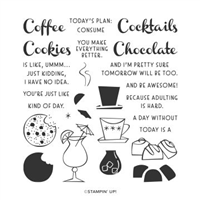
When was the last time you went a day without any chocolate. I’m not sure I can remember. I keep a supply of little dark chocolates in case of a chocolate emergency, which happens more often than you might thing. I used the Nothing’s Better Than stamp set (part of the Nothing’s. Better Than Bundle) to make today’s simple card. It was one of our August Stamp Club Projects.
If you are reading this in email, some photos may appear blurry, or may not appear at all. Please click here to see the post on my blog.
S better than better than better than better than
Here’s what I made:
S
Here’s what I did:
Cut and scored with my paper trimmer:
Soft Suede card stock (CS) cut to 4-1/4″ x 11″, then scored in half at 5-1/2″
Rococo Rose CS layer cut to 2-1/4″ x 3″
Early Espresso CS layer cut to 2″ x 2-3/4″
Whisper White CS layer cut to 1-3/4″ x 2-1/2″
strip of Whisper White CS cut to 5/8″ x 5″, for under the ribbon
Whisper White CS cut to 4″ x 5-1/4″ for the inside of the card base
Stamped with the Nothing’s Better Than stamp set:
“Chocolate” in Early Espresso ink randomly onto the front of the card base
sentiment and chocolates in Early Espresso ink onto the Whisper White CS layer
Colored using Stampin’ Blends Markers:
chocolates in Dark and Light Soft Suede and Light Rococo Rose
Assembled the card:
burnished the fold in the card base with a Bone Folder
Early Espresso ribbon adhered onto Rococo Rose ribbon using Tear & Tape
Rococo Rose ribbon adhered onto the Whisper White CS strip using Tear & Tape
ends of ribbon strip cut using Paper Snips
strip glued onto the center of the front of the card base
Whisper White CS layer glued onto the Early Espresso CS layer
Early Espresso CS layer glued onto the Rococo Rose CS layer
Rococo Rose CS layer adhered onto the front of the card base (over ribbon) using Stampin’ Dimensionals
Be sure not to put any Dimensionals where it covers the ribbon
Whisper White CS glued onto the inside of the card base
S
Here are today’s colors:
You can click on each one to see all the products that come in that color!
Click on these images for more details and to purchase. If you are reading this post in email, the product images may not show up. Please click hereto see the post on my blog.
Gift Certificates are available in any U.S. dollar amount from me. Contact mefor details.
Have you shopped from me within the past year? Join my private VIP Facebook groupfor exclusive project tutorials and more!
Join my team and enjoy a 20% discount (or more) on all your purchases! You choose $125 in products and pay only $99, and get free shipping! No obligation! No selling required!
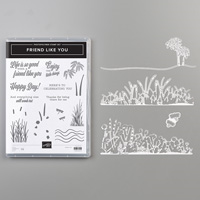
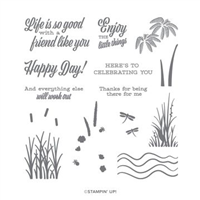
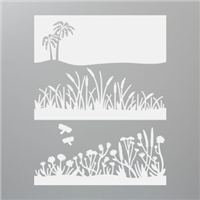
Today’s card is one of the Make & Take projects I made for my Stamp Club. We used the Friend Like You Bundle (Friend Like You stamp set and Friendly Silhouettes Dies.) We created the sunset background using Stampin’ Sponges and ink pads. Be sure to start with the lightest color and work toward the darkest, so you won’t get dark ink on your light ink pads. I also recommend using a separate sponge for each color. I usually cut each sponge into 8 wedges, so one pack gives me 24 colors.
Here’s what I made:
S
S
Here’s what I did:
Cut and scored with my paper trimmer:
Very Vanilla Thick card stock (CS) cut to 5-1/2″ x 8-1/2″, then scored in half at 4-1/4″
Early Espresso CS layer cut to 4-1/4″ x 3″
Very Vanilla CS layer cut to 4-1/4″ x 3″x
Colored using Stampin’ Sponges and ink pads:
Very Vanilla CS layer, from top to bottom, in Crushed Curry, Pumpkin Pie, Terracotta Tile, and Cherry Cobbler inks
Stamped with the Friend Like You stamp set:
sentiment in Early Espresso ink over the sponged layer
dragonflies in Early Espresso ink onto the inside of the card base
Cut using the Friendly Silhouettes Dies:
cut away the bottom of the sponged layer using the palm tree silhouette die
Assembled the card:
burnished the fold in the card base with a Bone Folder
Early Espresso CS layer glued onto the front of the card base
sponged layer glued onto the Early Espresso CS layer, lining up the top edges
S
Here are today’s colors:
You can click on each one to see all the products that come in that color!
Supply List <– Click here for a clickable and printable list!
S
Preorder the Pretty Petals Online Class by September 5:
Make 6 cards at home in your PJs!
2 each of 3 designs
Features the Pretty Petals Suite on pages 72-74 of the 2019-2020 Annual Catalog
I’ve done the trimming and scoring for you!
You’ll receive all you need to make the cards, including the stamp set, dies, embossing folder, pre-cut card kits, and 6 Very Vanilla envelopes.
Full detailed instructions
Limited spots available
Click on the image below for details and class options, or copy and paste this link into your browser: https://stampcandy.net/online-classes/pretty-petals-class-preorder/
Gift Certificates are available in any U.S. dollar amount from me. Contact mefor details.
Have you shopped from me within the past year? Join my private VIP Facebook groupfor exclusive project tutorials and more!
Join my team and enjoy a 20% discount (or more) on all your purchases! If you join by August 31 you’ll receive and extra $30 of free products in your Starter Kit! You choose $155 in products and pay only $99, and get free shipping! No obligation! No selling required!
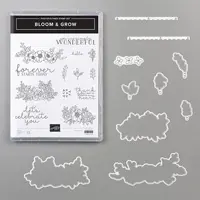
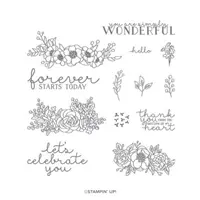
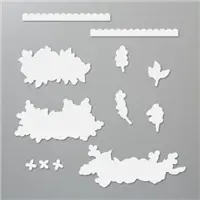
Today’s card is one I made for my monthly Stamp Club. It features the Bloom & Grow Bundle (Bloom & Grow stamp set and Budding Blooms Dies.) Every time I see the name of this bundle, I think of the song Edelweiss from The Sound of Music. There’s a lyric that goes “Blossom of snow may you bloom and grow, Bloom and grow forever.” You can hear the song at the bottom of this post.
S
Here’s what I made:
S
Here’s what I did:
Cut and scored with my paper trimmer:
Granny Apple Green card stock (CS) cut to 8-1/2″ x 5-1/2″, then scored in half at 4-1/4″
Basic Black CS layer cut to 5-1/4″ x 4″
Whisper White CS layer cut to 5-1/8″ x 3-7/8″
Whisper White CS cut to 5-1/4″ c 4″ for the inside of the card base
Stamped with the Bloom & Grow stamp set:
sentiment in Gorgeous Grape ink onto the center of the Whisper White CS layer
flowers in black Memento ink on the top right and bottom left corners of the Whisper White CS layer
Cut using the Budding Blooms Dies:
tiny flowers from scraps of Purple Posy, Highland Heather, and Gorgeous Grape CS
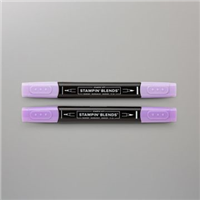
Colored using Stampin’ Blends:
flowers in Highland Heather
leaves in Garden Green
Assembled the card:
burnished the fold in the card base with a Bone Folder
Basic Black CS layer glued onto the front of the card base
tiny die cut flowers glued onto the Whisper White CS layer
Whisper White CS layer glued onto the Basic Black CS layer
Whisper White CS glued onto the inside of the card base
S
Here are today’s colors:
You can click on each one to see all the products that come in that color!
Preorder the Pretty Petals Online Class by September 5:
Make 6 cards at home in your PJs!
2 each of 3 designs
Features the Pretty Petals Suite on pages 72-74 of the 2019-2020 Annual Catalog
I’ve done the trimming and scoring for you!
You’ll receive the stamp set, dies, embossing folder, pre-cut card kits, and 6 Very Vanilla envelopes.
Full detailed instructions
Limited spots available
Click on the image below for details and class options, or copy and paste this link into your browser: https://stampcandy.net/online-classes/pretty-petals-class-preorder/
Gift Certificates are available in any U.S. dollar amount from me. Contact mefor details.
Have you shopped from me within the past year? Join my private VIP Facebook groupfor exclusive project tutorials and more!
Join my team and enjoy a 20% discount (or more) on all your purchases! If you join by August 31 you’ll receive and extra $30 of free products in your Starter Kit! You choose $155 in products and pay only $99, and get free shipping! No obligation! No selling required!
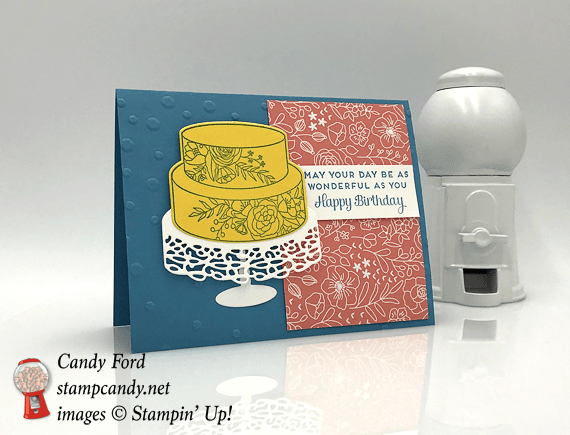
Who wouldn’t love to get a big yellow cake with white flowers piped on it for their birthday? Especially on a beautifully lacy cake stand! That’s the gist of this birthday card, made using the Cake Soiree stamp set, Sweet Cake Framelits Dies, and Sweet Soiree Designer Series Paper. The Scattered Sequins Dynamic Textured Embossing Folder (TIEF) adds a little something special to the background.
Here’s what I made:
Here’s what I did:
Cut and scored with my Stampin’ Trimmer:
Marina Mist card stock (CS) cut to 5-1/2″ x 8-1/2″, then scored in half at 4-1/4″
Sweet Soiree Designer Series Paper (DSP) cut to 2-1/2″ x 4″
Whisper White CS cut to 2-1/2″ x 1″
Whisper White CS cut to 5-1/4″ x 4″ for the inside
Stamped with the Cake Soiree stamp set:
sentiment in Marina Mist ink onto the 2-1/2″ x 1″ Whisper White CS
cake in Marina Mist ink onto a scrap of Daffodil Delight CS
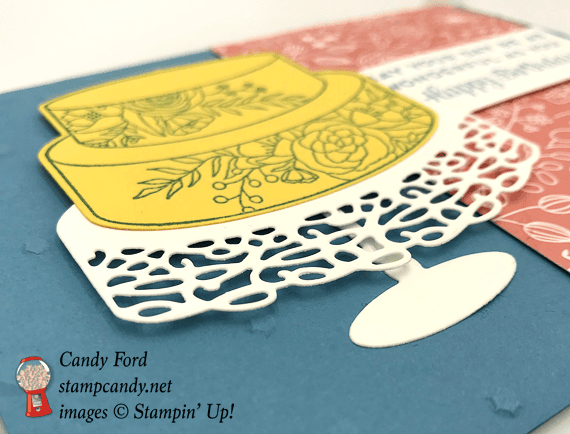
Die cut using the Sweet Cake Framelits:
cake
stand from a scrap of Whisper White CS
stand base from a scrap of Whisper White CS
Ran through the Big Shot with the Scattered Sequins Dynamic embossing folder:
front half of the card base
Assembled the card:
burnished score line in card base with a Bone Folder
DSP glued onto the front right of the card base
sentiment strip glued onto the DSP lining up the edges along the right side
stand base flued onto the front of the card base
cake glued onto cake stand
cake & stand adhered to the front of the card base with Stampin’ Dimensionals
Whisper White CS glued to the inside of the card base
Here are today’s colors:
You can click on each one to see all the products that come in that color!
Click on these images for more details and to purchase.
Here’s some stuff you should know:
This is a fabulous time to join my team! Sale-A-Bration is the biggest event of the Stampin’ Up! year and you can save big on the ultimate bundle, the Starter Kit. CLICK HERE for more information. Contact me with any questions: email candy@stampcandy.net or call/text 404-661-5222
Newsletter: subscribe for exclusive deals, projects, and more! Enter your email address and click SUBSCRIBE at the top right of this page, just under the picture of my smiling face. You can also choose to receive an email every day that I have a blog post.
Organize your craft space!
Click below to get started.
Disclaimer
The content in this blog is the sole responsibility of Candy Ford as an Independent Stampin’ Up! Demonstrator. The use of and content of classes, services or products offered is not endorsed by Stampin’ Up!
Daily Blog Updates: Each day there's a new blog post, you'll receive an email with a direct link to read it.
Weekly Newsletter: Once a week, you’ll receive an email with exclusive deals, product tutorials, and information about what’s happening in the world of Stamp Candy and Stampin’ Up!