Sep 24, 2020 | Autumn, Blog Hop, Boxes, Cards, Gallery, Gift Wrap, Gifts, Halloween, Holiday, Kits, Paper Pumpkin |

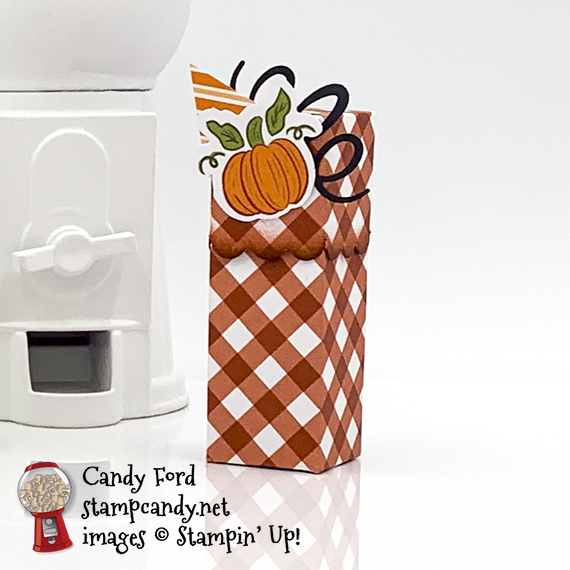
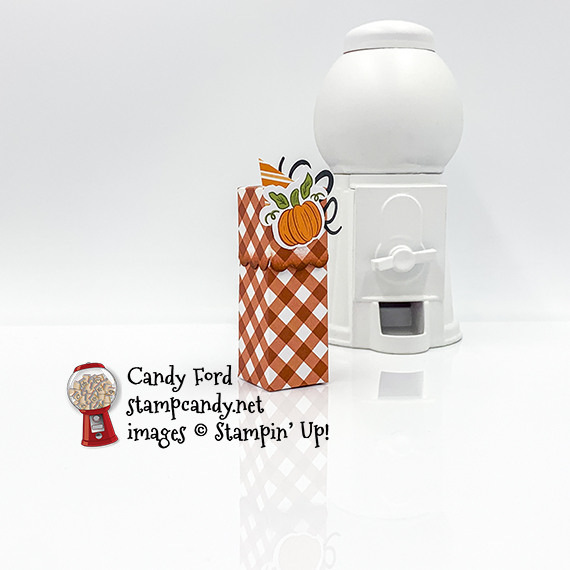
Welcome to the September 2020 APPT Blog Hop! This month’s kit is called Hello Pumpkin, and it makes the most adorable little treat holders. I used the pieces fro the kit to make a card and a little treat box. My treat box is 4 sided, which is different from the 5 sided one designed by Stampin’ Up! for the kit. I started by popping out all the die cut pieces from their sheets, including all the diamond shapes from the treat holders, saving everything. I used Black Stampin’ Dimensionals and Multipurpose Liquid Glue, but you can certainly use the Dimensionals and Glue Dots that came in the kit.
Be sure to hop around to all the stops, so you don’t miss any of the great projects this group has made for you!
If you are reading this in email, some photos may appear blurry, or may not appear at all. Please click here to see the post on my blog.
S September 2020 APPT September 2020 APPT September 2020 APPT September 2020 APPT
Here’s what I made:
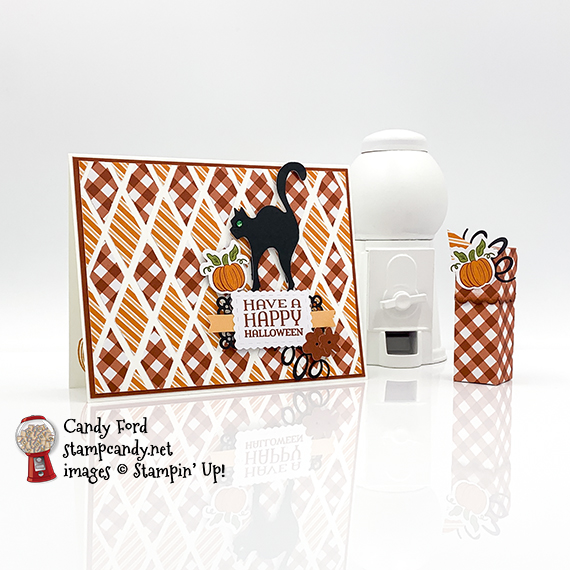
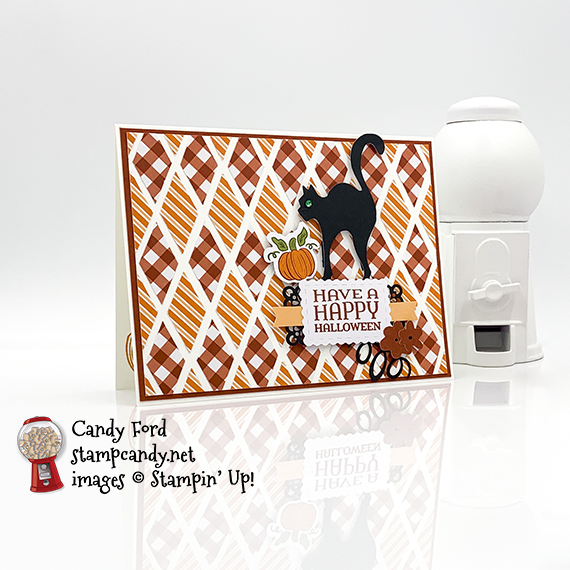
The cat’s green eye really shows up in this photo: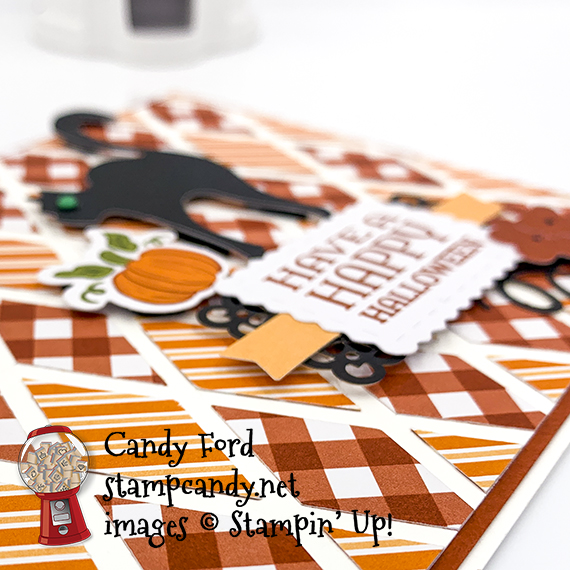

S
Here’s what I did:
Cut and scored with my paper trimmer:
- Whisper White Thick card stock (CS) cut to 5-1/2″ x 8-1/2″, then scored in half at 4-1/4″
- Cajun Craze CS layer cut to 5-3/8″ x 4-1/8″
- Whisper White Thick CS layer cut to 5-1/4″ x 4″
- cut apart a treat holder from the kit according to the photos below
Cut along the black lines. Remove the shaded areas.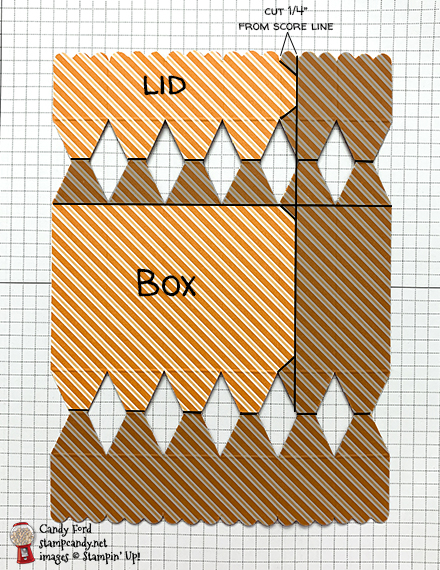

Stamped with the Hello Pumpkin stamp set:
- card sentiment in Cajun Craze ink onto a die cut label from the kit
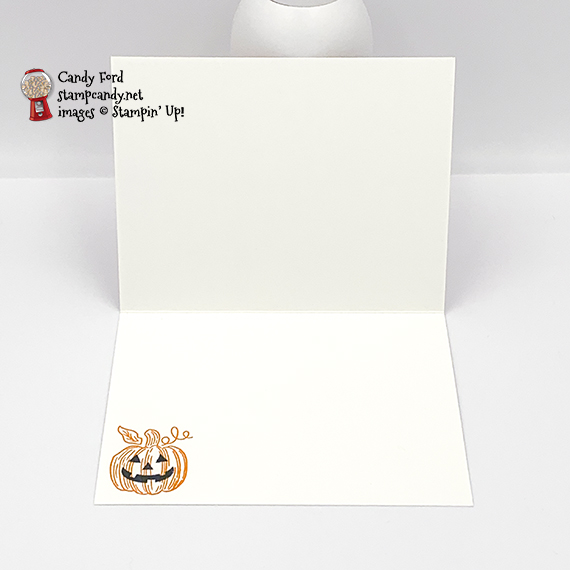
- pumpkin in Pumpkin pie ink onto the inside of the card base
- pumpkin face in Tuxedo Black Memento ink over the pumpkin
Cut using Paper Snips:
- halved a small banner for behind the card sentiment
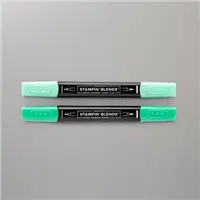
Colored using a Stampin’ Blends Marker:
- a small Rhinestone Basic Jewel in Dark Shaded Spruce
- NOTE: I started with the Old Olive and Mossy Meadow markers, since those are the greens in the kit, but I thought the dark Shaded Spruce showed up better against the black cat
Colored using a Sponge Dauber:
- bottom edges of the box top in Cajun Craze
Assembled the card:
- burnished the fold in the Whisper White Thick card base with a Bone Folder
- faint pencil lines drawn onto the Whisper White CS layer, vertical lines 3/4″ apart and horizontal lines 1-1/2″ apart
- diamond pieces glued onto Whisper White CS layer, using the pencil lines to arrange them evenly
- any pencil lines that still showed were erased
- Whisper White CS layer with diamonds glued onto the Cajun Craze CS layer
- Cajun Craze CS layer glued onto the front of the card base
- two halves of the small banner glued onto the back of the sentiment
- sentiment glued onto a black lace die cut piece from the kit
- two Cajun Craze flowers glued onto the bottom right corner of the sentiment, then the whole piece adhered onto the card front using Black Stampin’ Dimensionals
- black curly die cut glued onto the card front under the bottom right corner of the sentiment cluster
- green rhinestone applied onto the cat using the Take Your Pick tool
- cat adhered onto the card front above the sentiment using Black Stampin’ Dimensionals
- small pumpkin die cut adhered onto the card front, next to the cat, using Black Stampin’ Dimensionals
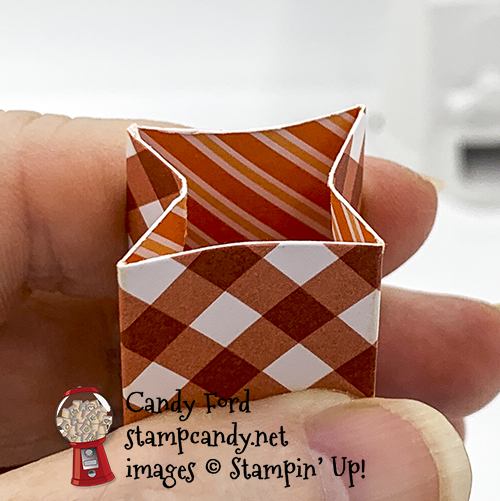
Assembled the treat box:
- burnished the folds in the box with a Bone Folder
- 1/4″ flap of box glued onto the inside of the opposite side, to form the body of the box
- end flaps folded in and glued together one at a time to form the bottom
Assembled the treat box lid:
- burnished the folds in the lid with a Bone Folder
- 1/4″ flap glued onto the inside of the opposite side, to form the body of the lid
- end flaps folded in and glued together one at a time to form the top
- a diamond and a black curly piece glued onto the back of a small pumpkin, then glued onto the front of the box lid
- NOTE: Since the box and the lid are the same size (width) it helps to squeeze the top of the box a little bit to get the lid over the top.
S
Here’s the September 2020 APPT Blog Hop:
S
Here are today’s colors:
You can click on each one to see all the products that come in that color!
S
Here’s what I used, other than what came in the kit:
Click on these images for more details and to purchase. If you are reading this post in email, the product images may not show up. Please click here to see the post on my blog.
Supply List. <— Click for a clickable and printable list of the products!
S
World Card Making Day 2020:

- Join me for an afternoon of Bingo, cardmaking, prizes, and fun!
- October 3 at 2:00 pm ET
- See details and register HERE by September 25
- $25 (extra Bingo cards available for $5 each)
- Tell your friends! The more people who register, the bigger the prizes!
S
Two ways to save in September!
Buy the Starter Kit and receive even more! It’s already the best deal: $99 for $125 in product of your choice plus Free shipping! In September you will also receive the Queen Anne’s Lace stamp set, the So Much Love stamp set, Rhinestone Basic Jewels, and 16 precut card kits! Wow! This is the perfect time to work on your wish list of Stampin’ Up! products! CLICK HERE for more details.

Buy the new Stampin’ Cut & Emboss Machine (standard size) from me by September 30 and I will give you a Magnetic Cutting Plate FREE! You’ll save almost $30! CLICK HERE for more details and to order.

S
Here are some helpful links:
S
Thanks for stopping by today, and Sweet Stamping!

Aug 14, 2020 | Cards, Gallery, Kits |
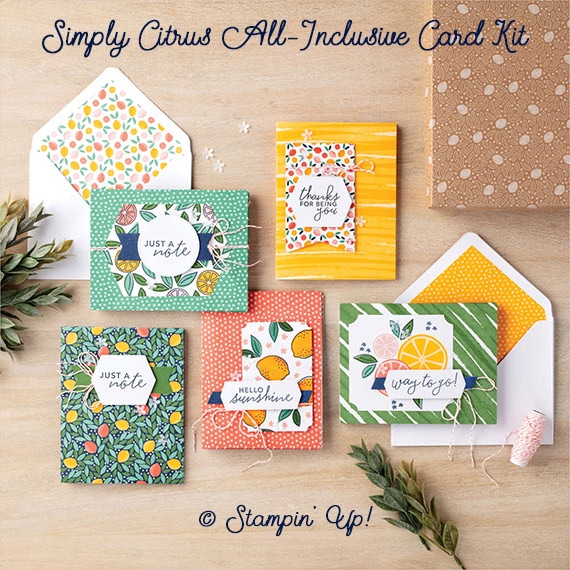
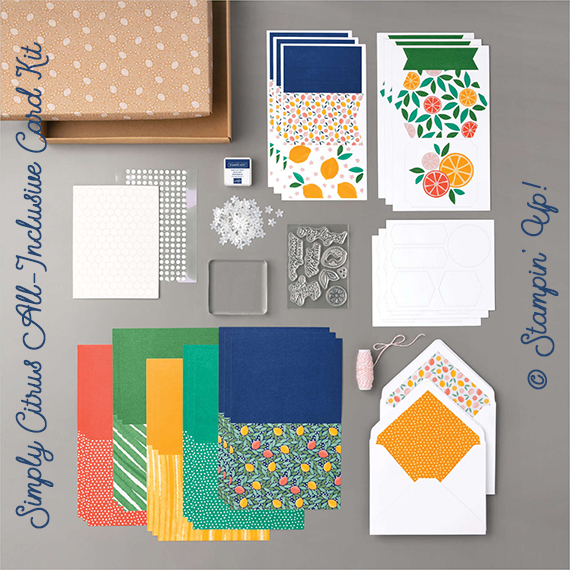
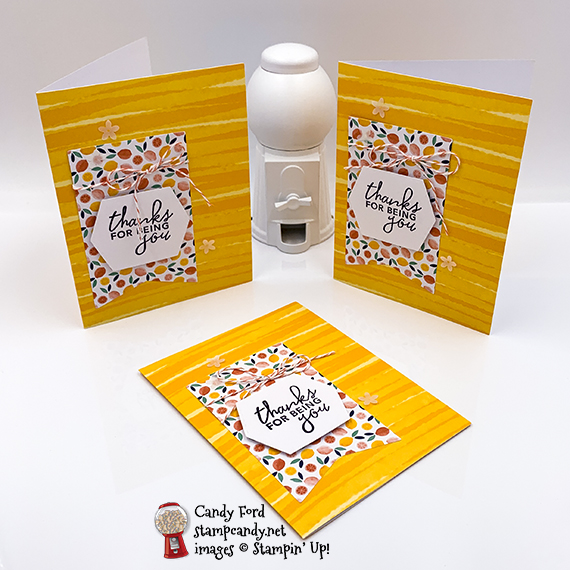
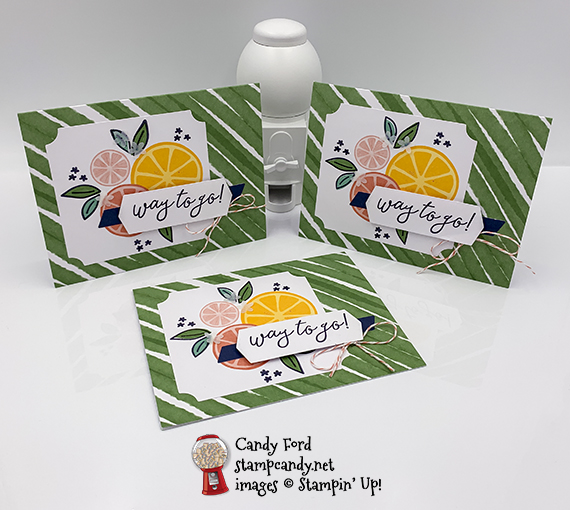
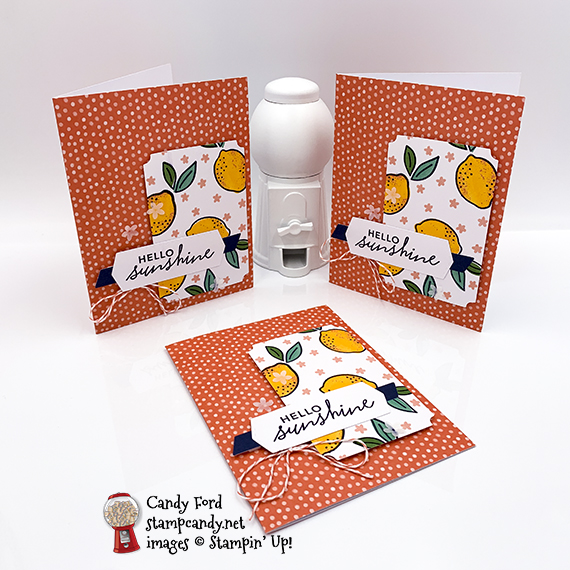
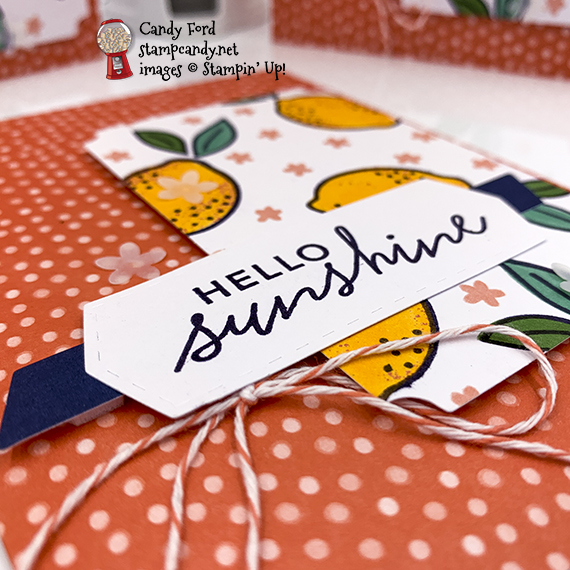
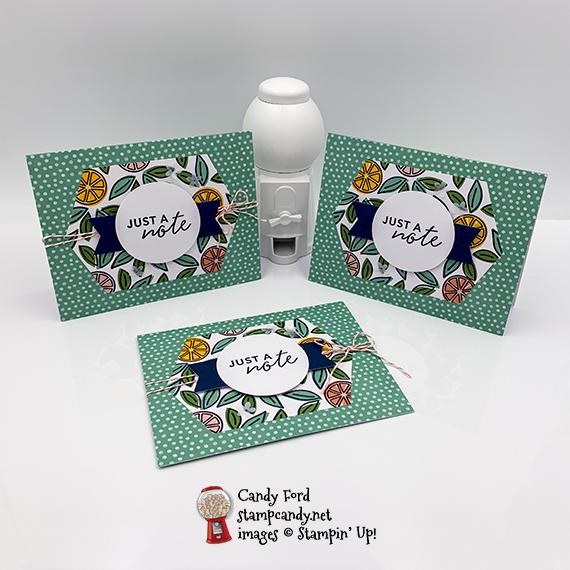
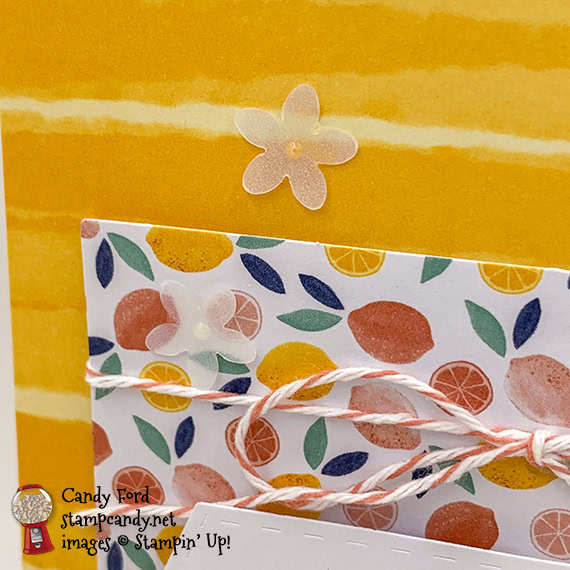
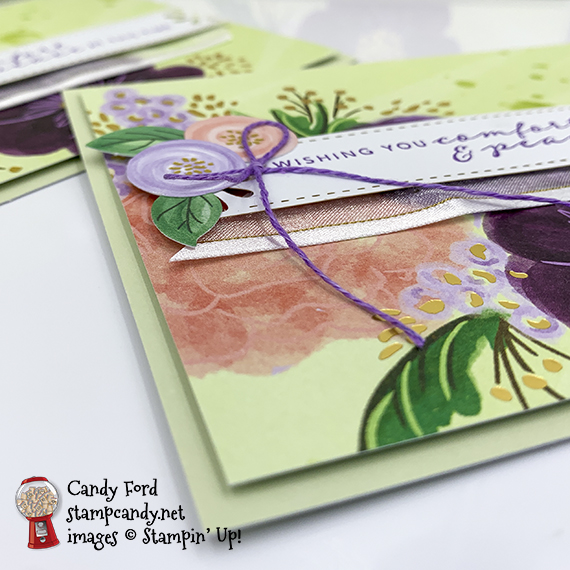
Today I’m sharing the cards I made using the Simply Citrus Card Kit. This kit is perfect for beginner stampers! It’s an all-inclusive kit, meaning it has everything you need to make the cards (except scissors to cut the twine.) You get the card bases, envelopes, die cut labels and images, stamp set, clear block, ink pad, embellishments, twine, adhesives, and a sweet box to hold it all. A lot of people could use a little sunshine these days. These 15 colorful and fun cards will help you send it to them.
If you are reading this in email, some photos may appear blurry, or may not appear at all. Please click here to see the post on my blog.
S Simply Citrus Simply Citrus Simply Citrus Simply Citrus
Here’s the kit:
S
Here’s what I made:
S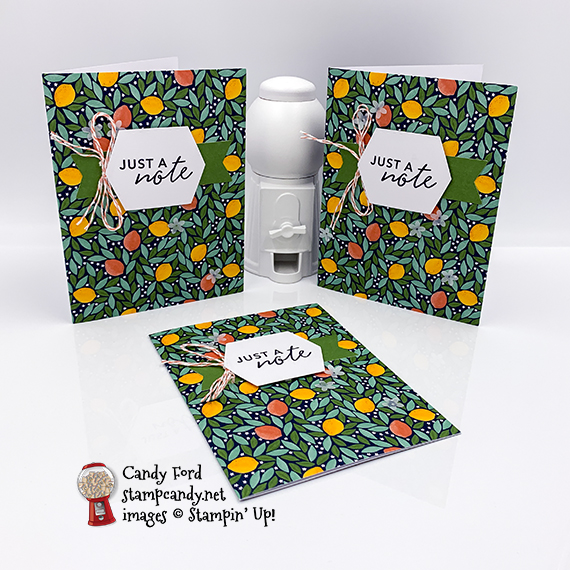
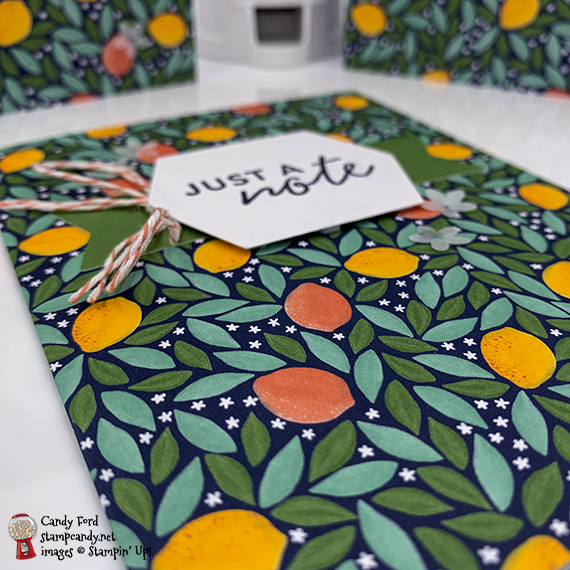
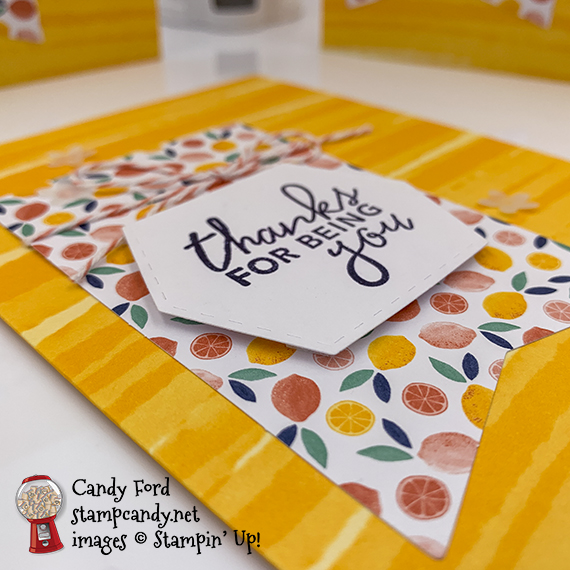
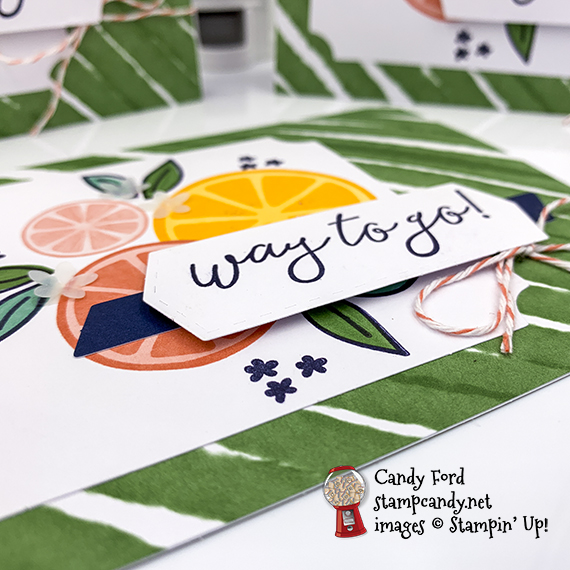
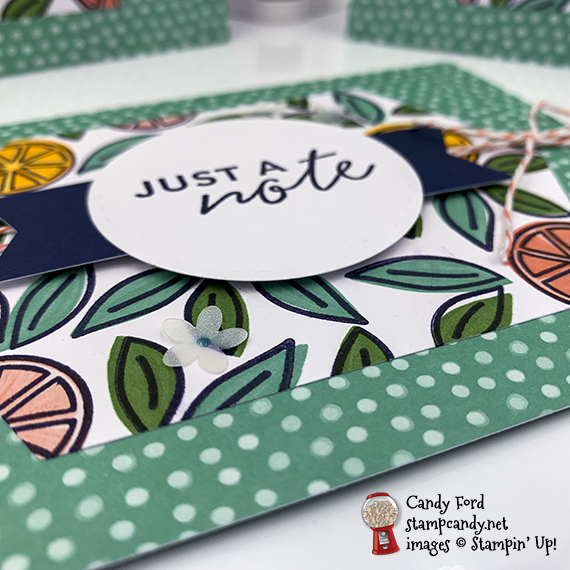
I just love these little flower details.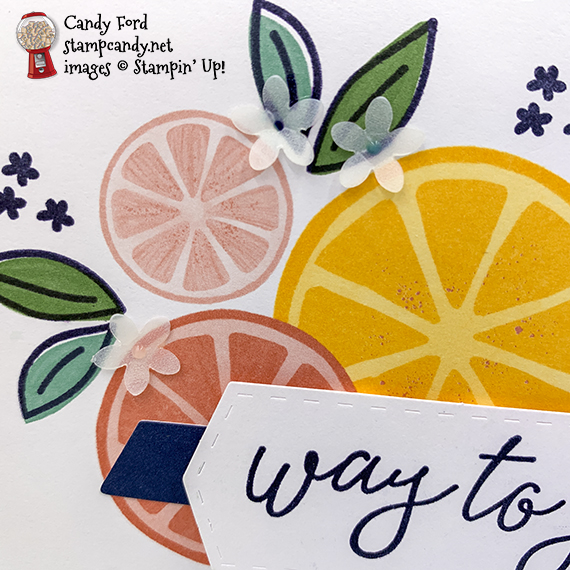
Here’s what I did:
Stamped with the Simply Citrus stamp set:
- sentiments in Night of Navy ink onto the included labels
- fruit and leaf outlines in Night of Navy ink onto some of the die cut layers
Assembled the cards:
- burnished the fold in the card bases with a Bone Folder
- followed the kit directions and adhered the layers and sentiments onto the card fronts
- cut twine with Paper Snips and adhered onto the cards according to the kit instructions
- flower embellishments glued onto the card fronts (adhesives are included in the kit, but I really love my glue)
S
Here are today’s colors:
You can click on each one to see all the products that come in that color!
S
Here’s what I used:
Click on these images for more details and to purchase. If you are reading this post in email, the product images may not show up. Please click here to see the post on my blog.
Supply List. <— Click for a clickable and printable list of the products!
S
Use your Bonus Days coupons by August 31!
Click the image below to shop now and use your Bonus Days coupons!

S
Here are some helpful links:
S
Thanks for stopping by today, and Sweet Stamping!
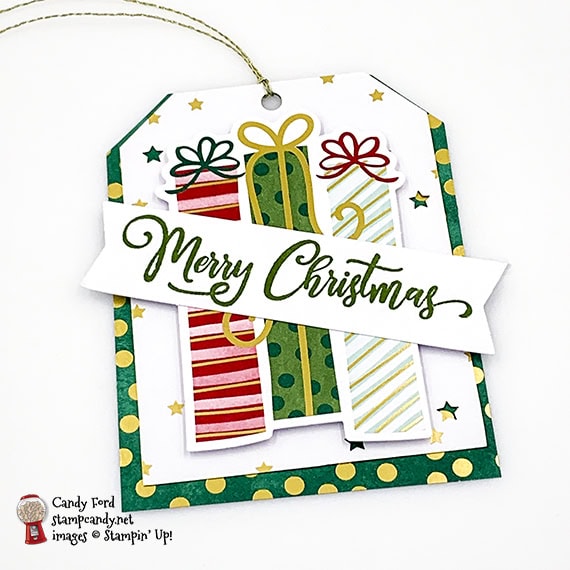
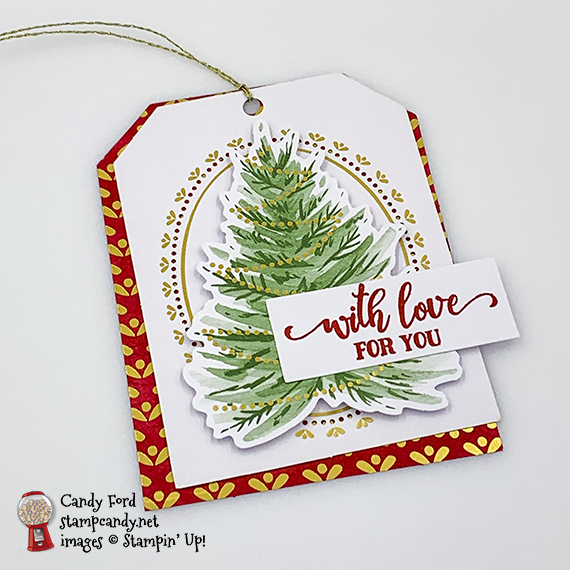
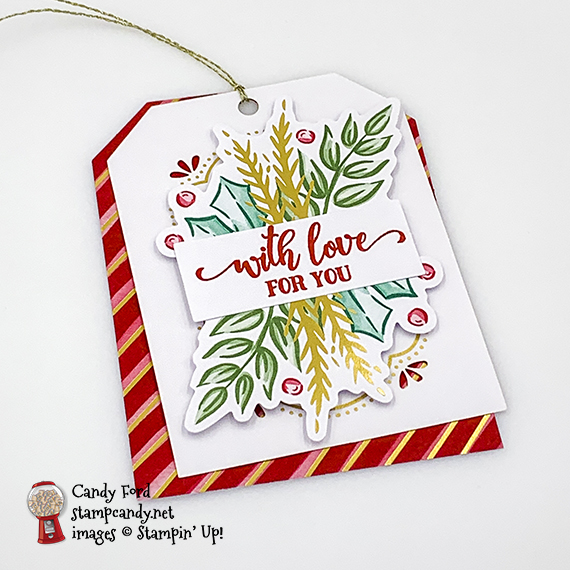
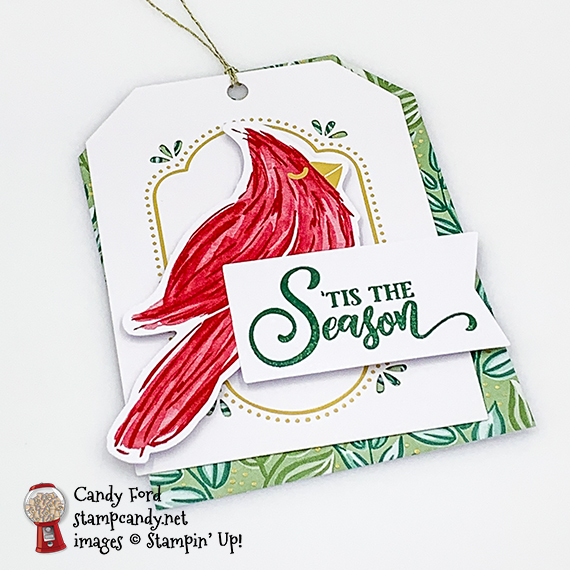
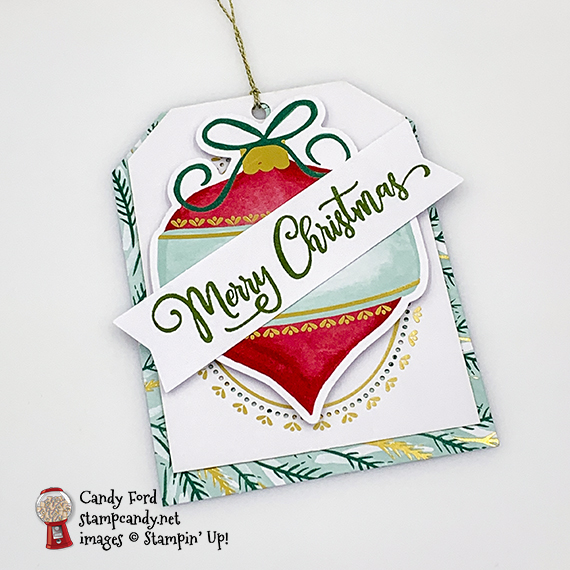
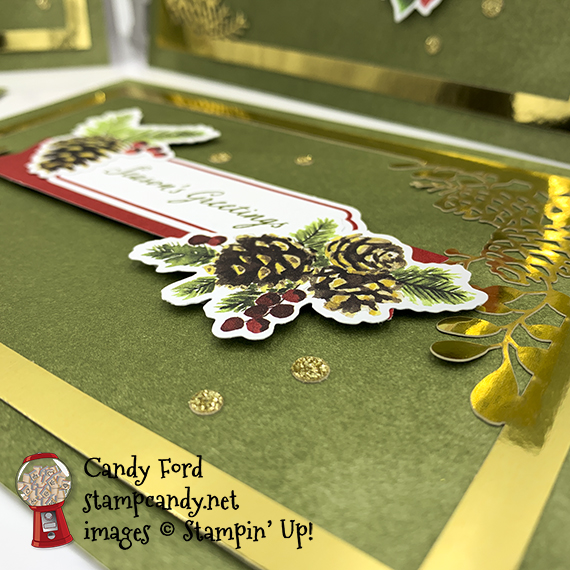
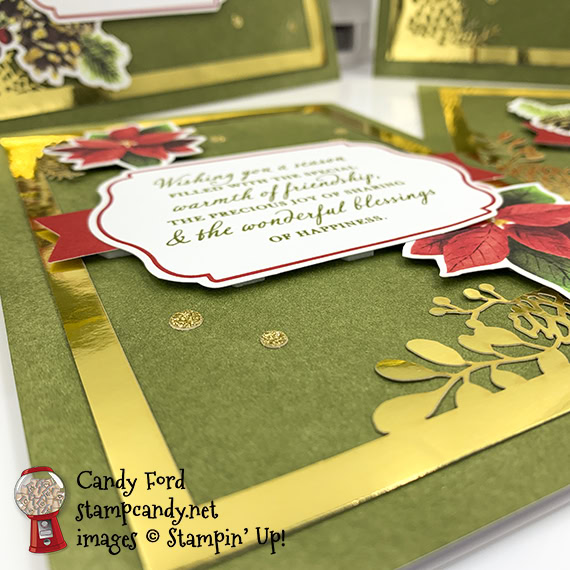
Aug 11, 2020 | Christmas, Gallery, Gifts, Holiday, Kits, New Products, Tags |
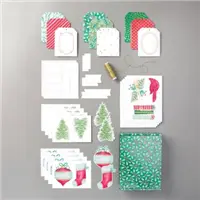
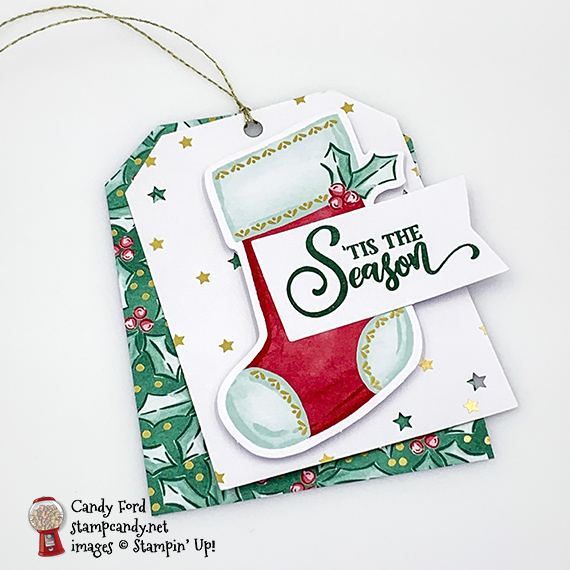
Today I’m sharing the Tag Buffet Project Kit. It makes 30 large tags. Each one is 3-1/4″ x 4-1/4″, and they also make great additions to card fronts. I don’t think any photos do these tags justice. They have gold accents, and delicate laser-cut features. Everything is pre-die cut. All you have to do is stamp the sentiments and layer the pieces together.
If you are reading this in email, some photos may appear blurry, or may not appear at all. Please click here to see the post on my blog.
S tag buffet tag buffet tag buffet tag buffet
Here are the Tag Buffet Kit and Stamp Set:
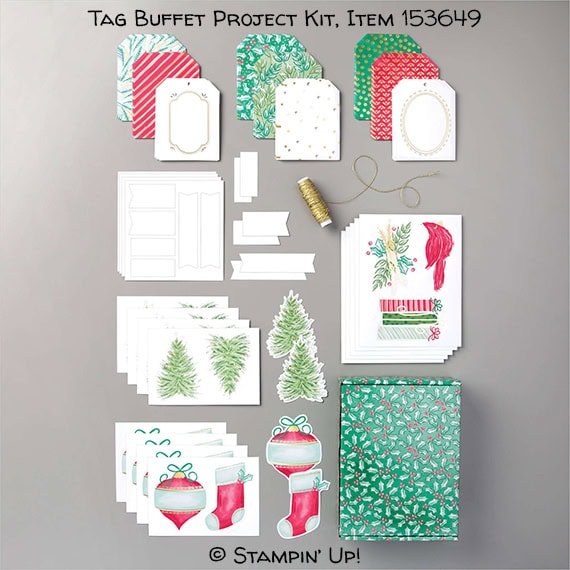
Tag Buffet Stamp Set, Item # 153612
Here’s what I made:
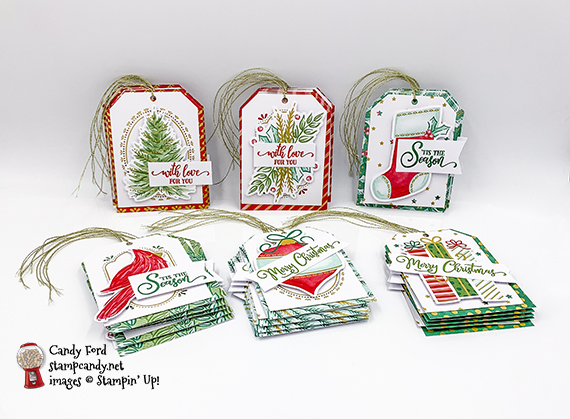
And look at this great box it comes in!
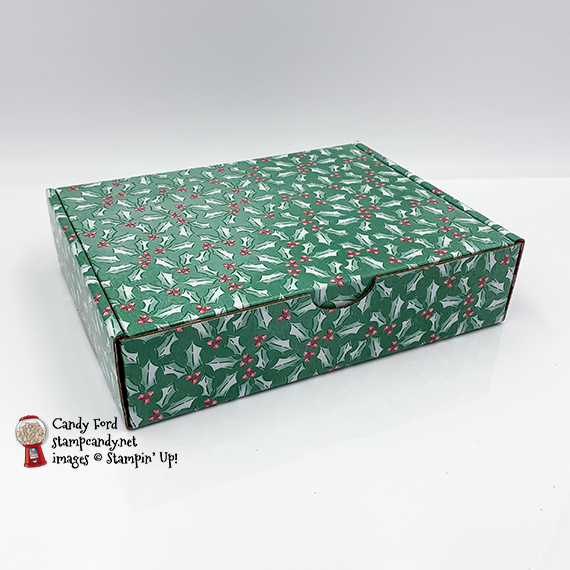
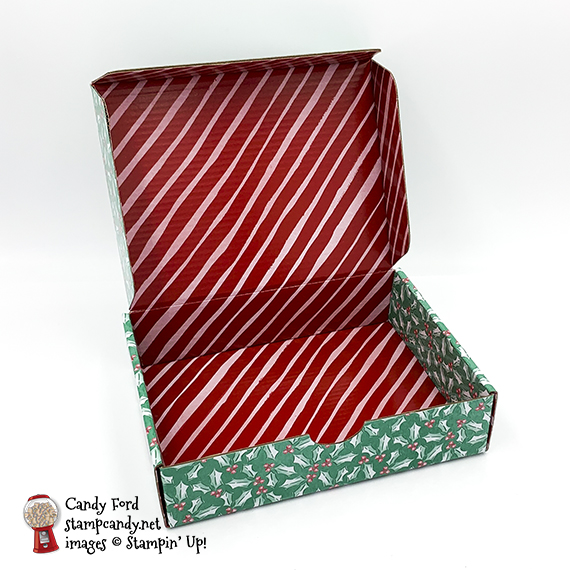
This would make a great gift!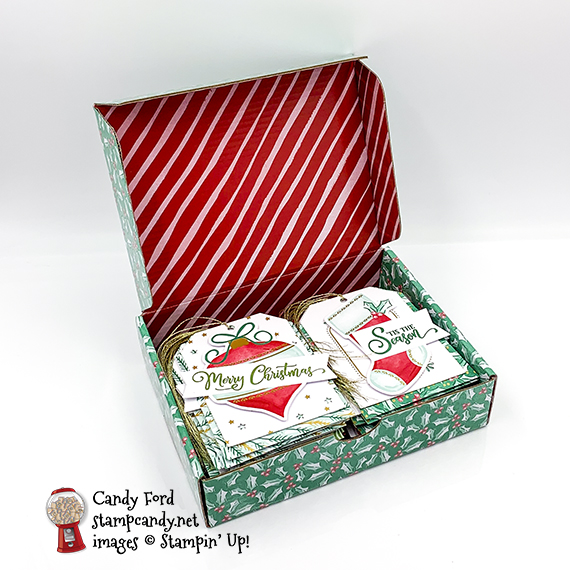
S
Here’s what I did:
Stamped with the Tag Buffet stamp set:
- sentiments in Garden Green, Real Red, and Shaded Spruce inks onto the included labels
Assembled the tags:
- sentiments glued onto the die cut images
- die cut images adhered onto the top tags using Stampin’ Dimensionals
- top and bottom tags tied together with the included gold twine
- That’s it!oS
S
Here are the kit’s colors:
You can click on each one to see all the products that come in that color!
S
Here’s what I used:
Click on these images for more details and to purchase. If you are reading this post in email, the product images may not show up. Please click here to see the post on my blog.
Supply List. <— Click for a clickable and printable list of the products!
S
The new catalog AND the new online store are live!
Click the image to check it out now!
S
Use your Bonus Days coupons by August 31!
Click the image below to shop now and use your Bonus Days coupons!
S
Here are some helpful links:
S
Thanks for stopping by today, and Sweet Stamping!
Jul 27, 2020 | Cards, Christmas, Gallery, Holiday, Kits |
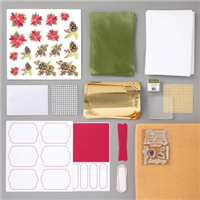
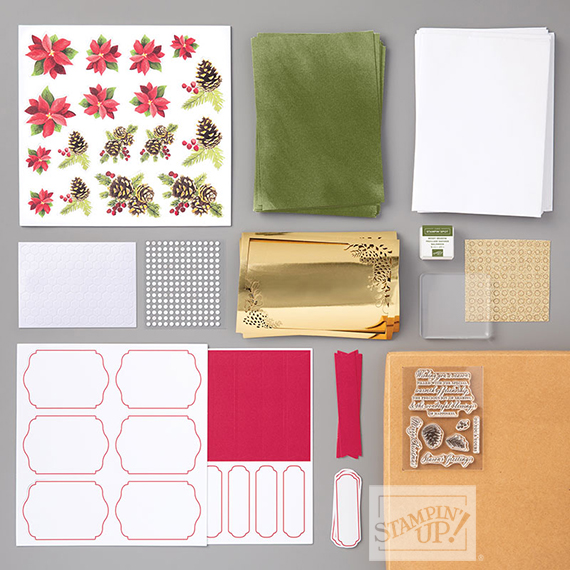
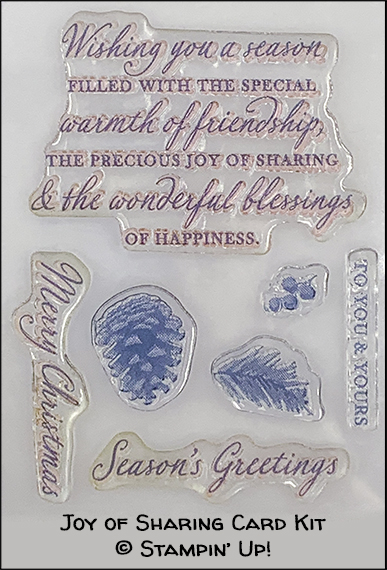
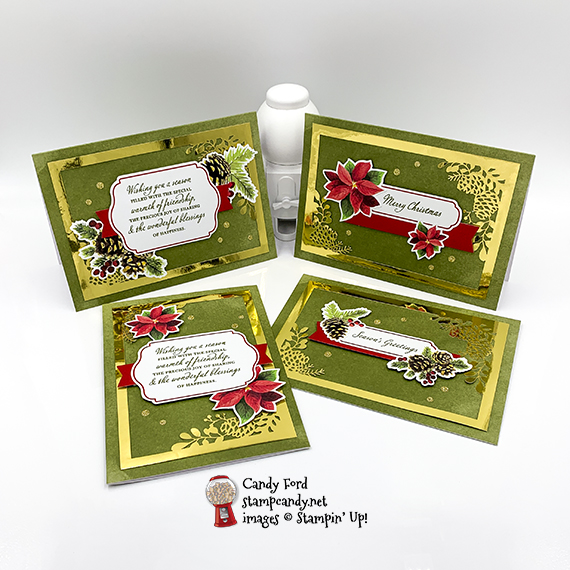
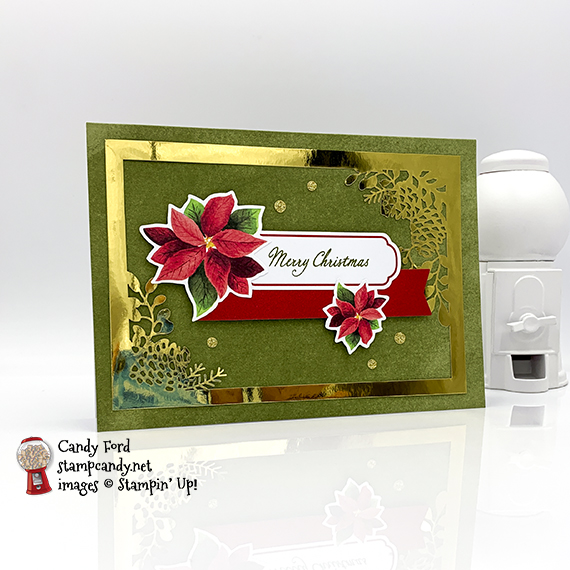
Today I’m sharing a sneak peek of the Joy of Sharing Card Kit from the August – December 2020 Mini Catalog. It’s an All-Inclusive kit, which means it contains everything you need to make the cards. The kraft box contains 15 card bases (5″ x 7″,) 15 envelopes, gold foil die cuts, printed die cuts and labels, stamp set, clear acrylic block, Mossy Meadow ink pad, gold glitter dots, and adhesives. You get way more of the die cuts than you need, so you can use them on even more projects, and really spread your Joy of Sharing this holiday season!
If you are reading this in email, some photos may appear blurry, or may not appear at all. Please click here to see the post on my blog.
S Joy of Sharing Joy of Sharing Joy of Sharing
Here’s the Joy of Sharing Card Kit:
You can add your own photos to the cards. I didn’t have any handy, so I made them without. 
Here’s what I made:

S
Only one week left to earn Bonus Days coupons!
For each $50 you spend on an order now through Monday, August 3, 2020, you will receive a $5 coupon code to use in August! Click the image below to shop now!

S
Here are the kit’s coordinating colors:
You can click on each one to see all the products that come in that color!
S
Here’s what I used:
Joy of Sharing Card Kit (Item #153650) will be available August 4, 2020.
S
Here are some helpful links:
S
Thanks for stopping by today, and Sweet Stamping!
Jul 20, 2020 | Cards, Gallery, Kits |
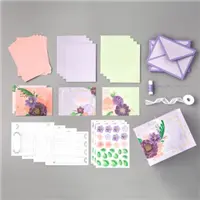
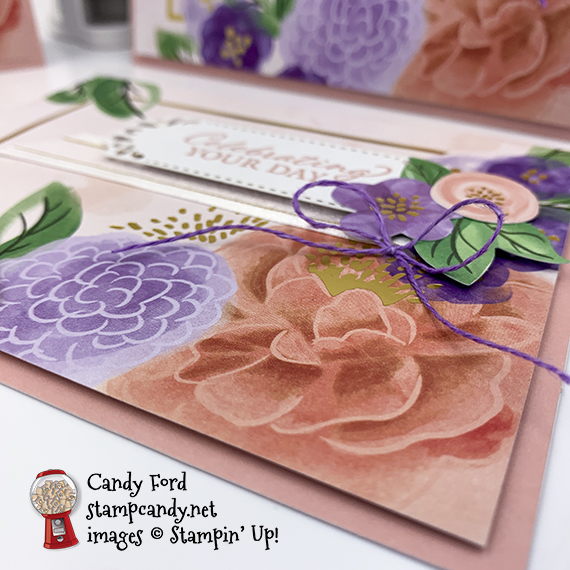
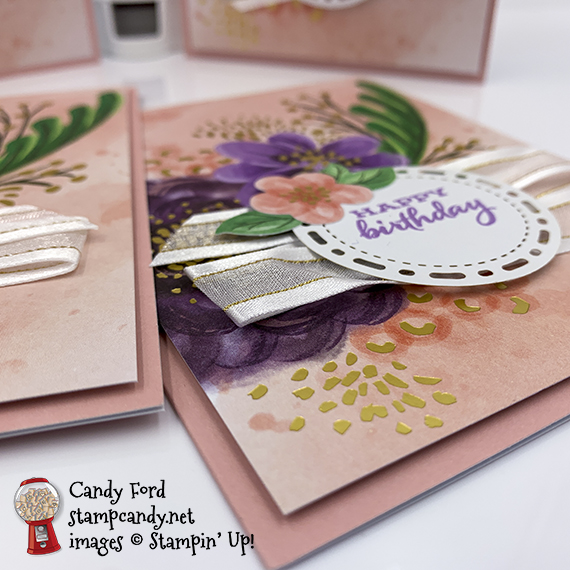
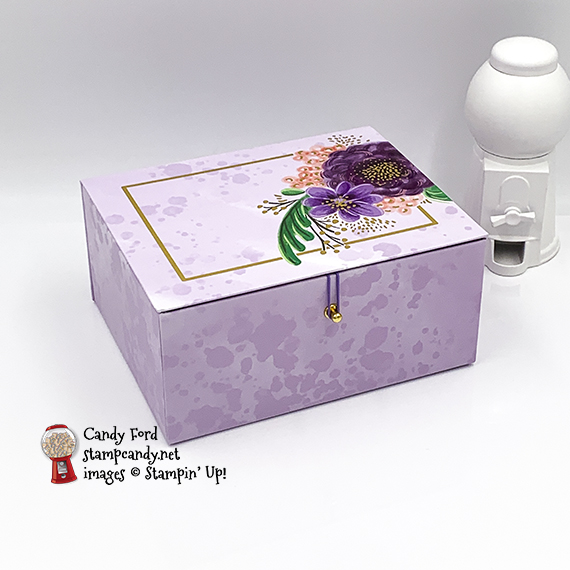
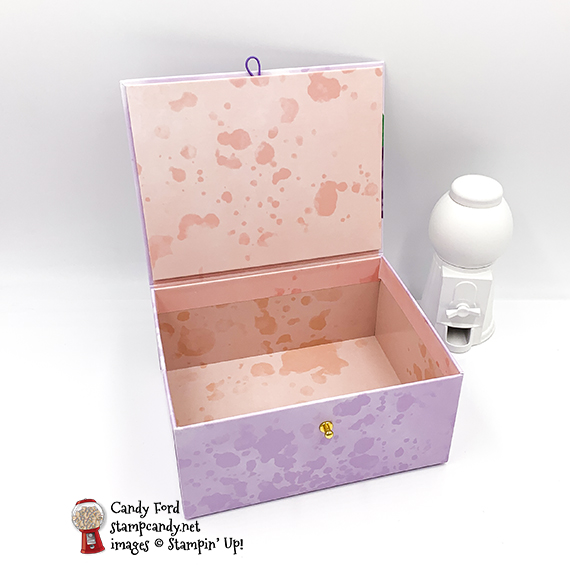
Today’s I’m sharing the Gorgeous Posies Project Kit. It makes 16 cards, 4 each of 4 designs, and they really are, well, gorgeous. I followed the kit instructions mostly. On some of the cards, I did use different sentiments from the Timeless Tulips and the Four Season Floral stamp sets. One of my favorite things about this kit is the box it comes in. I will definitely keep it in my office to hold assorted little items.
If you are reading this in email, some photos may appear blurry, or may not appear at all. Please click here to see the post on my blog.
S Gorgeous Posies Gorgeous Posies Gorgeous Posies Gorgeous Posies
Here’s the Gorgeous Posies Project Kit:
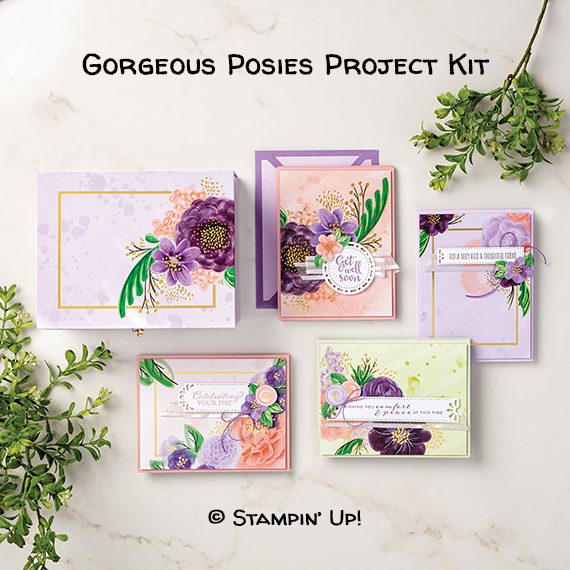

Here’s what I made:
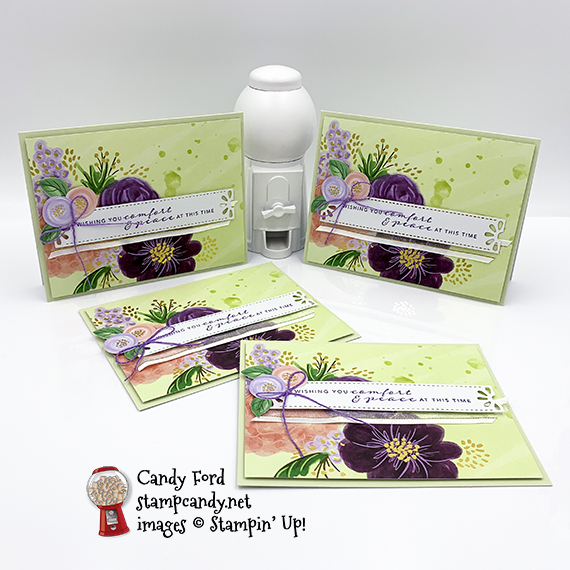
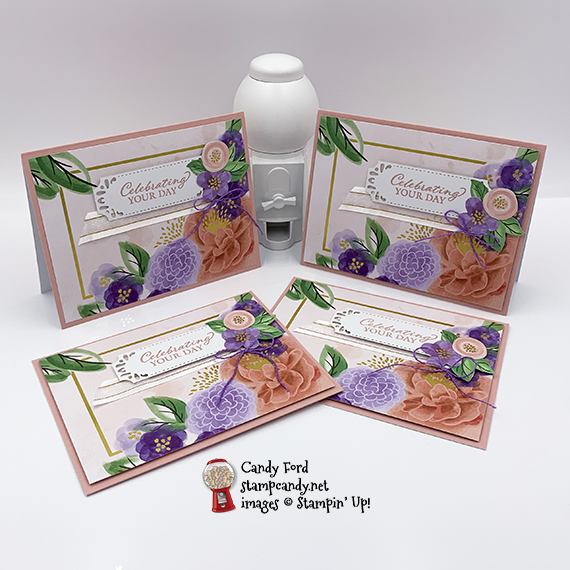
I used the Timeless Tulips stamp set to stamp the happy birthday sentiments in Blackberry Bliss ink.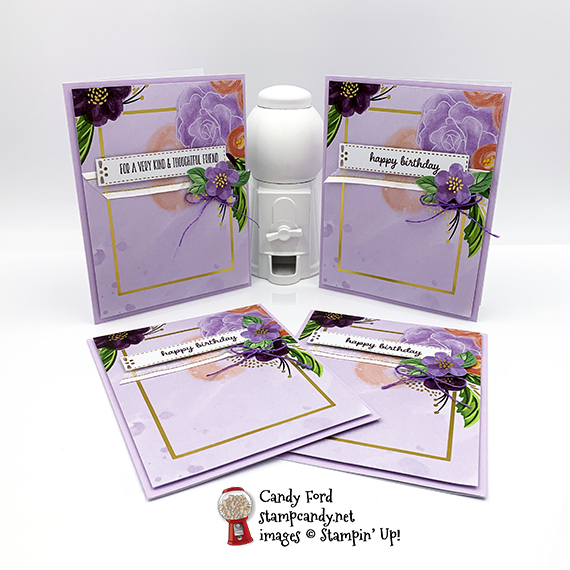

I used the Four Season Floral stamp set to stamp the happy birthday sentiments in Highland Heather ink.
This box is so pretty!
And how great are these envelopes?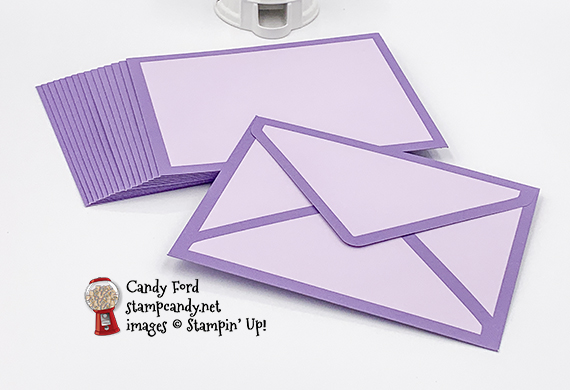
S
2 weeks left to earn Bonus Days coupons!
For each $50 you spend on an order now through Monday, August 3, 2020, you will receive a $5 coupon code to use in August! Click the image below to shop now!
S
Here are the colors in the kit:
You can click on each one to see all the products that come in that color!
S
Here’s what I used:
Click on these images for more details and to purchase. If you are reading this post in email, the product images may not show up. Please click here to see the post on my blog.
Supply List. <— Click for a clickable and printable list of the products!
S
S
Here are some helpful links:
S
Thanks for stopping by today, and Sweet Stamping!
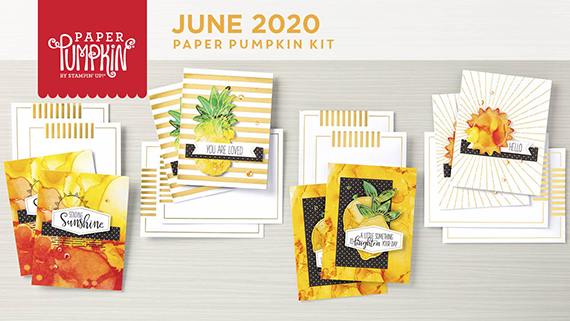
Jun 30, 2020 | Blog Hop, Boxes, Cards, Gallery, Kits, Paper Pumpkin |

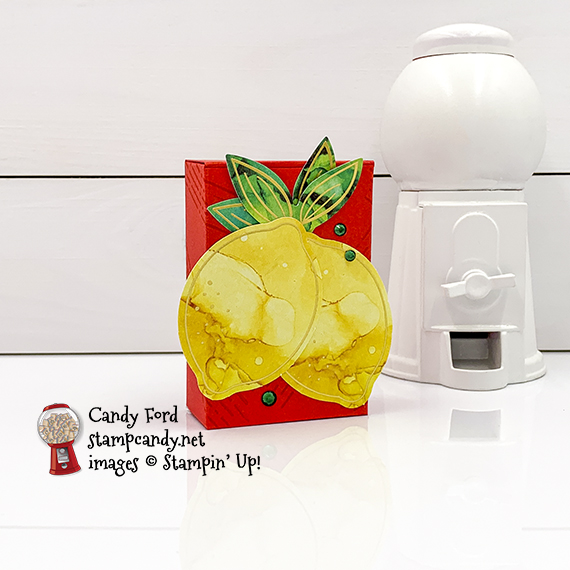
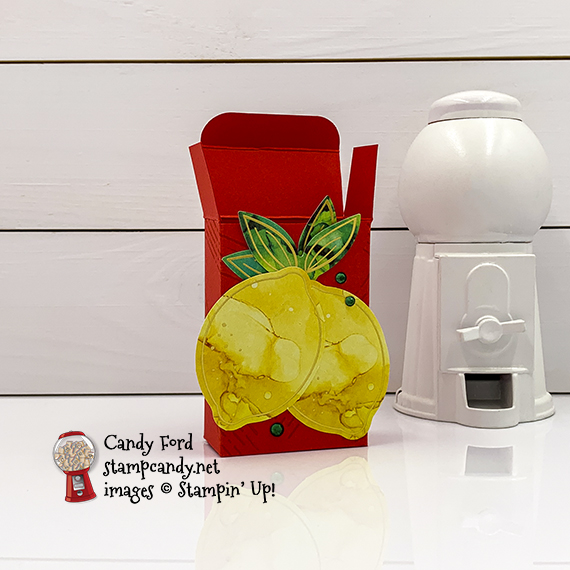
It’s time for the 06-2020 PPPBH. This month’s kit is called Box of Sunshine and it’s filled with enough goodies to make 8 bright and cheery cards so you can send some sunshine someone’s way. I used some pieces from the kit and some extra card stock and ink to create a card and a small treat box with lovely lemons on them, because what’s cheerier that lemons, right? I took a cue from the kit for the colors, which are listed on the back of the kit’s instruction sheet.
If you are reading this in email, some photos may appear blurry, or may not appear at all. Please click here to see the post on my blog.
S 06-2020 PPPBH 06-2020 PPPBH 06-2020 PPPBH 06-2020 PPPBH 06-2020 PPPBH
Here’s the Box of Sunshine kit:
CLICK HERE to download the printable stamp case insert for this month’s kit.

 S
S
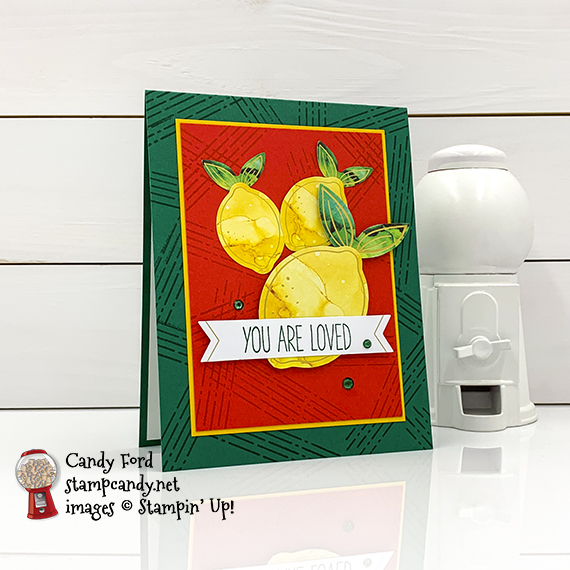
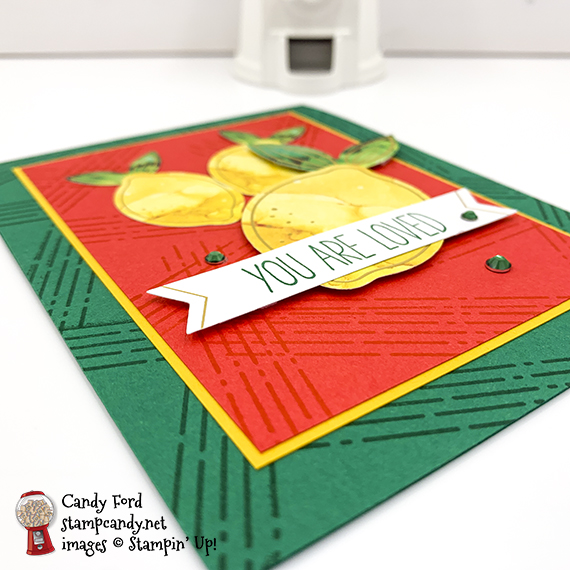
Here’s what I made:

S
Here’s what I did:
Cut and scored with my paper trimmer:
- Shaded Spruce card stock (CS) cut to 4-1/4″ x 11″, then scored in half at 5-1/2″
- Crushed Curry CS layer cut to 3-3/8″ x 4-5/8″
- Poppy Parade CS layer cut to 3-1/4″ x 4-1/2″
- Whisper White CS cut to 4″ x 5-1/4″ for the inside of the card base
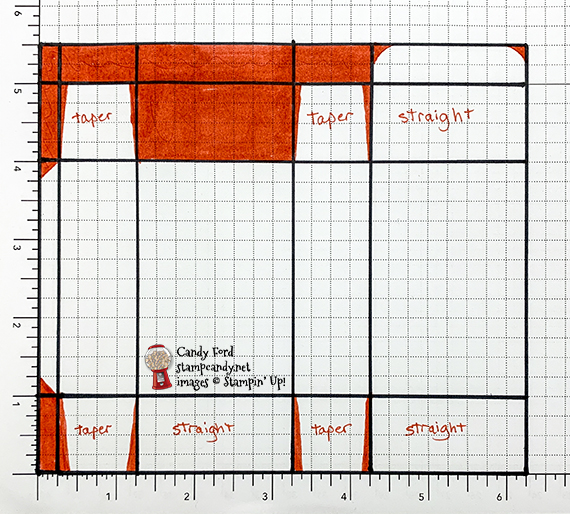
- Poppy Parade CS cut to 6-1/4″ x 5-1/2″, scored along the longer side at 1/4″, 1-1/4″, 3-1/4″, and 4-1/4″, and along the shorter side at 1″, 4″, and 5″ (See the diagram below. Remove all red areas with Paper Snips. Note that the smaller tabs are tapered and the wide ones have straight sides.)
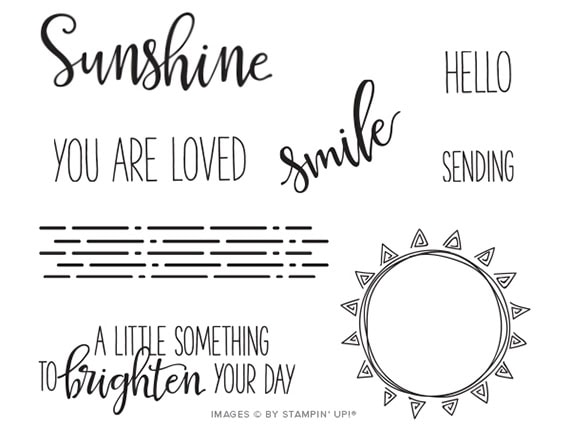
Stamped with the Box of Sunshine stamp set:
- sentiment in Shaded Spruce ink onto one of the banners from the kit
- lines in Poppy Parade ink onto the Poppy Parade CS card layer and the outside of the box
- NOTE: I stamped the box after I had scored and cut it. I think it would be easier to stamp on the card stock before doing that.
- lines in Shaded Spruce ink onto the front of the card base
Cut using the Detailed Trio Punch:
Assembled the card:
- burnished the fold in the card base with a Bone Folder
- Crushed Curry CS layer glued onto the front of the card base
- Poppy Parade CS layer glued onto the Crushed Curry CS layer
- 2 small lemon and leaf stickers applied onto the Poppy Parade CS layer
- large die cut leaf adhered onto the back of a large lemon die cut using a glue dot
- large lemon/leaf adhered onto the Poppy Parade CS layer using Stampin’ Dimensionals
- sentiment adhered over the lemon using Stampin’ Dimensionals at each end
- 3 Shaded Spruce rhinestones applied onto the card front
- Whisper White CS glued onto the inside of the card base
Assembled the box:
- burnished the folds in the box with a Bone Folder
- rounded the two corners of the box top tab using the Detailed Trio Punch
- long side tab adhered onto the inside of the opposite end using Tear & Tape
- on the bottom of the box, folded in the back tab, then adhered the side tabs to it
- adhered the front bottom tab over the 2 side tabs (Doing it this way hides the little side tabs between the two full size tabs.)
- adhered 2 large lemons and leaves onto the front of the box using glue dots
- 3 Shaded Spruce rhinestones applied onto the front of the box
the scored, cut, and stamped box
adhesive strip on the outside of the skinny flap
adhesive on the inside of the bottom flaps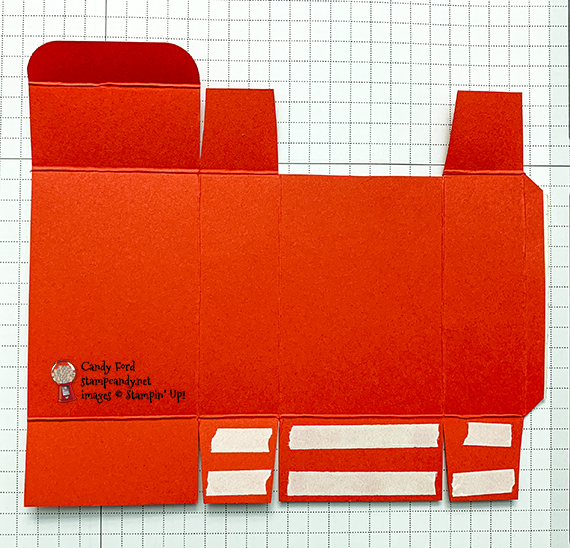
S
Here’s the hop:
Click the pumpkin below to hop to the next stop and see what Anastasia Radloff of Stampin’ Blondie has for you today!

Here are today’s main colors:
You can click on each one to see all the products that come in that color!
S
Here’s what I used other that the kit:
Click on these images for more details and to purchase. If you are reading this post in email, the product images may not show up. Please click here to see the post on my blog.
Supply List. <— Click for a clickable and printable list of the products!
S
Here’s how to get Paper Pumpkin:
- Order one of the items below.
- You will receive an email with a redemption code.
- CLICK HERE to redeem your code.
Supply List <— Click for a clickable and printable list of the products!
S
TODAY IS THE LAST DAY FOR THESE 2 GREAT PROMOTIONS!

It’s a bundle bash! When you purchase your Starter Kit in June, you can select one stamp and punch bundle (p. 168–169) OR one stamp and die bundle (p. 173-179) from the 2020–2021 Annual Catalog, in addition to your regular Starter Kit. Click here for more information.
Order Deadlines
- Phone: tonight 8:50 PM (ET), 7:50 PM (CT), 6:50 PM (MT), 5:50 PM (PT), 4:50 PM (Alaska), 2:50 PM (HI-Aleutian)
- Online: tonight 1:50 AM (ET), 12:50 AM (CT), 11:50 PM (MT), 10:50 PM (PT), 9:50 PM (Alaska), 7:50 PM (HI-Aleutian)
S

- Any order $250 or more will earn $25 EXTRA Stampin’ Rewards.
- All order types qualify for this promotion.
- Starter Kit orders do not qualify for this promotion.
- Paper Pumpkin prepaid subscriptions count toward a qualifying purchase. Month-to-month subscriptions do not qualify for this promotion.
- The qualifying amount must be reached prior to shipping and tax.
- Additional Stampin’ Rewards for this promotion will only be awarded once per order.
- Click here to shop now
Order Deadlines
- Phone: 30 June 2020; 6:50 PM (MT)
- Online: 30 June 2020; 11:50 PM (MT)
S
Here are some helpful links:
S
Thanks for stopping by today, and Sweet Stamping!