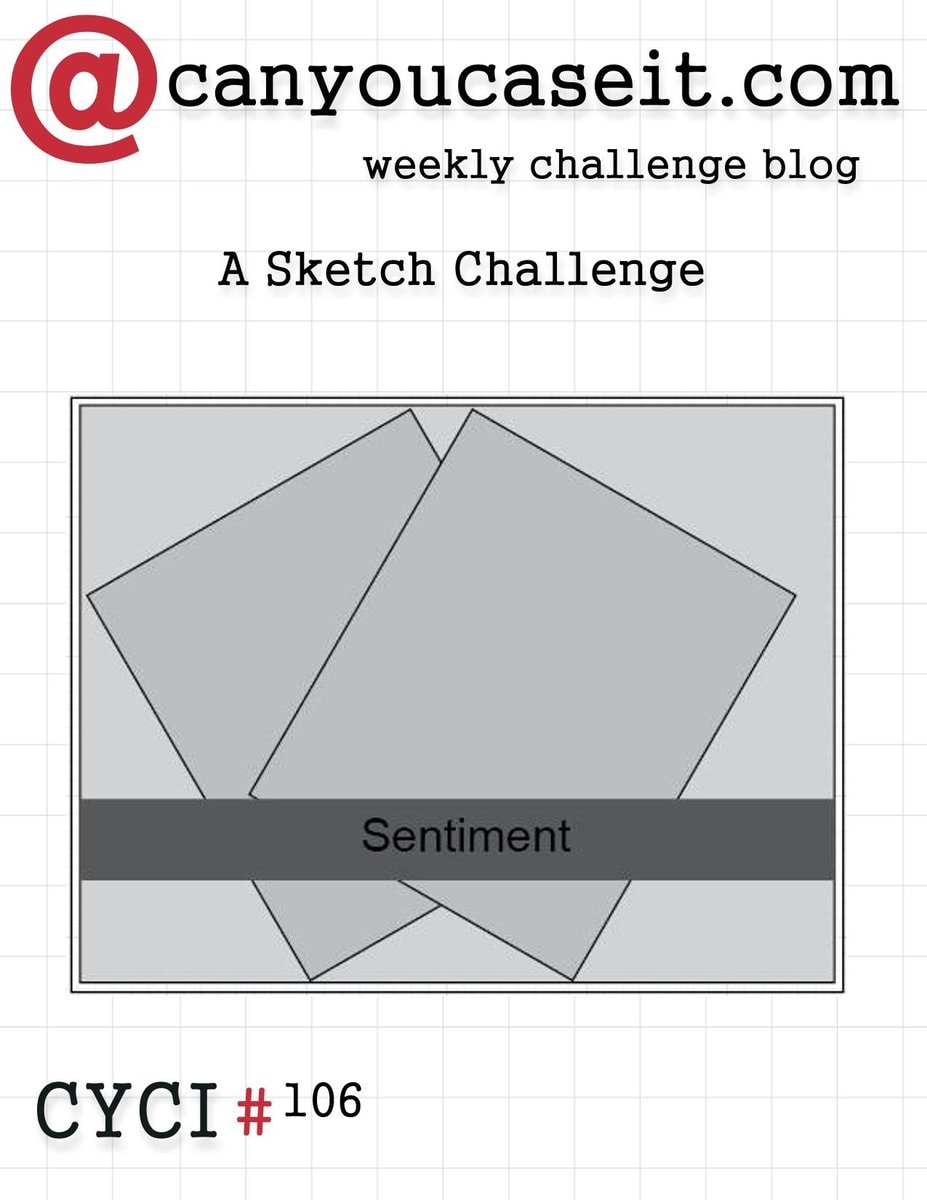
Apr 17, 2016 | Cards, Challenges, CYCI, Sketches |
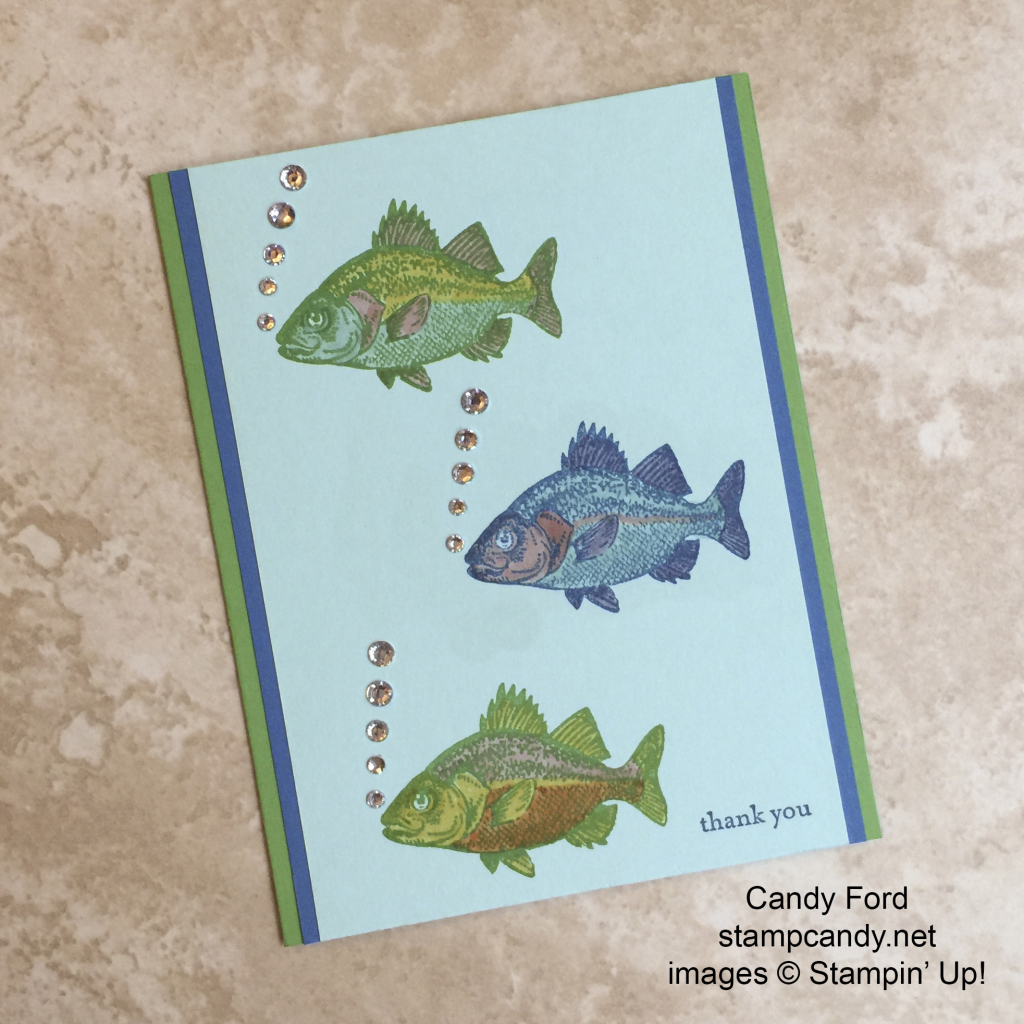
It’s time for another CYCI sketch challenge! As soon as I saw this sketch, the little circles reminded me of bubbles, and I knew I had to do fish. I pulled out my trusty By the Tide stamp set which has a great fish image.

I stamped two fish in Cucumber Crush and one in Pacific Point onto the Pool Party card front. I made sure the ink was good and dry to help prevent bleeding, then colored in the fish with Stampin’ Write Markers in Daffodil Delight, Blushing Bride, Pool Party, Wisteria Wonder, and Pumpkin Pie.
The bubbles are Rhinestone Basic Jewels. I used all three sizes that come in the pack to create graduated sizes of bubbles. I used my Paper Piercing Tool to apply the rhinestones. It’s easy to use the sharp point to get up under the jewel and transfer it exactly where you want it.

The sentiment from the Teeny Tiny Wishes stamp set is stamped in Pacific Point ink. This has to be one of the best stamp sets to have in your arsenal. It has 24 different sentiments for a wide array of occasions.

The card front is glued onto a piece of Pacific point card stock, and that’s glued onto the Cucumber Crush card base.
Here’s what I used:
Click here to check out all the great projects for this challenge, and to play along with us by posting your own project.
Thanks for stopping by today, and Sweet Stamping!

Apr 3, 2016 | Challenges, CYCI, Paper Pumpkin, Sketches |

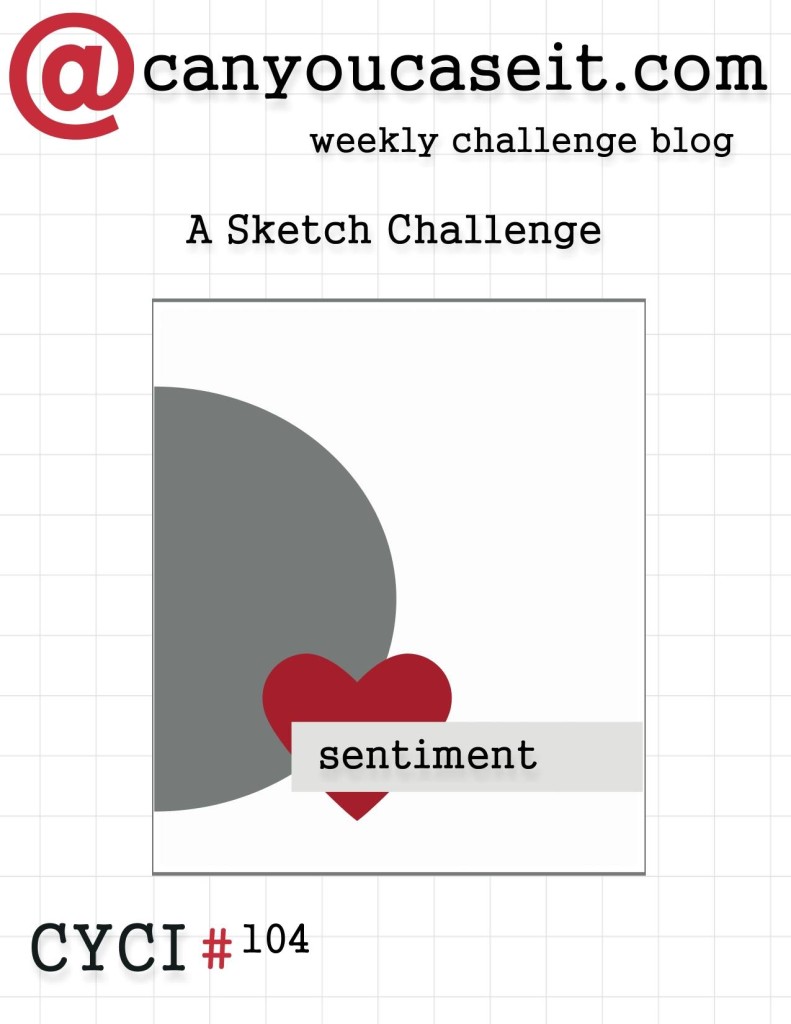
Here is this week’s Sketch Challenge from CYCI…
…and here’s my card, photographed on of a piece of Cucumber Crush card stock.

I used the March 2016 Paper Pumpkin kit to create this card. The kit makes 8 gift cards and 8 gift card envelopes.

I used one of the speckled card bases from the kit, and glued a piece of Bermuda Bay card stock on the front. I used the 1-3/8″ Circle Punch to cut out circles from the various pieces in the kit, as well as from the Brights Designer Series Paper Stack. I glued the circles along the slant of the Bermuda Bay card stock piece.
I stamped the sentiment from the Petite Pairs stamp set in Cucumber Crush ink onto a piece of Whisper White CS, then cut it with the Large Oval Punch. I cut a piece of Bermuda Bay CS with the Scalloped Oval Punch to mat the sentiment. I glued it all to the card front.
I stuck a White Perfect Accent in the top left corner to add balance to the overall layout.
To see more alternate projects using this kit, click here.
Here’s what I used:
Be sure to check out all the great projects this week at canyoucaseit.com, and play along by posting your own project!
Thanks for stopping by today, and Sweet Stamping!
Mar 20, 2016 | Cards, Challenges, CYCI, Sketches, Wedding |
It’s time for another sketch challenge from canyoucaseit.com! Here is this week’s sketch…
…and here is my card.

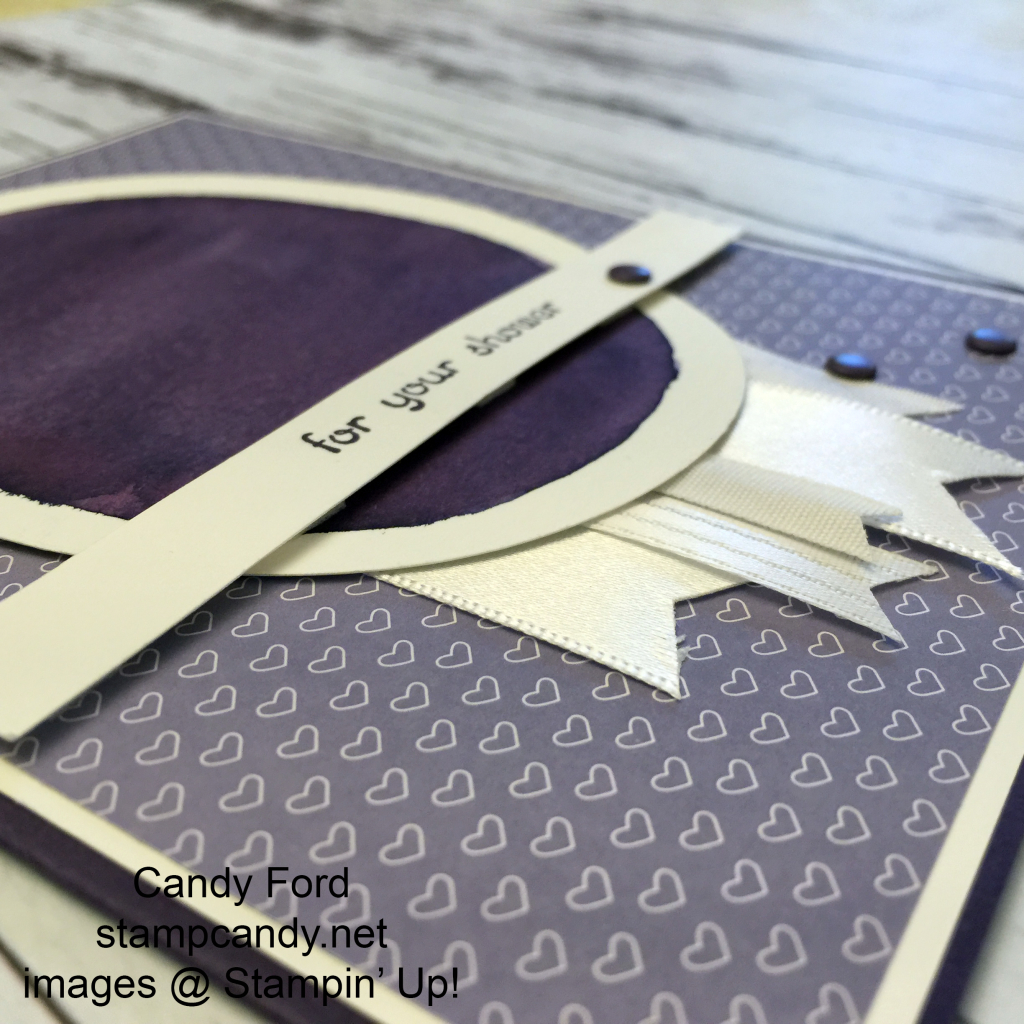
My interpretation of the sketch is pretty literal this time. But I think the watercolored oval changes things up a bit. It adds texture and interest without a particular image that might take away from the sentiment.
The card base is Elegant Eggplant card stock, with a Whisper White CS layer on top of that, and a layer of Have A Cuppa Designer Series Paper (in Wisteria Wonder and Whisper White) on top of that.
The oval is Watercolor Paper cut with the Ovals Collection Framelits Dies. I used an Aqua Painter to watercolor all but the outer rim in Elegant Eggplant. I adhered 5 different pieces of Whisper White ribbon to the back and trimmed them with my Craft Scissors – the best ribbon scissors ever! I then glued it onto the card front.
I stamped the sentiment from the Teeny Tiny Wishes stamp set in Elegant Eggplant on a strip of Whisper White CS and attached that with Stampin’ Dimensionals.

Lastly I added some Elegant Eggplant Candy Dots.
Be sure to check out all the great projects at canyoucaseit.com. And play along with us by posting your own version of today’s sketch!
Here’s what I used:
Thanks for stopping by today, and Sweet Stamping!
Mar 6, 2016 | Cards, Challenges, Color Palette, CYCI, Sketches |
Today I’m sharing a card designed for two challenges: this week’s canyoucaseit.com sketch challenge…
… and this week’s Global Design Project color challenge at www.global-design-project.com.

This card was a dual effort. My assistant, Jackie Bak, and I worked together on this design. The colors reminded us of sun and clouds, and the sketch reminded us of the sun and its rays. The cloudy sky also reminded us of the weather we’d had here in Atlanta the day before. It was one of those dark, gloomy, rainy days; at noon it felt like evening because it was so dark. Bright side: great napping weather!
We turned the design clockwise to a vertical orientation. The card base is Smoky Slate card stock. We stamped clouds from the Sprinkles of Life stamp set in Basic Gray directly on the card base, then we cut some clouds from Basic Gray CS with the Tree Builder punch and covered some of the stamped ones.


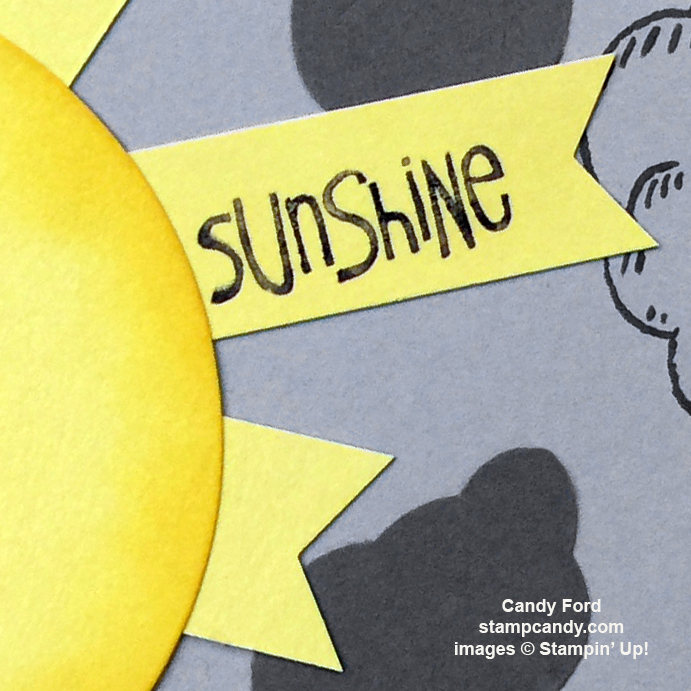
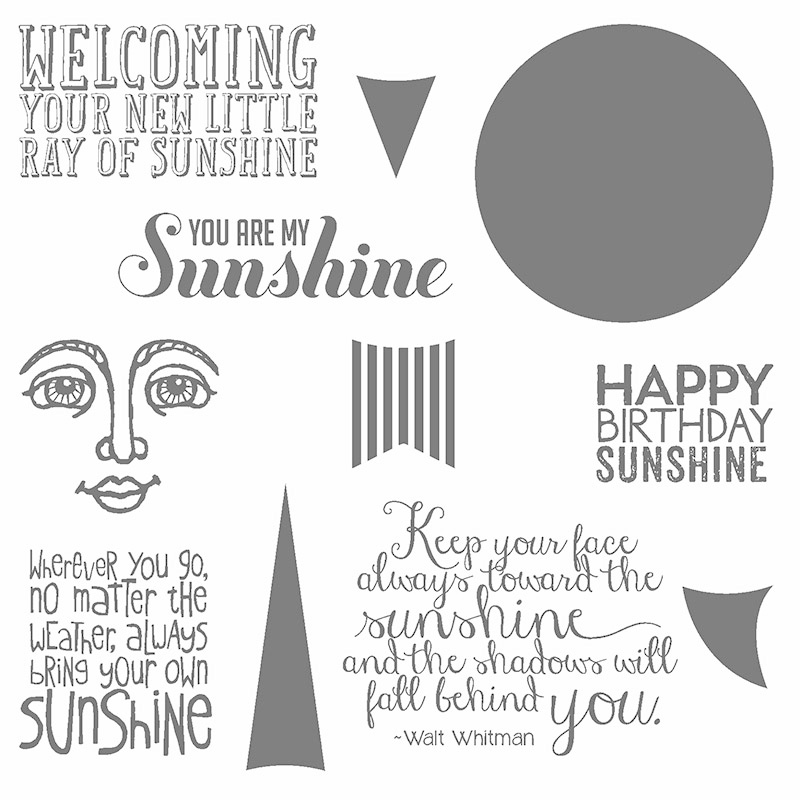
We cut the sun from Daffodil Delight CS with the Circles Collection Framelits, then sponged the edges with Daffodil Delight ink. We cut strips of the same CS and notched the ends with the Banner Triple Punch. These made the sun’s rays.
We stamped the sentiment from the Ray of Sunshine stamp set on two of the rays and left them longer. Both parts of the sentiment are parts of two different stamps. We used “You are my” from the stamp that says “You are my sunshine” and we used “Sunshine” from the stamp that says “Wherever you go, no matter what the weather, always bring your own sunshine.” We used the Basic Gray Stampin’ Write Marker to ink up only the part of the stamps we needed.

Here’s what we used:
Be sure to check out all the great projects at canyoucaseit.com and at www.global-design-project.com this week. Play along by uploading a photo of your own project!
Thanks for stopping by today, and Sweet Stamping!

Feb 7, 2016 | Cards, Challenges, CYCI, Occasions, Sketches |

It’s time for another sketch challenge from CYCI! Go to canyoucaseit.com to see the other projects and to play along with us by posting your own project! Here is this week’s challenge…

…and here is my card.

The Picture Perfect stamp set has four different multi-step images: a 3 step flower, a 2 step starfish, a three step leaf, and a 4 step hummingbird. The see through photopolymer stamps make lining up the images a snap.
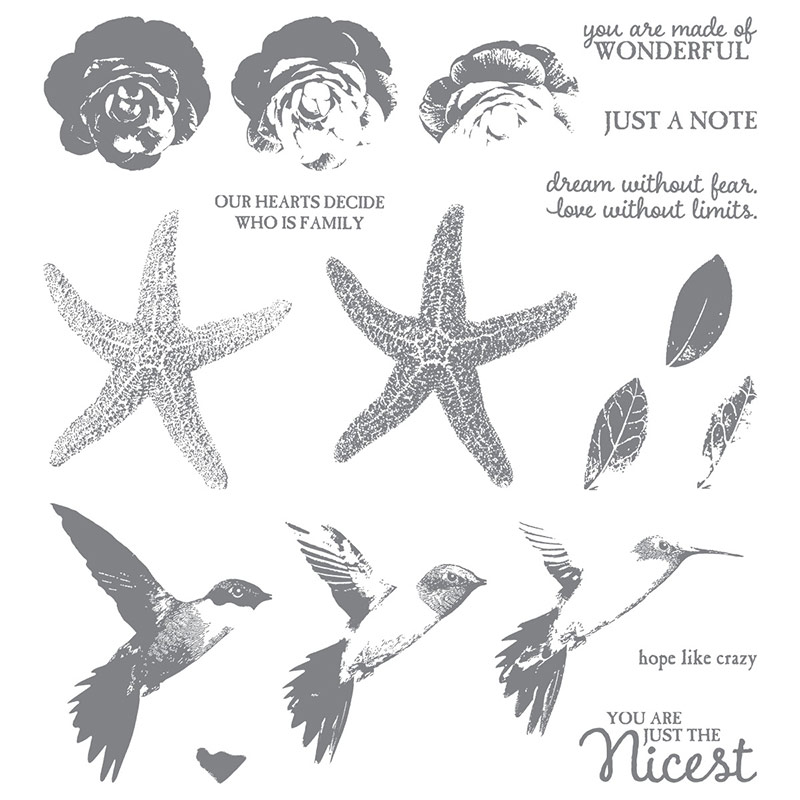
Picture Perfect Photopolymer Stamp Set 140520
For today’s card, I’ve used the starfish. On Very Vanilla card stock, I stamped the heavier image, seen on the right in the above image, in Hello Honey. Then I stamped the lighter, more detailed image in Soft Suede over the top of the first one. I did this twice, then used my Paper Snips to cut out the two starfish.
I stamped the sentiment from the same stamp set in Pacific Point on a strip of Very Vanilla card stock.
The fish and coral are from the By the Tide stamp set in the Annual catalog. It’s available in wood mount and clear mount.
By the Tide: Clear Mount 129120, Wood Mount 131910
On the front panel of Pool Party, I stamped the fish in Pacific Point and the coral in, you guessed it, Calypso Coral. I went over the fish with the Clear Wink of Stella Brush to give them a little shimmer. It also made the Pacific Point ink bleed slightly, to make the them stand out from the surrounding water.

Wink of Stella shimmer on the fish
I attached the starfish with Stampin’ Dimensionals that I cut into skinny pieces. Then I glued the front panel to a Pacific Point card stock layer, and glued that to the Calypso Coral card base.
Here’s what I used. Click on the images below to get what you need to make your own version of today’s project!
Thanks for stopping by today, and Sweet Stamping!
Jan 24, 2016 | Cards, Challenges, CYCI, Sketches |
Here is this week’s canyoucaseit.com sketch challenge…
…and here is my card.

I’ve been having a ball playing with all my new products from the 2016 Occasions and Sale-a-bration catalogs. It’s easy to get excited about brand new stuff, but remember there is a whole Annual catalog full of wonderful products, too. For today’s card I used English Garden Designer Series Paper and the Teeny Tiny wishes stamp set to create a subtle Mother’s Day card.
The card base is Blushing Bride card stock with a Mossy Meadow CS layer on top of that. I cropped the piece of DSP so the big rose was in the right place for the sketch, then glued that down. I used the 2″ Circle Punch to cut out another rose from the DSP, and the 2-1/2″ Circle Punch to cut the Mossy Meadow CS mat.
I stamped the sentiment in Mossy Meadow on Whisper White CS, matted it with Blushing Bride, and notched one end. The final touch is a Soft Suede Candy Dot to balance the sentiment strip and to mach the Soft Suede dots in the DSP. Super quick and simple.
Be sure to check out the other projects at canyoucaseit.com and play along with us by posting your own project!
Here’s what I used today:
Thanks for stopping by today, and Sweet Stamping!