Nov 14, 2022 | Blog Hop, Cards, Gallery, Holiday, Thanks |
 s
s
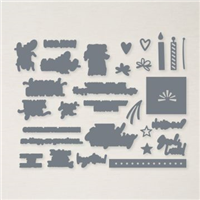
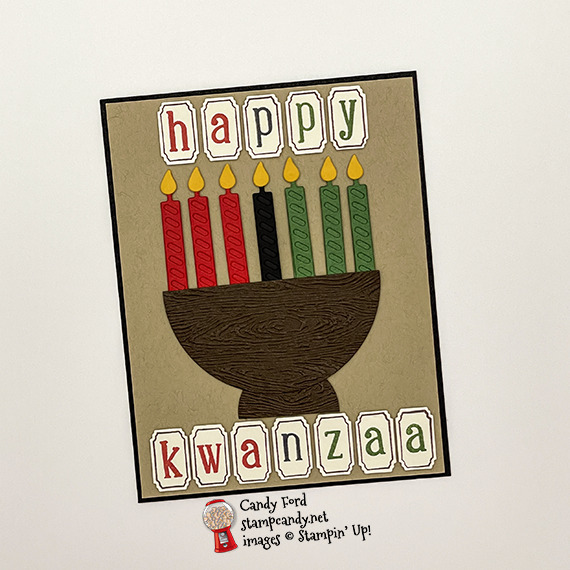
Welcome to the November 2022 Candy Hearts Blog Hop! This month we’re sharing Holiday themed projects. We all know that Stampin’ Up! has lots of great Christmas products to choose from, but I wanted to show how easy it is to use Stampin’ Up! products to make a card, even though there isn’t a specific stamp set for it in the current catalogs. I used the Alphabest Bundle, Sentiment Silhouettes Dies, and Layering Circles Dies to create a Happy Kwanzaa card. Change the colors and add two more candles for a Hannukah card.
After reading my post, I hope you will hop to the next person on the list below. Be sure to hop around to see ALL the great projects the Candy Hearts have created for you!
If you are reading this in email, some photos may appear blurry, or may not appear at all. Please click here to see the post on my blog.
S November 2022 Candy Hearts Blog Hop November 2022 Candy Hearts Blog Hop November 2022 Candy Hearts Blog Hop November 2022 Candy Hearts Blog Hop
Here’s what I made:
S
Here’s what I did:
Cut with my Paper Trimmer:
- Basic Black Cardstock (CS) cut to 8-1/2″ x 5-1/2″, scored in half at 4-1/4″
- Crumb Cake CS cut to 4-1/8″ x 5-3/8″
- Early Espresso CS cut to 3-1/4″ x 5″ for die cutting
- Very Vanilla Thick CS cut to 1-1/2″ x 6″ for punching
- Real Red CS cut to 1-1/2″ x 3″ for die cutting
- Garden Green CS cut to 1-1/2″ x 3″ for die cutting
- Basic Black CS cut to 1″ x 1-1/2″ for die cutting
- Crushed Curry CS cut to 3-1/2″ x 1/2″ for die cutting
- Very Vanilla CS cut to 4″ x 5-1/4″ for the inside
Stamped with the Alphabest stamp set:
- letters in Real Red, Garden Green, and Memento inks onto the 1-1/2″ x 6″ Very Vanilla Thick CS
- border around letters in Early Espresso ink
Cut using the Best Label Punch:
Cut using the Layering Circle Dies:
- 3-1/4″ x 5″ Early Espresso CS using the largest plain circle die and the second smallest plain circle die
Cut using the Sentiment Silhouettes Dies:
- 3 solid candles & 3 striped candles from the 1-1/2″ x 3″ Real Red CS
- 1 solid candle & 1 striped candle from the 1″ x 1-1/2″ Basic Black CS
- 3 solid candles & 3 striped candles from the 1-1/2″ x 3″ Garden Green CS
- 7 flames from the 3-1/2″ x 1/2″ Crushed Curry CS
Embossed with the Timber 3D Embossing Folder:
- both die cut circles, then cut both in half
Assembled the card:
- fold in the card base burnished with a Bone Folder
- Crumb Cake CS layer glued onto the front of the card base
- striped candles glued onto solid candles
- flames glued onto all candles
- one smaller half circle glued onto the back of one larger half circle to make the candle holder (save the other halves for another project)
- candles glued onto the back of the candle holder top
- letters and candle holder with candles adhered onto the Crumb Cake CS layer with Black Dimensionals (minis on the candles; regular size on everything else)
- Very Vanilla CS glued onto the inside of the card base
S
Here’s the November 2022 Candy Hearts Blog Hop:
s
Here are today’s colors:
You can click on each one to see all the products that come in that color!
sS
Here’s what I used:
Click on these images for more details and to purchase. If you are reading this post in email, the product images may not show up. Pleaseclick here to see the post on my blog.
Supply List. <— Click for a clickable and printable list of the products!
S
Here are some helpful links:
S
Thanks for stopping by today, and Sweet Stamping!
Oct 19, 2022 | Autumn, Blog Hop, Cards, Gallery, Halloween |

s
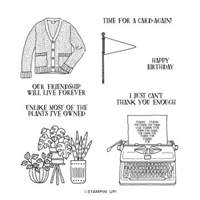
Welcome to the October 2022 Inking Royalty Blog Hop! This month’s blog hop is dedicated to Halloween. The inspiration for my card is a shirt I saw online and thought was a hoot:

I decided to make my own version with the sweater from the Forever Friendship stamp set. Just FYI, the Dark Cherry Cobbler Stampin’ Blends Marker is great for blood…ya know, just in case you ever need it. I used the black ink pad to grunge up the layers on the front and the inside. The one time I didn’t get an ink smudge on the card, and I wanted to!
We are excited to share our creations and hope you love them! After reading my post, I hope you will hop to the next person on the list below. Be sure to hop around to see ALL the great projects the Royals have created for you!
If you are reading this in email, some photos may appear blurry, or may not appear at all. Please click here to see the post on my blog.
S October 2022 Inking Royalty Blog Hop October 2022 Inking Royalty Blog Hop October 2022 Inking Royalty Blog Hop October 2022 Inking Royalty Blog Hop
Here’s what I made:


S
Here’s what I did:
Cut with my Paper Trimmer:
- Basic Black Cardstock (CS) cut to 4-1/4″ x 11″, then scored in half at 5-1/2″
- Celebrate Everything DSP layer (stars) cut to 4-1/4″ x 5-1/2″
- Mango Melody CS layer cut to 3-7/8″ x 3-7/8″
- DSP layer (jack-0-lanterns) cut to 3-3/4″ x 3-3/4″
- Basic White CS layer cut to 2-1/2″ x 2-1/2″
- Mango Melody CS cut to 4″ x 5-1/4″ for the inside
Stamped with the Forever Friendship stamp set:
- sweater in Tuxedo Black Memento ink onto a scrap of Basic White Thick CS
Stamped with the Alphabest stamp set:
- “i’m fine” letters and frames in Tuxedo Black Memento ink onto a scrap of Basic White Thick CS
- “happy halloween” onto the 4″ x 5-1/4″ Mango Melody CS for the inside
Cut using the Deckled Rectangles Dies:
- both Mango Melody CS layers, the Basic White CS layer, and the smaller DSP layer
- NOTE: for the square layers on the front, I used the largest die and cut two adjacent sides at a time.
Cut using the Best Label Punch:
Cut using Paper Snips:
- fussy cut the sweater, including the bite marks
Colored with Stampin’ Blends Markers:
- sweater in Light & Dark Crumb Cake
- bite edges in Dark Cherry Cobbler
Grunged with my Tuxedo Black Memento ink pad:
Assembled the card:
- burnished the fold in the card base with a Bone Folder
- star DSP layer glued onto the front of the card base
- Mango Melody CS layer glued onto the star DSP layer
- jack-o-lantern DSP layer glued onto the Mango Melody CS layer
- Basic White CS layer glued onto the jack-o-lantern DSP layer
- sweater adhered onto the Basic White CS layer using Black Stampin’ Dimensionals
- “i’m fine” letters adhered onto the star DSP layer using Black Stampin’ Dimensionals
- Mango Melody CS glued onto the inside of the card base
S
Here’s the October 2022 Inking Royalty Blog Hop:
Thank you for hopping along with us. If you get stuck during the Blog Hop, please use this line-up as a guide:
- Brian King at Stamp with Brian
- Renae Novak at Blessed by Cards
- Marilyn Jones at Stamp with MJ
- Ann Murray at Murray Stamps Ink
- Pam Morris at Tap Tap Stamp
- Candy Ford at Stamp Candy <—– YOU ARE HERE!
- Katie Ferguson at Cottage Paper
- Jan Dufour at Stamp Me Silly
- Jackie Beers at Blue Line Stamping
- Sue Jackson at Just Peachy Stamping
ss
Here are today’s colors:
You can click on each one to see all the products that come in that color!
S
Here’s what I used:
Click on these images for more details and to purchase. If you are reading this post in email, the product images may not show up. Please click here to see the post on my blog.
Supply List. <— Click for a clickable and printable list of the products!
S
Here are some helpful links:
S
Thanks for stopping by today, and Sweet Stamping!
Sep 12, 2022 | Autumn, Blog Hop, Cards, Gallery, Halloween |
 s
s
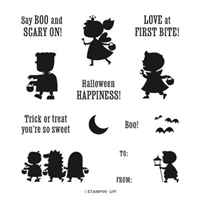
Welcome to the September 2022 Candy Hearts Blog Hop! It’s almost the time of year for all things spooky and fun. And Stampin’ Up! has all you need to make sure your treats are the cutest on the block. So today we’re sharing Halloween treat ideas. I used the Cracker & Treat Box Dies to create a cute little treat holder. I decorated some Designer Series Paper with washi tape, and added Metallic Mesh Ribbon which reminds me of silvery cobwebs. I used the Scary Cute stamp set for the sentiment – I inked only half of the sentiment at a time and stamped onto separate pieces of card stock.
After reading my post, I hope you will hop to the next person on the list below. Be sure to hop around to see ALL the great projects the Candy Hearts have created for you!
If you are reading this in email, some photos may appear blurry, or may not appear at all. Please click here to see the post on my blog.
S September 2022 Candy Hearts Blog Hop September 2022 Candy Hearts Blog Hop September 2022 Candy Hearts Blog Hop September 2022 Candy Hearts Blog Hop
Here’s what I made:

The front: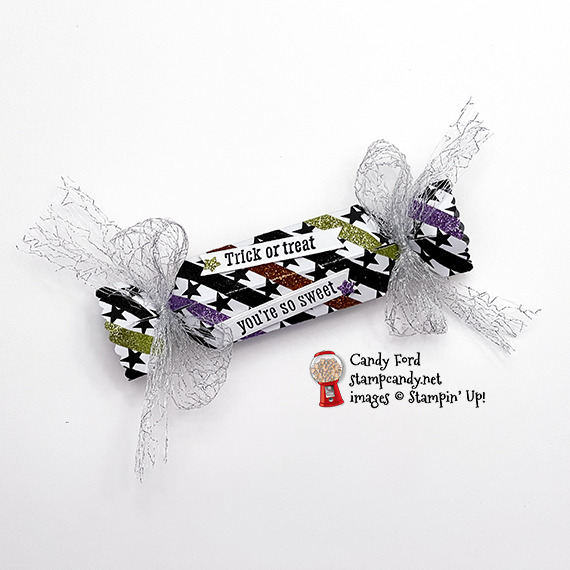
The back:

S
Here’s what I did:
Cut with my Paper Trimmer:
- Black & White Designs Designer Series Paper (DSP) cut to 6″ x 6″
- Basic White Thick CS cut to 2-1/2″ x 1″ (2 pieces)
Applied Glitter Washi Tape:
- onto the DSP between the rows of stars, alternating colors
Stamped with the Scary Cute stamp set:
- half of the sentiment in Tuxedo Black Memento ink onto each Basic White Thick CS piece
Die cut using the Cracker & Treat Box Dies:
- sentiments
- Washi Tape covered DSP
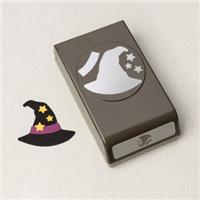
Cut using the Witch Hat Builder Punch:
- one small star from Old Olive Glitter Washi Tape
- one small star from Highland Heather Washi Tape
- TIP: When you press the punch, hold it closed until you can remove the star using a piercing tool. Then allow the punch to open, and tap gently on its side to release the scrap.
Cut using Paper Snips:
- 2 pieces of 1-1/2″ Metallic Mesh Ribbonx
Assembled the Treat Box:
- gently burnished the folds in the box with a Bone Folder
- adhered one end panel over the opposite end panel with Tear & Tape
- pinched together ends and tied ribbon around them and into a bow (Put in treats before closing the second end.)
- adhered sentiments onto two sides of the box, using Mini Stampin’ Dimensionals
- applied the washi tape stars onto the sentiments
S
Here’s the September 2022 Candy Hearts Blog Hop:
s
Here are today’s colors:
You can click on each one to see all the products that come in that color!
S
Here’s what I used:
Click on these images for more details and to purchase. If you are reading this post in email, the product images may not show up. Please click here to see the post on my blog.
Supply List. <— Click for a clickable and printable list of the products!
S
Here are some helpful links:
S
Thanks for stopping by today, and Sweet Stamping!
Aug 17, 2022 | Blog Hop, Cards, Gallery |
 s
s
Welcome to the August 2022 InKing Royalty Blog Hop! Can you believe it’s already time for schools to start back up?! The return to school after summer vacation is a really big deal for students, teachers, school workers and the parents who are left home alone. To honor this big event, we have created projects with a back to school theme. We are excited to share our creations and hope you love them! I used the *Apple Harvest bundle, *Playful Piggy Dies, and **Amazing Phrasing stamp set to create my Slimline card for today. After you read my post, I hope you’ll hop over to the next person on the list below.
* Apple Harvest bundle, Apple Blossoms Dies, and Playful Piggy Dies will be available to order 1-30 September 2022.
** Amazing Phrasing stamp set is available only until 31 August 2022, as a free Sale-a-bration item.
If you are reading this in email, some photos may appear blurry, or may not appear at all. Please click here to see the post on my blog.
S August 2022 InKing Royalty Blog Hop August 2022 InKing Royalty Blog Hop August 2022 InKing Royalty Blog Hop August 2022 InKing Royalty Blog Hop
Here’s what I made:

S
Here’s what I did:
Cut and scored with my Paper Trimmer:
- Basic Black card stock (CS) cut to 7″ x 8-1/2″, then scored in half at 3-1/2″
- Sweet Sorbet CS layer cut to 3-3/8″ x 8-3/8″
- Basic White CS layer cut to x 3-1/4″ x 8-1/4″
- Basic White CS layer cut to 3-1/4″ x 8-1/4″ for the inside of the card base
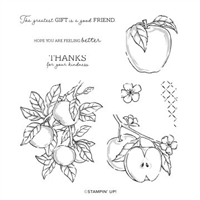
Stamped with the Apple Harvest stamp set:
- apple in Tuxedo Black Memento ink onto a scrap of Basic White CS
Stamped with the Amazing Phrasing stamp set:
- sentiments in Sweet Sorbet and Parakeet Party inks onto the Basic White CS layer
Colored using Stampin’ Blends Markers:
- apple in Sweet Sorbet and Parakeet Party
Cut using the Apple Blossoms Dies:
Cut using the Playful Piggy Dies:
- wagon from a scrap of Texture Chic Designer Series Paper (DSP)
- wheels and handle from a scrap of Basic Black CS
Cut using the Witch Hat Builder Punch:
- stars from a scrap of Daffodil Delight CS
Assembled the card:
- burnished the fold in the card base with a Bone Folder
- wheels and handle glued onto the DSP wagon
- apple glued onto the back of the wagon
- apple and wagon glued onto the Basic White CS layer
- stars glued around sentiments and apple – I dropped them from several inches above, and glued them where they landed. A few landed on top of the apple, so I re-dropped them.
- Sweet Sorbet CS layer glued onto the front of the card base
- Basic White CS layer glued onto the Sweet Sorbet CS layer
- plain Basic White CS glued onto the inside of the card base
S
Here’s the August 2022 InKing Royalty Blog Hop:
Thank you for hopping along with us. If you get stuck during the Blog Hop, please use this line-up as a guide:
- Brian King at Stamp with Brian
- Candy Ford at Stamp Candy
- Jackie Beers at Blue Line Stamping
- Pam Morris at Tap Tap Stamp
- Marilyn Jones at Stamp with MJ
- Jan Dufour at Stamp Me Silly
- Jessica Atchison at Stampin with the Atchisons
- Sue Jackson at Just Peachy Stamping
- Renae Novak at Blessed by Cards
- Robin Myren at Songbird Designs by Robin
s
Here are today’s colors:
You can click on each one to see all the products that come in that color!
S
Here’s what I used:
These items will be available to order 1-30 September 2022:
- Apple Blossoms Dies (160255)
- Playful Piggy Dies (160254)
Click on these images for more details and to purchase. If you are reading this post in email, the product images may not show up. Please click here to see the post on my blog.
Supply List. <— Click for a clickable and printable list of the products!
S
Here are some helpful links:
S
Thanks for stopping by today, and Sweet Stamping!
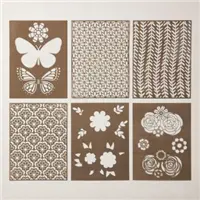
Mar 16, 2022 | Blog Hop, Cards, Gallery |
Welcome to the March 2022 InKing Royalty Blog Hop! As we prepare for Spring, flowers are always on our minds. We are sharing flower-themed projects with you today and hope you love them! After you read my post, I hope you’ll hop along to the next stop on the blog hop, Joanne Whittington at The Inky Dragon. There’s a lot of inspiration to be found in this group and you don’t want to miss it!I Thank you for stopping by today.
If you are reading this in email, some photos may appear blurry, or may not appear at all. Please click here to see the post on my blog.
S March 2022 InKing Royalty Blog Hop March 2022 InKing Royalty Blog Hop March 2022 InKing Royalty Blog Hop March 2022 InKing Royalty Blog Hop
Here’s what I made:

S
Here’s what I did:
Cut and scored with my paper trimmer:
- Polished Pink card stock (CS) cut to 4-1/4″ x 11″, then scored in half at 5-1/2″
- Granny Apple Green CS layer cut to 4″ x 5-1/4″
- Basic White CS cut to 4″ x 5-1/4″ for the inside of the card base
Stamped with the Easter Friends stamp set:
- sentiment in Granny Apple Green ink onto a scrap of Basic White Thick CS
Colored using the Butterflies & Flowers Layering Decorative Masks:
- vines onto the Granny Apple Green CS layer in Granny Apple Green ink using a Sponge Dauber
- flowers onto a scrap of Basic White Thick CS in Polished Pink and Melon Mambo inks using a Blending Brush
- leaves around the flowers in Granny Apple Green ink using a Sponge Dauber
Cut using the Everyday Label Punch:
Cut using Paper Snips Scissors:
- fussy cut the flowers & leaves
Assembled the card:
- burnished the fold in the card base with a Bone Folder
- white ribbon wrapped around the Granny Apple Green CS layer and adhered on the back with Tear & Tape
- Granny Apple Green CS layer glued onto the front of the card base
- sentiment adhered over the ribbon using Stampin’ Dimensionals
- flowers adhered using Stampin’ Dimensionals
- pearls applied onto two of the flower centers and onto the Granny Apple Green CS layer
- Basic White CS glued onto the inside of the card base
S
Here’s the March 2022 InKing Royalty Blog Hop:
Thank you for hopping along with us. If you get stuck during the Blog Hop, please use this line-up as a guide:
- Brian King at Stamp with Brian
- Marilyn Jones at Stamp with MJ
- Sue Jackson at Just Peachy Stamping
- Candy Ford at Stamp Candy <— YOU ARE HERE!
- Joanne Whittington at The Inky Dragon
- Jan Dufour at Stamp Me Silly
- Jackie Beers at Blue Line Stamping
- Lynn Kolcun at Avery’s Owlery
- Renae Novak at Blessed by Cards
- Sheryl Abernathy at Elegant Sentiments
- Pam Morris at Tap Tap Stamp
- Lisa Graham at Lisa’s Little Ink Spots
s
Here are today’s colors:
You can click on each one to see all the products that come in that color!
S
Here’s what I used:
Click on these images for more details and to purchase. If you are reading this post in email, the product images may not show up. Please click here to see the post on my blog.
Supply List. <— Click for a clickable and printable list of the products!
Here are some helpful links:
S
Thanks for stopping by today, and Sweet Stamping!