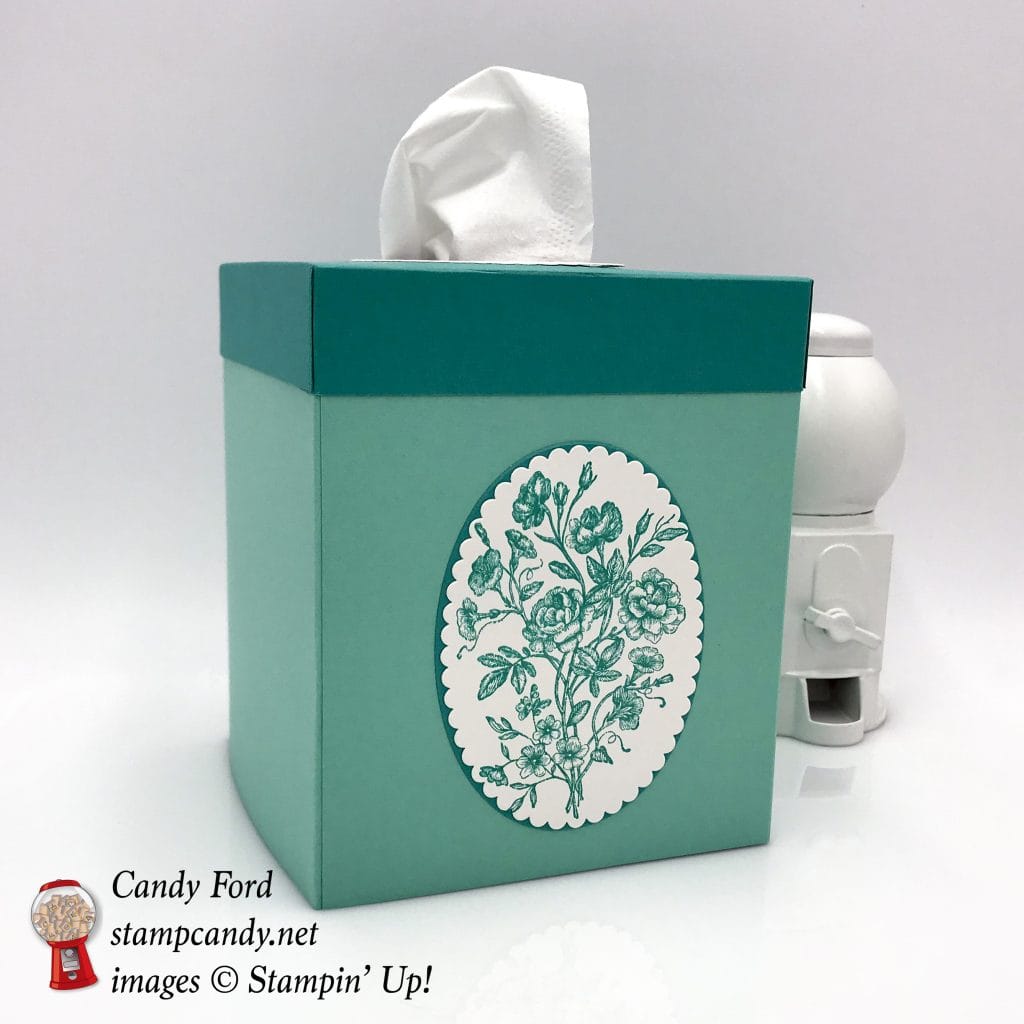
I can’t seem to get enough of the Very Vintage host stamp set. Especially the large floral image I’ve used today…..and the last few days. At least today’s project is a little different in that it isn’t even a card. It’s a tissue box cover. I like to make at least one whenever a new catalog comes out.
A tissue box cover comes in really handy when you want to match the decor of your room, or when you order a case of what you think are solid color boxes of tissues but instead receive a case with cartoon characters on them. Nothing against the cartoon characters, but they aren’t what I had planned on.
Here’s what I made:


Here’s what I did:
Cut and scored with my Stampin’ Trimmer:
- Coastal Cabana card stock (CS) cut to 9-1/2″ x 5-1/4″, then scored at 4-1/2″ and 9″ (2 pieces)
- Bermuda Bay CS cut to 6-9/16″ x 6-9/16″, and scored 1″ from each of the four edges
Stamped with the Very Vintage stamp set:
- floral image into Bermuda Bay ink onto a scrap of Whisper White CS
Die cut using the Layering Ovals Framelits:
- stamped image using a scalloped oval die
- a scrap of Bermuda Bay CS using a large plain oval die
- a scrap of Whisper White CS using a plain oval die and a larger scalloped oval die
- a hole in the Bermuda Bay box top using a plain oval die
- NOTE: the box top is wider than the Big Shot platform, so I folded in two opposite sides and used them to center the die
Cut using Paper Snips:
- one score line at each corner of the Bermuda Bay box top to create tabs
Assembled the cover:
- folded and burnished the score lines with a Bone Folder
- glued the skinny tab on each Coastal Cabana piece onto the inside of the other one, to create the main box
- glued the tabs onto the inside of the adjacent sides of the box top
- glued the die cut Whisper White oval frame around the hole in the box top
- the stamped image onto the die cut Bermuda Bay CS oval
- slipped the box top over the box, gluing the inside of the box top sides to the outside of the box sides
- glued the Bermuda Bay CS oval onto the front of the box, centering it between the bottom edge of the box top and bottom edge of the box
Here are today’s colors:
You can click on each one to see all the products that come in that color!
Here’s what I used:
Click on these images for more details and to purchase.
Here’s some information you should check out:
- Click here for your free catalog.
- Join my team to get a discount on your stamping supplies!
- SUBSCRIBE to my weekly newsletter and daily blog updates.
- June Host Code 9K74TMW4 – receive free product!
- Earn Gumball Rewards to receive free products!
- Gift Certificates are available in any U.S. dollar amount from me. Contact me for details.
Thanks for stopping by today, and Sweet Stamping!


more pictures of the progress would be nice. thank you!
I plan to make a new cover soon. I’ll be sure to include more photos of the assembly process. Thanks for the feedback, Simone!