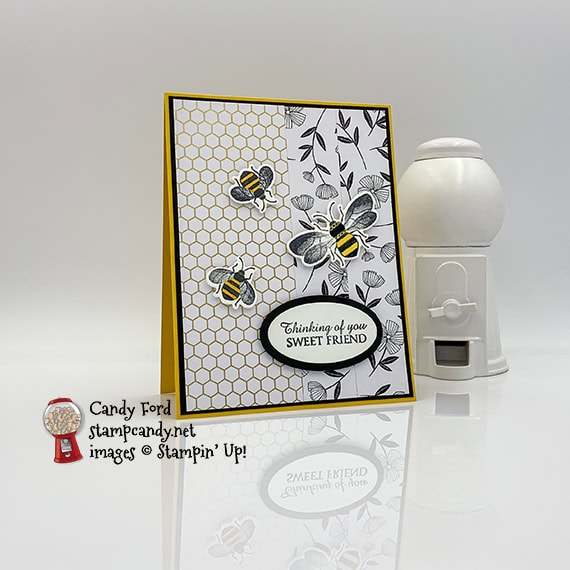
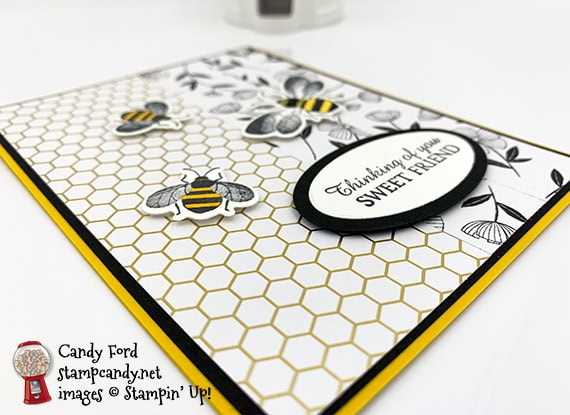
Today’s card is one I made for my January Stamp Club. I used the Honey Bee Bundle (Honey Bee stamp set and Detailed Bee Dies,) Layered Ovals Dies, and Golden Honey Specialty Designer Series (DSP) Paper to create this thinking of you sweet friend card.
The front most layer is made of two pieces of the DSP, one with gold foil honeycomb and one with black flowers. After I had cut all the Make & Take kits for the club, I only had 1″ wide strips of the floral DSP left. That’s why my card has two 1″ x 5-1/2″ pieces, instead of one 2″ x 5-1/2″ pieces, on the right side. You may not even have noticed, but in case you did, I wanted to explain the difference between the photo and the instructions.
bee bee bee
Here’s what I made:
S
Here’s what I did:
Cut and scored with my paper trimmer:
- Daffodil Delight card stock (CS) cut to 4-1/4″ x 11″, then scored in half at 5-1/2″
- Basic Black CS layer cut to 4-1/8″ x 5-3/8″
- Golden Honey Specialty Designer Series Paper (DSP) layer cut to 2″ x 5-1/4″ (2 pieces of 2 different designs)
- Whisper White CS cut to 4″ x 5-1/4
Stamped with the Honey Bee stamp set:
- sentiment in Tuxedo Black Memento ink onto a scrap of Whisper White CS
- one large and two small bees in Tuxedo Black Memento ink onto a scrap of Whisper White Thick CS
Cut using the Detailed Bee Dies:
- 3 stamped bees
Cut using the Layering Ovals Dies:
- sentiment
- scrap of Basic Black CS
Colored using Stampin’ Blends Markers:
- bee stripes in Daffodil Delight
- Note: I used the light marker on the large bee and the dark marker on the small bees. You can decide which you like better. I think the light matches the cardstock better, and the dark looks more like a real bee.
Assembled the card:
- burnished the fold in the card base with a Bone Folder
- Basic Black CS layer glued onto the front of the card base
- 2 DSP layers glued, side by side, onto the Basic Black CS layer
- sentiment glued onto the Basic Black CS oval
- Basic Black CS oval adhered onto the DSP layers using Black Stampin’ Dimensionals
- bees adhered onto the DSP layers using Stampin’ Dimensionals and Mini Stampin’ Dimensionals
- Whisper White CS glued onto the inside of the card base
S
Here are today’s colors:
You can click on each one to see all the products that come in that color!
S
Here’s what I used:
Click on these images for more details and to purchase.
Click “Supply List” for a clickable and printable list of the products!
S
Here are some helpful links:
- Shop my online store
- Sale-a-bration!
- Clearance Rack
- SUBSCRIBE to my weekly newsletter and daily blog updates.
- February Host Code SYG4ATBH – receive free product!
- Paper Pumpkin: buy a Prepaid Subscription or subscribe month to month
- Earn Gumball Rewards – receive free products!
- Gift Certificates are available in any U.S. dollar amount from me. Contact me for details.
- Have you shopped from me within the past year? Join my private VIP Facebook group for exclusive project tutorials and more!
- Join my team and enjoy a 20% discount (or more) on all your purchases! You choose $125 in products and pay only $99, and get free shipping! No obligation! No selling required! AND NOW, only during Sale-a-bration, you’ll also receive an exclusive Mini Paper Cutter a 6″ x 6″ Sampler of Designer Series Paper from the new Mini Catalog, and another stamp set of your choice.
S
Thanks for stopping by today, and Sweet Stamping!

