Dec 1, 2014 | Cards, Christmas |
I love figuring out new ways to use stamp sets, especially when I can use multiple sets together. For this card I used four.
Of course, I’ve been focusing on Christmas cards lately, but I started looking at my non-Christmas themed stamp sets to see how I might be able to get them in the mix. When I saw the toys in the Boys Will Be Boys set, I knew they would look great under a tree.
This is my first version.

But then I decided it needed a little something else, so I added another layer of Basic Black card stock. Better, don’t you think?

For the toys under the tree, I stamped the images on different colors of card stock, then fussy cut them with my Paper Snips. I attached them to the card front with Stampin’ Dimensionals for a 3D feel. Well, except for the little paratrooper – he was so small I used a couple of glue dots folded in half.

The tree boughs are from the Ornamental Pine stamp set. I heat embossed them in black for a silhouette effect.
The sentiment is pieced from three different stamp sets. “Sending wishes for the merriest Christmas ever” is from Partridge & Pears. “To the” is from Label Love. “Best kid ever” is from Boys Will Be Boys.
I used my Basic Black Stampin’ Write Marker to ink up just the part of the stamp I needed.

The Stamp-a-ma-jig was crucial to get the sentiment parts lined up.
Did you notice the Basic Black Baker’s Twine? It’s there in two places. I separated the strands. I used the black for the parachute strings and the white to hang the tag on the tree.
Here’s what I used:
Thanks for stopping by today, and Sweet Stamping!
Nov 28, 2014 | Cards, Christmas |
I’ve been collecting stamp sets for a while now, so I have quite a few I haven’t even used yet. I’m slowly making my way through these new sets. This card uses the Wintertime stamp – one big stamp that is really gorgeous. I paired Crisp Cantaloupe with Night 0f Navy, with just of touch of white from the pearls.
I think the dots in the design lend themselves to pearls and rhinestones.

And as always, Stampin’ Dimensionals give it some oomph.
You know I always have to add more doodahs. I thought the snowflakes would add to the card, but I think I prefer it without.
Which do you like better?


Here’s what I used:
Thanks for stopping by today, and Sweet Stamping!
Nov 27, 2014 | Cards, Christmas |
I just loooove the All Is Calm DSP. The combination of Soft Sky, Lost Lagoon and Whisper White is very soothing, and that’s a nice thing during the hustle and bustle this season can bring.
The vertical lines in this sheet give the feeling of falling snow.

Stampin’ Dimensionals separate the layers for a more interesting look.

Here’s what I used:
Thanks for stopping by today, and Sweet Stamping!
Nov 24, 2014 | Christmas, Decor |
When I was making some Geodesic ornaments I looked at the belly band and thought it might make a cute napkin ring. And I was right! You may recognize this one from an earlier post (see how to make geodesic ornaments here.)
It was cute as it was:

but of course I had to add some doodahs to it:

I think I’ll make more of these. Oooooh, maybe even for gifts! Aren’t I clever?
Thanks for stopping by today, and Sweet Stamping!
Here’s what I used:
Nov 19, 2014 | Blog Hop, Christmas, Gift Wrap |

Welcome to the November InKing Royalty Blog Hop. We’re excited to share projects that showcase fun gift wrap and packaging ideas for the holidays.
You may have started the Blog Hop here or may have hopped over from Angie Coleman at Coastal Stamping. After you read my post, I hope you’ll hop over to the next. If you get off track at any point during the blog hop, there’s a complete list of participants at the end of this post.
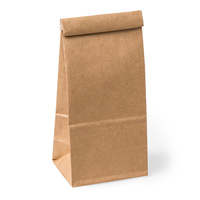
Funny story. I was on my way to the Stampin’ Up! convention in July. I bought some food on the plane (I’m being very liberal with the word food here – it was inedible) but it came in a cafe bag with the roll down top. I thought, these would make such great gift bags, and they’d be so easy to decorate. I’m gonna find some for Christmas gifts this year. Skip to the next day at convention when we got our Holiday Catalogs, and what did I find on page 10? Petite Cafe Gift Bags! I couldn’t believe it.
I have loved the old animated TV show, Rudolph the Red Nosed Reindeer since I was a child. Silver and Gold sung by Burl Ives was one of my favorites songs from that show. Why do I mention this? Because I’m combining the Petite Cafe Bag with Silver and Gold!

I’m afraid my lighting just isn’t right to capture how pretty this is. But trust me, in person the silver and gold really show. I tried to get some shots that showed the shininess, but the silver and gold look sort of blue and green. I hope you can at least get an idea of what it really looks like.


The tags – I stamped one in silver, one in gold, and one in baked brown sugar to match the bag. I tied them onto the silver ribbon with linen thread. I like the look of the shiny metallics against the matte brown.


Thank you for stopping by today. I hope you’ll hop along to the next stop on the blog hop, Kelly DeTommaso at Kelly’s Creative Corner. You certainly won’t want to miss any of these projects.
Thanks for stopping by today, and Sweet Stamping!
Candy Ford
- Lynn Kolcun at Avery’s Owlery
- Angie Coleman at Coastal Stamping
- Candy Ford at StampCandy
- Kelly DeTommaso at Kelly’s Creative Corner
- Amy Whelan at Amy’s Inklings
- Katie Ferguson at Cottage Paper
- Brian King at Stamp with Brian
- Becky Volpp at Ink Blossom with Becky
- Pam Morris at Tap Tap Stamp
Here’s what I used for this project:
Nov 16, 2014 | Christmas, Decor |
Ever had one of those days? I got to Brian King’s house yesterday morning for his Craft Garage Sale (which was awesome) only to discover I was wearing mismatched shoes. Actually Brian noticed it before I even got to the front door and said, “Do you know that you’re wearing different shoes?” Otherwise I may have never noticed!

Since it was “one of those days” I didn’t get to create something new for today’s blog post. So I went to my stash/stache and pulled out this great little item. Earlier this month a group of Stampin’ Up! Demonstrators gathered for a shoebox swap. This is one of the projects we got to make. Megan Quillen brought it. Isn’t it adorable? Thanks, Megan!

The image from the Santa Stache stamp set was stamped in Tuxedo Black Memento Ink on Whisper White card stock. We colored it with Stampin’ Blendabilities markers, cut it out with Paper Snips, and added some Rhinestone Basic Jewels. Then we adhered the layers with Stampin’ Dimensionals.
There was one more step that I opted to omit because I was afraid it wouldn’t dry before I had to pack everything up and go home. Most people traced over the lines of the mustache with Dazzling Details (124117) which gave it a nice glimmery look.

Onto the back we glued a wooden clothes pin that had a small magnet glued to it.
This little guy now lives on my refrigerator to hold notes, coupons, wish lists, whatever.
Projects like this are so quick and easy, but make a big statement. And they make perfect small gifts. I like to make up some extras to have on hand for those unexpected situations – like maybe I feel I should give something to the mail carrier, or the bank teller, etc.
Here’s what we used:
Thanks for stopping by today, and Sweet Stamping!