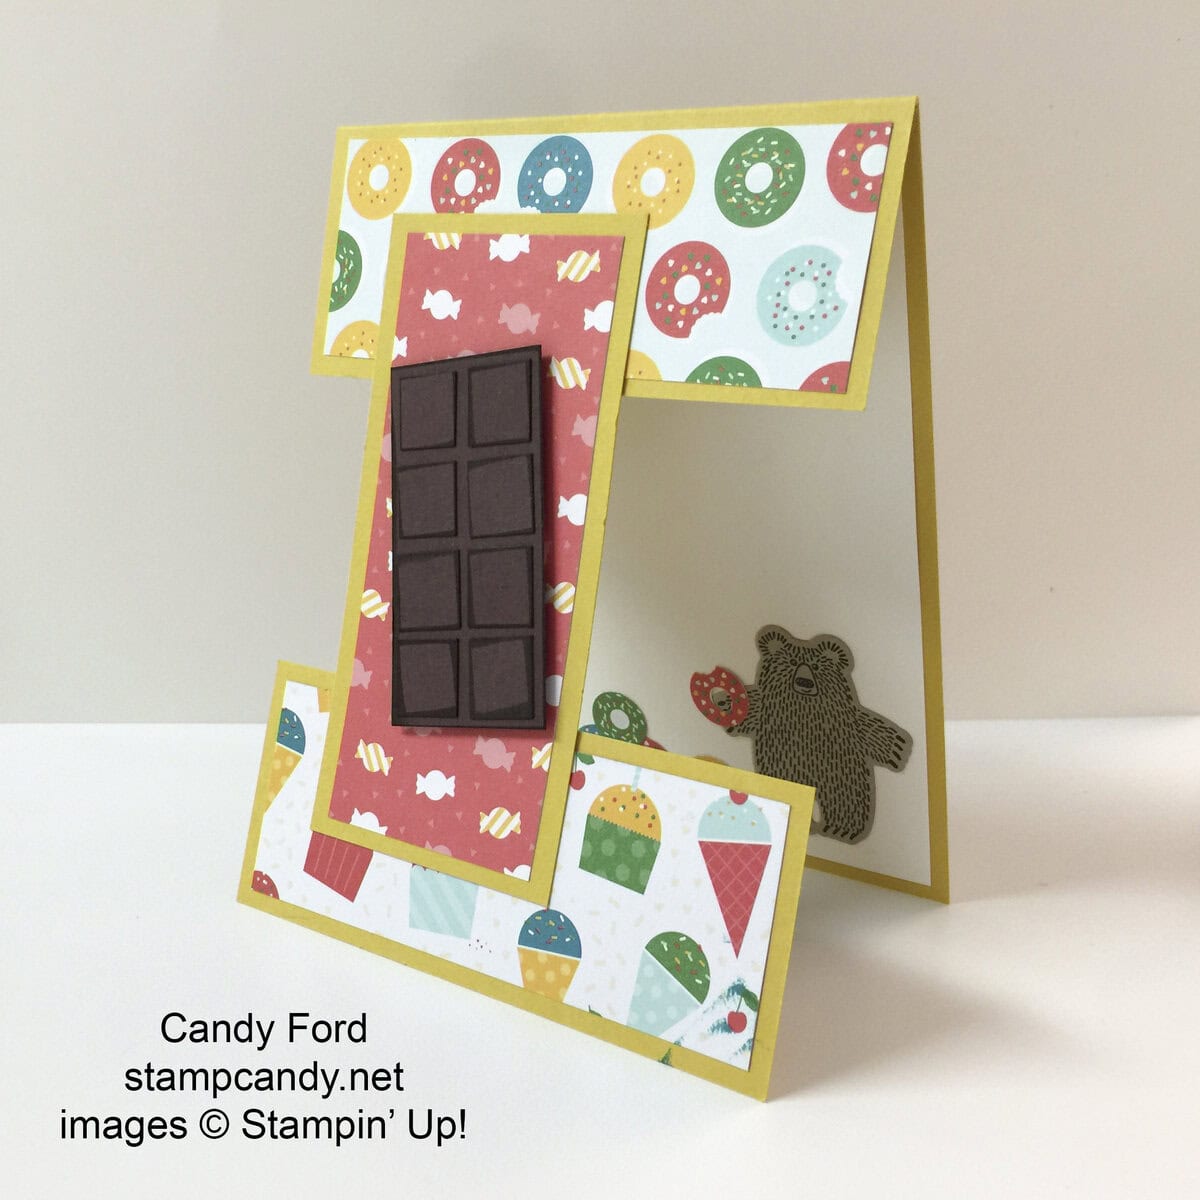
Today I’m sharing another project we made in this month’s Bundle Class, which featured the Bear Hugs stamp set and Framelits. You can see the first two here and here.
The Cherry on Top Designer Series Paper Stack provided the inspiration for this card. Wouldn’t you love to overload on all these sweets? I know this little bear would!
For the card base, cut Crushed Curry card stock to 4-1/4″ x 11″, and score at 5-1/2″. That will give you the basic vertical tent card. Now cut 1-1/2″ off one end, then another 2″ off the same end. Turn the 2″ panel vertically and glue the ends to the other two pieces, to achieve the card shape shown.
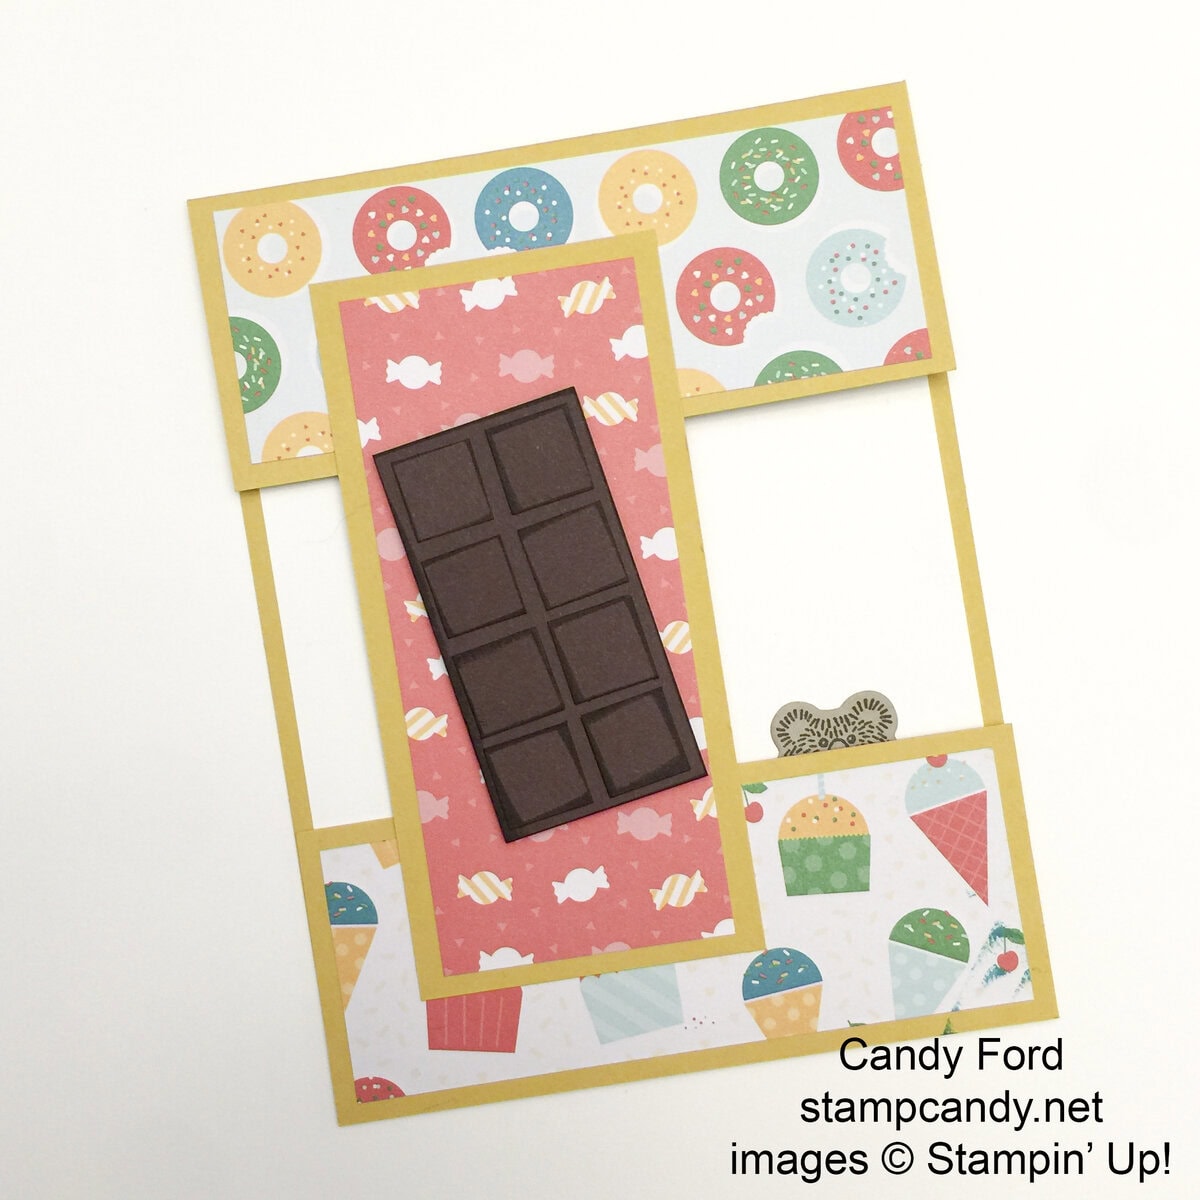
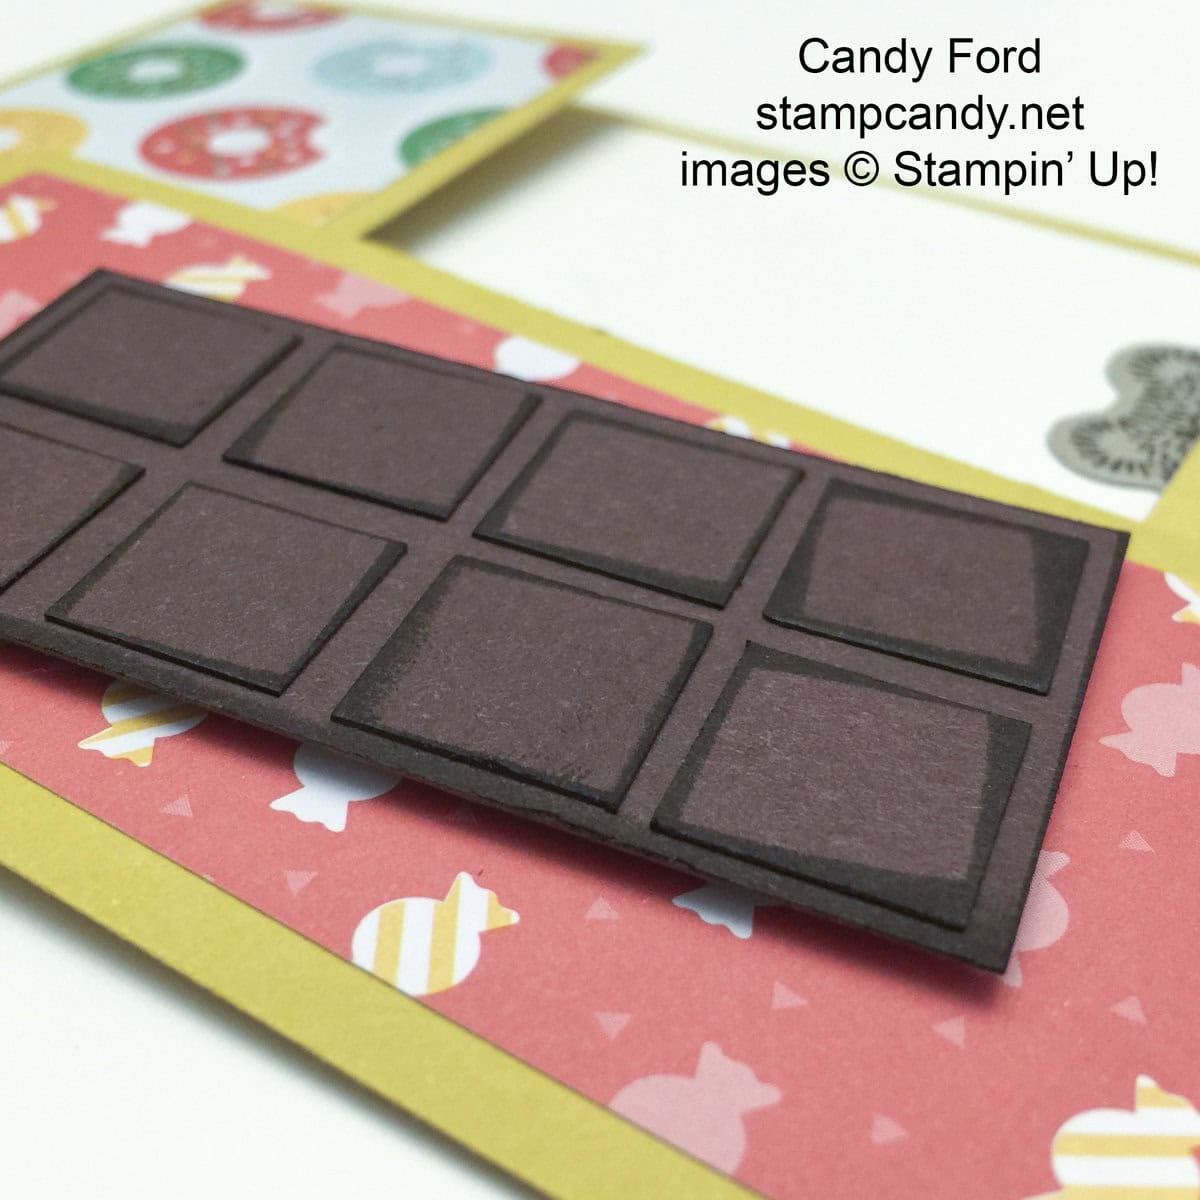
All the panels on the front are from the DSP stack. The chocolate bar is made from Chocolate Chip card stock. Each piece is edged in Chocolate Chip ink before gluing them together. It’s attached to the card panel with Stampin’ Dimensionals.
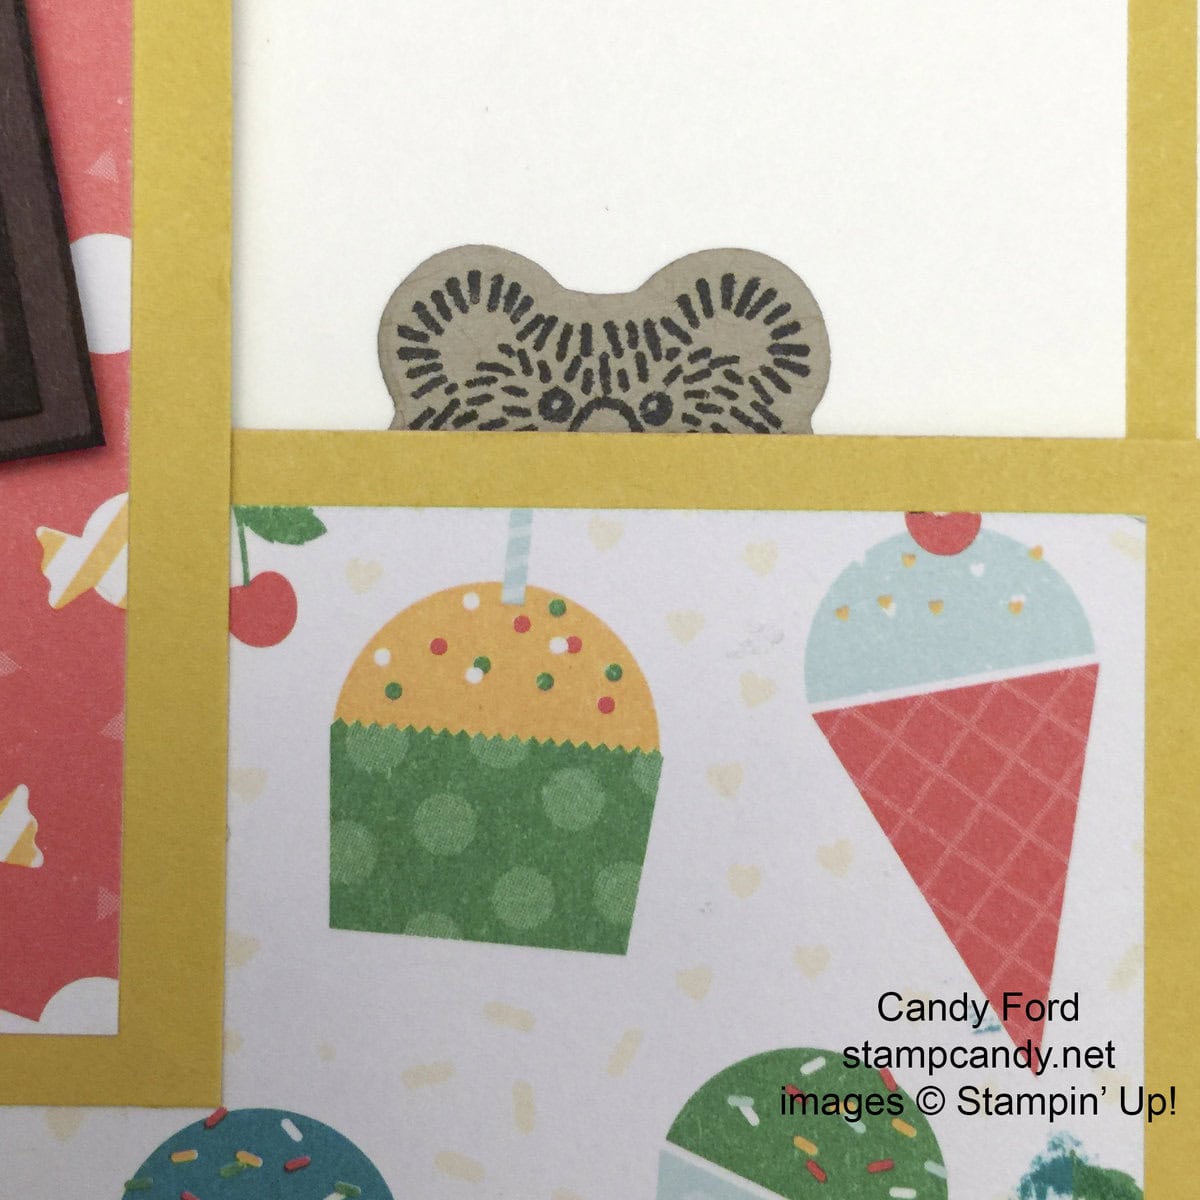
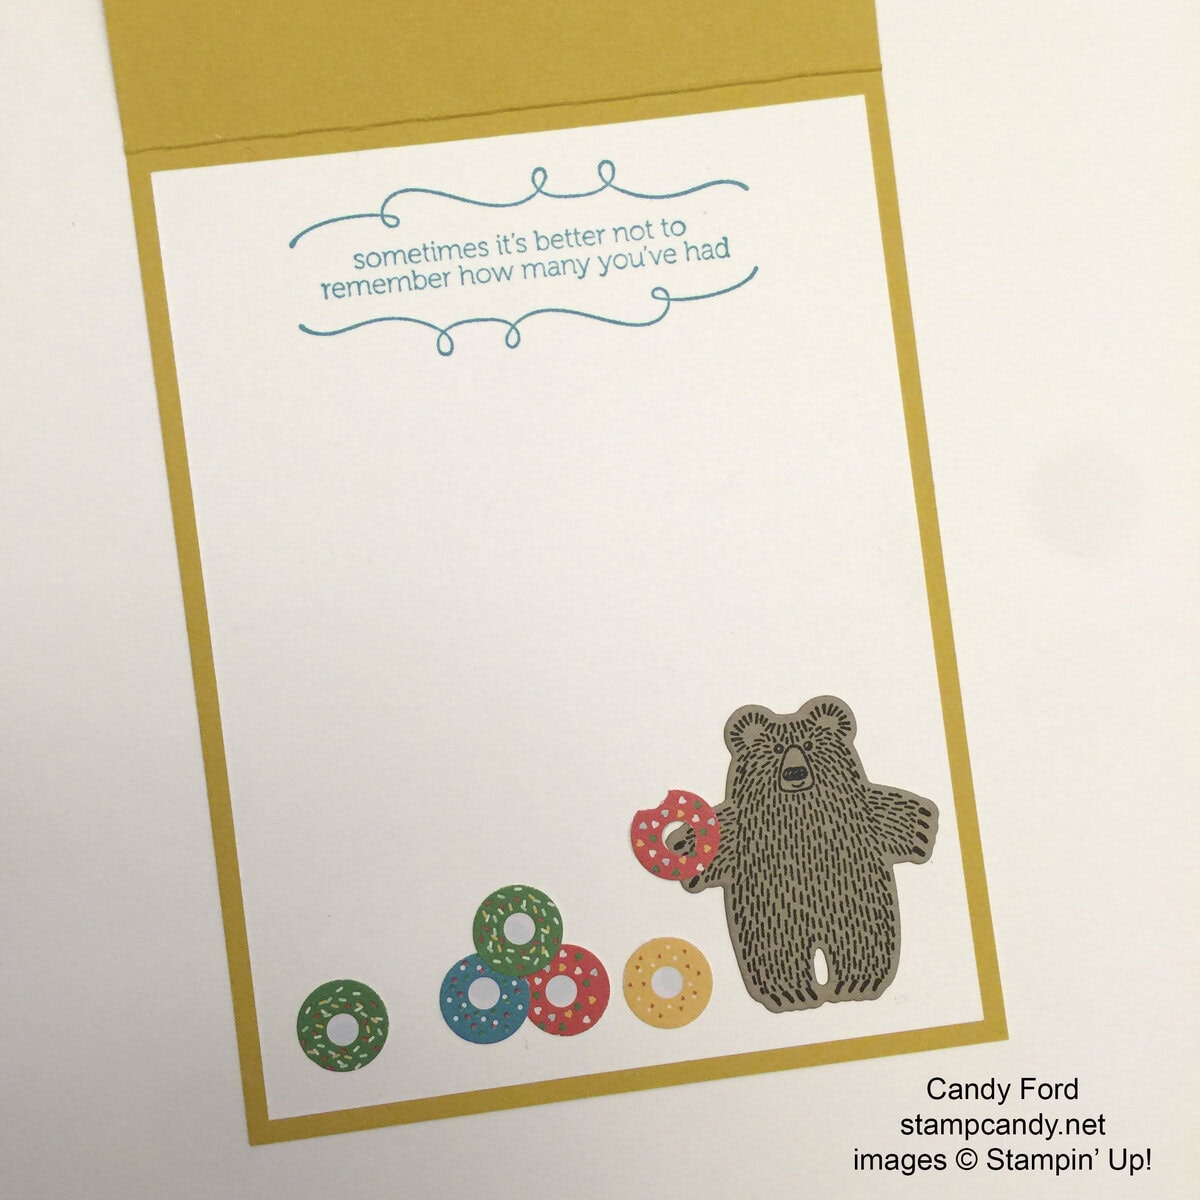
The sentiment, from the Sprinkles on Top stamp set, is stamped in Bermuda Bay ink onto Whisper White card stock, which is glued to the card’s interior. The small bear is stamped in Basic Black Archival ink onto Tip Top Taupe card stock, cut with the coordinating die, and glued to the interior. The doughnuts are punched from the DSP with the 1/2″ Circle Punch, which is a little smaller than the doughnut images, but that’s okay. It just makes these doughnuts a little smaller than the ones on the front of the card. They glued to the interior as well.
When decorating this interior piece, make sure nothing shows when the card is closed except what you want to show, like the little bear peeking out.
Peep-eye! One of my favorite things about this card is the little bear peeking out.
Here’s what we used:
There are only 5 days left to shop from the 2015-2016 Annual Catalog’s Retiring List! Click here to shop what is still available.
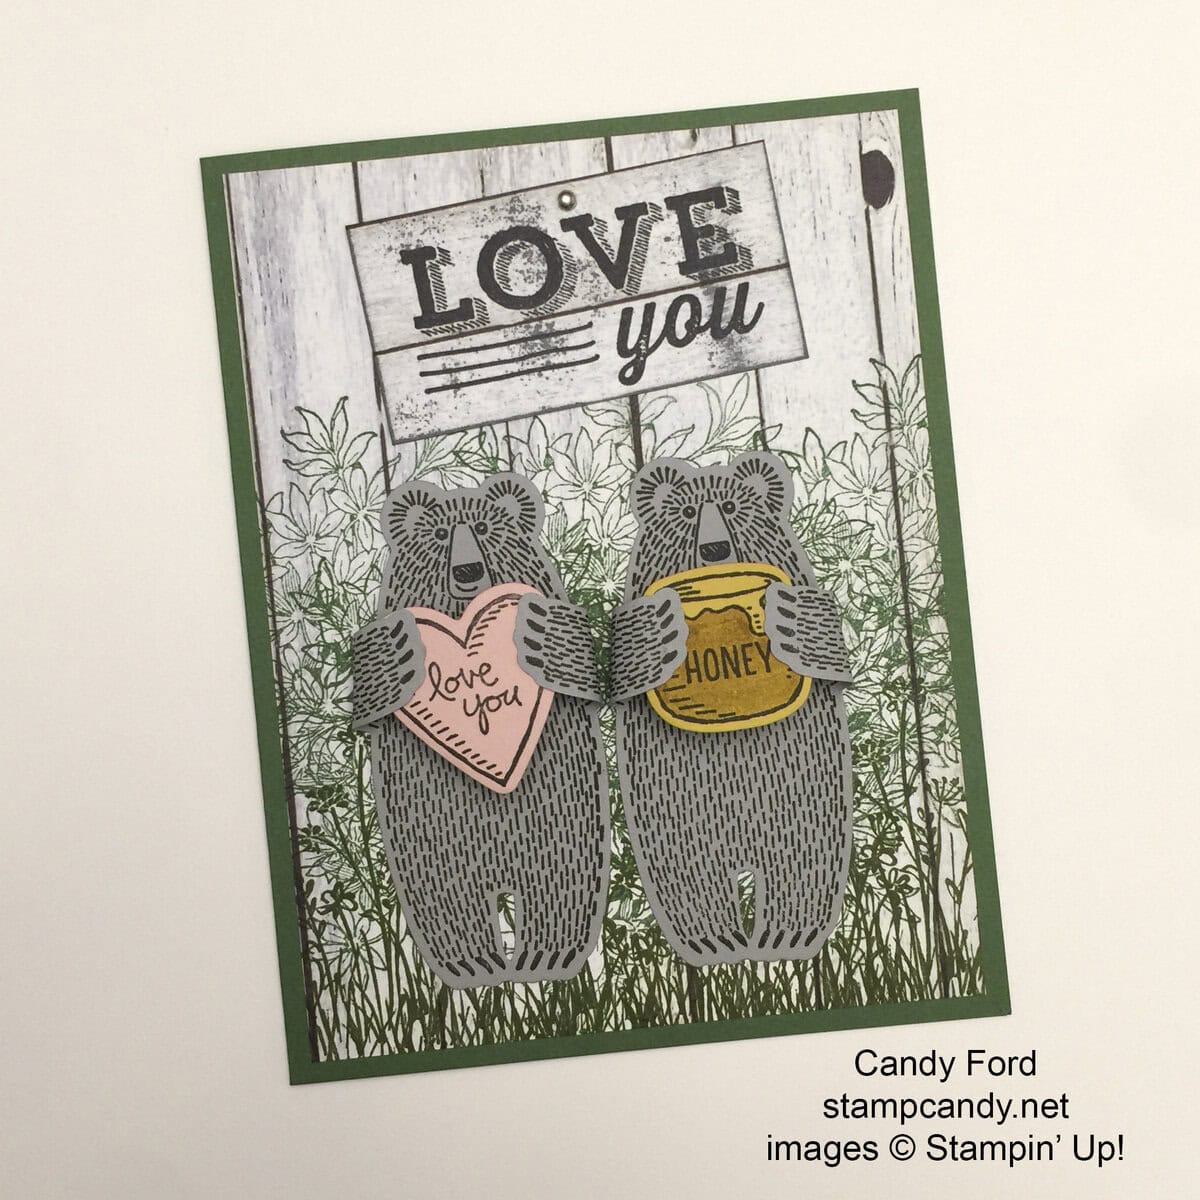
Today I’m sharing another of the projects we made in this month’s Bundle Class, which featured the Bear Hugs stamp set and Framelits. You can see the first one here.
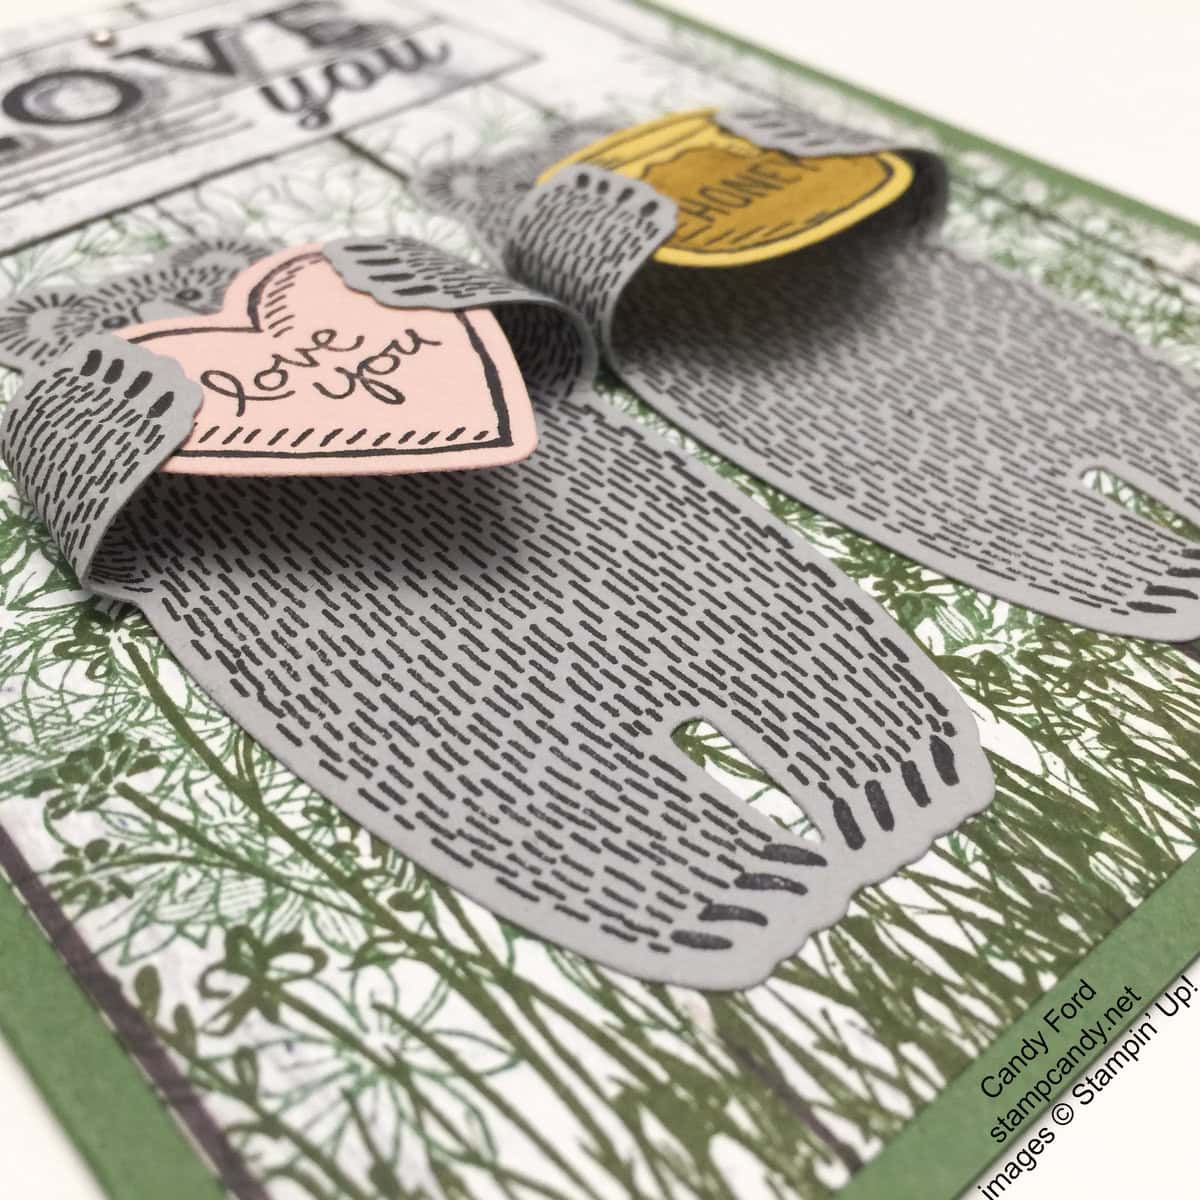
Do you see my mistake on this card? The sentiment on the items the bears are holding is, “Love you, Honey.” I wanted to the sign on the wall behind them to complement that sentiment. But when I was looking at my stamp sets, I became more concerned with the size of image. I chose the “Love you” stamp from the Friendly Wishes stamp set. It wasn’t until the card was completed that I realized I had doubled the “Love you” sentiment. So now the card says, “Love you love you, Honey,” which I suppose is okay, but not what I had in mind. In class, we used the “Happy Anniversary” stamp from the Timeless Love stamp set which worked much better. The sign could also say Happy Birthday, Congratulations, or anything else you might want to say to your honey bear.
The card base is Garden Green card stock.
For the card front, we used a piece of Farmer’s Market Designer Series Paper. We stamped directly onto the DSP. In Mossy Meadow ink, we stamped foliage and grass from the In the Meadow stamp set. In Garden Green ink, we stamped the largest image from the Awesomely Artistic stamp sets. Then we glued the card front to the card base.
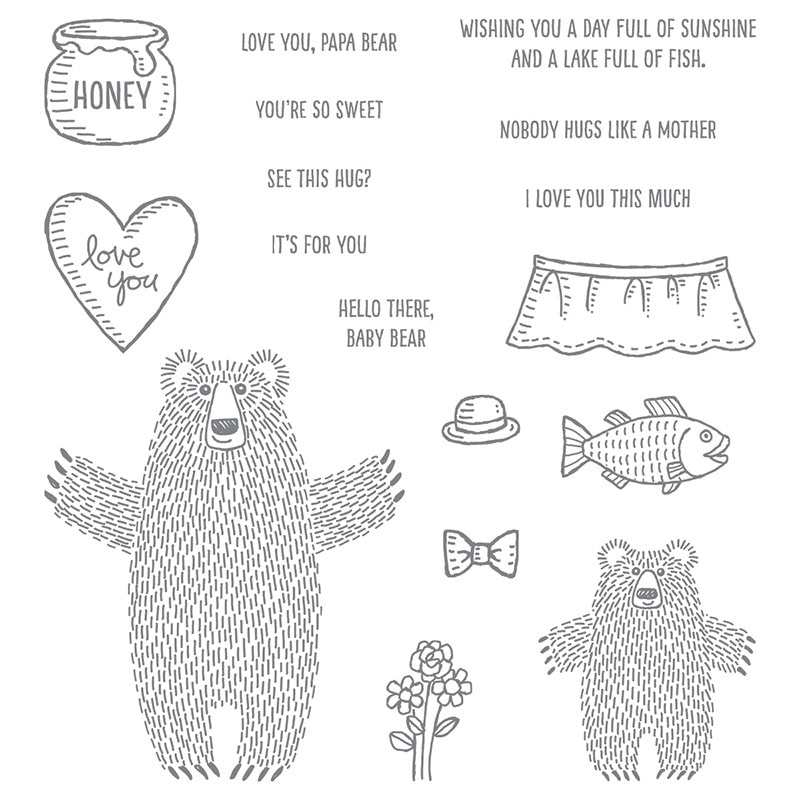
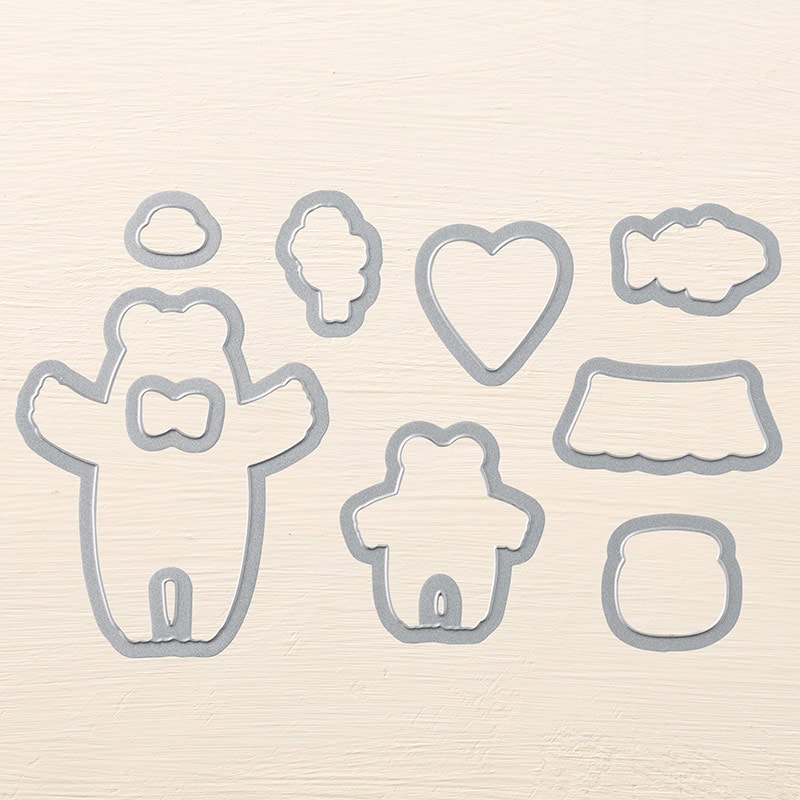
We stamped the bears in Basic Black Archival ink onto Smoky Slate card stock, then cut them with the coordinating die. We then used a Stamp-a-ma-jig to stamp again on the back side of the bears. We used a bone folder to curl the arms.
We used the same black ink to stamp the heart onto Blushing Bride card stock and the honey jar onto Crushed Curry card stock, then cut them with the coordinating dies. We colored in the jar with a Delightful Dijon Stampin’ Write Marker.
We used a tiny dot of glue to attach each of the bears’ paws to the item they are holding. Then we glued the bears onto the card front.
If you intend to mail this card, you should put some Stampin’ Dimensionals under the heart and jar, unless you don’t mind if they get smashed flat. If you are hand delivering it, you should be fine without them.
We stamped the larger sentiment onto a piece of the same DSP, then cut it down to size. We inked the edges of the sign, still using the same black ink. We also dirtied up the front by gently laying it face down on the ink pad and just barely pressing down in a few spots. We used a Paper Piercing Tool to poke a hole in the sign and inserted a 1/8″ Mini Brad, so it would look like the sign is hung on the wall with a nail. We then glued the sign to the card front, a little askew.
Here’s a video from Stampin’ Up! featuring the Bear Hugs Bundle, including how to stamp on both sides of the bear using the Stamp-a-ma-jig:
There are only 6 days left to shop from the 2015-2016 Annual Catalog’s Retiring List! Click here to shop what is still available.
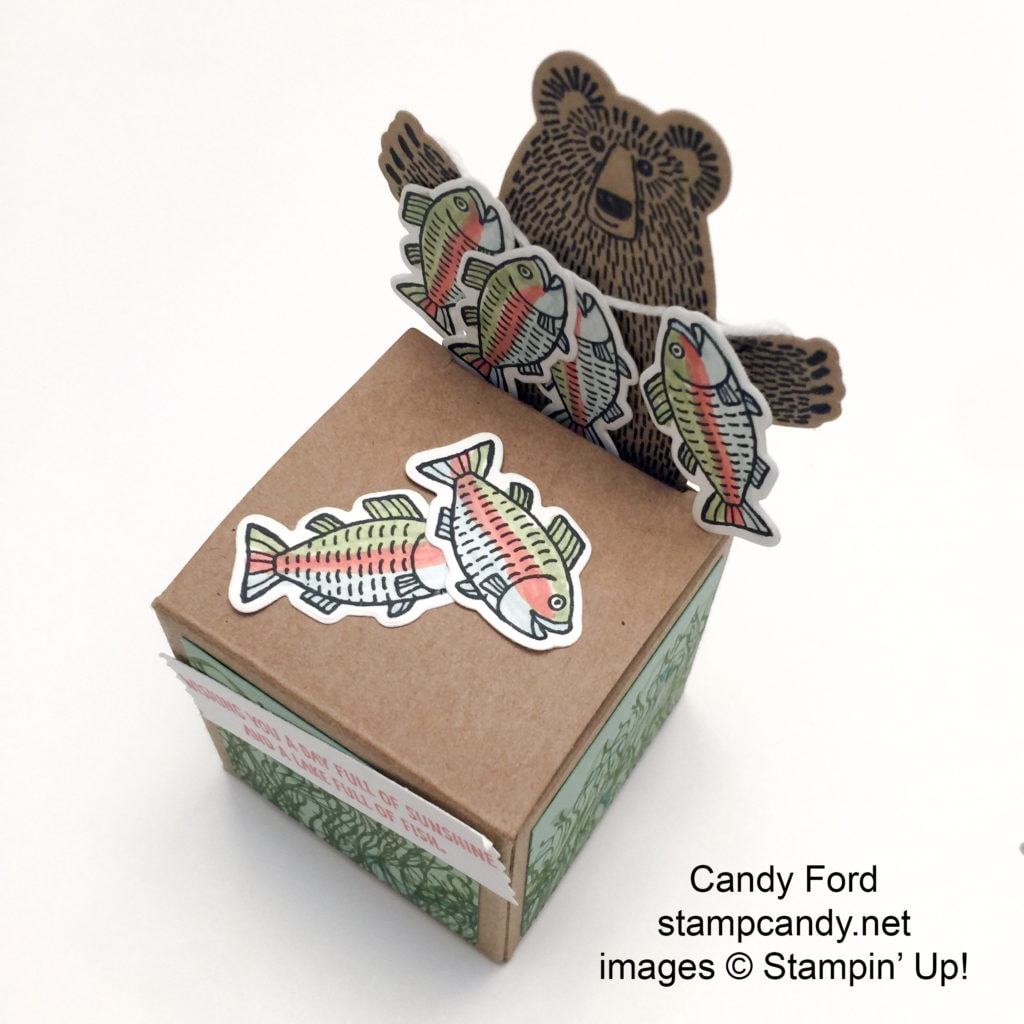
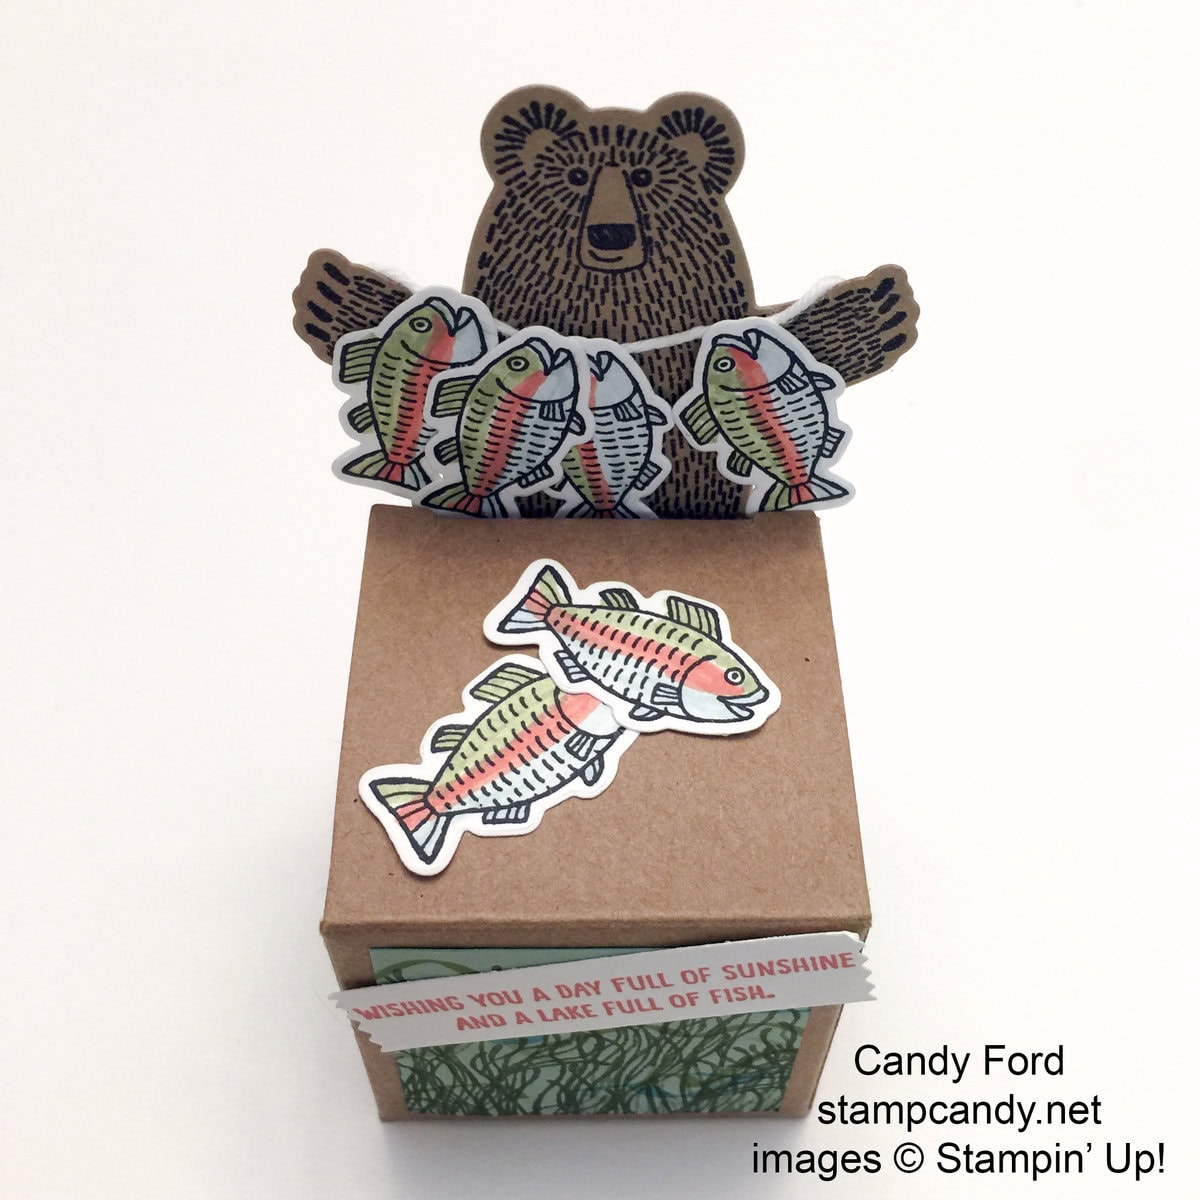
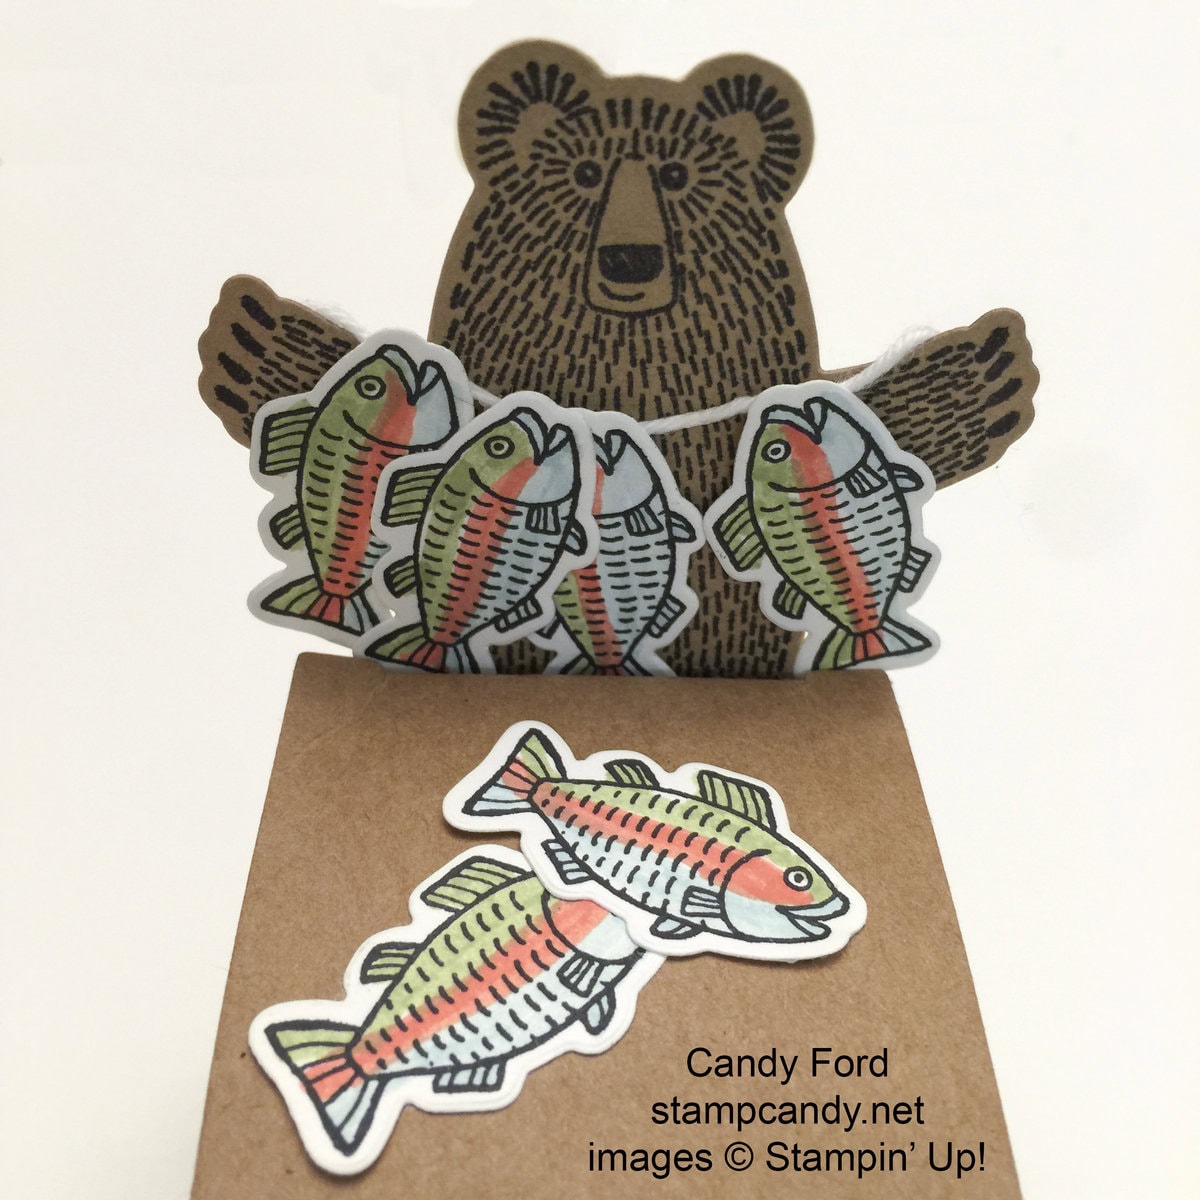
Today I’m sharing one of the projects we made in my recent Bear Hugs Bundle Class. It’s an adorable little box perfect for anyone who enjoys sunny days and fishing, or cute bears and fish!
We began by stamping the large bear in Basic Black Archival ink onto Crumb Cake card stock. We used the same black ink to stamp the fish onto Whisper White card stock. We colored the fish with Soft Sky, Calypso Coral, and Pear Pizzazz Stampin’ Write Markers. Then we cut out the images with the Bear Hugs Framelits Dies.
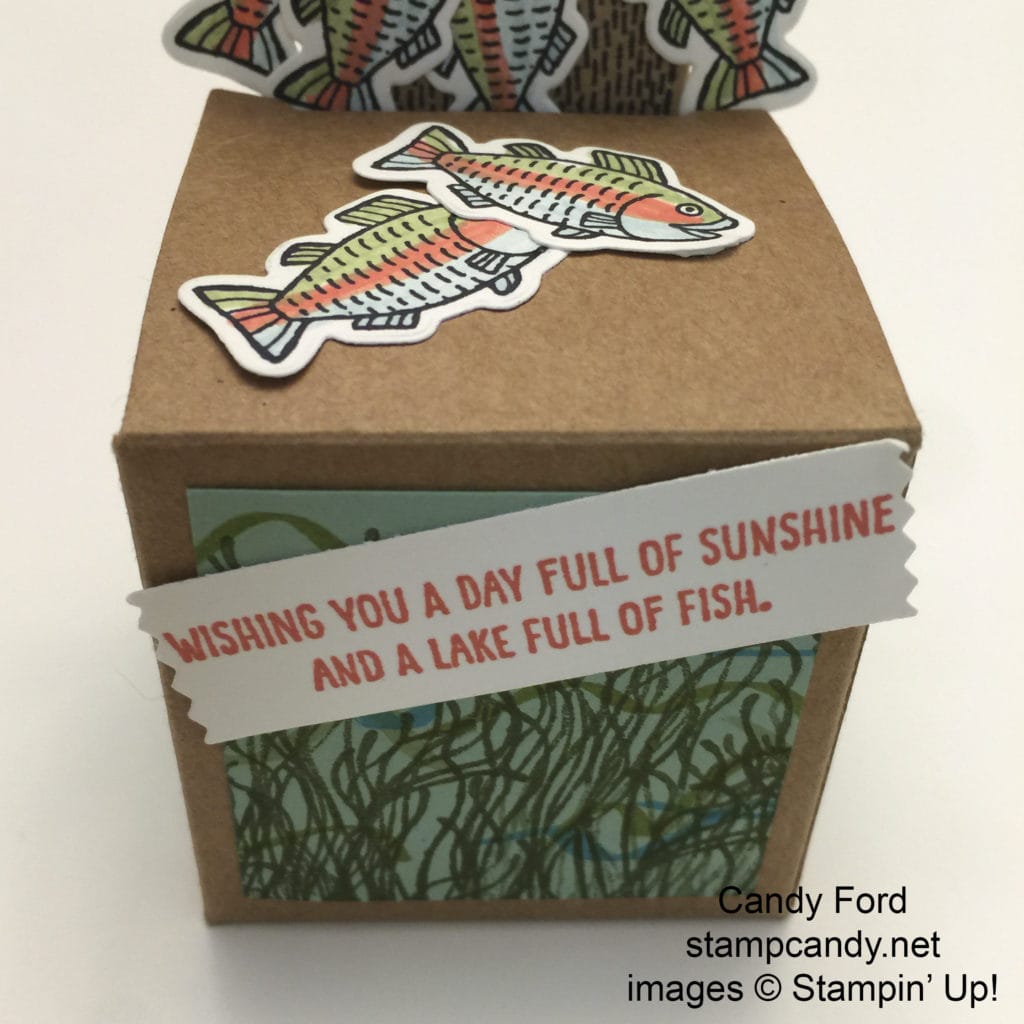
We stamped the sentiment in Calypso Coral onto Whisper White card stock and cut it out with the Washi Label Punch.
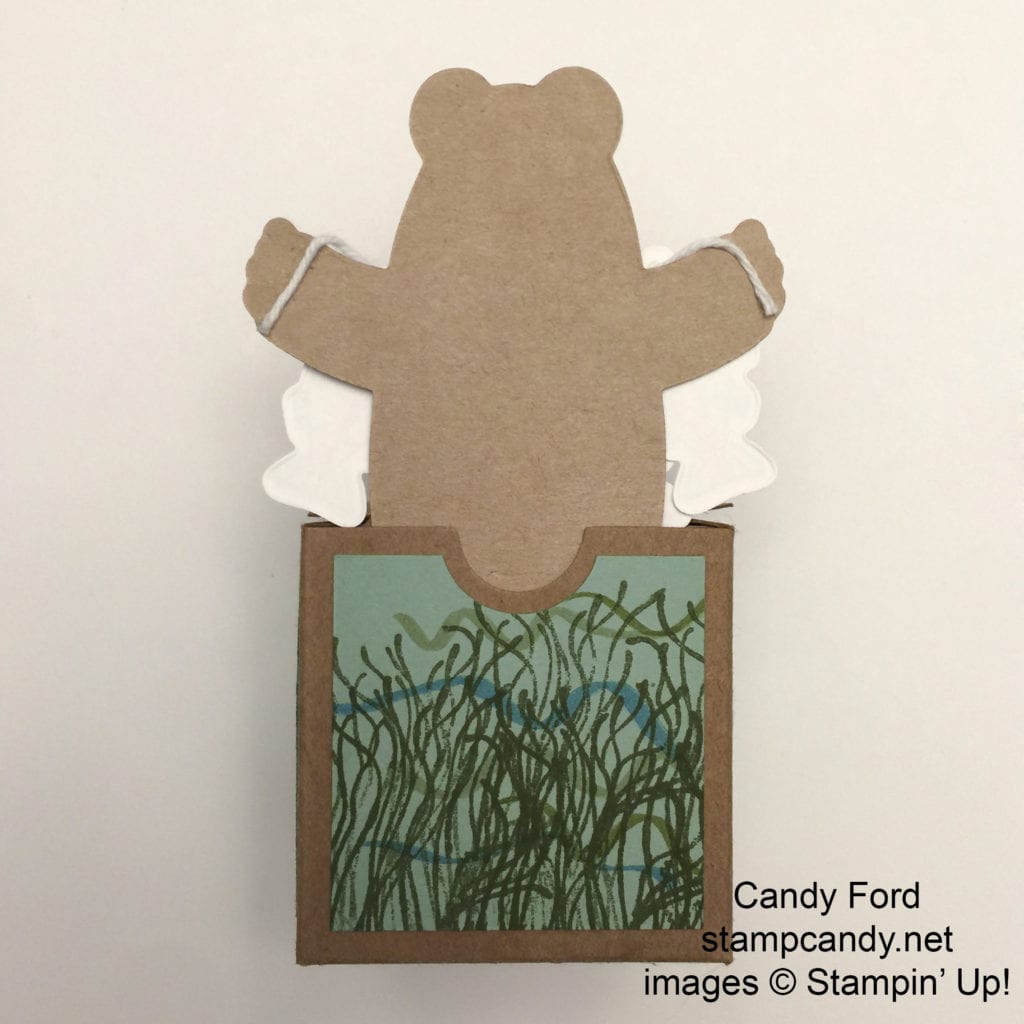
We cut a piece of Pool Party card stock to 1-3/4″ x about 7″ and drew squiggly lines with Old Olive and Tempting Turquoise Stampin’ Write Markers. Then we stamped in Mossy Meadow ink the “seaweed” (or whatever the stuff groing at the bottom of a lake is called) using the jellyfish from the From Land to Sea stamp set upside down – the tentacles made the perfect swaying plants. We then cut the strip into four 1-3/4″ squares. We used the 3/4″ Circle Punch to cut a notch in the top of one square to accommodate the round notch in the top of the box front. We glued the other squares to the other sides.
Back view:
We glued the sentiment to the back of the box, which we’re using as the front.
We glued two fish to the top of the box.
We glued some fish to a piece of Whisper White Baker’s Twine, then attached the ends of the twine to the bear’s hands. Kimberly cut between two of the bear’s fingers and slipped the twine between them. Brilliant! I wish I had thought of that! I glued mine to his hands.
We glued the back of the bear’s legs to the inside of the box on the front side. Now when you close the it, the bear is coming up from inside the box with his string of fish.
Here’s what we used:
There are only 7 days left to shop from the 2015-2016 Annual Catalog’s Retiring List! Click here to see what is still available.
Today I’m sharing the fourth and final project from the Birthday bouquet class. You can see the previous three projects here, here, and here.
Since most of the group were scrapbookers, we used many of the same supplies to create this lovely traditional scrapbook page.
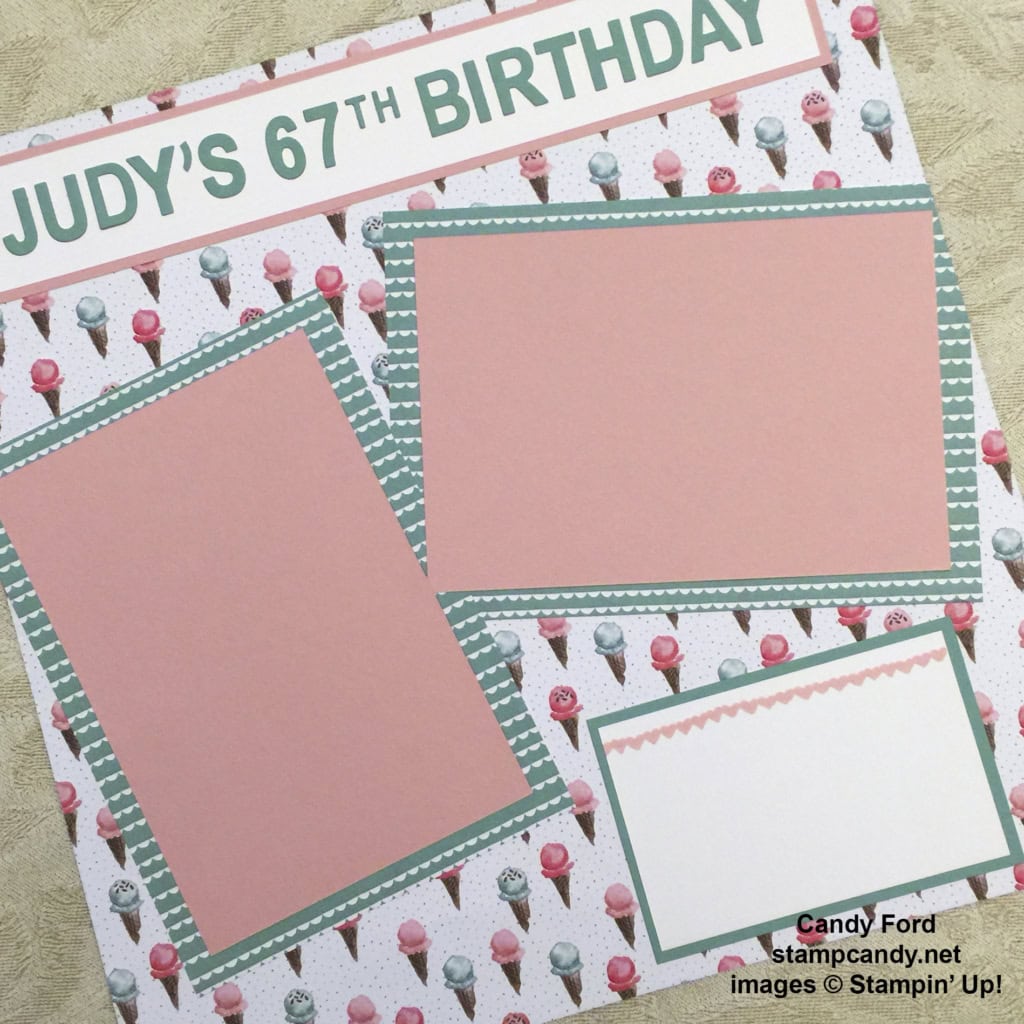
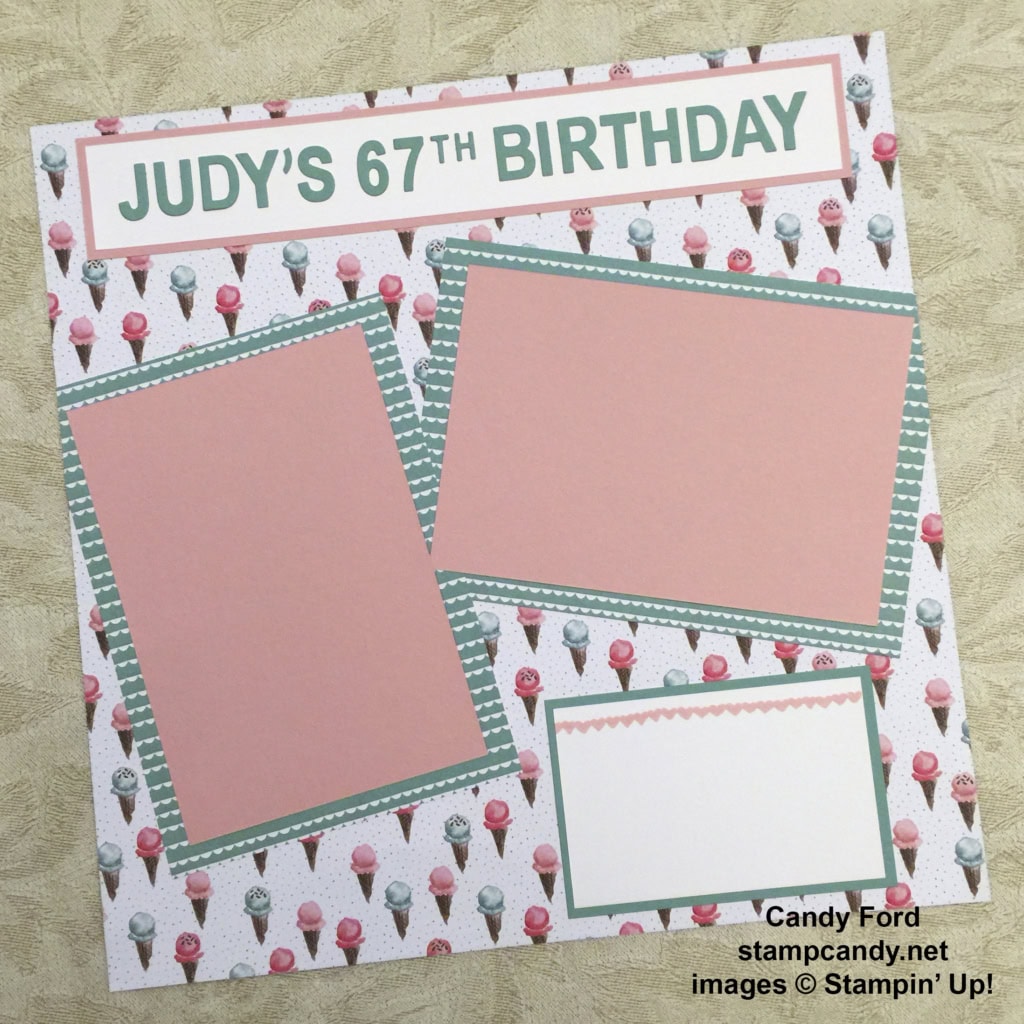
The background is a piece of Birthday Bouquet Designer Series Paper. This is one of my personal favorites from this DSP. The little ice cream cones are so pretty. And the colors in this set are sweet and soothing and beautiful. And with such spectacular paper, there’s no need to add a lot of “doodahs” to fancy up the page.
For the title, we cut Mint Macaron card stock with the Little Letters Thinlits and the Little Numbers Thinlits Dies. We adhered the pieces onto a strip of Whisper White card stock and matted it with Blushing Bride card stock.
For the photo mats, we cut Blushing Bride card stock to 4-1/4″ x 6-1/4″, then matted that with a different pattern from the DSP cut to 5″ x 7″. A few things about the mats: 1) They went past the edge of the 12″ x 12″ page a little, so we trimmed off the excess. 2) They also overlapped in the center, so we made sure the Blushing Bride pieces were on the top of all the DSP pieces. The DSP of the right one goes under the DSP of the left one, but the card stock of the right one goes over the DSP of the left one. So the paper “sandwich” at the overlap is (bottom to top) right DSP, left DSP, right card stock, left cardstock. 3) This DSP pattern has a definite direction, so we cut one piece vertically and the other one horizontally, so the patterns are going in the same direction.
For the journaling panel, we stamped the line of hearts from the Birthday Blooms stamp set in Blushing Bride onto Whisper White card stock. We matted it with Mint Macaron card stock.
Now all that’s left to do is to add two photos and some journaling. And wouldn’t the journaling look great written with the Mint Macaron Stampin’ Write Marker?
Of course, you can also use these same supplies with your Project Life pages. Check out the great Project Life by Stampin’ Up! products here. They are the Project Life products you love, but in the Stampin’ Up! colors, so all your other Stampin’ Up! products will match perfectly!
Today I’m sharing the third project we made in the Birthday Bouquet class. You can see the first two here and here.
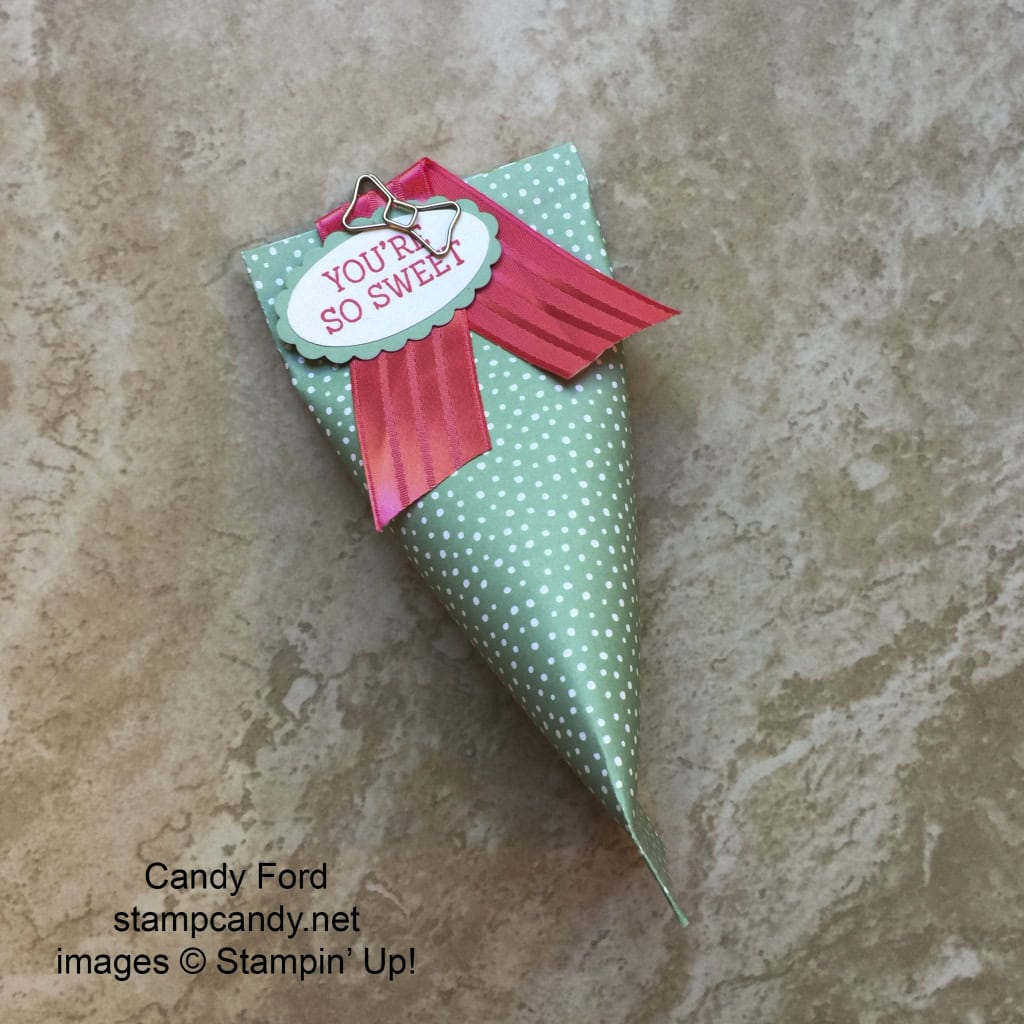
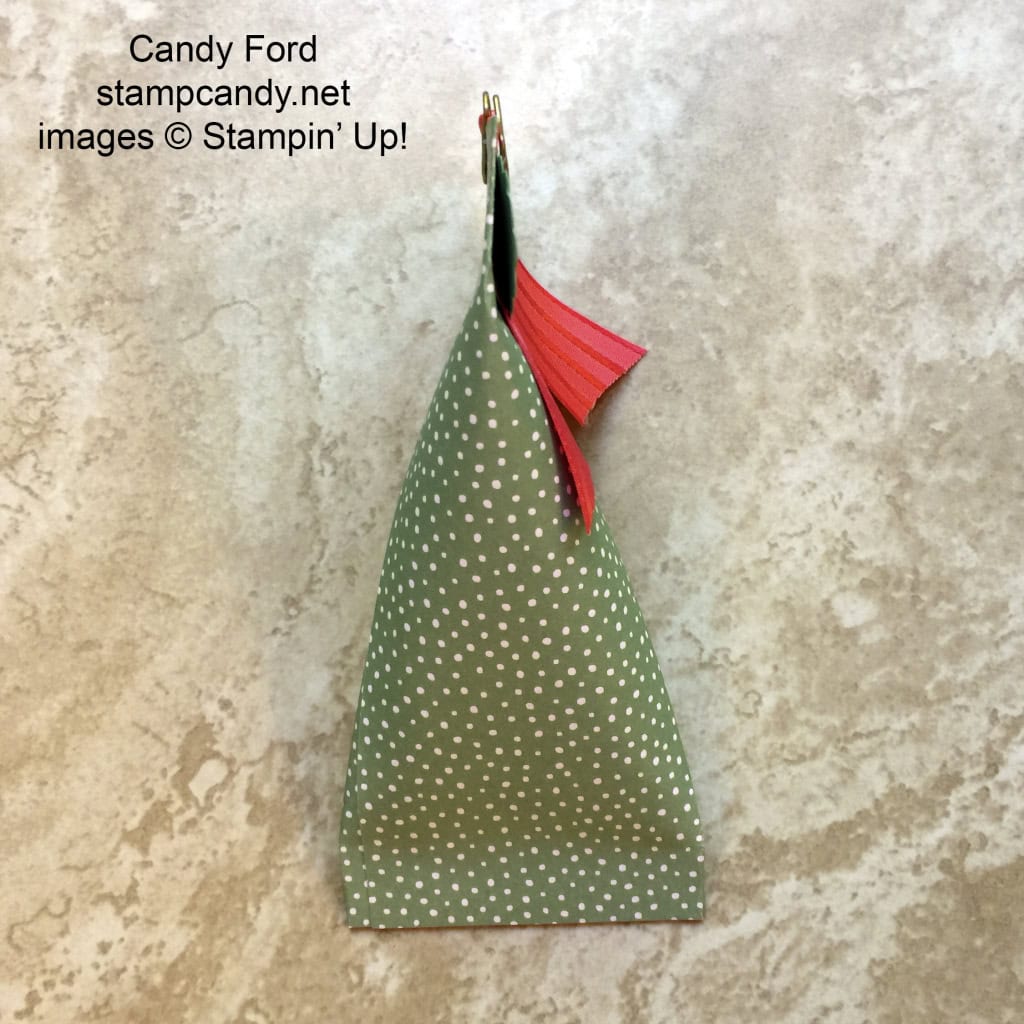
These sour cream containers are adorable, and they’re super quick and easy to make. We started with a 6″ x 6″ piece of Birthday Bouquet Designer Series Paper. We put adhesive along the top and bottom edges and along one side edge, then rolled it to make a tube, adhering the sides – I prefer Fast Fuse for this because it’s very strong. We pinched the bottom closed so it was flat.
At this point we put our goodies inside the container, careful not to get them stuck on the adhesive around the inside top edge. Then we pinched the top closed so it was flat and perpendicular to the bottom.
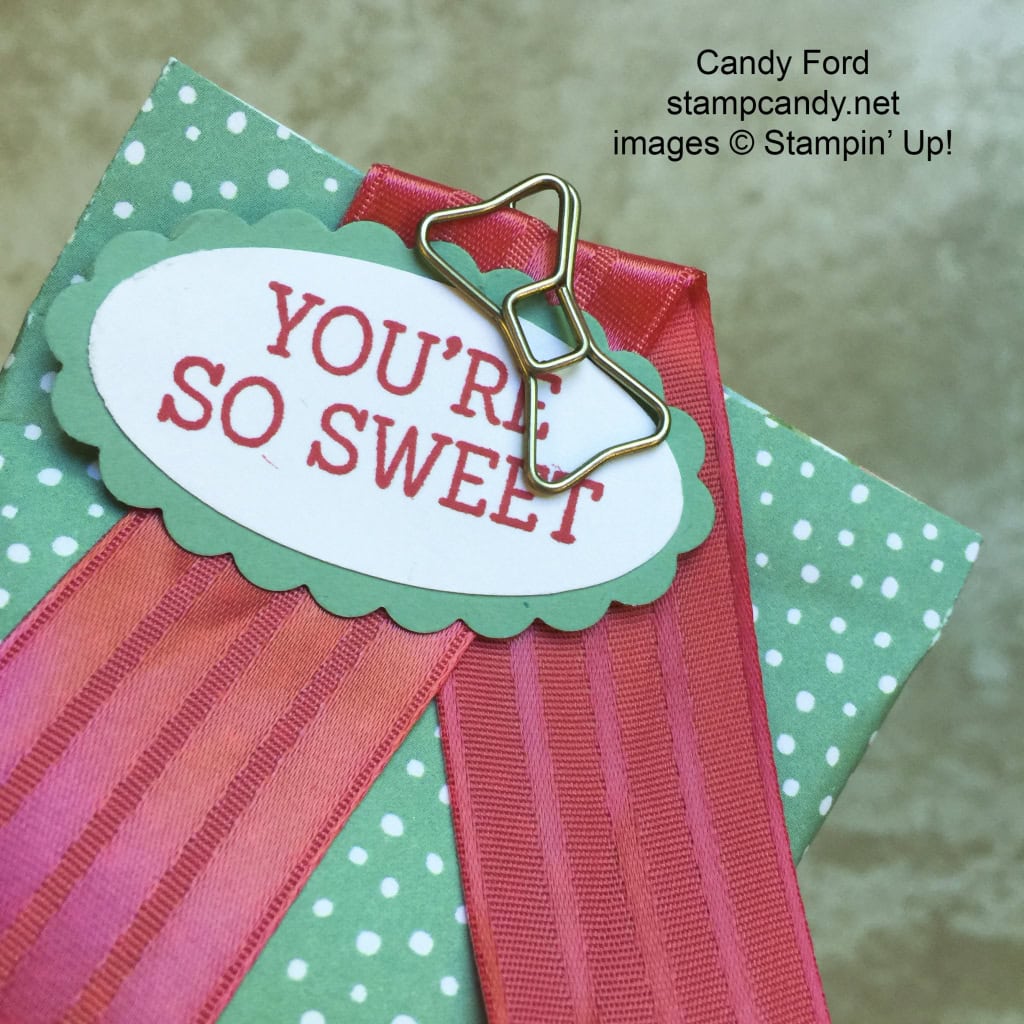
For the tag, we stamped the sentiment from the Honeycomb Happiness stamp set in Watermelon Wonder onto Whisper White card stock, then cut it with the Large Oval Punch. We cut a piece of Mint Macaron card stock with the Scallop Oval Punch, then glued the two pieces together.
We attached the tag and a piece of Watermelon Wonder 1″ Stitched Satin Ribbon with a Bow Paper Clip Embellishment.
Yesterday I shared with you a Mini Treat Bag we made in a class for Kimberly Laidley and her friends. You can see that post here. Today I’m sharing the card that goes in that bag.
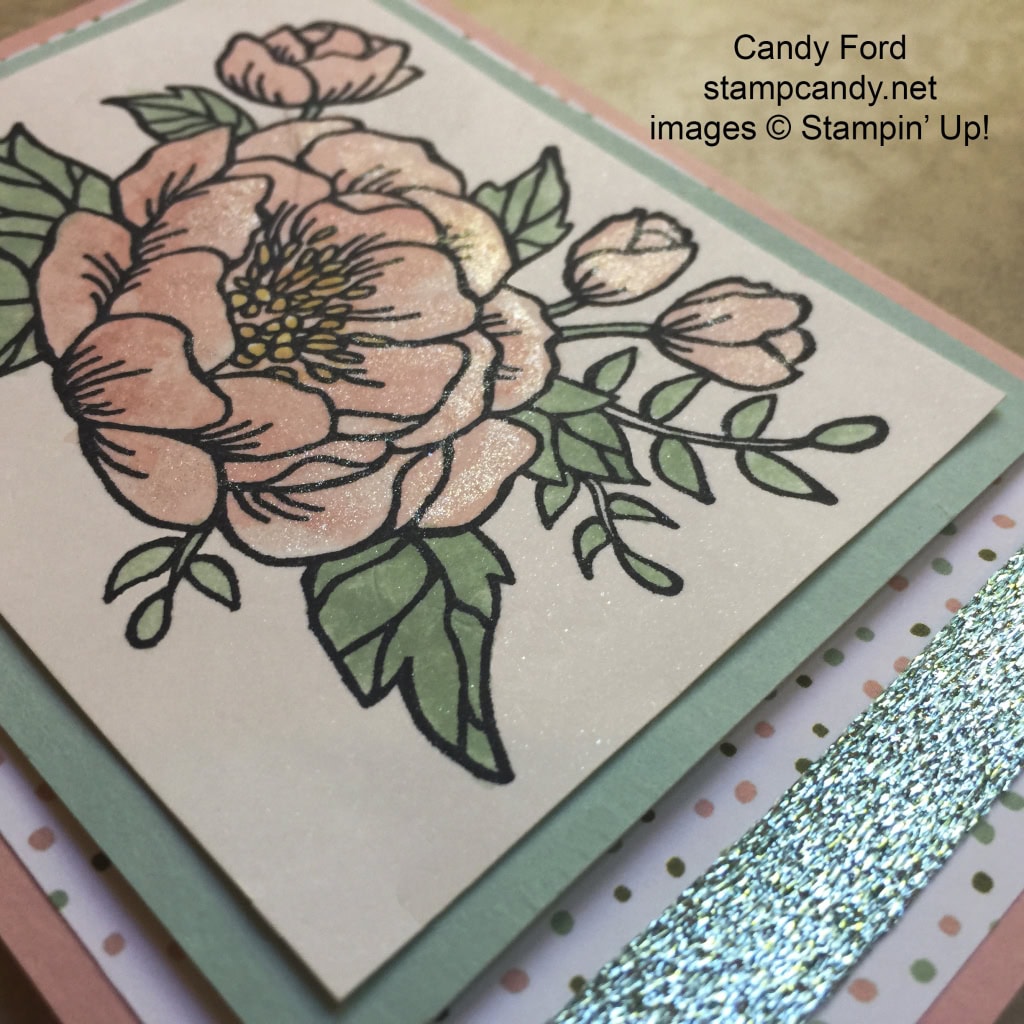
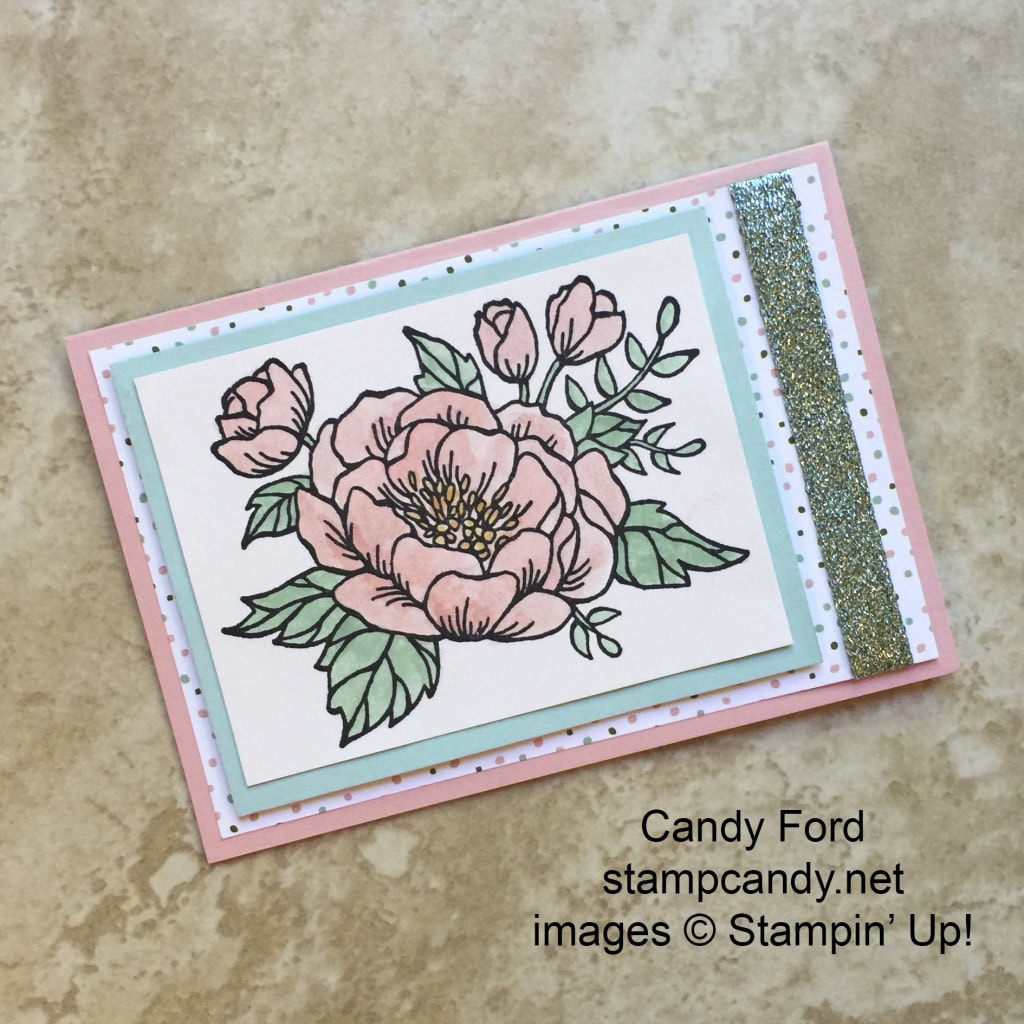
We again used the Birthday Bouquet Designer Series Paper, and the colors for the entire card came from that.
The card base is Blushing Bride card stock. On top of that, here is a layer of the DSP with a piece of Pool Party Glitter Ribbon wrapped around one end. The photo at the top of this post is a better representation of the ribbon color that the one below. The sparkly ribbon reflects different colors of light in the different angles of these two photos.
This ribbon is called Glitter Ribbon, but it isn’t messy like some other glittery items. It’s really more like it’s woven in metallic threads. It’s very easy to work with, and did I mention no mess?
We stamped the image from the Birthday Blooms stamp set in Basic Black Archival Ink onto Shimmer White card stock. We then used an Aqua Painter to color in the image with Blushing Bride and Mint Macaron inks. We colored the flower center with a Daffodil Delight Stampin’ Write Marker. We went over the flower petals with a Clear Wink of Stella Glitter Brush, which also shows up better in the top photo.
We matted this with a piece of Pool Party card stock, and attached it to the card with Stampin Dimensionals.
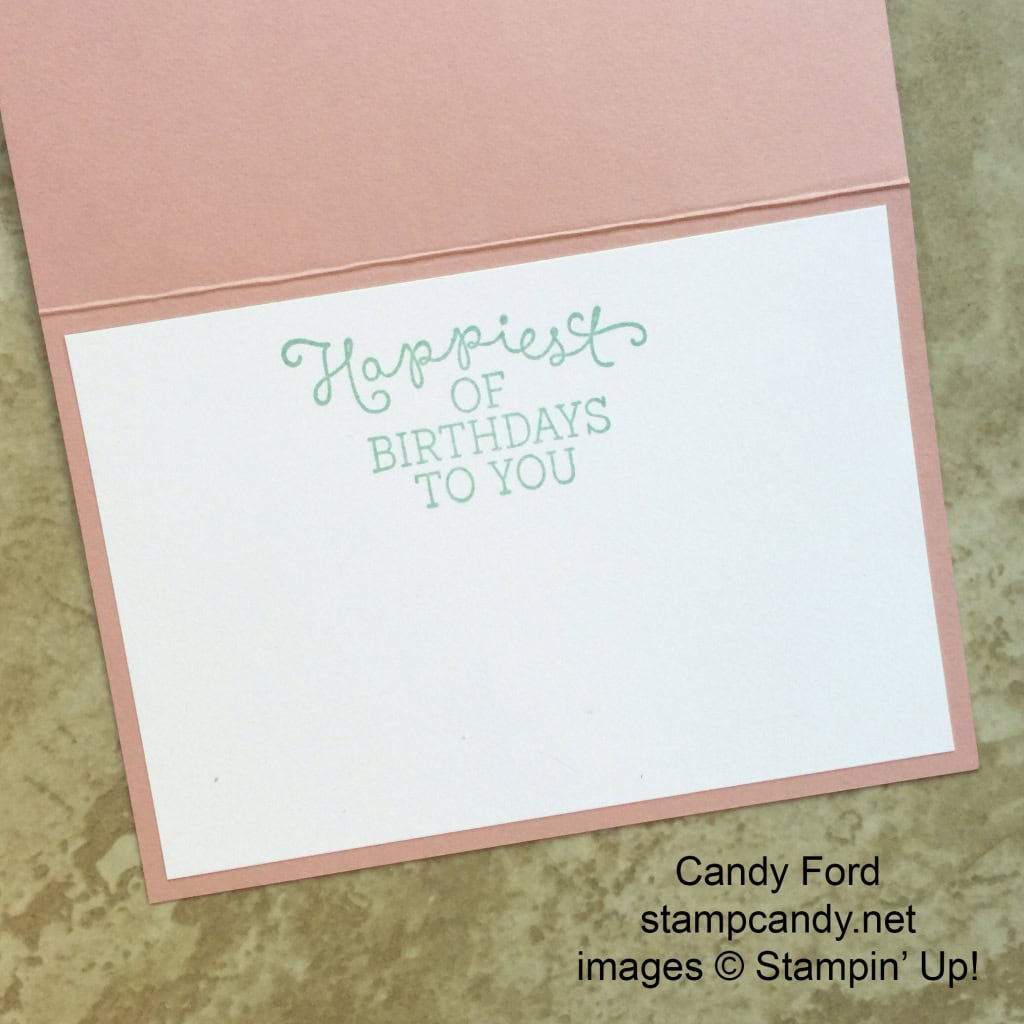
We stamped the sentiment in Pool Party ink onto a piece of Whisper White card stock and glued it to the card’s interior.

 There are only 5 days left to shop from the 2015-2016 Annual Catalog’s Retiring List! Click here to shop what is still available.

