Tasteful Touches Origami Flower Card
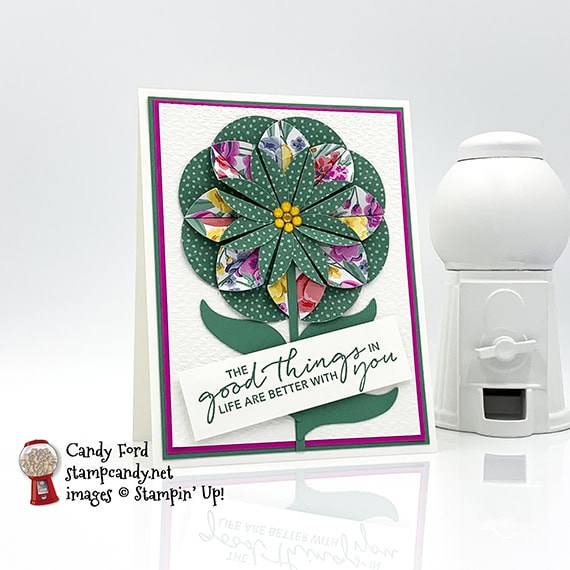
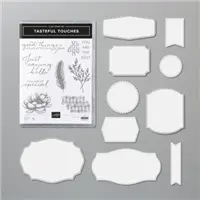
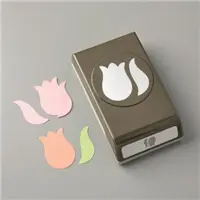
I made this Origami flower card using the Tasteful Touches stamp set, Tasteful Textile 3D Embossing Folder, Tulip Builder Punch, and Flowers for Every Season Designer Series Paper. Last week I hosted another Mystery Stamping Party on Facebook, and this is was my example. I enjoy these parties. I post clues that folks follow to create the mystery project, then everyone posts a photo of their project. It’s wonderful to see all the creative ways people interpret the clues. You can go ahead and join the Facebook group now to see what we do. Then you can participate in the next party on Wednesday, December 2 at 8:00 PM (ET.)
If you are reading this in email, some photos may appear blurry, or may not appear at all. Please click here to see the post on my blog.
S Tasteful Touches Tasteful Touches Tasteful Touches Tasteful Touches
Here’s what I made:
 S
S
Here’s what I did:
Cut and scored with my paper trimmer:
- Whisper White Thick card stock (CS) cut to 4-1/4″ x 11″, then scored in half at 5-1/2″
- Just Jade CS layer cut to 4″ x 5-1/4″
- Magenta Madness CS layer cut to 3-7/8″ x 5-1/8″
- Whisper White Thick CS layer cut to 3-3/4″ x 5″
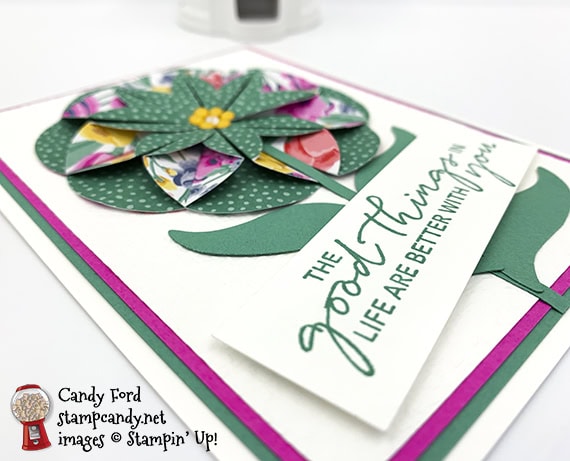
- Just Jade CS cut to 1/8″ x 4″
- Whisper White Thick CS cut to 3-1/2″ x 1″ for the sentiment
Stamped with the Tasteful Touches stamp set:
- sentiment in Just Jade ink onto the 3-1/2″ x 1″ Whisper White Thick CS
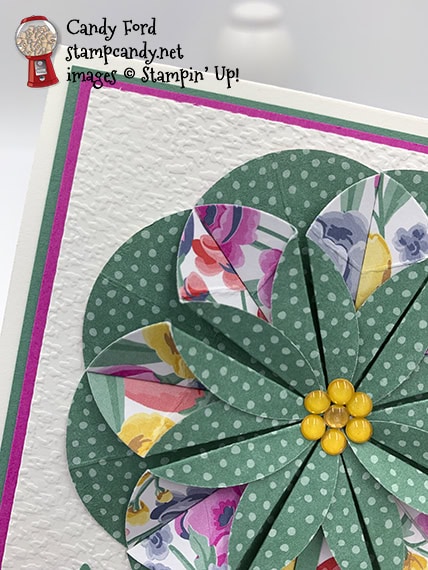
Cut using the Layering Circle Dies:
- 8 circles (appr. 1-5/8″ diameter) from a piece of Flowers for Every Season Designer Series Paper (DSP)
- 1 circle from a scrap of Whisper White CS
Cut using the Tulip Builder Punch:
- 3 leaves from a scrap of Just Jade CS
Embossed using the Tasteful Textile 3D Embossing Folder:
- the Whisper White Thick CS layer
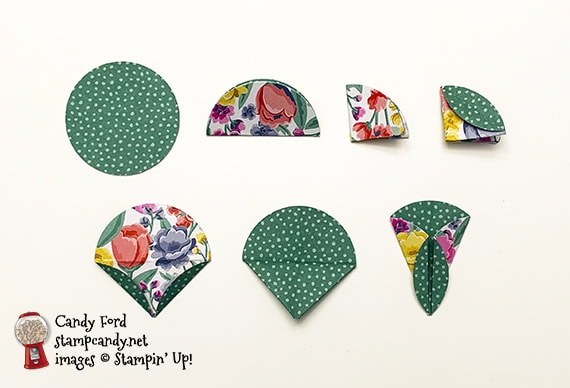
Folded the flower petals:
- folded the 8 DSP circles in half, then in half again, to make quarter circles
- on each side, folded down one curved edge (one layer only)
- unfolded except for the small curved folds
- flipped over so the curved folds were face down
- folded both straight edges to the center
- burnished using a Bone Folder
Assembled the card:
- burnished the fold in the card base with a Bone Folder
- Just Jade CS layer glued onto the front of the card base
- Magenta Madness CS layer glued onto the Just Jade CS layer
- Whisper White CS layer glued onto the Magenta Madness CS layer
- tips of DSP petals glued onto the Whisper White CS circle, side by side, with the points touching in the center, to create the flower
- back of flower glued onto the Whisper White CS layer, near the top
- 1/8″ Just Jade CS strip glued onto the Whisper White CS layer, with the end tucked under the edge of the flower (I’m not sure why I glued mine on top of the flower. Just a brain cramp, I guess.)
- leaves glued onto the Whisper White CS layer with the tips touching the 1/8″ strip
- sentiment adhered over the leaves/stem using Stampin’ Dimensionals
- 7 Bumblebee enamel dots applied onto the center of the flower using my Take Your Pick tool
S
Here are today’s colors:
You can click on each one to see all the products that come in that color!
S
Here’s what I used:
Click on these images for more details and to purchase. If you are reading this post in email, the product images may not show up. Please click here to see the post on my blog.


Supply List. <— Click for a clickable and printable list of the products!
S
S
Here are some helpful links:
- November Host Code T9TNBY67 – receive free product!
- Shop my online store
- Clearance Rack
- Request a free catalog
- SUBSCRIBE to my weekly newsletter and/or daily blog updates.
- Paper Pumpkin: buy a Prepaid Subscription or subscribe month to month
- Earn Gumball Rewards – receive free products!
- Gift Certificates are available in any U.S. dollar amount from me. Contact me for details.
- Have you shopped from me within the past year? Join my private VIP Facebook group for exclusive project tutorials and more!
- Join my team and enjoy a 20% discount (or more) on all your purchases! You choose $125 in products and pay only $99, and get free shipping! No obligation! No selling required!
S
Thanks for stopping by today, and Sweet Stamping!

