
It’s time for the PPP Blog Hop 01-2020! This month’s kit is called I’ll Bee Yours and it makes adorable note cards and treat bags. Of course, we are sharing alternate projects with you today, so you can see just how versatile the kit is. I used the kit to adorn a Whisper White card and a Mini Pizza Box. And the sentiment is, you guessed it, a pun! You know how I like puns.
I cut a hole in the card front and filled it with vellum for a soft, ethereal feel. I used the cut out piece on the box. No waste!
PPP Blog Hop 01-2020 PPP Blog Hop 01-2020
Here’s what I made:


PPP Blog Hop 01-2020 PPP Blog Hop 01-2020
Here’s what I did:
Cut and scored with my paper trimmer:
- Whisper White Thick card stock (CS) cut to 4-1/4″ x 11″, then scored in half at 5-1/2″
- card from the kit cut in half and each side cut to 3″ x 3″, so you have a Mint Macaron layer for the card and a Whisper White layer for the box
- Vellum CS cut to 2-7/8″ x 2-7/8″
Stamped with the I’ll Bee Yours stamp set:
- large floral stamp in Highland Heather ink onto the center of the Vellum (I heat set the ink with my Heat Tool.)
- large floral stamp in Highland Heather ink onto the Whisper White layer, around all the edges
- sentiment in Mint Macaron ink onto the bottom left corner of the Mint Macaron layer
Cut using the Layering Squares Dies:
- center from the Mint Macaron layer
- same size cut from the front of the Whisper White Thick CS card basex
Assembled the card:
- burnished the fold in the card base with a Bone Folder
- vellum glued onto the back of the Mint Macaron layer, then glued onto the card front, lining up the die cuts
- bees from the kit adhered onto the card front using glue dots
- 3 Highland Heather adhesive sequins applied onto the card front
Assembled the box:
- burnished the folds in the pizza box with a Bone Folder, and folded to assemble
- Mint Macaron die cut glued onto the Whisper White Thick CS layer
- bees from the kit adhered onto the layers using glue dots
- 3 Highland Heather adhesive sequins applied onto the Mint Macaron layer
- Whisper White CS layer adhered onto the top of the box using Stampin’ Dimensionals
Here you can see the translucence of the vellum window in the card front: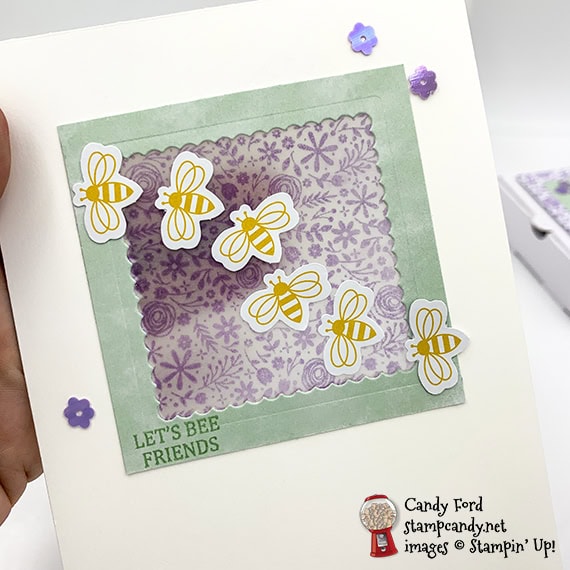 S
S
Here’s the PPP Blog Hop 01-2020:
Click the Next button to hop to the next stop, Deb Naylor of The Flying Stamper:
 S
S
Here are today’s colors:
You can click on each one to see all the products that come in that color!
S
Here’s what I used, other than what came in the kit:
Click on these images for more details and to purchase.
Click “Supply List” for a clickable and printable list of the products!
S
Here are some helpful links:
- Shop my online store
- Sale-a-bration!
- Clearance Rack
- SUBSCRIBE to my weekly newsletter and daily blog updates.
- January Host Code HRDJTUGZ – receive free product!
- Paper Pumpkin: buy a Prepaid Subscription or subscribe month to month
- Earn Gumball Rewards – receive free products!
- Gift Certificates are available in any U.S. dollar amount from me. Contact me for details.
- Have you shopped from me within the past year? Join my private VIP Facebook group for exclusive project tutorials and more!
- Join my team and enjoy a 20% discount (or more) on all your purchases! You choose $125 in products and pay only $99, and get free shipping! No obligation! No selling required! AND NOW, only during Sale-a-bration, you’ll also receive an exclusive Mini Paper Cutter a 6″ x 6″ Sampler of Designer Series Paper from the new Mini Catalog, and another stamp set of your choice.S
S
Thanks for stopping by today, and Sweet Stamping!


Candy, I love how you used the positive and negative of your die cut. Cute project
Thanks, Judi!
Such a cute idea…love this kit.
Thanks, Elizabeth!
Cute card Candy!
Thanks, Charmane!
Love the layout of the bees!
Thanks, Terri!
Great ideas – Thank you for hoping with us!
Thanks, Janey!
Soft and pretty projects. I love this color combination.
Thanks, Tricia!