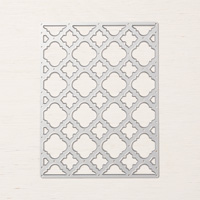
Recently I used the Florentine Filigree Thinlits Die to create a template for applying Shimmery White Embossing Paste to the front of a card. Afterward, I realized the template was covered in the paste, and of course I had to save it for another project. For today’s card, I glued the shimmery die cut template over Garden Impressions Designer Series Paper, and added accents of Wood Textures Designer Series Paper.
S
Here’s what I made:
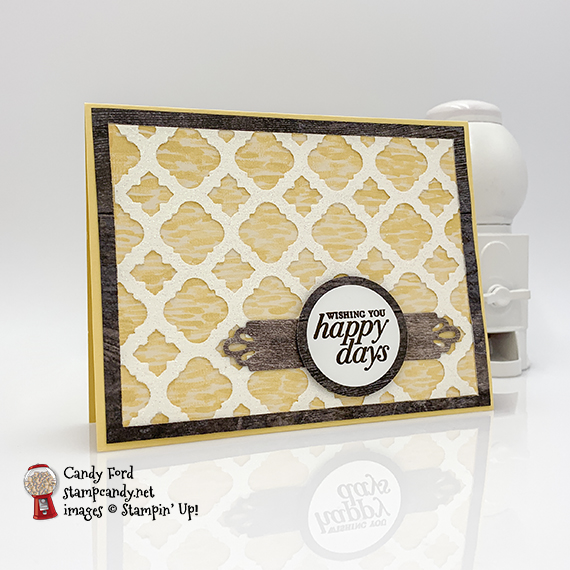
I wish I could have gotten the shimmery part to show better in the photos.

S
Here’s what I did:
Cut and scored with my Stampin’ Trimmer:
- So Saffron card stock (CS) cut to 5-1/2″ x 8-1/2″, then scored in half at 4-1/4″
- Garden Impressions Designer Series Paper (DSP) cut to 5-1/4″ x 4″
- Wood Textures DSP cut to 5-1/4″ x 4″, then the center cut out leaving a 1/4″ border all the way around
- NOTE: Or you could cut 1/4″ strips of the Wood Textures DSP to create the frame
- die cut template cut to 4-3/4″ x 3-1/2″
- Whisper White CS cut to 5-1/4″ x 4″ for the inside of the card base
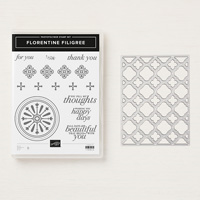
Stamped with the Florentine Filigree stamp set:
- sentiment in Early Espresso ink onto a scrap of Whisper White CS
Die cut using the Florentine Filigree Thinlit:
- cut the shape from a piece of Whisper White CS, and spread Shimmery White Embossing Paste over the whole thing using a palette knife
- This is the piece I had left over from a previous project.
Die cut using the Layering Circle Dies:
- sentiment
- slightly larger circle from a scrap of the wood DSP
Die cut using the Needlepoint Elements Framelits:
- a piece of the wood DSP for behind the sentiment circles
Assembled the card:
- burnished the fold in the card base with a Bone Folder
- Garden Impressions DSP layer glued onto the front of the card base
- shimmery Florentine die cut piece glued onto the Garden Impressions DSP layer
- wood DSP frame glued around the Florentine die cut
- long wood DSP die cut glued over the Florentine die cut
- sentiment glued onto the wood DSP circle, then adhered over the long wood DSP die cut using Stampin’ Dimensionals
- Whisper White CS glued onto the inside of the card base
S
Here are today’s colors:
You can click on each one to see all the products that come in that color!
S
Here’s what I used:
Click on these images for more details and to purchase.


S
Preorder the Life is Grand Online Card Class by April 17:
- Make 6 pretty cards at home in your PJs!
- 2 each of 3 designs
- Features the Life Is Grand stamp set, Un-inked Spectrum Ink Pad (with 5 reinkers), and Petal Promenade Designer Series Paper
- Featured colors: Petal Pink, Powder PInk, Blushing Bride, Flirty Flamingo, and Lovely Lipstick
- I’ve done the cutting, scoring, and embossing for you!
- You’ll receive all you need to make the cards, including the stamp set, spectrum Pad, reinkers, the precut/prescored/pre-embossed card kits, 6 Very Vanilla envelopes and envelope liners.
- Limited spots available
Click on the image below for details and class options, or copy and paste this link into your browser: https://stampcandy.net/online-classes/life-grand-card-class-preorder/

S
Here are some helpful links:
- Shop my online store
- Clearance Rack
- NEW Storage by Stampin’ Up!
- SUBSCRIBE to my weekly newsletter and daily blog updates.
- April Host Code GDG7WK3J – receive free product!
- Earn Gumball Rewards – receive free products!
- Gift Certificates are available in any U.S. dollar amount from me. Contact me for details.
- Have you shopped from me within the past year? Join my private VIP Facebook group for exclusive project tutorials and more!
- Join my team! Get a 20% discount on all your purchases!
S
Thanks for stopping by today, and Sweet Stamping!