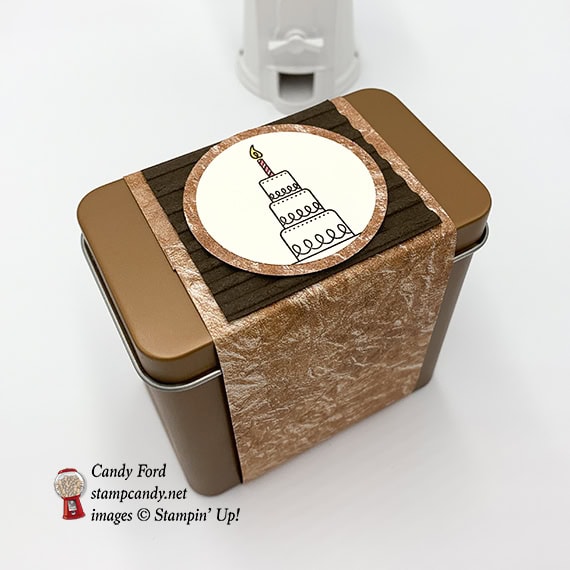
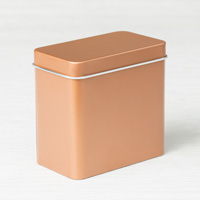
 Welcome to the Bring on the Birthdays edition of the OSAT Blog Hop! For my projects, I used the Amazing Life stamp set, Corrugated Dynamic Textured Impressions Embossing Folder, and Petal Promenade Designer Series Paper to create a birthday card and to decorate a Copper Tea Tin.
S
Here’s what I made:


 S
S
Here’s what I did:
Cut and scored with my Stampin’ Trimmer:
- Early Espresso card stock (CS) cut to 4-1/4″ x 11″, then scored in half at 5-1/2″
- Early Espresso CS layer cut to 4″ x 5-1/4″
- Petal Promenade Designer Series Paper (DSP) layer cut to 3-5/8″ x 2-3/8″
- Very Vanilla CS layer cut to 3-1/4″ x 2″
- Very Vanilla CS cut to 4″ x 5-1/4″ for the inside of the card base
- DSP cut to 2-1/2″ x 12″
- Early Espresso CS cut to 2-1/4″ x 2-1/4″
Stamped with the Amazing Life stamp set:
- cake and large sentiment in Early Espresso ink onto the 3-1/4″ x 2″ Very Vanilla CS layer
- cake in Early Espresso ink onto a scrap of Very Vanilla CS
- small sentiment in Early Espresso ink onto a scrap of Very Vanilla CS
Cut using Circle Punches:
- cake cut using 1-3/4″ punch
- DSP scrap cut using 2″ punch
Cut using the Classic Label Punch:
- small sentiment
Embossed using the Corrugated Dynamic embossing folder:
- both Early Espresso CS layers
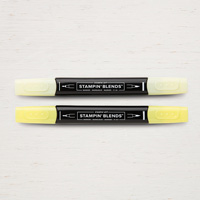
Colored using Stampin’ Blends Markers:
- both cake candles in Flirty Flamingo
- both candle flames in Pineapple Punch
- “CAKE” in Flirty Flamingo
Assembled the card:
- burnished the fold in the card base with a Bone Folder
- large embossed Early Espresso CS layer glued onto the front of the card base
- cake/sentiment glued onto the DSP layer
- DSP layer glued onto the large embossed Early Espresso CS layer
- small sentiment glued onto the large embossed Early Espresso CS layer
- Very Vanilla CS glued onto the inside of the card base
Assembled the tin:
- 12″ DSP wrapped around the tin and the ends glued together, making sure it is snug but also loose enough to slide off the tin
- small embossed Early Espresso CS glued onto the DSP, on top of the tin
- punched cake glued onto the punched DSP
- punched DSP glued onto the small embossed Early Espresso CS
S
Here’s the Bring on the Birthdays hop:
Be sure to check out every stop to see all the great birthday projects!
Here are today’s colors:
You can click on each one to see all the products that come in that color!
S
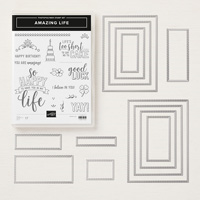
Here’s what I used:
Click on these images for more details and to purchase.


S
Preorder the Geared Up Garage Manly Card Online Class by March 20!
- Make 6 masculine cards at home in your PJs!
- 2 each of 3 designs
- manly designs for birthday, Father’s Day, or just to say I love you
- Limited spots available
Click on the image below for details:

S
Here are some helpful links:
- Sale-a-bration!!!– earn free items!
- Shop my online store
- Clearance Rack
- SUBSCRIBE to my weekly newsletter and daily blog updates.
- March Host Code RHZ6NBS7 – receive free product!
- Earn Gumball Rewards – receive free products!
- Gift Certificates are available in any U.S. dollar amount from me. Contact me for details.
- Have you shopped from me within the past year? Join my private VIP Facebook group for exclusive project tutorials and more!
- Join my team! Sale-a-bration is a super time to join! You get so much extra, like the amazing Craft & Carry Tote Bag!

S
Thanks for stopping by today, and Sweet Stamping!


A great set and perfect for a more masculine birthday too
Thanks, Emma!
Wow! What a super job creating the card (love the corrugated paper which adds depth) and wrapping the container…you went the extra mile.
Aw thanks, Sheila!
Great masculine card. That stamp set is perfect!
Thanks, Jo Anne!
Love a little bit of copper me!
Thanks, Martin!