Jul 13, 2020 | Blog Hop, Cards, Gallery |

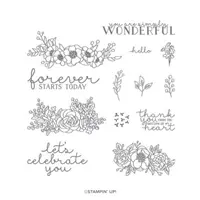
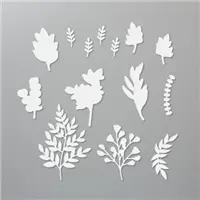
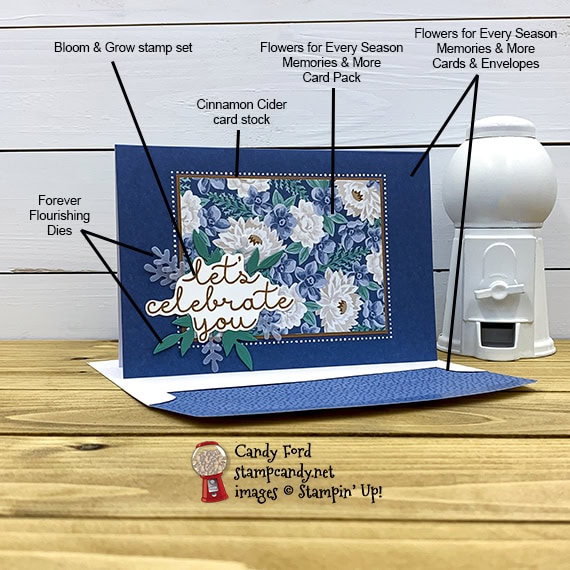
Welcome to the July 2020 Candy Hearts Blog Hop! This month we are featuring the new 2020-2022 In Colors. I used three of them on my card: Cinnamon Cider, Just Jade, and Misty Moonlight. I used Memories & More (M&M) products from the Flowers for Every Season Suite along with the bloom & Grow Stamp set and Forever Flourishing Dies. The matching M&M card bases and envelopes and the M&M card pack make it a cinch to create a great card in no time.
If you are reading this in email, some photos may appear blurry, or may not appear at all. Please click here to see the post on my blog.

We have a special guest hopper today, Brian King of Stamp with Brian. He’s an amazingly talented stamper and I can’t wait to see what he has made for us. Be sure to hop around to all the stops, because you don’t want to miss any of the great projects the Candy Hearts have in store for you today!
S July 2020 Candy Hearts Blog Hop July 2020 Candy Hearts Blog Hop July 2020 Candy Hearts Blog Hop July 2020 Candy Hearts Blog Hop
Here’s what I made:
S
Here’s what I did:
Cut and scored with my paper trimmer:
- Cinnamon Cider card stock (CS) layer cut to 3-1/8″ x 4-1/8″
Stamped with the Bloom & Grow stamp set:
- sentiment in Cinnamon Cider ink onto a scrap of Whisper White Thick CS
Cut using the Forever Flourishing Dies:
- leaves from a scrap of Just Jade CS (cut two, then cut them in half with Paper Snips)
- small leaves from a scrap of Vellum CS
Cut using Paper Snips:
Assembled the card:
- burnished the fold in the card base with a Bone Folder
- M&M card glued onto the Cinnamon Cider CS layer
- Cinnamon Cider CS layer glued onto the front of the card base, within the dotted frame
- die cut leaves glued onto the card front
- sentiment adhered using Mini Stampin’ Dimensionals over the leaves
S
Here’s the July 2020 Candy Hearts Blog Hop:
Thank you for hopping with the Hearts today! Be sure to hop around to all the stops. You do not want to miss any of the creativity in this talented group of stampers!
- Candy Ford of Stamp Candy <—– YOU ARE HERE!!!
- Brian King of Stamp with Brian
- Linda Krueger of The Stamp Coach
- Joanne Brown of Stamping with Jojo
S
Bonus Days are here!
Click the image below to shop now!

S
Here are today’s colors:
You can click on each one to see all the products that come in that color!
S
Here’s what I used:
Click on these images for more details and to purchase. If you are reading this post in email, the product images may not show up. Please click here to see the post on my blog.
Supply List. <— Click for a clickable and printable list of the products!
S
Here are some helpful links:
S
Thanks for stopping by today, and Sweet Stamping!
Jul 10, 2020 | Cards, Gallery |
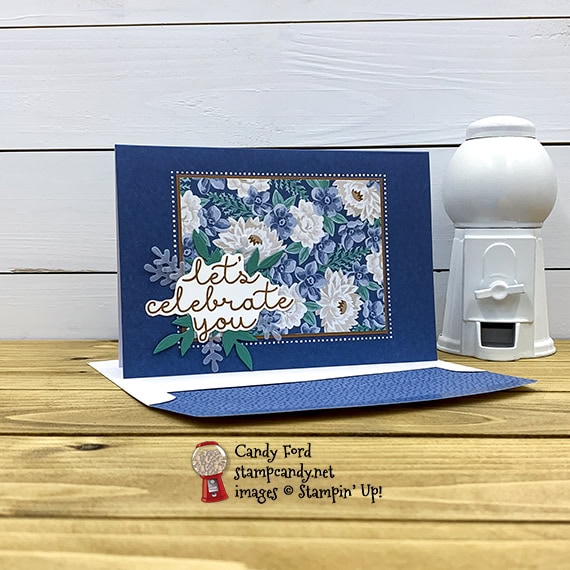
I’ve just gotta say that I really love the 2020-2022 In Colors. So of course, I love the Flowers for Everything Suite, which includes all five of them. When I broke into my Flowers for Everything Memories & More Cards & Envelopes and my Flowers for Everything Memories & More Card Pack, I immediately fell in love. The variety is amazing – there are even Christmas cards! – and they make it so incredibly quick and easy to create a pretty card in no time. Today I’m sharing one that I made using one of the Bumblebee card bases and envelopes. I added a card from the M&M card pack, a strip of card stock, and 3 enamel dots. That’s it!
M&M = Memories & More
If you are reading this in email, some photos may appear blurry, or may not appear at all. Please click here to see the post on my blog.
S flowers for flowers for flowers for flowers for flowers for
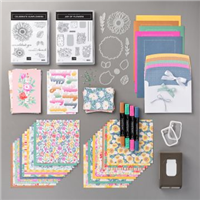
Here’s the Flowers for Everything Suite:
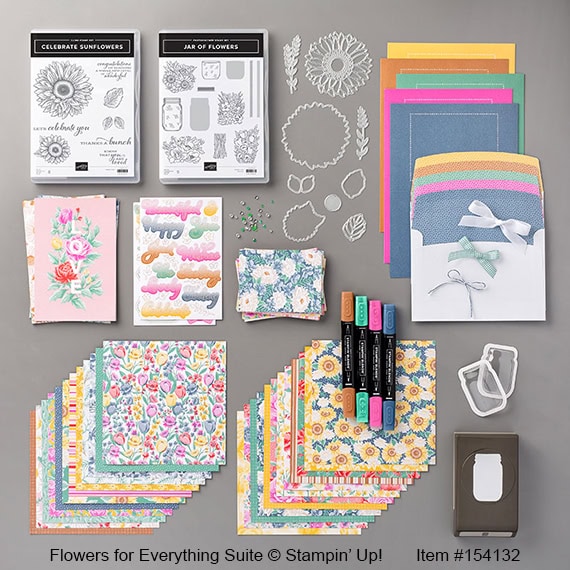
The Flowers for Every Season Suite Collection includes:
* Jar of Flowers Photopolymer Stamp Set (10% off)
* Jar Punch (10% off)
* Celebrate Sunflowers Cling Stamp Set (10% off)
* Sunflower Dies (10% off)
* Flowers for Every Season 6″ x 6″ (15.2 x 15.2 cm) Designer Series Paper
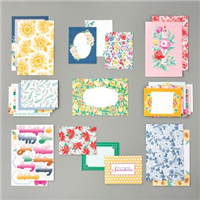
* Flowers for Every Season Memories & More Card Pack
* Flowers for Every Season Memories & More Cards & Envelopes
* Mason Jar Shaker Domes
* Flowers for Every Season Ribbon Combo Pack
* Flowers for Every Season Gems
* Cinnamon Cider Stampin’ Blends Combo Pack
* Just Jade Stampin’ Blends Combo Pack
* Magenta Madness Stampin’ Blends Combo Pack
* Misty Moonlight Stampin’ Blends Combo Pack
Product colors: Bumblebee, Cinnamon Cider, Just Jade, Magenta Madness, Misty Moonlight, Poppy Parade, and Whisper White.
S
Here’s what I made:

S
Here’s what I did:
Cut with my Paper Trimmer:
- Misty Moonlight card stock (CS) cut to 6″ x 2″
Assembled the card:
- burnished the fold in the card base with a Bone Folder
- Misty Moonlight CS glued onto the front of the card base
- adhered the M&M card over the CS, using Stampin’ Dimensionals
- 3 Misty Moonlight enamel dots applied onto the M&M card
- That’s it!
S
Bonus Days are here!
For each $50 you spend on an order now through August 3, 2020, you will receive a $5 coupon code to use in August!
S
Here are today’s colors:
You can click on each one to see all the products that come in that color!
S
Here’s what I used:
Click on these images for more details and to purchase. If you are reading this post in email, the product images may not show up. Please click here to see the post on my blog.
Supply List. <— Click for a clickable and printable list of the products!
S
S
Here are some helpful links:
S
Thanks for stopping by today, and Sweet Stamping!
Jul 9, 2020 | Blog Hop, Cards, Gallery, Tags |

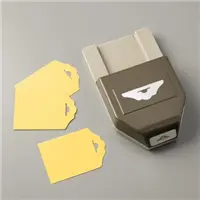
Welcome to the July 2020 OSAT Blog Hop! This month’s theme is Pretty in Pink, so we’re featuring the amazing pinks in the Stampin’ Up! color line up. As usual, I couldn’t choose just one, so I used them all: Petal Pink, Blushing Bride, Flirty Flamingo, Rococo Rose, Melon Mambo, and Magenta Madness. I cut strips of card stock in all the colors and arranged them in a sort of pinwheel design for the front of the card. The sentiment I cut using the Playful Alphabet Dies, Whisper White Card stock, and the new Foam Adhesive Sheets. I stamped the frame from the Swirly Frames stamp set and heat embossed it in white. For the tag, I covered one side in the same strips, and cut the top with the Fancy Tag Topper Punch.
Be sure to hop around to all the stops! I can’t wait to see what all the blog hop team members have for us today!
If you are reading this in email, some photos may appear blurry, or may not appear at all. Please click here to see the post on my blog.
S July 2020 OSAT Blog Hop July 2020 OSAT Blog Hop July 2020 OSAT Blog Hop July 2020 OSAT Blog Hop
Here’s what I made:


S
Here’s what I did:
Cut and scored with my paper trimmer:
- Whisper White thick card stock (CS) cut to 5-1/2″ x 8-1/2″, then scored in half at 4-1/4″
- Magenta Madness CS layer cut to 5″ x 3-3/4″
- Whisper White CS layer cut to 4-5/8″ x 3-3/8″
- Whisper White CS layer cut to 4-1/2″ x 3-1/4″
- Petal Pink, Blushing Bride, Flirty Flamingo, Rococo Rose, Melon Mambo, and Magenta Madness CS cut into strips varying from 1/2″ down to 1/8″ wide by about 5″ long
- Whisper White CS cut to 2″ x 6″
- Flirty Flamingo CS cut to 2″ x 1-1/4″
- Melon Mambo CS cut to 2″ x 1″
Stamped with the Swirly Frames stamp set:
- frame in Versamark ink onto the strip layer, then heat embossed in white (after the strip layer was assembled)*
Cut using the Playful Alphabet Dies:
- Whisper White CS applied onto a Foam Adhesive Sheet, then die cut the sentiment
Cut using the Fancy Tag Topper Punch:
Assembled the card:
- burnished the fold in the card base with a Bone Folder
- drew an X at the center of the smaller Whisper White CS layer as a guide for the CS strips
- strips glued onto the smaller Whisper White CS layer, starting in the middle and working my way out
- trimmed away the excess strip bits around the edge of the layer
- stamped and heat embossed the frame in white*
- peeled the backing off the die cut letters and applied them onto the strip layer, inside the white embossed frame
- 3 Magenta Madness enamel dots applied around the sentiment
- strip layer glued onto the larger Whisper White CS layer
- Whisper White CS layer glued onto the Magenta Madness CS layer
- Magenta Madness CS layer glued onto the front of the Whisper White Thick CS card base
Assembled the tag:
- burnished the fold in the card base with a Bone Folder
- glued assorted pink CS strips onto one side of the tag at an angle
- trimmed excess strip bits from all edges
- glued the 2″ x 1″ Melon Mambo CS piece onto the bottom of the other side of the tag, and another skinny strip next to it
- glued the 2″ x 1-1/4″ Flirty Flamingo CS piece onto the top end of the tag, and another skinny strip next to it, leaving a large white space to write on the tag
- cut top end of the tag with the Tag Topper Punch
- tied a piece of Magenta Madness ribbon through the hole in the tag
S
Here’s the July 2020 OSAT Blog Hop:
If you get lost during the hop, use this line up as a guide:
S
Bonus Days are here!
Click the image below to shop now and earn Bonus Days coupons to use next month!
S
Here are today’s colors:
You can click on each one to see all the products that come in that color!
S
Here’s what I used:
Click on these images for more details and to purchase. If you are reading this post in email, the product images may not show up. Please click here to see the post on my blog.
Supply List. <— Click for a clickable and printable list of the products!
S
Here are some helpful links:
S
Thanks for stopping by today, and Sweet Stamping!
Jul 8, 2020 | Cards, Gallery |
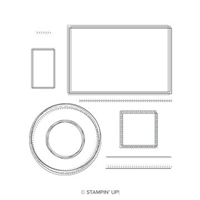
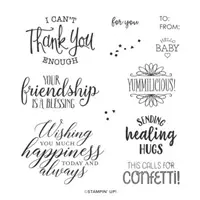
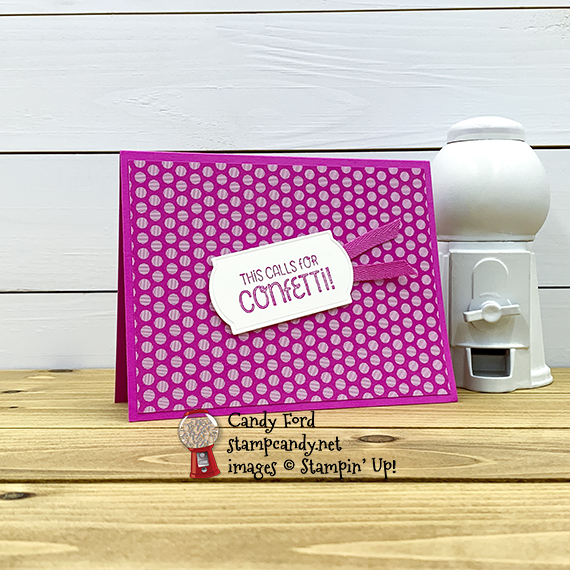
Today’s card features the new 2020-2022 In Color Magenta Madness. I used the So Sentimental stamp set, Timeless Label Punch, 2020-2022 In Color Designer Series Paper, and Magenta Madness 1/4″ Ribbon. It’s a really simple card. I used the DSP with dots to match the sentiment, “This calls for confetti!”
If you are reading this in email, some photos may appear blurry, or may not appear at all. Please click here to see the post on my blog.
S So Sentimental So Sentimental So Sentimental So Sentimental So Sentimental
Here’s what I made:
S
Here’s what I did:
Cut and scored with my paper trimmer:
- Magenta Madness card stock (CS) cut to 5-1/2″ x 8-1/2″, then scored in half at 4-1/4″
- 2020-2022 Designer Series Paper (DSP) layer cut to 5-1/4″ x 4″
- Whisper White CS cut to 5-1/4″ x 4″ for the inside of the card base
Stamped with the So Sentimental stamp set:
- sentiment in Magenta Madness ink onto a scrap of Whisper White Thick CS
Cut using the Timeless Label Punch:
Assembled the card:
- burnished the fold in the card base with a Bone Folder
- DSP layer glued onto the front of the card base
- about 4″ of Magenta Madness 1/4″ ribbon folded in half and adhered onto the back of the sentiment using Stampin’ Seal (or Tear & Tape)
- sentiment adhered onto the DSP layer using Stampin’ Dimensionals
- Whisper White CS glued onto the inside of the card base
S
Bonus Days are here!
Click the image below to shop now and earn Bonus Days coupons to use next month!
S
Here are today’s colors:
You can click on each one to see all the products that come in that color!
SS
Here’s what I used:
Click on these images for more details and to purchase. If you are reading this post in email, the product images may not show up. Please click here to see the post on my blog.
Supply List <— Click for a clickable and printable list of the products!
S
Here are some helpful links:
S
Thanks for stopping by today, and Sweet Stamping!
Jul 7, 2020 | Cards, Gallery |
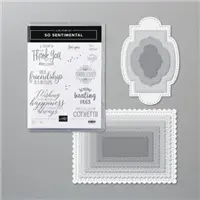
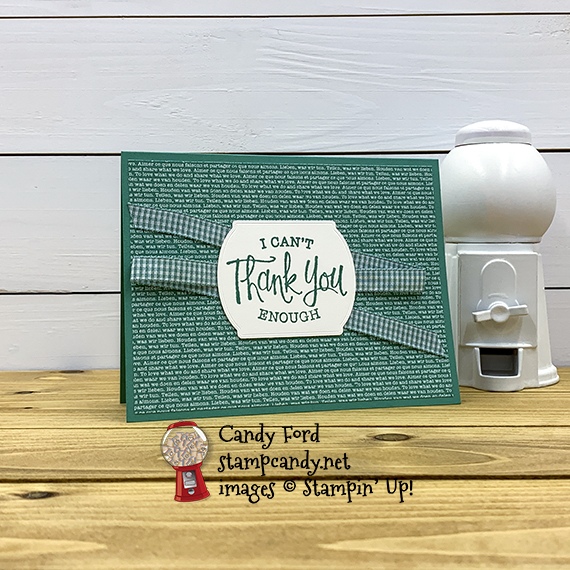
Today’s card features the new 2020-2022 In Color Just Jade. I used the So Sentimental stamp set, Tasteful Labels Dies, 2020-2022 In Color Designer Series Paper, and Just Jade Gingham Ribbon.
If you are reading this in email, some photos may appear blurry, or may not appear at all. Please click here to see the post on my blog.
S So Sentimental So Sentimental So Sentimental So Sentimental So Sentimental
Here’s what I made:
S
Here’s what I did:
Cut and scored with my paper trimmer:
- Just Jade card stock (CS) cut to 5-1/2″ x 8-1/2″, then scored in half at 4-1/4″
- 2020-2022 Designer Series Paper (DSP) layer cut to 5-1/4″ x 4″
- Whisper White CS cut to 5-1/4″ x 4″ for the inside of the card base
Stamped with the So Sentimental stamp set:
- sentiment in Just Jade ink onto a scrap of Whisper White Thick CS
Cut using the Tasteful Labels Dies:
Assembled the card:
- burnished the fold in the card base with a Bone Folder
- DSP layer glued onto the front of the card base
- about 15″ of ribbon folded into thirds and stuck to the back of the sentiment using Stampin’ Seal (or Tear & Tape)
- sentiment adhered over the twine using Stampin’ Seal (or Tear & Tape)
- Whisper White CS glued onto the inside of the card base
S
Bonus Days are here!
Click the image below to shop now and earn Bonus Days coupons to use next month!
S
Here are today’s colors:
You can click on each one to see all the products that come in that color!
S
Here’s what I used:
Click on these images for more details and to purchase. If you are reading this post in email, the product images may not show up. Please click here to see the post on my blog.
Supply List. <— Click for a clickable and printable list of the products!
S
Here are some helpful links:
S
Thanks for stopping by today, and Sweet Stamping!
Jul 6, 2020 | Cards, Gallery, Swaps |
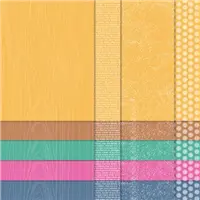
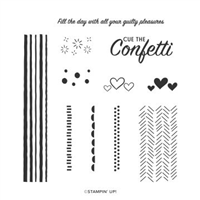
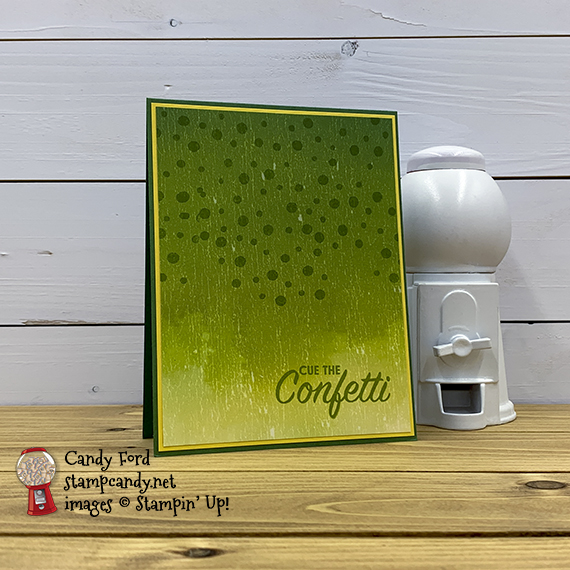
Today I’m sharing the card I made for the June 2020 Candy Hearts team card swap. I used the Pattern Play stamp set and Artistry Blooms Designer Series Paper to create these simple and fun birthday cards. I love the cute stamped confetti over the scuffed up pattern of the DSP. Even though all the cards I made came from the same pattern of DSP, they all look a little different because some have more yellow than others, and because I stamped the confetti differently on each one. I posted a photo of two of the cards side by side below so you can see the difference between them.
By the way, this #simplestamping card is just stamps, ink, and paper! (Plus adhesive, of course.)
If you are reading this in email, some photos may appear blurry, or may not appear at all. Please click here to see the post on my blog.
S Pattern Play stamp Pattern Play stamp Pattern Play stamp
Here’s what I made:
See the difference:

S
Here’s the Artistry Blooms DSP I used:

S
Here’s what I did:
Cut and scored with my paper trimmer:
- Garden Green card stock (CS) cut to 5-1/2″ x 8-1/2″, then scored in half at 4-1/4″
- Daffodil Delight CS layer cut to 4″ x 5-1/4″
- Artistry Blooms Designer Series Paper (DSP) layer cut to 4-1/8″ x 5-3/8″
- Whisper White CS cut to 5-1/4″ x 4″ for the inside of the card base
Stamped with the Pattern Play stamp set:
- confetti in Granny Apple Green ink onto the top of the DSP layer
- sentiment in Granny Apple Green ink onto the bottom right of the DSP layer
Assembled the card:
- burnished the fold in the card base with a Bone Folder
- Daffodil Delight CS layer glued onto the front of the card base
- DSP layer glued onto the Daffodil Delight CS layer
- Whisper White CS glued onto the inside of the card base
S
Bonus Days are here!
Click the image below to shop now and earn Bonus Days coupons to use next month!
Here are today’s colors:
You can click on each one to see all the products that come in that color!
S
Here’s what I used:
Click on these images for more details and to purchase. If you are reading this post in email, the product images may not show up. Please click here to see the post on my blog.
Supply List <— Click for a clickable and printable list of the products!
S
Here are some helpful links:
S
Thank you for reading all the way to the end of my blog post! Today is my 60th birthday! (How in the world did that happen? It seems like I turned 30 just a couple years ago!) Comment below with birthday greetings for a chance to win a special gift from me! Comment by Wednesday, July 8.
S
Thanks for stopping by today, and Sweet Stamping!