Aug 23, 2016 | Cards, Christmas, Gallery, Holiday, New Products, Open House, Sales |
Scroll to the bottom of this post for details on
BOGO Sale and Open House this Sunday, noon-4pm!
I am honored to be featured today on Brian King’s blog, stampwithbrian.com. He is an enormously talented card maker and inspires many people every day, including myself. He asked me to make something with the new Santa’s Sleigh bundle (Santa’s Sleigh stamp set and Santa’s Sleigh Thinlits Dies) which will be available to purchase when the 2016 Holiday catalog goes live on September 1. I was excited he asked me to use this one because I hadn’t used it yet. There are 15 stamps and 12 dies – plenty of images and shapes to make lots of different projects.

Here is what I came up with:
I wanted to use the sleigh and reindeer framelits, but couldn’t fine a good way to fit them onto a regular 4-1/4″ x 5-1/2″ card. So I decided to create the scene I wanted, then build the card around it. It ended up being 4″ x 8″, so I made an envelope for it from a piece of Tip Top Taupe paper from the 2015-2017 In Color Envelope Paper.

Here’s how I did it:
I cut two sleighs, one from Real Red card stock and one from a Gold Foil Sheet. I cut the runner off the bottom of the red one and glued it onto the gold one, so I had a red sleigh with a gold runner. Then I cut the decorative top piece from the Gold Foil Sheet and glued it over the red. So the sleigh is three layers and the runner is only one.
Most of the stamping on this card is tone on tone. I stamped the tree in Garden Green ink onto Garden Green card stock and cut it out with the coordinating die. I glued it to the back of the sleigh so it looks like it’s propped inside it.
I stamped two deer. I inked up the stamp once with Crumb Cake ink on the body and Whisper White Craft ink on the antlers, and stamped it onto Crumb Cake card stock. I inked it up again with Soft Suede ink on the body and Whisper White Craft ink on the antlers, and stamped it onto Soft Suede card stock. I set the craft ink with my heat tool, then I cut out the two deer with the coordinating die.
I stamped the bow in Real Red ink onto Real Red card stock, and the wreath in Garden Green ink onto Garden Green card stock, and cut them out with the coordinating dies. I glued the bow onto the neck of one deer. I cut the wreath so I could slip it around the other deer’s neck and glued it in place.
I stamped the sentiment in Versamark ink onto Very Vanilla card stock and heat embossed it in gold. I cut it out with a banner die from the Gift Card Envelope & Trims Thinlits. The die is notched on only one end, so I cut the sentiment with the notched end of the die close to one end of the sentiment, then cut it again with the notched end near the other end of the sentiment. I matted this with a 3/4″ wide strip of Gold Foil Sheet and used Paper Snips to notch the ends to match. (I hurriedly typed up the info for Brian, and I think I may have mistakenly told him I used a different die set for this banner; maybe the Cupcake Cutout Framelits?)
So now I had all these pieces that needed a background. I envisioned a road through the snowy woods.
I began with a piece of watercolor paper cut large enough to contain the scene (3-1/2″ x 7-1/2″.) I used a Stampin’ Spritzer to get the front wet. I also spritzed the back a couple times to help keep it from curling up.
I used an Aqua Painter to swash Soft Sky ink onto most of the paper, and Crumb Cake ink onto the bottom portion. The road wasn’t as dark as I wanted, so I went over it with a Soft Suede Stampin’ Write Marker and blended it with the Aqua Painter. I could’ve let it sit overnight to dry, but I was too impatient, so I used my heat tool to dry it in just a few minutes.
I used a stamp from the Thoughtful Branches stamp set for the trees. I inked it in Mint Macaron ink and stamped off before stamping onto the watercolor paper. I wanted there to be a hint of trees in the background, but with so much snow you can barely see them.
I matted this piece with Gold Foil Sheet (3-3/4″ x 7-3/4″) and glued that to a Garden Green card base (8″ x 8″, scored at 4″.)
I adhered the sleigh to the card front. I glued the runner and used Stampin’ Dimensionals under the topmost part of the sleigh and the tree. I did this because I couldn’t get the foam adhesive cut skinny enough to go under the pieces, but I wanted the sleigh to stand out from the card a bit.
I adhered a piece of gold twine from the new Baker’s Twine Trio Pack to the back of the Soft Suede deer’s neck. Then I glued the deer to the card front. I adhered the Crumb Cake deer to the card with Stampin’ Dimensionals.
For the reins, I ran the gold twine from the darker deer back to the sleigh and back to the lighter deer. I threaded it through the wreath and around the neck and adhered it on the back with a Glue Dot. I adhered the reins to the underside of the front of the sleigh with a Glue Dot. I used my Paper Piercing Tool to push the glue dots into place.

The last thing to do was glue the sentiment onto the top center of the card. I would usually put the sentiment somewhere else on the card, but this reminded me so much of Christmas cards my family received when I was little, so this just seemed the right place for it.
Here’s what I used:
The holiday items will be available to purchase on September 1. Everything else can be purchased now by clicking on the images below.

You can see this card, and others I’ve made, up close this Sunday at my Holiday Catalog Open House AND a BOGO Sale of retired items. Here are the details.
Stampin’ Up’s brand new Holiday Catalog goes live September 1
and I’m celebrating a few days early with an

– AND –

August 28, 2016, noon-4 PM
***** It’s FREE to attend *****
Please RSVP here so I can make sure I have enough Make & Take kits.
1621 Executive Park Lane NE, Atlanta, GA 30329
VERY IMPORTANT: PLEASE PARK ALONG THE STREET (WOODCLIFF) BEHIND OUR BUILDING. DO NOT PARK NEXT TO ANY OF THE UNITS IN THIS COMPLEX. Thanks!
Tell your friends!

Shop my retired products and get the same $ amount in new products FREE!
I have a LOT of retired Stampin’ Up! items that need new homes. I mean, boxes and boxes and boxes full. I can’t even walk through the room they’re stored in! I really have to let this stuff go. Sooooo, I’m having a BOGO sale:
Whatever you spend on retired items, I will give you that much in new items! You only pay tax and shipping on the new stuff. Yes, you get twice the product!
Example: Say you buy $100 in retired product from me. Then you get $100 toward an order of new product. So you can get $100 in new product and pay just $17.70 for tax and shipping OR you can subtract $100 from a larger order of new product.
PLUS you get a Gum Ball for every $50 you spend. (See how Gum Ball Rewards work here.)
This is a wonderful way to stock up, not only on retired products you may have missed, but also on current products in the Annual and Holiday catalogs. Be sure to have your current product wish list ready before you come, to make the order process easier.
– order from the brand new Holiday catalog AND from the current Annual catalog. I will place Holiday orders when the catalog goes live on September 1.
– get your FREE catalog
– see new products AND wonderful new projects made with them
– order new products
– use new products (FREE Make & Take)
– sign up for classes
– schedule a private class and receive a gift
– subscribe to Paper Pumpkin
– get the starter kit
– earn Gum Ball Rewards for a free stamp set (See how Gum Ball Rewards work here.)
Email candy@stampcandy.net with any questions or comments. Use subject line “OH/BOGO”
Thanks for stopping by today, and Sweet Stamping!

Aug 22, 2016 | Cards, Christmas, Gallery, Holiday, New Products |

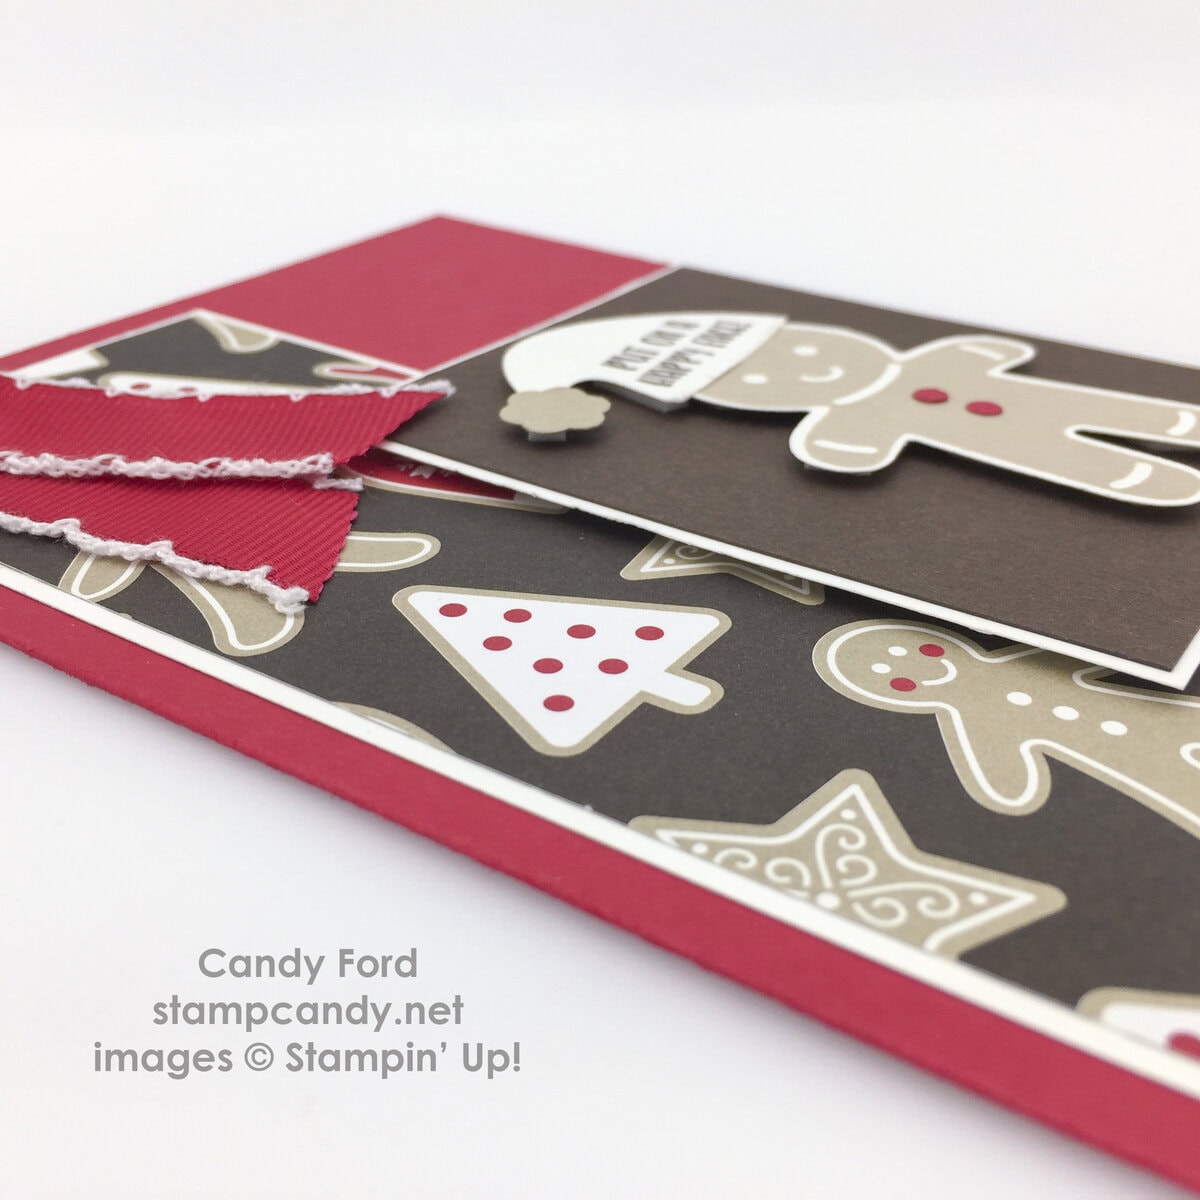
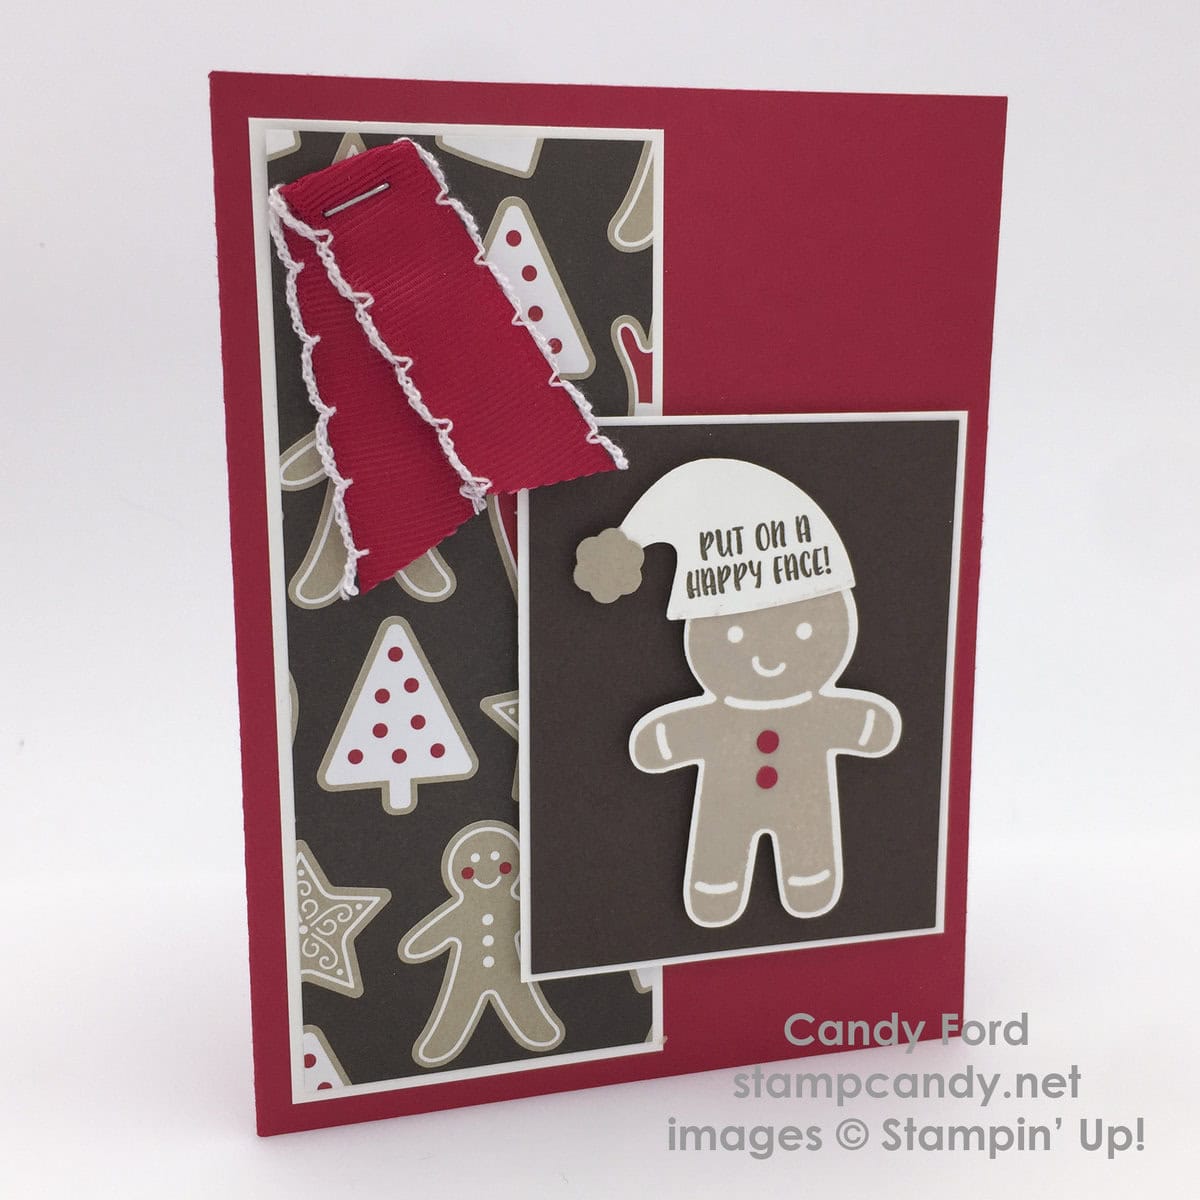
It’s easy to put on a happy face when you apply it with icing! I have really loved playing with the new Cookie Cutter Christmas Bundle (Cookie Cutter Christmas stamp set and Cookie Cutter Builder Punch) and the Cookie Cutter Halloween stamp set that also goes with the punch.
And can we talk about the Candy Cane Lane Designer Series Paper? Real Red, Crumb Cake, and Whisper White has long been one of my very favortie color combos. This DSP has those three colors along with Early Espresso – an outstanding addition in my opition.
Today’s card uses this bundle and the new DSP, as well as the new Jolly Hat Builder Punch, and the new Real Red 3/4″ Stitched Edge Ribbon.
Here’s how I did it:
I stamped the little guy in Crumb Cake ink (what other color could I use, right?) onto Whisper White card stock, then cut him out with the Cookie Cutter Builder Punch. I punched two buttons from Real Red card stock with the 1/8″ Circle Punch and glued them to his torso.
I used the new Jolly Hat Builder Bunch to cut the hat from Whisper White card stock and the pompom from Crumb Cake card stock. I stamped the sentiment from the Cookie Cutter Christmas stamp set in Early Espresso ink onto the hat, then I glued the hat pieces to the gingerbread man. I attached him to a piece of Early Espresso CS with Stampin’ Dimensionals, and matted that with Whisper White CS.
I cut a piece of the Candy Cane Lane DSP, stapled on a piece of the ribbon, and matted it with Whisper White CS.
I glued the matted DSP to the Real Red card base, then attached the matted gingerbread man piece with Stampin’ Dimensionals.

Here’s what I used:
The Christmas items will be available to purchase on September 1, 2016. Everything else is available now!
Three things:
- My Open House and BOGO Sale is this Sunday, August 28, noon – 4pm ET. Click here for more details.
- The Thoughtful Branches bundle is only available until August 31! Click here to see it.
- August 31 is the last day you can redeem the Bonus Days coupons you earned in July.
Thanks for stopping by today, and Sweet Stamping!
Aug 16, 2016 | Christmas, Classes, Events, Food, Gallery, Holiday, New Products |

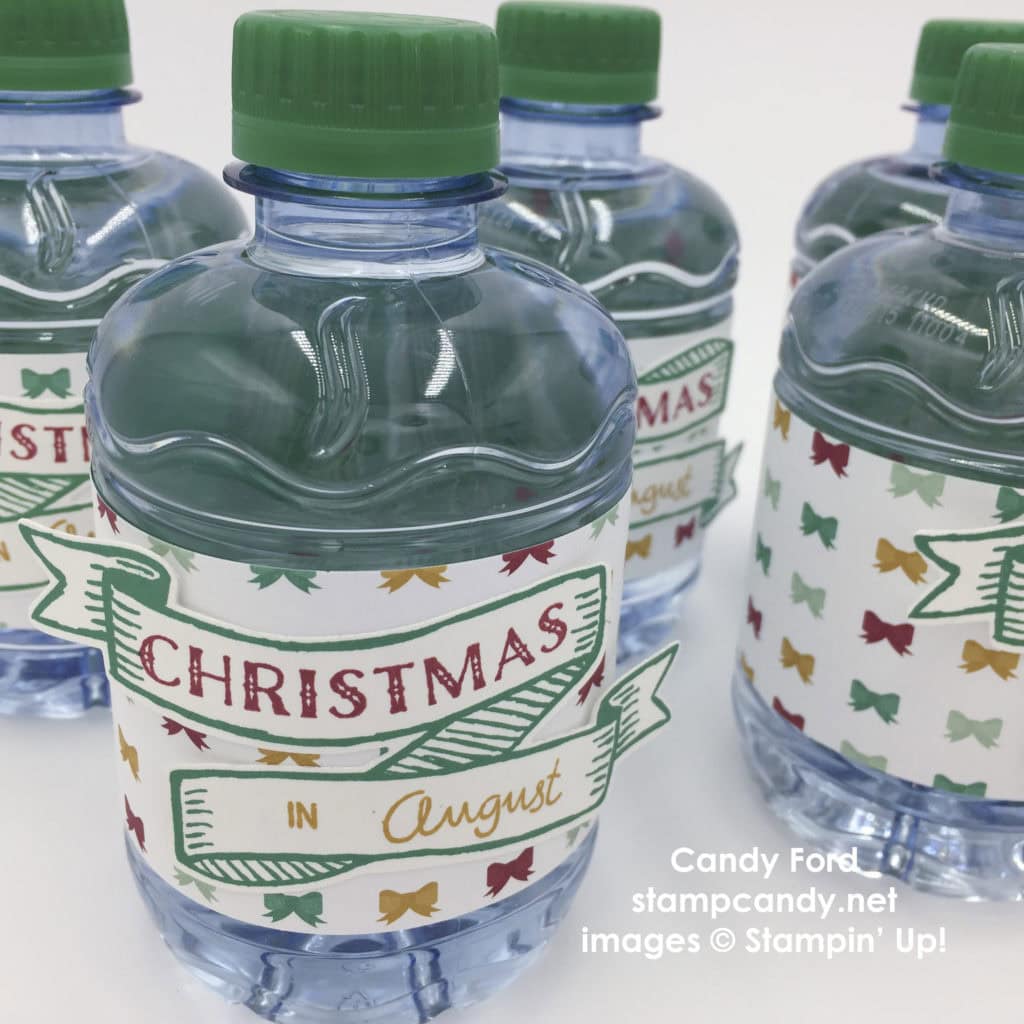
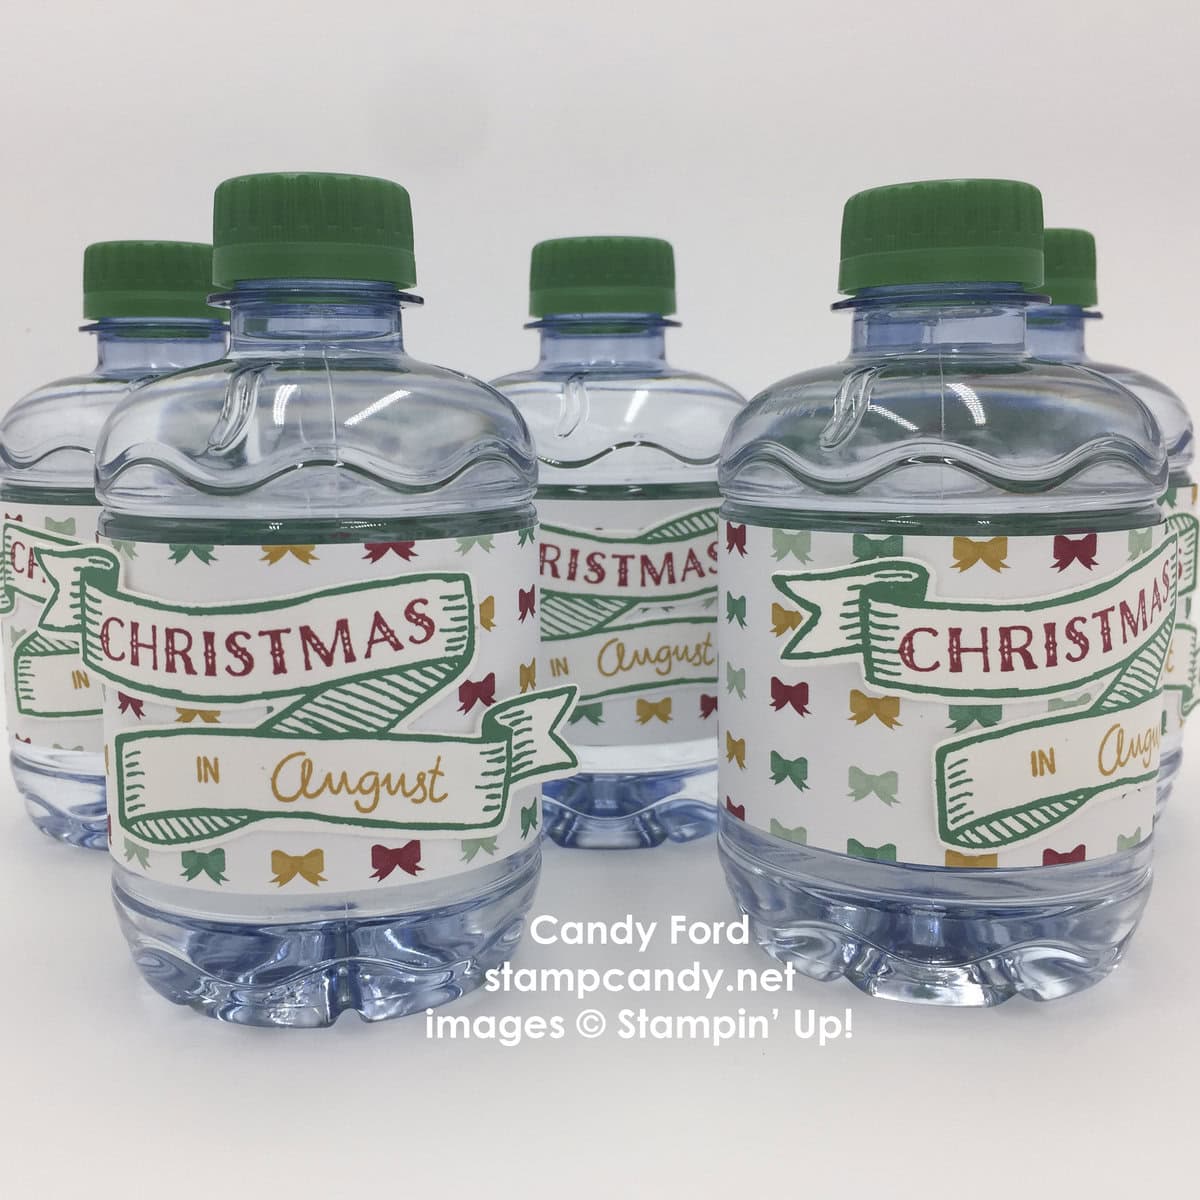
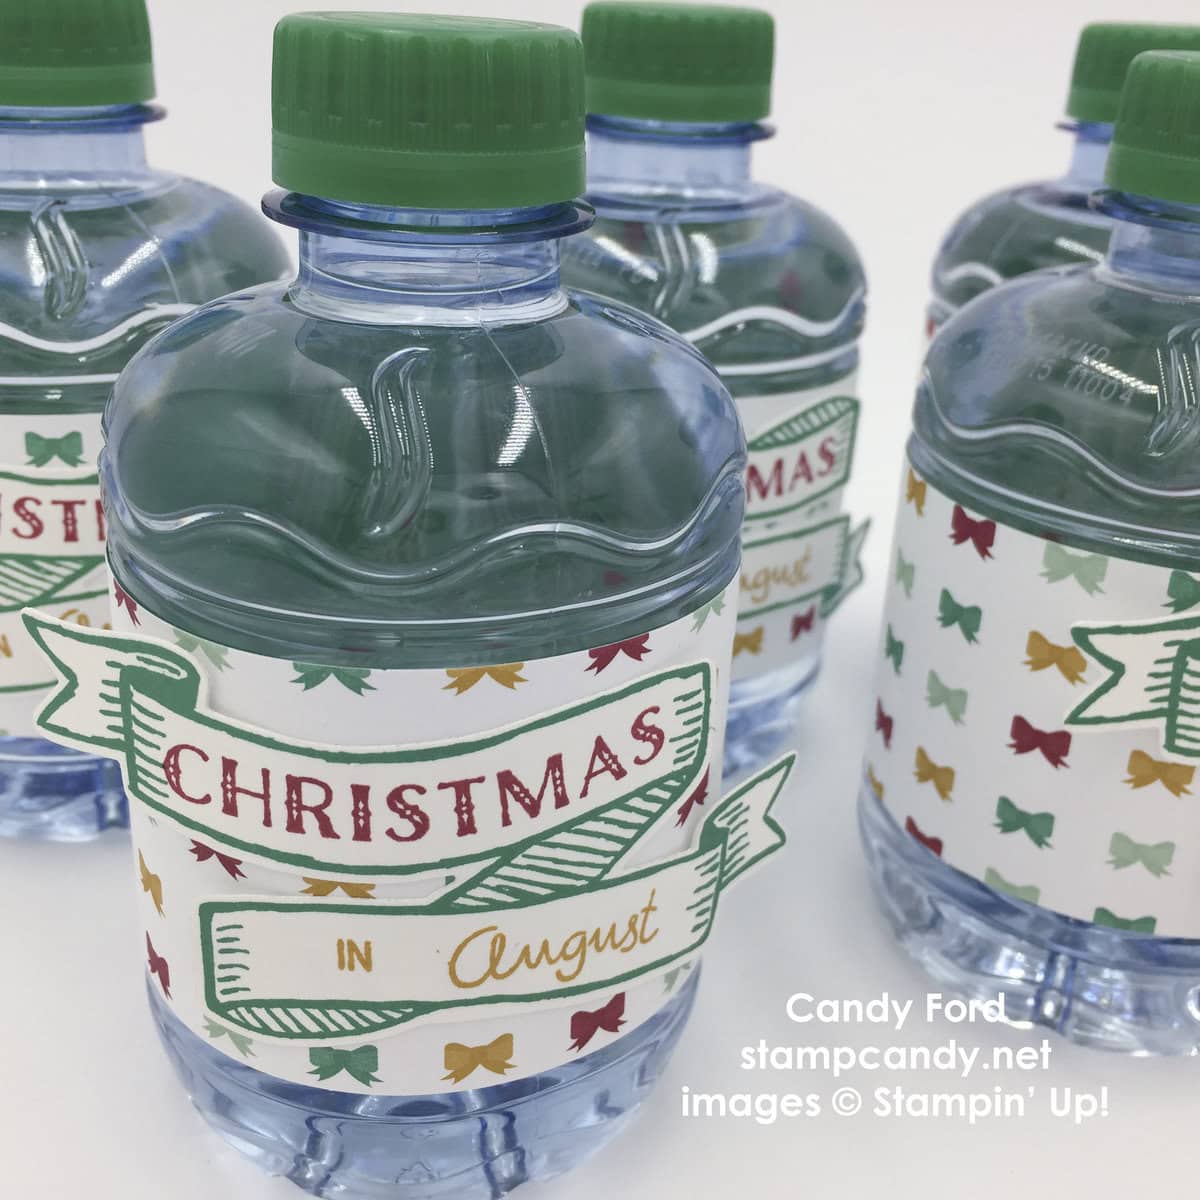
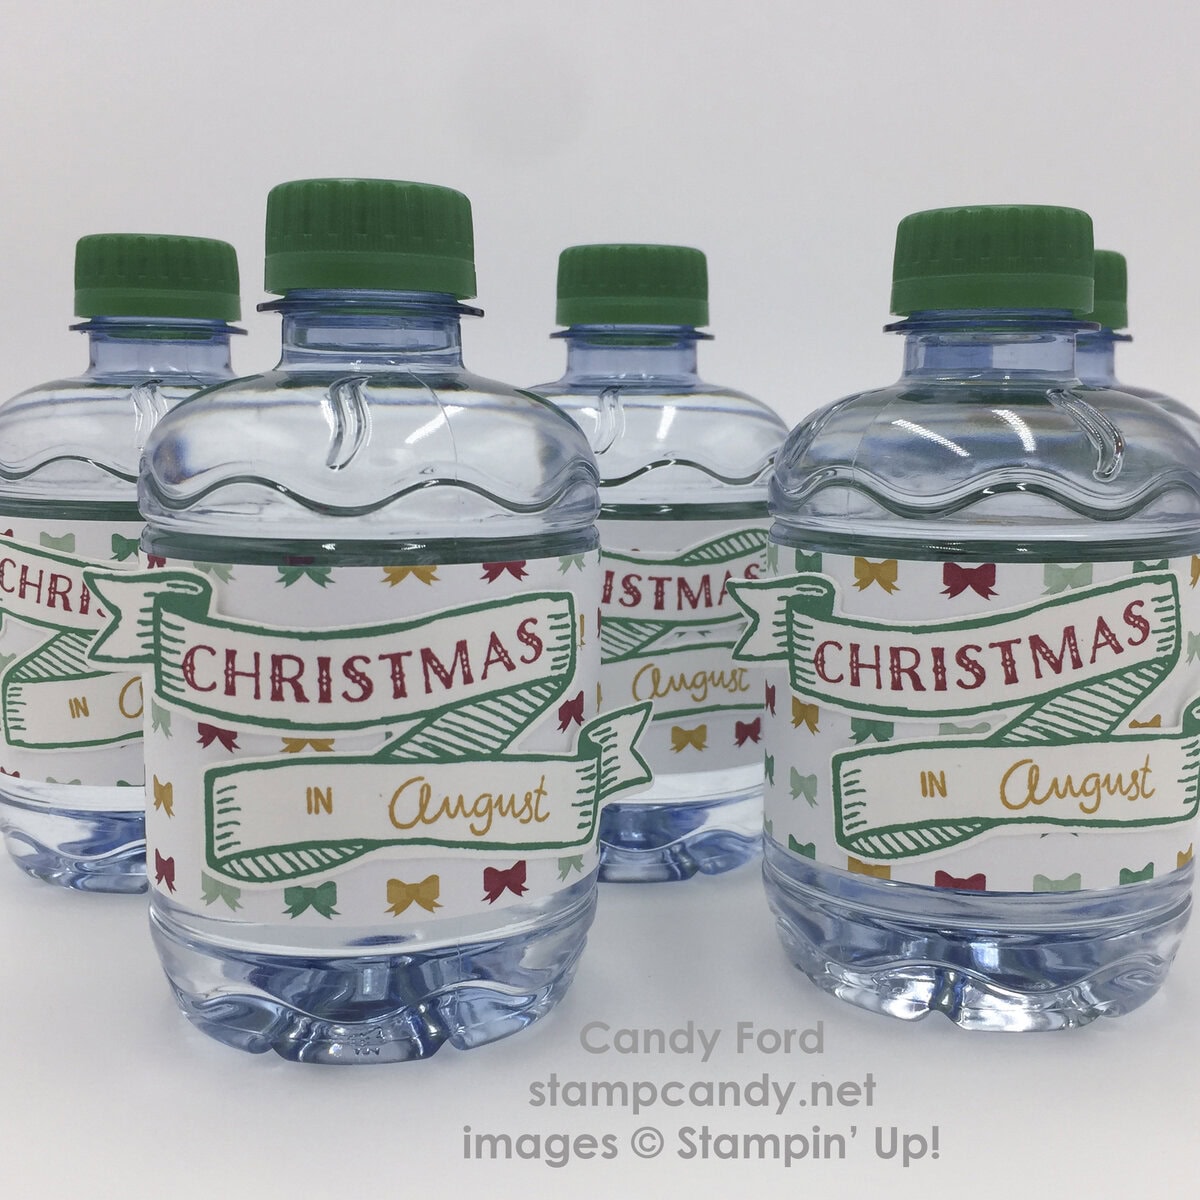
I always decorate bottles of water for my classes, not only because attendees need to stay hydrated, but mostly to let them know how special I think they are, and how much I appreciate them. My Christmas in August card class was this Sunday, and I thought I would share those bottles with you today.
I used to buy larger bottles, but too much was wasted. These smaller ones are just right. The brand doesn’t matter. Remove the original label and measure it. Cut your paper to that measurement, or maybe just a little longer.
Here’s how I did it:
These particular bottles are Dasani 10.1 fl.oz. I cut the 9″ x 2″ belly band from the new Presents & Pinecones Designer Series Paper. I put some Fast Fuse adhesive at each end, and wrapped it around the bottle.
I stamped the banner from the new Banners for Christmas stamp set in Emerald Envy ink onto Whisper White card stock. I then stamped “Christmas” from the same stamp set in Cherry Cobbler ink, and “in August” from the Project Life Date It stamp set in Delightful Dijon ink, inside the banner. Then I cut it out with the coordinating die from the Bunch of Banners Framelits. I attached the banner to the bottle with Fast Fuse, leaving just the two ends loose.
I recommend adding any ornamentation to the belly band after it’s on the bottle. If you add it before, it might pop off or stretch oddly when you curve the band around the bottle.
I hope this inspires you to do little things like this for your own events. Even just turning a boring old bottle of water into something that will make your guests feel special, since you went to the time and trouble (almost none of either, actually!) to create this for them.
Here’s what I used:
The first 2 items will be available when the new Holiday catalog goes live on September 1. Everything else is available now!
AUGUST HOSTESS CODE
PMTWBJMQ
If you are placing an order for less than $150, please use this Hostess Code. Click here for details on how to use the Hostess Code.If you are placing an order of $150 or more, you will receive Stampin’ Rewards on your order, so do not use the Hostess Code.
Thanks for stopping by today, and Sweet Stamping!
Aug 15, 2016 | Cards, Christmas, Gallery, Holiday, New Products |

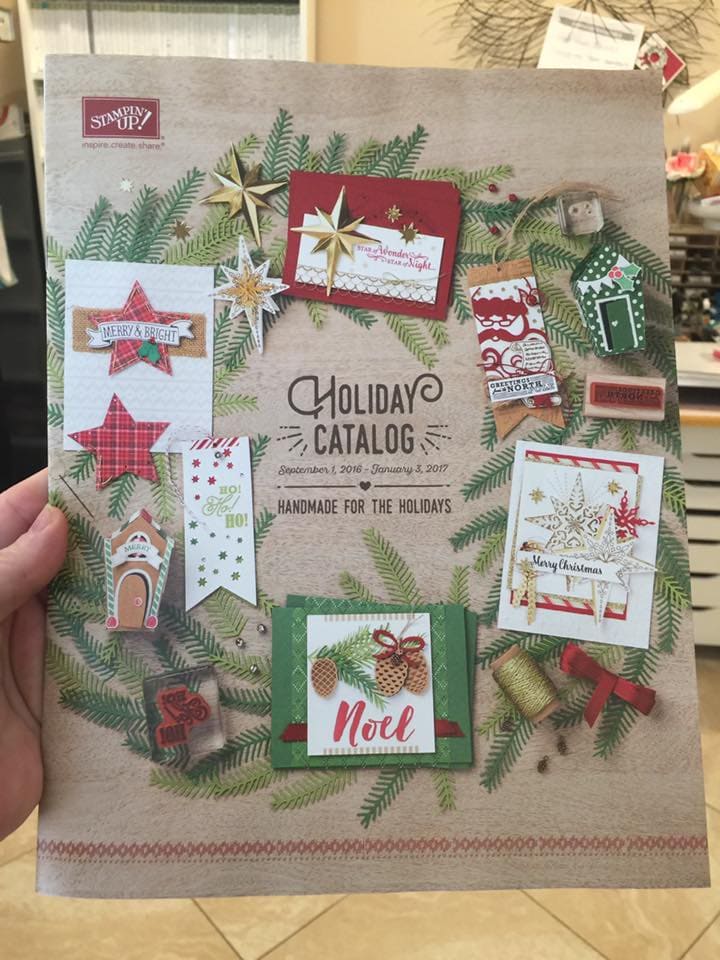
I am so excited about this year’s Holiday catalog! There are some amazing new items in it. Let me know if you need a copy and I’ll get one to you. (Of course, if you already have a demonstrator, please get it from them. Thanks!)

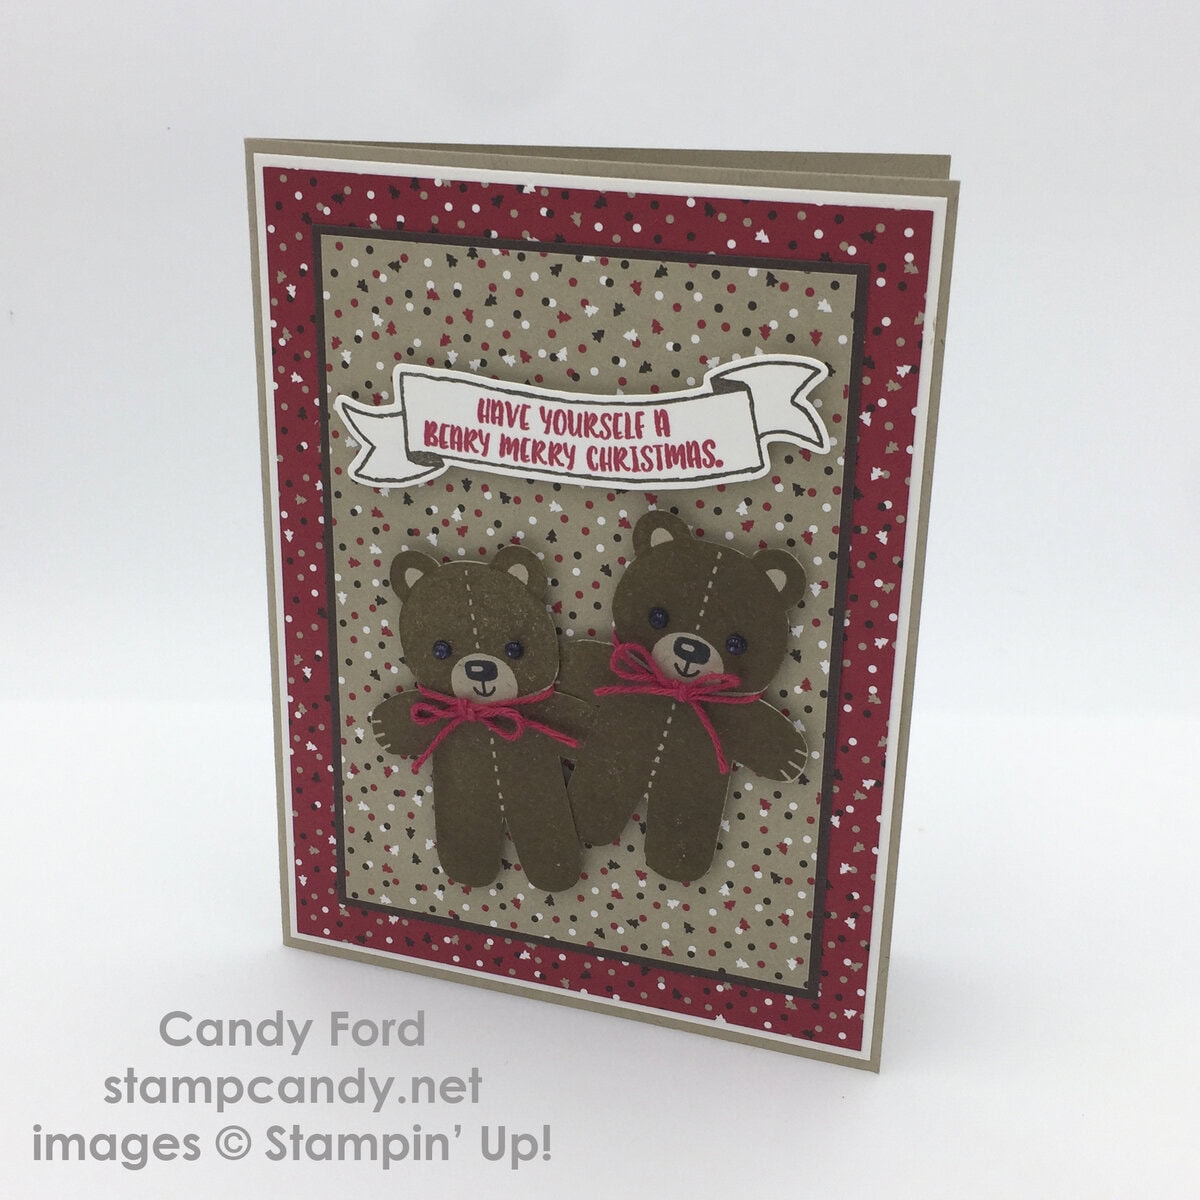
For today’s card, I used the new Cookie Cutter Christmas bundle: Cookie Cutter Christmas Stamp set and Cookie Cutter Builder Punch. Aren’t these teddy bears just too cute?

Here’s how I did it:
The card base is Crumb Cake with a Whisper White layer, and a layer of Candy Cane Lane Designer Series Paper on top of that. Then there’s an Early Espresso layer with another piece of the DSP on top. These two pieces of the DSP are the same pattern but with different background colors. Can you see the tiny trees in the pattern?
I stamped the banner from the Banners for You stamp set in Early Espresso ink onto Whisper White card stock, the stamped the sentiment in Real Red ink inside the banner. (The photopolymer stamps are easy to curve into the shape of the banner!) I cut it out with the coordinating die from the Bunch of Banners Framelits. I adhered it to the card with Stampin’ Dimensionals.
I stamped the two teddy bears in Soft Suede ink onto Crumb Cake card stock. I stamped their faces in Black Memento ink. Then I cut them out with the Cookie Cutter Builder Punch. Be sure not to stamp them too close together, because the punch has multiple shapes that it cuts out all at once, and you don’t want to cut out one bear only to realize you cut a circle out of the next one.
I colored the smallest Pearl Basic Jewels with a black Sharpie marker and put those over the eyes to make them pop a bit more. I tied Real Red twine around their necks and adhered them to the card with Stampin’ Dimensionals.
I’m not sure you can see it in the photo, but there’s something about the Soft Suede ink on the Crumb Cake card stock that makes everyone want to touch it. It looks like felt or velvet or something textured like that. But it’s just ink on card stock.
Here’s what I used.
The first 5 items will be available for purchase on September 1. Everything else is available now.
Thanks for stopping by today, and Sweet Stamping!
Aug 12, 2016 | Cards, Christmas, Gallery, Holiday, New Products |
This is another sneak peek of the upcoming 2016 Holiday Catalog. I know it’s early, but I just can’t help sharing these with you. I’m so excited for you to see the new products! This new catalog has sooooo many new wonderful products, including 16 new bundles!
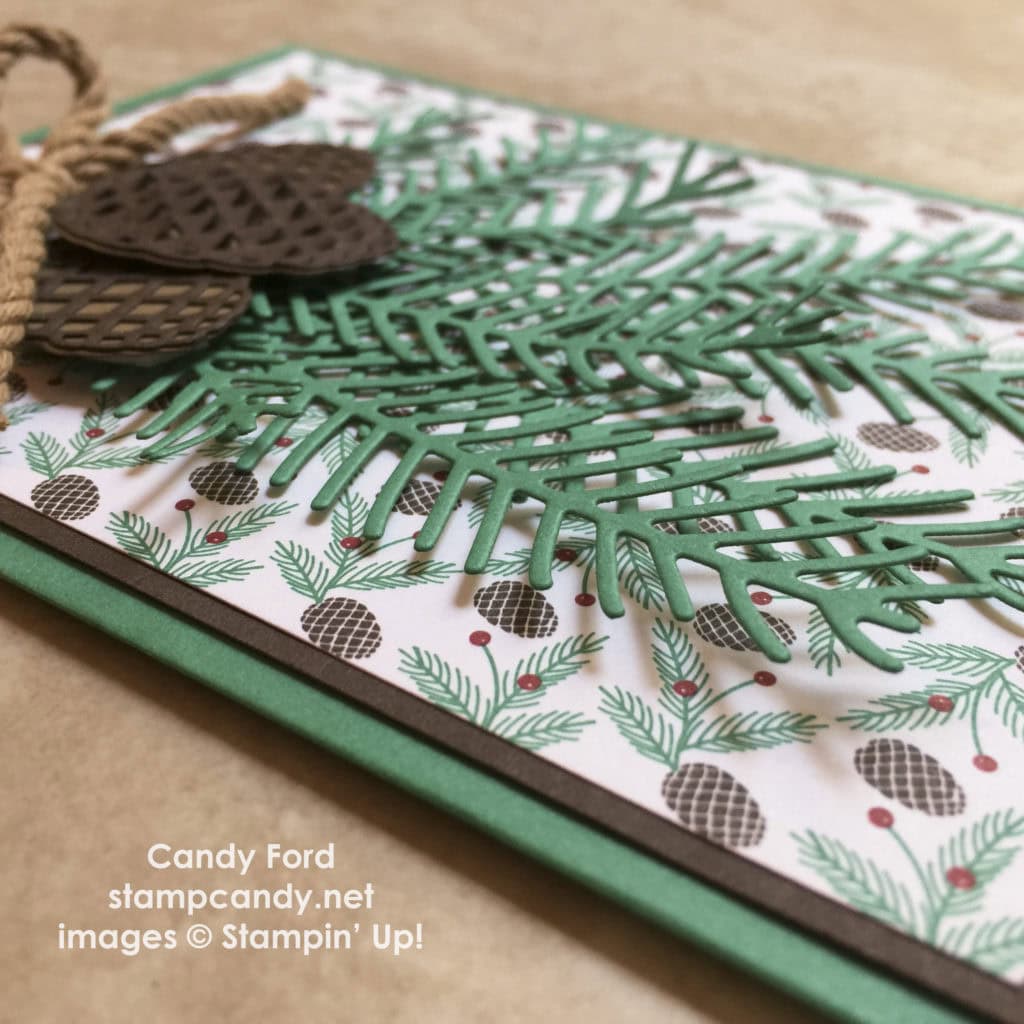
For today’s card I used the Pretty Pines Thinlits again. You can see the first card I made with these dies here. These Thinlits are available in a bundle with the Christmas Pines stamp set.
Here’s how I did it:
The card base is Wild Wasabi card stock. I stamped the sentiment, from the new Suite Seasons stamp set, in Versamark ink onto the card base, then heat embossed it in gold.
With the dies, I cut several twigs from Wild Wasabi card stock, and the bow from a Gold Foil Sheet. I cut the berries from Very Vanilla card stock with the 1/8″ Circle Punch. I glued all these pieces onto a piece of Cherry Cobbler card stock, and glued that to the card base.

I held it toward the light for a better angle to show how shiny the gold embossing is:

Here’s what I used:
These items will be available to purchase on September 1:
Click on the images below to get these items now!
AUGUST HOSTESS CODE
PMTWBJMQ
If you are placing an order for less than $150, please use this Hostess Code. Click here for details on how to use the Hostess Code.If you are placing an order of $150 or more, you will receive Stampin’ Rewards on your order, so do not use the Hostess Code.
Thanks for stopping by today, and Sweet Stamping!
Aug 9, 2016 | Cards, Christmas, Gallery, Holiday, New Products |
I know it may seem early, but I just had to share a little sneak peek of the upcoming Holiday catalog. I can’t show you the inside of the catalog online yet, but I can give you an actual catalog! Let me know if you need one. (If you already have a demonstrator, please get your catalog from them. Thanks!)
I’ve had these new products to play with for almost a week now and I couldn’t wait any longer. (Seeing, and getting, new products a month before everyone else is just one of the many awesome perks of being a Stampin’ Up! Demonstrator! Click on “Be a Candy Heart” above to get more details.)
I have fallen in love with the new Presents & Pinecones suite of products, especially the Pretty Pines Thinlits Dies. I’m thrilled to be able to share this card that I made using some of these products.

Here’s how I did it:
The card base is Emerald Envy card stock with an Early Espresso layer, then a piece of the Presents & Pinecones Designer Series Paper on that.
I used the Pretty Pines Thinlits to cut pinecones from Soft Suede and Early Espresso card stock, and pine boughs from Emerald Espresso card stock. I glued the detailed Early Espresso pinecones onto the solid Soft Suede pinecones. I then glued the pine boughs and pinecones to the card front.
I tied a bow with the new Kraft Rope Trim and attached it to the card with Glue Dots.
Here’s what I used:
These are products from the upcoming 2016 Holiday Catalog that will be available September 1.
These are current products that you can get right now by clicking on the images below!
AUGUST HOSTESS CODE
PMTWBJMQ
If you are placing an order for less than $150, please use this Hostess Code. Click here for details on how to use the Hostess Code. If you are placing an order of $150 or more, you will receive Stampin’ Rewards on your order, so do not use the Hostess Code.
Thanks for stopping by today, and Sweet Stamping!


