Dec 9, 2014 | Christmas, Decor, Kits, Studio |
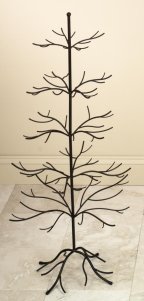
I’ve been looking for something I can 1) decorate in my studio for the holidays and 2) maybe even leave up all year to showcase samples. I found this online. It’s dark brown metal, and heavy enough to hold a lot. I don’t think it’s too Christmasy to use year round. I saw it on several web sites, but Amazon.com had the best deal.
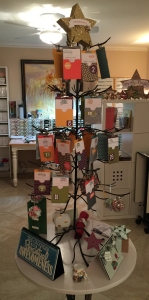
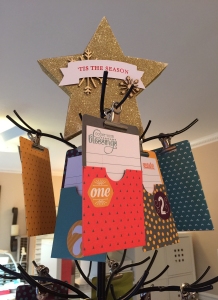
I’ve hung my Gratitude for Days Simply Created Kit around the tree, starting at the top, and it goes almost to the bottom. I fill out a card every day.
I have some of my handmade ornaments around the bottom.
And, of course, a gold glitter star box from the Many Merry Stars Simply Created Kit sits on the top – I cut a hole in the bottom and slipped it over the top point of the tree.
I’ll be sharing some gift ideas in the coming days. I like to make nice presentations for all those small gifts, like things for the UPS man, etc. And Stampin’ Up! has all I need!
What are you doing to get ready for the holidays? I’d love to know!
Be sure to stop by tomorrow for the Stampin’ Pretty Pals Blog Hop! You’ll get great ideas for your Wish List.
Speaking of your Wish List, did you know that folks can buy you a Stampin’ Up! Gift Certificate? That’s right! They can purchase the gift certificate from me, then you can use it to buy your favorite Stampin’ Up! Products! Just give them my contact info and I’ll be more than happy to help them: email candy@stampcandy.net or call 404-661-5222.
Thanks for stopping by today, and Sweet Stamping!
Dec 7, 2014 | Christmas, Decor, Kits |
I put together most of the Many Merry Stars Simply Created Kit (138104) a while back, but I didn’t do the glitter stars. I love the look of glitter, but it can be so messy to work with, especially for a klutz like me. But I decided my ornament tree needed a topper, and I thought one of the glitter star boxes would look great.
Here are the three parts of the star box. It’s super easy to assemble. The sides come as one long pre-scored strip with adhesive tabs. Fold all the score lines before you start. Just peel the adhesive liner off and stick to the back side of stars. I did one star point at a time, then moved on to the next one before peeling off any more adhesive liner.

I had heard about using Aqua Net hair spray to prevent glitter from falling off a project. I decided to try it, so off to the supermarket I went.
I took my assembled star outside and placed it on several sheets of Grid Paper (130148.) Then I sprayed the heck out it. I doused it with a couple layers. Be careful because I almost got it too wet at one point. It’s best to let each layer dry before applying the next.

And it works! Well, I mean, it isn’t magic, but practically no glitter comes off on my hand now.

Once it was dry I scraped off a bit of glitter with my Paper Snips (103579) so the dimensionals would have a better chance of sticking.

I used Stampin’ Dimensionals (104430) and Liquid Multipurpose Glue (110755) to adhere the embellishments. I weighed it all down with the glue bottle while it dried.

Check back later to see it on the tree!
Thanks for stopping by today, and Sweet Stamping!
Dec 2, 2014 | Christmas, Decor |

I know this looks like it took forever, but these ornaments are super easy and quick.
First take a 12″ x 12″ piece of DSP and score at 5″ and 9″. Then cut it into 1/2″ strips perpendicular to the score lines, so that each strip is scored at 5″ and 9″.
Fold each strip into a Z like so.

Curl in the shortest part.

Curl the middle part over the first loop.

Curl the longest part over the first two. Now you have a set of 3 different sized loops.

Staple it together.


Place a glue dot in the stapled area…

…and adhere it to the next loop set.

Continue until you have enough to make an ornament you like. I used 17, but I could have added more.
Once the last two are adhered together and you have a circle, adhere a 7/8″ scallop circle to the center with glue. Do this on both sides.
Tie a ribbon through one of the outer loops to hang.


It looks quite delicate from the front…

…but substantial from the side.


For this ornament I adhered all layers with glue dots instead of stapling. The loops are much looser, so I could make an ornament with as few as five. I adhered a star to the center instead of a scallop circle.

Here’s what I used:
Thanks for stopping by today, and Sweet Stamping!
Nov 30, 2014 | Decor, Kits |

I’ve had the Gratitude for Days Simply Created Kit for a while now, but didn’t take the time to put it together until a couple days ago. Hubby and I went to my in-laws’ house for a few days for Thanksgiving, and I had taken the kit with me hoping I would have some time to play. Friday afternoon, while everyone was chilling out after having eaten turkey, dressing, et al for the 3rd time in two days, I had the perfect opportunity.
I’ll admit I wasn’t sure I would like this kit when I first got it. But once I got it put together – which was very easy and fast – I loved it! I hung it up in a couple different places at their house, trying to get a good pic – on an etagere and on the porch railing.
I’m not exactly sure where I’ll hang it in my house – maybe in the new stamping studio? I do know I have a lot for which to be grateful, and I’ll be filling up these cards in no time.


Here’s what I used:
Thanks for stopping by today, and Sweet Stamping!
Nov 29, 2014 | Decor |
Okay, this is the easiest thing in the world. Thanks to Pam Morris for the idea!
Cut a Curvy Keepsake Box out of Fancy Designer Foil Vellum, assemble it, and put a battery-operated flickering tea light inside. That’s it!
Set a few of these around to create a magical ambiance. Hang them on the Christmas tree. Give them as gifts.

This is all you need to make these:
Thanks for stopping by today, and Sweet Stamping!
Nov 24, 2014 | Christmas, Decor |
When I was making some Geodesic ornaments I looked at the belly band and thought it might make a cute napkin ring. And I was right! You may recognize this one from an earlier post (see how to make geodesic ornaments here.)
It was cute as it was:

but of course I had to add some doodahs to it:

I think I’ll make more of these. Oooooh, maybe even for gifts! Aren’t I clever?
Thanks for stopping by today, and Sweet Stamping!
Here’s what I used: