Dec 16, 2016 | Bags, Christmas, Food, Gallery, Gifts, Holiday, Retiring Products |
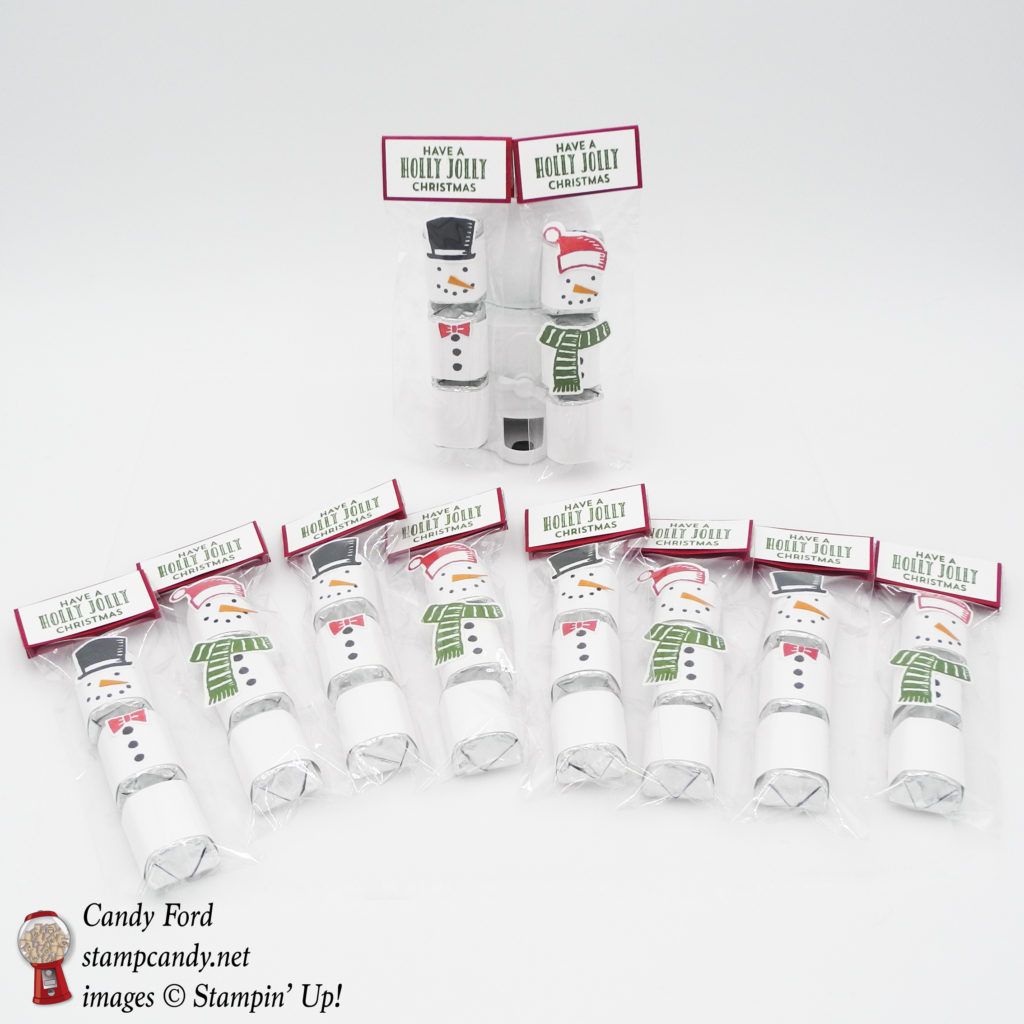
Christmas is only 10 days away! Today’s project is another gift you can make for all those people in your life you want to recognize with just a little something. They are snowmen made from Hershey’s Nuggets.
Here’s what I made:
Here’s how I did it:
For the snowmen:
I cut strips of Whisper White card stock to 1″ x 3″. This is the perfect size to wrap around Hershey’s Nuggets.
I left the bottom strip blank.
On the center strip, I stamped buttons from the Snow Place stamp set in Memento Black ink.
On the top strip, I stamped the face using one eye from one of the faces in the Foxy Friends stamp set. I stamped it twice for the eyes, and 5 times for the mouth.
I wrapped the strips around Nuggets.
On a separate piece of Whisper White card stock, I stamped the hats, tie, and scarf from the Snow Friends stamp set in Memento Black, Real Red, and Garden Green inks. Then I cut them out with the Snow Friends Framelits Dies. I glued these pieces to the Nuggets as shown.
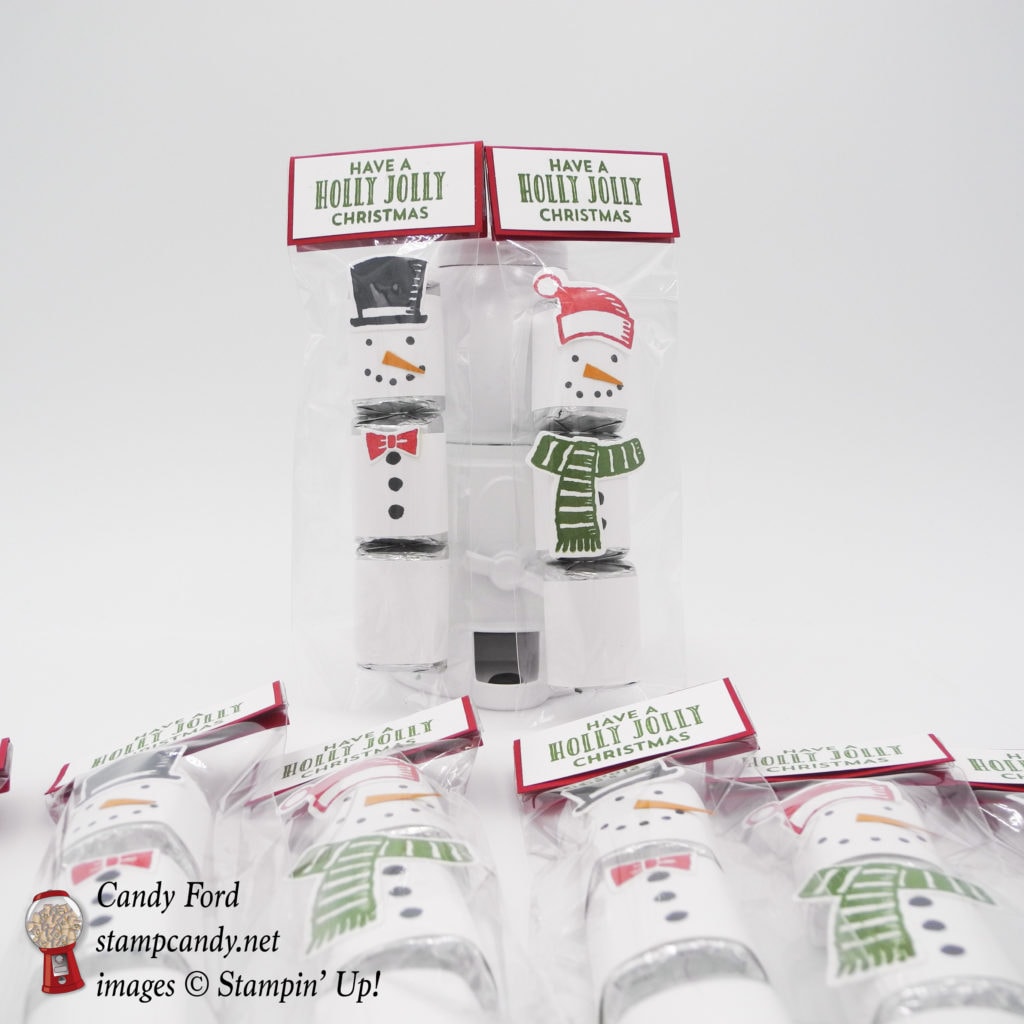
For the nose, I used Paper Snips to cut a tiny wedge from a piece of Pumpkin Pie card stock. I glued that onto the face.
For the bags:
I dropped the Nuggets into a 2″ x 6″ Cellophane Bag, and folded over the top.
I cut a piece of Real Red card stock to 2″ x 2″ and scored it at 1″ to fold it in half. I stapled it to the top of the bag. The Handheld Stapler is available only while supplies last!
I stamped the sentiment from the Stitched With Cheer photopolymer stamp set in Garden Green ink onto a 1-7/8″ x 7/8″ piece of Whisper White card stock, then glued it to the Real Red bag top. The Stitched With Cheer stamp set is retiring soon, so get it while you can!
Note: I cut a lot of strips at once, laid them out, and stamped them all. This assemble line method enabled me to make a whole bunch of these in very little time.
Here’s what I used:
Thanks for stopping by today, and Sweet Stamping!

Dec 10, 2016 | Bags, Boxes, Christmas, Food, Gallery, Gift Wrap, Gifts, Holiday |
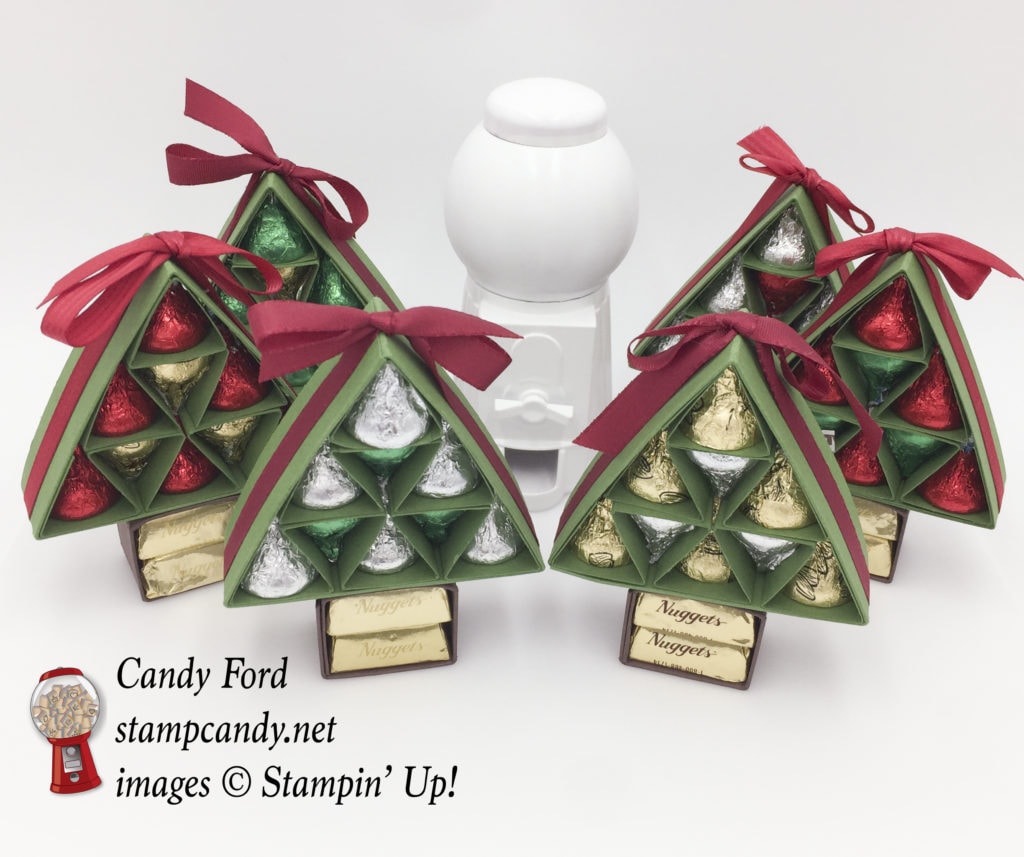
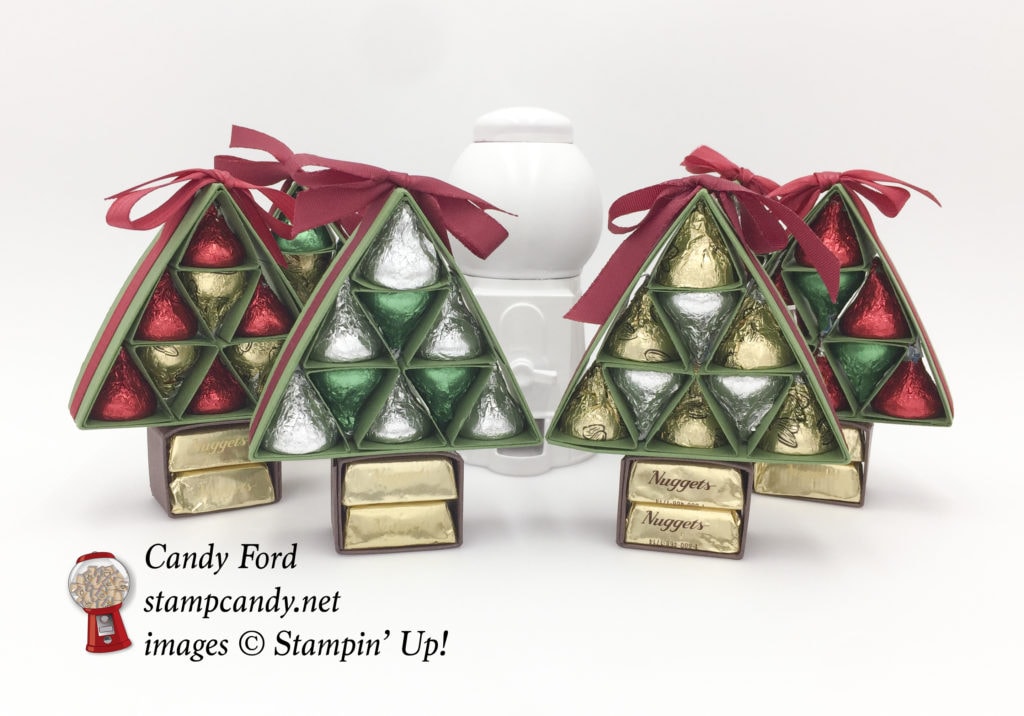
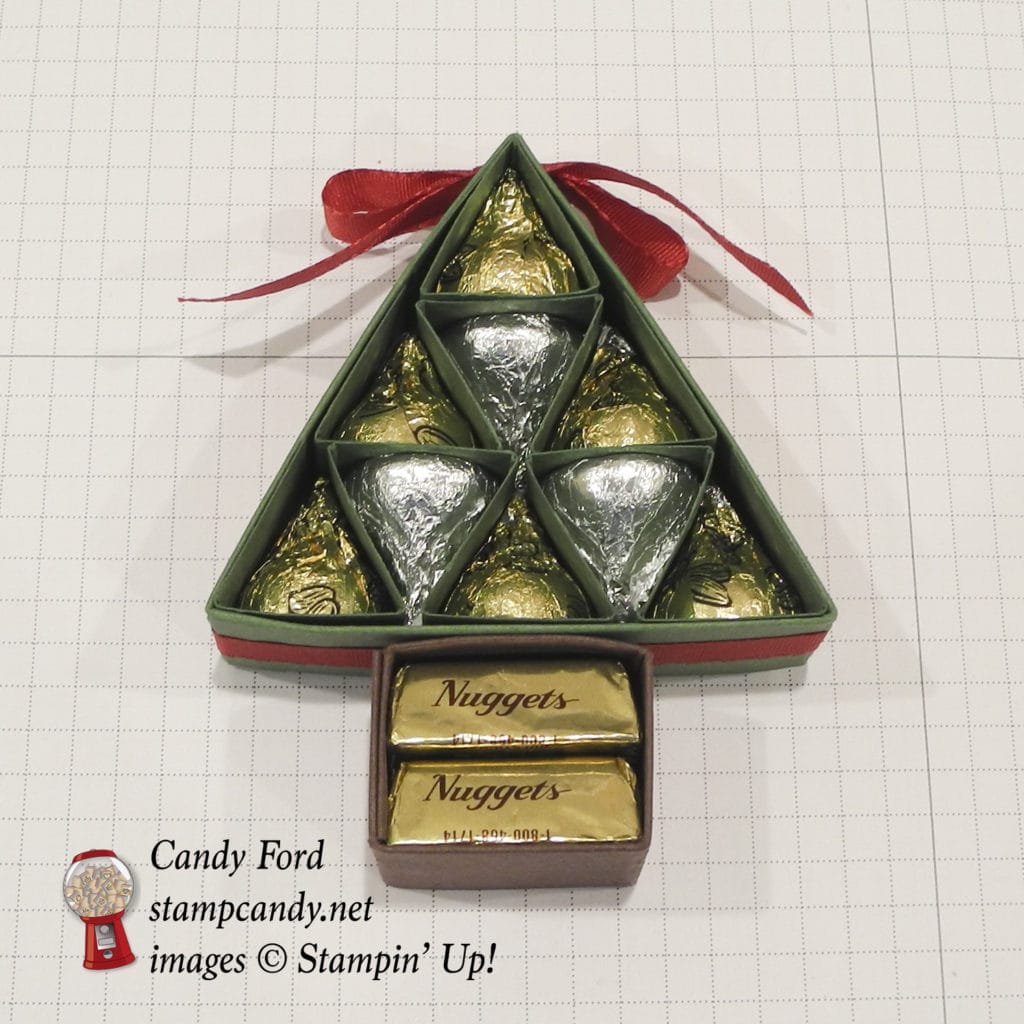
Need a cute little gift for someone? This is perfect, and it’s a whole lot easier than you may think. I’ve made and given several of these already. One day I was running late (imagine that!) and made 8 of these in about 15 minutes.
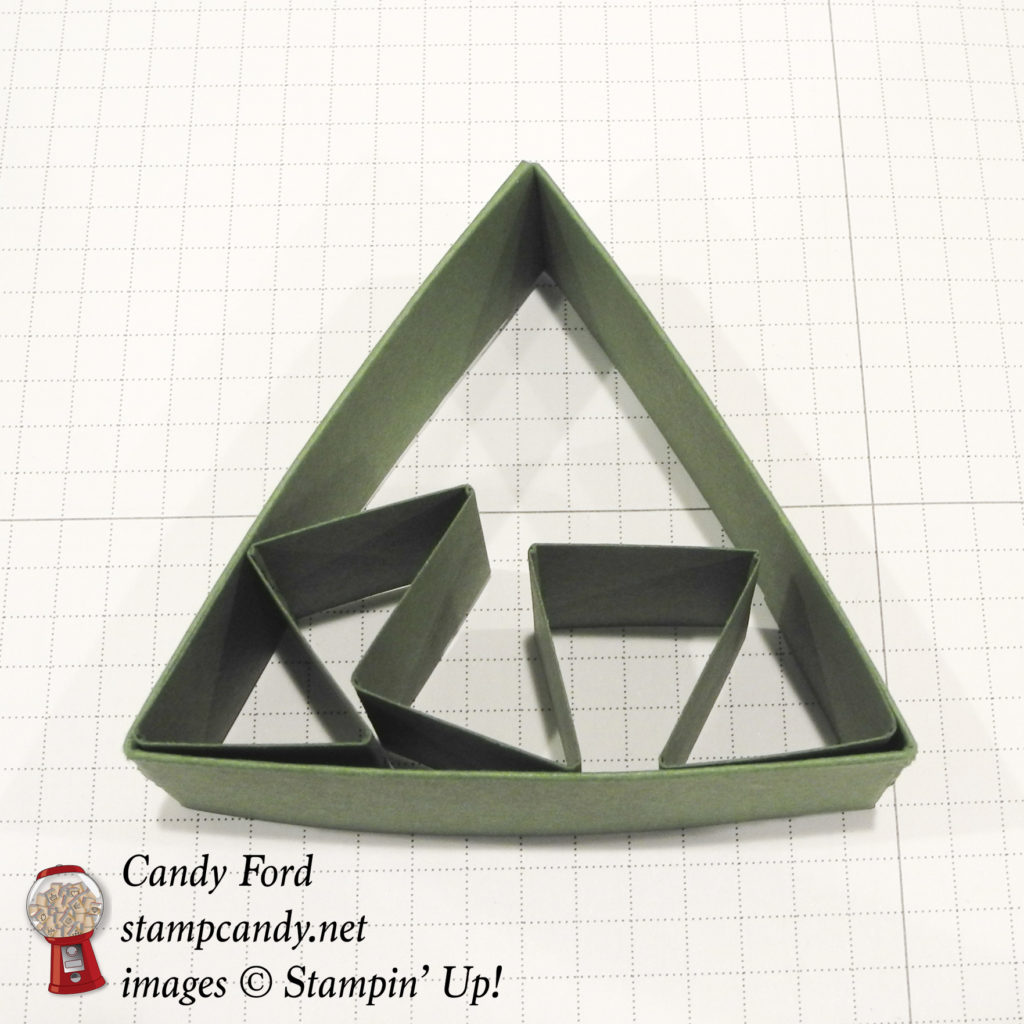
Here’s what I made:
Here’s how I did it:
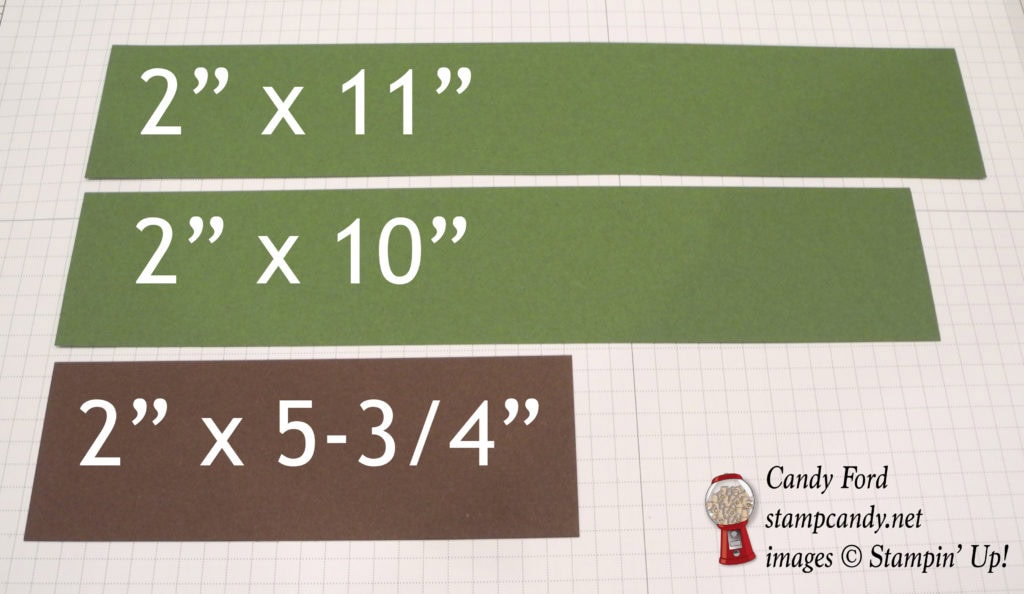
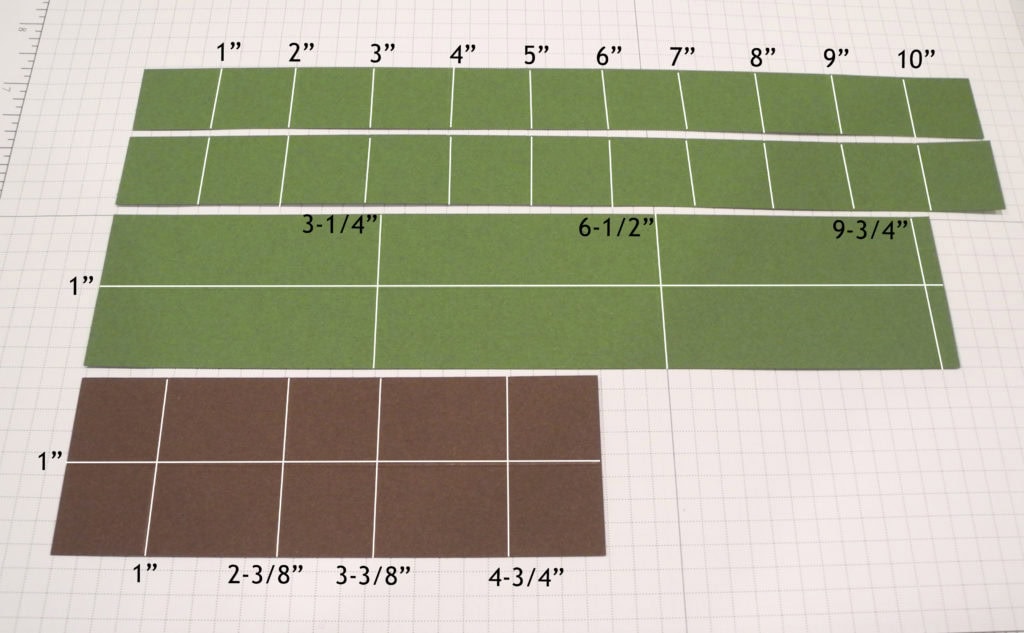
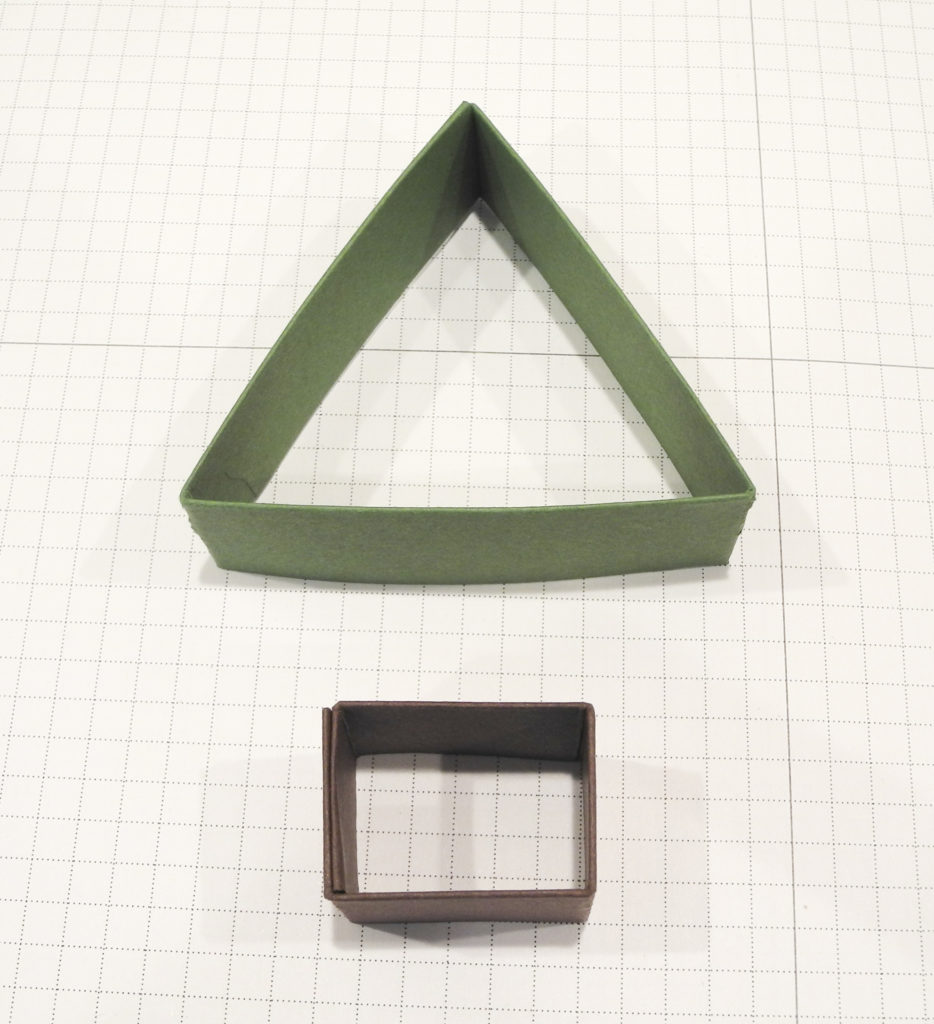
Cut one piece of Garden Green card stock to 2″ x 10″. Score on the long side at 3-1/4″, 6-1/2″, and 9-3/4″. Score on the short side at 1″. Fold it in half to 1″ x 10″ and glue to keep it closed. Fold all score lines to form a triangle. Glue the 1/2″ area at one end to the inside of the other end.
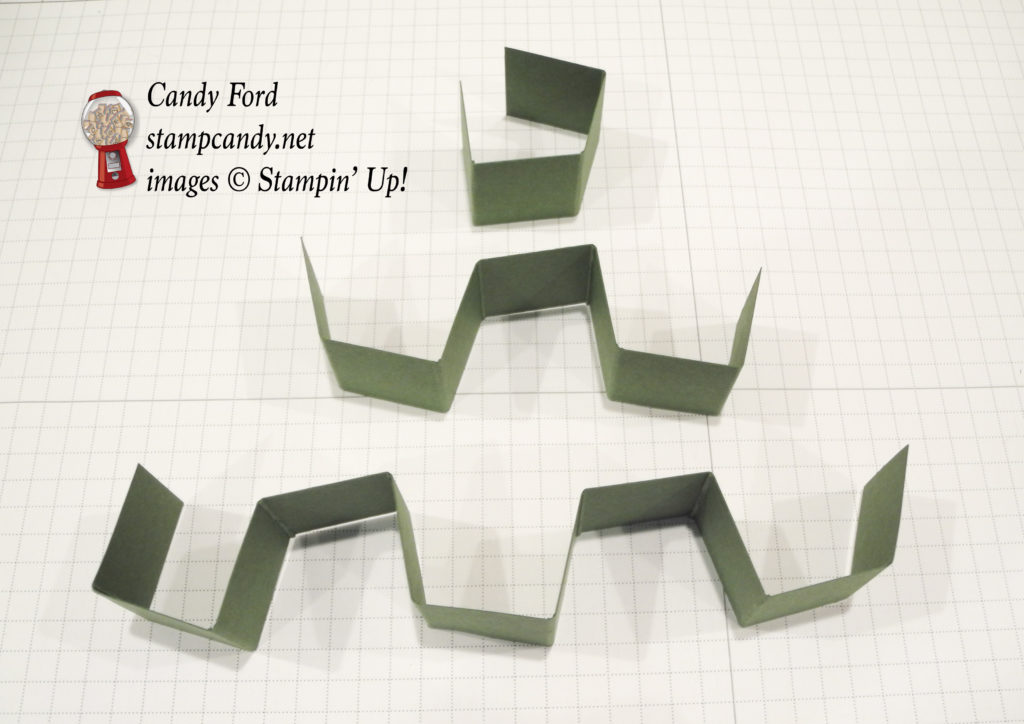
Cut one piece of Garden Green CS to 2″ x 11″. Score on the long side every 1″ for the full length. Turn a quarter turn and cut to create two 1″ x 11″ strips. Cut one of those strips into two pieces: 4″ and 7″. Fold all three pieces like this: two valleys then two mountains, then repeat to the end of each piece. Insert them into the triangle, the longest at the bottom, the smallest at the top, and the middle one in the middle. Insert one Hershey’s Kiss into each little triangle – 9 pieces. I used the almond ones with gold wrappers, but you can use any color. I think a combination of red, green, and silver would look very festive.
Note: If you want, you can glue all the pieces inside the tree, but the pressure from the kisses and the ribbon keep it together just fine.
Wrap ribbon around the perimeter of the triangle and tie at the top. I like to use a little Fast Fuse to hold it in place. For these examples, I usedReal Red 3/8″ Stitched Satin Ribbon on some, and Cherry Cobbler Ribbon from the Silky Taffeta 3/8″ Ribbon Combo Pack on the others.
Cut one piece of Chocolate Chip CS to 2″ x 5-3/4″. Score on the long side at 1″, 2-3/8″, 3-3/8″, and 4-3/4″. Score on the short side at 1″. Fold in half to 1″ x 5-3/4″ and glue to keep it closed. Fold all score lines to form a rectangle. Glue the two end areas together. Insert two Hershey Nuggets. I used two of the gold wrapped ones from an assorted bag.
Adhere the Chocolate Chip base to the Garden Green tree.

Here’s what I used:
Thanks for stopping by today, and Sweet Stamping!
Dec 6, 2016 | Boxes, Christmas, Gallery, Gift Wrap, Gifts, Holiday |
Today’s project is another in a series of quick, easy, small, inexpensive gifts. The white, unscented candle came from the Dollar Tree (my local store where everything costs $1.)
Here’s what I made:


Here’s how I did it:
I cut five 2-3/4″ x 2-3/4″ pieces of Floral Boutique Designer Series Paper, and glued them to the sides and top of a White Gift Box.
I took a length of Whisper White Organza Ribbon and colored it with a Night of Navy Stampin’ Write Marker. I let it dry for a while before tying it around the box.
I put 3 strips of Tear & Tape adhesive around the candle, then rolled it in Mica Flakes. I brushed off any loose flakes with my fingers.
I put some blue tissue (also from the Dollar Tree) in the box, put in the candle, and tied the ribbon around the box.
That’s it!
Note: I didn’t use the clear acetate sleeve that comes with the box, so I’ll save it to use with another project.
Here’s what I used:
Thanks for stopping by today, and Sweet Stamping!
Dec 5, 2016 | Christmas, Food, Gallery, Gift Wrap, Gifts, Holiday |
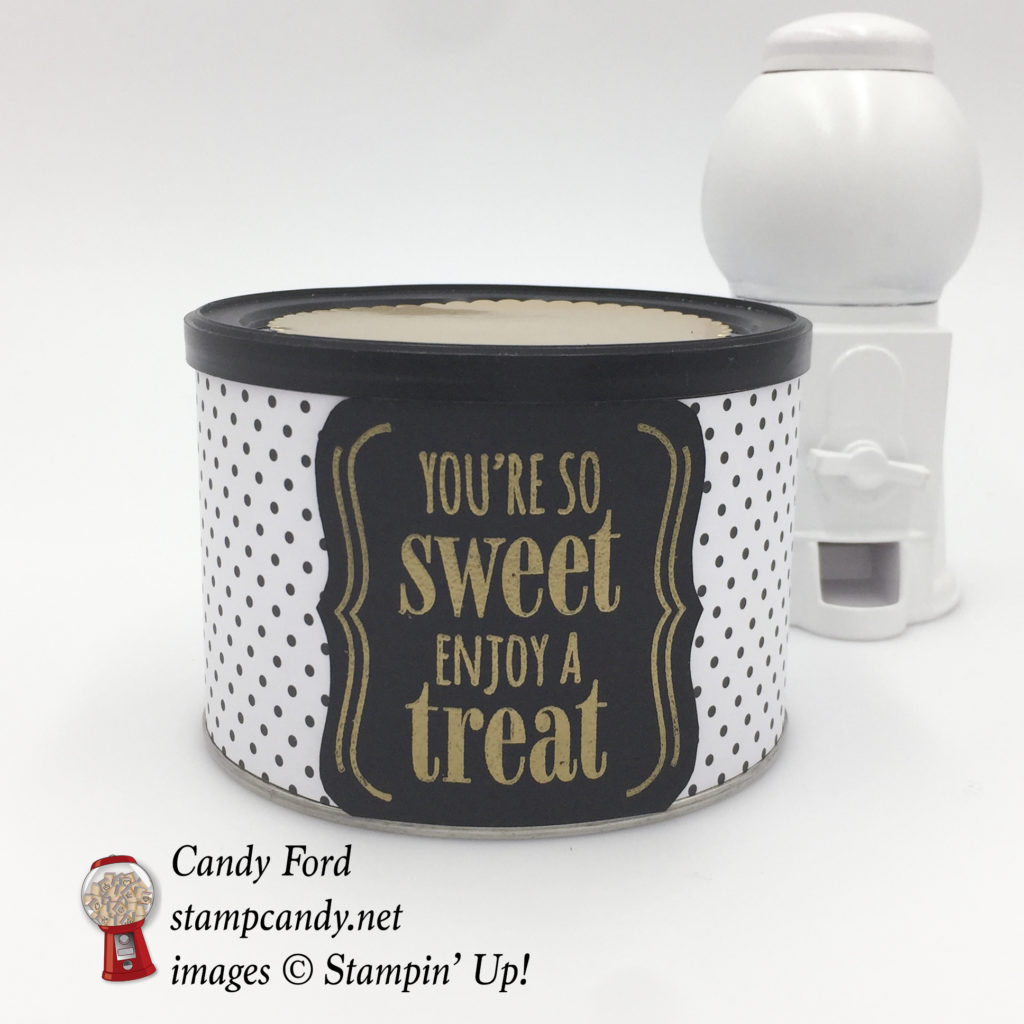
Recently I’ve been sharing projects that are great for small gifts – perfect for people you want to give just a little something to. The projects are inexpensive items dressed up with papercrafting products. This one is a can of honey roasted cashews. Or you could eat the cashews and use the empty container for another small gift – cookies maybe?
Here’s what I made:
Here’s how I did it:
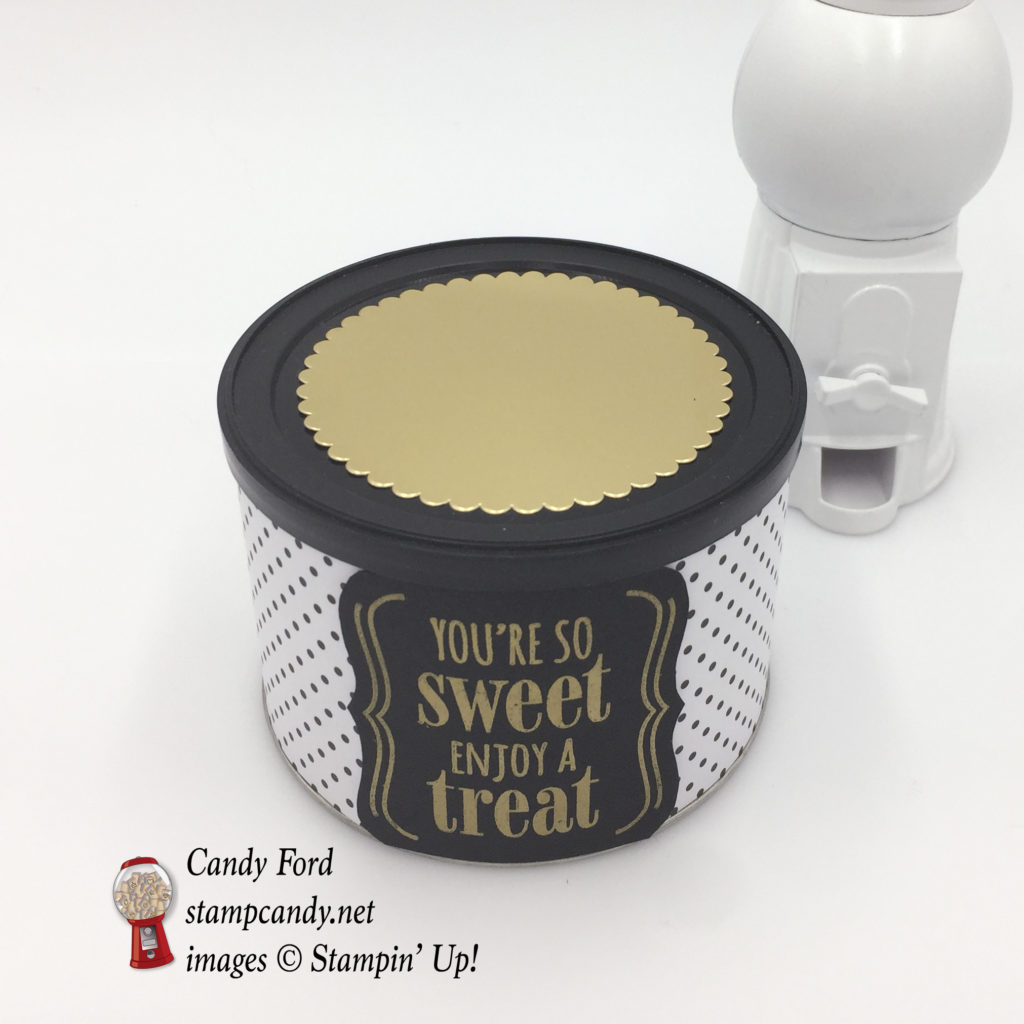
The can came with a black lid, which prompted my choice of colors. I cut a piece of Pop of Pink Designer Series paper (white with black dots) to fit around the can and adhered it with Fast Fuse.
On a piece of Basic Black card stock, I heat embossed in gold a sentiment from the You’re So Sweet stamp set. I cut it out with Paper Snips and glued it to the DSP. I wrapped a couple of rubber bands around it until the glue dried.
For the final touch, I cut a piece of Gold Foil Sheet with the Layering Circles Framelits and adhered it to the lid with Fast Fuse.
Here’s what I used:
Thanks for stopping by today, and Sweet Stamping!
Dec 4, 2016 | Boxes, Cards, Christmas, Gallery, Gift Wrap, Gifts, Holiday, Tags |
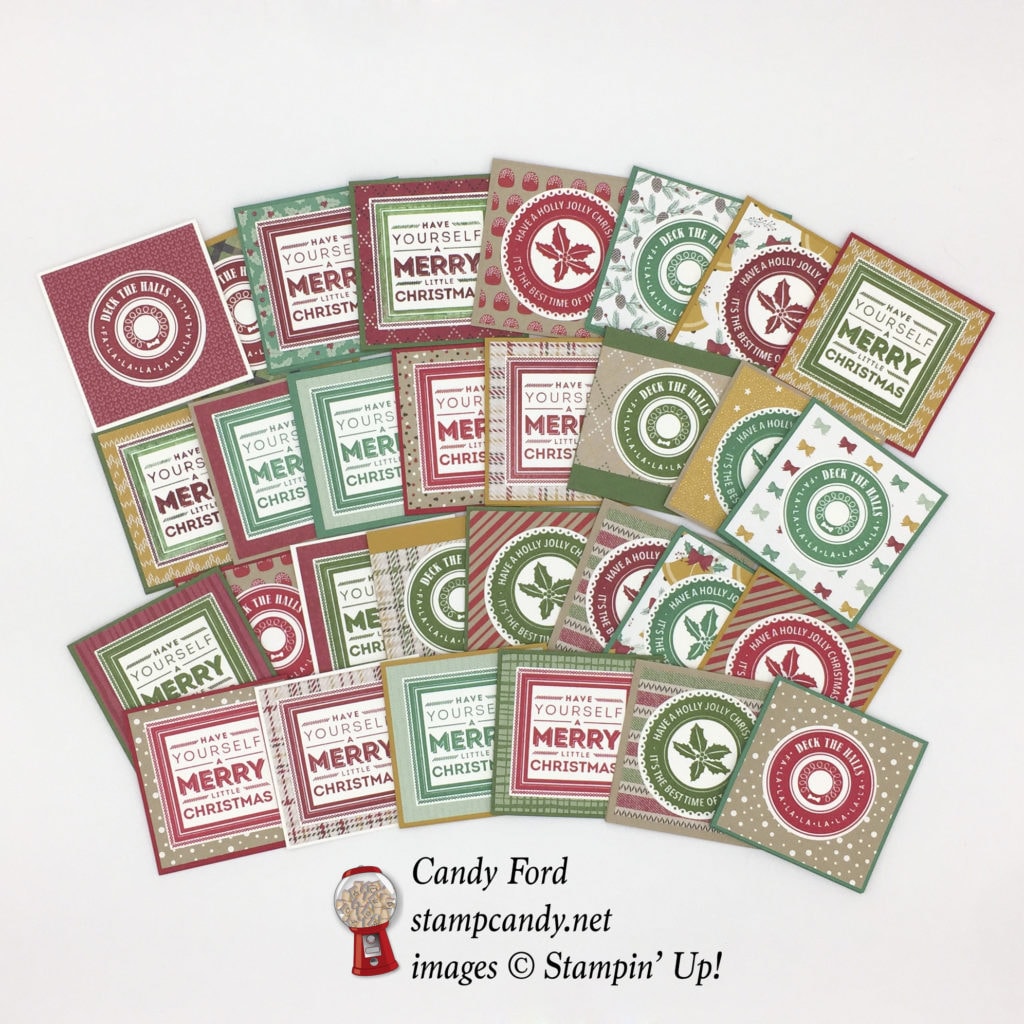
Yesterday I showed you a box I decorated to hold Christmas tags. You can see that post here. Today I’m sharing the actual tags. I made an assortment, as you can see. No two are exactly alike.
Here’s what I made:
Here’s how I did it:
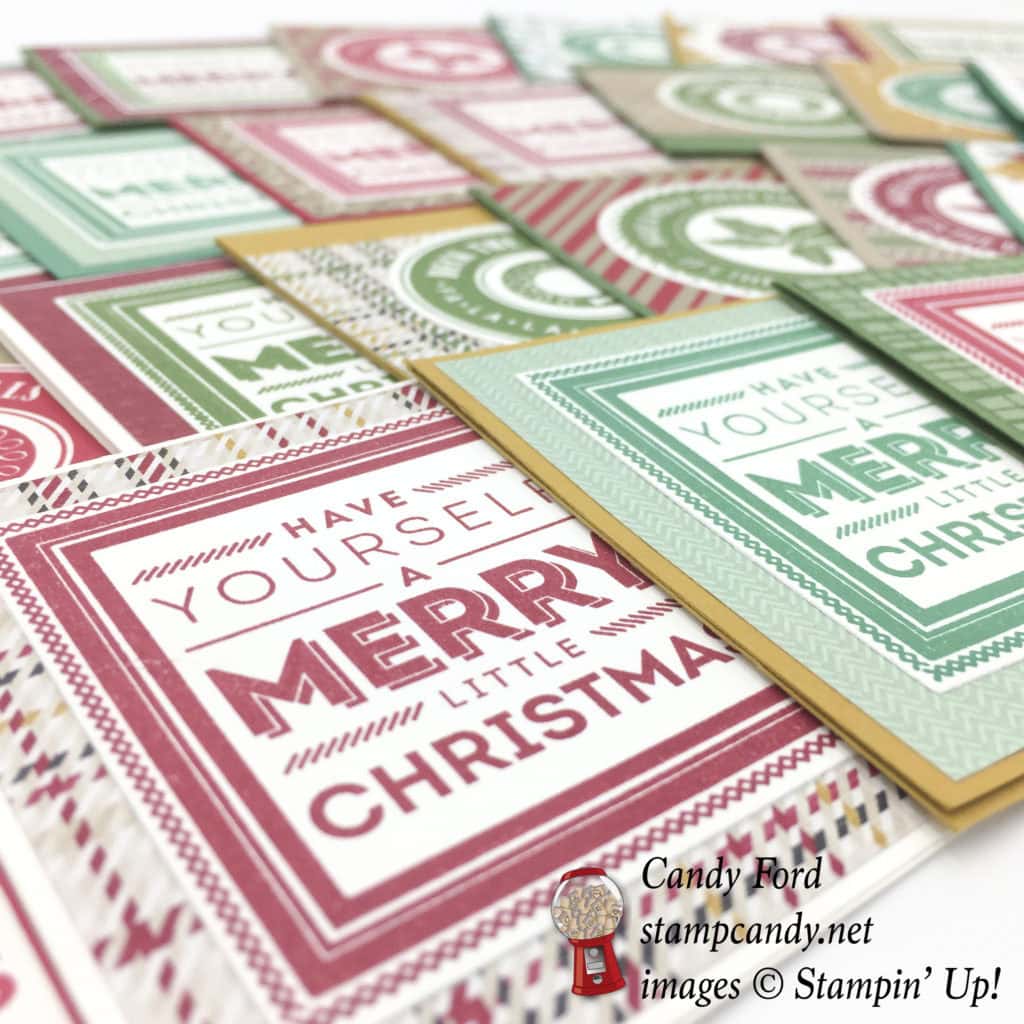
I cut pieces of card stock to 2-3/4″ x 5-1/5″, then scored them on the long side at 2-3/4″, then folded them in half. I used Thick Whisper White, Delightful Dijon, Garden Green, Cherry Cobbler, Real Red, Emerald Envy, and Crumb Cake card stocks.
For the card fronts I cut an assortment of 2-1/2″ x 2-1/2″ squares from Designer Series Paper. I used Candy Cane Lane, Warmth & Cheer, and Presents & Pinecones DSPs. For a few, I used a leftover scrap of paper that was about 2″ tall x 2-3/4″ wide.
Onto Whisper White CS, I stamped images from the Holly Jolly Layers (host) stamp set in Garden Green, Cherry Cobbler, Real Red, and Emerald Envy inks. I cut them out with the Layering Circles and the Layering Squares Framelits Dies.
I glued all the pieces together. That’s it!
By the way, the White Gift Box will hold more tags than this, but I thought 30 was a pretty good number.
Here’s what I used:
Thanks for stopping by today, and Sweet Stamping!
Dec 3, 2016 | Boxes, Christmas, Gallery, Gift Wrap, Gifts, Holiday, Tags |
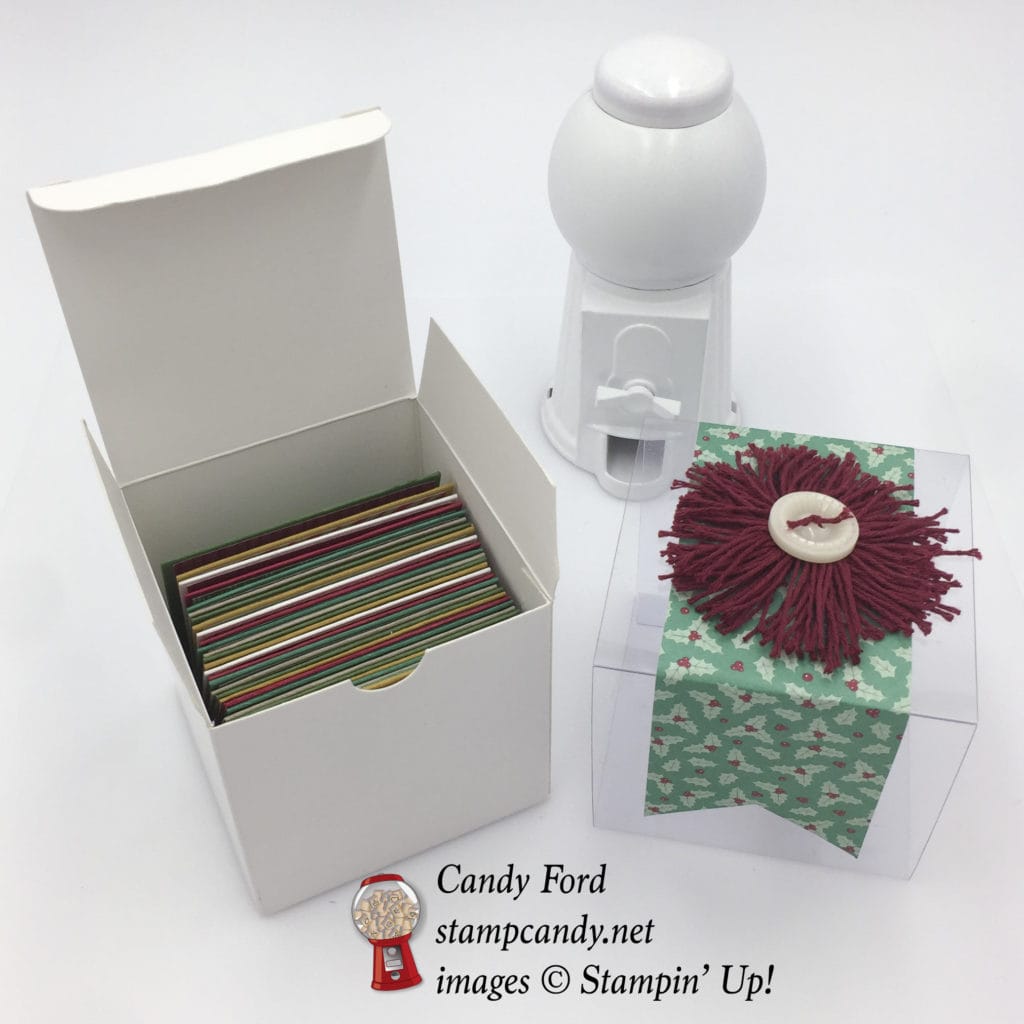
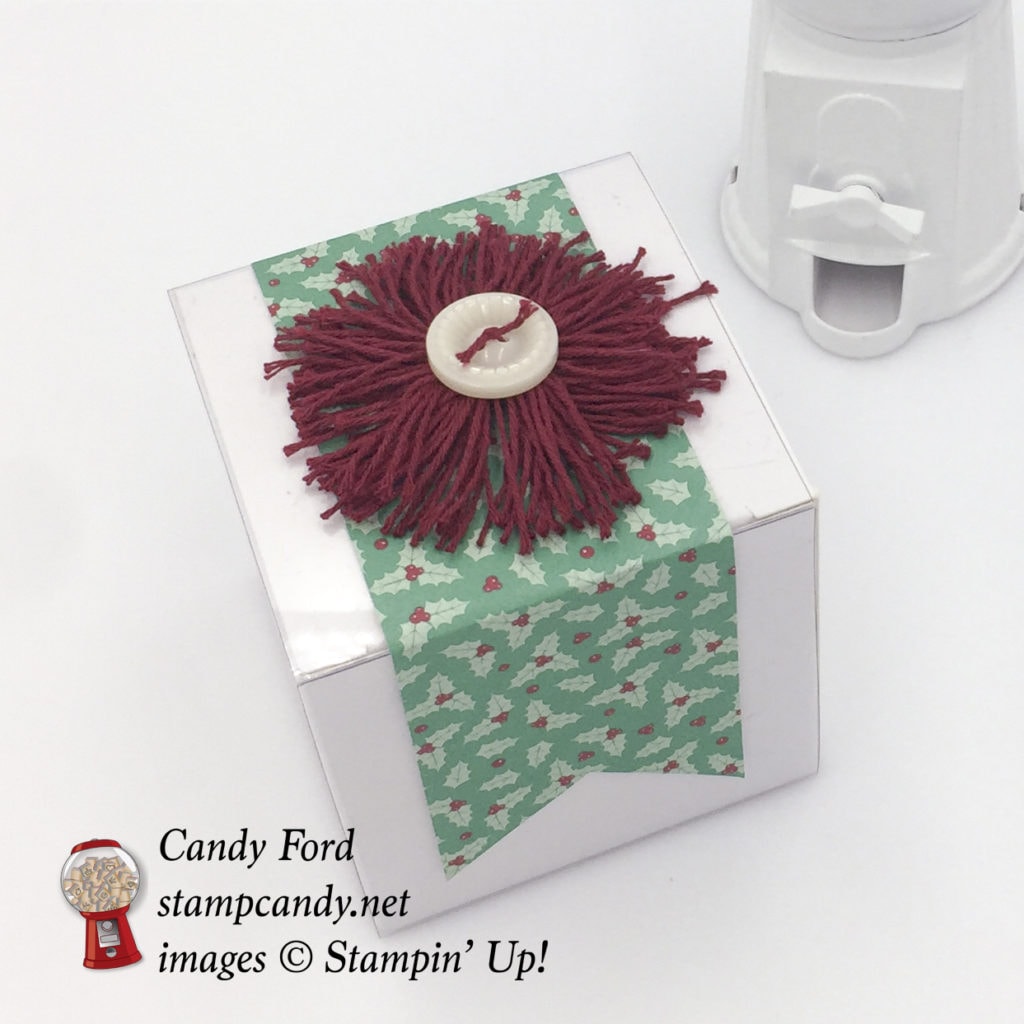
Today’s project is sort of a meta-gift. It’s basically gift wrap for gift wrap. Everyone needs tags for their gifts, right? I decorated this little box full of Christmas gift tags to give someone with a lot of gifts to wrap.
Here’s what I made:
Here’s how I did it:
The White Gift Boxes in the 2016 Holiday Catalog are 3″ x 3″ x 3″, the perfect size for so many small gifts. For this project I left the box as is, and decorated the clear acetate sleeve.
I cut a piece of Presents & Pinecones Designer Series Paper to 2″ x 9″. I notched both ends with the Banner Triple Punch, then adhered it with Fast Fuse to the sleeve as shown.
I attempted to make a pompom out of Cherry Cobbler Thick Baker’s Twine, but I am an abysmal pompom maker. So I flattened it out and put a button on top. I tied the button onto the flattened pompom with another piece of twine, then adhered the whole thing to the DSP with Glue Dots.
I slid the sleeve onto the box and voila!
Check back tomorrow to see all the tags inside!
Here’s what I used:
Thanks for stopping by today, and Sweet Stamping!


