Dec 2, 2016 | Boxes, Food, Gallery, Gift Wrap, Gifts |
Recently I had the honor of presenting at an event for Stampin’ Up! Demonstrators. Today I’m sharing one of the small gift ideas I showed. (I didn’t photograph the items until after the event, so some of them are a bit worn looking. Lots of people handled and looked at them.)
Here’s what I made:
It’s just a tiny blue box (1-1/2″ x 1-1/2″ x 1-1/2″) with brown and gold on all sides.
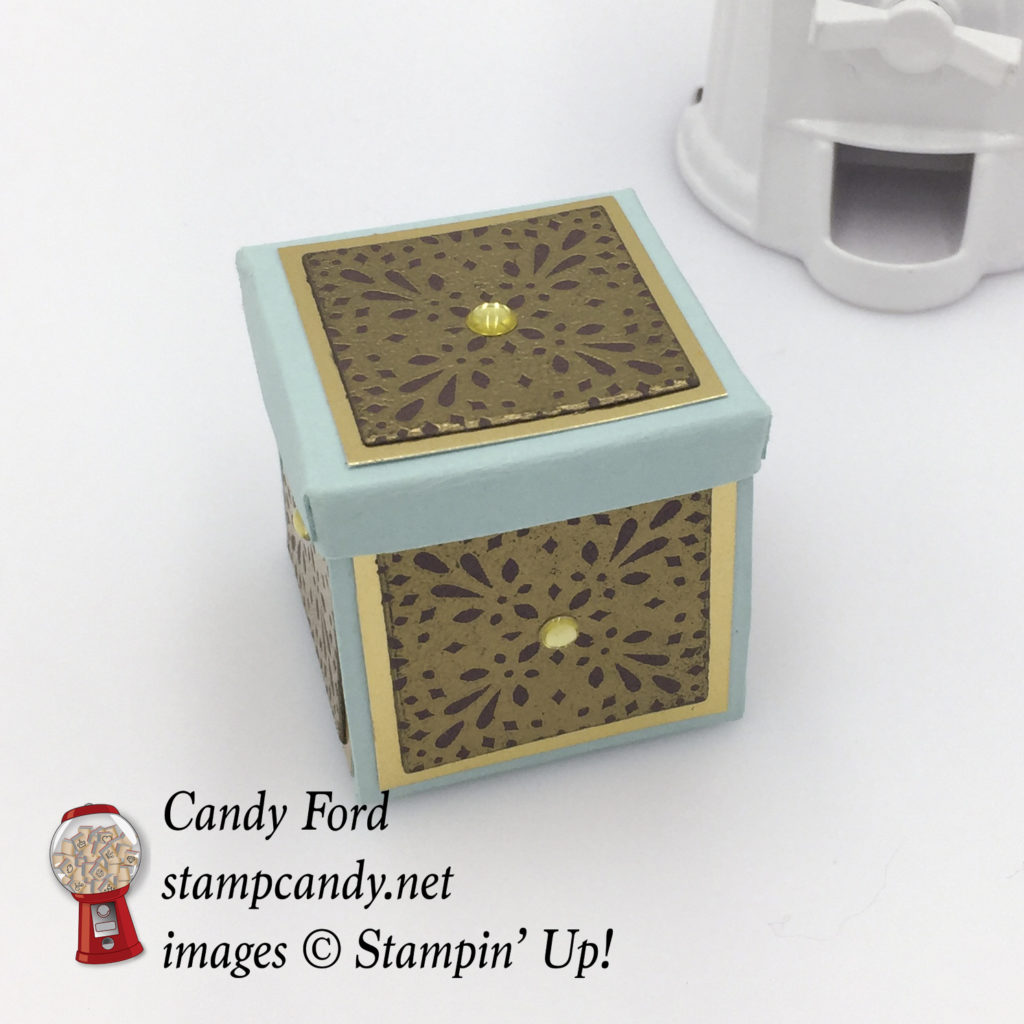
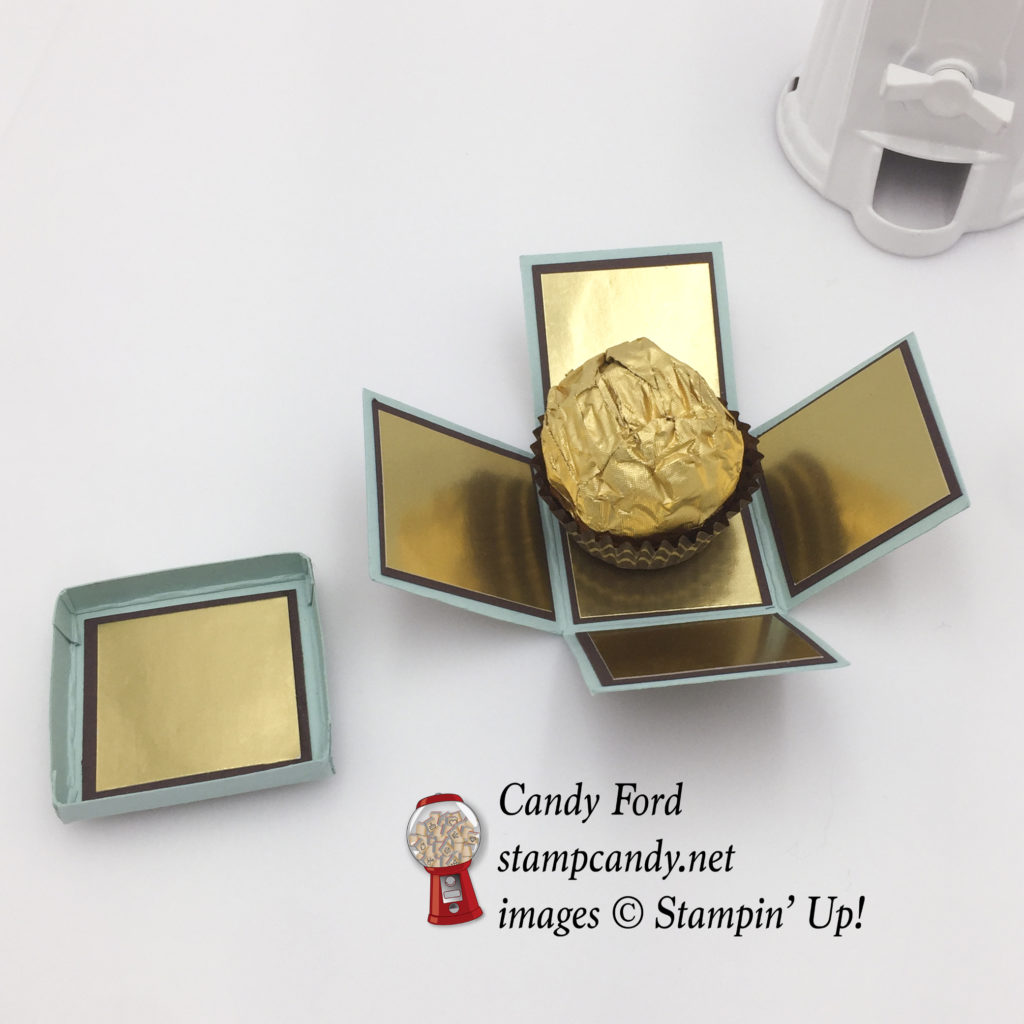
When you lift the top off, the sides fall away to expose one delicious Ferrero Rocher candy. It’s an elegant way to dress up a very small gift.
Here’s how I did it:
For the box:
I cut a piece of Soft Sky card stock to 4-1/2″ x 4-1/2″. I scored it 1-1/2″ and 3″, then turned it a quarter turn and scored at1-1/2″ and 3″. I cut away the corner areas, then folded on all score lines.
For the interior, I cut 6 pieces Chocolate Chip CS to 1-3/8″ x 1-3/8″, and I cut 6 pieces of Gold Foil Sheet to 1-1/4″ x 1-1/4″. I glued 5 of the Chocolate Chip pieces to the interior squares, and 5 of the gold pieces on top of those. I saved the other 2 pieces for the lid’s interior.
For the exterior, I stamped and heat embossed the smaller medallion image from the Frosted Medallions stamp set in gold onto Chocolate Chip CS 5 times. I used the Layered Squares Framelits to cut each image. I cut 5 pieces of Gold Foil Sheet to 1-3/8″ x 1-3/8″. I glued the gold pieces onto the 4 sides of the box, and the embossed pieces on top of those. I put a gold embellishment from the Metallic Enamel Shapes on the center of each embossed piece. I saved the other 2 pieces for the top of the lid.
For the lid:
I cut a piece of Soft Sky CS to 2-1/16″ x 2-1/16″. I scored it 1/4″ in from each of the four sides. I cut one score line at each corner, and folded all score lines. I glued the small pieces at the corners to the inside of the adjacent side, forming the lid.
I glued the leftover pieces from above to the lid’s interior and exterior, to match the box.
Note: I almost always use glue for this kind of project, but I prefer to use Fast Fuse when adhering something to a slick surface, like the gold side of the Gold Foil Sheet.
TIP: When making this type of box, I find it helpful to make it just big enough to hold the contents without any extra room. In this instance, the candy helps to hold up the sides of the box when the lid is on. If there is too much empty space inside, the sides can lean in and your box won’t look, well, like a very good box.
Here’s what I used:

YEAR-END CLOSEOUT DEALS HAVE BEGUN!
Stampin’ Up! has been doing a little year-end cleaning, and we’ve got some great deals to offer you and your customers! Our Year-End Closeouts will include holiday retiring products, clearance rack items, and current high-inventory catalog products. Read below for promotion rules and information.
Details
• Promotion period: December 1, 2016 – January 3, 2017
• All products (and discounts, if any) can be found in the Year-End Closeouts category of the online store beginning December 1.
• Year-end closeout items may be added to all order types: demonstrator, workshop, customer, and online.
• Clearance Rack items are only available while supplies last.
• Following the Year-End Closeouts promotion, some products may remain on the Clearance Rack; other items may be removed from the Clearance Rack to be added at another undetermined time.
• High-inventory items will only be discounted through January 3; beginning January 4, they will still be available, but at regular price.
• Retiring item availability will follow standard retiring item rules:
• Retiring stamp sets are guaranteed available until December 21, after which they will be only available while supplies last.
• Retiring accessories will only be available while supplies last.
• Retiring items will only be available while supplies last. All retiring items will be discontinued after January 3.
Other Year-End Closeouts products and applicable discounts can be found in the online store.
• No minimum purchase is required to participate in Year-End Closeouts.
• Year-End Closeouts are eligible for Stampin’ Rewards with qualifying orders.
• New demonstrators may add Year-End Closeouts items to their Starter Kit! Click on Be a Candy Heart at the top of the page!
Thanks for stopping by today, and Sweet Stamping!

Aug 19, 2016 | Gallery, Gifts |
I’ve already shared with you the Thank You cards I made for my customers in July. You can see them here. Today I’m sharing the little gifts I sent along with those cards. They are scissor charms. I will confess right now that I completely CASEd this from Sam Hammond of pootles.co.uk. She is a brilliant Stampin’ Up! Demonstrator in the UK, and I asked her for gift ideas. (CASE = Copy And Share Everything or Copy And Selectively Edit. Basically it’s taking inspiration from someone else’s project, either entirely, or just partly.)

Here’s how I did it:
For the matchbook enclosure, I cut a piece of Peekaboo Peach card stock to 2″ x 5-3/4″. I scored it on the long side at 2-3/4″ and 5″. I folded it up, and burnished both folds with a Bone Folder. I used the 1/8″ Circle punch to make two holes toward the top of the inside (see photo) and I stapled the small bottom flap – be sure to staple very close to the fold, so the top flap can be tucked under it.
I cut a piece of Peekaboo Peach Designer Series Paper to 2-1/2″ x 2-1/2″ and glued it to the front cover. Do this with the cover tucked in, so the DSP will show when the matchbook is closed. I used Circle Punches to cut a 1-1/2″ circle from Whisper White card stock and a 1-1/4″ circle from Peekaboo Peach card stock. I glued the larger circle to the DSP, then adhered the smaller circle with Stampin’ Dimensionals.
I used the Petite Petals Punch to cut one flower each from Whisper White and Peekaboo Peach card stock. I glued them together, Peekaboo Peach on top, and glued them to the Peekaboo Peach circle. The I put a Perfect White Accent in the center of the flower.
The charm itself is a Bow Clip on a piece of Gold Taffeta Ribbon.
I ran the ribbon through the holes in the marchbook, and tied it in a bow on the back. Now the recipient can just untie the bow and tie the charm onto their scissors handle.
Thanks to Sam Hammond for this amazing gift idea! Be sure to check out her web site!
Here’s what I used:

Be sure to use your Bonus Days coupons by August 31!
Thanks for stopping by today, and Sweet Stamping!
Aug 3, 2016 | Boxes, Events, Gallery, Gift Wrap, Gifts, Techniques |
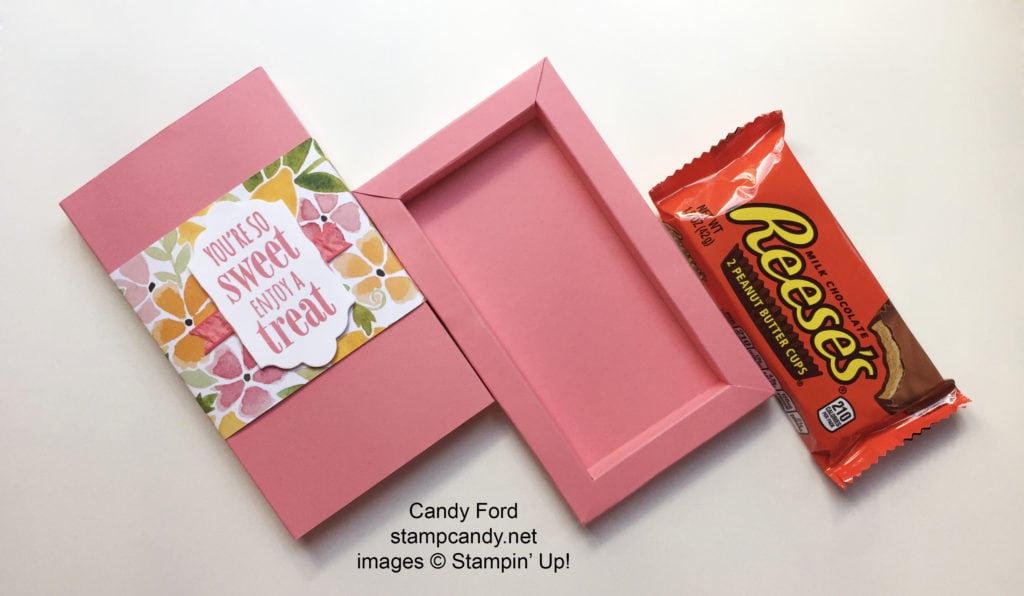
Today’s project was one of the Make & Takes in our July Candy Hearts Team Meeting. It’s a cute little treat box with a sliding tray.
I designed this one to fit a pack of 2 large Reese Cups.
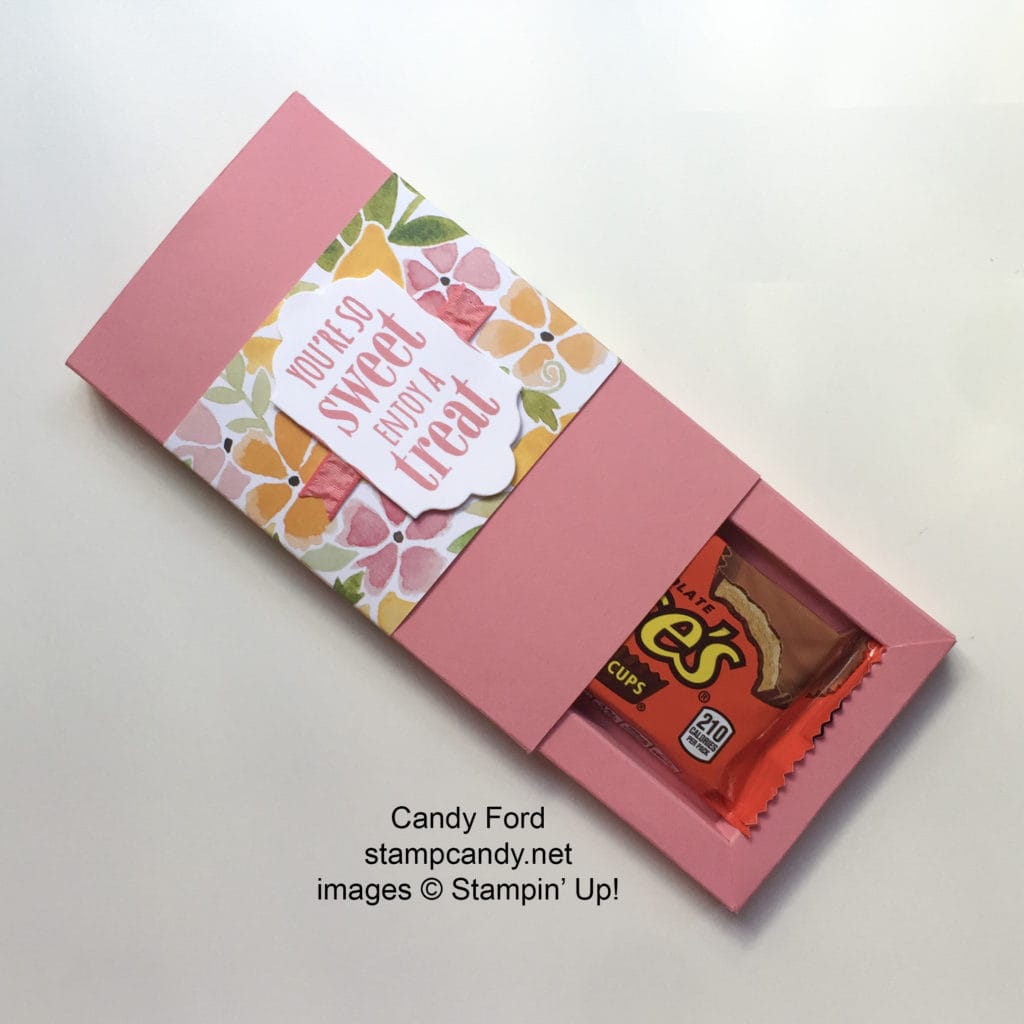
There are two parts to the box: the cover and the tray.
Here’s how I did it:
First determine the dimensions of your box. I measured a Reese’s cup package and determined I needed a box 2-1/2” wide x 5” long x 1/2” deep.
Create the tray:
Add the box depth x 10 to the width and to the length. So for the Reese cup box, the box depth is 1/2” and 1/2” x 10 = 5”. I added 5” to the width and to the length, so I cut my card stock to 7-1/2” x 10”.
Score 4 times from the edge of all four sides, the depth of the box each time. So I scored every 1/2” (the depth of my box.) I scored at 1/2”, 1”, 1-1/2”, and 2” on all four sides.
On the short sides, score one more time, 1/2” in from the last scores, but only down to the second score line. It should look something like this:
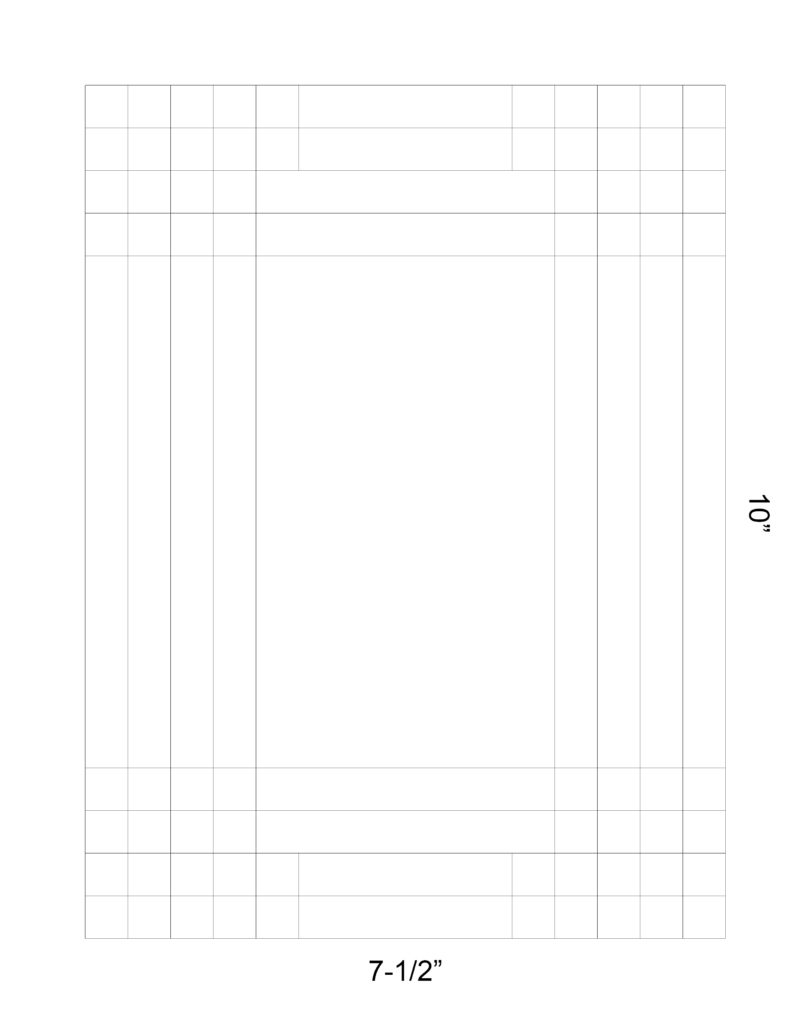
Cut the 16 (4 x 4) small squares made by the scored lines from each of the four corners (yellow areas.)
On the short sides cut down the two short scored lines, then cut diagonally down to the next corner (green areas.)

Discard all the pieces you have cut away.
Fold all score lines with a bone folder.
Now you’re ready to make the two long sides of the box. Turn up the scored side and put adhesive on the outermost strip. Roll toward the inside of the box, adhering that strip to the box bottom. Do the same thing on the other side.
Now make the two short sides of the box. Put adhesive on the outermost strip, just like before, and roll so that strip adheres to the box bottom. The skinnier center part will go between the two long sides, and the diagonal cut will lie on top of tip of the long side to create a mitered corner look. Do that on the other short side.
Create the cover:
Cut a piece of card stock the size you need to wrap around your tray and overlap by an inch or so. I cut mine to 6-1/8” wide (the length of my box plus 1/8”) by 10” long.
Wrap it around the tray, making sure it isn’t too snug, because it needs to slide on and off. Pinch where the bends need to be. Score and fold along the pinched areas. Wrap it around the tray and adhere the ends.
Now decorate:
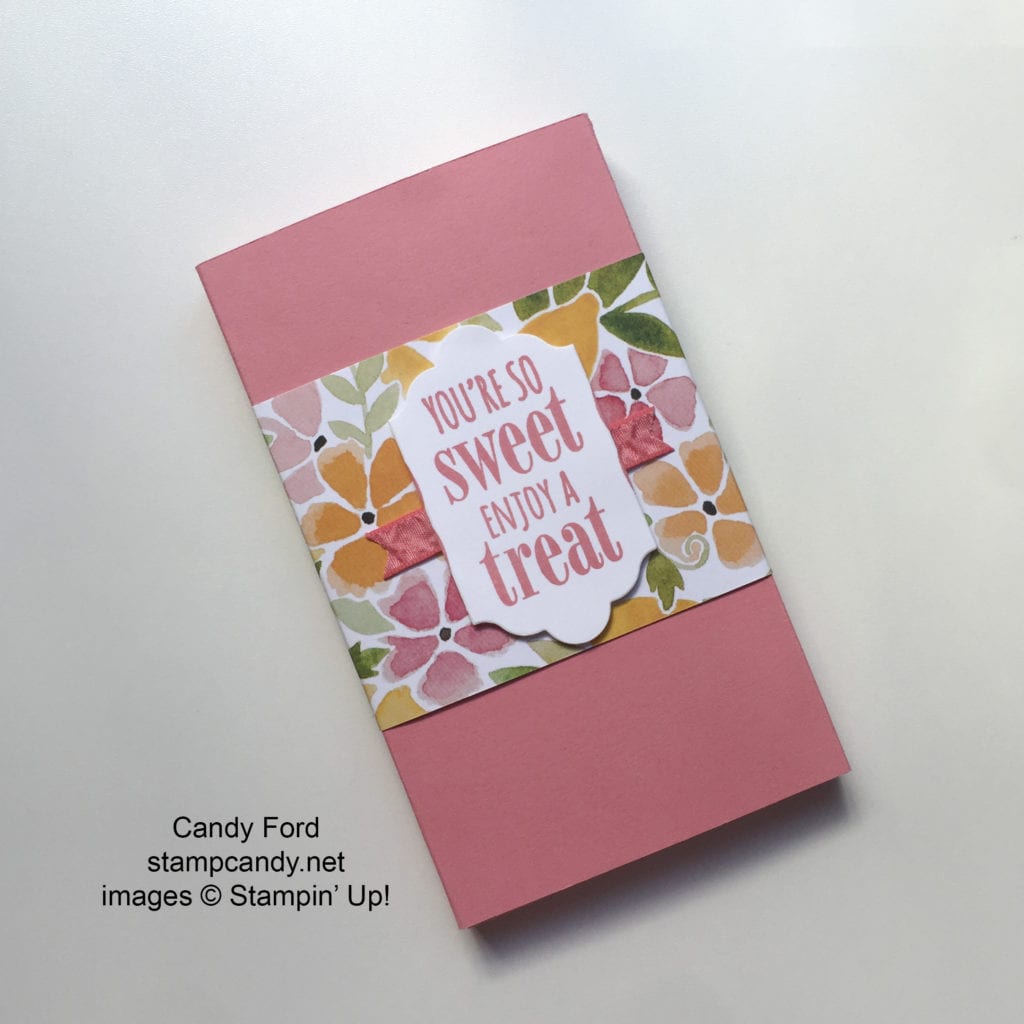
I cut a piece of Fruit Stand Designer Series Paper to 3″ x 10″ and wrapped it around the cover, gluing it in place.
I stamped the sentiment from the You’re So Sweet stamp set in Flirty Flamingo ink onto Whisper White card stock, then cut it with a die from the Lots of Labels Framelits. I adhered a piece of Flirty Flamingo Ruched Ribbon to the cover with Fast Fuse, then adhered the sentiment over than with Stampin’ Dimensionals.
I realize these directions can seem a bit confusing. It’s much easier to show how to make this than to write it. Please contact me if you have any questions at all!
Here’s what I used:
AUGUST HOSTESS CODE
PMTWBJMQ
If you are placing an order for less than $150, please use this Hostess Code.
Click here for details on how to use the Hostess Code.
If you are placing an order of $150 or more, you will receive Stampin’ Rewards on your order, so do not use the Hostess Code.
Thanks for stopping by today, and Sweet Stamping!
May 14, 2016 | Bags, Gift Wrap, Gifts |
Recently I whipped up this quick and simple gift wrap idea when I gave Bohemian Washi Tape as a gift. It’s simply a Mini Muslin Bag and a tag.
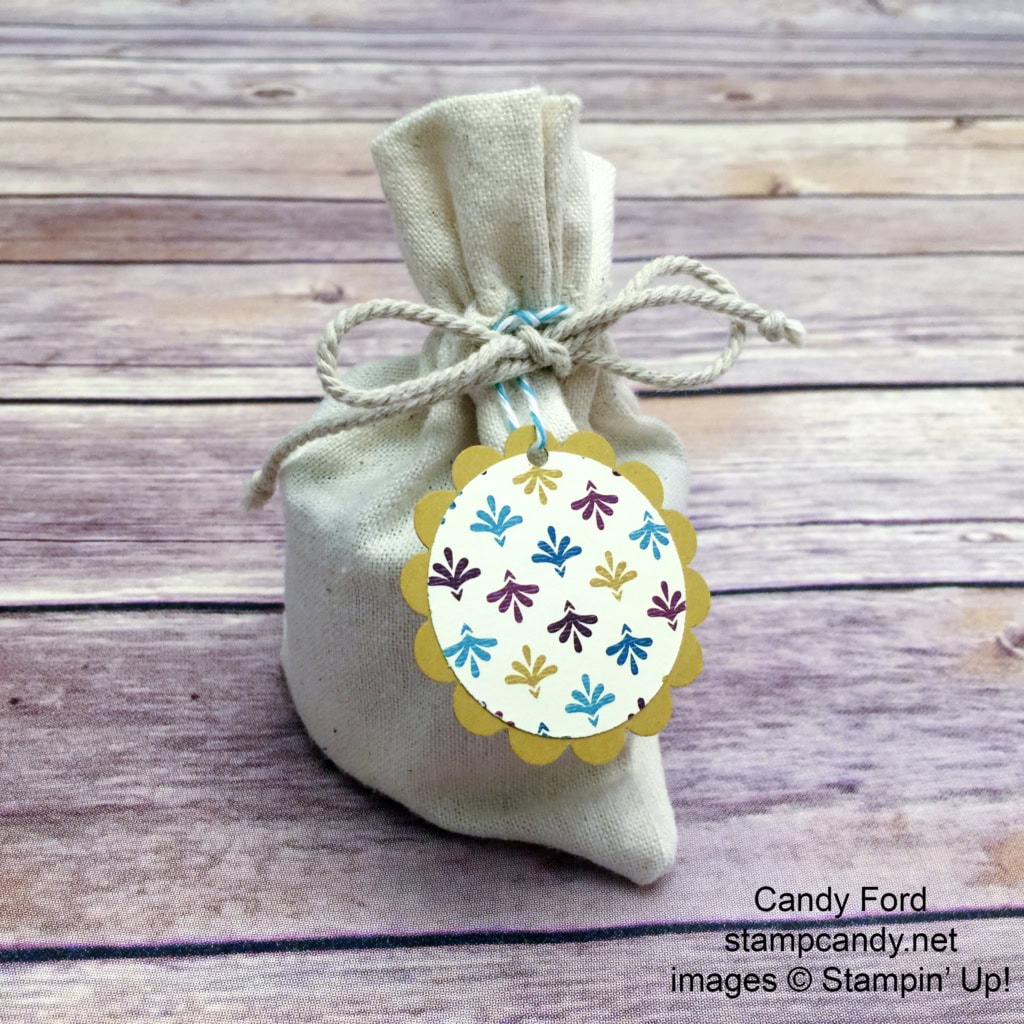
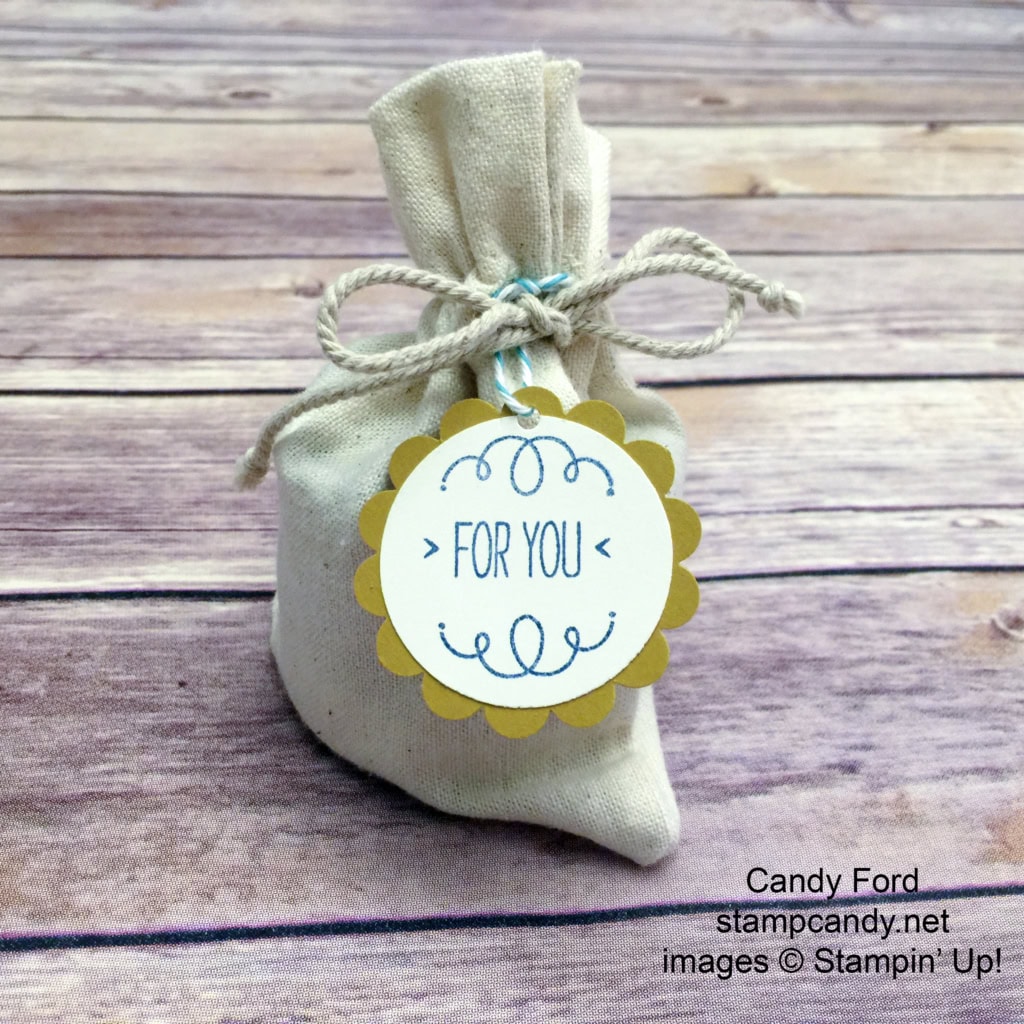
I stamped the sentiment from the You’re So Lovely stamp set on a piece of Very Vanilla card stock, then cut it with the 1-1/2″ Circle Punch. I cut a piece of Bohemian Designer Series Paper with the same punch.
I cut a piece of Delightful Dijon card stock with the 1-3/4″ Scalloped Circle Punch and glued the two smaller circles to either side. I punched a hole with the 1/8″ Circle Punch and tied it onto the bag with a piece of Bermuda Bay Baker’s Twine.
Here’s what I used:
 There are only 17 days left to shop from the 2015-2016 Annual Catalog’s Retiring List! Click here to see what is still available.
Thanks for stopping by today, and Sweet Stamping!
May 10, 2016 | Bags, Gift Wrap, Gifts |
Need a super quick and easy gift bag for a small gift? I have just the thing. I was giving an embossing folder to someone and needed a really quick gift wrap solution.
The folder fit great inside a Kraft Tag a Bag Gift Bag.
I stamped the design from the I Think You’re Great stamp set in Real Red onto Whisper White card stock, then cut around it with my Stampin’ Trimmer.
I stamped the sentiment from the Tag Talk stamp set in Crumb Cake onto Whisper White card stock and cut it with the Label Bracket Punch. I attached the sentiment to the red piece with Stampin’ Dimensionals, which I then glued to the bag.
Voila! Awesome gift wrap in just a few minutes! And it was still nice and flat (no bulky bow to get crushed) so I could sneak it in tucked inside my catalog.
Here’s what I used:
There are only 21 days left to shop from the 2015-2016 Annual Catalog’s Retiring List! Click here to see what is still available.
Thanks for stopping by today, and Sweet Stamping!

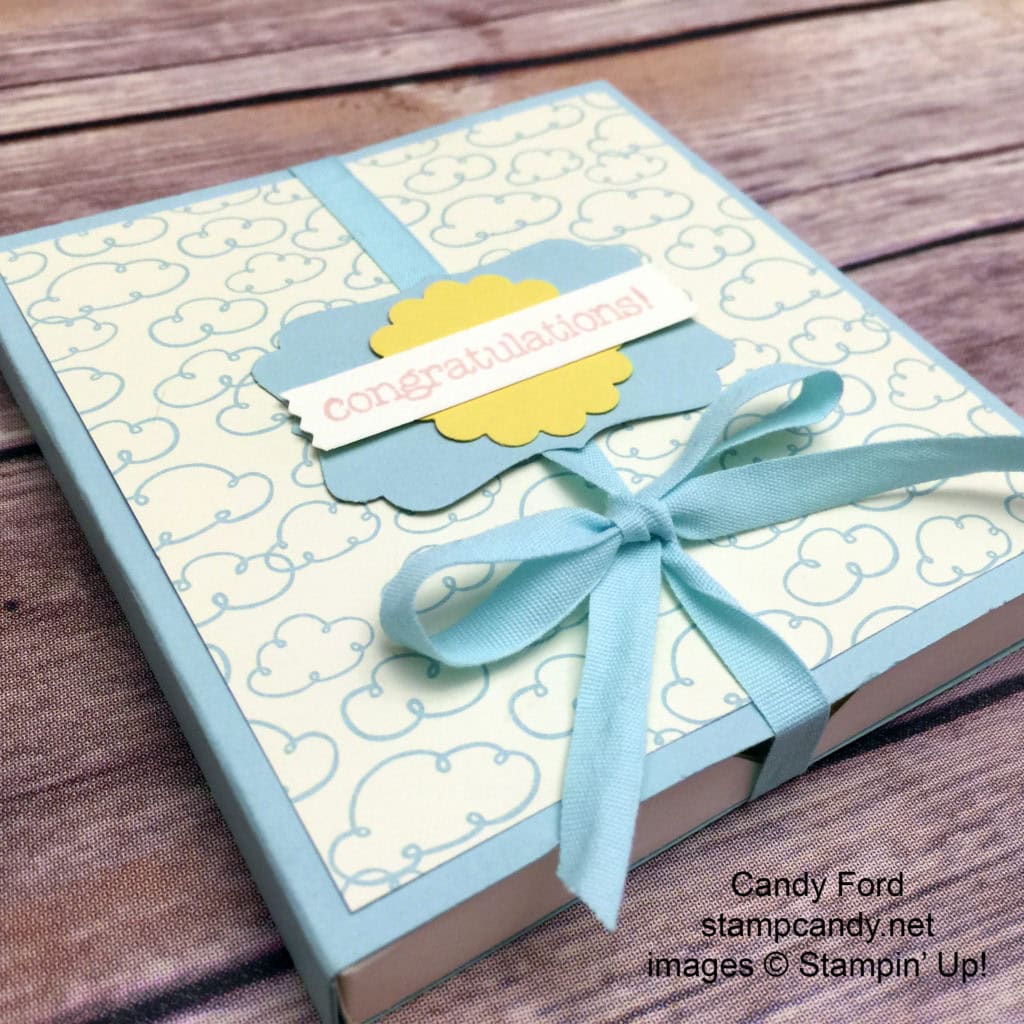
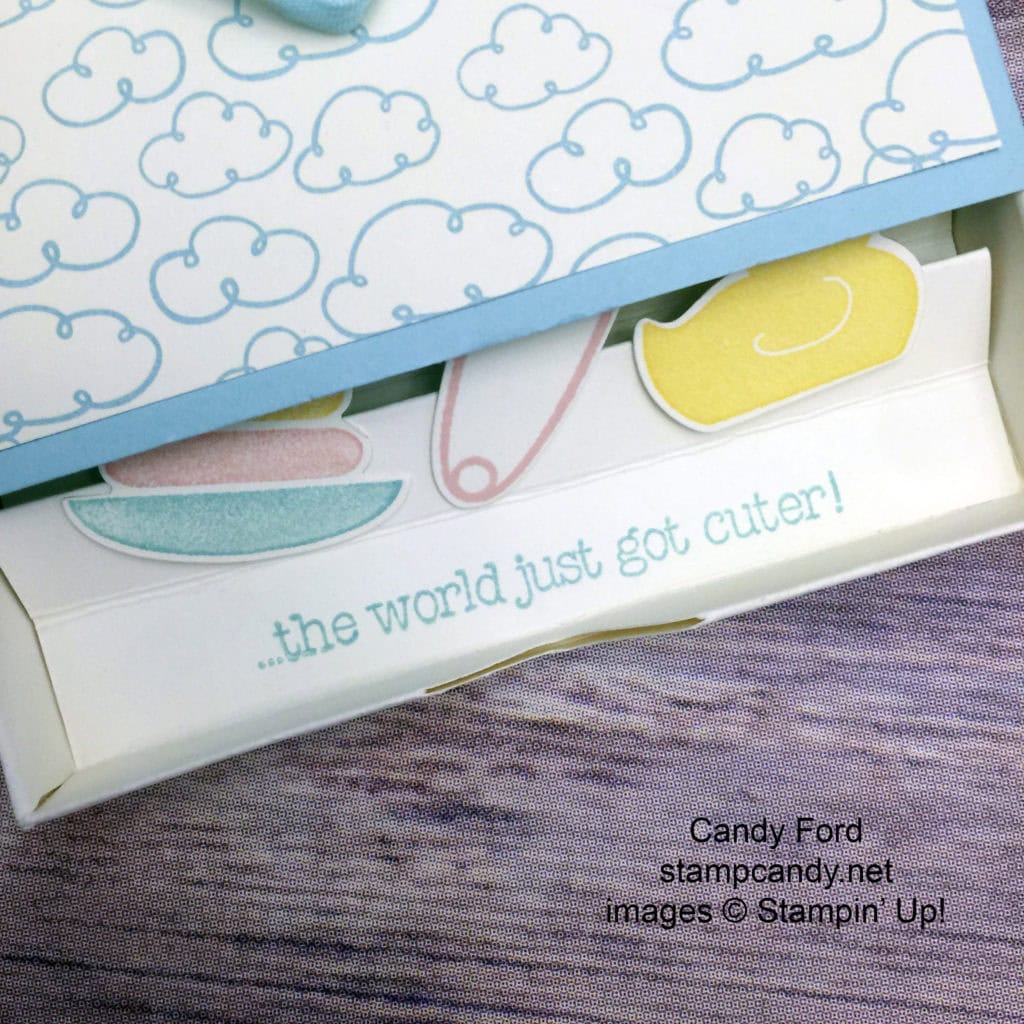
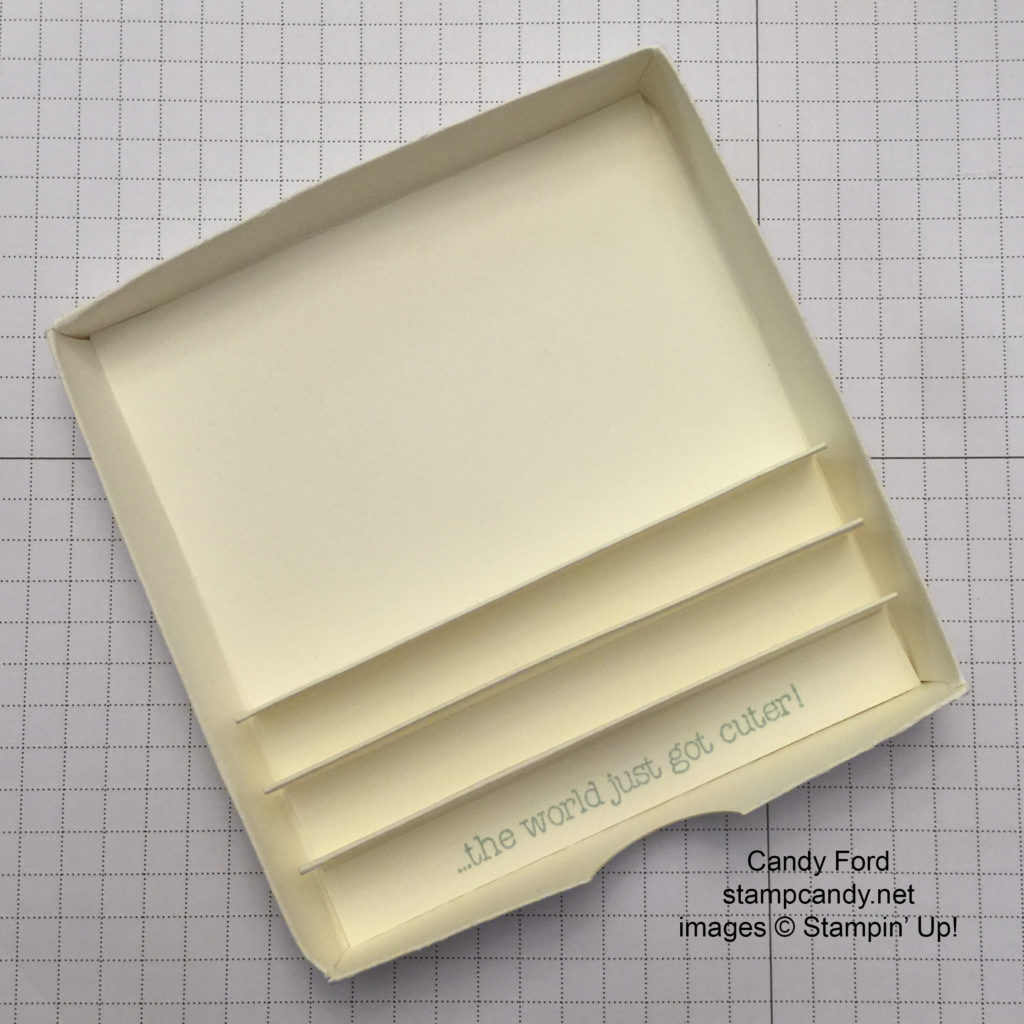
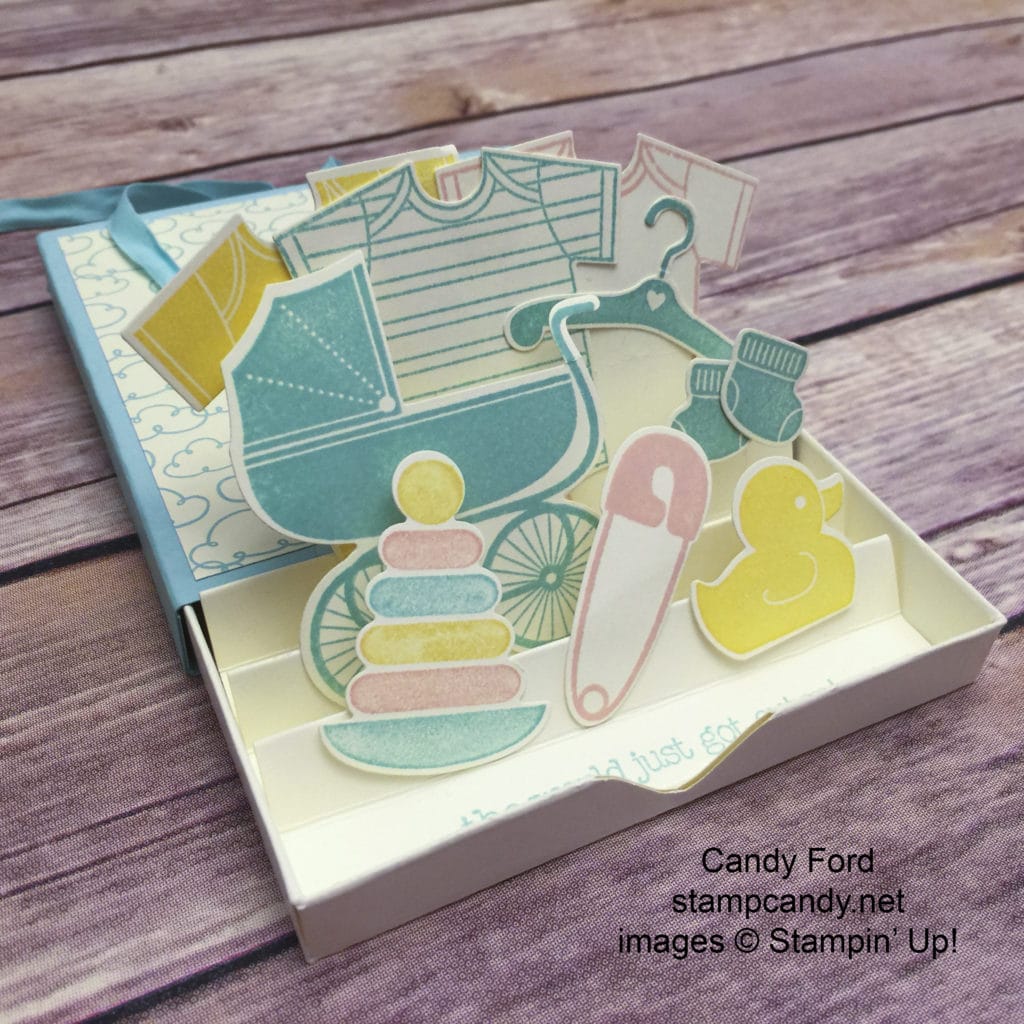
May 7, 2016 | Baby, Boxes, Cards, Club, Gifts |
Hello, Sweet Stampers! I’m sorry I haven’t posted in a few days. I’ve been having some computer issues. Hopefully they’re fixed now.
Today I’m excited to share another Stamp Club project with you. It’s a Baby Themed Pop Up Matchbox Card with space in the back for a gift card. Everyone got to choose which color cover and ribbon they wanted to use, which colors to stamp the items inside the box, and which colors to use for the box label – all combinations of Blushing Bride, Daffodil Delight, and Pool Party. My sample has more blue than pink and yellow.
At first you see the sweet little box tied up with ribbon.
Then when you untie the ribbon and begin to pull out the inner tray, you see the continuation of the sentiment from the cover peeking out.
As you continue to pull, all the little goodies pop up! Window Sheets cut into strips and adhered to the backs of the images with Glue Dots help them pop.

This is what the tray looks like before adding the goodies.There is space in the back for a gift card.
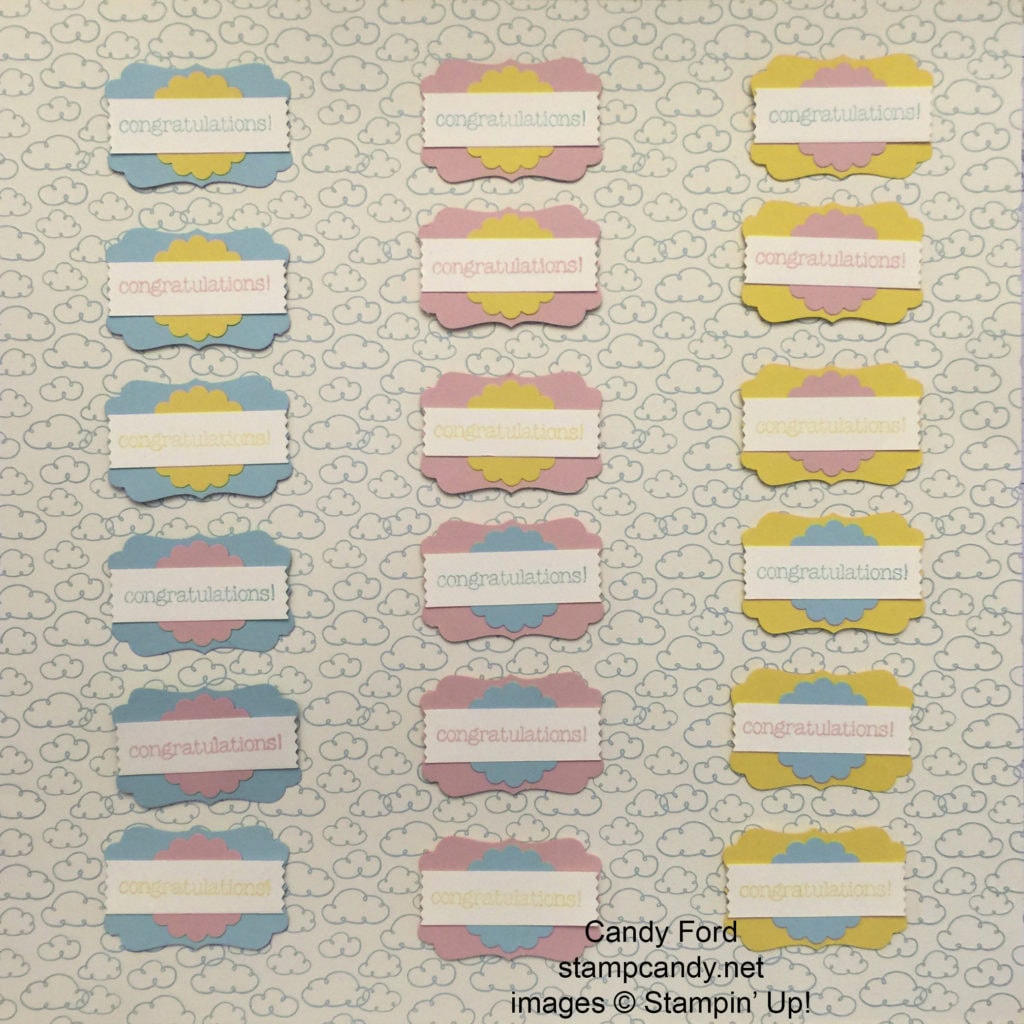
Here are 18 different color combinations of the box label, to help you decide which you like best:

Would you like the tutorial for this project? Click here to upload the pdf. Remember, you can always contact me with questions!
I hope you enjoy making your own Pop Up Matchbox Card!
Here’s what I used:
There are only 24 days left to order from the 2015-2016 Annual Catalog! Be sure to check out the remaining retiring items here.
Thanks for stopping by today, and Sweet Stamping!


