Apr 12, 2017 | Bags, Cards, Deals, Gallery, Retiring Products, Sales |
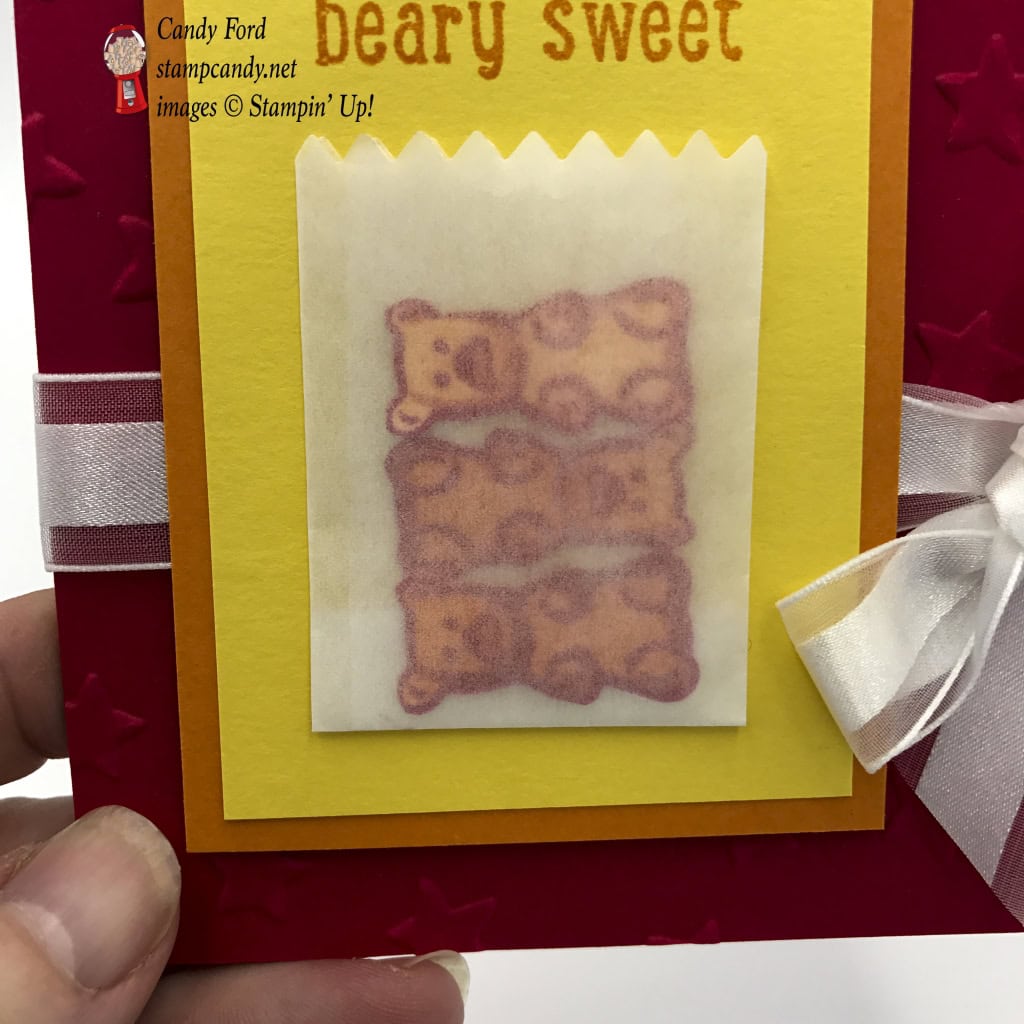
I like gummy bears. Well, I like gummy worms, so I assume I would like gummy bears. Aren’t all the gummy critters made of the same stuff? I prefer the yellow/orange/red ones (as opposed to the clear/red/green ones) so those are the ones I tried to replicate for today’s card made with the Just Keep Swimming stamp set.

Just Keep Swimming © Stampin’ Up!
The winner of the blog candy from my April 5 post is jamesmominwa@aol.com! I will email you today to get your mailing information, and will get your blog candy right out to you! Congratulations, jamesmominwa@aol.com!
Stampin’ Up! has released the list of retiring products from the 2016-2017 Annual Catalog and the 2017 Occasions Catalog. Scroll down for more information!
Here’s what I made:
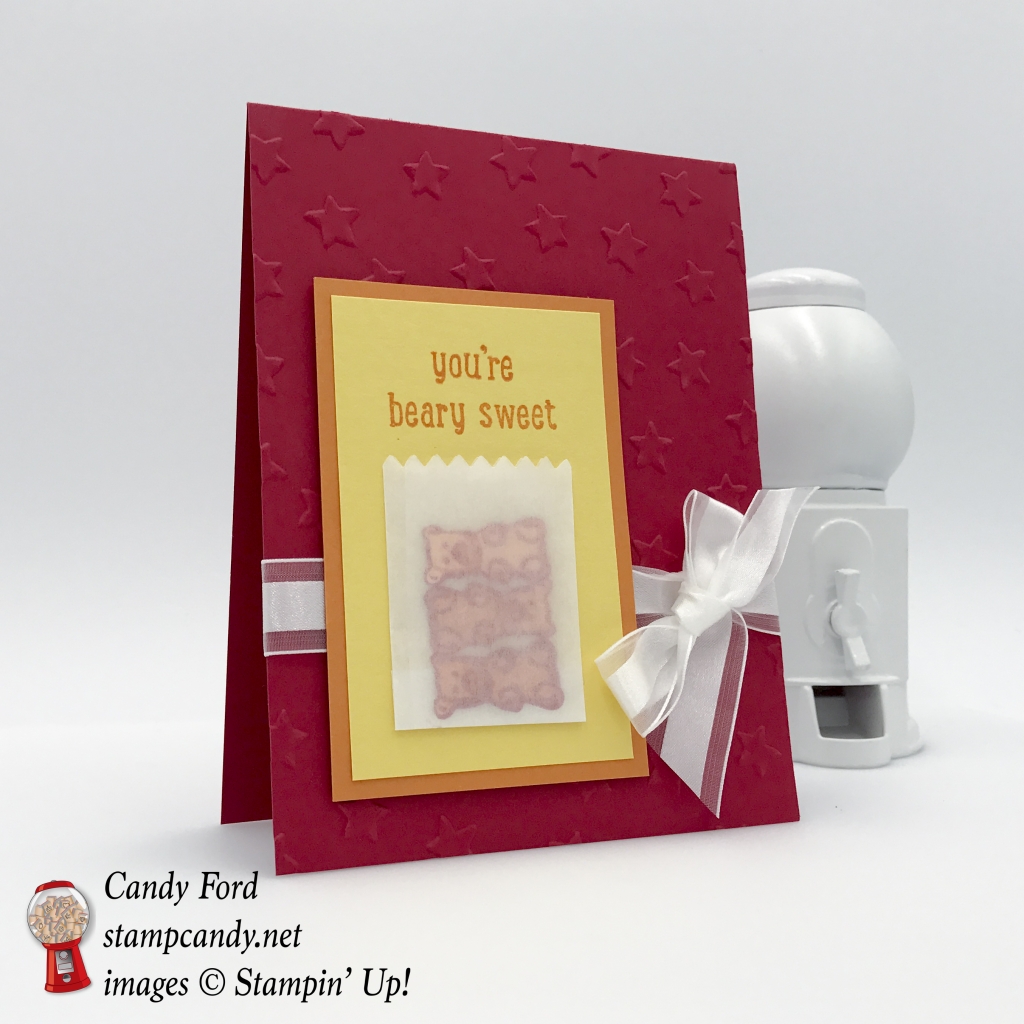
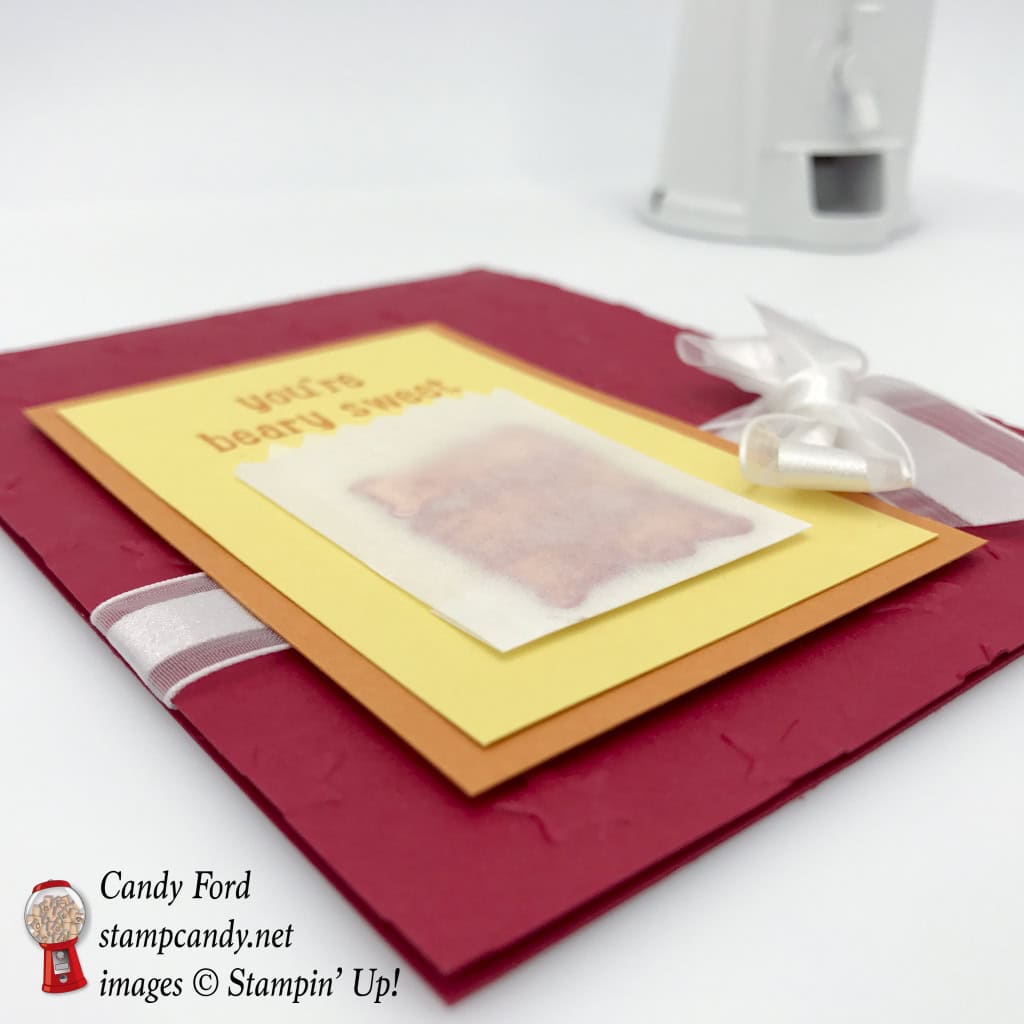
Here’s what I did:
Cut and scored with my Stampin’ Trimmer:
- Real Red card stock (CS) to 4-1/4″ x 11″, then scored in half at 5-1/2″
- Pumpkin Pie CS to 3-1/2″ x 3-3/4″
- Daffodil Delight CS to 2-1/4″ x 3-1/2″
- Glassine Sheet to 3-1/2″ x 2-1/2″
- Whisper White CS to 4′ x 5-1/2″ for the inside
Stamped with the Just Keep Swimming stamp set:
- 3 gummy bears in Pumpkin Pie and Real Red onto a scrap of Peekaboo Peach CS – this is a three step stamp, but I used the CS as the base color, and stamped the second stamp in Pumpkin Pie, then the last stamp in Real Red
- sentiment in Pumpkin Pie ink onto the Daffodil Delight CS
Die cut using the Mini Treat Bag Framelits:
- just the top of the little glassine bag
Fussy cut with Paper Snips:
Embossed with Lucky Stars TIEF:

Lucky Stars TIEF © Stampin’ Up!
Assembled the card:
- glassine sheet folded into a bag big enough for the gummy bears, 1-1/2″ wide and bottom folded up 1/2″ – you can cut the top with the Mini Treat Bag Framelits either before or after you fold it
- bears adhered to inside of bag with Mini Glue Dots – I opened up the bag, placed the glue dots on the bears’ backs, arranged them face down on the inside front of the bag, then closed the bag, so the bears were adhered to the back part of the bag and the glue dots wouldn’t show
- folded the bag back into shape and sealed it shut in the back with Fast Fuse
- bag adhered to Daffodil Delight CS with Fast Fuse
- Daffodil Delight CS glued onto Pumpkin Pie CS
- Whisper White Organza Ribbon wrapped around front of card base, adhered with Fast Fuse, and tied in a bow
- Pumpkin Pie CS adhered to card front with Stampin’ Dimensionals
- Whisper White CS glued to the inside of the card base
Here’s what I used:
Click on the images for more details and to purchase.

Here’s the official Retiring List from Stampin’ Up!:
Items are available through May 31, 2017 OR while supplies last. Many items are marked down, up to 50% off. So get them now while you still can. Please go to my online store and use the Host Code below.
Click here for the pdf.
Click here for the sortable Excel spreadsheet.
Click here to see the Retiring List in my online store.
Gum Ball Rewards
 You always earn a Gum Ball for every $50 you spend on an order with me. Earn 10 Gum Balls and I’ll send you a free stamp set of your choice! See the Gum Ball Rewards page for details.
Click here to shop my online store!
April Host Code
HV6MJT2X
Use the Host Code on online orders less than $15o. See how to use a Host Code here.
Online orders of $75-149.99 placed with the Host Code will receive the gift of the month!
Online orders of $150 or more will automatically receive the gift of the month! Do not use the Host Code.
April’s gift is a pack of Urban Underground Embellishments! Each pack contains 24 brushed silver embellishments – 8 each of 3 designs. (I can ship within US only.)
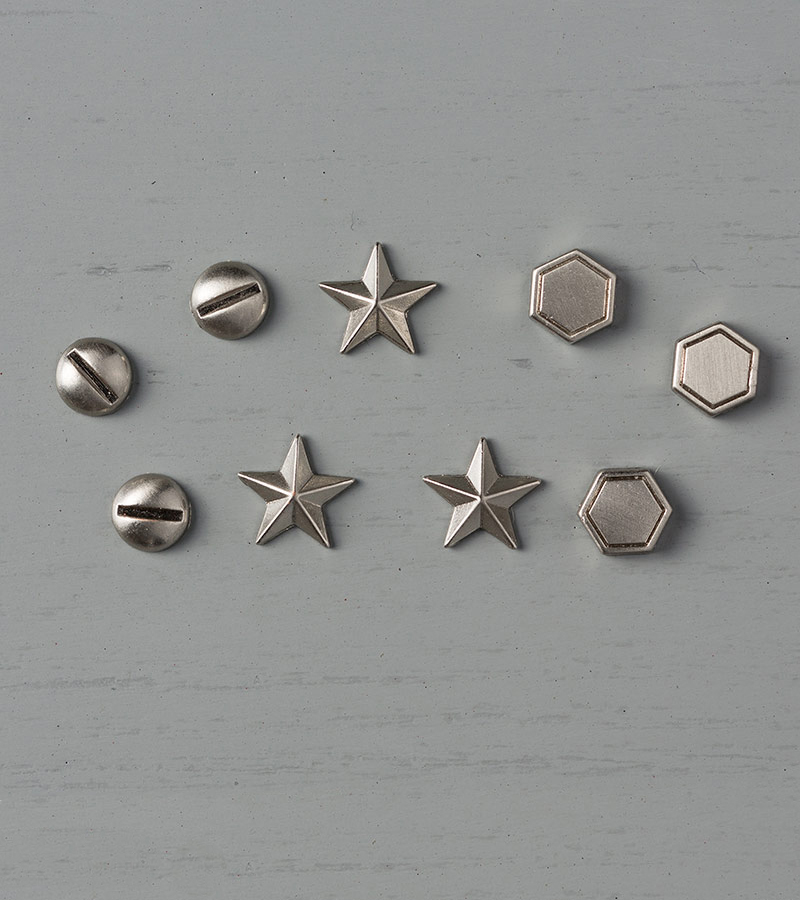
Urban Underground Embellishments © Stampin’ Up!
Thanks for stopping by today, and Sweet Stamping!

Dec 3, 2016 | Deals, Gallery, Holiday, Retiring Products, Sales |

The Retiring List has been released.
Get these products while you still can!
Available while supplies last, until January 3, 2017.
You can print the list if you want, but it will be updated as things sell out. Check back often.
Thanks for stopping by today, and Sweet Stamping!
Dec 1, 2016 | Deals, Gallery, Holiday, Retiring Products, Sales |

YEAR-END CLOSEOUT DEALS BEGIN TODAY!
Stampin’ Up! has been doing a little year-end cleaning, and we’ve got some great deals to offer you and your customers! Our Year-End Closeouts will include holiday retiring products, clearance rack items, and current high-inventory catalog products. Read below for promotion rules and information.
Details
• Promotion period: December 1, 2016 – January 3, 2017
• All products (and discounts, if any) can be found in the Year-End Closeouts category of the online store beginning December 1.
• Year-end closeout items may be added to all order types: demonstrator, workshop, customer, and online.
• Clearance Rack items are only available while supplies last.
• Following the Year-End Closeouts promotion, some products may remain on the Clearance Rack; other items may be removed from the Clearance Rack to be added at another undetermined time.
• High-inventory items will only be discounted through January 3; beginning January 4, they will still be available, but at regular price.
• Retiring item availability will follow standard retiring item rules:
• Retiring stamp sets are guaranteed available until December 21, after which they will be only available while supplies last.
• Retiring accessories will only be available while supplies last.
• Retiring items will only be available while supplies last. All retiring items will be discontinued after January 3.
Other Year-End Closeouts products and applicable discounts can be found in the online store.
• No minimum purchase is required to participate in Year-End Closeouts.
• Year-End Closeouts are eligible for Stampin’ Rewards with qualifying orders.
• New demonstrators may add Year-End Closeouts items to their Starter Kit! Click on Be a Candy Heart at the top of the page!
Thanks for stopping by today, and Sweet Stamping!
Aug 28, 2016 | Cards, Christmas, Gallery, Holiday, New Products, Open House, Sales |

Well, by now I guess you’ve figured out that I’m pretty smitten with the new Holiday Catalog. There are so many fun, pretty, amazing new products, and I want to show you them all! Today I’m featuring a new embossing folder called Pine Bough. It’s included in the Presents & Pinecones suite of products, but I think it does just fine on its own.

Here’s how I did it:
The card base is a Silver Foil Sheet cut to 4-1/4″ x 11″ and scored at 5-1/2″. Although if I were to make this card again, I would cut it to 5-1/2″ x 8-1/2″ and score it at 4-1/4″ for a tent card. I adhered a 4-1/8″ x 5-3/8″ piece of Soft Sky card stock to the front with Fast Fuse. I find Fast fuse works better than liquid glue on the slick foil sheets.
I ran a 4″ x 5-1/4″ piece of Whisper White card stock through the Big Shot with the new Pine Bough embossing folder.
I cut an ornament and ornament topper from a Silver Foil Sheet with the Delicate Ornament Thinlits Dies. I adhered the top to the ornament with Fast Fuse, then glued the ornament onto the embossed piece. Glue works fine on the back of the foil sheets.
I used my Paper-Piercing Tool to poke a tiny hole in the paper, and threaded a piece of Silver Metallic Thread around the ornament top and through the hole, where I adhered it on the back with Fast Fuse. I glued the Whisper White piece onto the Soft Sky piece.
The last touch was the bow. There is no Soft Sky Baker’s Twine, so I made some. I cut a length of Whisper White Solid Baker’s Twine, and put it in a small glass bowl with a few drops of Soft Sky Classic Stampin’ Ink Refill. I moved it around with my Paper-Piercing tool to make sure it all got dyed, then I laid it out on a paper towel to dry. I tied the dried twine in a small bow and adhered it to the ornament with a Mini Glue Dot.
Here’s what I used:
Today is my Holiday Catalog Open House and BOGO Sale!
If you’re in the Atlanta area between noon and 4pm, stop by!
1621 Executive Park Lane NE, Atlanta, GA 30329
Park along the street (Woodcliff) behind the building.
Thanks for stopping by today, and Sweet Stamping!
Aug 26, 2016 | Cards, Christmas, Gallery, Holiday, New Products, Open House, Sales |

I like washi tape. I do. But I rarely remember to use it. I’m not sure why. So to make up for it, I made this card with a lot of washi tape on it.
Here’s how I did it:
I cut a piece of Whisper White card stock to 4″ x 5-1/4″, then I applied strips of Presents & Pinecones Designer Washi Tape approximately 1/4″ apart. I glued this to the Mint Macaron card base.
I stamped the sentiment from the Christmas Pines stamp set in Cherry Cobbler ink onto Whisper White card stock, then cut it with the Delicate Ornament Thinlits Dies. I used a Sponge Dauber to ink the edges in Mint Macaron.
I tied a bow with Delightful Dijon ribbon from the 3/8″ Ribbon Trio Pack, then I adhered it to the top of the ornament with Glue Dots.
I adhered the ornament to the card front with Stampin’ Dimensionals. Super easy, and it took no time!
Here’s what I used:
Three things:
- My Open House and BOGO Sale is this Sunday, August 28, noon – 4pm ET. Click here for more details.
- The Thoughtful Branches bundle is only available until August 31! Click here to see it.
- August 31 is the last day you can redeem the Bonus Days coupons you earned in July.
Thanks for stopping by today, and Sweet Stamping!
Aug 24, 2016 | Blog Hop, Cards, Gallery, Halloween, Holiday, New Products, Open House, Sales, Techniques |

Welcome to InKing Royalty’s August Blog Hop! Stampin’ Up! demonstrators have been actively ordering from the 2016 Holiday Catalog, before it opens to customers on September 1. We are excited to share some of our new goodies with you today! Today’s Blog Hop is filled with inspiring projects that feature each artist’s take on the Fall months – Halloween and Thanksgiving are just around the corner. After you read my post, I hope you’ll hop over to the next person on the list at the base of this post.
I’m always honored and humbled to participate in a blog hop with this amazing group. Today I am especially excited to participate in a blog hop with the fabulous Louise Sharp. I met Louise on the incentive trip in May, and just fell in love with her. She is adorable and sweet, and a very talented paper artist. Thank you, Louise, for joining us today!
Anyone who knows me knows that I love Halloween. It’s always been one of my favorite holidays. So today I’m sharing a Halloween card made with one of my favorite new stamp sets in the 2016 Holiday Catalog, Jar of Haunts. I knew I had to have it as soon as I saw the dripping ooze and the floating eyeballs!

And it coordinates perfectly with the Everyday Jars Framelits Dies.

Here’s what I came up with:

I love old horror movies. Not the gory slasher movies of today, but the old monster movies. With this card I was going for a mad scientist’s laboratory feel, with old wood, cob webs, and jars with icky oozy contents. This is the second day in a row I’ve made a 4″ x 8″ card. It just happens to be the size I needed to create the scenes of these two cards. You can see the other one here.
Here’s how I did it:
I stamped the mummy jar in Early Espresso ink onto Very Vanilla card stock. I used a Blender Pen to smear the ink a bit for shading. I used the Framelits to cut the stamped image, and to cut the jar shape from a Window Sheet. I then covered the image with glue from the Fine-Tip Glue pen and pressed the clear jar onto it. I did this on a Silicone Craft Sheet to catch the glue that oozed out. I held it for a moment, then curved it with my fingers and wrapped a small rubber band around it. I let it sit this way until the glue dried. This is how I got the rounded jars on the card. The glue made the ink run a bit, but I like the effect on this one.
For the jar of blood, I cut the jar shape from a Window Sheet and from Cherry Cobbler card stock. I glued the two pieces together, curved them, and let it sit with a rubber band wrapped around it, as I did the previous one. I stamped the ooze in Cherry Cobbler ink onto Cherry Cobbler card stock, lined it up with the jar die and cut it out, then used Paper Snips to cut away the part of the jar below the ooze. I covered this with the same glue and let it sit on the Silicone Craft Sheet until it was dry. It curled a bit on its own, which helped when I glued it onto the full jar.
For the green jar, I stamped the eyeballs in Smoky Slate ink onto Shimmery White card stock. I used this paper because I knew I wanted to watercolor. I lined up the jar die with the eyeball image and cut it out. I used the same die to cut a Window Sheet. I colored the eyeballs with Stampin’ Write Markers in Pacific Point, Cucumber Crush, Soft Suede, and Cherry Cobbler. I used an Aqua Painter and Old Olive ink to color the liquid in the jar. I used my Paper Snips to cut away the part of the jar above the eyeballs and waterline.
I was afraid to use the glue on this one, because I really didn’t want the colors to run like they did on the mummy. So I covered the image completely with Fast Fuse adhesive, then stuck on the clear jar. Again I curved it with my fingers and let it sit for a while with a rubber band wrapped around it.
While the jars sat curling, I made the jar lids. I stamped the image from the Jar of Love stamp set in Versamark ink onto a Gold Foil sheet, then heat embossed it in copper. I used the corresponding die to cut them out. I used a Sponge Dauber to apple black Staz-On ink to make them look old and rusty. I used Fast Fuse to adhere the lids onto the jar of eyeballs and the mummy jar. I used a Real Red Stampin’ Write Marker to add some “blood” to the rim of the third lid, and set it with the heat tool.
For the card, I cut a piece of Halloween Night Designer Series Paper (silver cobweb on black) to 4″ x 8″ and glued it to the front of a Basic Black card base the same size (8″ x 8″ scored at 4″.) I used the Hardwood stamp with Basic Black ink on Basic Grey card stock to create the dark wood. I cut the image in strips and glued them around the edges of the card front. I made the bottom wider to look like a window sill, and adhered it with Foam Adhesive Strips.
I put a line of Stampin’ Dimensionals down the center of each jar, three layers thick, and adhered them to the card to look like they’re sitting on the sill. I used Foam Adhesive strips to adhere the last jar lid next to the bloody jar.
I hope you can come to my Open House and BOGO Sale this Sunday to see this card in person. Photos really don’t do it justice. See the event details here.
Everything I used on today’s card is listed at the bottom of this post.
I hope you’ll hop along to the next stop on the blog hop, Karen Browning at StampWithMeKZB. There’s a lot of inspiration to be found in this group, and you don’t want to miss it!
Thank you for hopping along with us. If you get stuck during the Blog Hop, please use this line-up as a guide:
- Brian King at Stamp with Brian
- Imogene Thomas at MomoMakes.com
- Lynn Kolcun at Avery’s Owlery
- Louise Sharp at Louise Sharp.com
- Shawn de Oliveira at ShawnStamps
- Robin Myren at Songbird Designs by Robin
- Candy Ford at Stamp Candy <– YOU ARE HERE
- Karen Browning at StampWithMeKZB
- Becky Volpp at InkBlossom with Becky
- Jennifer Spiller at Westside Paper Creations
Here’s what I used today:
The holiday items will be available to purchase September 1, but you can look at them in my online store now. You can purchase everything else now by clicking on the images below!
Thanks for stopping by today, and Sweet Stamping!


