May 17, 2017 | Bags, Blog Hop, Gallery, Gift Wrap, Gifts, New Products |
Need a quick little gift bag to give some yummy little goodies in? Today’s project is just that, and it is soooo easy to make! It’s also a sneak peek from the new 2017-2018 Stampin’ Up! Annual Catalog, for the InKing Royalty May Blog Hop. The new products I used are the Label Me Pretty Bundle (Label Me Pretty stamp set and Pretty Label Punch,) Delightful Daisy Designer Series Paper, and 3/8″ Mini Chevron Ribbon in Old Olive, and they will be available to order on June 1!

Welcome to InKing Royalty’s May Blog Hop! Today’s Blog Hop is filled with projects that offer you a sneak peek at new items in Stampin’ Up!’s 2017-2018 Annual Catalog. We are so excited about the June 1 release of this new catalog – it’s AMAZING – and we are excited to share our sneak peek creations with you today. After you read my post, I hope you’ll hop along to the next stop on the blog hop, Robin Myren at Songbird Designs by Robin. There’s a lot of inspiration to be found in this group – and you don’t want to miss any of it!
Here’s what I made:

Scroll down to see how I made it and what I used.
Here’s the InKing Royalty May Blog Hop:
Thank you for hopping along with us. If you get stuck during the Blog Hop, please use this line-up as a guide:
- Brian King at Stamp with Brian
- Julie DiMatteo at The Paper Pixie
- Candy Ford at Stamp Candy
- Robin Myren at Songbird Designs by Robin
- Shawn de Oliveira at ShawnStamps
- Lisa Pretto at Ink Big Academy Stamps
- Jennifer Spiller at Westside Paper Creations
- Lynn Kolcun at Avery’s Owlery
- Rachael Shedeed at Bluebonnet Stampin’
- Jackie Beers at Blue Line Stamping
- Karen Browning at StampWithMeKZB
Here’s what I did:
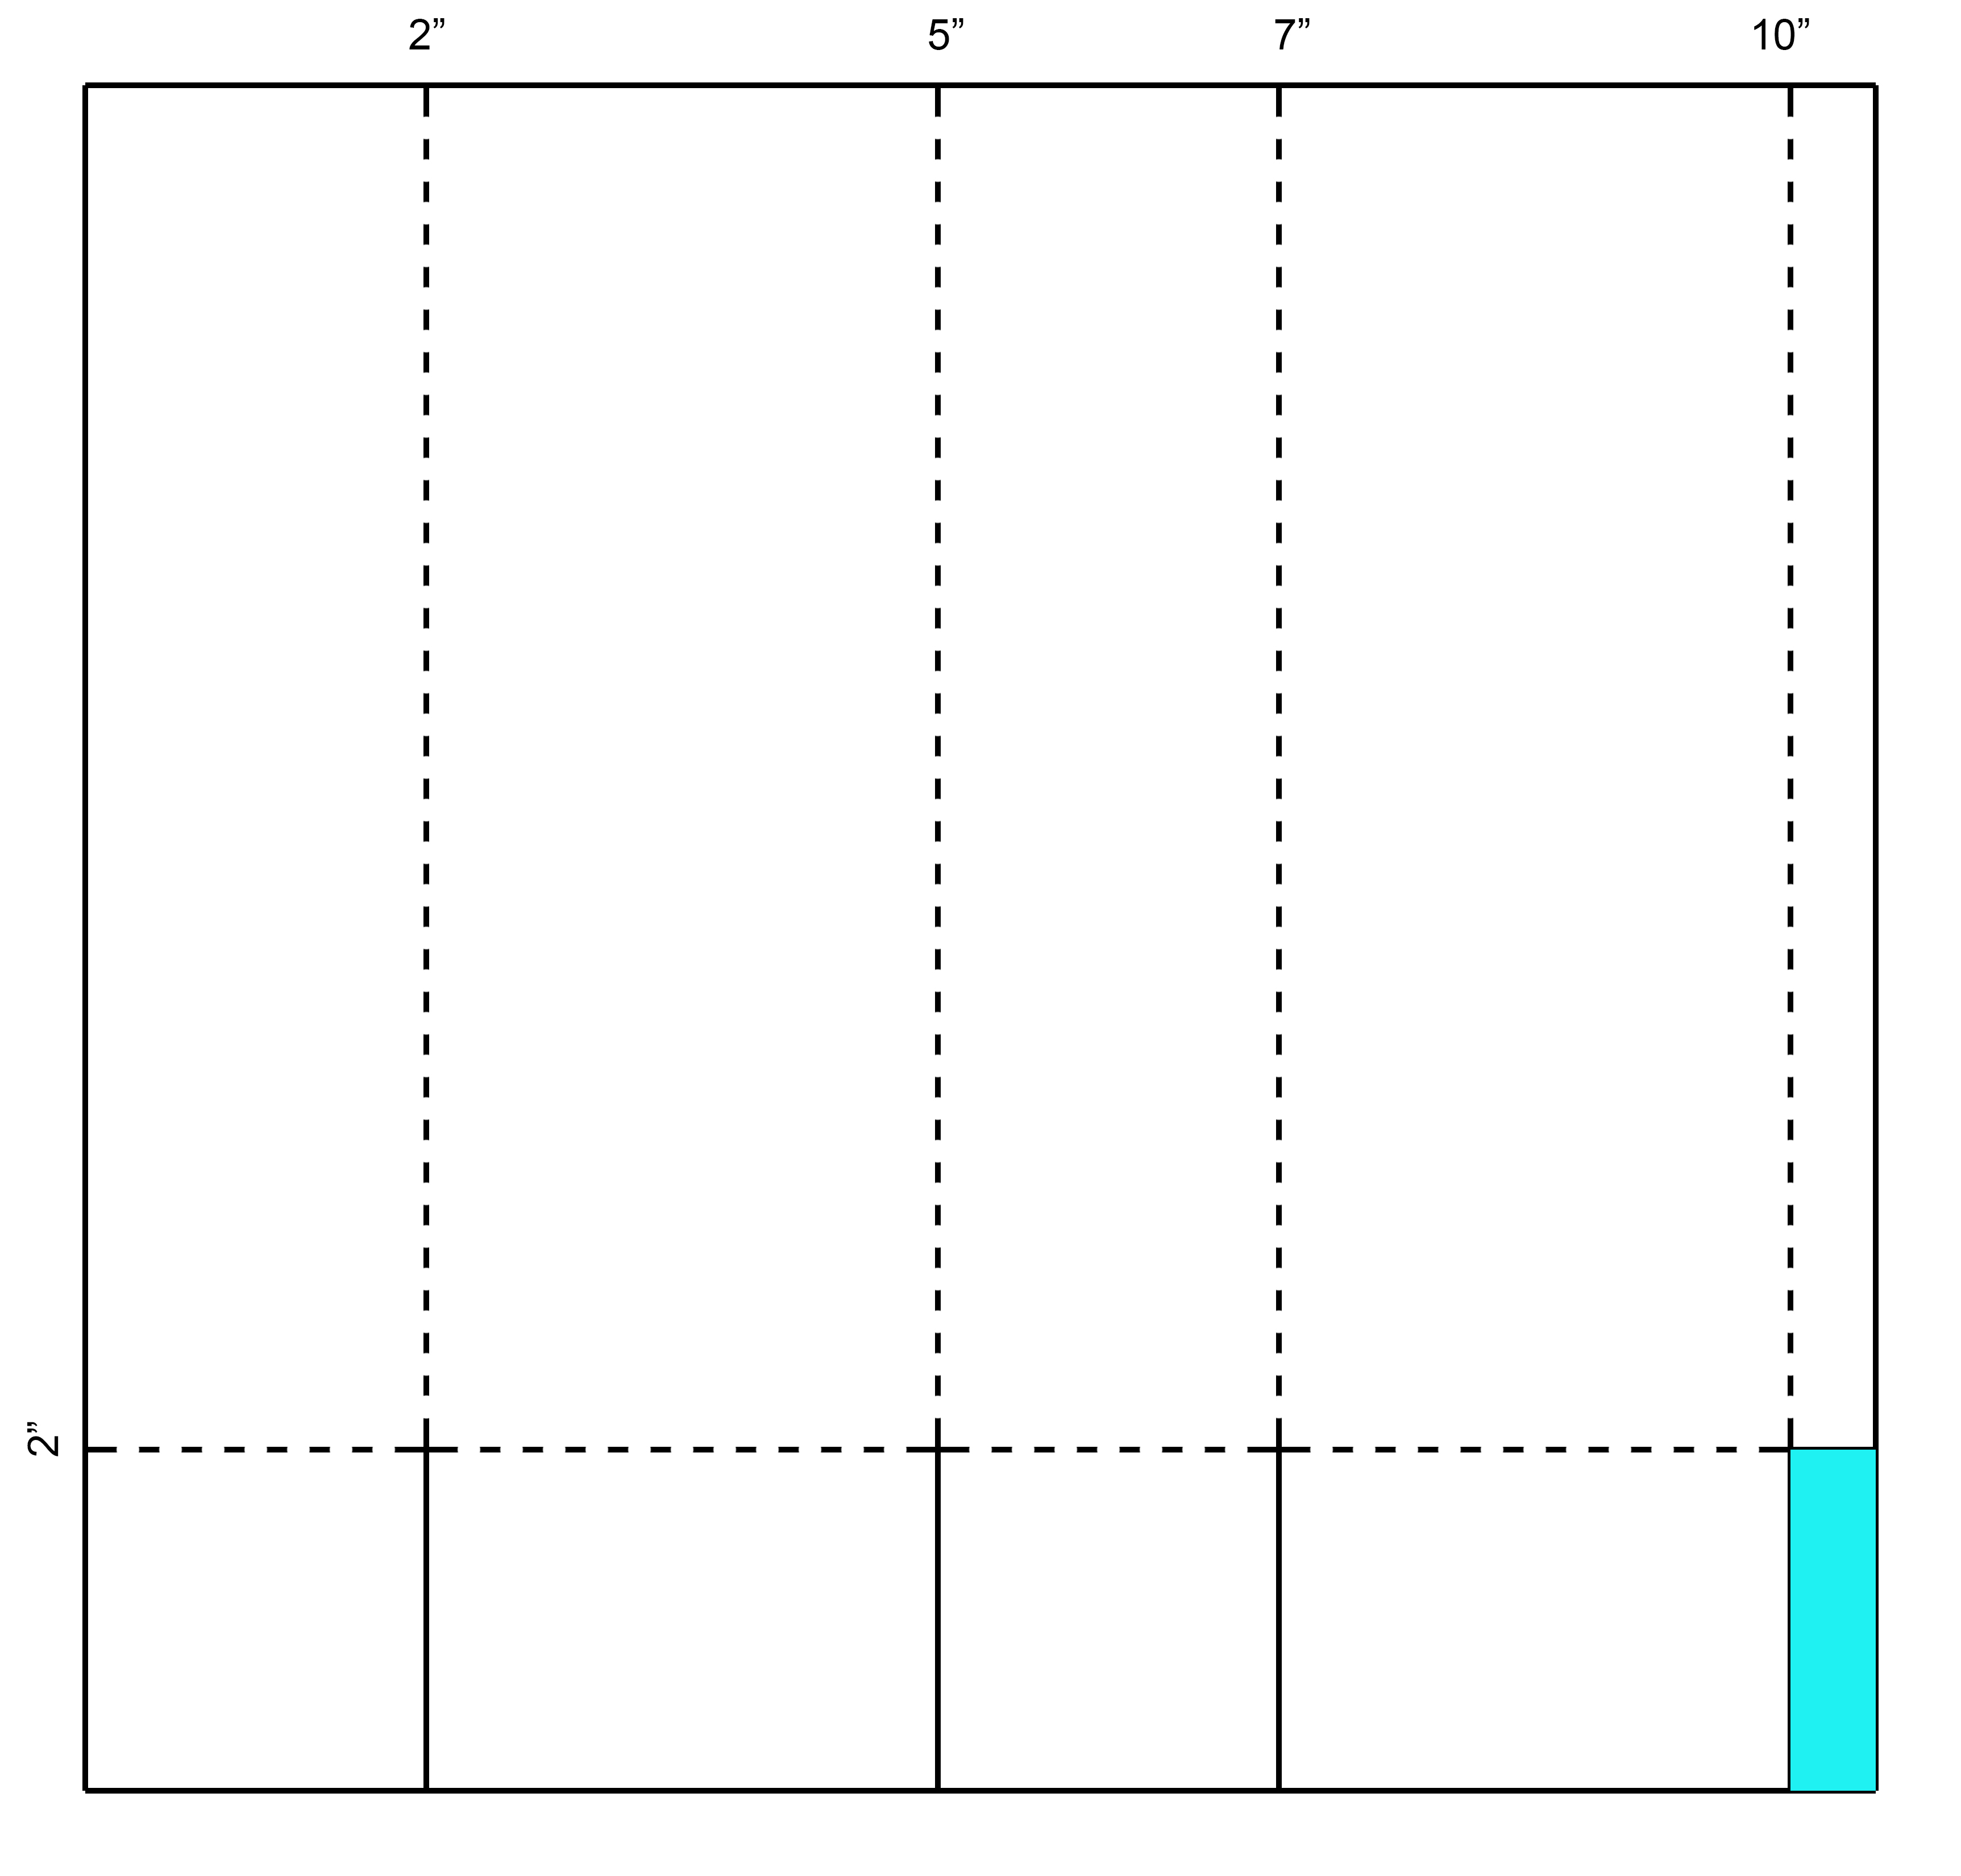
Cut and scored with my Stampin’ Trimmer:
- Delightful Daisy Designer Series Paper (DSP) cut to 10-1/2″ x 10″
- with 10-1/2″ side at the top, scored at 2″, 5″, 7″, and 10″
- with 10″ side at the top, scored at 2″
Stamped with the Label Me Pretty stamp set:
- used Stampin’ Write Markers in Night of Navy, Old Olive, and Calypso Coral to color the stamp, then stamped image onto Whisper White card stock (CS)

Label Me Pretty Stamp Set © Stampin’ Up!
Cut using the Pretty Label Punch:
Assembled the bag:
- all scored lines folded
- used Paper Snips to cut the short vertical score lines up to the horizontal score line (see diagram below)
- used Paper Snips to cut away the smallest corner rectangle (blue area on diagram)
- applied glue to the outside of the 1/2″ tab and adhered it to the inside of the other end
- folded in four bottom flaps and glued together – I prefer to fold in the back first, then the two sides, and the front flap last.
- adhered stamped/punched piece to front of bag with Stampin’ Dimensionals
- folded over top of bag and tied a piece of ribbon around it
Diagram:
Score along dotted lines and cut along solid lines:
Here’s what I used:
Click on the images for more details and to purchase.
Stamp Camp!!!
Only 3 days left to register!
Saturday, June 3, 2017, 9am-5pm
Candy’s Stamping Studio, Atlanta, GA
You’ll have 8 hours with no kids, no pets, no job, no worries – just fun with friends stamping and shopping!
Click here for all the details!!!
Register here by May 20. Prepayment is necessary to make sure I have enough of everything on hand. Space is limited so register soon. Also, the earlier you register, the more prize drawing tickets you will receive at the door!

Swatch Books & Paper Shares
for the brand new
2017-2018 Annual Catalog
Designer Series Papers
are coming soon!
I can start taking orders May 25. I’ll order the materials on June 1, and I’ll begin shipping them out once I receive the materials and get the books and shares assembled, hopefully that same week.
Click here for more details!


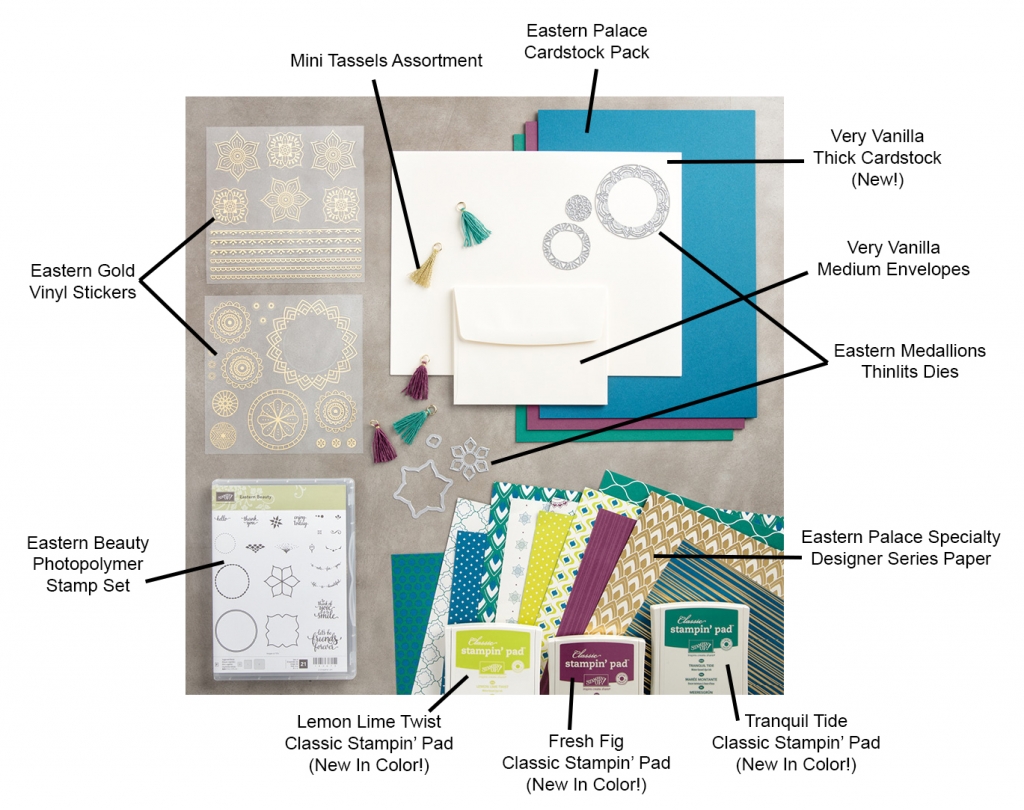
Eastern Palace Bundles
The 2017-2018 Annual Catalog goes live June 1, but you can order the brand new Eastern Palace Bundles now! Through May 31, you can order these exclusive bundles, and get a head start on making beautiful projects with these amazing new products. Included in this early release are three of the new In Colors: Fresh Fig, Lemon Lime Twist, and Tranquil Tide.
These products will still be available after May 31, BUT this incredible deal will not!
(If you join my team now, you can order these items individually as well as the bundles, PLUS other new products in the new catalog NOW!)
Get these terrific Bundles now by clicking on the images below:

May Host Code
TPR2ZNKB
Use the Host Code on online orders less than $15o. See how to use a Host Code here.
Online orders of $75-149.99 placed with the Host Code will receive the FREE gift of the month!
Online orders of $150 or more will automatically receive the FREE gift of the month! Do not use the Host Code.
May’s FREE gift is a pack of Metallic Enamel Shapes. Each pack contains:
- 100 enamel shapes, 50 each in gold and silver foil.
- 1 sheet per color: gold and silver
- Each sheet has 15 mini circles, 10 small circles, 10 hearts, and 15 stars.

Metallic Enamel Shapes © Stampin’ Up!
(I can ship within US only.)
Gum Ball Rewards
 You always earn a Gum Ball for every $50 you spend on an order with me. Earn 10 Gum Balls and I’ll send you a free stamp set of your choice! See the Gum Ball Rewards page for details.
Click here to shop my online store!
Thanks for stopping by today, and Sweet Stamping!

Apr 12, 2017 | Bags, Cards, Deals, Gallery, Retiring Products, Sales |
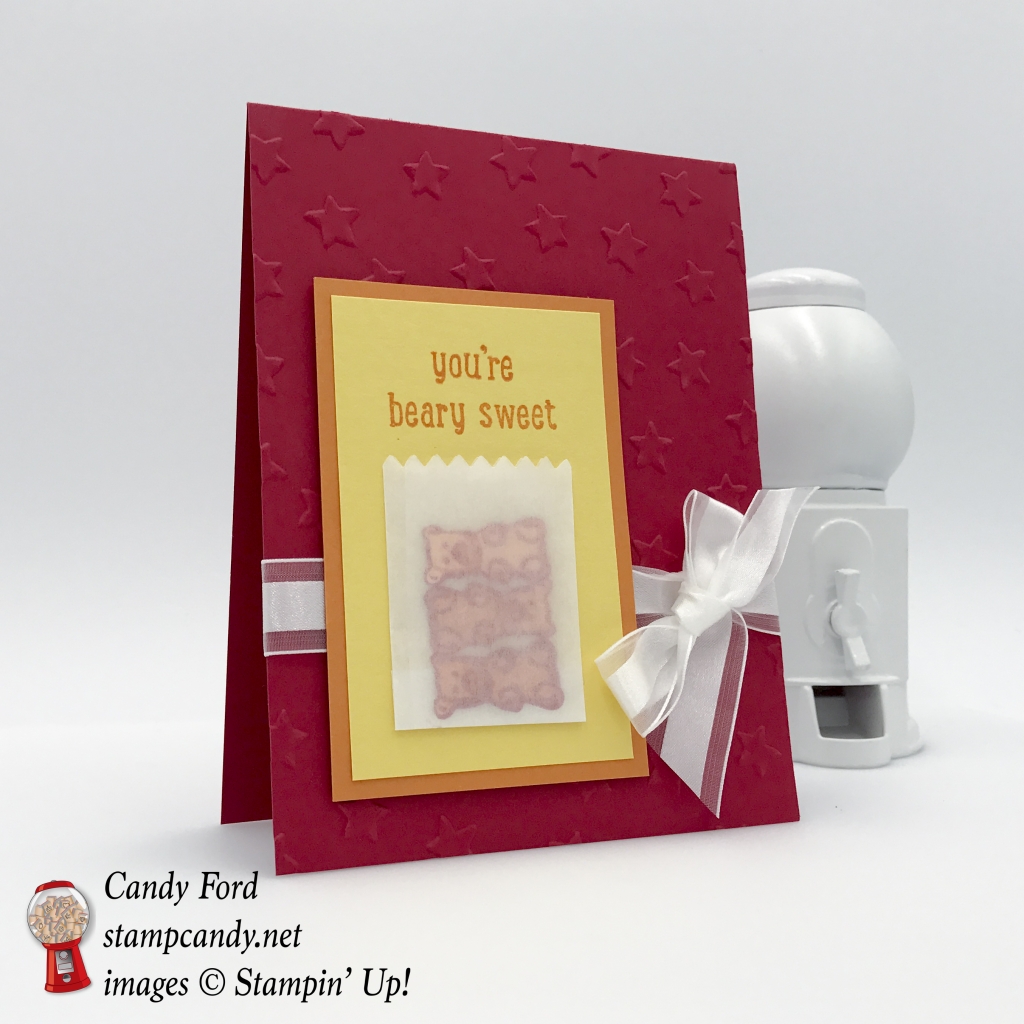
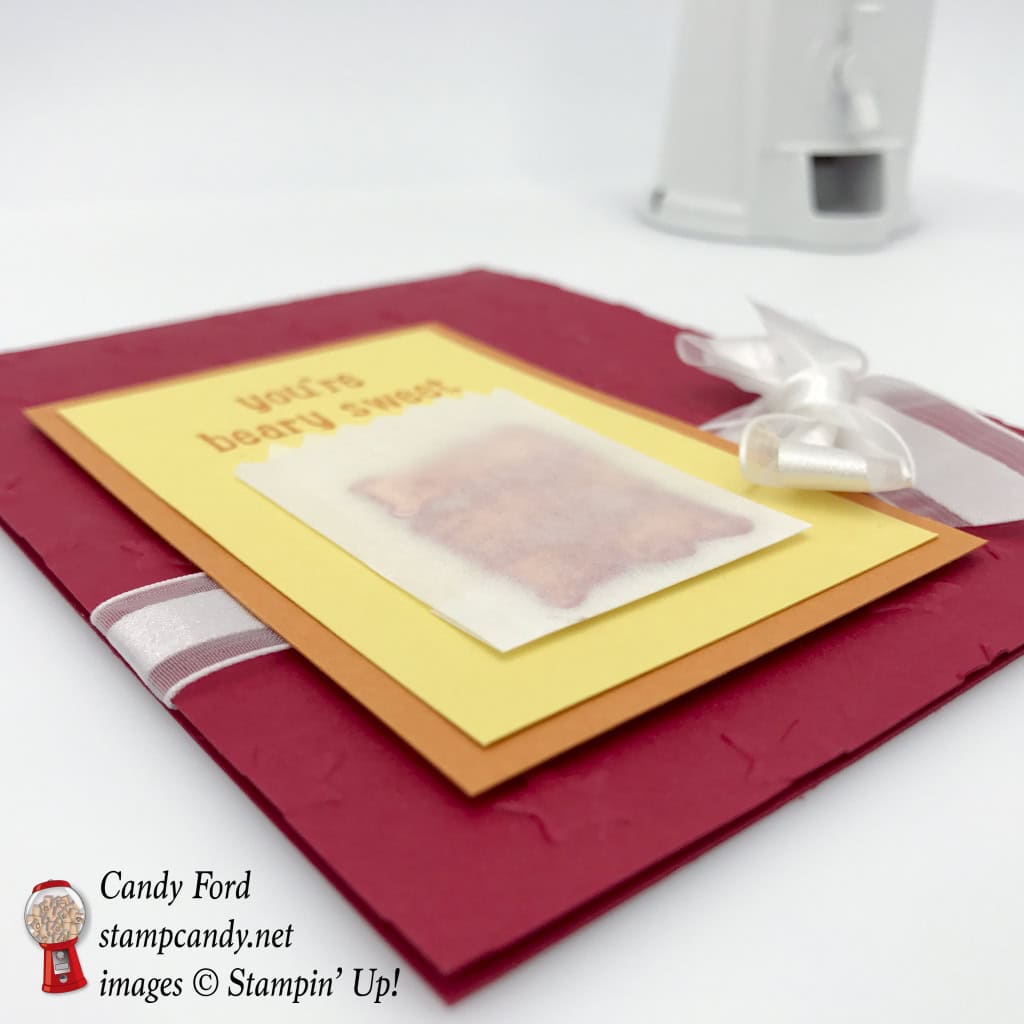
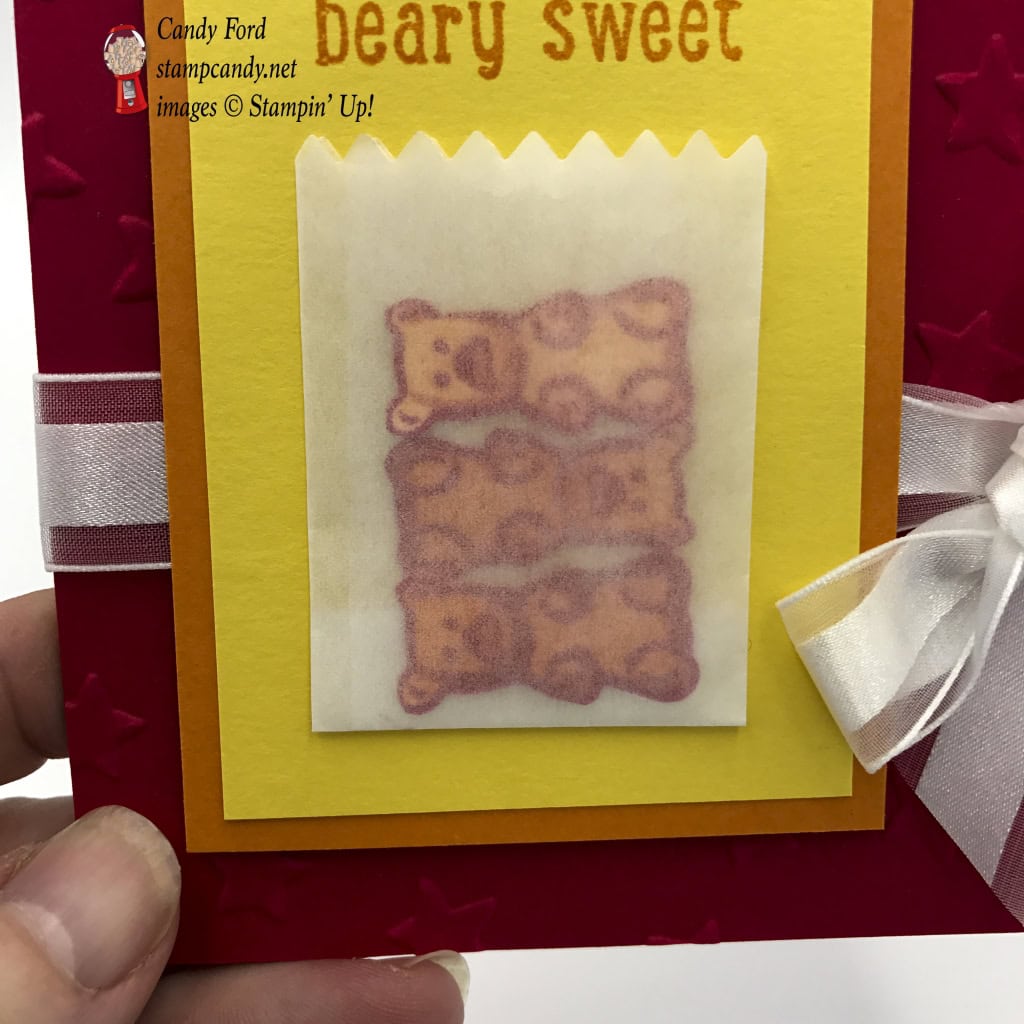
I like gummy bears. Well, I like gummy worms, so I assume I would like gummy bears. Aren’t all the gummy critters made of the same stuff? I prefer the yellow/orange/red ones (as opposed to the clear/red/green ones) so those are the ones I tried to replicate for today’s card made with the Just Keep Swimming stamp set.

Just Keep Swimming © Stampin’ Up!
The winner of the blog candy from my April 5 post is jamesmominwa@aol.com! I will email you today to get your mailing information, and will get your blog candy right out to you! Congratulations, jamesmominwa@aol.com!
Stampin’ Up! has released the list of retiring products from the 2016-2017 Annual Catalog and the 2017 Occasions Catalog. Scroll down for more information!
Here’s what I made:
Here’s what I did:
Cut and scored with my Stampin’ Trimmer:
- Real Red card stock (CS) to 4-1/4″ x 11″, then scored in half at 5-1/2″
- Pumpkin Pie CS to 3-1/2″ x 3-3/4″
- Daffodil Delight CS to 2-1/4″ x 3-1/2″
- Glassine Sheet to 3-1/2″ x 2-1/2″
- Whisper White CS to 4′ x 5-1/2″ for the inside
Stamped with the Just Keep Swimming stamp set:
- 3 gummy bears in Pumpkin Pie and Real Red onto a scrap of Peekaboo Peach CS – this is a three step stamp, but I used the CS as the base color, and stamped the second stamp in Pumpkin Pie, then the last stamp in Real Red
- sentiment in Pumpkin Pie ink onto the Daffodil Delight CS
Die cut using the Mini Treat Bag Framelits:
- just the top of the little glassine bag
Fussy cut with Paper Snips:
Embossed with Lucky Stars TIEF:

Lucky Stars TIEF © Stampin’ Up!
Assembled the card:
- glassine sheet folded into a bag big enough for the gummy bears, 1-1/2″ wide and bottom folded up 1/2″ – you can cut the top with the Mini Treat Bag Framelits either before or after you fold it
- bears adhered to inside of bag with Mini Glue Dots – I opened up the bag, placed the glue dots on the bears’ backs, arranged them face down on the inside front of the bag, then closed the bag, so the bears were adhered to the back part of the bag and the glue dots wouldn’t show
- folded the bag back into shape and sealed it shut in the back with Fast Fuse
- bag adhered to Daffodil Delight CS with Fast Fuse
- Daffodil Delight CS glued onto Pumpkin Pie CS
- Whisper White Organza Ribbon wrapped around front of card base, adhered with Fast Fuse, and tied in a bow
- Pumpkin Pie CS adhered to card front with Stampin’ Dimensionals
- Whisper White CS glued to the inside of the card base
Here’s what I used:
Click on the images for more details and to purchase.
Here’s the official Retiring List from Stampin’ Up!:
Items are available through May 31, 2017 OR while supplies last. Many items are marked down, up to 50% off. So get them now while you still can. Please go to my online store and use the Host Code below.
Click here for the pdf.
Click here for the sortable Excel spreadsheet.
Click here to see the Retiring List in my online store.
Gum Ball Rewards
You always earn a Gum Ball for every $50 you spend on an order with me. Earn 10 Gum Balls and I’ll send you a free stamp set of your choice! See the Gum Ball Rewards page for details.
Click here to shop my online store!
April Host Code
HV6MJT2X
Use the Host Code on online orders less than $15o. See how to use a Host Code here.
Online orders of $75-149.99 placed with the Host Code will receive the gift of the month!
Online orders of $150 or more will automatically receive the gift of the month! Do not use the Host Code.
April’s gift is a pack of Urban Underground Embellishments! Each pack contains 24 brushed silver embellishments – 8 each of 3 designs. (I can ship within US only.)
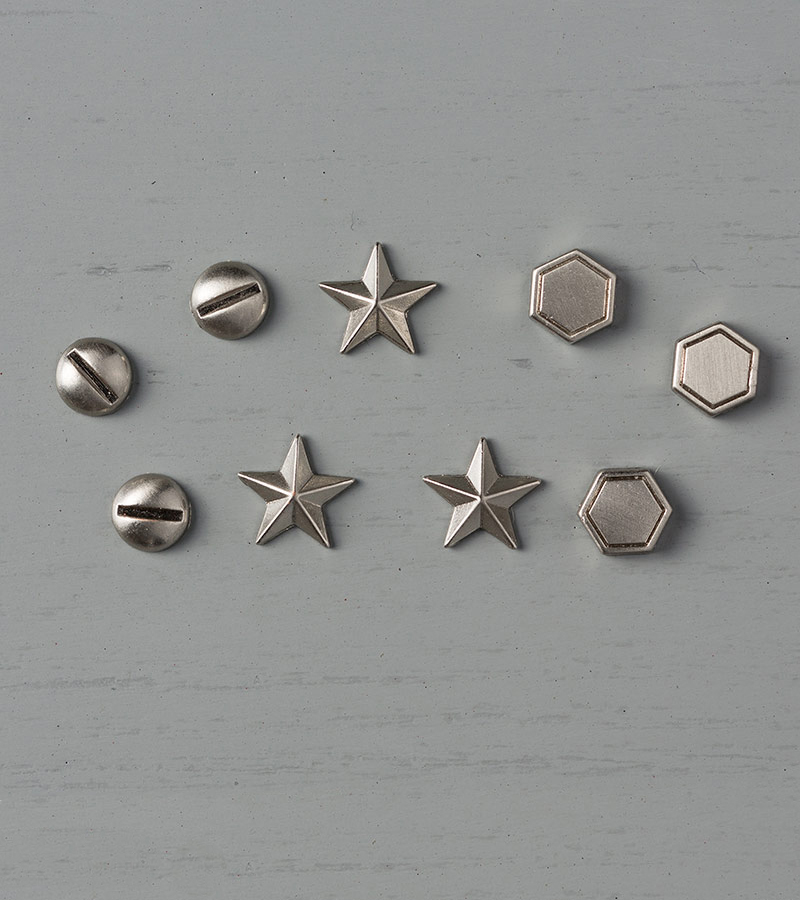
Urban Underground Embellishments © Stampin’ Up!
Thanks for stopping by today, and Sweet Stamping!

Feb 26, 2017 | Baby, Bags, Challenges, Gallery, Gift Wrap, Gifts, Occasions |
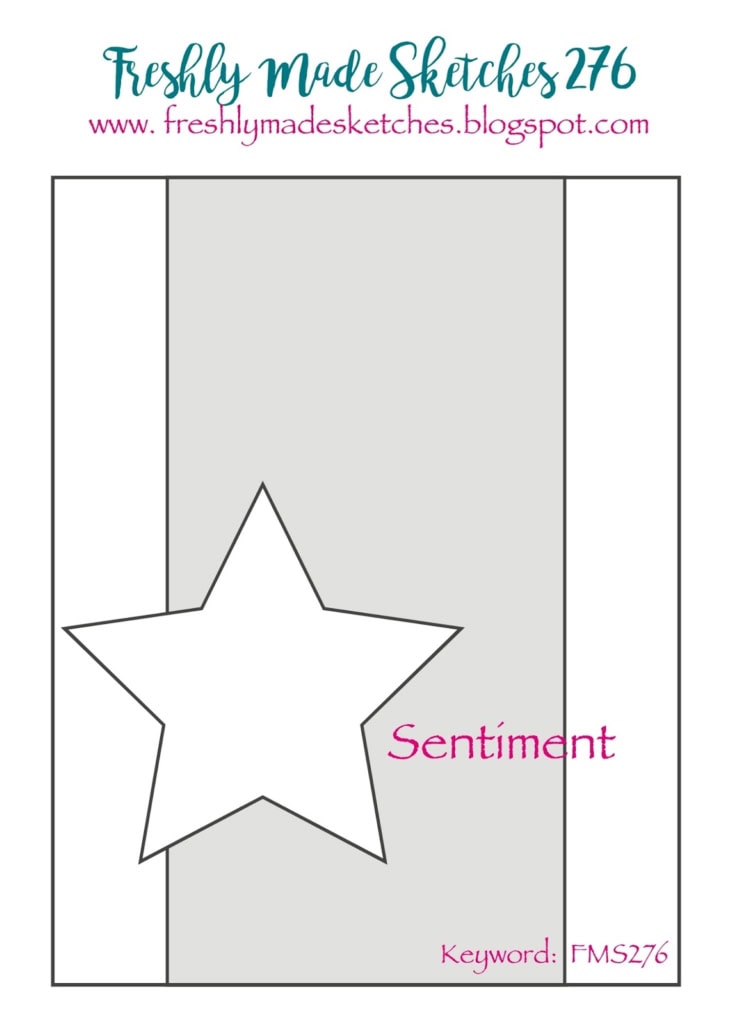
My project today is made with the Moon Baby stamp set, Kraft Tag a Bag Gift Bags, and Layering Ovals Framelits Dies. This sweet little gift bag is perfect for a small baby shower gift or card. The design is inspired by this week’s Freshly Made Sketches Challenge:
Here’s what I made:
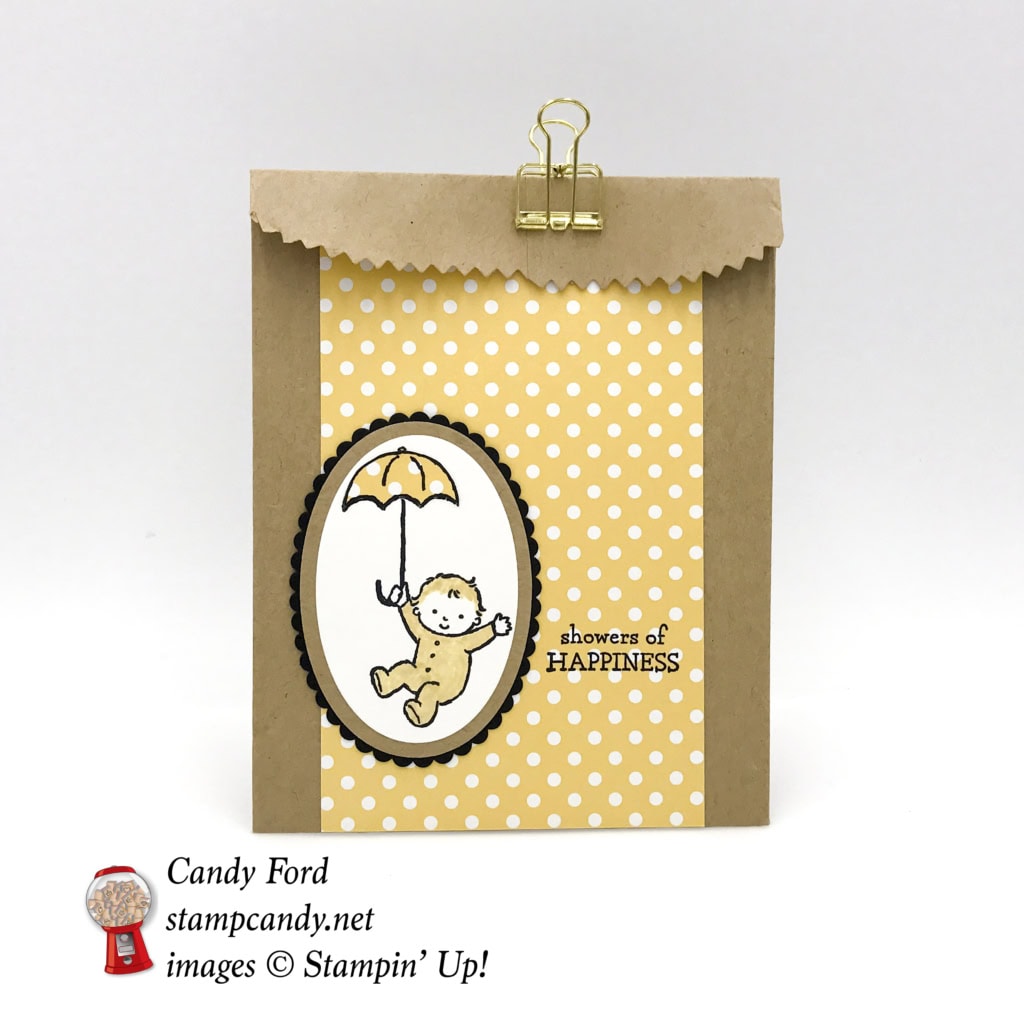
Here’s what I did:
Cut with my Stampin’ Trimmer:
- So Saffron DSP from the Subtles Designer Series Paper Stack to 3-1/2″ x 6″
Stamped with the Moon Baby stamp set:
- full image in Basic Black ink onto a piece of Whisper White CS
- sentiment in Basic Black ink onto the 3-1/2″ x 6″ piece of DSP
- just the umbrella in Basic Black ink onto a small scrap of the DSP
Colored in with So Saffron Stampin’ Write Marker:
- baby’s clothes and hair
- tiny circle on the top of the umbrella
Die cut using the Layering Ovals Framelits Dies :
- full image on Whisper White CS
- next size up oval from another Kraft Tag a Bag Gift Bag
- scalloped oval from Basic Black CS
Fussy cut with Paper Snips:
- umbrella top that was stamped on the scrap of DSP
Assembled the bag:
- umbrella top glued to the full image
- full image glued to the oval cut from another kraft bag
- kraft oval glued to scalloped Basic Black oval
- large piece of DSP glued to the front of the bag, and folded over the top of the bag
- Basic Black oval glued to the DSP & bag
- folded over the top of the bag and used a clip to hold it closed
Here’s what I used:
Click on the images for more details and to purchase.

Now through March 31, you will earn a FREE item from the Sale-a-bration catalog for every $50 you spend on an order. See the items you can earn for FREE here and here.
PLUS you will earn a Gum Ball for every $50 you spend on an order with me. Earn 10 Gum Balls and I’ll send you a free stamp set of your choice! See the Gum Ball Rewards page for details.
Click here to shop my online store!
February Host Code
C7RRWU4B
Use the Host Code on online orders less than $15o. See how to use a Host Code here.
Online orders of $75-149.99 placed with the Host Code will receive the gift of the month!
Online orders of $150 or more (do not use the Host Code) will automatically receive the gift of the month!
Click here to shop my online store!
Thanks for stopping by today, and Sweet Stamping!
Dec 16, 2016 | Bags, Christmas, Food, Gallery, Gifts, Holiday, Retiring Products |
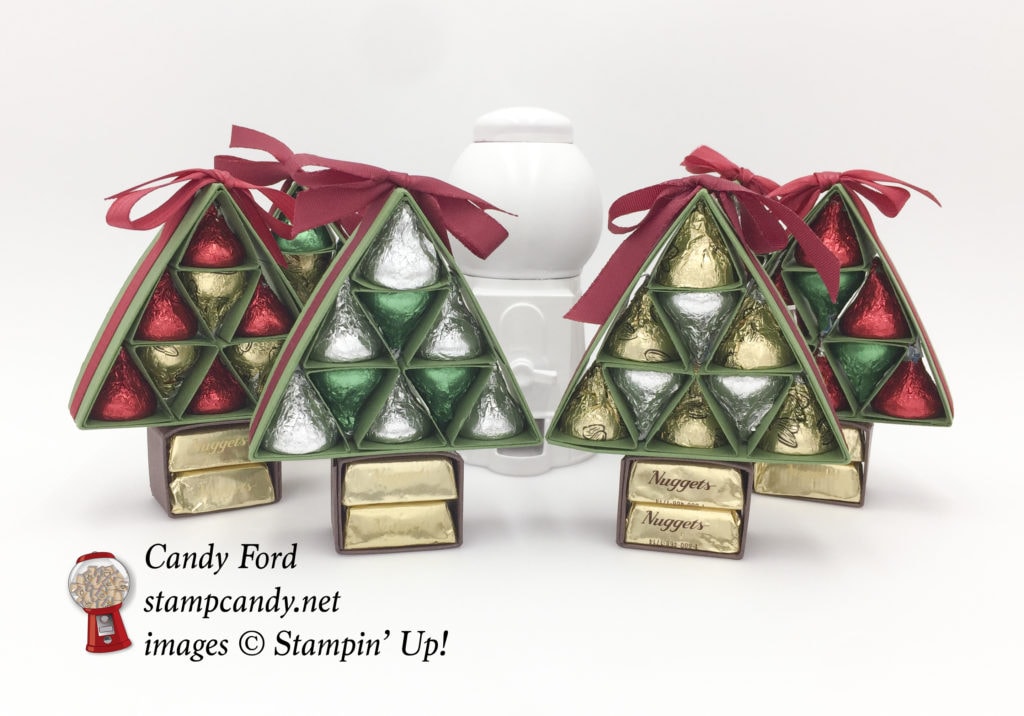
Christmas is only 10 days away! Today’s project is another gift you can make for all those people in your life you want to recognize with just a little something. They are snowmen made from Hershey’s Nuggets.
Here’s what I made:
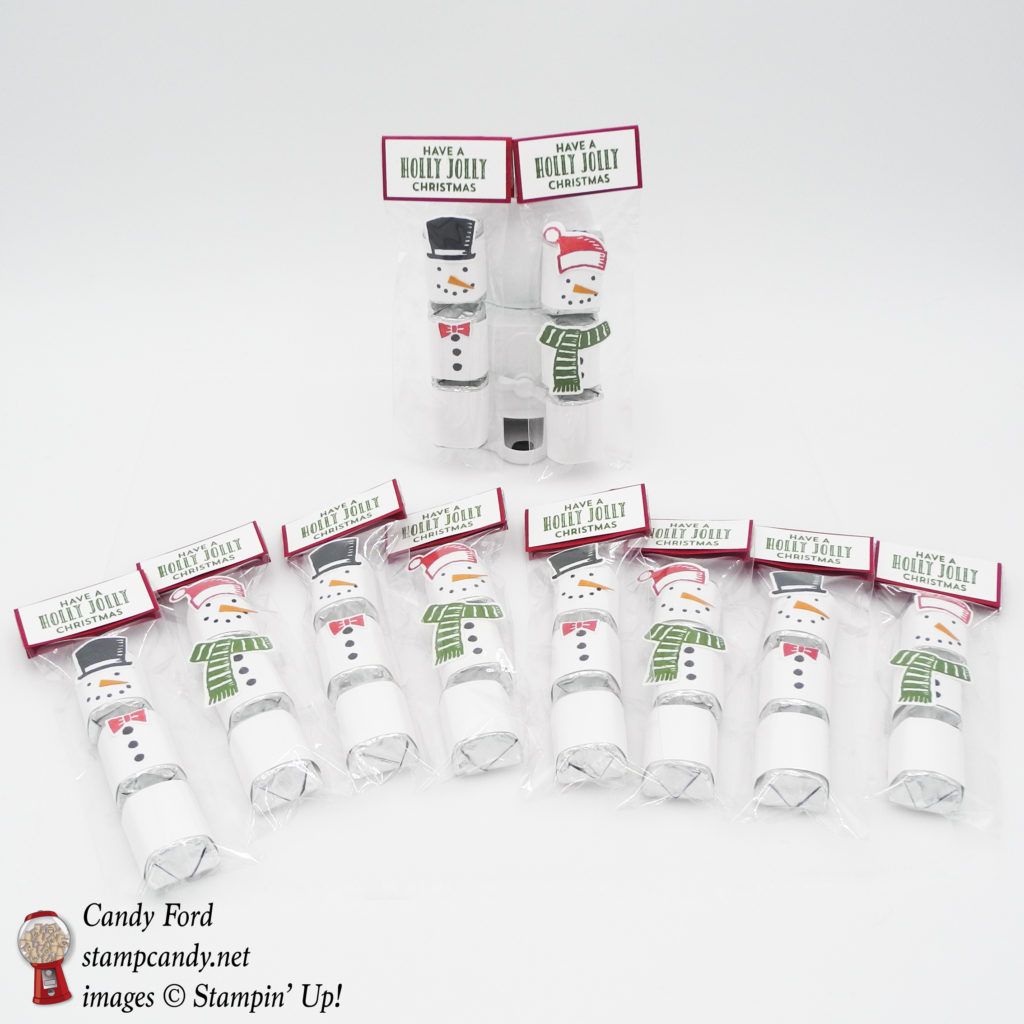
Here’s how I did it:
For the snowmen:
I cut strips of Whisper White card stock to 1″ x 3″. This is the perfect size to wrap around Hershey’s Nuggets.
I left the bottom strip blank.
On the center strip, I stamped buttons from the Snow Place stamp set in Memento Black ink.
On the top strip, I stamped the face using one eye from one of the faces in the Foxy Friends stamp set. I stamped it twice for the eyes, and 5 times for the mouth.
I wrapped the strips around Nuggets.
On a separate piece of Whisper White card stock, I stamped the hats, tie, and scarf from the Snow Friends stamp set in Memento Black, Real Red, and Garden Green inks. Then I cut them out with the Snow Friends Framelits Dies. I glued these pieces to the Nuggets as shown.
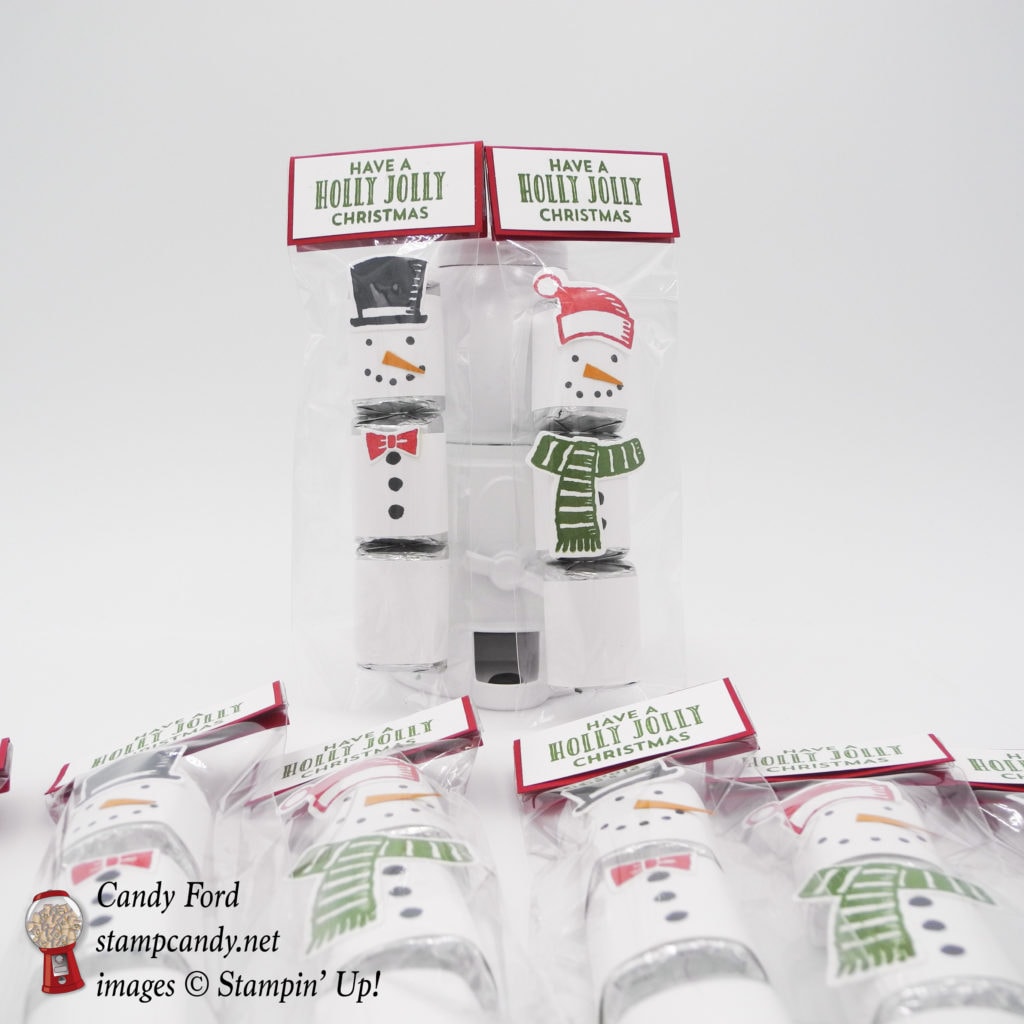
For the nose, I used Paper Snips to cut a tiny wedge from a piece of Pumpkin Pie card stock. I glued that onto the face.
For the bags:
I dropped the Nuggets into a 2″ x 6″ Cellophane Bag, and folded over the top.
I cut a piece of Real Red card stock to 2″ x 2″ and scored it at 1″ to fold it in half. I stapled it to the top of the bag. The Handheld Stapler is available only while supplies last!
I stamped the sentiment from the Stitched With Cheer photopolymer stamp set in Garden Green ink onto a 1-7/8″ x 7/8″ piece of Whisper White card stock, then glued it to the Real Red bag top. The Stitched With Cheer stamp set is retiring soon, so get it while you can!
Note: I cut a lot of strips at once, laid them out, and stamped them all. This assemble line method enabled me to make a whole bunch of these in very little time.
Here’s what I used:
Thanks for stopping by today, and Sweet Stamping!
Dec 10, 2016 | Bags, Boxes, Christmas, Food, Gallery, Gift Wrap, Gifts, Holiday |
Need a cute little gift for someone? This is perfect, and it’s a whole lot easier than you may think. I’ve made and given several of these already. One day I was running late (imagine that!) and made 8 of these in about 15 minutes.
Here’s what I made:
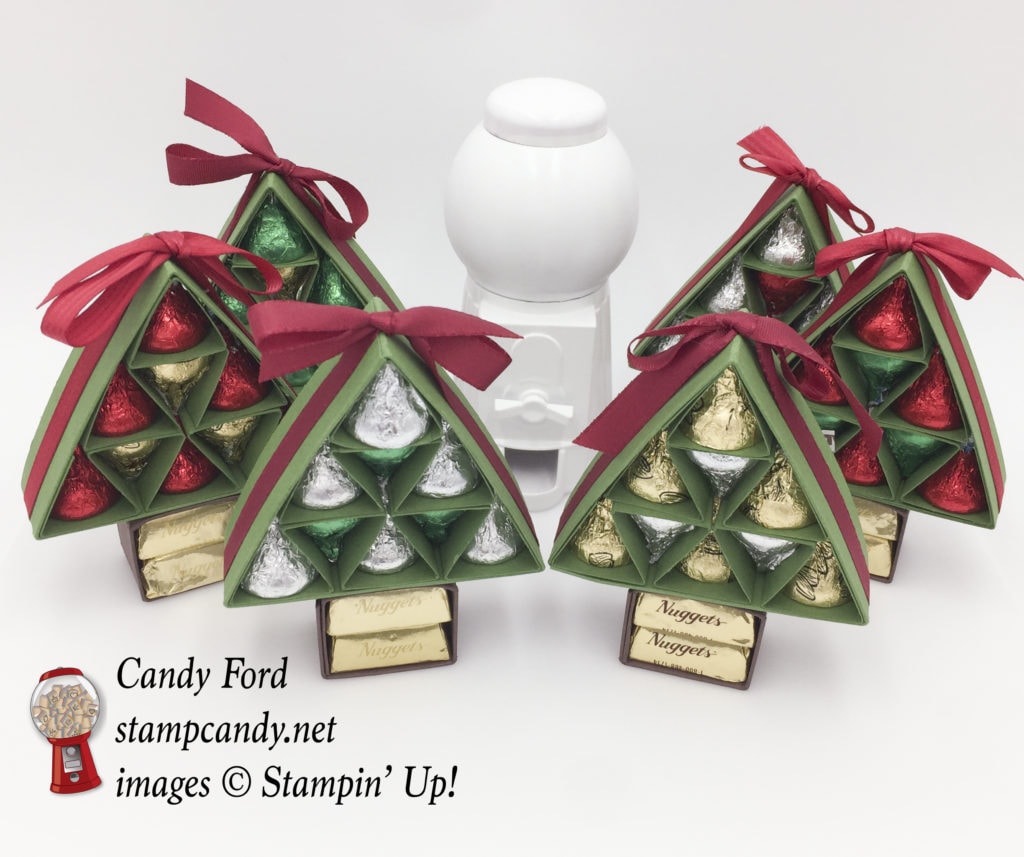
Here’s how I did it:
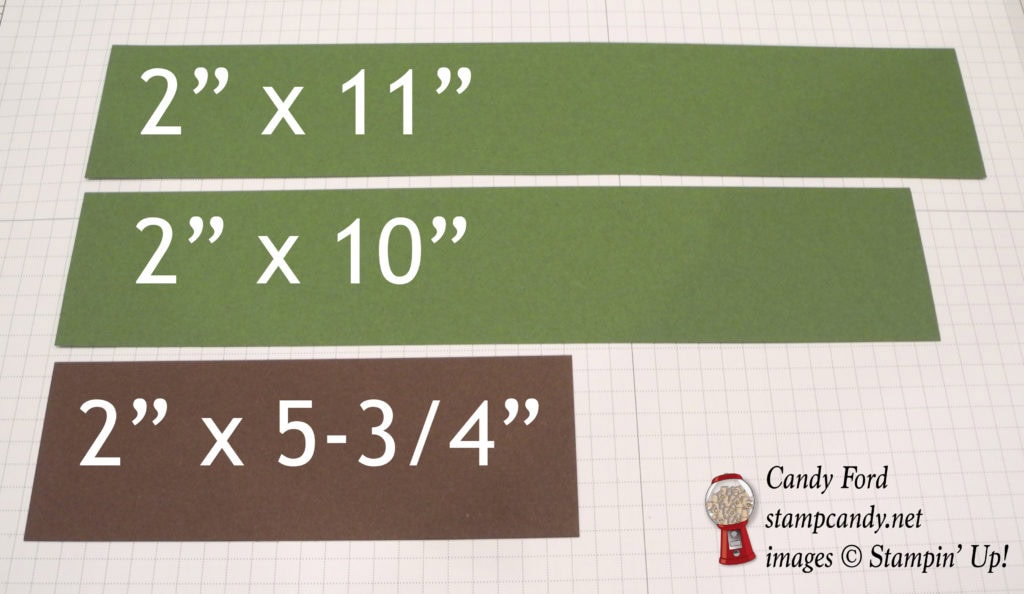
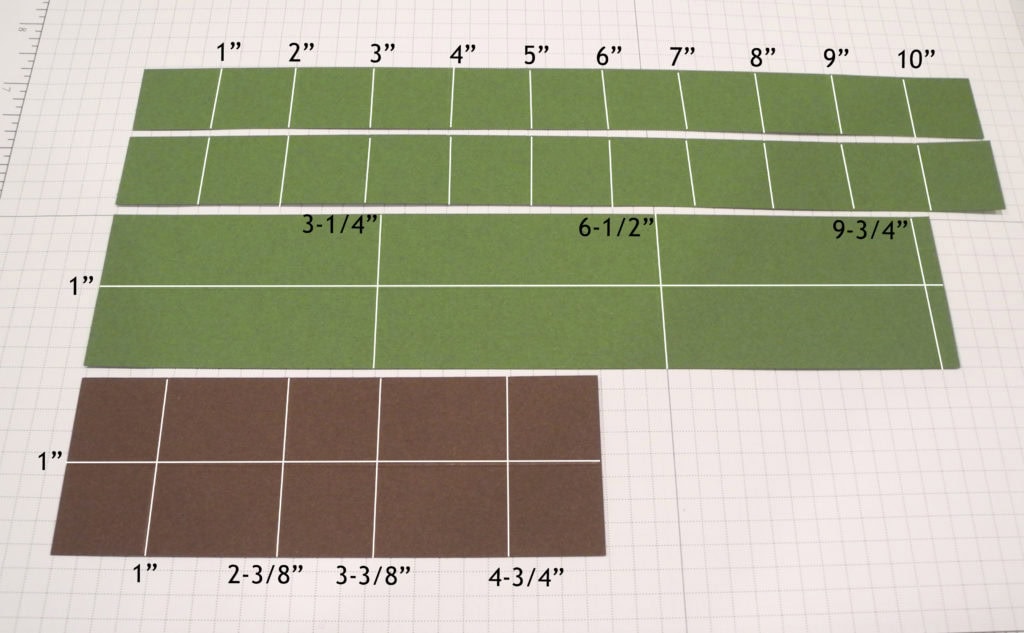
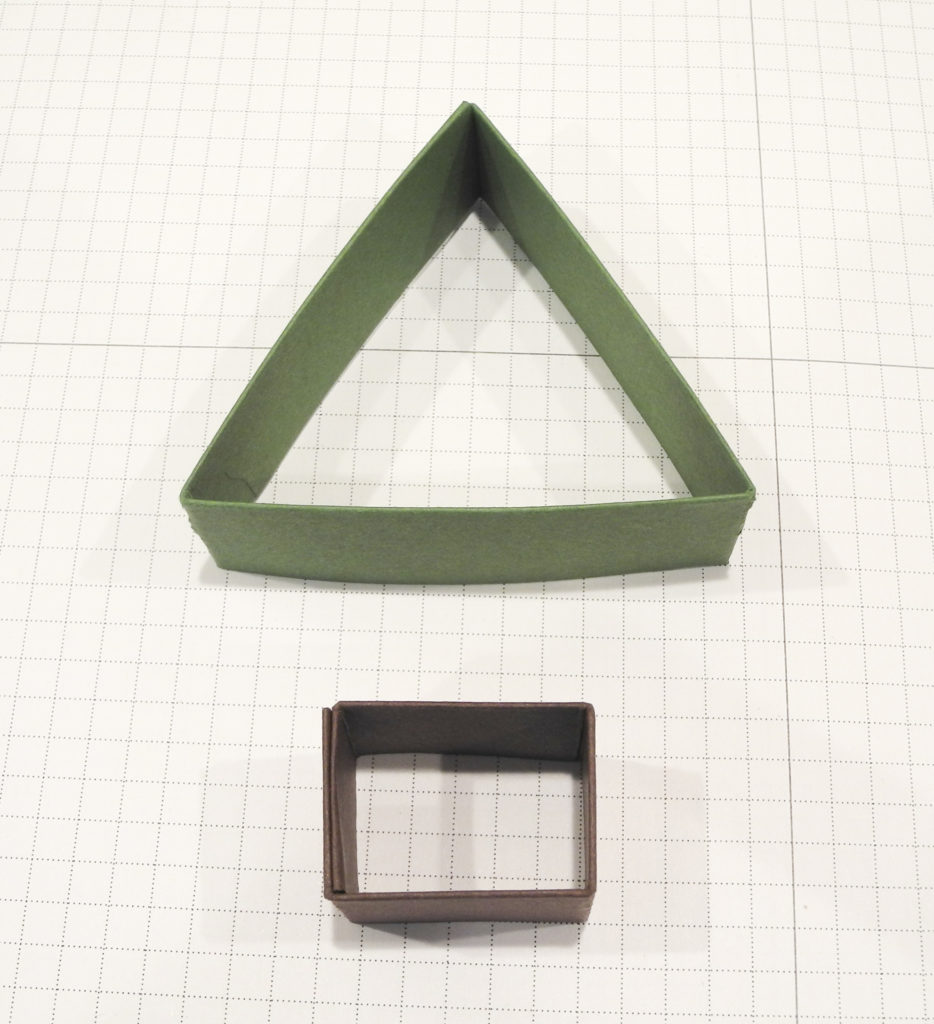
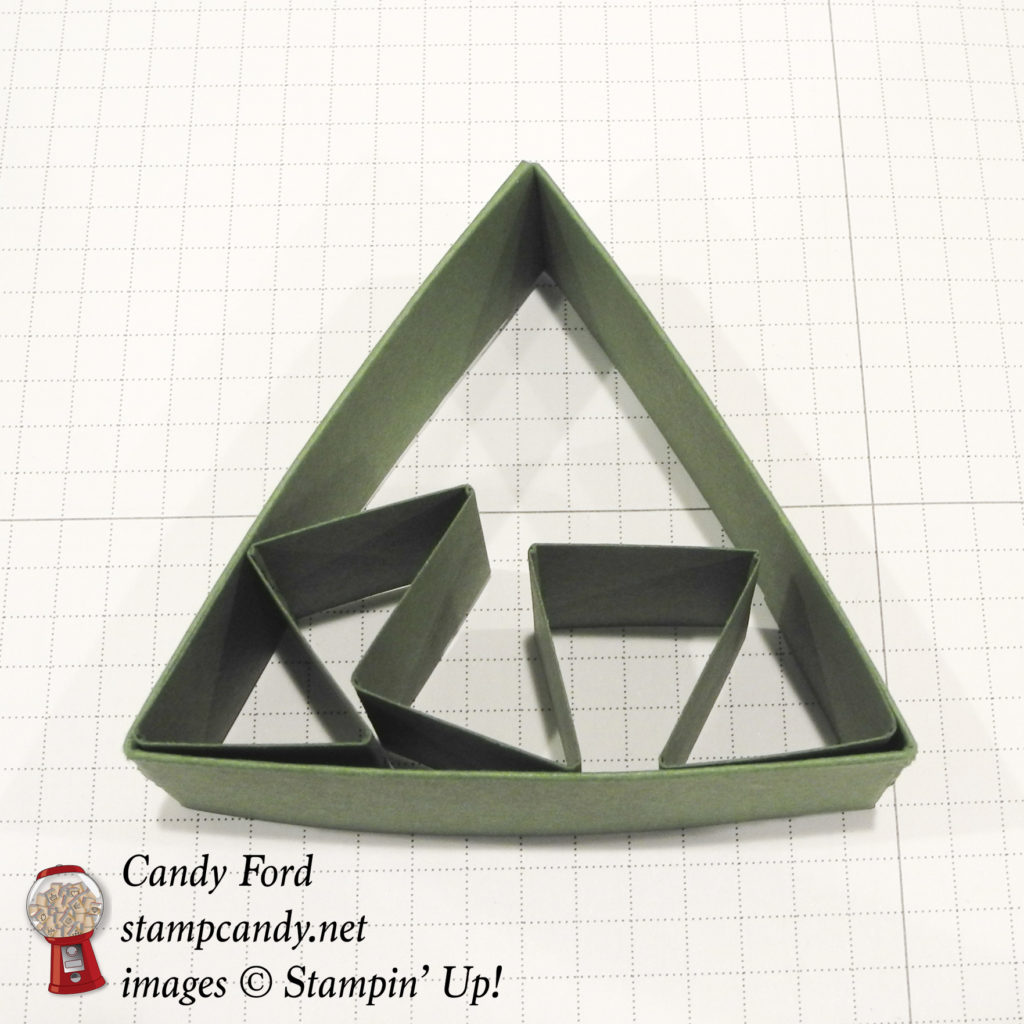
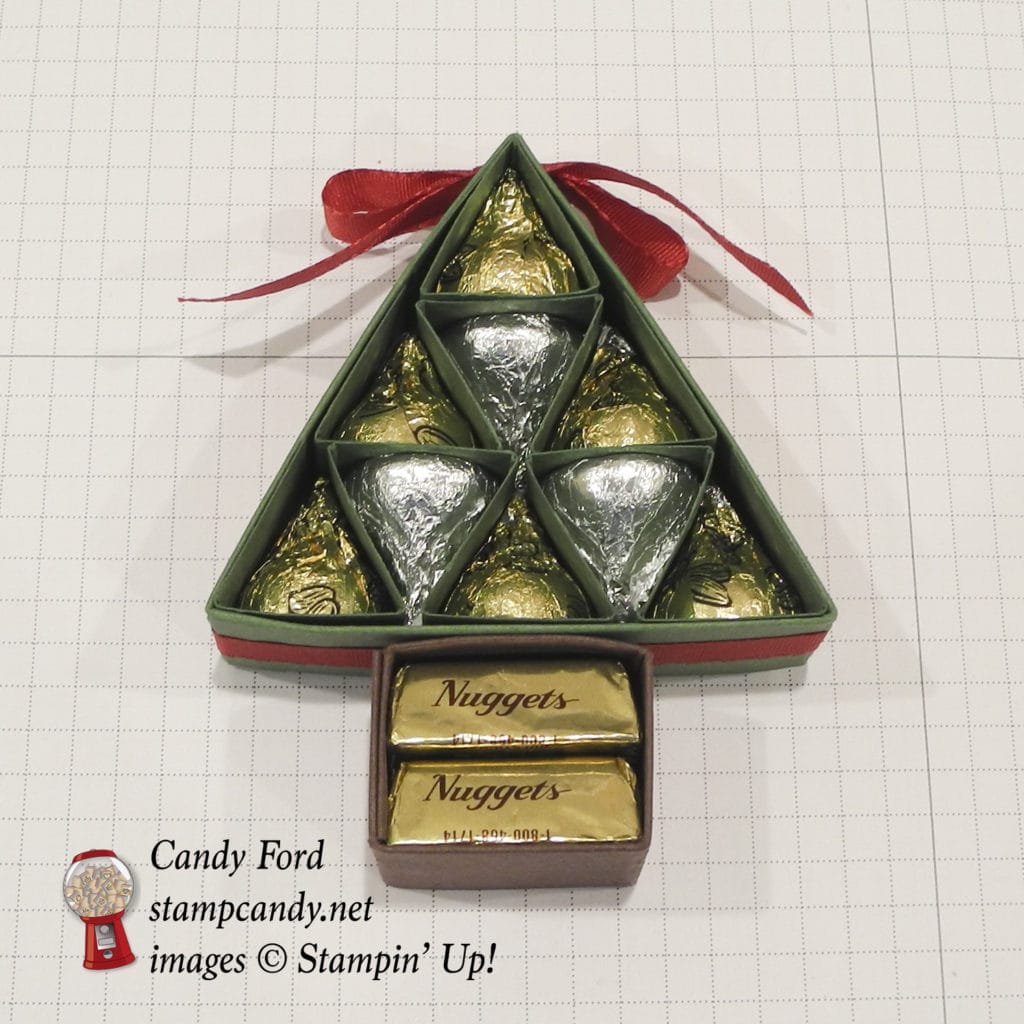
Cut one piece of Garden Green card stock to 2″ x 10″. Score on the long side at 3-1/4″, 6-1/2″, and 9-3/4″. Score on the short side at 1″. Fold it in half to 1″ x 10″ and glue to keep it closed. Fold all score lines to form a triangle. Glue the 1/2″ area at one end to the inside of the other end.
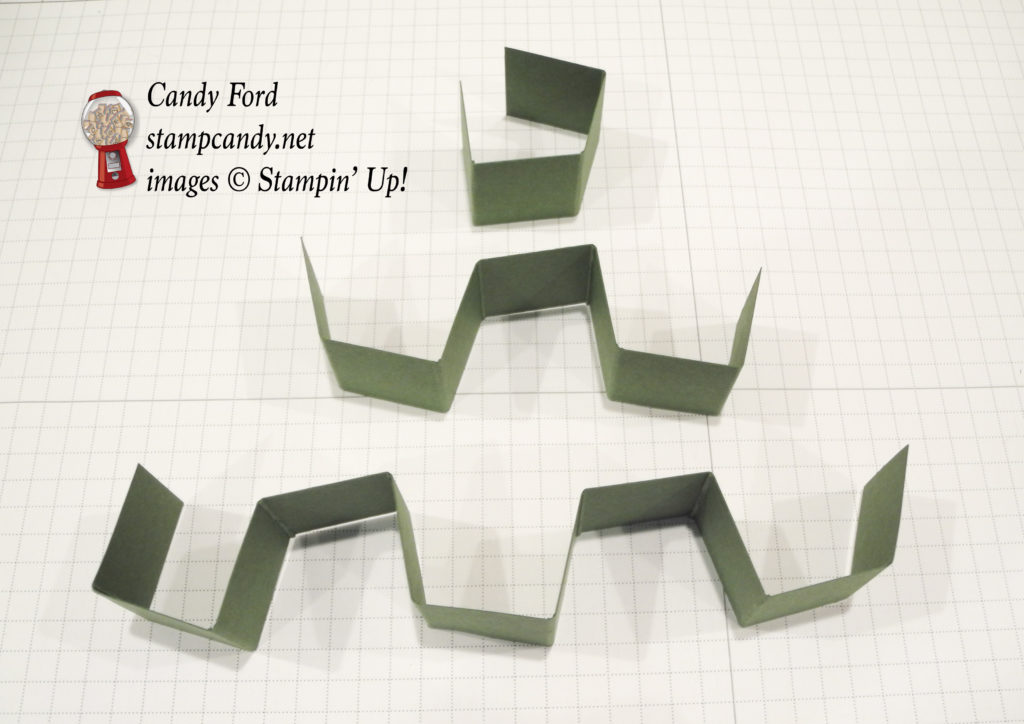
Cut one piece of Garden Green CS to 2″ x 11″. Score on the long side every 1″ for the full length. Turn a quarter turn and cut to create two 1″ x 11″ strips. Cut one of those strips into two pieces: 4″ and 7″. Fold all three pieces like this: two valleys then two mountains, then repeat to the end of each piece. Insert them into the triangle, the longest at the bottom, the smallest at the top, and the middle one in the middle. Insert one Hershey’s Kiss into each little triangle – 9 pieces. I used the almond ones with gold wrappers, but you can use any color. I think a combination of red, green, and silver would look very festive.
Note: If you want, you can glue all the pieces inside the tree, but the pressure from the kisses and the ribbon keep it together just fine.
Wrap ribbon around the perimeter of the triangle and tie at the top. I like to use a little Fast Fuse to hold it in place. For these examples, I usedReal Red 3/8″ Stitched Satin Ribbon on some, and Cherry Cobbler Ribbon from the Silky Taffeta 3/8″ Ribbon Combo Pack on the others.
Cut one piece of Chocolate Chip CS to 2″ x 5-3/4″. Score on the long side at 1″, 2-3/8″, 3-3/8″, and 4-3/4″. Score on the short side at 1″. Fold in half to 1″ x 5-3/4″ and glue to keep it closed. Fold all score lines to form a rectangle. Glue the two end areas together. Insert two Hershey Nuggets. I used two of the gold wrapped ones from an assorted bag.
Adhere the Chocolate Chip base to the Garden Green tree.

Here’s what I used:
Thanks for stopping by today, and Sweet Stamping!
May 14, 2016 | Bags, Gift Wrap, Gifts |
Recently I whipped up this quick and simple gift wrap idea when I gave Bohemian Washi Tape as a gift. It’s simply a Mini Muslin Bag and a tag.
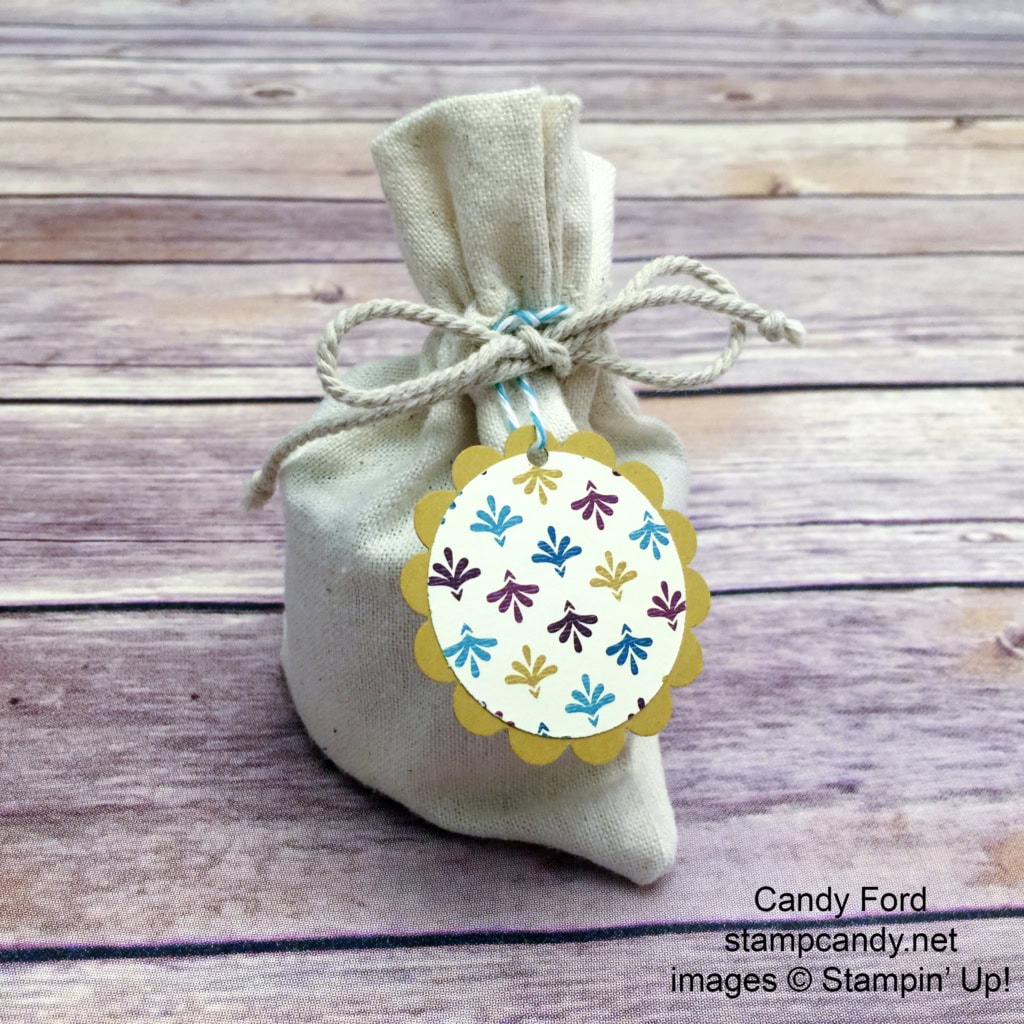
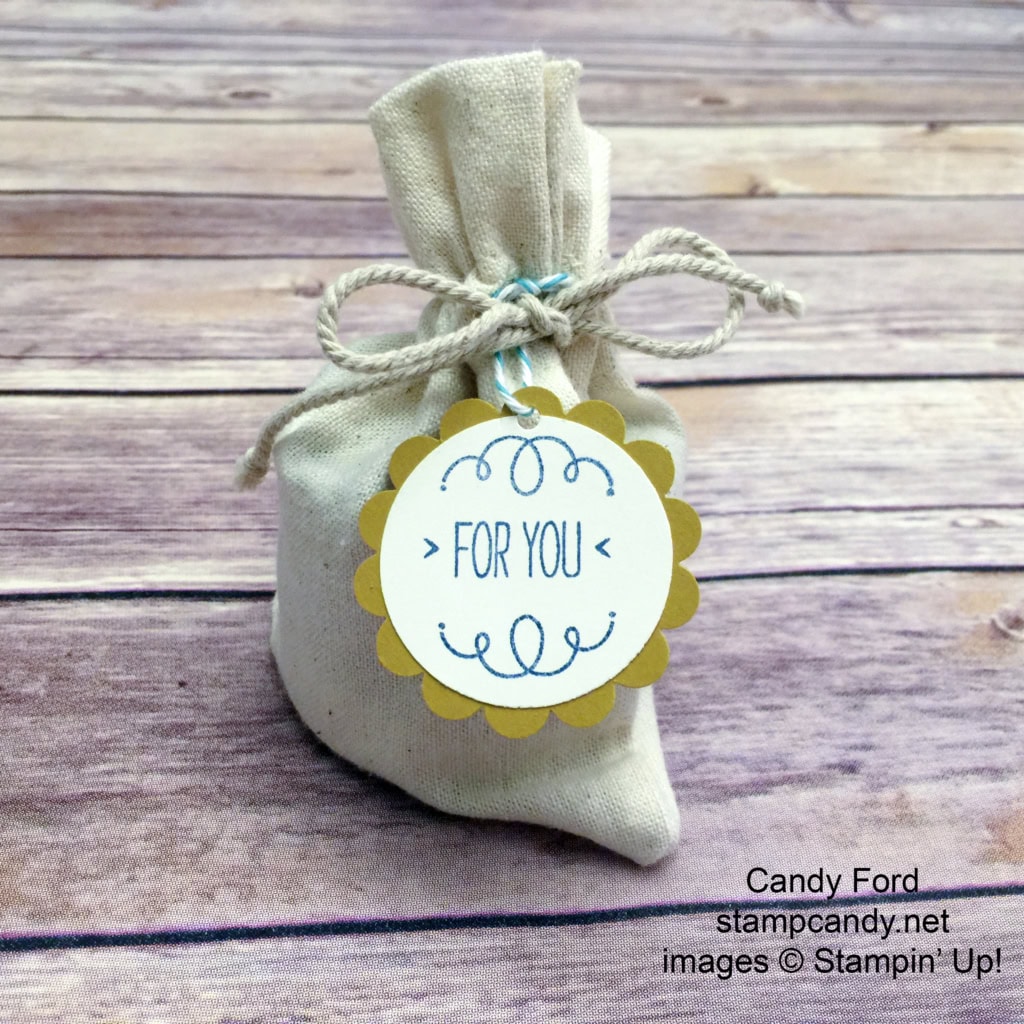
I stamped the sentiment from the You’re So Lovely stamp set on a piece of Very Vanilla card stock, then cut it with the 1-1/2″ Circle Punch. I cut a piece of Bohemian Designer Series Paper with the same punch.
I cut a piece of Delightful Dijon card stock with the 1-3/4″ Scalloped Circle Punch and glued the two smaller circles to either side. I punched a hole with the 1/8″ Circle Punch and tied it onto the bag with a piece of Bermuda Bay Baker’s Twine.
Here’s what I used:
 There are only 17 days left to shop from the 2015-2016 Annual Catalog’s Retiring List! Click here to see what is still available.
Thanks for stopping by today, and Sweet Stamping!


