Aug 6, 2020 | Cards, Gallery, Halloween, Holiday |
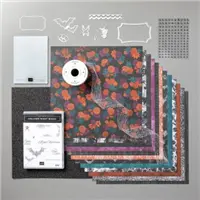
Today I’m sharing a card I made using the Hallows Night Magic Bundle and other products from the Magic in This Night Suite.
Last night I hosted a Mystery Stamping Party on Facebook, and I had such a great time! Throughout the party, I posted “clues” that participants followed to create a card, without seeing what the end result would look like. There were some really talented stampers making amazing cards. I look forward to doing this again.
If you’d like to invite your friends to a Facebook stamping party, let me know. You will earn Stampin’ Rewards on sales placed using the Host Code for the party.
If you are reading this in email, some photos may appear blurry, or may not appear at all. Please click here to see the post on my blog.
S night magic night magic night magic night magic
Here’s what I made:


S
Here’s what I did:
Cut and scored with my paper trimmer:
- Whisper White Thick card stock (CS) cut to 5-1/2″ x 6-1/4″, then scored along the longer side at 4-1/4″
- Whisper White Thick CS cut to 5-1/2″ x 1″
- Magic in This Night Designer Series Paper (DSP) layer cut to 5-1/4″ x 1-3/4″ (Blackberry Bliss pattern)
- Magic in This Night Designer Series Paper (DSP) layer cut to 5-1/4″ x 3/4″ (Blackberry Bliss pattern)
- Whisper White Thick CS layer cut to 2-1/2″ x 3-1/2″
- Magic in This Night Designer Series Paper (DSP) layer cut to 2-1/4″ x 3-1/4″ (Basic Black pattern)
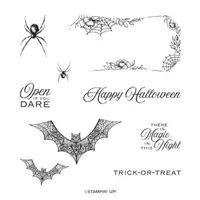
Stamped with the Hallows Night Magic stamp set:
- sentiment in Tuxedo Black Memento ink onto the inside of the card base, where it will show through the “window”
- large spider in Tuxedo Black Memento ink onto a scrap of Basic Gray CS
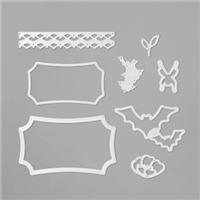
Cut using the Halloween Magic Dies:
Assembled the card:
- burnished the fold in the card base with a Bone Folder
- 5-1/4″ x 1-3/4″ DSP layer glued onto the top of the front of the card base
- 5-1/4″ x 3/4″ DSP layer glued onto the 1″ strip of Whisper White Thick CS
- 2-1/4″ x 3-1/4 DSP layer glued onto the Whisper White Thick CS layer
- 1″ strip lined up along the bottom of the back of the card base
- Whisper White Thick CS layer glued, at the top and bottom only, onto the two parts of the front of the card base
- die cut spider glued onto the center of the black DSP layer
- Metallic Mesh Ribbon tied in a bow and adhered onto the top DSP layer using a Mini Glue Dot
S
Here are today’s colors:
You can click on each one to see all the products that come in that color!
S
Here’s what I used:
Click on these images for more details and to purchase. If you are reading this post in email, the product images may not show up. Please click here to see the post on my blog.
Supply List. <— Click for a clickable and printable list of the products!
S
The new catalog, and the new online store, are live!
Click the image to shop now!
S
Use your Bonus Days coupons by August 31!
Click the image below to shop now and use your Bonus Days coupons!

S
Here are some helpful links:
S
Thanks for stopping by today, and Sweet Stamping!
Aug 4, 2020 | Cards, Gallery, Halloween, Holiday, Techniques |
Today the brand new August – December 2020 Mini Catalog goes live! To celebrate, I used two brand new products. I used the stamp set from the Hallows Night Magic Bundle, and the dies from the Snow Wonder Bundle to create today’s Happy Halloween card. The background was created using the Smooshing Technique. Basically you smear some ink around a slick surface, like a Window Sheet, and spritz it with water, then “smoosh” paper into it. Every piece is unique.
If you are reading this in email, some photos may appear blurry, or may not appear at all. Please click here to see the post on my blog.
S hallows hallows hallows hallows
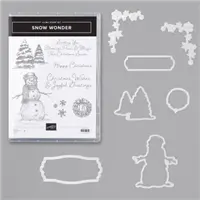
Here are the new products I used:
I used the stamp set from this bundle.
I used the dies from this bundle, specifically the one at the bottom left. The die is taller than the 7/8″ strip for the sentiment, but I centered it over the sentiment, and used it to cut only the ends.
S
Here’s what I made:

I heat embossed the sentiment in white, then colored it with a Dark Highland Heather Stampin’ Blends Marker.
S
Here’s what I did:
Cut and scored with my paper trimmer:
- Basic Black card stock (CS) cut to 5-1/2″ x 8-1/2″, then scored in half at 4-1/4″
- Shimmery White CS layer cut to 5-3/8″ x 4-1/8″
- Basic Black CS cut to 4″ x 7/8″
- Smoky Slate CS cut to 5-3/8″ x 4-1/8″ for the inside of the card base (Purple Posy or Highland Heather CS would work well also.)
Smooshing Technique:
- Gorgeous Grape and Tuxedo Black Memento ink refills dripped onto a Window Sheet, then swirled around
- water spritzed onto the ink
- Shimmery White CS layer laid on the Window Sheet to transfer the ink to it, then lifted it and laid it down in a different area of the Window Sheet
- continued “smooshing” the CS in the ink until I liked the look
- set the CS aside to dry completely
- Just a few drops of ink are more than enough for one card, so I smooshed 4 pieces of the Shimmery White CS. I’ll hold on to the other three for future projects. You can see in this photo that there was still some ink left on the Window Sheet.The piece at the bottom left is the one I used for today’s card, because I thought it looked the most like a spooky sky.

Stamped with the Hallows Night Magic stamp set:
- the bats in Tuxedo Black ink onto the smooshed CS layer
- sentiment in Versamark ink onto the strip of Basic Black CS, then heat embossed it in white
Cut using the Snow Time Dies:
- sentiment
- I centered the strip in the die to cut only the ends.
Colored using a Stampin’ Blends Marker:
- embossed sentiment in Dark Highland Heather
Assembled the card:
- burnished the fold in the card base with a Bone Folder
- smooshed layer glued onto the front of the card base
- sentiment adhered onto the smooshed layer using Black Stampin’ Dimensionals
- 2 Red Rhinestones applied onto the larger bat as eyes
- Smoky Slate CS glued onto the inside of the card base (I think I’ll try using Purple Posy or Highland Heather CS on the inside of the cards I make using the other smooshed pieces.)
S
Use the Bonus Days coupons you earned in the last month!
Click the image below to shop now and use your Bonus Days coupons!
S
Here are today’s main colors:
You can click on each one to see all the products that come in that color!
S
Here’s what I used:
Click on these images for more details and to purchase. If you are reading this post in email, the product images may not show up. Please click here to see the post on my blog.
Supply List. <— Click for a clickable and printable list of the products!
S
Here are some helpful links:
S
Thanks for stopping by today, and Sweet Stamping!
Aug 3, 2020 | Cards, Gallery |
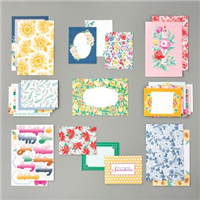
I made today’s thank you card in 2020-2022 In Colors, featuring Just Jade, using the Flowering Blooms stamp set, Layering Circles Dies, Flowers for Every Season Memories & More Cards & Envelopes. Flowers for Every Season Memories & More Card Pack, and 2020-2022 In Color Enamel Dots.
The new August – December 2020 Mini Catalog goes live tomorrow! You can use the Bonus Days Coupons you’ve earned in the past month on new holiday products!
If you are reading this in email, some photos may appear blurry, or may not appear at all. Please click here to see the post on my blog.
S Just Jade Just Jade Just Jade Just Jade
Here’s what I made:

S
Here’s what I did:
Stamped with the Flowering Blooms stamp set:
- sentiment in Just Jade ink onto a scrap of Whisper White card stock (CS)
Cut using the Layering Circles Dies:
- sentiment
- scrap of Magenta Madness CS slightly larger than the sentiment
Assembled the card:
- burnished the fold in the card base with a Bone Folder
- 3″ x 4″ M&M glued onto the front of the card base
- sentiment glued onto the Magenta Madness CS circle
- Magenta Madness CS circle adhered onto the M&M card using Stampin’ Dimensionals
- 3 Magenta Madness enamel dots applied – 1 onto the sentiment and 2 onto the card base
S
Today is the last day to earn Bonus Days Coupons!
For each $50 you spend on an order, you’ll receive a $5 coupon code to use the rest of August. You can start using them tomorrow, when the new August – December 2020 Mini Catalog goes live, on all your holiday needs. Click the image below to start shopping.

S
Here are today’s colors:
You can click on each one to see all the products that come in that color!
S
Here’s what I used:
Click on these images for more details and to purchase. If you are reading this post in email, the product images may not show up. Please click here to see the post on my blog.
Supply List. <— Click for a clickable and printable list of the products!
S
Here are some helpful links:
S
Thanks for stopping by today, and Sweet Stamping!
Jul 31, 2020 | Cards, Gallery |
Today I’m sharing a card that features the 2020-2022 In Color Magenta Madness. It is a ridiculously quick and easy card. I used the Flowers for Every Season Memories & More Cards & Envelopes, Flowers for Every Season Memories & More Card Pack, and 2020-2022 In Color Enamel Dots.
Seriously, the Memories and More Card & Envelopes and Card Pack make it so easy to crank out beautiful cards. There isn’t even any stamping on today’s card! And the matching envelopes are fantastic.
If you are reading this in email, some photos may appear blurry, or may not appear at all. Please click here to see the post on my blog.
S Magenta Madness Magenta Madness Magenta Madness Magenta Madness
Here’s what I made: 
S
Here’s what I did:
Cut and scored with my paper trimmer:
- Just Jade CS layer cut to 3-1/8″ x 4-1/8″
Assembled the Magenta Madness card:
- burnished the fold in the card base with a Bone Folder
- M&M card glued onto the Just Jade CS layer
- Just Jade CS layer glued onto the front of the card base
- 3 Just Jade enamel dots applied around the sentiment
- That’s it!
S
Monday is the last day to earn Bonus Days coupons!
Click the image below to shop now and earn Bonus Days coupons to use next month!
S
Here are today’s colors:
You can click on each one to see all the products that come in that color!
S
Here’s what I used:
Click on these images for more details and to purchase. If you are reading this post in email, the product images may not show up. Please click here to see the post on my blog.
Supply List. <— Click for a clickable and printable list of the products!
S
Here are some helpful links:
S
Thanks for stopping by today, and Sweet Stamping!
Jul 30, 2020 | Cards, Christmas, Gallery, Holiday |
Today’s card is another quick and easy one I made using the Flowers for Every Season Memories & More Cards & Envelopes, Flowers for Every Season Memories & More Card Pack, and 2020-2022 In Color Enamel Dots. The card base and matching envelope are Just Jade, and the M&M card on the front has a winter/Christmas theme.
If you are reading this in email, some photos may appear blurry, or may not appear at all. Please click here to see the post on my blog.
S more more more more
Here’s the Memories & More Christmas card I made:
S
Here’s what I did:
- burnished the fold in the card base with a Bone Folder
- 3″ x 4″ M&M card glued onto the front of the card base, inside the dotted frame
- 3 Cinnamon Cider enamel dots applied onto the front of the card base
- Easy peasy lemon squeezy!
S
Bonus Days are here!
Click the image below to shop now and earn Bonus Days coupons to use next month!
S
Here are today’s colors:
You can click on each one to see all the products that come in that color!
S
Here’s what I used:
Click on these images for more details and to purchase. If you are reading this post in email, the product images may not show up. Please click here to see the post on my blog.
Supply List<— Click for a clickable and printable list of the products!
S
Here are some helpful links:
S
Thanks for stopping by today, and Sweet Stamping!
Jul 29, 2020 | Cards, Gallery |
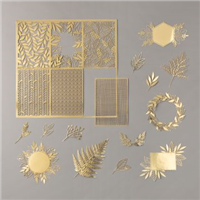
For today’s thank you card, I used the Bloom & Grow stamp set with the Flowers for Every Season Memories & More Cards & Envelopes, Flowers for Every Season Memories & More Card Pack, Forever Gold Laser-Cut Specialty Paper, and Frosted & Clear Epoxy Droplets. You know how I love monochromatic cards, and today’s is a real beauty in Misty Moonlight with Whisper White. I like all the 2020-2022 In Colors, but this dusty blue is quickly becoming my favorite.
If you are reading this in email, some photos may appear blurry, or may not appear at all. Please click here to see the post on my blog.
S bloom & grow bloom & grow bloom & grow bloom & grow
Here’s what I made:

S
Here’s what I did:
Cut and scored with my paper trimmer:
- Misty Moonlight CS layer cut to 4″ x 3″
Stamped with the Bloom & Grow stamp set:
- sentiment in Versamark ink onto the bottom right corner of the Misty Moonlight CS layer, then heat embossed in white
Assembled the card:
- burnished the fold in the card base with a Bone Folder
- 4″ x 6″ card from the card pack glued onto the front of the card base
- Misty Moonlight CS layer adhered onto the 4″ x 6″ card using Stampin’ Dimensionals
- sprig from the Forever Gold Laser-Cut Specialty Paper glued onto the Misty Moonlight CS layer (gold side down)
- 3 frosted epoxy droplets applied onto the Misty Moonlight CS layer
S
Bonus Days are here!
Click the image below to shop now and earn Bonus Days coupons to use next month!
S
Here are today’s colors:
You can click on each one to see all the products that come in that color!
S
Here’s what I used:
Click on these images for more details and to purchase. If you are reading this post in email, the product images may not show up. Please click here to see the post on my blog.
Supply List. <— Click for a clickable and printable list of the products!
S
Here are some helpful links:
S
Thanks for stopping by today, and Sweet Stamping!