Dec 1, 2016 | Boxes, Christmas, Gallery, Gift Wrap, Holiday, Tags |
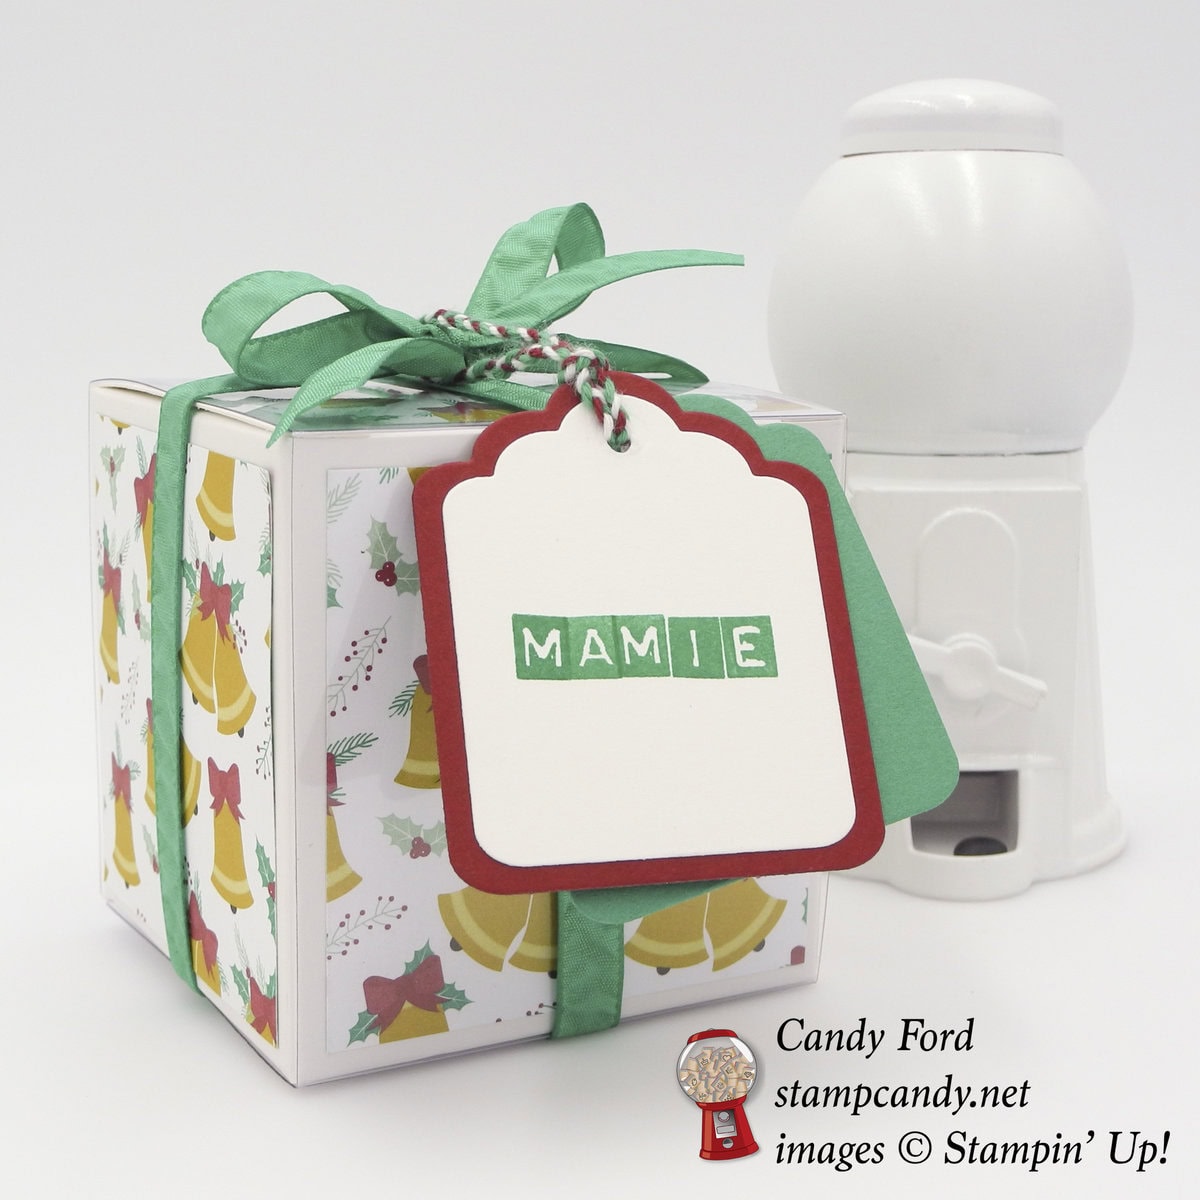
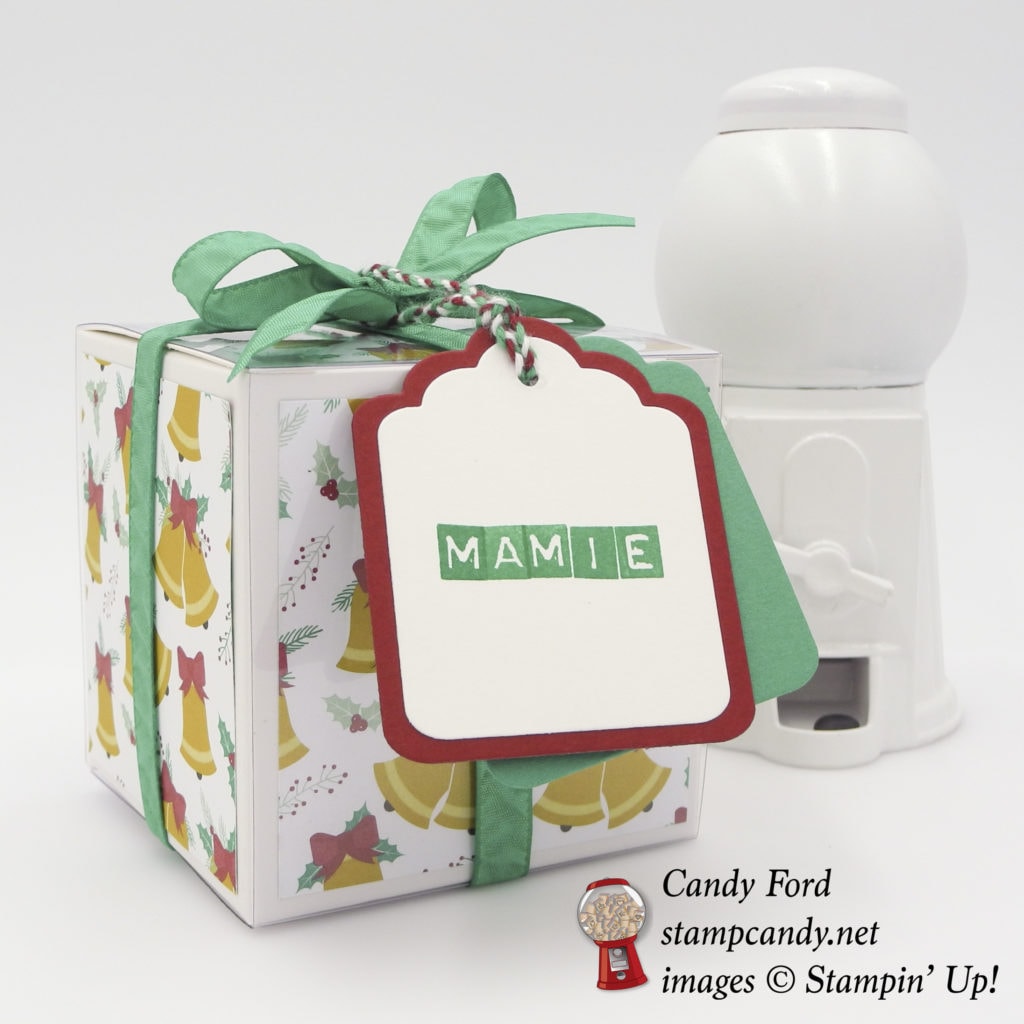
Our former neighbors have a little dog named Mamie. I get her a cute outfit each Christmas. This year I didn’t find anything I liked, except a little knit hat. I can’t wait to get a photo of her wearing it! Of course, the hat needed just the right gift wrap.
Here’s what I made:
 Here’s how I did it:
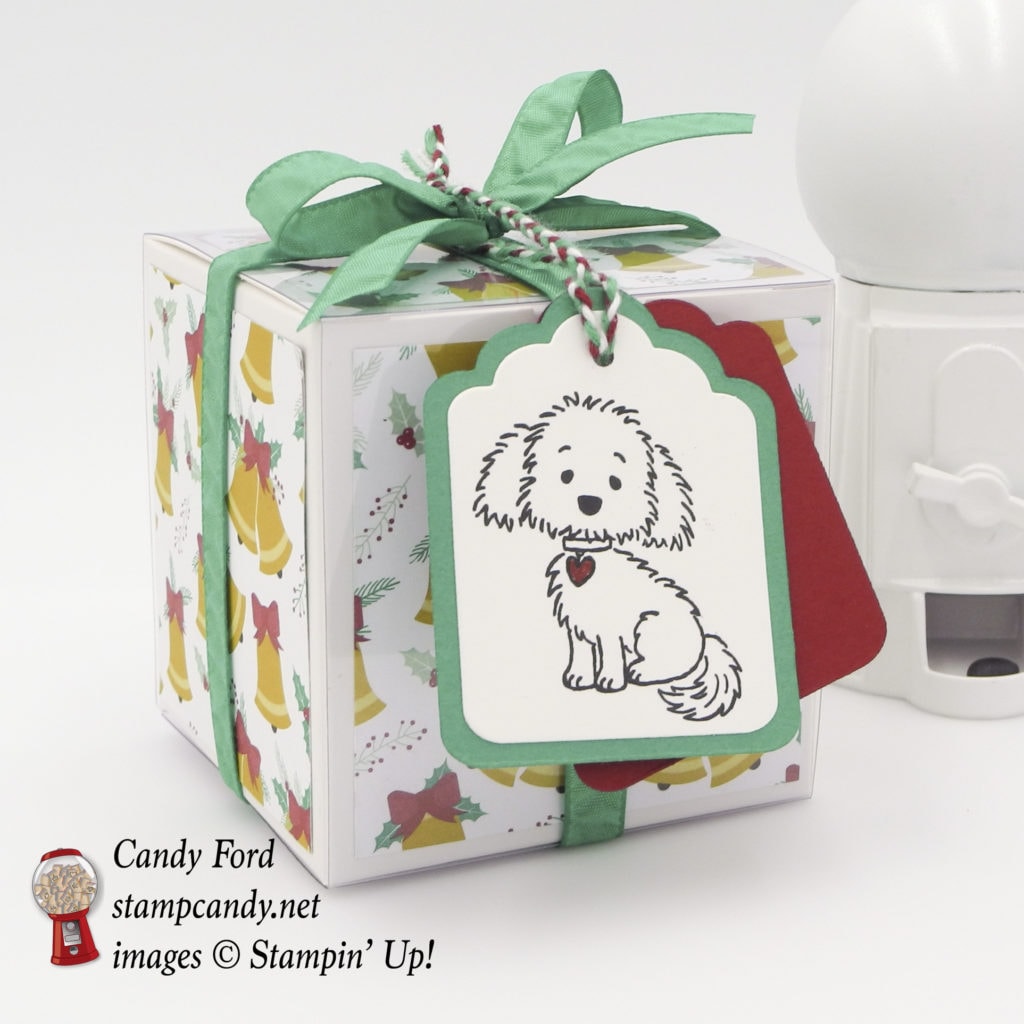
For the box:
The White Gift Boxes from this year’s Holiday Catalog are the perfect size for a small gift like this. They are 3″ x 3″ x 3″ and come with clear acetate sleeves. I cut 5 pieces ofPresents & Pinecones Designer Series Paper to 2-3/4″ x 2-3/4″. I used the 1″ circle punch to cut small piece from the top of the front piece to accommodate the cut out in the box. I glued the DSP pieces to the four sides and the top of the box. I slipped the clear sleeve over the box, then tied a piece of Emerald Envy Ruched Ribbon around it.
For the tag:
I stamped the dog from the Bella & Friends stamp set in Basic Black ink onto Thick Whisper White card stock. I used a Cherry Cobbler Stampin’ Write Marker to color in the heart. Then I cut it out with the Tags & Labels Framelits. Using the Labeler Alphabet stamp set, I stamped MAMIE in Emerald Envy ink onto Thick Whisper White CS, then cut it out with the same tag Framelit.
I used a larger Framelit from the same set to cut a piece of Cherry Cobbler CS and a piece of Emerald Envy CS. I glued the white pieces onto the colored pieces, then punched holes in the tops with the 1/8″ Circle Punch.
I braided pieces of Emerald Envy, Cherry Cobbler, and Whisper White Baker’s Twine and used it to tie the tag onto the gift’s bow.
Here’s what I used:
Thanks for stopping by today, and Sweet Stamping!

Sep 8, 2016 | Cards, Christmas, Gallery, Holiday |
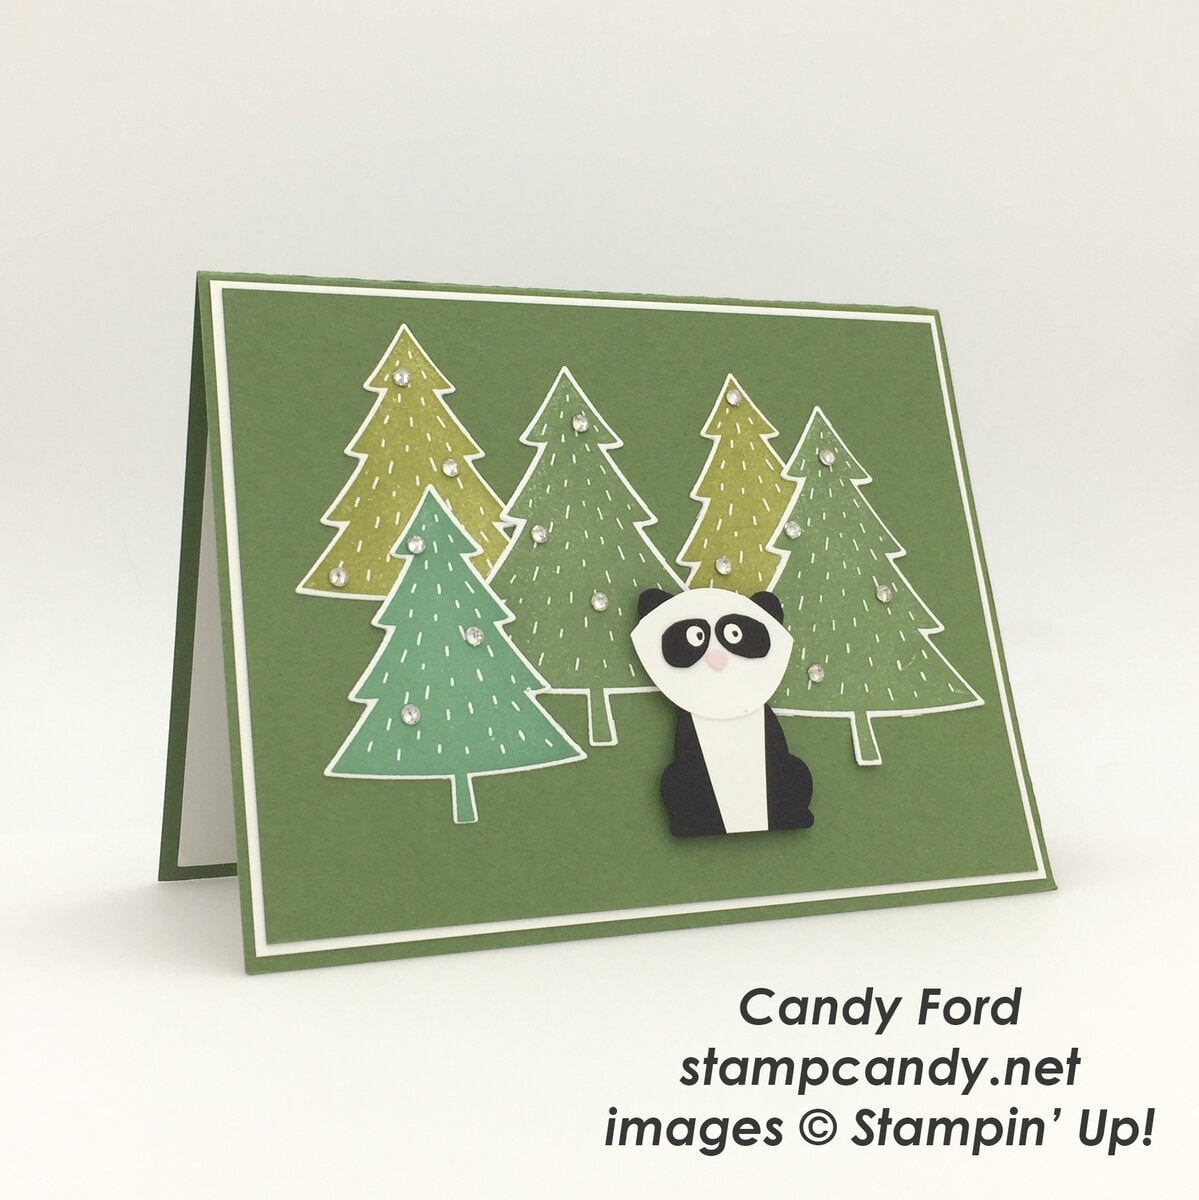
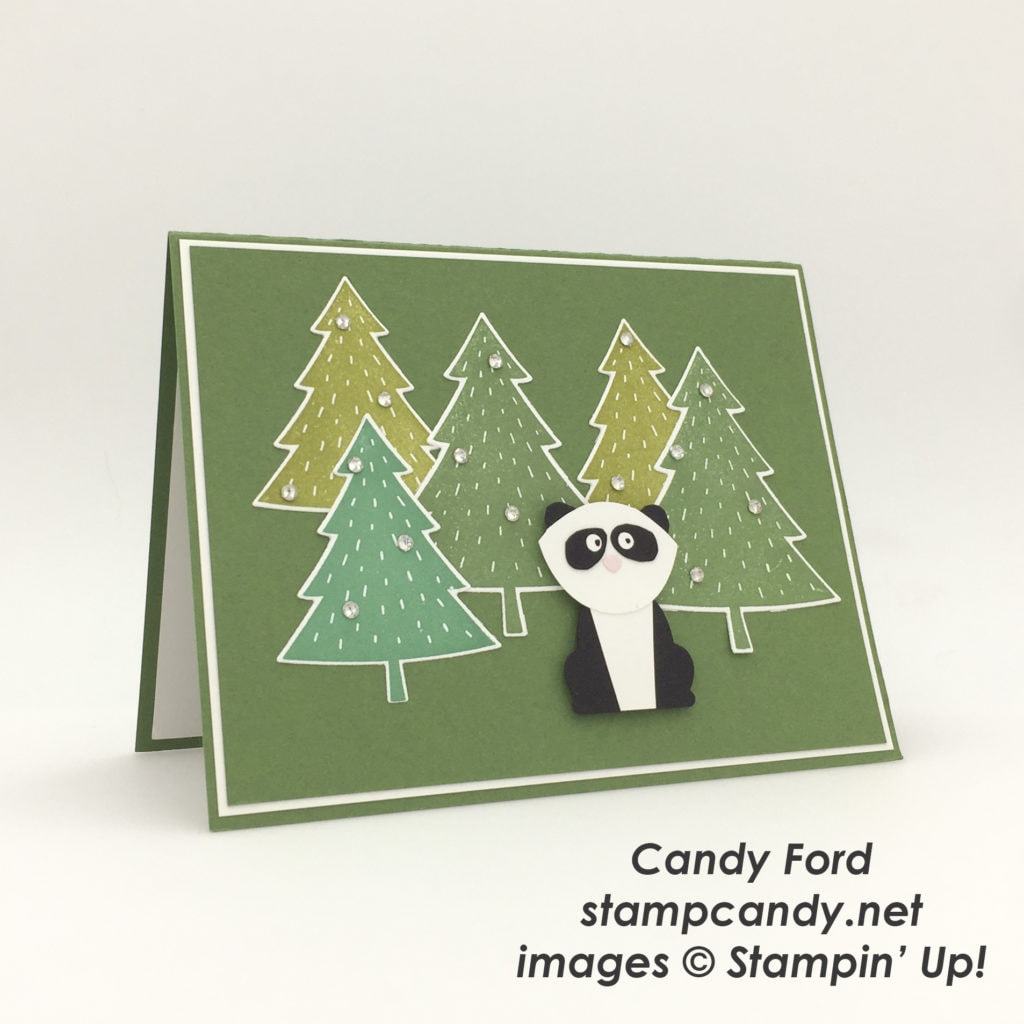
Today’s card can be used as a Christmas card, but it doesn’t have to be. It says nothing about Christmas specifically. And you could leave off the rhinestones for just plain old pine trees.
Here’s how I did it:
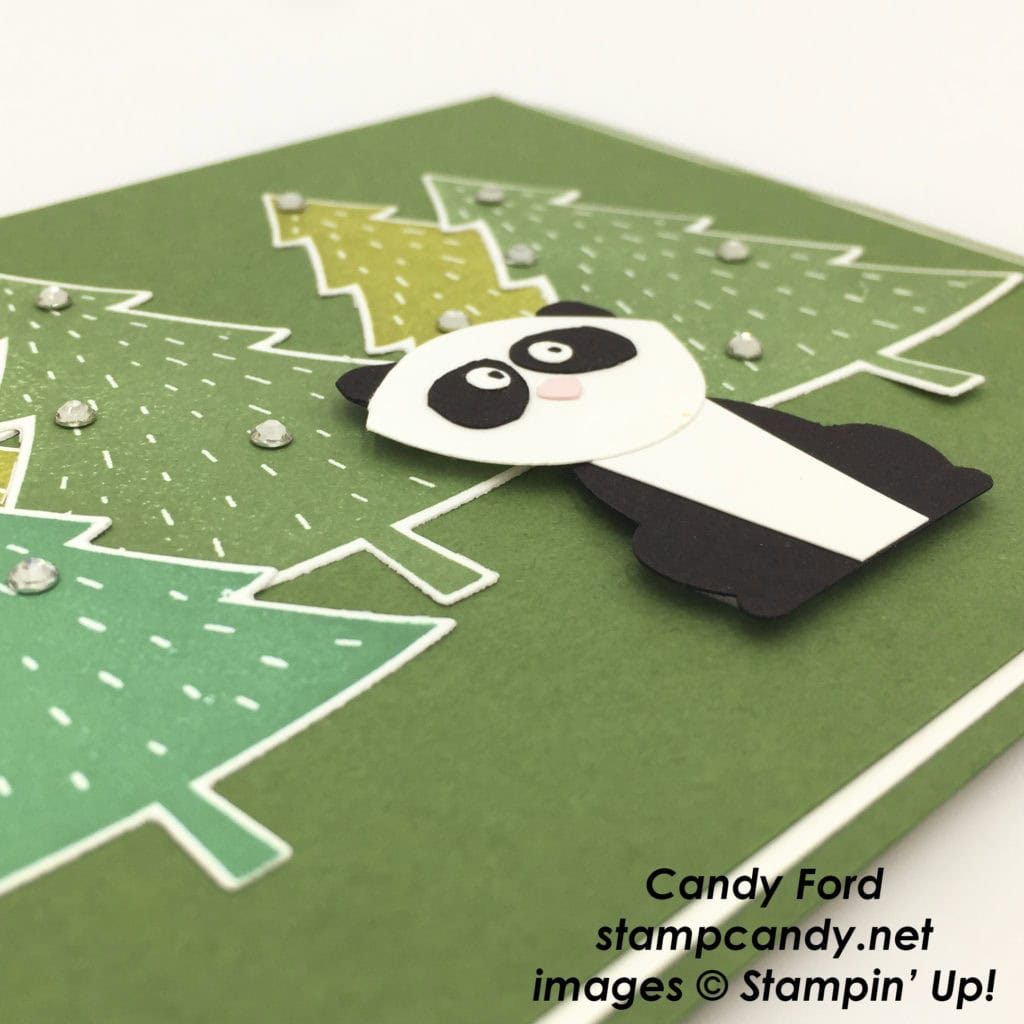
For the panda:
I used the Fox Builder Punch to cut the pieces from Basic Black, Whisper White, and Pink Pirouette. I used my Paper Snips to round the ears of the Basic Black head, and to cut off the ears from the Whisper White head. I glued the white on top of the black.
For the eyes, I punched two pieces of Basic Black card stock with the 1/2″ Circle Punch. I used my Paper Snips to cut each circle into a lop-sided oval. I glued these onto the head. I used the 1/8″ Circle Punch to cut two pieces of Whisper White card stock, then glued them to the black ovals. I used the small tip of a Basic Black Stampin’ Write Marker to put dots on the white circles.
I glued the Pink Pirouette nose onto the face.
I cut the sides off the Whisper White body, making it skinner at the bottom wider at the top. I glued that onto the Basic Black body. Then I glued the head onto the top of the body.
For the trees:
I stamped the trees from the Foxy Friends stamp set in Garden Green, Old Olive, and Emerald Envy inks onto Whisper White card stock, then cut them with the Perfect Pines Framelits Dies.
For the card front:
I glued the trees to a piece of Garden Green card stock, then adhered the panda with Stampin’ Dimensionals. I then applied Rhinestone Basic Jewels to the trees, about 3 on each.
I glued this to a piece of Whisper White card stock, and glued that to the Garden Green card base.
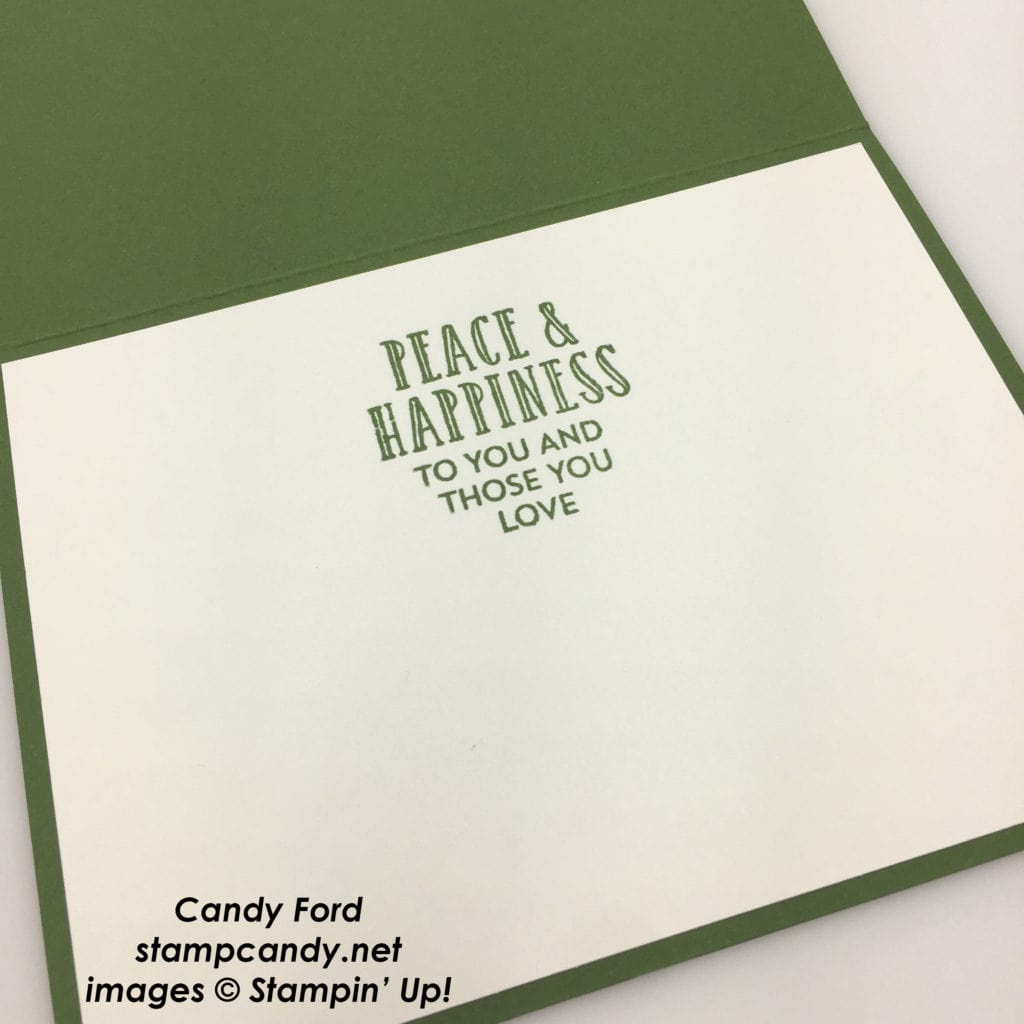
For the sentiment:
I stamped the sentiment from the Stitched With Cheer stamp set in Garden Green ink onto a piece of Whisper White card stock, which I then glued to the inside of the card.
Here’s what I used:

Check out this week’s new
Special Offers!
The new holiday catalog is full of delightful new products to carry you through the Autumn and Winter months, and beyond.
Click here to shop the new Holiday Items.
Click here for a pdf of the catalog.
To request a catalog be mailed to you, email me at candy@stampcandy.net, call/text me at 404-661-5222, or fill out the contact form on this page.

If you are placing an order for less than $150, please use this Hostess Code. Click here for details on how to use the Hostess Code. If you are placing an order of $150 or more, you will receive Stampin’ Rewards on your order, so do not use the Hostess Code.
Thanks for stopping by today, and Sweet Stamping!
Sep 2, 2016 | Cards, Christmas, Gallery, Holiday, New Products |
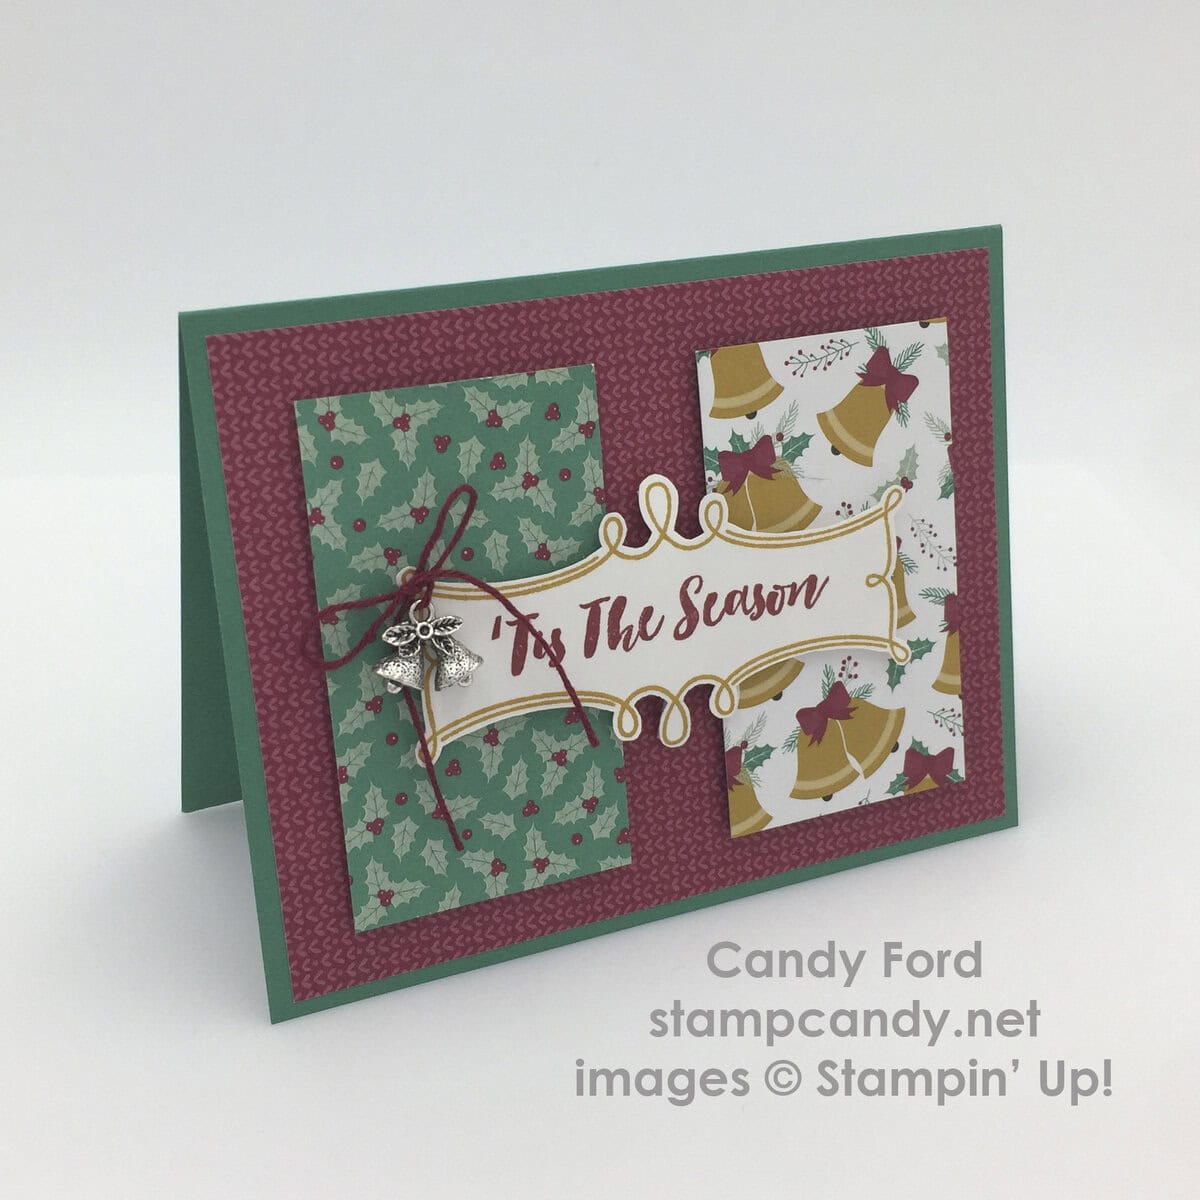
This card is mostly all about the paper. The Presents & Pinecones Designer Series Paper is beautiful, and I wanted to show off more than just one design.
Here’s how I did it:
The card base is Emerald Envy card stock.I glued a layer of the DSP onto the front. I attached the two smaller pieces of DSP with Stampin Dimensionals.
I stamped the sentiment from the Christmas Pines stamp set in Cherry Cobbler ink onto Whisper White card stock, then the outline in Delightful Dijon ink. I cut it out with my trusty Paper Snips (I love these scissors!) and attached it to the card front with Stampin’ Dimensionals. Since the two small DSP pieces are also attached with Dimensionals, I put them two layers thick in the center of the sentiment piece that is between the DSP pieces.
I tied a piece of Cherry Cobbler Baker’s Twine onto the bell charm from the Christmas Trinkets Embellishments. I adhered this to the top left corner of the sentiment piece with a Mini Glue Dot.
Here’s what I used:
Thanks for stopping by today, and Sweet Stamping!
Sep 1, 2016 | Cards, Catalogs, Christmas, Gallery, Holiday, New Products |
The 2016 Holiday Catalog is live!
Click on the image below to shop now!

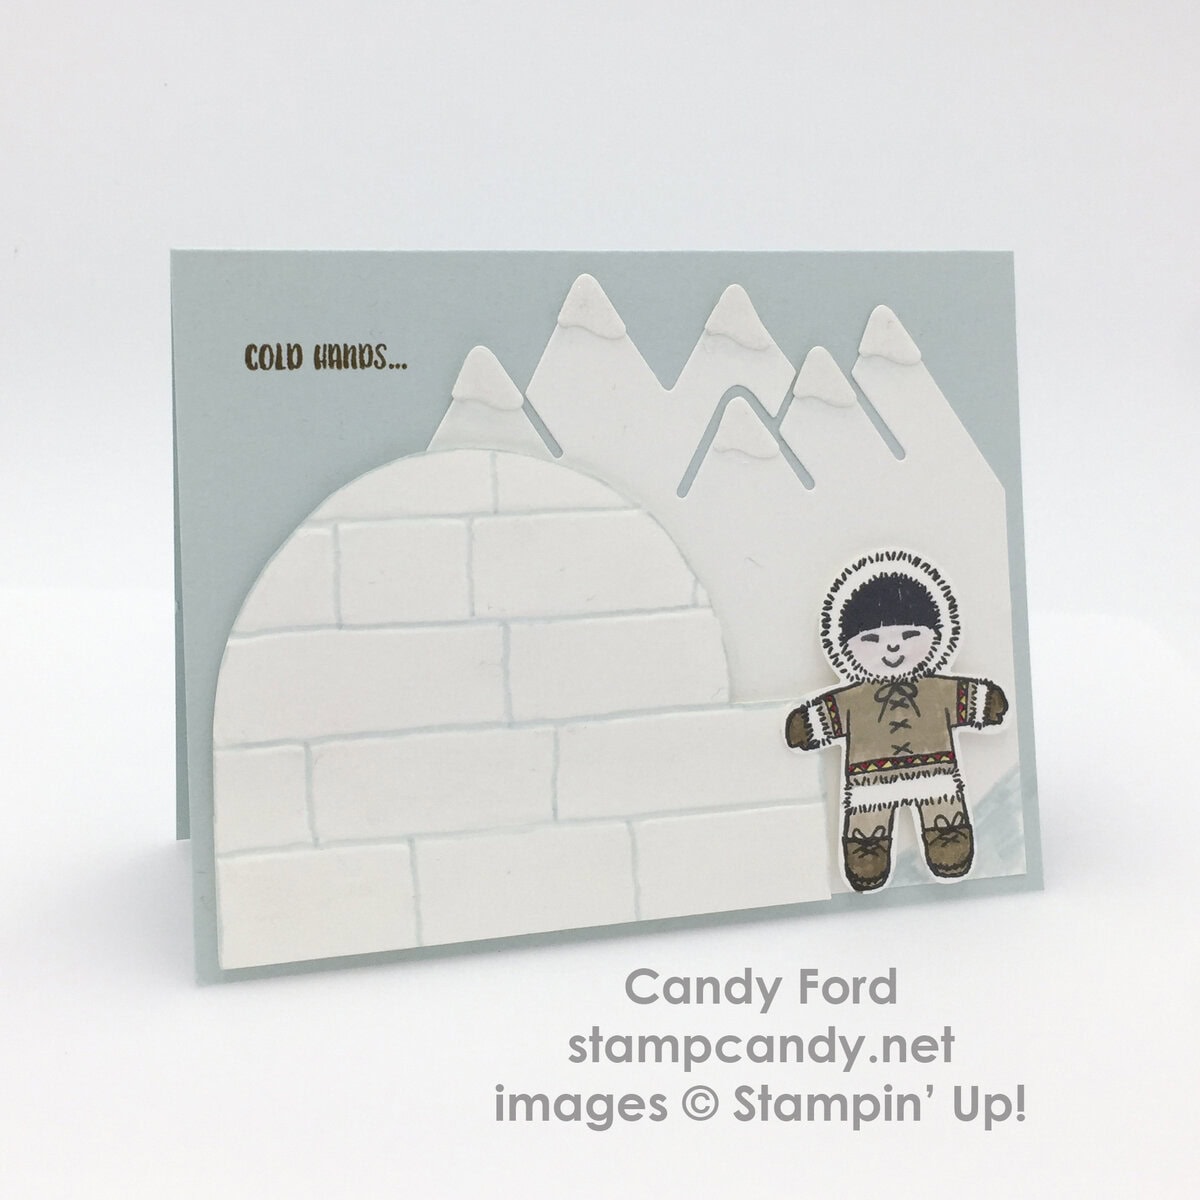
When I saw the new Cookie Cutter Christmas stamp set, I just loved all the images and couldn’t wait to use them. But I wasn’t quite sure how to use the little cutie at the top right. I don’t remember ever seeing a Christmas card with an eskimo. But all I had to do was take a closer look at the sentiments in the set to figure out what I wanted to do.

This little bundled up guy (or girl) needs to be where it’s cold. And what more iconic place for an eskimo than beside an igloo?

Here’s how I did it:
I stamped the eskimo in black ink onto Whisper White card stock. I colored the image with Stampin’ Write Markers in Soft Suede, Chocolate Chip, Crumb Cake, Real Red, Pink Pirouette, and Crushed Curry. I used a Blender Pen with Crumb Cake ink to color the legs, and with Pink Pirouette ink for the face, to make the colors lighter. I used the Cookie Cutter Punch to cut him out.
I ran a piece of Whisper White card stock through the Big Shot in the Brick Wall embossing folder. I then used a Layered Circles Framelits Die to trace a circle on the back with a pencil. You can use anything you have on hand that is round and the right size. I used Paper Snips to cut around the top curve, down straight on the left side, and to the top of the second brick from the bottom on the right side. I cut an entrance on the right. I used a Soft Sky Stampin’ Write Marker to color in the cracks between the ice bricks. I went over the whole thing with a Clear Wink of Stella Glitter Brush (which unfortunately never show up well in photos.)
I used the Outdoor Adventures Framelits Dies to cut the mountains and the snow caps from Whisper White card stock. I glued the caps on the mountain tops, then went over just the caps with the Clear Wink of Stella Glitter Brush.
Now the assembly. The card base is Soft Sky card stock. I glued the mountains onto the card base. I adhered the igloo and the eskimo with Stampin’ Dimensionals.
I stamped the first part of the sentiment on the card front, and the second part on the card’s interior, in Early Espresso ink.

Here’s what I used:
Thanks for stopping by today, and Sweet Stamping!
Aug 28, 2016 | Cards, Christmas, Gallery, Holiday, New Products, Open House, Sales |

Well, by now I guess you’ve figured out that I’m pretty smitten with the new Holiday Catalog. There are so many fun, pretty, amazing new products, and I want to show you them all! Today I’m featuring a new embossing folder called Pine Bough. It’s included in the Presents & Pinecones suite of products, but I think it does just fine on its own.

Here’s how I did it:
The card base is a Silver Foil Sheet cut to 4-1/4″ x 11″ and scored at 5-1/2″. Although if I were to make this card again, I would cut it to 5-1/2″ x 8-1/2″ and score it at 4-1/4″ for a tent card. I adhered a 4-1/8″ x 5-3/8″ piece of Soft Sky card stock to the front with Fast Fuse. I find Fast fuse works better than liquid glue on the slick foil sheets.
I ran a 4″ x 5-1/4″ piece of Whisper White card stock through the Big Shot with the new Pine Bough embossing folder.
I cut an ornament and ornament topper from a Silver Foil Sheet with the Delicate Ornament Thinlits Dies. I adhered the top to the ornament with Fast Fuse, then glued the ornament onto the embossed piece. Glue works fine on the back of the foil sheets.
I used my Paper-Piercing Tool to poke a tiny hole in the paper, and threaded a piece of Silver Metallic Thread around the ornament top and through the hole, where I adhered it on the back with Fast Fuse. I glued the Whisper White piece onto the Soft Sky piece.
The last touch was the bow. There is no Soft Sky Baker’s Twine, so I made some. I cut a length of Whisper White Solid Baker’s Twine, and put it in a small glass bowl with a few drops of Soft Sky Classic Stampin’ Ink Refill. I moved it around with my Paper-Piercing tool to make sure it all got dyed, then I laid it out on a paper towel to dry. I tied the dried twine in a small bow and adhered it to the ornament with a Mini Glue Dot.
Here’s what I used:
Today is my Holiday Catalog Open House and BOGO Sale!
If you’re in the Atlanta area between noon and 4pm, stop by!
1621 Executive Park Lane NE, Atlanta, GA 30329
Park along the street (Woodcliff) behind the building.
Thanks for stopping by today, and Sweet Stamping!
Aug 26, 2016 | Cards, Christmas, Gallery, Holiday, New Products, Open House, Sales |

I like washi tape. I do. But I rarely remember to use it. I’m not sure why. So to make up for it, I made this card with a lot of washi tape on it.
Here’s how I did it:
I cut a piece of Whisper White card stock to 4″ x 5-1/4″, then I applied strips of Presents & Pinecones Designer Washi Tape approximately 1/4″ apart. I glued this to the Mint Macaron card base.
I stamped the sentiment from the Christmas Pines stamp set in Cherry Cobbler ink onto Whisper White card stock, then cut it with the Delicate Ornament Thinlits Dies. I used a Sponge Dauber to ink the edges in Mint Macaron.
I tied a bow with Delightful Dijon ribbon from the 3/8″ Ribbon Trio Pack, then I adhered it to the top of the ornament with Glue Dots.
I adhered the ornament to the card front with Stampin’ Dimensionals. Super easy, and it took no time!
Here’s what I used:
Three things:
- My Open House and BOGO Sale is this Sunday, August 28, noon – 4pm ET. Click here for more details.
- The Thoughtful Branches bundle is only available until August 31! Click here to see it.
- August 31 is the last day you can redeem the Bonus Days coupons you earned in July.
Thanks for stopping by today, and Sweet Stamping!