Dec 12, 2014 | Christmas, Gifts, Techniques |

It seems a lot of people come down with colds or flu this time of year. Whether you have the sniffles or an allergy – or you’re just messy like me – it’s always nice to have some tissues handy. This is a nice way to give folks something useful and pretty at the same time.
I used Kleenex pocket tissue packs. I imagine most brands are the same size, but you may need to adjust the dimensions a little. These measured just under 4-1/2 x 2-1/2 x 1 inch, so those are the dimensions of my box. I used card stock to make the boxes and DSP to decorate them.
Start with a piece of card stock cut to 7 x 7-1/2 inches. Score along the longer side at 1, 3-1/2, 4-1/2, and 7 inches. Rotate counter-clockwise and score along the shorter side at 1/2, 1-1/2, and 6 inches. You’ll end up with something that looks like this.

Now cut along the dark lines. The parts colored in will be gone.

You’ll have something that looks like this:

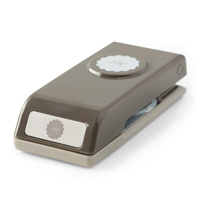
Cut DSP like so: one piece at 4-1/4 x 2-1/4 inches, two pieces at 4-1/4 x 3/4 inch, and two pieces at 2-1/4 x 3/4 inch. In the middle of the largest piece, cut a hole large enough to pull a tissue through. I used my Decorative Label punch (120907.) You could also use another punch, your paper trimmer, or scissors.

Center the cut/punched piece of DSP on the top area of the box, but do not adhere it yet.

Holding the DSP in place, use a pen or pencil to mark the outline of the cut/punched out area on the box.

Now cut out this area from the box, making sure to make the hole larger than the markings, but also making sure to leave enough paper around the hole to glue. (Please forgive the different colors used in these photos. I made several different colors, and I remembered to take photos at different points during the process on each one.)

Now glue the DSP over the hole. Here is one from the back. See how the hole in the box is larger than the decorative hole in the DSP? You don’t want the card stock to show.

Now glue the other pieces of DSP on the 4 sides of the box.

I used Multipurpose Liquid Glue because I wanted to make sure everything would hold together in a pocket or purse.
Now assemble the box. Make sure the wider side panel goes over the skinny side panel.

I like to lay it flat so I can fold the wider panel over the skinny panel. Apply glue to the skinny panel, then fold the wider panel over it to adhere.


On the end with 4 flaps, fold in the two smallest and apply glue to the top of them.


Fold in the bottom flap to adhere to the small flaps. Apply glue to it, then fold down the last flap to finish the end of the box.


Now you have a box with one open end.

Prepare tissues. Option #1:
Put the pack of tissues inside the box, then mark around the opening.


Take them out and cut a hole in the plastic wrapper a little bigger than the marking. Insert the pack into the box.

Prepare tissues. Option #2:
Remove the wrapper from the tissues and insert them into the box.


Now close the box and you’re done! I don’t glue this end of the box closed, so tissues can be added once it’s empty.

Of course, you can continue to decorate it with punched shapes, bling, etc., but I chose to keep mine simple.
Thanks for stopping by today, and Sweet Stamping!
Dec 11, 2014 | Cards, Christmas, Food, Gift Wrap, Gifts |
There are always folks you want to do a little something for during the holidays, like your delivery man, dry cleaner, and others you see on a regular basis. Here’s an idea for a yummy little treat to keep them warm during the holidays. It holds an individual pack of hot cocoa mix.
The Garden Green card stock base is the standard 4-1/4″ x 5-1/2″. The DSP is from the Trim The Tree stack. The mats are Cherry Cobbler card stock. I used the Scoring Tool with the Diagonal Scoring Plate to create the flap at the top right of the card, just to give them a peek inside. I sealed the bottom shut with Sticky Strip.
The Bearing Gifts stamp is a friendly way to let folks know there’s something inside for them. I stamped the image in Tuxedo Black Memento Ink and colored it with Blendabilities (Cherry Cobbler, Daffodil Delight, Old Olive, Calypso Coral, Smoky Slate, and Skin Tone Assortment.)
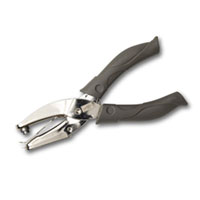
I used Cherry Cobbler Bakers Twine to attach the marshmallows to the card. I punched 6 holes through both layers of the card base with the 1/8″ Handheld Circle Punch, then laced the twine through them.

Here it is from the back.

The 1×8 Cellophane Bags fit miniature marshmallows perfectly – I happened to find peppermint flavored ones. For the toppers, I punched bits of Garden Green and Cherry Cobbler card stock with the Modern Label Punch. Then I stamped greetings from the Teeny Tiny Wishes stamp set on Whisper White card stock, and punched them out with the Word Window Punch. I used the Hand Held Stapler to attach the green and red pieces to the top of the bag, then I glued the white pieces on top to cover the staple.

Thanks for stopping by, and Sweet Stamping!
Dec 10, 2014 | Blog Hop, Cards, Christmas, Tools |

Welcome to the last Pals Blog Hop of 2014. This month we want to help you start your holiday wish list by sharing projects featuring our favorite Stampin’ Up! papers, stamps, tools and accessories. Get your wish list ready as you move along through the blog hop.
You may just be starting the blog hop or may have come from Jackie Diediker at Stampin’ Jackie on the Pals Hop. If you get off track at any time, the full lineup below will help you move along from blog to blog so you see all of the projects.

This card uses some of my very favorite tools from Stampin’ Up! I’ll post the things I think everyone should have on their wish list (including the ones used on this card) at the bottom of this post.
The 2014-2016 In Colors are just magnificent used alone or together. I recommend the Modern Label for your first punch – it’s definitely the one I use most. For your first stamp set, I recommend Teeny Tiny Wishes. It includes 24 greetings for just about any occasion. If you choose the clear mount set, you only need one acrylic block, the G block. The Word Window Punch fits all the greetings and fits atop the Modern Label beautifully. Perfect Polka Dots is wonderful for your first embossing folder – it can be used for a zillion different card styles and themes. And once you have a Big Shot, you’ll be able to emboss and cut with lots of different folders and dies. These items would make a terrific starter kit for anyone beginning to make cards – of course, every card maker needs them!
I raised two of the color panels and the greeting with Stampin’ Dimensionals, a very economical way to add depth and interest to any project.

Here’s a close up of the embossing and greeting.

The next stop is Susan Lankford at Stamp and Create With Susan on the Pals Blog Hop! Thanks for visiting and I hope to see you in 2015.
- Michelle Gleeson at StampinMojo
- Shannon Hokanson at Paper Works by Shannon
- Dawn Tidd at Tiddbits from Dawn
- Sherrie Gross at Stampin Sunshine
- Beth McCullough at Stamping Mom
- Kalyn Shubnell at The Stamping Chronicles
- September Gray at www.septembergray.com
- Debbie Mageed at Secret Stamper
- Patti MacLeith at Papercrafts by Patti
- Nancy Gleason at MyStampinSpace
- Maggie Mata at Maggie Made Cards
- Debbie Crowley at expressivelydeb…
- Wendy Klein at Doggone Delightful Stampin’
- Amy Whelan at Amy’s Inklings
- Brian King at Stamp with Brian
- Amy Williams at Stamps and Spice
- Mary Fish at Stampin’ Pretty
- Pamela Sadler at Stampin Pink Rose
- Jackie Diediker at Stampin’ Jackie
- Candy Ford at Stamp Candy
- Susan Lankford at Stamp and Create With Susan
- Peggy Noe at Pretty Paper Cards
- Nicole Watt at Pixel Maven’s Retreat
- Amy Hoptay at Inking of You!
- Lynn Kolcun at Stamping with Avery’s Owlery
- Beth Beard at My little craft blog
- Sue Becker at RnR Stamping
- Lisa Ann Bernard at Queen B Creations
- Kerry Willard Bray at Peonies and Paper Chains
- Rae Harper-Burnet at WildWestPaperArts.com
- Deb Cozzone at Deb Cozzone’s Stamping Zone
- Debra Simonis at Deb’s Stampin’ Grounds
- Susan Itell at Simple Stampin
- Jane Knudsen at see jane stamp
- Katy McGloin at Just Fun Stamping
- Martie Pollard at The Crafty Bandit
- Natalie Bradley at Natalie Bradley Events
- Becky Volpp at InkBlossomWithBecky
Here are the basic items I recommend for everyone’s wish list. I hope Stampin’ Santa is very good to you this year! Sweet Stamping!
Dec 9, 2014 | Christmas, Decor, Kits, Studio |
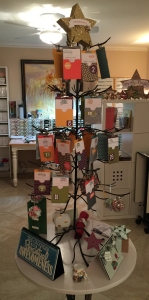
I’ve been looking for something I can 1) decorate in my studio for the holidays and 2) maybe even leave up all year to showcase samples. I found this online. It’s dark brown metal, and heavy enough to hold a lot. I don’t think it’s too Christmasy to use year round. I saw it on several web sites, but Amazon.com had the best deal.
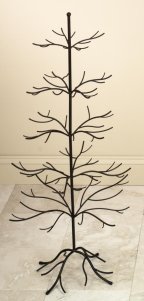
I’ve hung my Gratitude for Days Simply Created Kit around the tree, starting at the top, and it goes almost to the bottom. I fill out a card every day.
I have some of my handmade ornaments around the bottom.
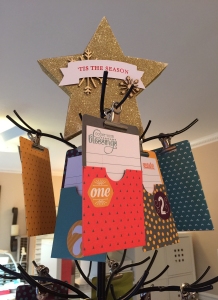
And, of course, a gold glitter star box from the Many Merry Stars Simply Created Kit sits on the top – I cut a hole in the bottom and slipped it over the top point of the tree.
I’ll be sharing some gift ideas in the coming days. I like to make nice presentations for all those small gifts, like things for the UPS man, etc. And Stampin’ Up! has all I need!
What are you doing to get ready for the holidays? I’d love to know!
Be sure to stop by tomorrow for the Stampin’ Pretty Pals Blog Hop! You’ll get great ideas for your Wish List.
Speaking of your Wish List, did you know that folks can buy you a Stampin’ Up! Gift Certificate? That’s right! They can purchase the gift certificate from me, then you can use it to buy your favorite Stampin’ Up! Products! Just give them my contact info and I’ll be more than happy to help them: email candy@stampcandy.net or call 404-661-5222.
Thanks for stopping by today, and Sweet Stamping!
Dec 7, 2014 | Christmas, Decor, Kits |
I put together most of the Many Merry Stars Simply Created Kit (138104) a while back, but I didn’t do the glitter stars. I love the look of glitter, but it can be so messy to work with, especially for a klutz like me. But I decided my ornament tree needed a topper, and I thought one of the glitter star boxes would look great.
Here are the three parts of the star box. It’s super easy to assemble. The sides come as one long pre-scored strip with adhesive tabs. Fold all the score lines before you start. Just peel the adhesive liner off and stick to the back side of stars. I did one star point at a time, then moved on to the next one before peeling off any more adhesive liner.

I had heard about using Aqua Net hair spray to prevent glitter from falling off a project. I decided to try it, so off to the supermarket I went.
I took my assembled star outside and placed it on several sheets of Grid Paper (130148.) Then I sprayed the heck out it. I doused it with a couple layers. Be careful because I almost got it too wet at one point. It’s best to let each layer dry before applying the next.

And it works! Well, I mean, it isn’t magic, but practically no glitter comes off on my hand now.

Once it was dry I scraped off a bit of glitter with my Paper Snips (103579) so the dimensionals would have a better chance of sticking.

I used Stampin’ Dimensionals (104430) and Liquid Multipurpose Glue (110755) to adhere the embellishments. I weighed it all down with the glue bottle while it dried.

Check back later to see it on the tree!
Thanks for stopping by today, and Sweet Stamping!
Dec 2, 2014 | Christmas, Decor |

I know this looks like it took forever, but these ornaments are super easy and quick.
First take a 12″ x 12″ piece of DSP and score at 5″ and 9″. Then cut it into 1/2″ strips perpendicular to the score lines, so that each strip is scored at 5″ and 9″.
Fold each strip into a Z like so.

Curl in the shortest part.

Curl the middle part over the first loop.

Curl the longest part over the first two. Now you have a set of 3 different sized loops.

Staple it together.


Place a glue dot in the stapled area…

…and adhere it to the next loop set.

Continue until you have enough to make an ornament you like. I used 17, but I could have added more.
Once the last two are adhered together and you have a circle, adhere a 7/8″ scallop circle to the center with glue. Do this on both sides.
Tie a ribbon through one of the outer loops to hang.


It looks quite delicate from the front…

…but substantial from the side.


For this ornament I adhered all layers with glue dots instead of stapling. The loops are much looser, so I could make an ornament with as few as five. I adhered a star to the center instead of a scallop circle.

Here’s what I used:
Thanks for stopping by today, and Sweet Stamping!