Mar 20, 2018 | Color Palette, Retiring Products |

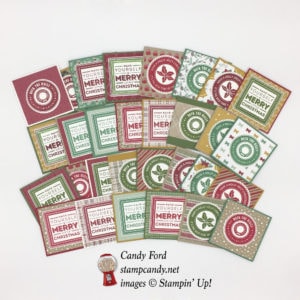
Not only are we nearing the end of Sale-A-Bration, but also the new 2018-2019 Annual Catalog goes live June 1! That means 5 new In Colors! It also means 5 In Colors will retire. The official retiring list won’t be released by Stampin’ Up! until April, but we do know that the 2016-2018 In Colors will not be carrying over. My advice is to get everything you want that comes in, or with, the 2016-2018 In Colors as soon as possible. Once the actual retiring list comes out, things will start selling out very quickly, especially the In Colors. Don’t wait and take the chance of missing out on these amazing colors!
2016-2018 In Colors:
Click each color to see everything that comes in/with that color.
Here are some of the products:
Click on each one to see details and to purchase.
Here are some things I’ve posted using these colors:
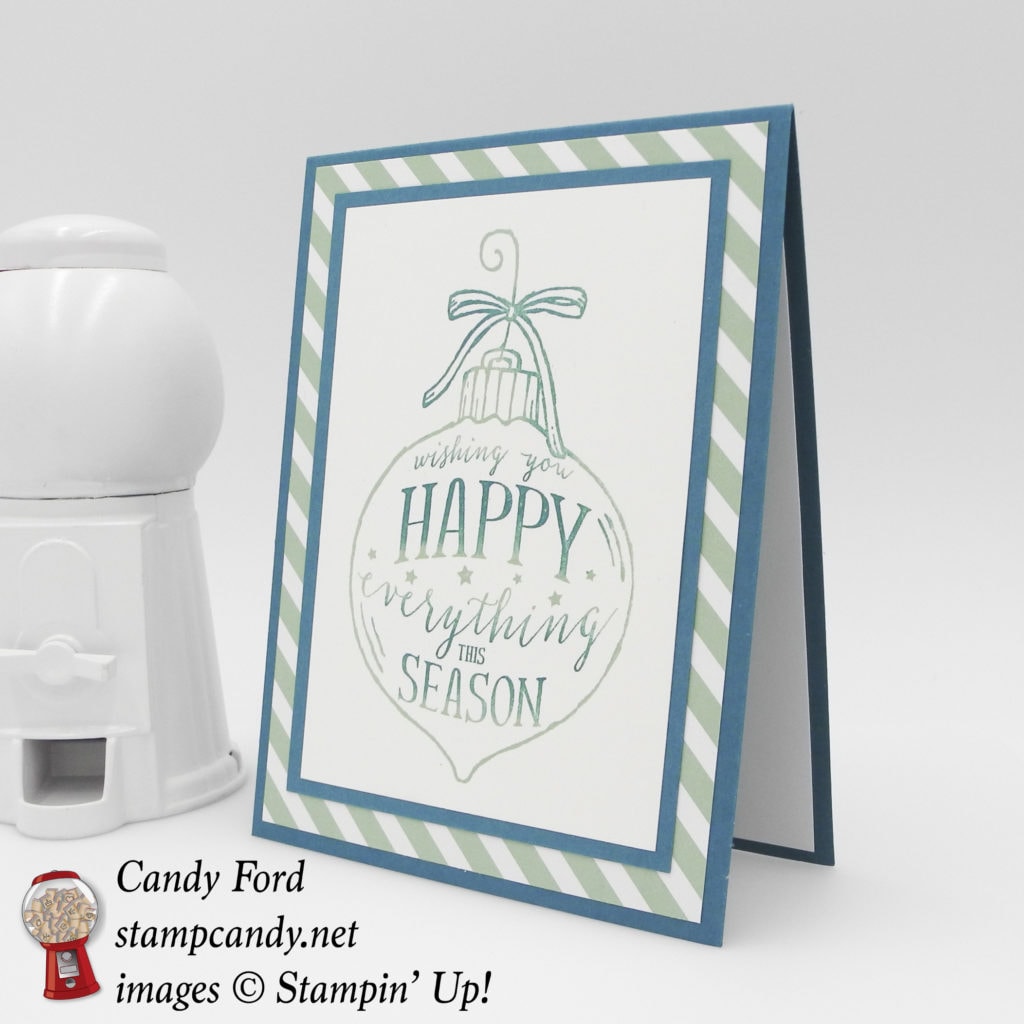
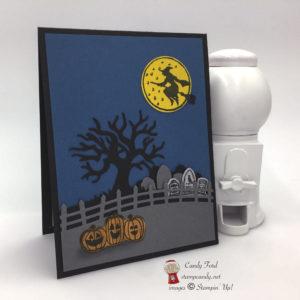
Sep 22, 2017 | Cards, Challenges, Color Palette, Gallery |
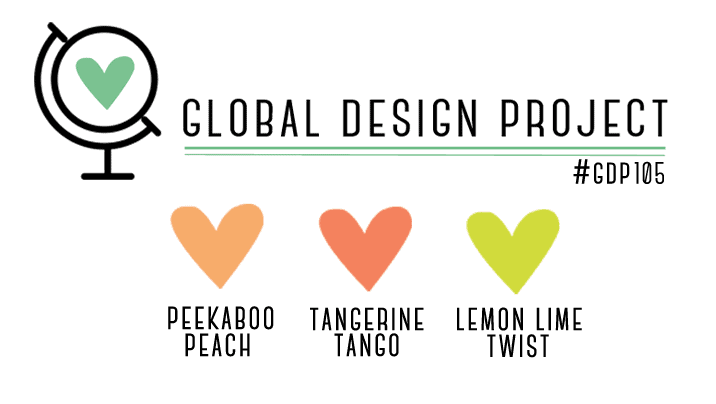
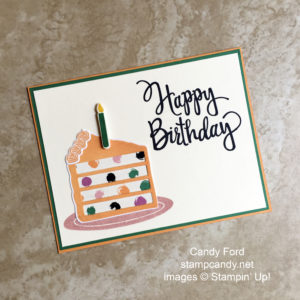
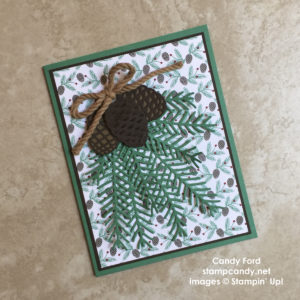
I am in love with the Painted Harvest Suite of products on pages 48-49 of the 2017 Holiday Catalog. The two step images in this stamp set are sooooo easy to do. And the Painted Autumn Designer Series Paper (DSP) is gorgeous – it has 10 colors in it so you can use it with lots of different projects. I used some of the products in the suite for today’s card, which I made for this week’s Global Design Project color challenge (GDP105.)
Here’s the GDP105 challenge:
Here’s what I made:
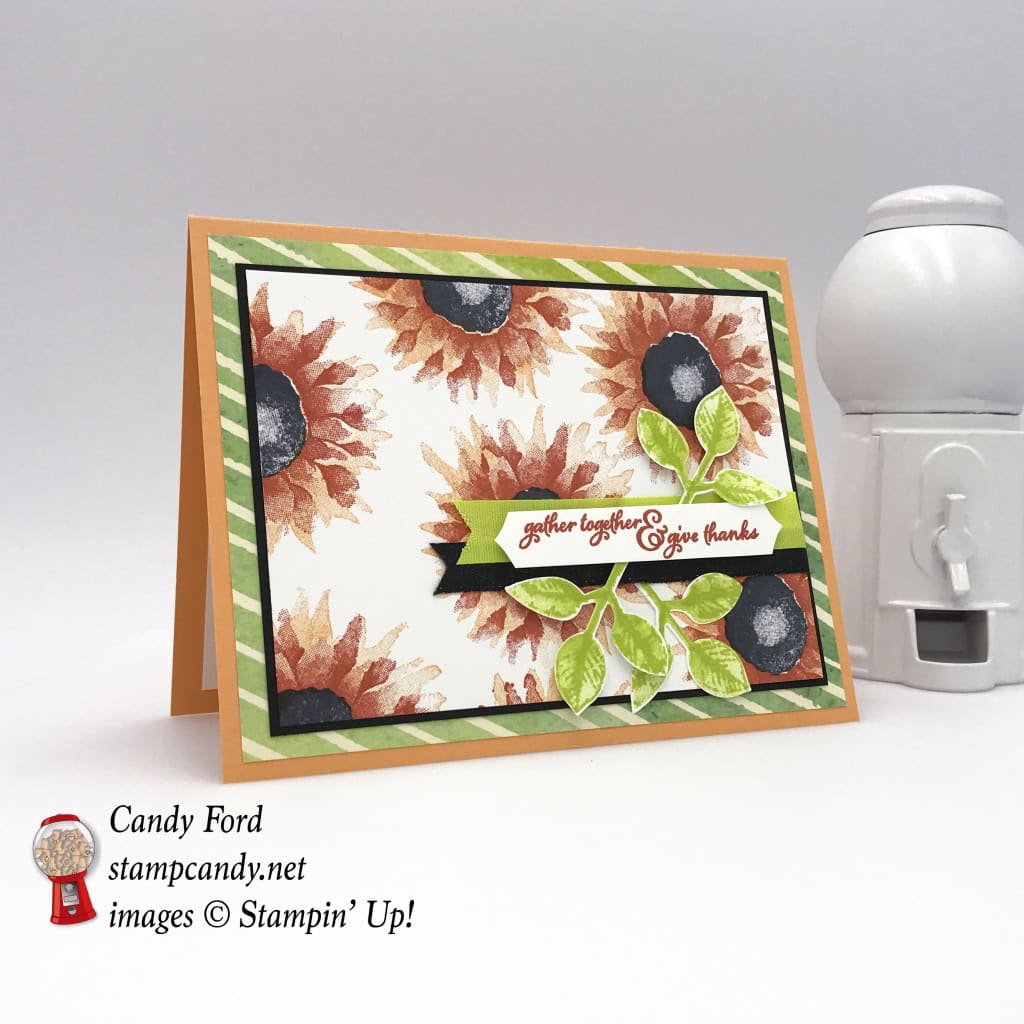
Here’s what I did:
Cut and scored with my Stampin’ Trimmer:
- Peekaboo Peach card stock (CS) cut to 5-1/2″ x 8-1/2″, then scored in half at 4-1/4″
- Painted Autumn Designer Series Paper (DSP) cut to 5-1/4″ x 4″ (I chose a design with Lemon Lime Twist stripes.)
- Basic Black CS cut to 4-7/8″ x 3-5/8″
- Whisper White CS to 4-3/4″ x 3-1/2″
- Whisper White CS cut to 7/8″ x 4″
- Whisper White CS cut to 5-1/4″ x 4″, for the inside
Stamped with the Painted Harvest stamp set:
- first flower stamp in Peekaboo Peech ink onto the 4-3/4″ x 3-1/2″ Whisper White CS layer
- second flower stamp in Tangerine Tango onto the Peekaboo Peach images
- flower center in Basic Black ink onto the flowers
- first leaf stamp (x 3) in Lemon Lime Twist ink onto a scrap of Whisper White CS
- second leaf stamp in Lemon Lime Twist ink onto the first leaf images
- sentiment in Tangerine Tango ink onto the center of the 7/8″ strip of Whisper White CS
Punched using the Leaf Punch :
Punched using the Best Badge Punch:
- ends of the sentiment strip, by inserting each end into the punch from the back side

Assembled the card:
- cut one end of a piece of Lemon Lime Twist ribbon and a piece of Basic Black ribbon in a notch using Paper Snips
- adhered the two pieces of ribbon to the stamped layer with Tear & Tape adhesive (Fast Fuse would work well also) and wrapped the non-notched end around to the back of the layer
- glued one leaf onto the bottom right, sticking the stem end under the ribbon slightly
- adhered two leaves using Mini Stampin’ Dimensionals, making sure the stem ends would be covered by the sentiment
- adhered sentiment using Stampin’ Dimmensionals
- top layer glued to Basic Black layer
- Basic Black layer glued to DSP layer
- DSP layer glued onto the front of the card base
- 5-1/4″ x 4″ Whisper White CS glued to the inside of the card base
Here are today’s colors:
You can click on each one to see all the products that come in that color!
Here’s what I used:
Click on the images for more details and to purchase.
Here are some key points to remember:
- Gumball Reward for all orders over $50.
Find out more HERE. - Hostess Code for the month of September (N4ZFHXK9)
Find out more about HOW, WHEN and WHY to use that HERE. - September’s FREE gift
Quilt Top Textured Impressions Embossing Folder
Find out more HERE. - Help those affected by Hurricane Harvey and Irma
I will donate 20% of my September sales (matched by Stampin’ Up! corporate) to the American Red Cross for Hurricane Harvey & Irma Relief. Please help make a difference. CLICK HERE to shop now. Click HERE for more details. - New Merry Patterns Hostess Stamp Set – added to your Host Rewards
There’s a brand new stamp set that isn’t in any catalog. You can’t buy it, but you can get if for free with a qualifying order! You can host a party, or place your own order, or join under me and get a 20% discount on your demonstrator order. Find out more HERE.
Thanks for stopping by today, and Sweet Stamping!
Apr 14, 2017 | Catalogs, Color Palette, New Products, Retiring Products |
Stampin’ Up! Demonstrators have access to the new 2017-2018 Annual Catalog, and it is chock full of amazing new items. Today I want to share with you the five new In Colors.
Here are the new In Colors:

Here are the retiring In Colors:
If there’s anything in these five colors you want, order it now! Things are already selling out!

Here are the In Colors that will stay one more year:

Here’s the link to the Retiring Products:
A few days ago I posted a pdf file and an Excel spreadsheet file, but they won’t be kept up to date. Check my online store for the latest:
Click here to shop Retiring Products.
Here’s April’s Host Code:
HV6MJT2X
Use the Host Code on online orders less than $15o. See how to use a Host Code here.
Online orders of $75-149.99 placed with the Host Code will receive the gift of the month!
Online orders of $150 or more will automatically receive the gift of the month! Do not use the Host Code.
April’s gift is a pack of Urban Underground Embellishments! Each pack contains 24 brushed silver embellishments – 8 each of 3 designs. (I can ship within US only.)
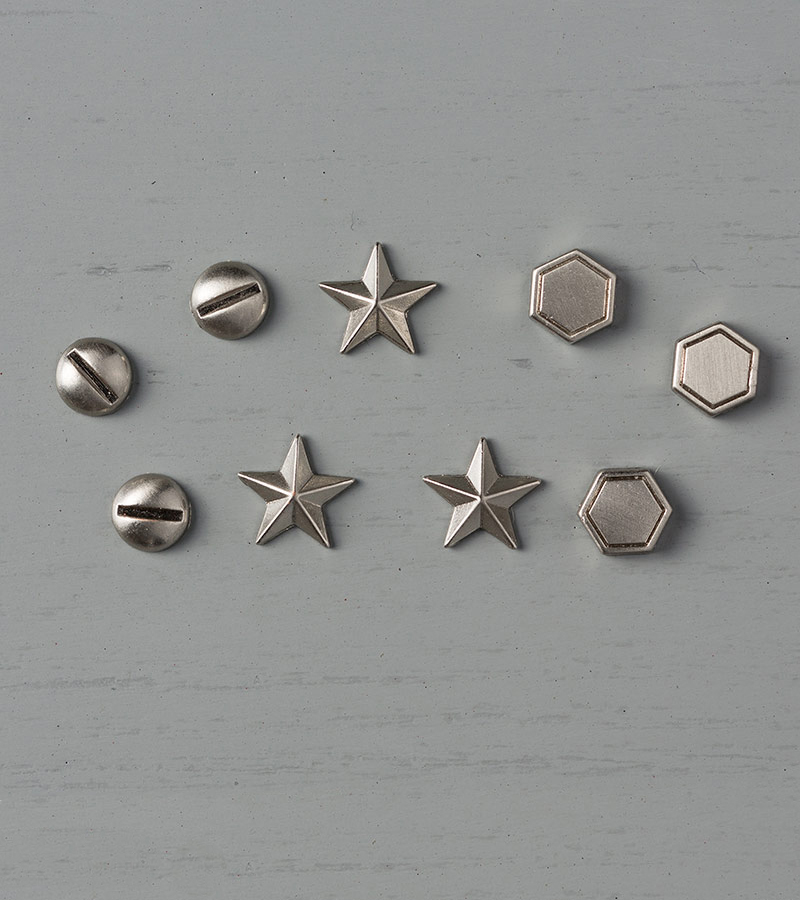
Urban Underground Embellishments © Stampin’ Up!
Here’s my Gum Ball Rewards Program:
 You always earn a Gum Ball for every $50 you spend on an order with me. Earn 10 Gum Balls and I’ll send you a free stamp set of your choice! See the Gum Ball Rewards page for details.
Click here to shop my online store!
Thanks for stopping by today, and Sweet Stamping!

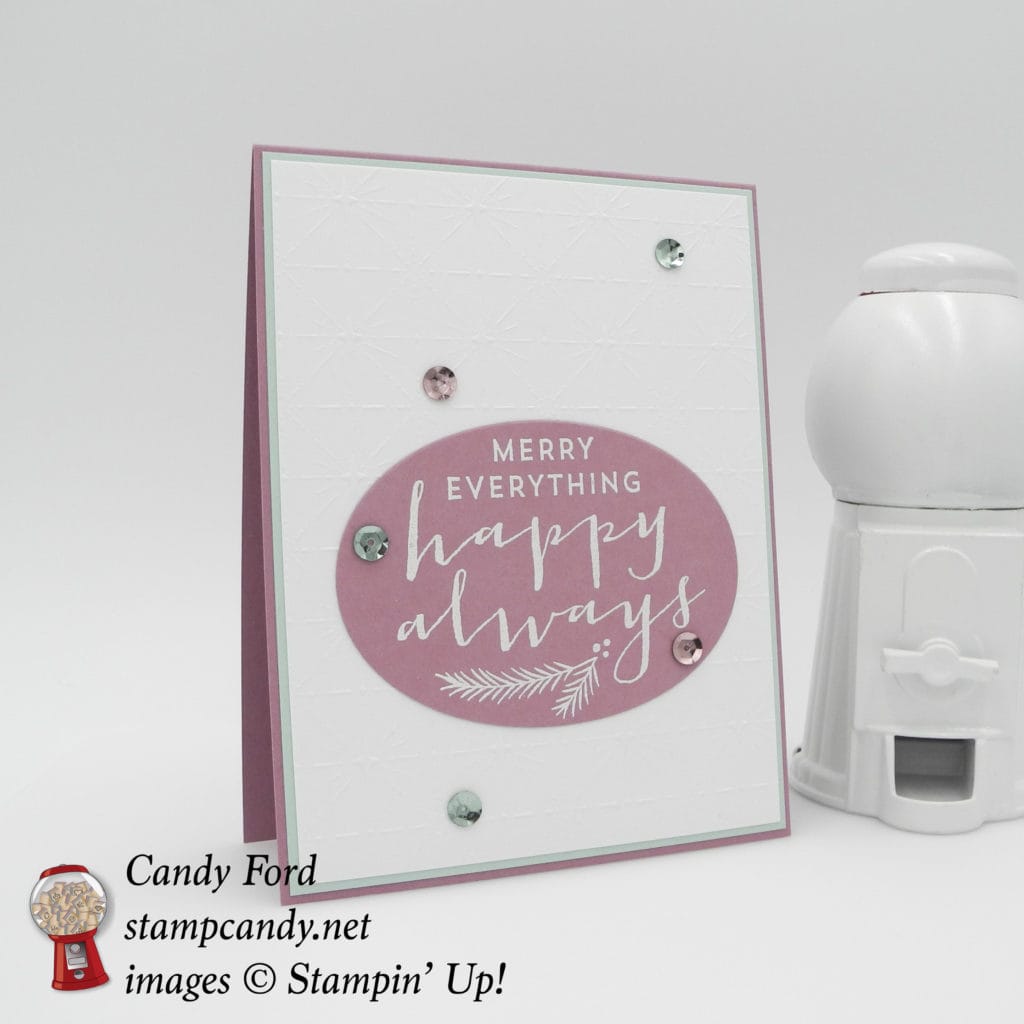
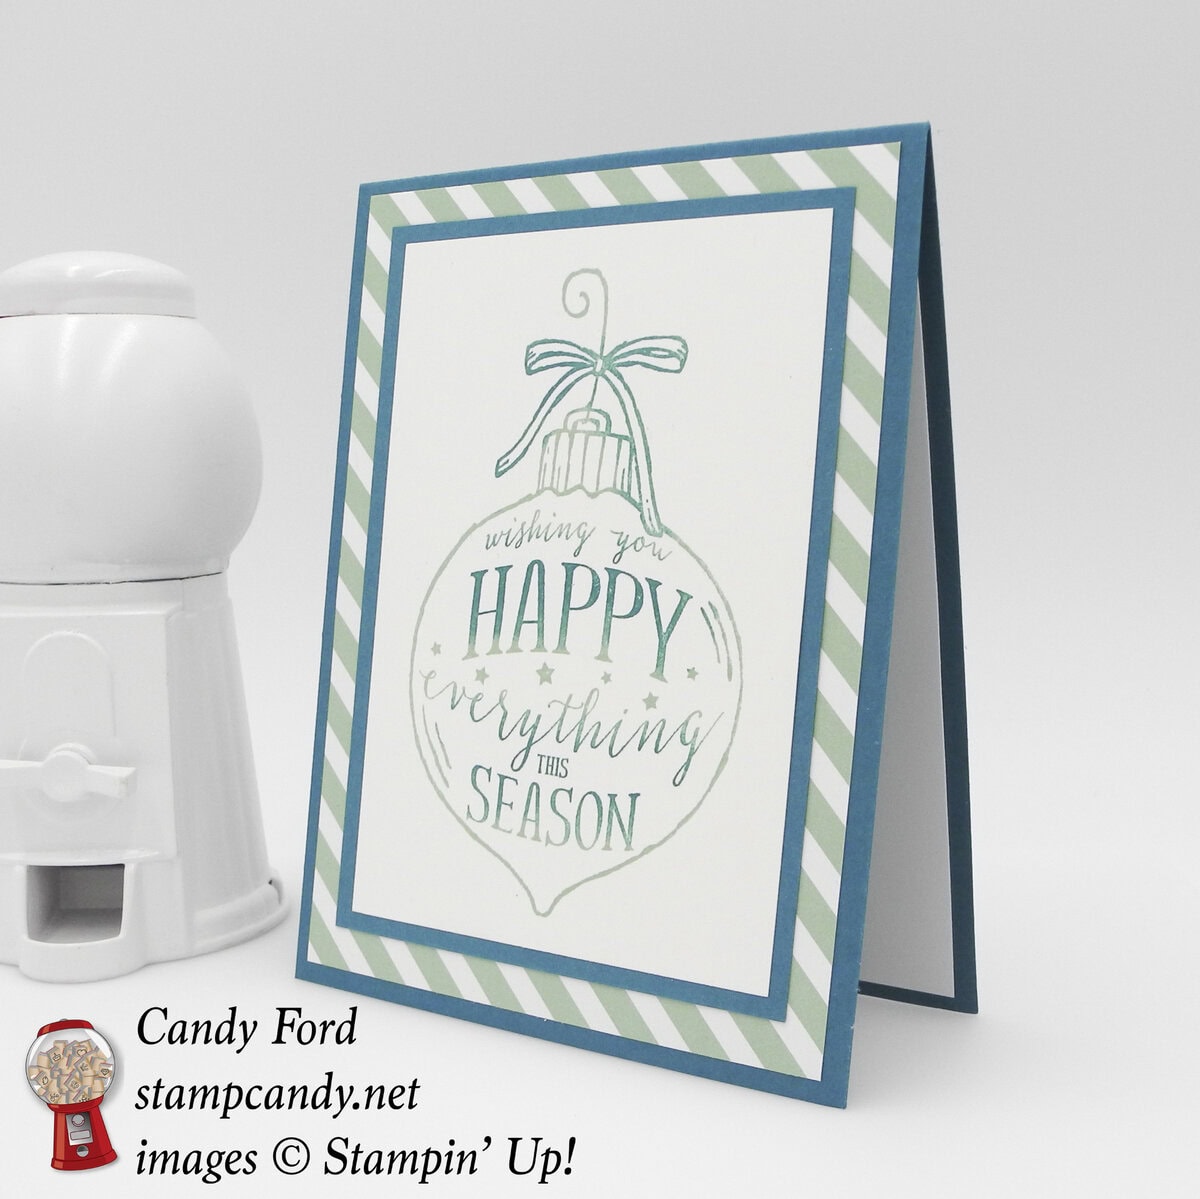
Dec 14, 2016 | Cards, Christmas, Color Palette, Gallery, Holiday, Retiring Products |
The Happy Ornament wood mount stamp is retiring soon, so get it while you can! I used it to create this card with a palette of cool colors. This is a really quick card to make. There’s only one stamp and the rest is gluing together some layers.
Here’s what I made:
Here’s how I did it:
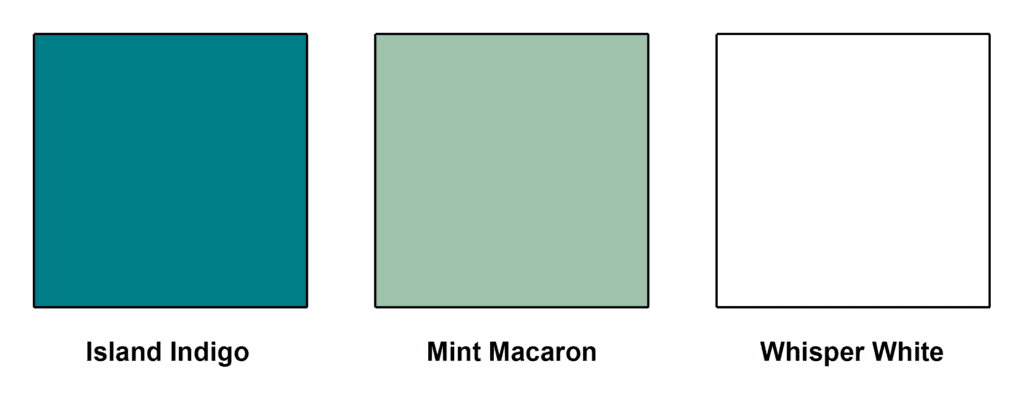
The card base is Island Indigo card stock. There is a piece of Whisper White CS glued to the inside for a handwritten note. On the front is a layer of Mint Macaron Designer Series Paper from the 2015-2017 In Color Designer Series Paper Stack, then a layer of Island Indigo CS.
I inked the stamp with a Mint Macaron ink pad, then used a Sponge Dauber to color in certain areas with Island Indigo ink. I stamped the image on a piece of Whisper White CS, then glued it to the card front.
Here’s what I used:


YEAR-END CLOSEOUT!
Details:
• Promotion period: December 1, 2016 – January 3, 2017
• All products (and discounts, if any) can be found in the Year-End Closeouts category of the online store beginning December 1.
• Year-end closeout items may be added to all order types: demonstrator, workshop, customer, and online.
• Clearance Rack items are only available while supplies last.
• Following the Year-End Closeouts promotion, some products may remain on the Clearance Rack; other items may be removed from the Clearance Rack to be added at another undetermined time.
• High-inventory items will only be discounted through January 3; beginning January 4, they will still be available, but at regular price.
• Retiring item availability will follow standard retiring item rules:
• Retiring stamp sets are guaranteed available until December 21, after which they will be only available while supplies last.
• Retiring accessories will only be available while supplies last.
• Retiring items will only be available while supplies last. All retiring items will be discontinued after January 3.
Other Year-End Closeouts products and applicable discounts can be found in the online store.
• No minimum purchase is required to participate in Year-End Closeouts.
• Year-End Closeouts are eligible for Stampin’ Rewards with qualifying orders.
• New demonstrators may add Year-End Closeouts items to their Starter Kit! Click on Be a Candy Heart at the top of the page!
Thanks for stopping by today, and Sweet Stamping!

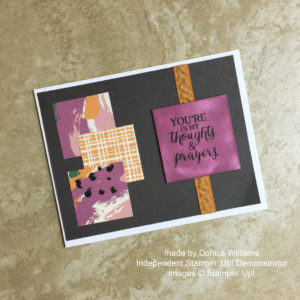
Dec 13, 2016 | Blog Hop, Cards, Christmas, Color Palette, Gallery, Holiday, Retiring Products |

Welcome to InKing Royalty’s December Blog Hop! While Stampin’ Up! demonstrators are actively ordering from the 2017 Occasions Catalog and earning products from the 2017 Sale-a-Bration brochure, we are also getting ready for the upcoming holidays. We are excited to share some fun winter-themed projects with you! Today’s Winter Wishes Blog Hop is filled with inspiring projects that feature each artist’s take on Winter. After you read my post, I hope you’ll hop over to the next person on the list at the base of this post.
Here’s what I made:
I decided to go simple and pretty for today’s project. The Sweet Sugarplum, Soft Sky, and white color palette is soft and wintery. And I love this sentiment from the Suite Seasons stamp set.

Here’s how I did it:
The card base is Sweet Sugarplum card stock. The next layer up is Soft Sky card stock. On top of that is a piece of Fancy Frost Specialty Designer Series Paper.
I heat embossed the sentiment in white onto Sweet Sugarplum card stock, then I cut it out with a die from the Layering Ovals Framelits. I glued that onto the card front.
Finally I glued on some Soft Sky and Sweet Sugarplum sequins from the Fancy Frost Sequins.
Here are the Hop Stops:
I always feel so honored to be included in the InKing Royalty blog hop with such a talented group paper crafters. I hope you’ll hop along to the next stop on the blog hop, the amazing Jennifer Spiller at Westside Paper Creations, as well as the rest of the hoppers on the list. There’s a lot of inspiration to be found in this group – and you don’t want to miss it!
If you get stuck during the Blog Hop, please use this line-up as a guide. Thank you for hopping along with us!
- Brian King at Stamp with Brian
- Lisa Pretto at InkBig Academy Stamps
- Pam Morris at Tap Tap Stamp
- Candy Ford at Stamp Candy
- Jennifer Spiller at Westside Paper Creations
- Becky Volpp at InkBlossom with Becky
- Robin Myren at Songbird Designs by Robin
- Karen Browning at StampWithMeKZB
- Lory Robinson at The Robin’s Nest Designs
- Shawn de Oliveira at ShawnStamps
Here’s what I used:
Thanks for stopping by today, and Sweet Stamping!
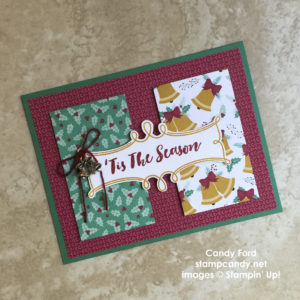
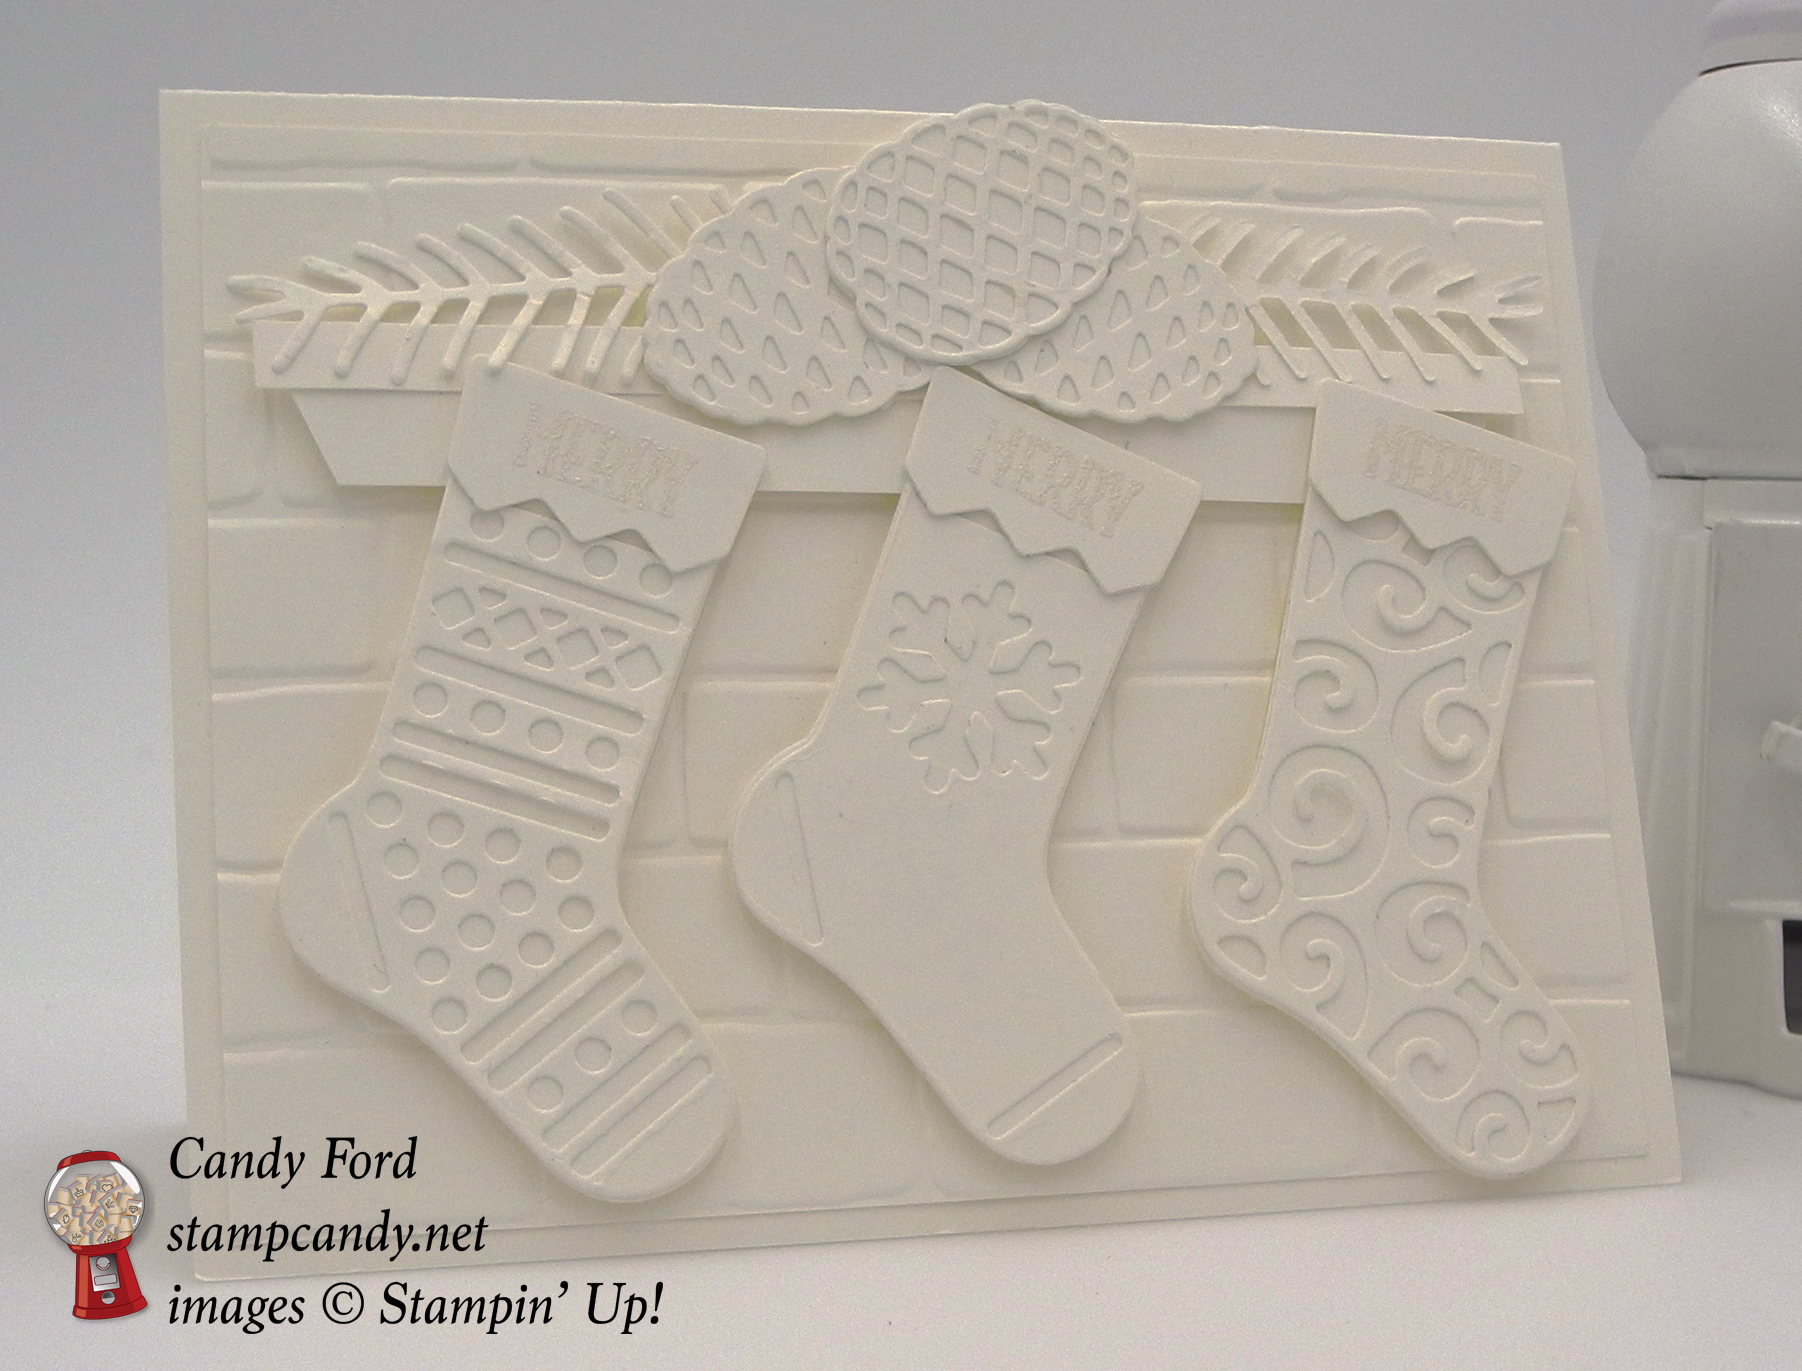
Dec 7, 2016 | Blog Hop, Cards, Christmas, Color Palette, Gallery, Holiday |
This month the Inspire, Create, & Share Blog Hop is all about white-on-white projects. I love tone-on-tone projects, and white-on-white is my favorite. I also enjoy using different products together, and I used several to create today’s card.
Here’s what I made:
My card has three stockings hanging from a mantle covered in pine boughs and pinecones. The sentiment is subtle: each stocking has the word Merry.

While the details are visible in person, it’s hard to make them show up in a photo. Here’s a darkened photo to help.
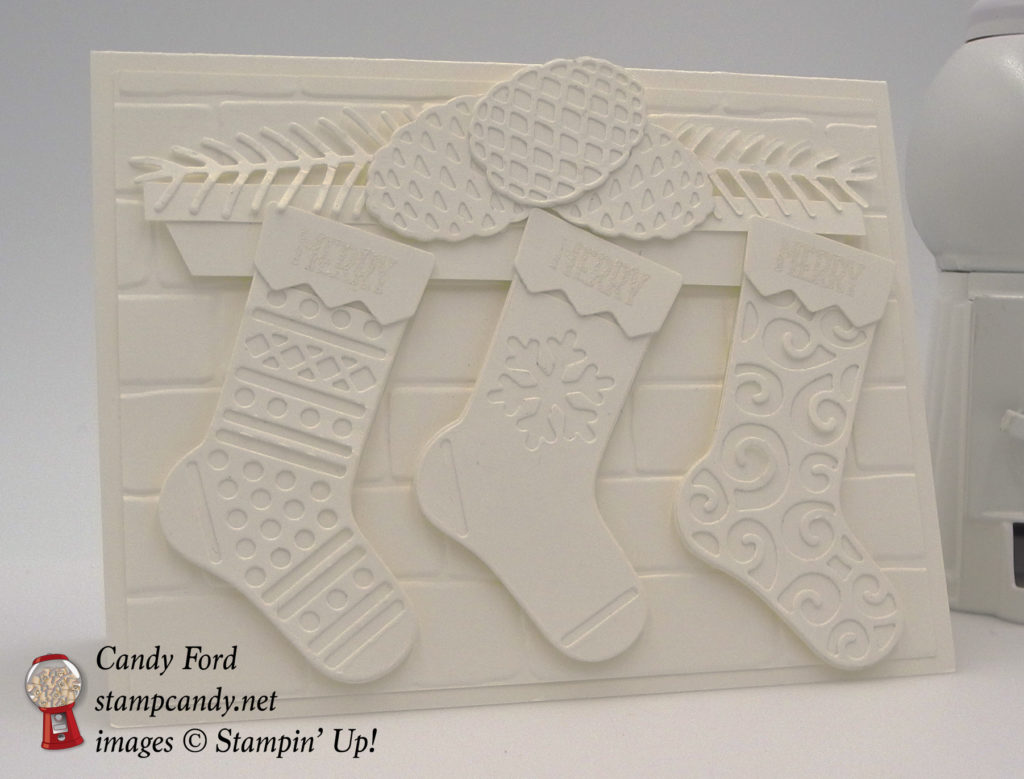
Here’s how I did it:
The card base is Thick Whisper White card stock. Everything else is the regular Whisper White card stock (CS.)
I used the Christmas Stocking Thinlits to cut the three stockings: back, front, and topper. For the toppers, I first heat embossed the word Merry in white onto CS, then cut them with the die. I glued the pieces together.
The word Merry is from this stamp in the Hang Your Stocking stamp set:

Here’s a close up of the heat embossed words:
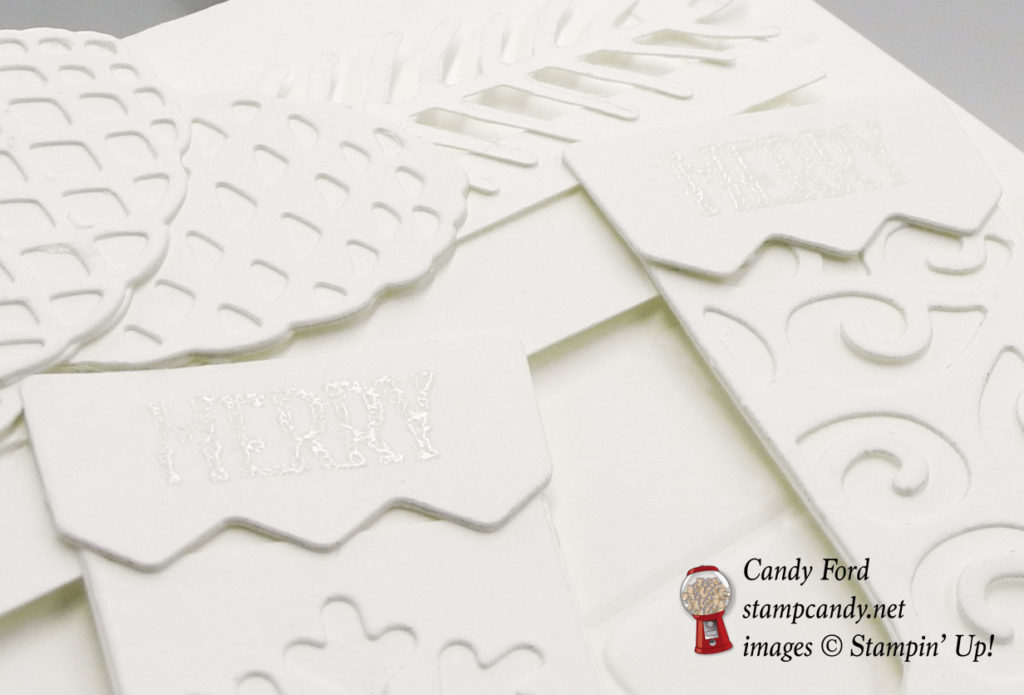
I cut a 1/4″ x 5″ strip of CS for the mantle top, and a 1/2″ x 4-3/4″ strip of CS for the mantle base. I used Paper Snips to cut an angle at each end of the base. I glued the two pieces together.
I used the Pretty Pines Thinlits to cut the pine boughs and the pinecone backs and fronts.
I ran a 5-1/4″ x 4″ piece of CS through the Big Shot with the Brick Wall embossing folder, and glued it to the card base.
I attached the mantle to the brick wall with Stampin’ Dimensionals. I attached the stockings to the brick wall with Stampin’ Dimensionals, and to the mantle with glue.
I attached the pine boughs with glue, then attached the pinecones with Fast Fuse.
Click on this image to see the next blog on the hop, Darla Roberts of Stampin’ With Darla!

Here’s what I used:
DECEMBER HOST CODE
U3YAHB4R
If you are placing an order for less than $150, please use this Host Code.
If you are placing an order of $150 or more, you will receive Stampin’ Rewards on your order, so do not use the Host Code.
Place at least one individual order of $75 or more from me in December and use the Host Code, and I will send you a package of Pearl Basic Jewels! (Shipment within US only.) If you place an order of $150 or more, you will automatically get the Pearl Basic Jewels!
Click here for details on how to use the Hostess Code.
Thanks for stopping by today, and Sweet Stamping!


