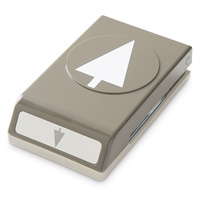
Weekly Deals


Click on the products image to check out the amazing discount on these items!
Click on the products image to check out the amazing discount on these items!
I’m afraid Halloween prep and coming down with a nasty bug took their toll on my schedule this week. Now I’m back up and running (or at least out of bed.) I can’t wait to show you some of the pumpkins I’ve decorated with my Stampin’ Up supplies!
But for now, here’s a quick little card I had fun making:

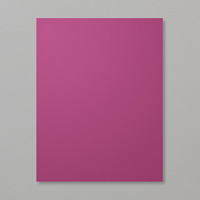
It’s a standard 4-1/4″ x 5-1/2″ card in Rich Razzleberry card stock, which I chose just for something different from the usual Christmas red. I used the new Snowflake Card Thinlits Dies to cut out trees from Dazzling Diamonds Glimmer Paper. Using the Festival of Trees stamp set, I stamped trees on Garden Green card stock with White Craft Stampin’ Ink, heat embossed with Iridescent Ice Stampin’ Emboss Powder, and punched them out with the new Tree Punch. The sentiments are also from the Festival of Trees stamp set – stamped in Garden Green ink on Whisper White card stock and trimmed into banners with my Stampin’ Trimmer and Paper Snips.
In the photo you can’t really see the glisten on the trees – from the glimmer paper and the emboss powder – so it looks a bit static. But in person it is much more dynamic.

Inside I wrote directly on the Rick Razzleberry card with a white uni-ball Signo Gel Pen – my favorite white pen of all time!
Thanks for stopping by!
SAVE 15% when you buy the Festival of Trees stamp set and Tree Punch in a bundle!
Well, I don’t have a project to share again today. You see, this time of year we’re in full on Halloween mode in my house. At Christmas we’re always at our family’s house, so Halloween is our big holiday. We decorate the whole house, inside and out. So we’ve been taking things out of storage and trying to figure out what to use this year, what to put back in storage for later, and what to let go of. In years past I’ve begun decorating the house as early as August 1. The invitations are usually made in April. I’m running way behind this year, so I’ve been working on that a lot lately. I still have to finish the invitations. Our den is packed full of boxes and piles of Halloween decor items. I’ll keep you posted on the progress.
Be sure to check out Stampin’ Up’s Weekly Deals only good through Monday. Get 25% off these items:
Okay, the truth is I wasn’t sure I would like the new Wondrous Wreath stamp set. I mean, could it really be that easy? Then I got to try it out at Convention in July, and I knew I had to have it. Not only is it super easy to line up the stamped layers; it’s also super easy to cut out the pieces with the corresponding Wonderful Wreath Framelits Dies.
It may seem that I used two colors of green ink on this card, but actually I used only one. I inked the base layer of the wreath with Pear Pizzazz, then “stamped off” once before stamping onto the Whisper White card stock, making the leaves a paler green. I inked the second layer with Pear Pizzazz and stamped directly on top of the first layer, making those leaves a darker green. Thanks to Sean Douglass at Stampin’ Up (he does all the wonderful kits we love so much) for teaching me this two-tone technique in Salt Lake City this past July!

Did you know…
…you save 15% when you buy the Wondrous Wreath Stamp Set & Wonderful Wreath Framelits together in a bundle?
…you can receive the Good Greetings Stamp Set for FREE? Now until October 31, you will earn an exclusive Good Greetings Stamp Set (clear mount or wood mount – your choice) when your party total, or your order total, reaches $300 – that’s in addition to the other exciting benefits! That’s right, a FREE stamp set IN ADDITION TO all the other exciting and generous benefits you get when you host a party, but only until October 31! This versatile stamp set covers holidays from Halloween to Valentines and more. Contact me today to schedule your party! candy@stampcandy.net or 404-661-5222
Below what I used to make this card. Thanks for stopping by!
How would you like to get two months of Paper Pumpkin for the price of one! If you sign up by September 10, you get two months for half price! Then if you decide it isn’t for you, just cancel. But if you love it (like I know you will) you can continue with a month to month subscription, or buy a prepaid subscription for 3, 6, or 12 months.
Each month you receive an orange box containing everything you need (except scissors and adhesive – and sometimes it even includes the adhesive) to complete that month’s project. It may be cards, decor items, gift items, etc., but it’s always something wonderful.
Sign up now to join in all the fun! It’s easy! Just click here to sign up. Use Promo Code HALFOFF2 and remember to choose me, Candy Ford in Atlanta, GA, as your demonstrator.
Questions? Leave a comment below, email me (candy@stampcandy.net,) text or call me (404-661-5222.)

Thanks for stopping by Stamp Candy today!
Here’s another card I CASEd from someone at last weekend’s crop. A lovely lady named Shirley was using a kit that made beautiful cards with panels that folded in different directions for a 3D look. It took me a couple of attempts before I figured out the right measurements, but I finally came up with a card. Once I figure out how to make a template that you can actually read, I’ll post it.
…and here’s the inside.

I just love the Santa & Co. DSP with all its cute little images: the Santas, the moose, the trees, the mountains,… I used an 8.5″ x 11″ piece of Old Olive card stock for the base. Then I started cutting the DSP into pieces that fit the panels.
I stamped the front sentiment with black Staz-On ink onto SU Vellum and used Santa & Co. Designer Washi Tape to hold it in place.
I stamped the merry, merry, merry, merry christmas with the Good Greetings stamp set in black; but then I decided I liked white better, so I traced over the words slowly with a white Uni-Ball Signo Gel Pen. This has been my favorite white pen for years, and I’m so glad Stampin’ Up! carries it.
A few Frosted Sequins scattered here and there and I was done. I left the back of the card blank so there’s plenty of room for writing a sentiment. Or you could leave the far right panel (where I have the mountains) blank for writing.
Here are a couple more angles…

…from above…

… and from below.
Thanks for stopping by today!
Have a party or place an order totaling $300 and you will receive the exclusive Good Greetings stamp set FREE in addition to the regular host benefits

Here’s what I used to make today’s card: