Aug 16, 2016 | Christmas, Classes, Events, Food, Gallery, Holiday, New Products |

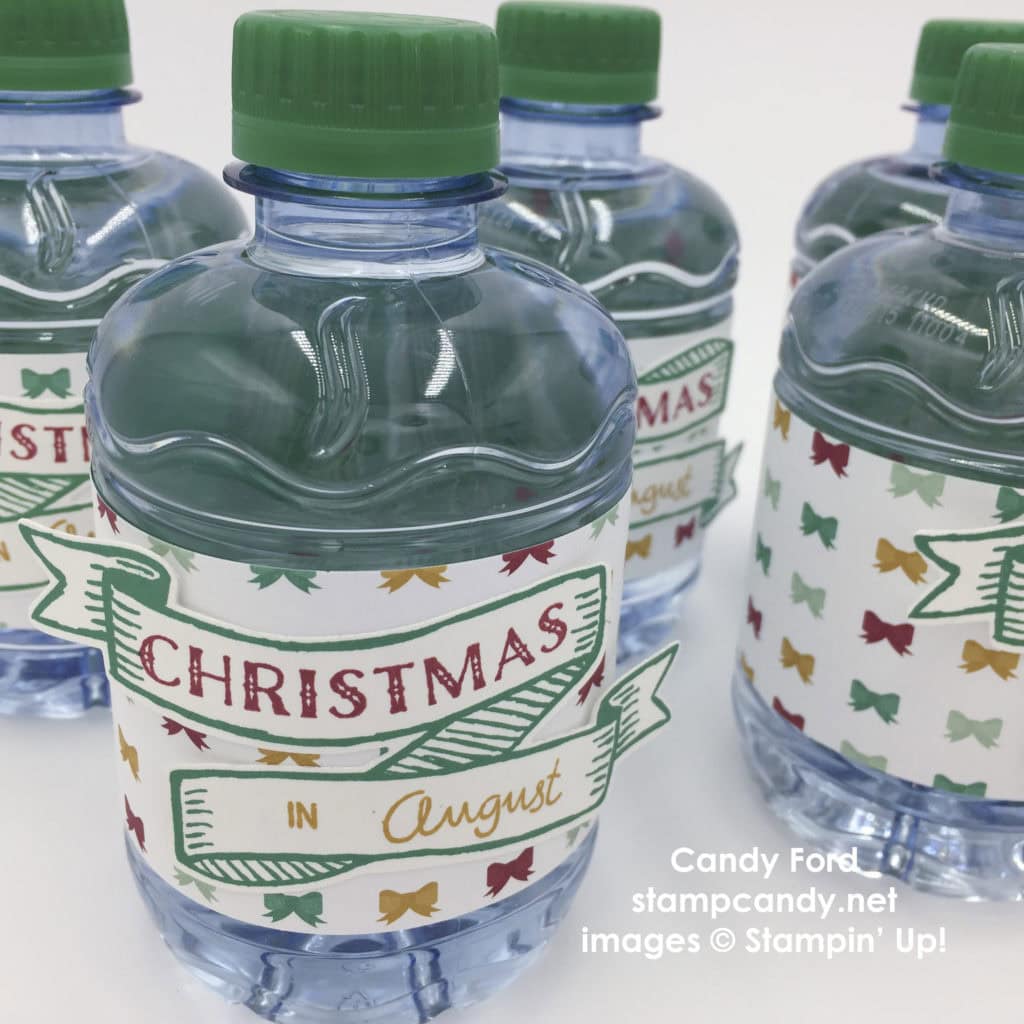
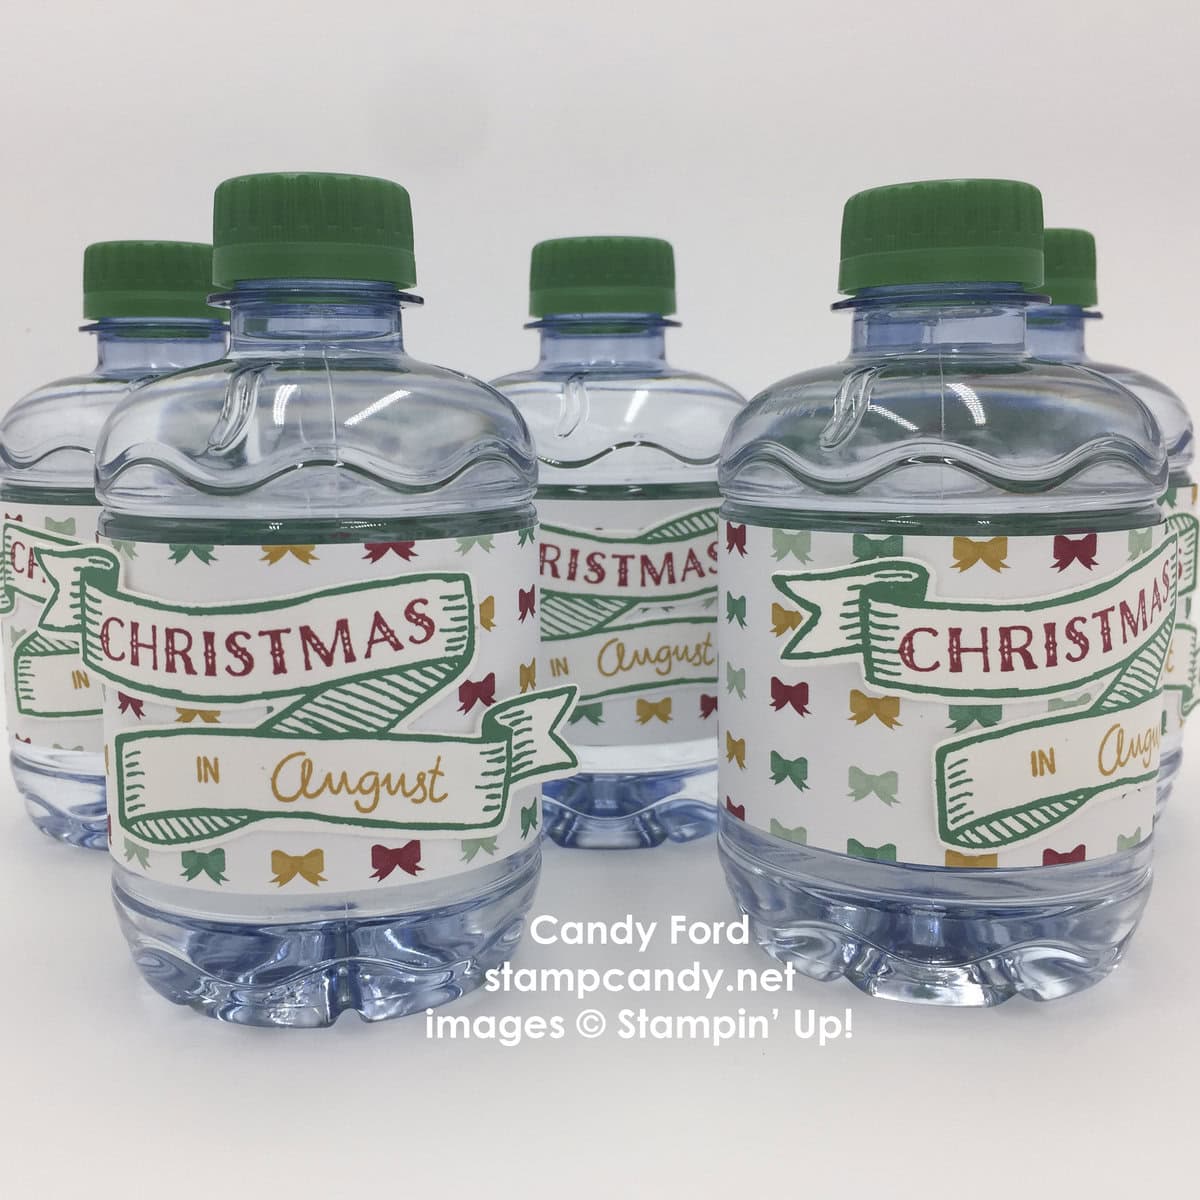
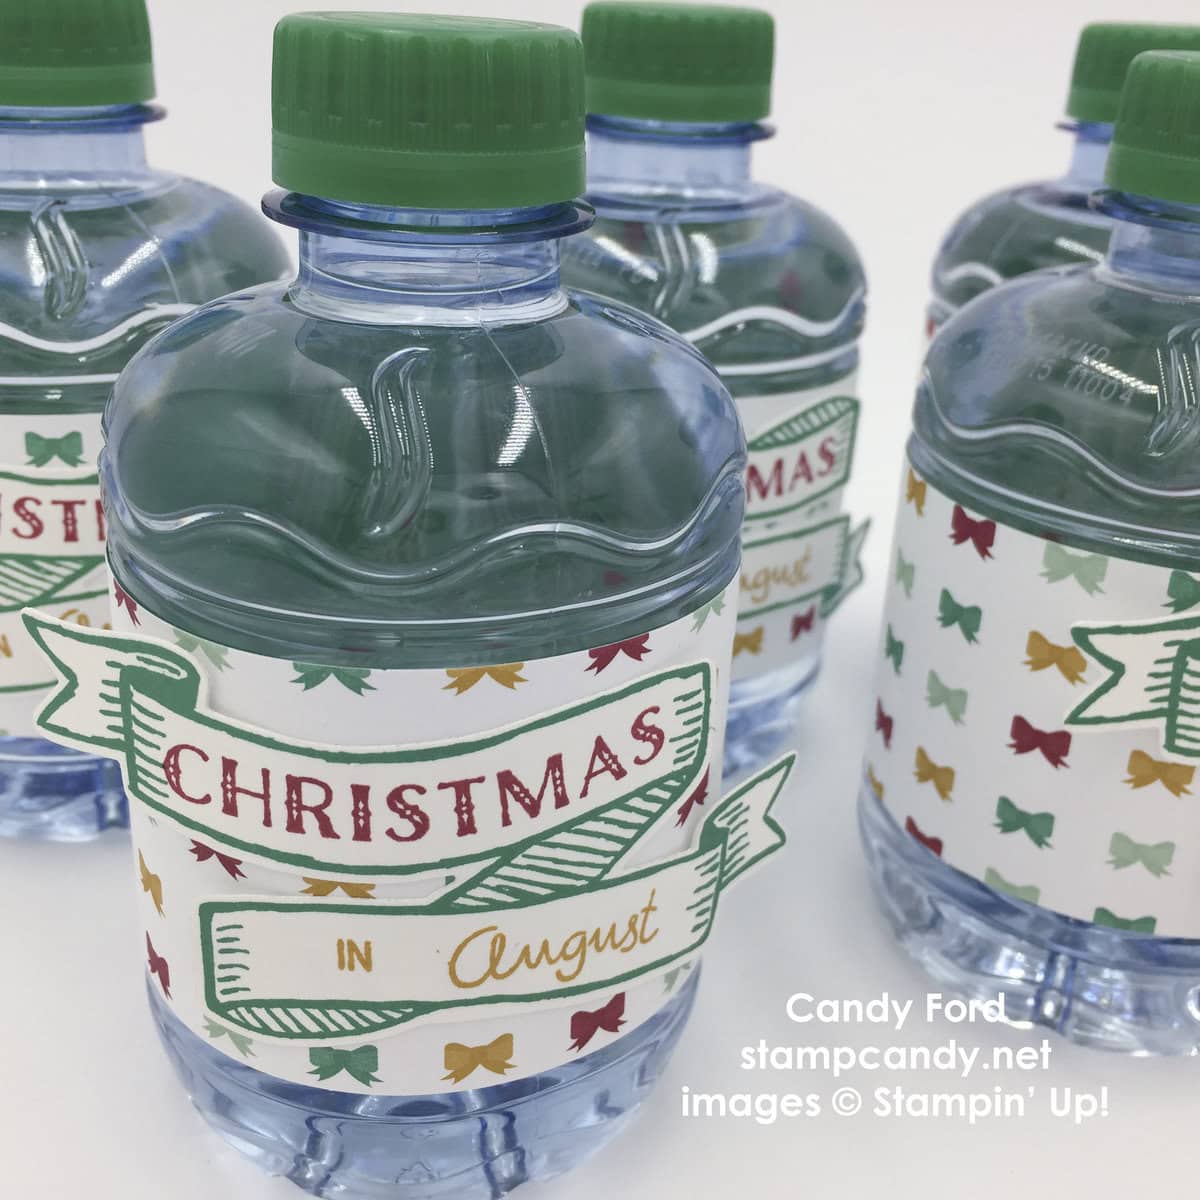
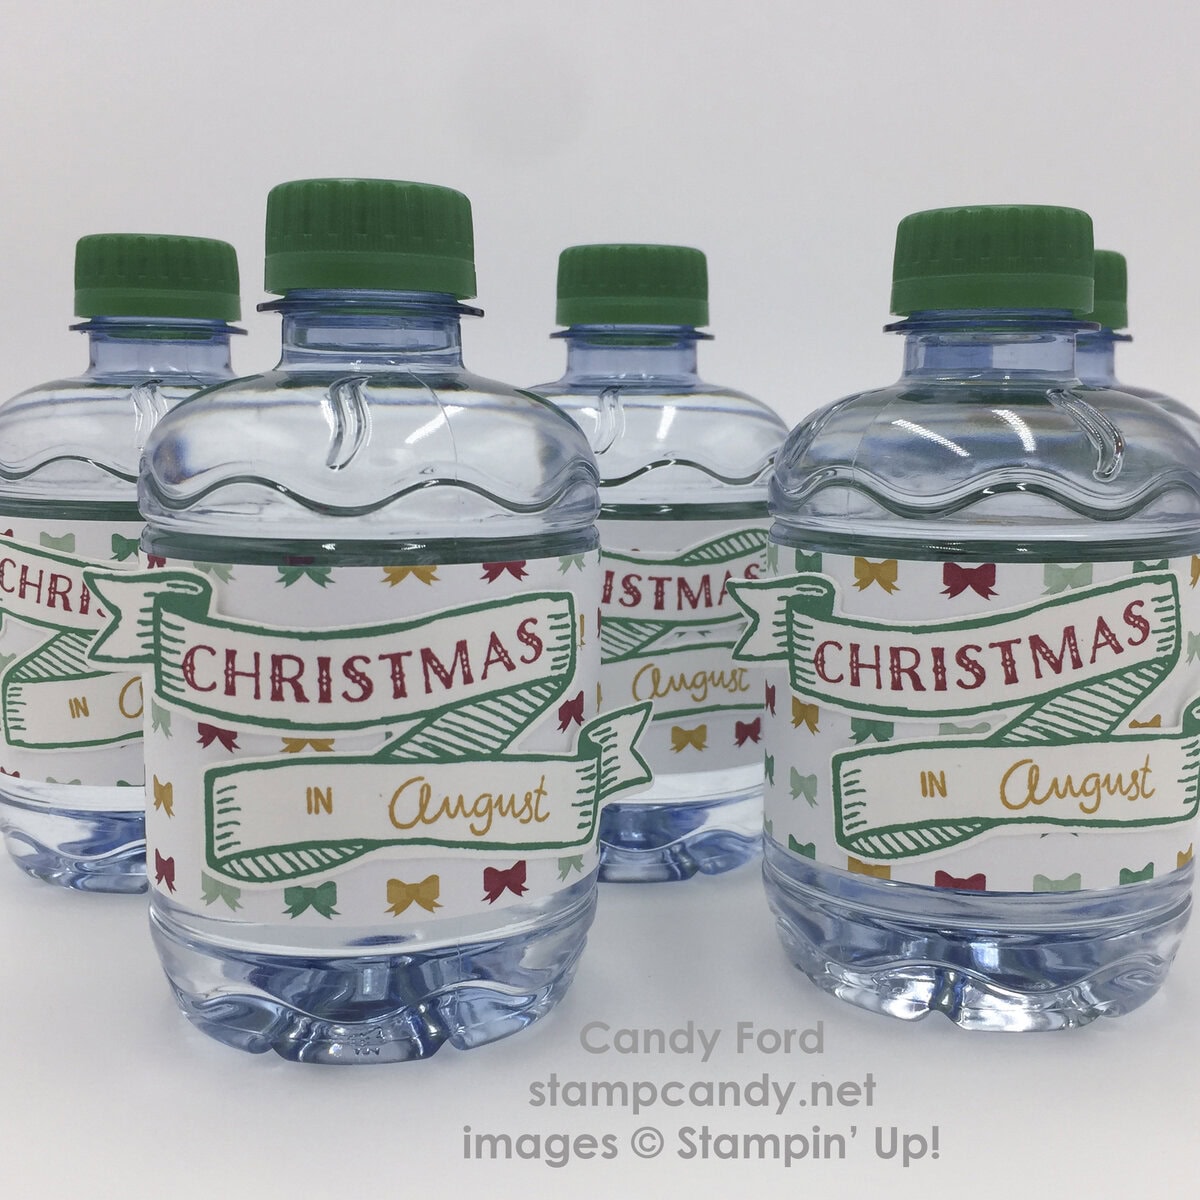
I always decorate bottles of water for my classes, not only because attendees need to stay hydrated, but mostly to let them know how special I think they are, and how much I appreciate them. My Christmas in August card class was this Sunday, and I thought I would share those bottles with you today.
I used to buy larger bottles, but too much was wasted. These smaller ones are just right. The brand doesn’t matter. Remove the original label and measure it. Cut your paper to that measurement, or maybe just a little longer.
Here’s how I did it:
These particular bottles are Dasani 10.1 fl.oz. I cut the 9″ x 2″ belly band from the new Presents & Pinecones Designer Series Paper. I put some Fast Fuse adhesive at each end, and wrapped it around the bottle.
I stamped the banner from the new Banners for Christmas stamp set in Emerald Envy ink onto Whisper White card stock. I then stamped “Christmas” from the same stamp set in Cherry Cobbler ink, and “in August” from the Project Life Date It stamp set in Delightful Dijon ink, inside the banner. Then I cut it out with the coordinating die from the Bunch of Banners Framelits. I attached the banner to the bottle with Fast Fuse, leaving just the two ends loose.
I recommend adding any ornamentation to the belly band after it’s on the bottle. If you add it before, it might pop off or stretch oddly when you curve the band around the bottle.
I hope this inspires you to do little things like this for your own events. Even just turning a boring old bottle of water into something that will make your guests feel special, since you went to the time and trouble (almost none of either, actually!) to create this for them.
Here’s what I used:
The first 2 items will be available when the new Holiday catalog goes live on September 1. Everything else is available now!
AUGUST HOSTESS CODE
PMTWBJMQ
If you are placing an order for less than $150, please use this Hostess Code. Click here for details on how to use the Hostess Code.If you are placing an order of $150 or more, you will receive Stampin’ Rewards on your order, so do not use the Hostess Code.
Thanks for stopping by today, and Sweet Stamping!

Aug 3, 2016 | Boxes, Events, Gallery, Gift Wrap, Gifts, Techniques |
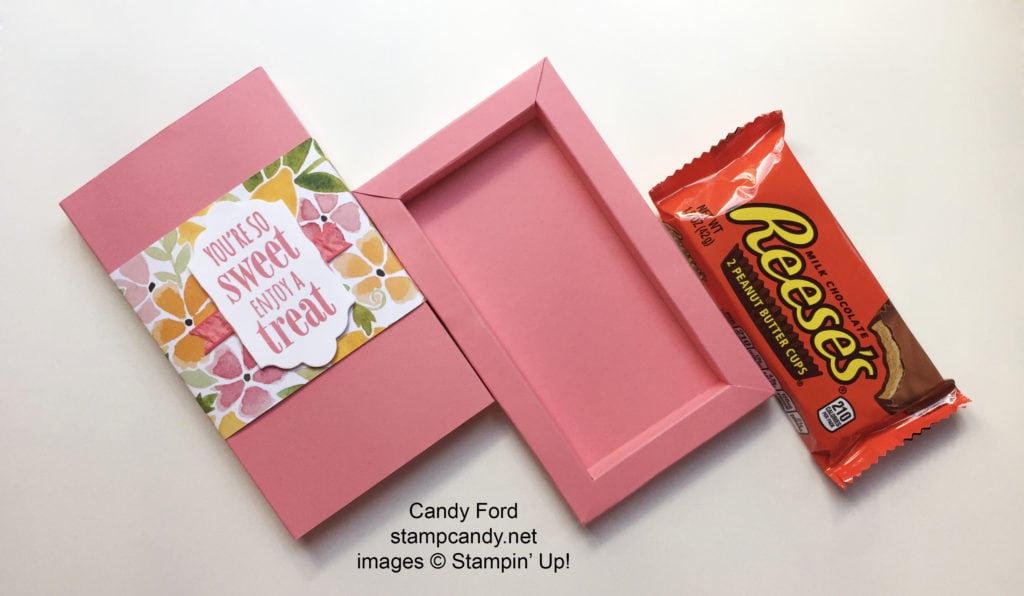
Today’s project was one of the Make & Takes in our July Candy Hearts Team Meeting. It’s a cute little treat box with a sliding tray.
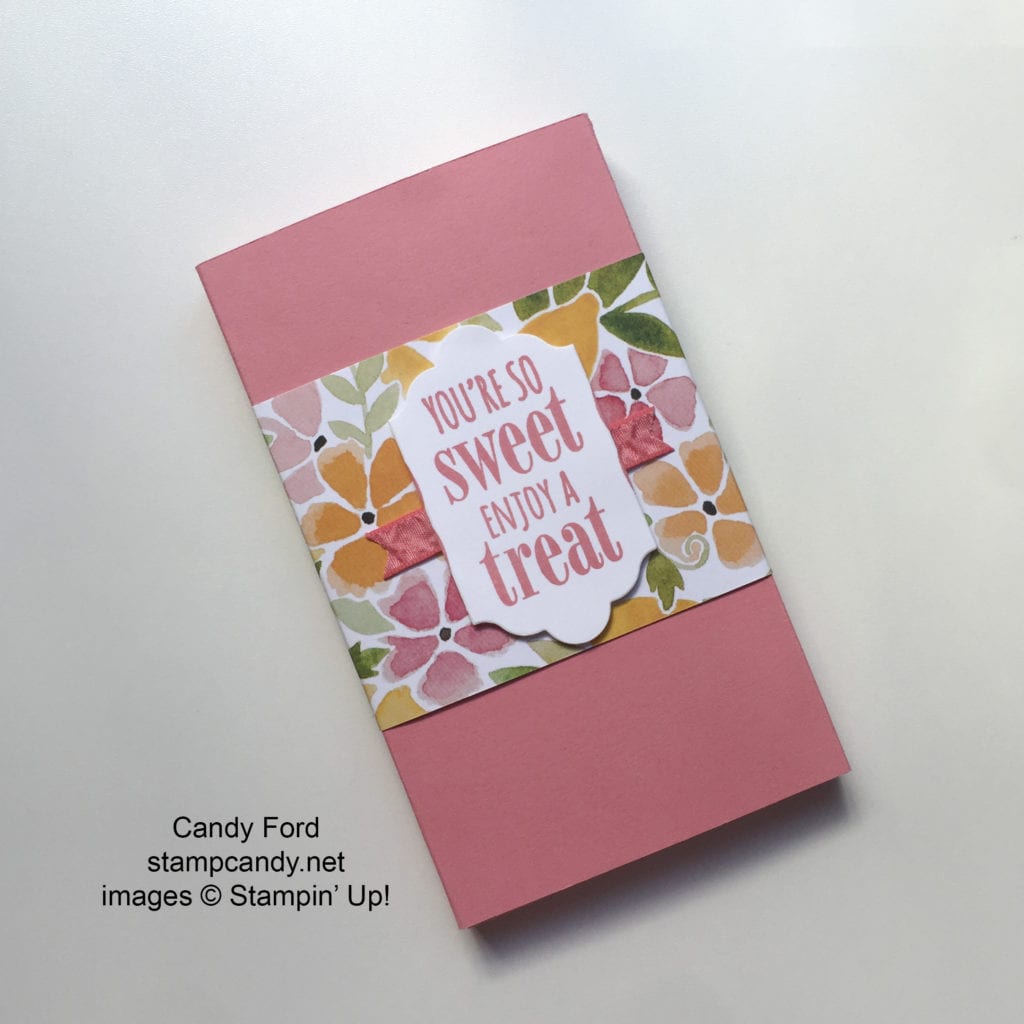
I designed this one to fit a pack of 2 large Reese Cups.
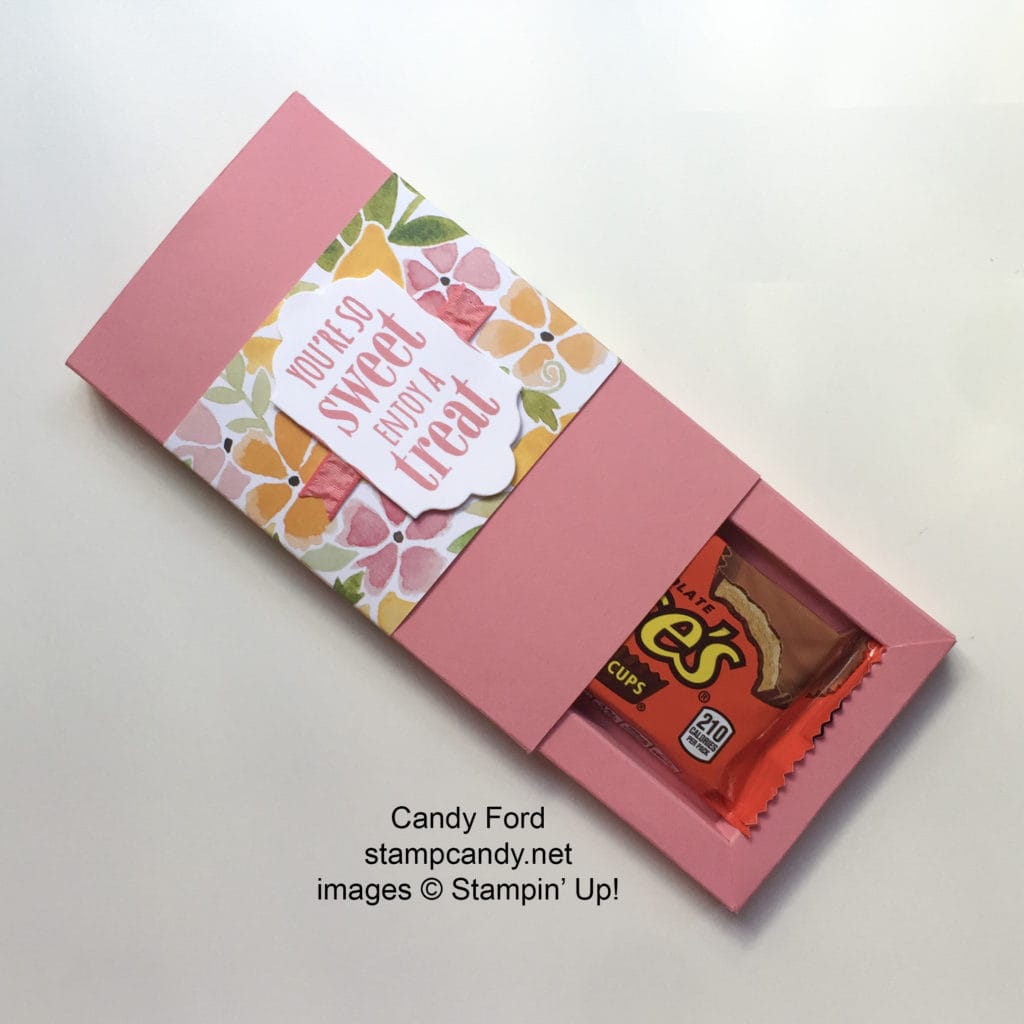
There are two parts to the box: the cover and the tray.
Here’s how I did it:
First determine the dimensions of your box. I measured a Reese’s cup package and determined I needed a box 2-1/2” wide x 5” long x 1/2” deep.
Create the tray:
Add the box depth x 10 to the width and to the length. So for the Reese cup box, the box depth is 1/2” and 1/2” x 10 = 5”. I added 5” to the width and to the length, so I cut my card stock to 7-1/2” x 10”.
Score 4 times from the edge of all four sides, the depth of the box each time. So I scored every 1/2” (the depth of my box.) I scored at 1/2”, 1”, 1-1/2”, and 2” on all four sides.
On the short sides, score one more time, 1/2” in from the last scores, but only down to the second score line. It should look something like this:
Cut the 16 (4 x 4) small squares made by the scored lines from each of the four corners (yellow areas.)
On the short sides cut down the two short scored lines, then cut diagonally down to the next corner (green areas.)

Discard all the pieces you have cut away.
Fold all score lines with a bone folder.
Now you’re ready to make the two long sides of the box. Turn up the scored side and put adhesive on the outermost strip. Roll toward the inside of the box, adhering that strip to the box bottom. Do the same thing on the other side.
Now make the two short sides of the box. Put adhesive on the outermost strip, just like before, and roll so that strip adheres to the box bottom. The skinnier center part will go between the two long sides, and the diagonal cut will lie on top of tip of the long side to create a mitered corner look. Do that on the other short side.
Create the cover:
Cut a piece of card stock the size you need to wrap around your tray and overlap by an inch or so. I cut mine to 6-1/8” wide (the length of my box plus 1/8”) by 10” long.
Wrap it around the tray, making sure it isn’t too snug, because it needs to slide on and off. Pinch where the bends need to be. Score and fold along the pinched areas. Wrap it around the tray and adhere the ends.
Now decorate:
I cut a piece of Fruit Stand Designer Series Paper to 3″ x 10″ and wrapped it around the cover, gluing it in place.
I stamped the sentiment from the You’re So Sweet stamp set in Flirty Flamingo ink onto Whisper White card stock, then cut it with a die from the Lots of Labels Framelits. I adhered a piece of Flirty Flamingo Ruched Ribbon to the cover with Fast Fuse, then adhered the sentiment over than with Stampin’ Dimensionals.
I realize these directions can seem a bit confusing. It’s much easier to show how to make this than to write it. Please contact me if you have any questions at all!
Here’s what I used:

AUGUST HOSTESS CODE
PMTWBJMQ
If you are placing an order for less than $150, please use this Hostess Code.
Click here for details on how to use the Hostess Code.
If you are placing an order of $150 or more, you will receive Stampin’ Rewards on your order, so do not use the Hostess Code.
Thanks for stopping by today, and Sweet Stamping!
Jul 26, 2016 | Cards, Events, Gallery, Guest Stamper, Tags |
This weekend was the July Candy Hearts Team Meeting. As usual we had a lot of fun, with snacks and prize drawings and Make & Takes. Another thing we do every month is have a card swap. Today I’m sharing the July cards.

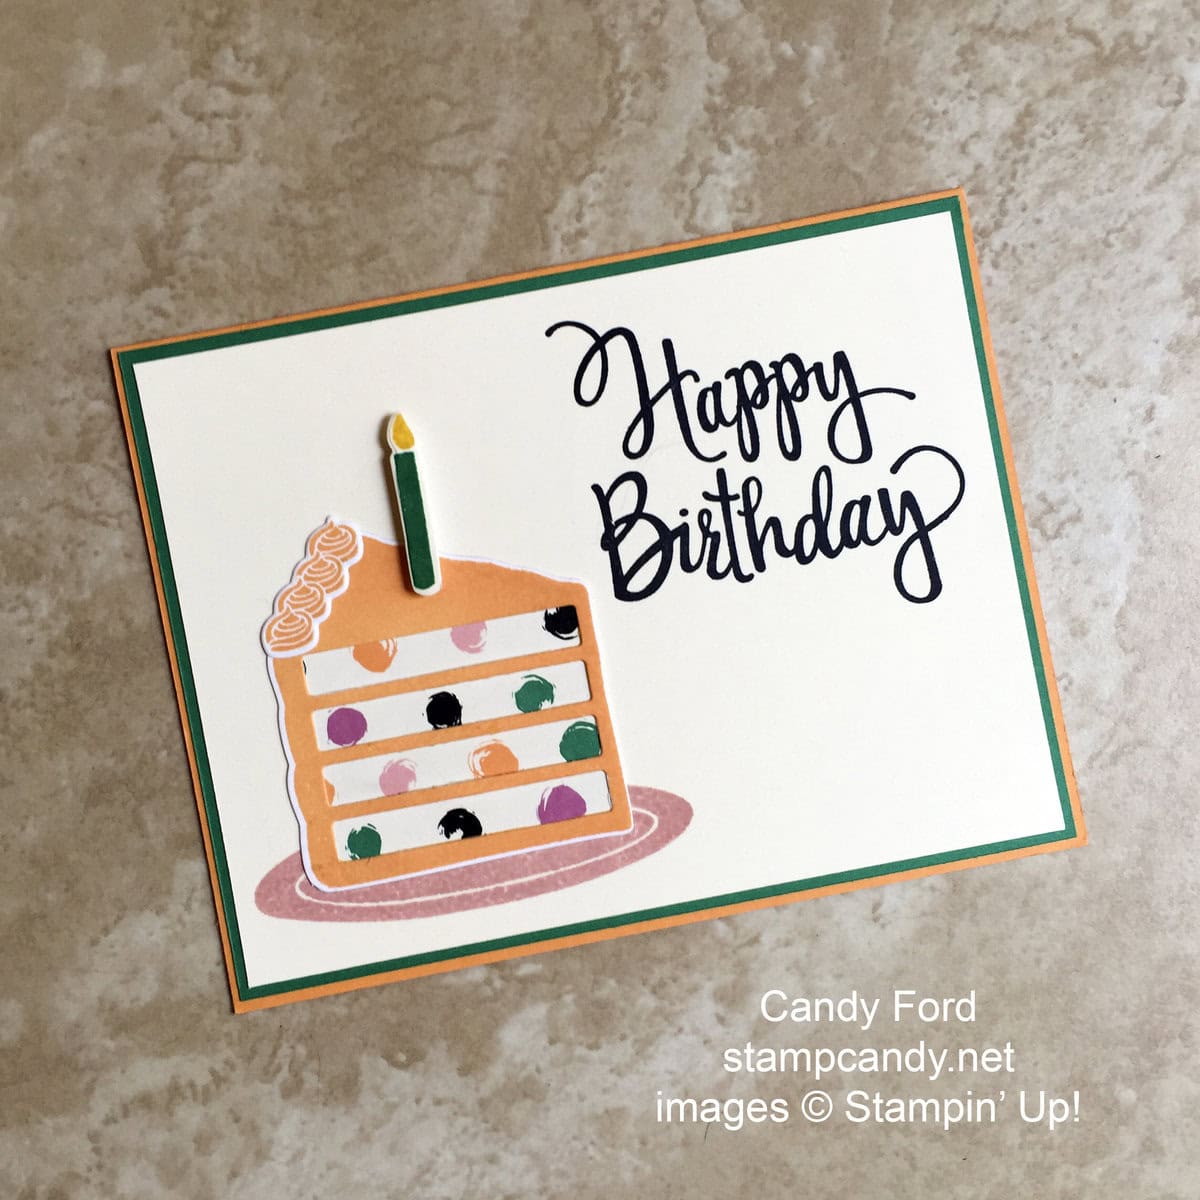
For this birthday card, I used the Biggest Birthday Ever bundle (Biggest Birthday Ever stamp set and Wish Big Framelits dies,) the Stylized Birthday stamp, Playful Palette Designer Series Paper, card stock (Peekaboo Peach, Emerald Envy, and Very Vanilla,) and inks (Blushing Bride, Emerald Envy, Crushed Curry, and Basic Black.) The candle is adhered with a piece of a Foam Adhesive Strip.

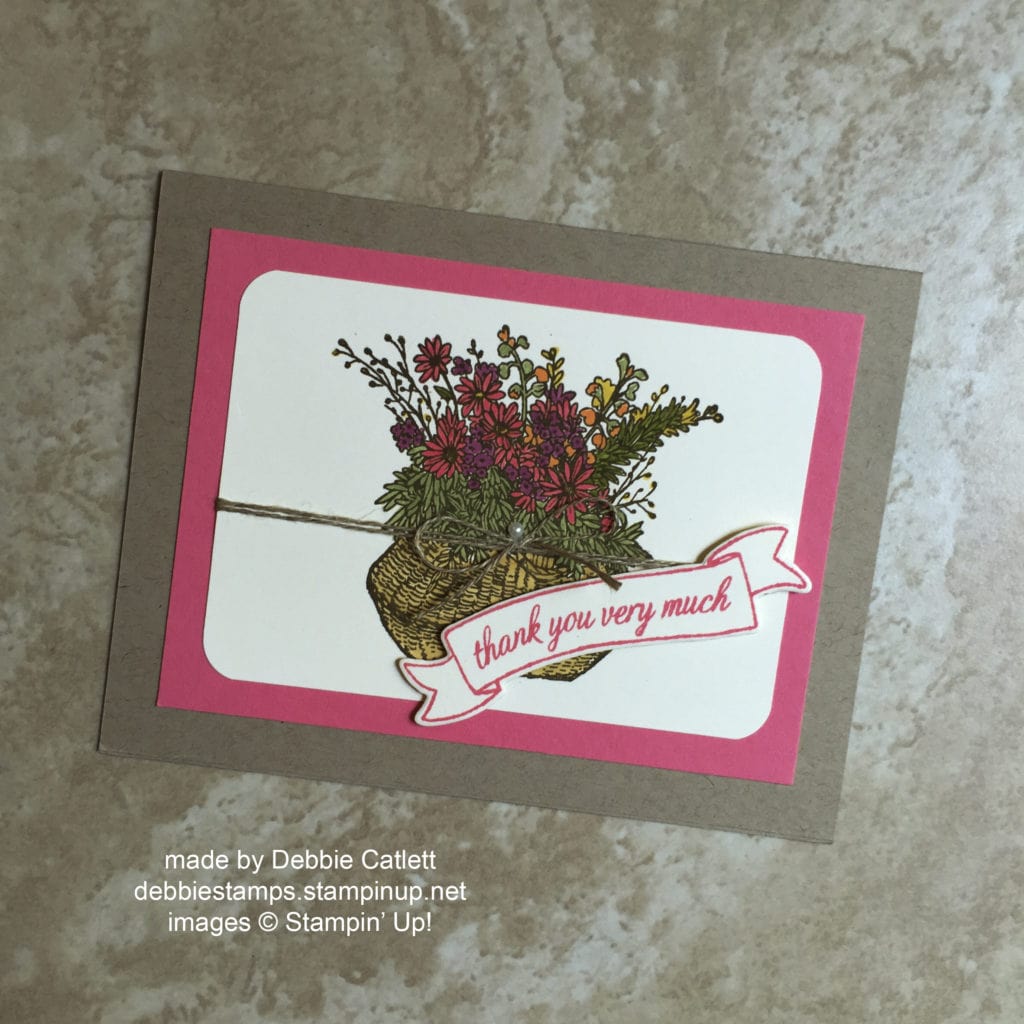
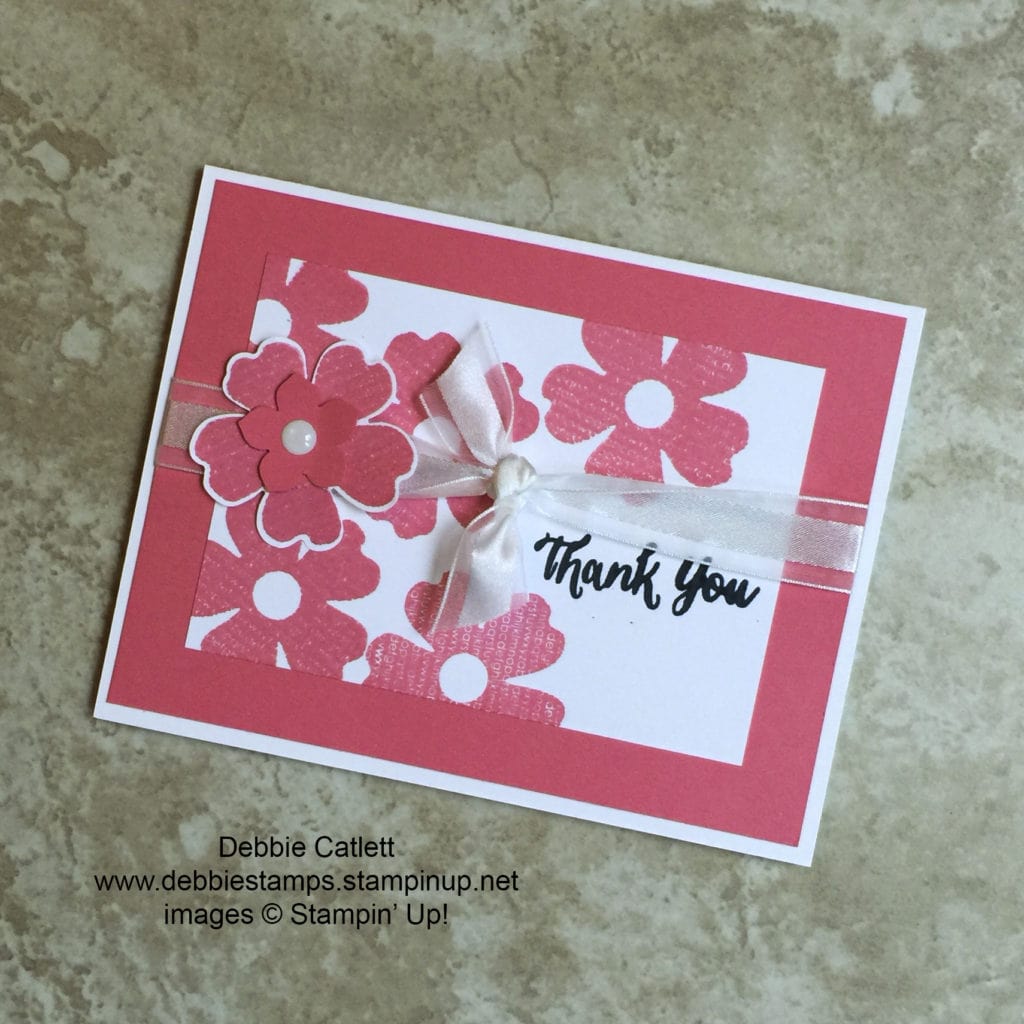
Debbie used the Basket for You stamp set, Bunch of Banners Framelits, Linen Thread, card stock (Crumb Cake, Melon Mambo, Whisper White,) Melon Mambo ink, Stampin’ Write Markers, and a Pearl Basic Accent.
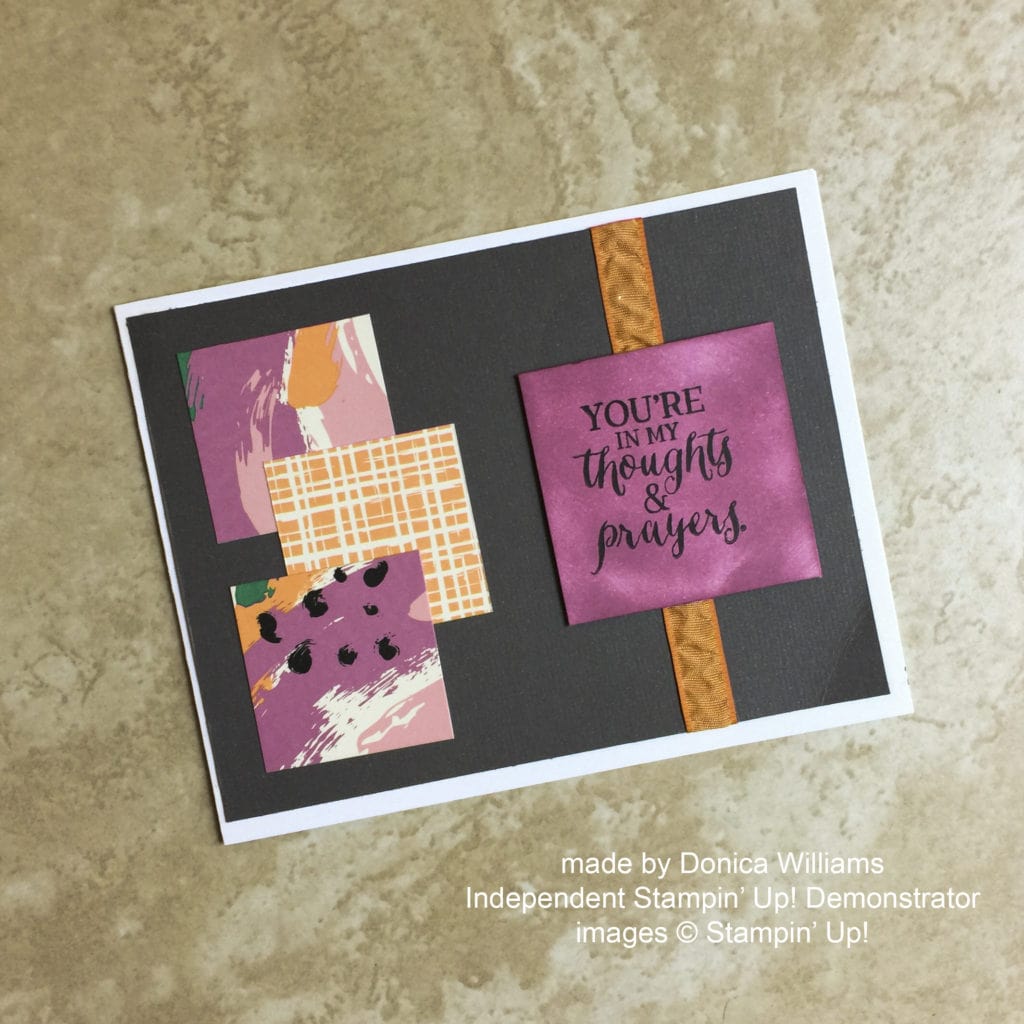
Donica used the Rose Wonder stamp set, Playful Palette DSP, Peekaboo Peach Ruched Ribbon, and card stock (Whisper White, Basic Gray.)
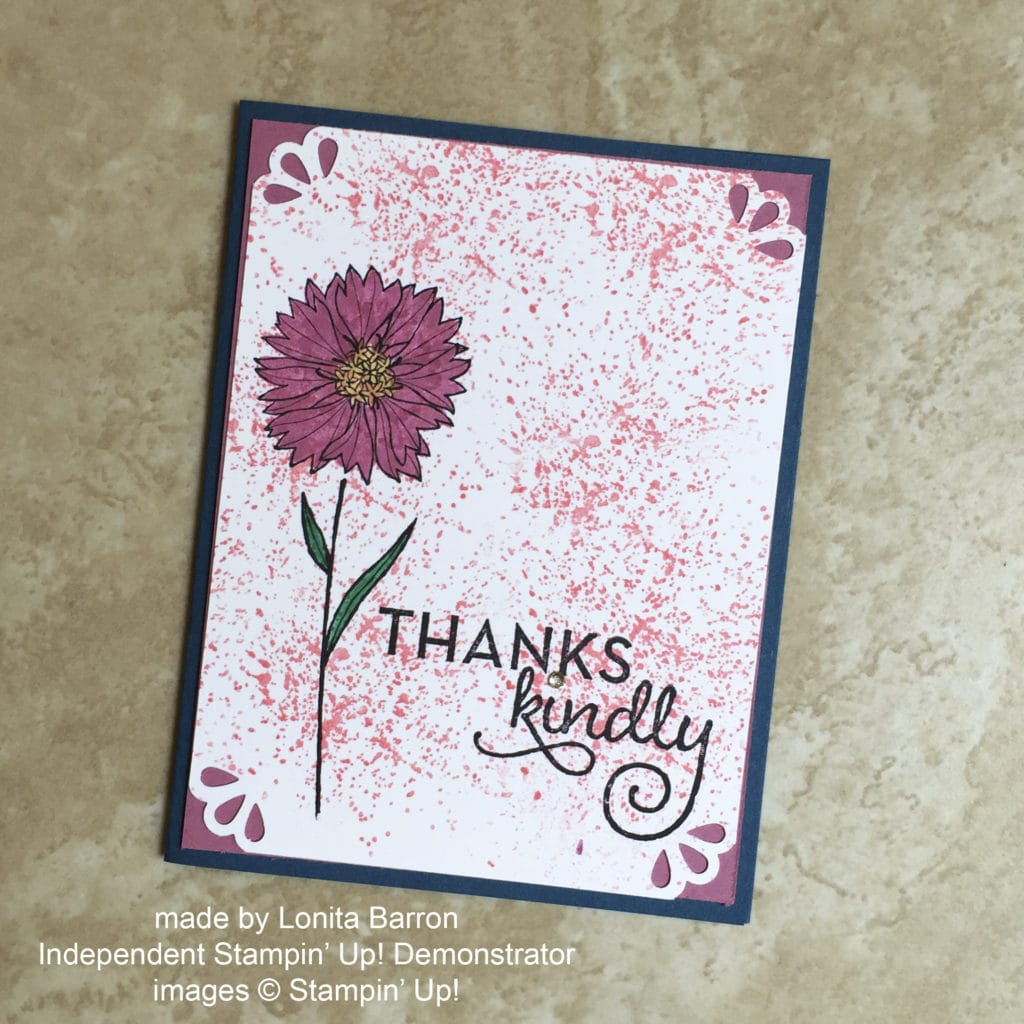
Lonita used the One Big Meaning and the Touches of Texture stamp sets, card stock (Dapper Denim, Sweet Sugarplum, Whisper White,) and inks (Emerald Envy, Sweet Sugarplum, Basic Black.)
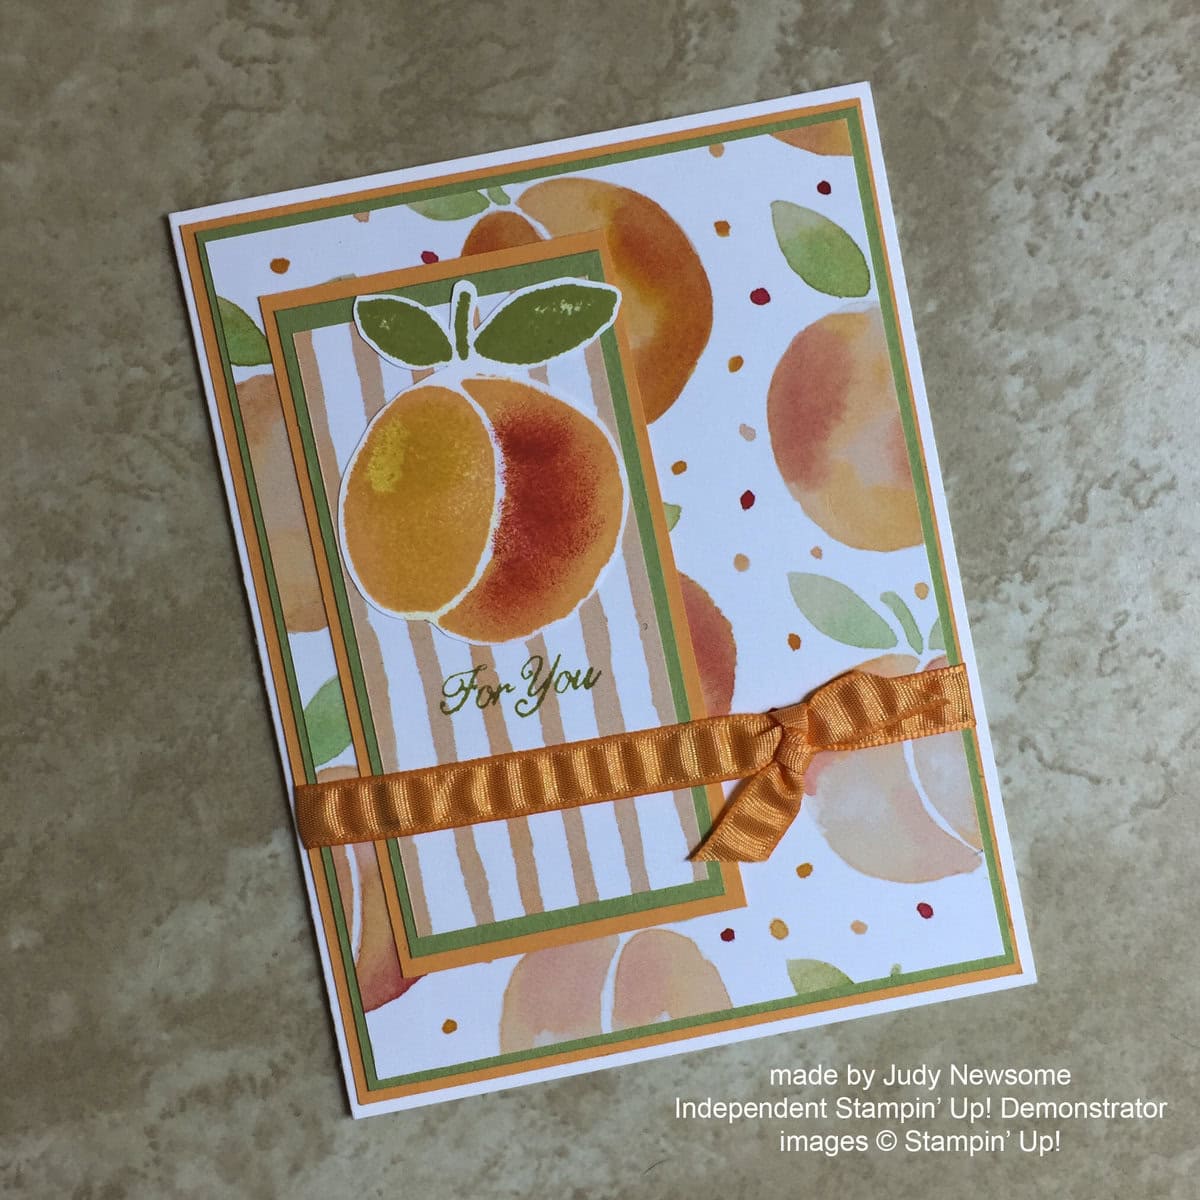
Judy used the Fresh Fruit and the Gift of Love stamp sets, Fruit Stand DSP, Peekaboo Peach Rushed Ribbon, card stock (Whisper White, Peekaboo Peach, Pear Pizzazz,) and inks (Pear Pizzazz, Peekaboo Peach, Tangerine Tango.)

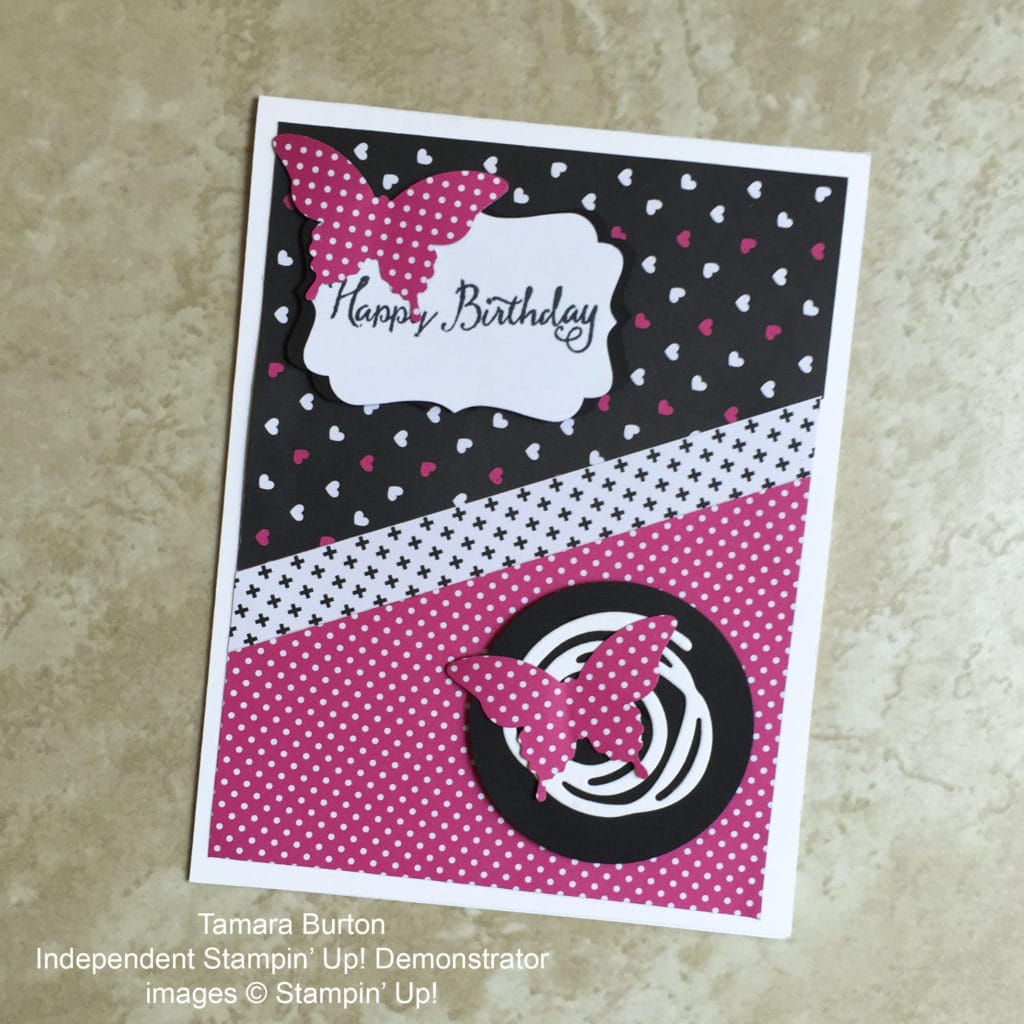
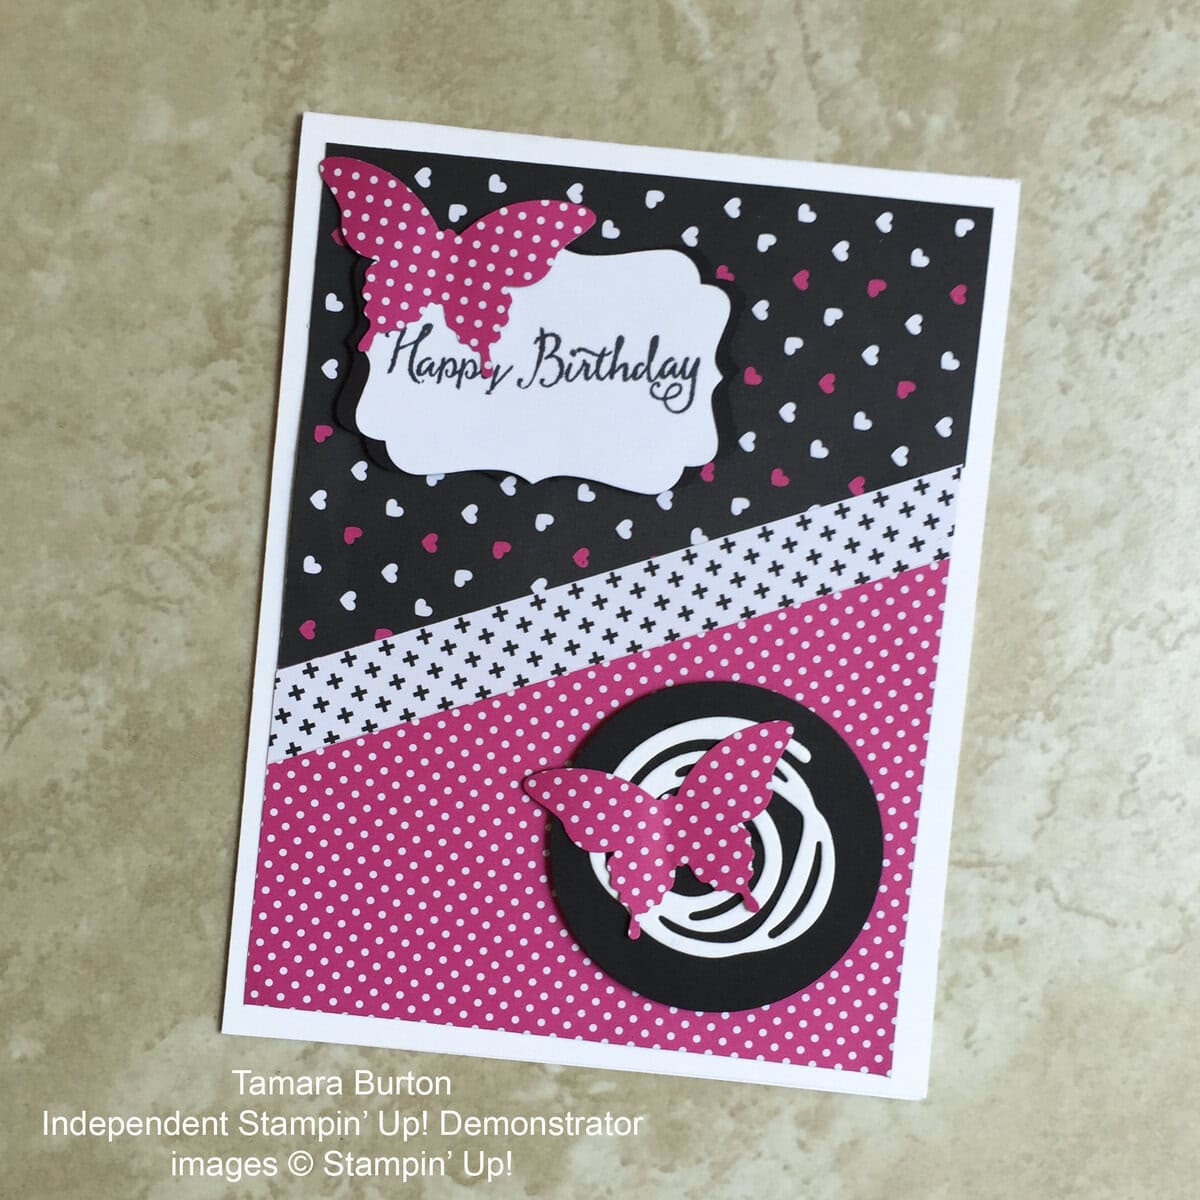
Tamara used the Balloon Celebration stamp set, Pop of Pink DSP, Swirly Scribbles Thinlits, Elegant Butterfly Punch, card stock (Basic Black, Whisper White,) and Basic Black ink.
The Candy Hearts are a very talented group, and I hope you’ve enjoyed these cards.
Thanks for stopping by today, and Sweet Stamping!
Jul 1, 2016 | Classes, Events, Scrapbooking |

Here are my events coming up in the next few months:
July 6 – Stamp Club – RSVP by July 3
$25 minimum order, 6 month commitment
July 9 – Stamp Club Weekend Edition – RSVP by July 3
$25 minimum order, 6 month commitment
July 17 – Candy Hearts Team Meeting – RSVP by July 14
(demonstrators or prospective demonstrators only)
$5 (your first time is free)
July 18 – Card Smorgasbord – RSVP by July 15
Make any 6 cards for $15. You can make extras at $2.50 each.
July 23 – Memory Keeping Class – RSVP by July 20
$34 –cover a 6×8 album and create inserts for 24 pages (12 double sided)
July 24 – Christmas in July – Prepay by July 17
$30 – Create 12 Christmas cards (4 each of 3 different designs)
July 25 – Paper Pumpkin Party (for June kit) – RSVP by July 22
Bring your July Paper Pumpkin kit and we’ll assemble them together.
$5 class fee (FREE if you are my subscriber or my team member)
July 26 – Jar of Love Bundle Class – Prepay by July 12
$62 and you get to keep the stamp set & the dies!
If you own the bundle and bring it to class, you can make the projects for $15!
Aug 3 – Stamp Club – RSVP by July 31
$25 minimum order, 6 month commitment
Aug 6 – Stamp Club Weekend Edition – RSVP by July 3
$25 minimum order, 6 month commitment
Aug 15 – Card Smorgasbord – RSVP by Aug 12
Make any 6 cards for $15. You can make extras at $2.50 each.
Aug 20 – Memory Keeping Class – RSVP by Aug 17
$18 – use Good Vibes set to create 12×12 layouts: one 2-page and two 1-page (page protectors included)
Aug 21 – Candy Hearts Team Meeting – RSVP by July 14
(demonstrators or prospective demonstrators only)
$5 (your first time is free)
Aug 23 – Foxy Friends Bundle Class – Prepay by Aug 9
$52 and you get to keep the stamp set and punch!
If you own the bundle and bring it to class, you can make the projects for $15!
Aug 25 – Paper Pumpkin Party (for June kit) – RSVP by July 22
Bring your August Paper Pumpkin kit and we’ll assemble them together.
$5 class fee (FREE if you are my subscriber or my team member)
Sep 7 – Stamp Club – RSVP by Sep 4
$25 minimum order, 6 month commitment
Sep 10 – Stamp Club Weekend Edition – RSVP by Sep 4
$25 minimum order, 6 month commitment
Sep 17 – Memory Keeping Class – RSVP by Sep 14
$18 – use Blooms & Bliss paper to create four 1-page traditional 12×12 layouts
Sep 18 – Candy Hearts Team Meeting – RSVP by Sep 15
(demonstrators or prospective demonstrators only)
$5 (your first time is free)
Sep 19 – Card Smorgasbord – RSVP by Sep 16
Make any 6 cards for $15. You can make extras at $2.50 each.
Sep 27 – Best Birds Bundle Class – Prepay by Sep 13
$58 and you get to keep the stamp set and dies!
If you own the bundle and bring it to class, you can make the projects for $15!
Sep 29 – Paper Pumpkin Party (for June kit) – RSVP by July 22
Bring your September Paper Pumpkin kit and we’ll assemble them together.
$5 class fee (FREE if you are my subscriber or my team member)
Please contact me with any questions or for payment information: candy@stampcandy.net
Sweet Stamping!

May 17, 2016 | Cards, Events, New Products, Retiring Products |

At the May Candy Hearts gathering, one of the Make & Takes was one card in each of the five new In-Colors. I only made one example card, so I’m sharing the cards made by my team member, Debbie Catlett, from Chattanooga, TN.
The card bases are Thick Whisper White card stock. The sentiments are from the Rose Wonder stamp set and are stamped in Black Memento ink.
Flirty Flamingo:
Emerald Envy:
Peekaboo Peach:

Sweet Sugarplum:
I’m sorry I didn’t get anything posted yesterday. We flew all Saturday night, and I cannot sleep on a plane. We got to the hotel in time for Sunday lunch. I had the Sunday roast lamb with all the trimmings – When it came to the table it looked like enough food for several people, but I was hungry and almost finished it off. Well, then I was so full, and tired, that I had to have a nap.
At dinner I ordered something much lighter, but they got my order wrong, yada yada yada, so I ended up with another Sunday roast meal (pork this time.) I was so full and tired after that, I couldn’t even stay awake to post. Since we’re 5 hours ahead here, I probably could have worked on it the next morning, but I ended up sleeping until 4:30 in the afternoon! That’s what long red-eye flights do to me.
I do have Internet access in the hotel room, but I’m having trouble getting some photos to upload. For example, I wanted to share 5 photos with you today, but only 4 of them would upload. Sorry you didn’t get to see the Dapper Denim card.
Here’s what we used for today’s 5 cards:
 There are only 14 days left to shop from the 2015-2016 Annual Catalog’s Retiring List! Click here to see what is still available.
Thanks for stopping by today, and Sweet Stamping!

May 14, 2016 | Events |

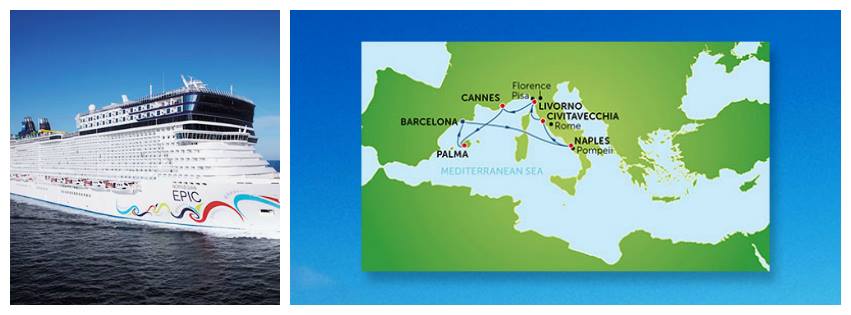
Hello, Sweet Stampers!
I am thrilled because my hubby and I are about to leave for a wonderful trip, including a week in London then the Mediterranean Cruise that I earned through Stampin’ Up! last year. I plan to eat some fabulous food, see some spectacular sights, spend time with my fellow Stampin’ Up! Demonstrators, and of course, spend time with my wonderful husband.
We’ll be gone for a couple of weeks. I don’t know what my Internet situation will be while I’m gone. I have photos of projects on my laptop, but I need to write and schedule the posts. Hopefully I will have a good connection, at least in London, and can get them posted. But if you don’t hear from me at any point during the next couple of weeks, that’s why.
Sweet Stamping!


