Sep 27, 2015 | Boxes, Challenges, Christmas, CYCI, Gift Wrap, Gifts, Holiday, Techniques |
With this week’s CanYouCaseIt.com Designer’s Choice challenge, you can make whatever you want!

Be sure to check out all the great projects here. Here’s mine.
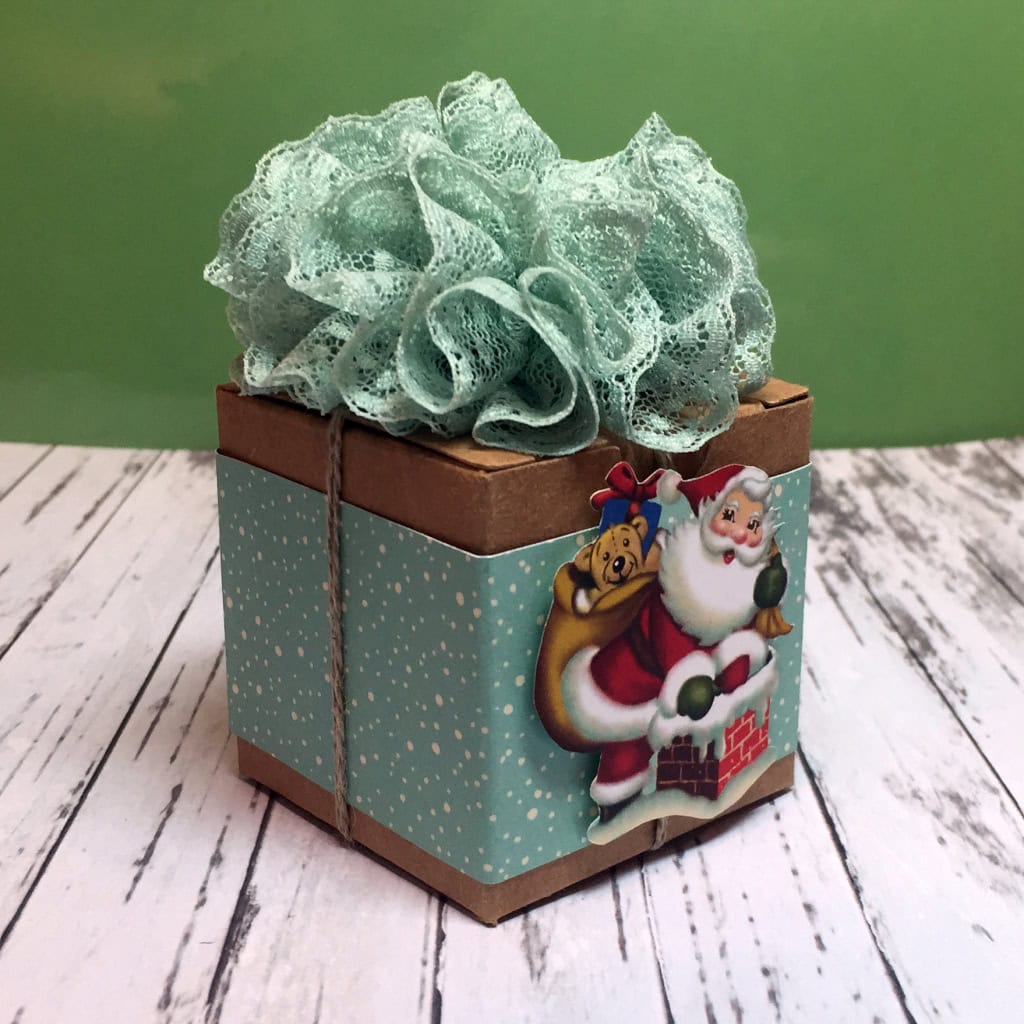
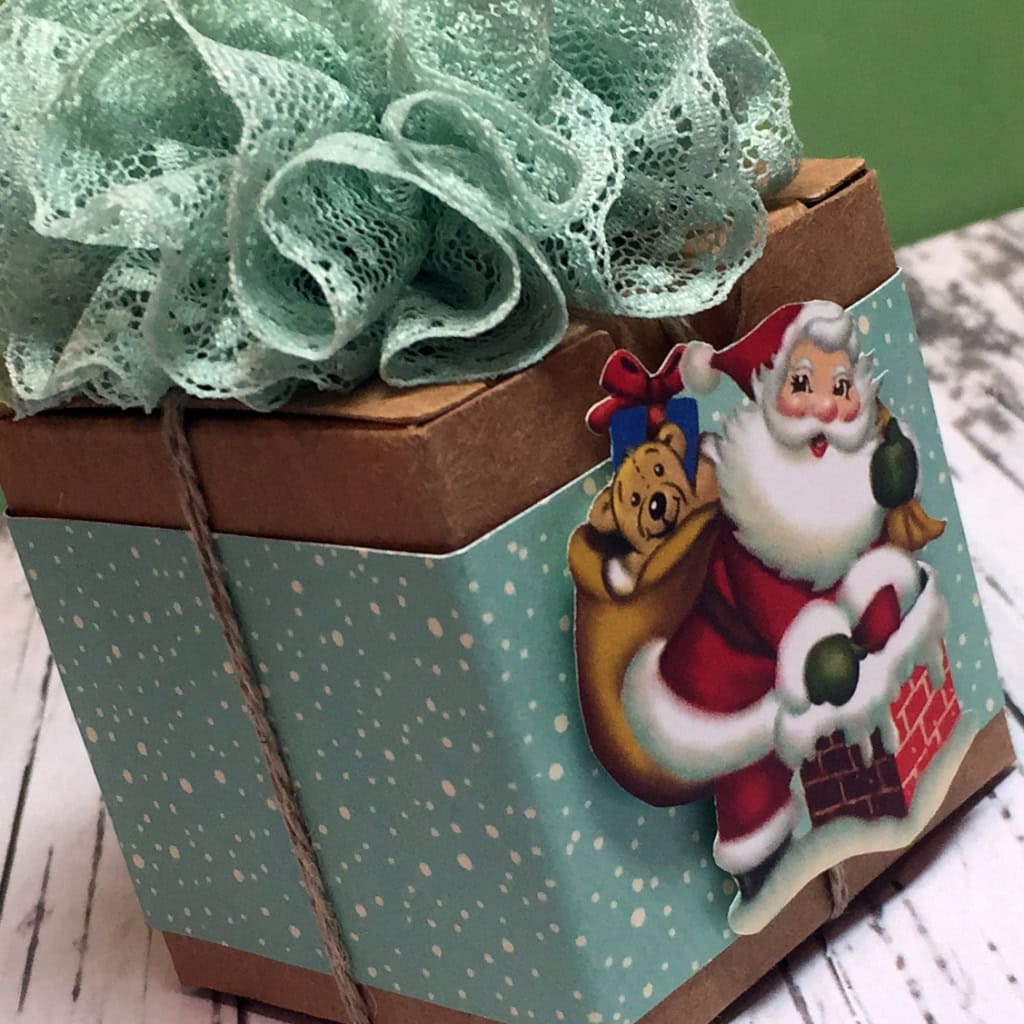
I just love these Tiny Treat Boxes. They’re so versatile. They are a great size for little treats and small gifts. (A Pandora charm box fits in perfectly.) You can use them individually, or stack them together to make an Advent calendar, for instance.
Today I’ve wrapped one with a belly band made from Home for Christmas Designer Series Paper. I used my Paper Snips to fussy cut a Santa from the same DSP, then attached it with Stampin’ Dimensionals.
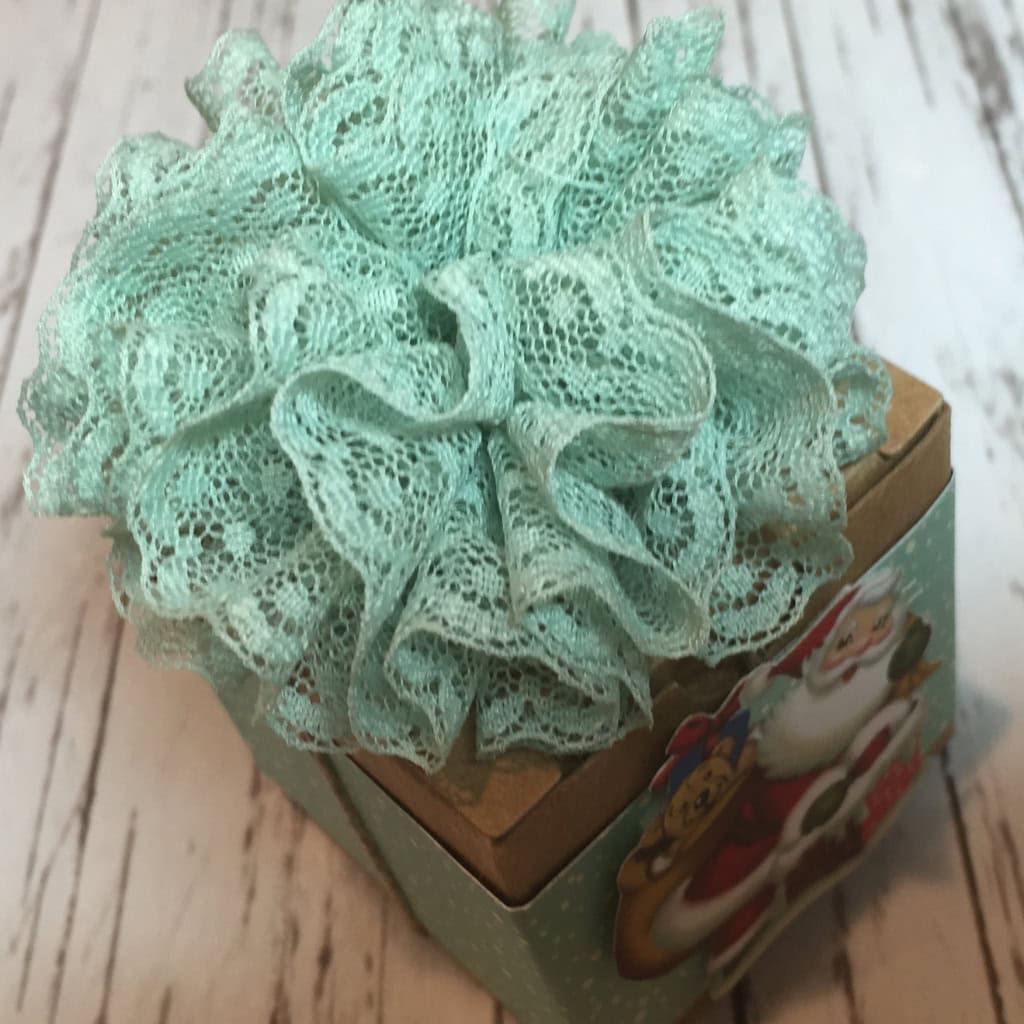
I tied up the box with Linen Thread and topped it with a pompom made of Mint Macaron 1″ Dotted Lace Trim.
TECHNIQUE: The pompom is easy to make. Cut a length of the Dotted Lace Trim (I used about 6 feet) and use a needle and thread to gather it along the straight edge. I used Linen Thread and a floss threader, because I had it at hand. Just gather it up and tie it off, then tie onto the box.
Here’s what I used:
I love hearing from you! Please leave your comments and questions below.
Thanks for stopping by today, and Sweet Stamping!
Sep 26, 2015 | Boxes, Christmas, Classes, Deals, Gift Wrap, Holiday, New Products |

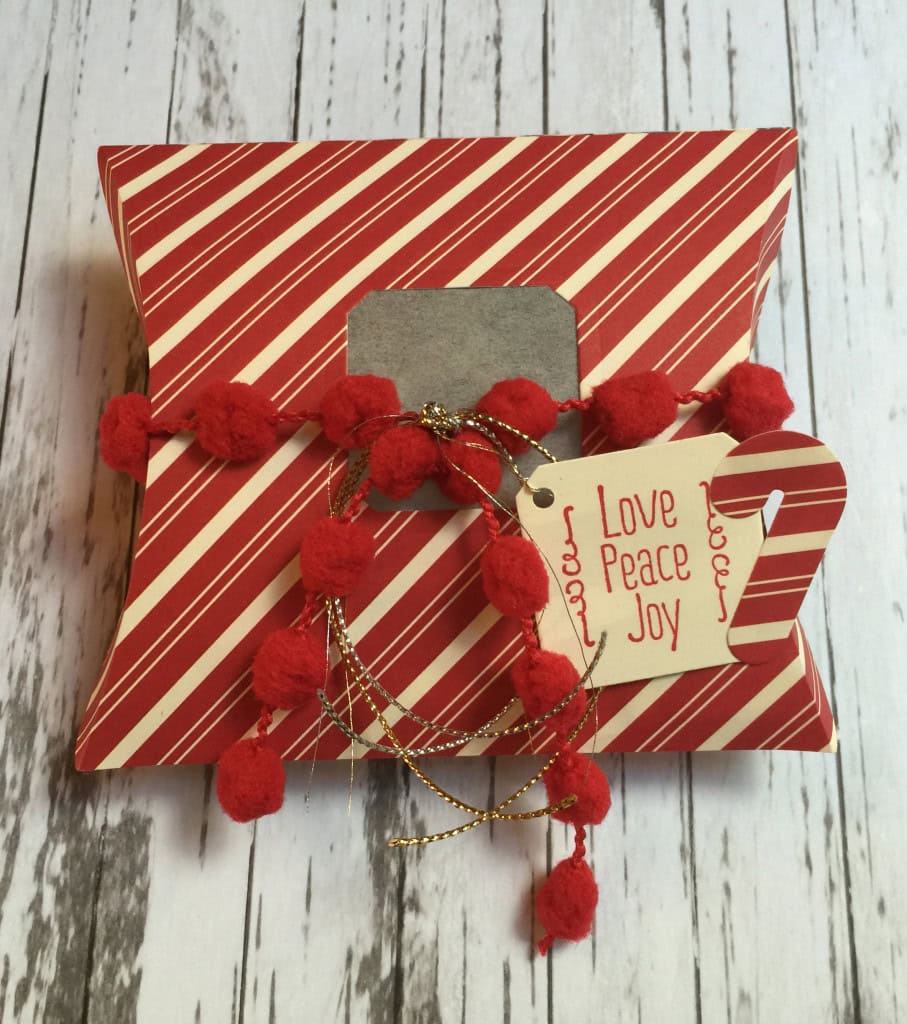
Need an adorable gift box in a hurry? The Square Pillow Box is your answer. This 5-15/16″ x 4-5/8″ box is perfect for all those small gifts and sweet treats you’ll be giving this holiday season. You can cut it from different paper for any time of year. It would be great cut from Happy Haunting Designer Series Paper for Halloween treats!
Today I’ve made it with Home For Christmas DSP. I love the festive stripes in Real Red and Very Vanilla. I cut a small window in one side and covered it with Vellum Card Stock so the recipient can get just a sneak peek of what’s inside.
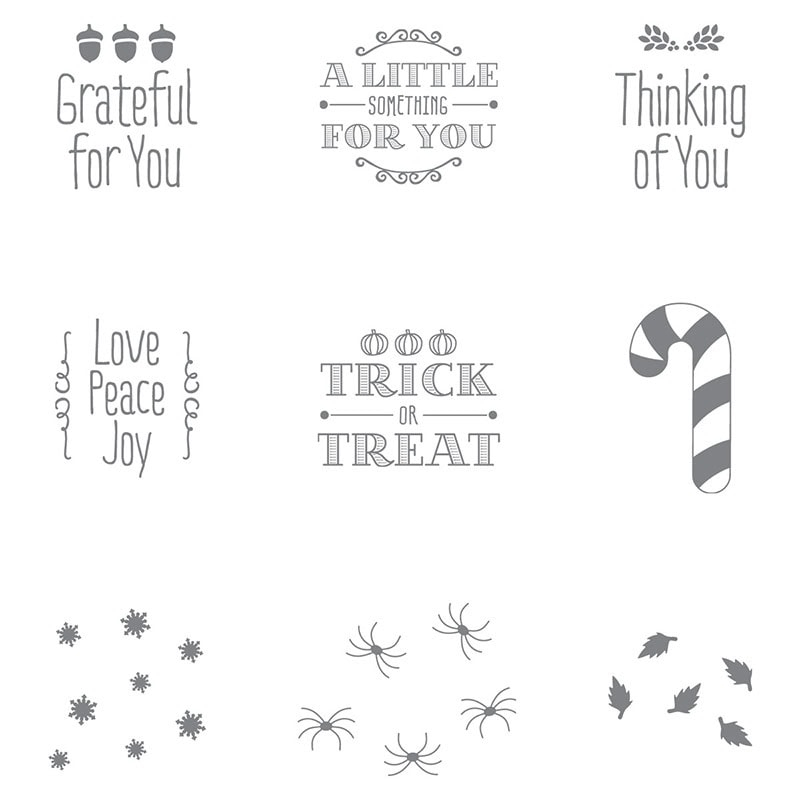
I used the same window die to cut the tag from Very Vanilla CS. I punched a hole with the 1/8″ Circle Punch to attach it to the box. The sentiment is from the A Little Something stamp set. I used the DSP piece cut from the window to cut the candy cane, and glued it onto the tag.
BUNDLE!!! You can buy the Pillow Box Thinlits Dies and A Little Something stamp set together in a bundle to save 15%! I looooooove bundles!
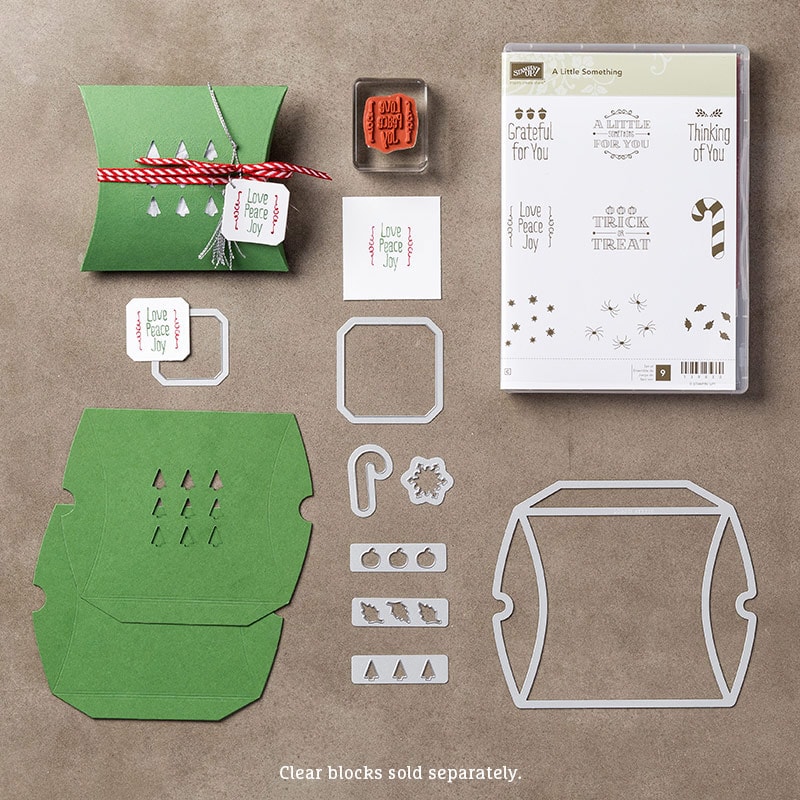
I tied some Real Red Pompom Trim around the box. Then I tied on pieces of Gold and Silver Cording Trim and Gold and Silver Metallic Thread, using one piece to tie on the tag.
The box is super easy to assemble. Cut two pieces with the box die. Fold in the flap on each one and apply Tear & Tape along the flap. Flip one piece over onto the other one and stick together. Fold in the ends of the box and you’re done.
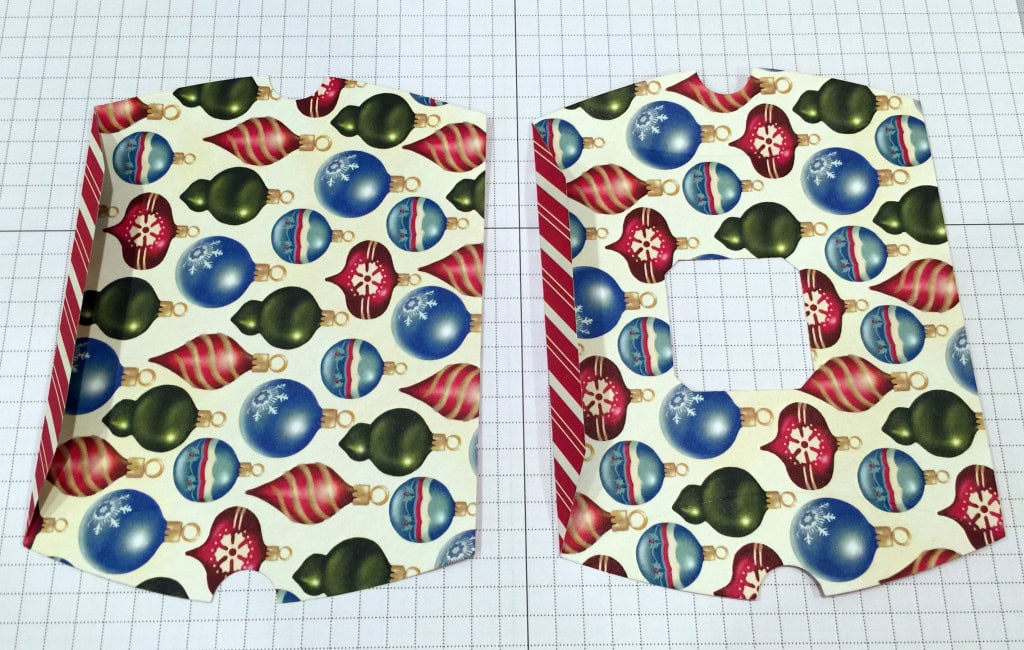
TIP: If you want a window or anything else cut in the side of the box, be sure to do that before you assemble the box. Also, be sure to cover the window from the inside before assembling.
Here’s what I used:
You can make this plus 11 different cards in my Christmas Bundle Up Class. I’m hosting one this Saturday, September 26, at 12:30. You’ll use 12 of the new Christmas Bundles. Bring your scissors and adhesive and I provide everything else. All for only $30! R.S.V.P. by Friday so I’ll have enough projects prepared.
I love hearing from you! Please leave your questions and comments below.
Thanks for stopping by today, and Sweet Stamping!
Sep 22, 2015 | Bags, Christmas, Classes, Gift Wrap, Gifts, Holiday, Kits, New Products, Workshops |

Need a gift bag super fast? No problem! Just grab your Gift Bag Punch Board and a piece of paper, and a minute later you’ll have one.
Now, need a tag for that bag? Get the Oh What Fun Tag Project Kit. I love having these tags on hand to put on those last minute gifts. The kit makes 30 tags, 3 each of 10 different designs, and they are so fun!
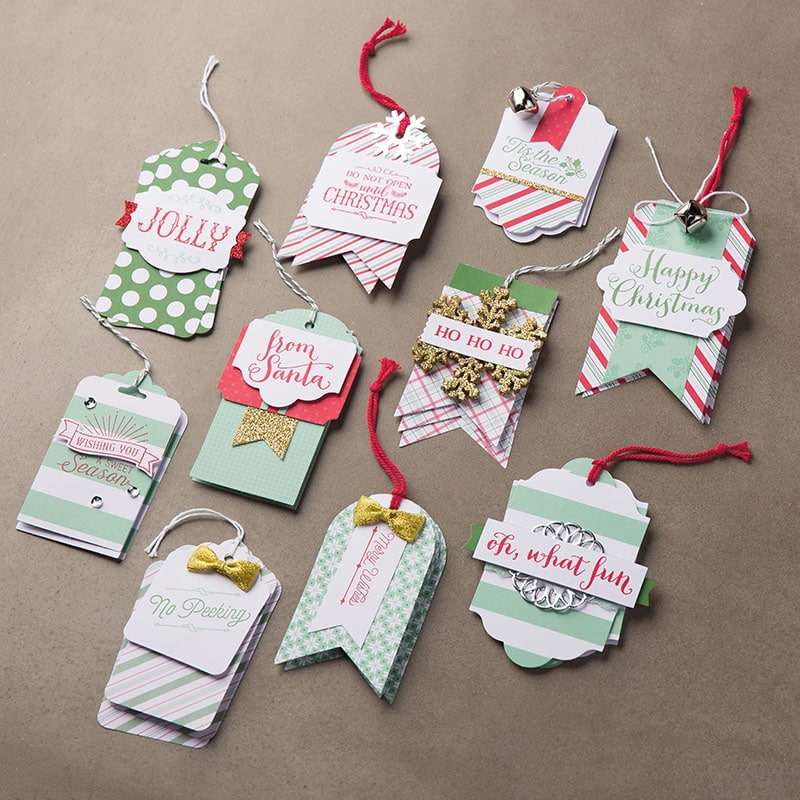
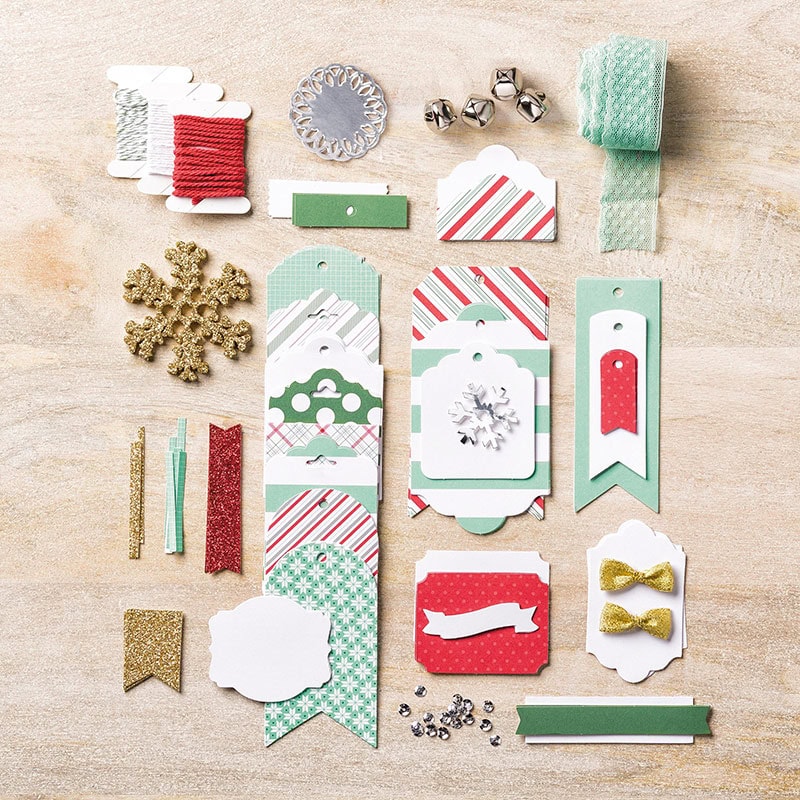
Here are just some of the items that come in the kit.
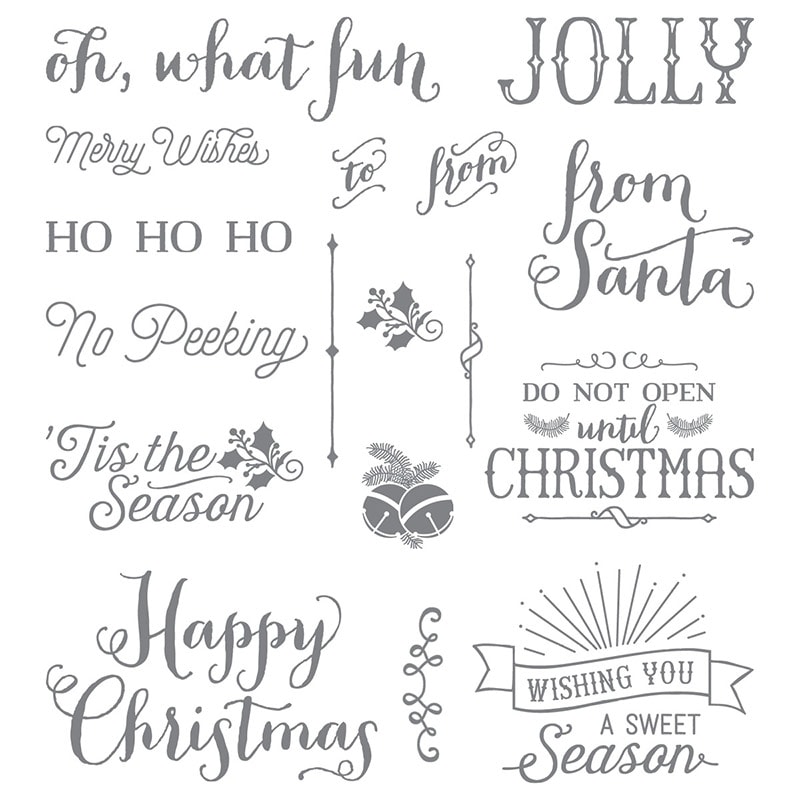
The Oh What Fun stamp set coordinates beautifully with the kit.
Spend a relaxing hour or two with this kit and stamp set, and you’ll have these great tags on hand whenever you need them.
Or better yet, invite some friends over, and if you’re in the Atlanta area, I’ll bring my stamps and inks, so you can each make 30 tags while enjoying time with friends and family. Email me (candy@stampcandy.net) so we can find a date that works for you! You can even earn Stampin’ Rewards as host!
If you aren’t local, have each person order their own kit, and split the cost of the stamp set and any other supplies you need. Ask me how to use a Hostess Code for your gathering so you can get free products!
The tag I used today has a jingle bell. How festive is that? I tied it onto a Mint Macaron gift bag that I made with, you guessed it, the Gift Bag Punch Board.

Here’s what I used:
Thanks for stopping by today, and Sweet Stamping!
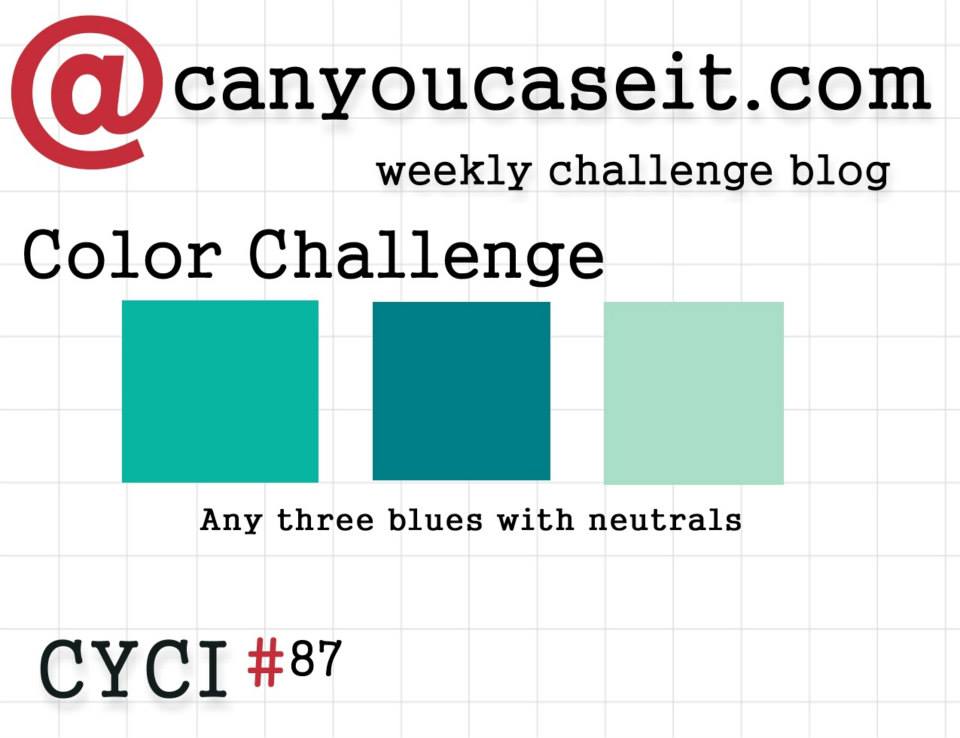
Sep 20, 2015 | Boxes, Challenges, Christmas, Color Palette, CYCI, Gift Wrap, Techniques |

CanYouCaseIt.com has a color challenge this week:
Here’s my project:
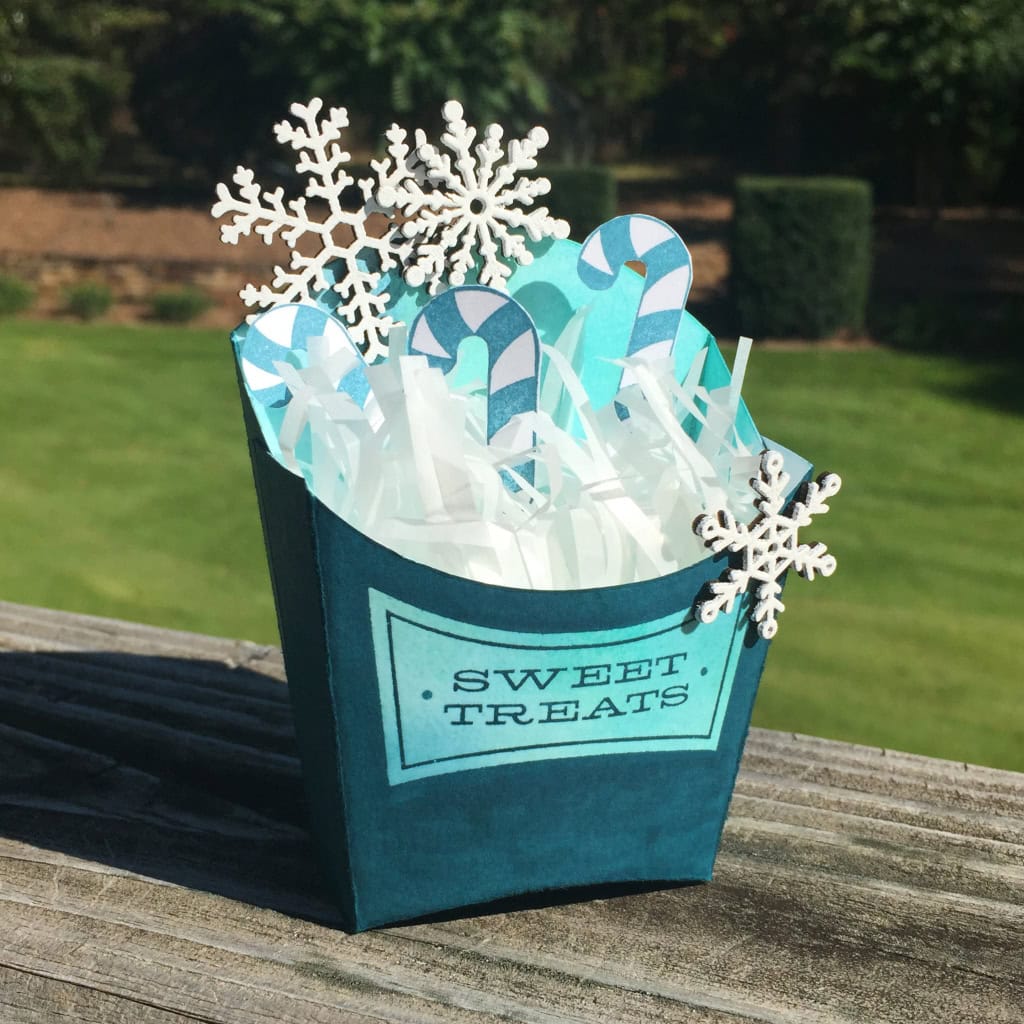
This would be perfect as a party favor, or for each place setting at a holiday gathering.
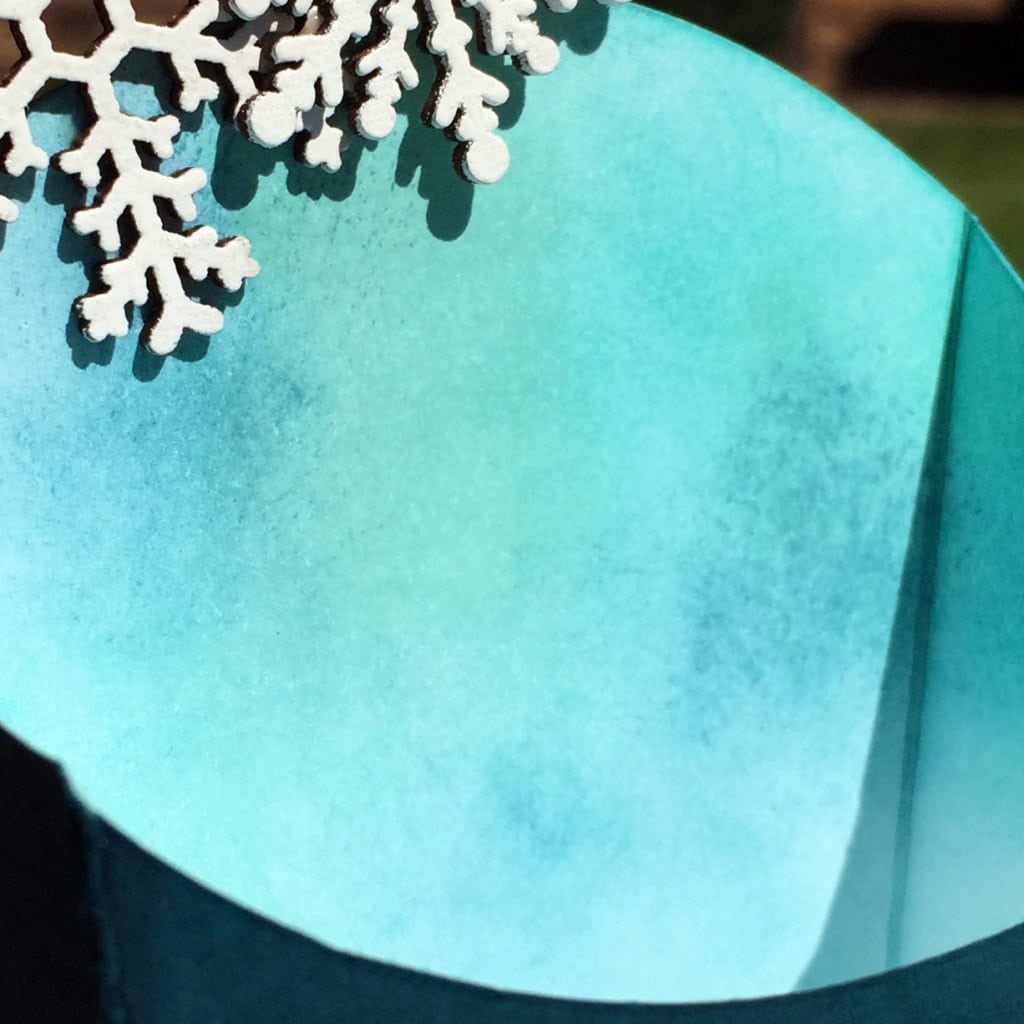
I used Soft Sky, Bermuda Bay, and Island Indigo as my three blues. I cut the Fry Box out of Whisper White Thick Card Stock. Then I sponged the whole thing, inside and out, with the three colors of blue for a marbled/mottled sort of look.
On the front of the box I stamped the sentiment in Versamark ink, then heat embossed it with Clear Stampin’ Embossing Powder.
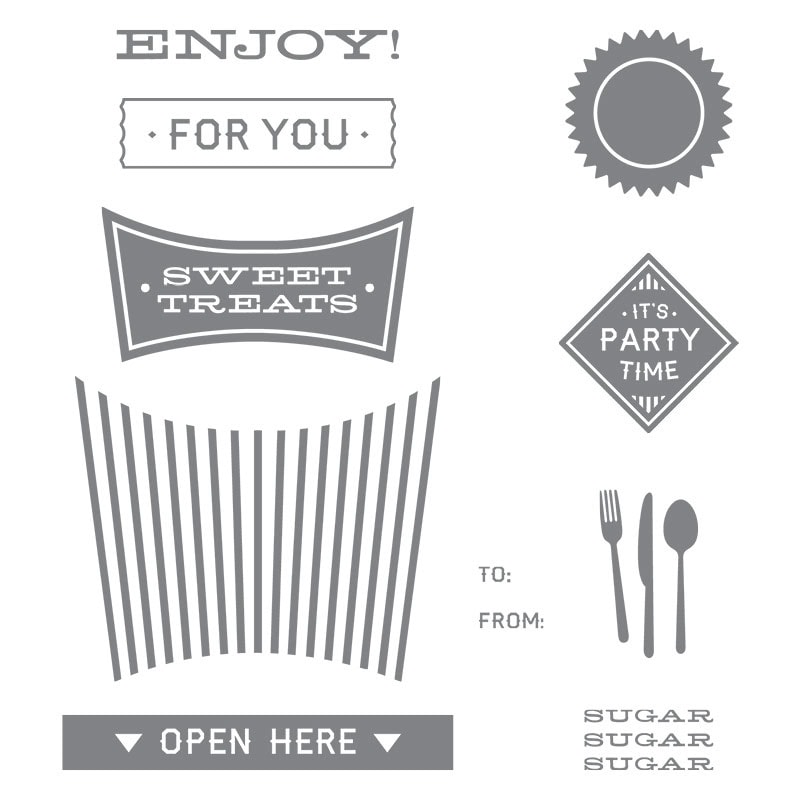
The All About Sugar stamp set is made to coordinate with the Fry Box Bigz L Die, and the two are available as a bundle to save 15%!
After heat embossing, I colored the entire exterior of the box with Island Indigo ink. This is called the Joseph’s Coat technique. There are a few ways to do this, but the two most efficient are 1) using a brayer, and 2) taking your ink pad directly to the paper. You could also use a Stamping Write Marker, but that will take longer. Be careful as you’re doing this, as the card stock can start to pill if it gets too wet. As it happened, I got it just wet enough to make the fibers stand up a tiny bt, so it looks like suede. I love happy accidents!
I assembled the box by adhering the sides with Tear & Tape. Now I had an Island Indigo Fry Box, with a mottled tri-color sentiment and interior.
The three snowflakes are from the new Snowflake Elements wooden embellishments. Holding each one with tweezers, I pressed it into the Versamark ink pad, then into White Stampin’ Emboss Powder, then heated it with my Heat Tool. I adhered them with Multipurpose Liquid Glue.
For the filler, I cut a Glassine Sheet with Fringe Scissors, then crumpled it with my fingers.
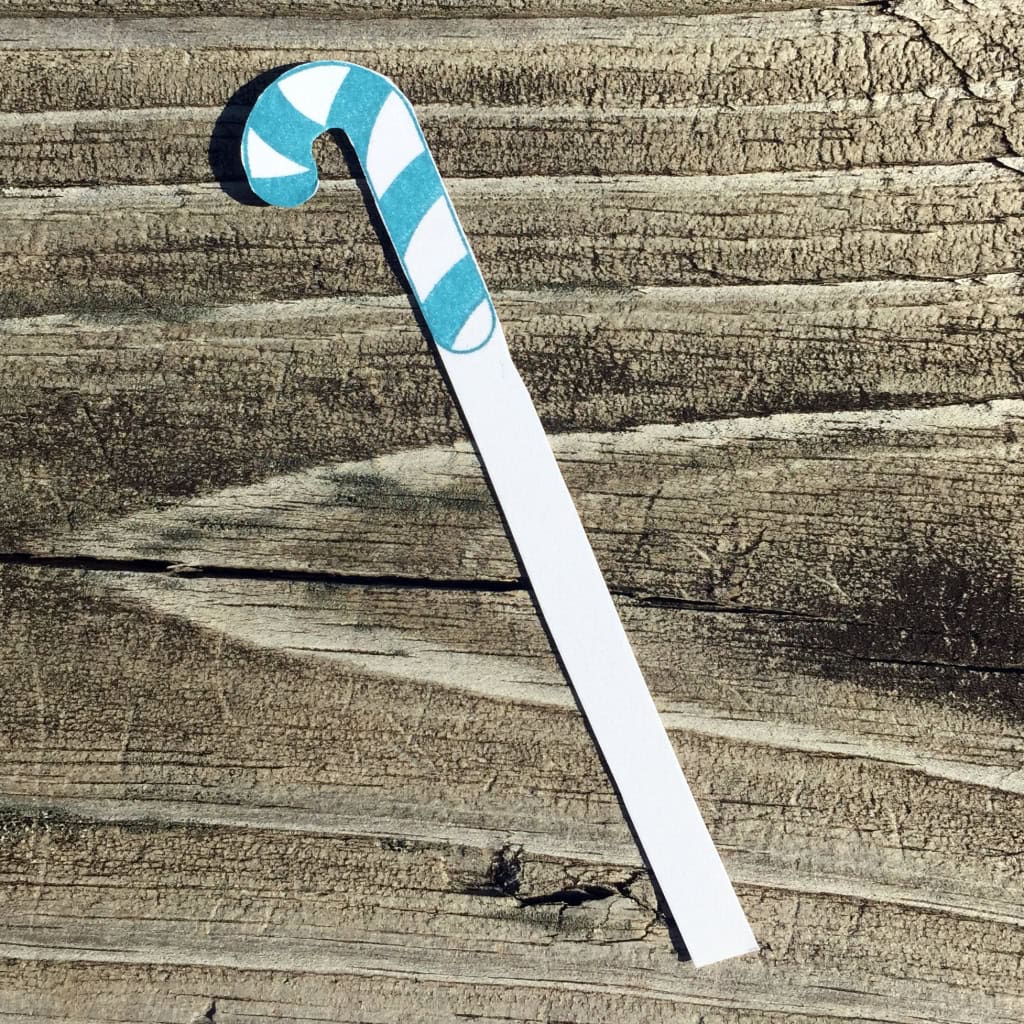
I stamped the candy cane from the A Little Something stamp set three times in Island Indigo. I fussy cut them with my Paper Snips, leaving a long stem to stick down into the Glassine filler. (The Snow Place stamp set has a longer, thinner candy cane stamp, but I preferred the fatter one for this project.)
 Here’s what I used:
I love hearing from you! Please leave your questions and comments below.
Thanks for stopping by today, and Sweet Stamping!
Aug 23, 2015 | Boxes, Christmas, Gift Wrap, Holiday, New Products |
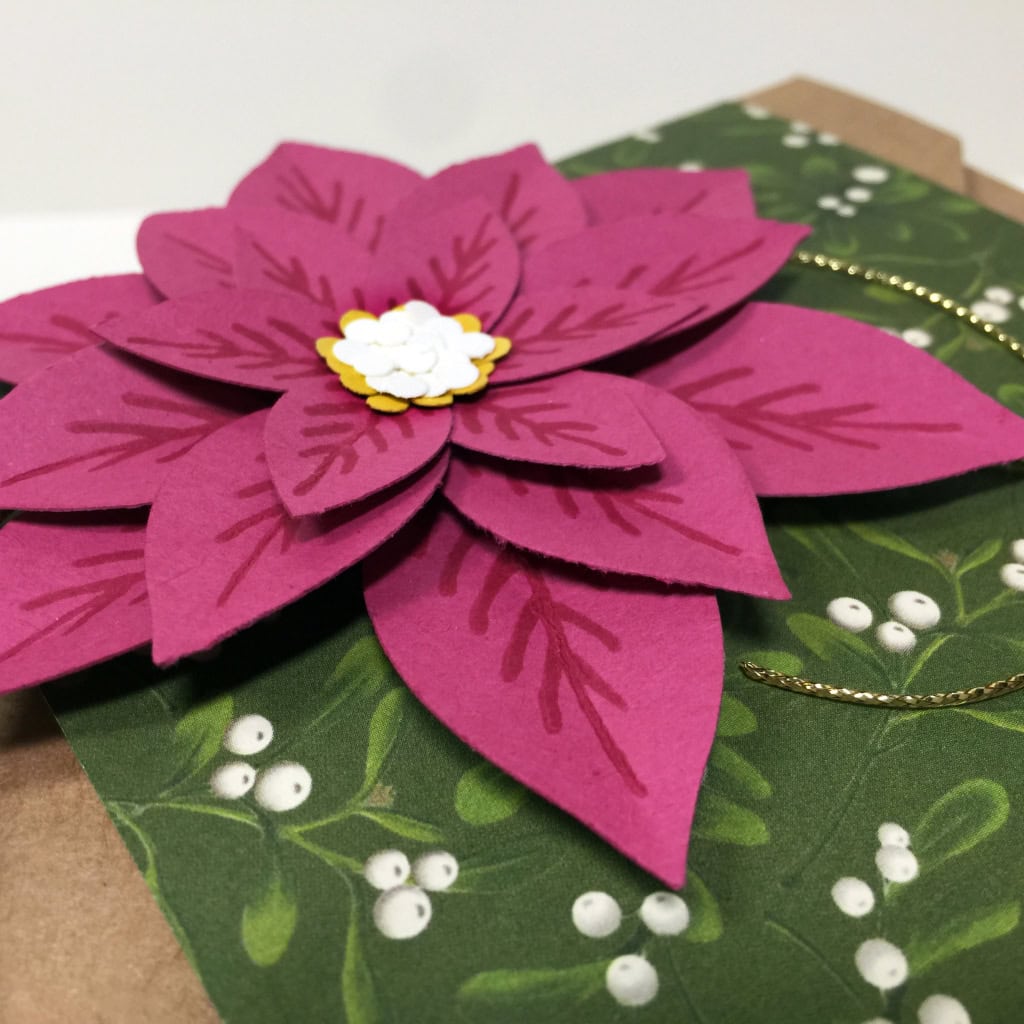
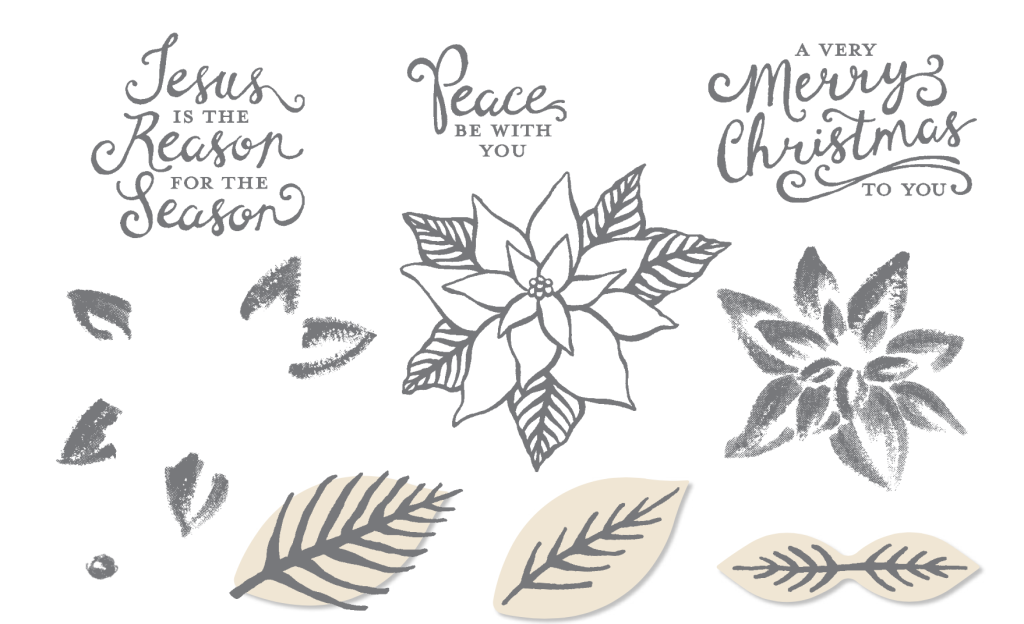
Today I’m highlighting a bundle from page 31 in the new Holiday catalog: the Reason for the Season stamp set and the Festive Flower Builder Punch. The stamp set includes a three step poinsettia, three different sentiments, and images for the punched shapes.
I’m also using Home for Christmas Designer Series Paper and Gold Cording Trim from the new Holiday catalog. I wrapped a Take Out Box with the DSP and glued the poinsettia to it. Then I tied the tag on with the trim.
Note: I cut a 4″ x 12″ piece of DSP and it didn’t quite reach all the way around the box. So I cut a 4″ x 2″ piece to extend the belly band. The ends of the longer piece over lap the smaller piece on the bottom of the box.

I stamped the sentiment in Rose Red on Very Vanilla card stock, then cut it with the Note Tag Punch. I used the 1/8″ Circle Punch for the hole.

To build the flower, I punched a 1-3/8″ circle of Rose Red card stock and glued the first layer of petals to it. To give it dimension, I bent each petal in half, and used a Stampin’ Dimensional between the layers.
For the center of the flower, I first punched of the punch’s three center pieces in Hello Honey. I then punched a bunch of 1/8″ circles in Very Vanilla and glued them to the center.

Here are the current products I used:
Thanks for stopping by today, and Sweet Stamping!

Aug 22, 2015 | Bags, Christmas, Gift Wrap, Holiday |

During the holidays, or anytime really, it’s nice to have some little treat bags handy for impromptu gifts. Here’s a simple one that anyone will enjoy receiving…full of little goodies, of course. All these products are in the annual catalog, so you don’t have to wait for the new Holiday catalog to get started!
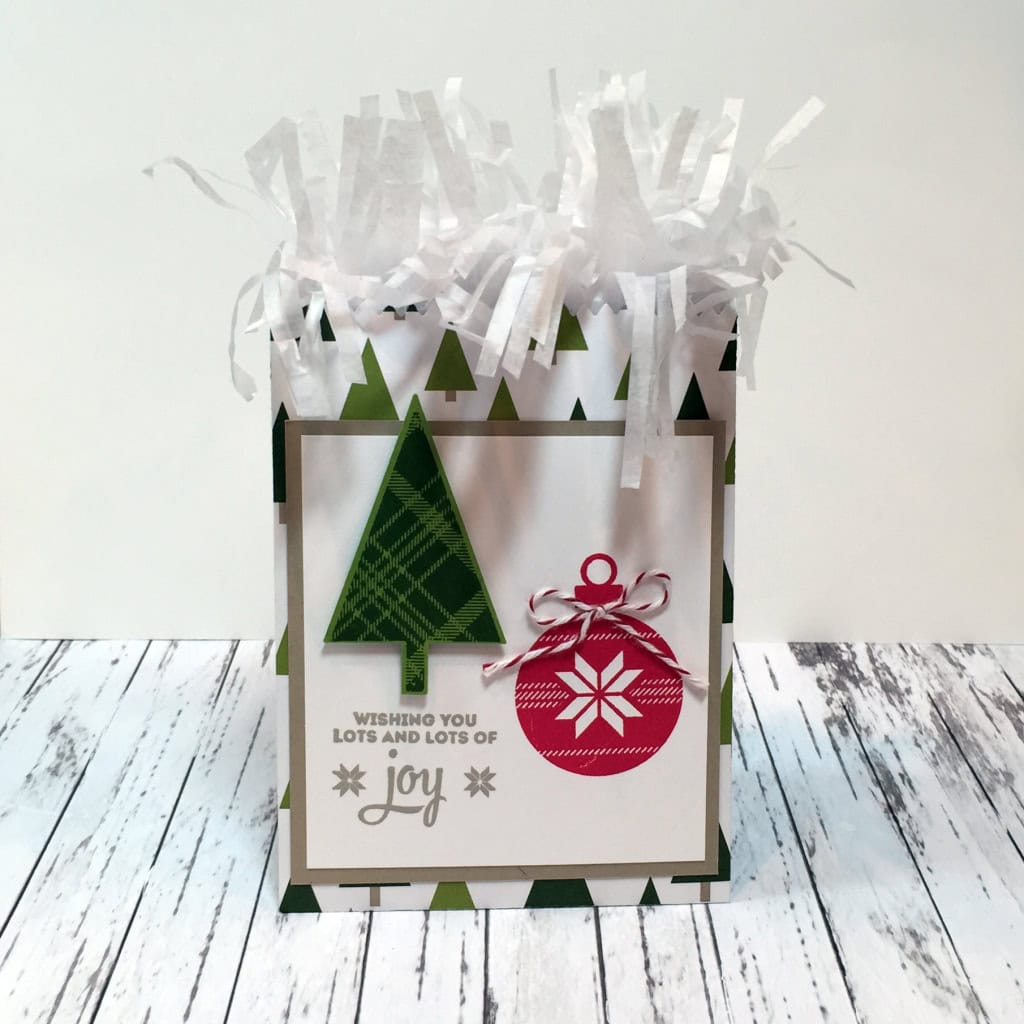
I used the Mini Treat Bag Thinlits to cut the bag from Merry Moments Designer Series Paper (DSP.) The Lots of Joy stamp set and the Tree Punch add the decor for the front of the bag. The plaid tree is adhered with Stampin’ Dimensionals, and the Baker’s Twine bow with a Mini Glue Dot. The Crumb Cake sentiment and Real Red ornament are stamped directly onto the Whisper White card stock.
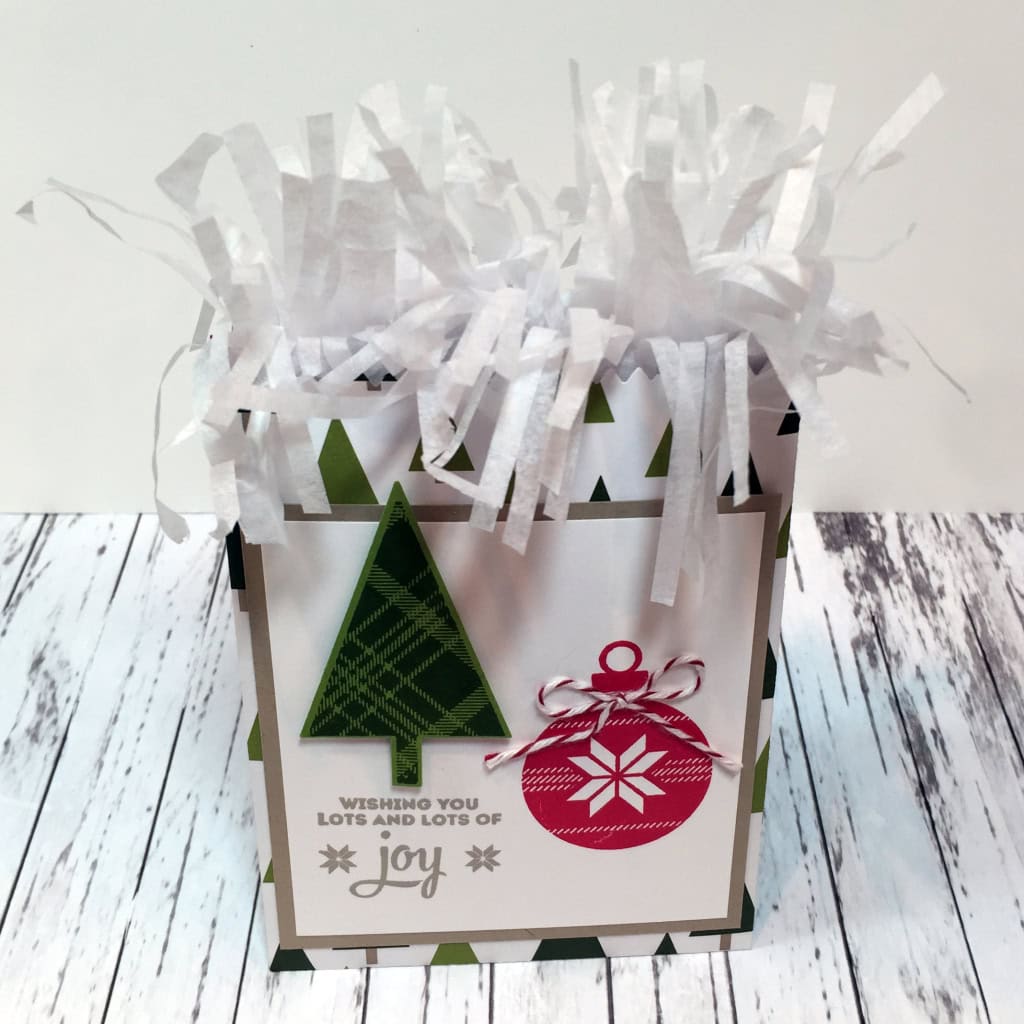
I used Fringe Scissors to cut the edge of some gift wrap tissue, then tucked it into the bag.
Here’s what I used:
Thanks for stopping by today, and Sweet Stamping!

