Oct 18, 2017 | Cards, Gallery, Halloween, Holiday, Parties |
My husband and I host a Halloween party every year, and it’s coming up very soon – this Saturday as a matter of fact! So today I’m sharing an idea for an invitation for your Halloween event. I used the Graveyard Gate stamp set, which is available in a bundle with the exquisite Detailed Gate Thinlits Dies, to create a spooky yet inviting scene. It’s very simple

Graveyard Gate stamp set © Stampin’ Up!
Here’s what I made:

Here’s what I did:
Cut and scored with my Stampin’ Trimmer:
- Basic Gray card stock (CS) cut to 4 1/4″ x 11″, scored at 5 1/2″
- Pumpkin Pie CS cut to 4″ x 5 1/4″
- Basic Black CS cut to 4″ x 5 1/4″
- Very Vanilla CS to cut 3 7/8″ x 5 1/8″
Stamped with the Graveyard Gate stamp set:
- gate, arch, raven, and bats in Basic Black ink onto the Very Vanilla CS layer
- columns in Basic Gray ink onto the Very Vanilla CS layer
- NOTE: the Stamp-a-ma-jig makes it easy to line up all the images. I used it for everything but the bats.
Die Cut using the Patterned Pumpkins Thinlits:
- jack-o-lantern from a piece of Spooky Night Designer Series Paper
Assembled the card:
- jack-o-lantern glued onto the Very Vanilla CS layer
- Very Vanilla CS layer glued onto Basic Black CS layer
- Basic Black CS layer glued onto the front of the Basic Gray card base
- Pumpkin Pie CS glued to the inside of card base
Here are today’s colors:
You can click on each one to see all the products that come in that color!
Here’s what I used:
Click on the images for more details and to purchase.
Here are some key points to remember:
- Designer Series Paper Sale October 1-31, Buy 3 Get 1 FREE! See details HERE.
- Hostess Code for the month of October (HGB2HGXK)
Find out more about HOW, WHEN and WHY to use that HERE. - October’s FREE gift
Mini Pizza Boxes
Find out more HERE. - Merry Patterns Hostess Stamp Set – added to your Host Rewards only through October 31! You can’t buy it, but you can get if for free with a qualifying order! You can host a party, or place your own order, or join under me and get a 20% discount on your demonstrator order. Find out more HERE.
- Gumball Rewards for all orders over $50
Find out more HERE.
Thanks for stopping by today, and Sweet Stamping!

Oct 16, 2017 | Cards, Gallery, Halloween, Holiday |
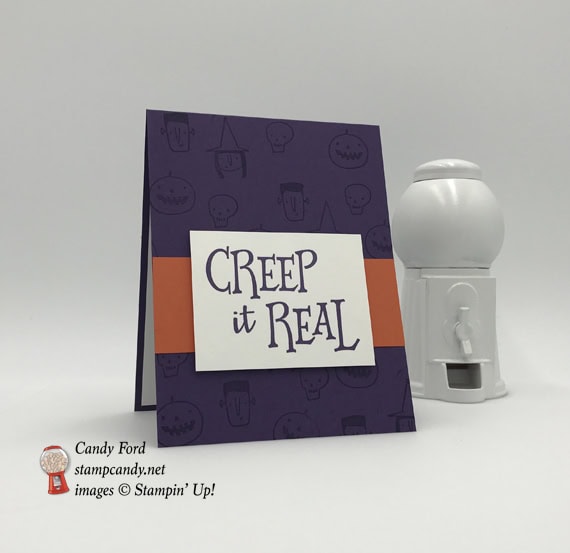
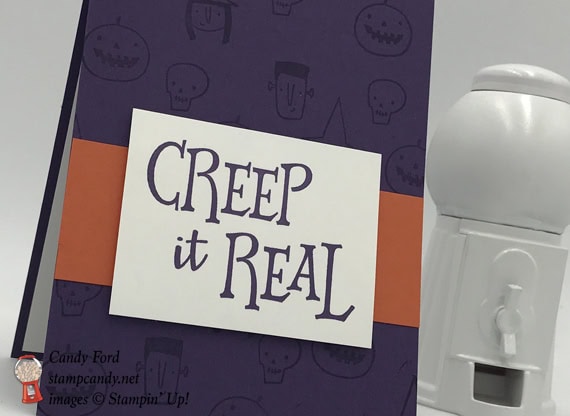
It’s no secret that I love Halloween. Our house is in the throes of Halloween party prep right now. So I have really enjoyed the Halloween items in Stampin’ Up!’s 2017 Holiday Catalog. One example is the cute and adorably scary Creep It Real stamp set. You can see other projects I’ve made with it here, here, and here. I believe I’ve used every stamp in the set between all four projects. For today’s, I used the titular sentiment and the four small character faces to create a very quick and easy card perfect for everyone.

Creep It Real stamp set © Stampin’ Up!
Here’s what I made:
Here’s what I did:
Cut and scored with my Stampin’ Trimmer:
- Elegant Eggplant card stock (CS) cut to 4-1/4″ x 11″, then scored in half at 5-1/2″
- Pumpkin Pie CS cut to 4-1/4″ x 1-1/2″
- Whisper White CS cut to 3″ x 2-1/2″
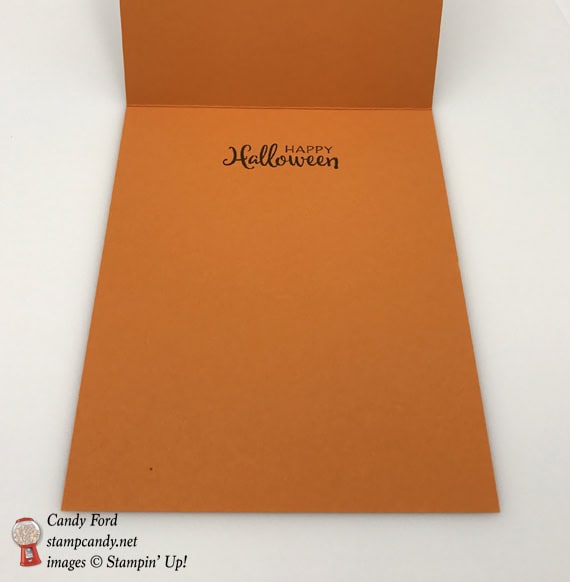
- Whisper White CS cut to 4″ x 5-1/4″ (for the inside
Stamped with the Creep It Real stamp set:
- Halloween character faces in Elegant Eggplant ink onto the front of the card base
- sentiment in Elegant Eggplant ink onto the smaller piece of Whisper White CS
Assembled the card:
- Pumpkin Pie CS strip glued onto the front of the card base
- sentiment adhered to card front with Stampin’ Dimensionals
- Whisper White CS layer glued onto the inside of the card base
Here are today’s colors:
You can click on each one to see all the products that come in that color!
Here’s what I used:
Click on the images for more details and to purchase.
Here are some key points to remember:
- Designer Series Paper Sale October 1-31, Buy 3 Get 1 FREE! See details HERE.
- Hostess Code for the month of October (HGB2HGXK)
Find out more about HOW, WHEN and WHY to use that HERE. - October’s FREE gift
Mini Pizza Boxes
Find out more HERE. - New Merry Patterns Hostess Stamp Set – added to your Host Rewards
There’s a brand new stamp set that isn’t in any catalog. You can’t buy it, but you can get if for free with a qualifying order! You can host a party, or place your own order, or join under me and get a 20% discount on your demonstrator order. Find out more HERE. - Gumball Rewards for all orders over $50
Find out more HERE.
Thanks for stopping by today, and Sweet Stamping!
Oct 15, 2017 | Gallery, Halloween, Holiday |
Have you played with the Season to Sparkle bundle yet? No? Well, you’re gonna LOVE it when you do! There are two gorgeous chandeliers in this bundle, a stamp and a die. And there are so many goodies to adorn them, you can use this bundle all year round, even for weddings. Today I went with a Halloween theme.
Here’s what I made:

Here’s what I did:
Cut and scored with my Stampin’ Trimmer:
- Pumpkin Pie card stock (CS) cut to 4-1/4″ x 11″, then scored in half at 5-1/2″
- Basic Black CS cut to 4-1/8″ x 5-3/8″
- Spooky Night Designer Series Paper (DSP) cut to 3-7/8″ x 5-1/8″
Stamped with the Season to Sparkle stamp set:
- raven and dangling spiders in Basic Black ink onto a scrap of Very Vanilla CS
- chandelier chain in Basic Black ink onto the top of the DSP layer
- sentiment in Basic Black ink onto the inside of the card base (If you prefer, you stamp the greeting onto a 4″ x 5-1/4″ piece of Very Vanilla CS, then glue it onto the inside of the card base)
Die cut using the Chandelier Thinlit Dies :
- chandelier from Basic Black CS (to save paper, you can cut it from the center of the Basic Black CS layer, since it will be covered up with the DSP layer anyway)
- raven and spiders
Assembled the card:
- Basic Black CS layer glued onto the front of the card base
- DSP layer glued onto the Basic Black CS layer
- chandelier glued onto the DSP
- Spiders and raven glued onto the card front
- Black Rhinestones adhered to chandelier (I’m sorry they don’t show up well in the photo)
Here are today’s colors:
You can click on each one to see all the products that come in that color!
Here’s what I used:
Click on the images for more details and to purchase.
Here are some key points to remember:
- Designer Series Paper Sale October 1-31, Buy 3 Get 1 FREE! See details HERE.
- Hostess Code for the month of October (HGB2HGXK)
Find out more about HOW, WHEN and WHY to use that HERE. - October’s FREE gift
Mini Pizza Boxes
Find out more HERE. - New Merry Patterns Hostess Stamp Set – added to your Host Rewards
There’s a brand new stamp set that isn’t in any catalog. You can’t buy it, but you can get if for free with a qualifying order! You can host a party, or place your own order, or join under me and get a 20% discount on your demonstrator order. Find out more HERE. - Gumball Rewards for all orders over $50
Find out more HERE.
Thanks for stopping by today, and Sweet Stamping!
Oct 13, 2017 | Cards, Gallery, Halloween, Holiday |
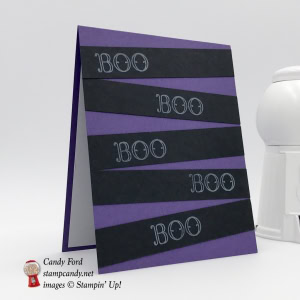
The Creep It Real stamp set is really cute, and I’ve had a lot of fun playing with it. You can see the other projects I’ve used it on here and here. Today’s card is one of the easiest ever. Really. One stamp and some card stock. That’s it! I stamped the word BOO in white craft ink onto Basic Black card stock for a ghostly feel. The background is Elegant Eggplant, a nice, deep, Halloweeny purple. The strips remind me of boards nailed over the windows of a condemned, and haunted, house.
Here’s what I made:
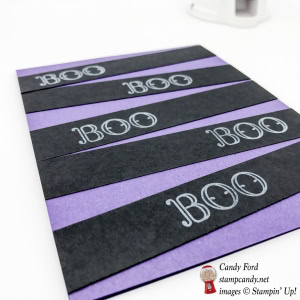
Here’s what I did:
Cut and scored with my Stampin’ Trimmer:
- Elegant Eggplant card stock (CS) cut to 4-1/4″ x 11″, then scored in half at 5-1/2″
- 5 strips of Basic Black CS cut to 5″ x 3/4″
- Whisper White CS cut to 4″ x 5-1/4″ for the inside
Stamped with the Creep It Real stamp set:
- BOO in Whisper White Craft Ink on each Basic Black CS strip
- heat set the ink with a Heat Tool
Assembled the card:
- Basic Black CS strips glued onto the front of the card base
- cut the bits of the strips that stick out past the sides of the card base using Paper Snips
- Whisper White CS glued to the inside of the card base
Here are today’s colors:
You can click on each one to see all the products that come in that color!
Here’s what I used:
Click on the images for more details and to purchase.
Here are some key points to remember:
- World Card Making Day Sale October 1-10, 15% off select card making essentials. See details HERE.
- Designer Series Paper Sale October 1-31, Buy 3 Get 1 FREE! See details HERE.
- Hostess Code for the month of October (HGB2HGXK)
Find out more about HOW, WHEN and WHY to use that HERE. - October’s FREE gift
Mini Pizza Boxes
Find out more HERE. - New Merry Patterns Hostess Stamp Set – added to your Host Rewards
There’s a brand new stamp set that isn’t in any catalog. You can’t buy it, but you can get if for free with a qualifying order! You can host a party, or place your own order, or join under me and get a 20% discount on your demonstrator order. Find out more HERE. - Gumball Rewards for all orders over $50
Find out more HERE.
Thanks for stopping by today, and Sweet Stamping!
Oct 12, 2017 | Cards, Gallery, Halloween |
I think the gate die cut from the Detailed Gate Thinlits Dies is exquisite. I’ve used it here for a spooky Halloween card, but you can just as easily use it, or even just parts of it, for wedding, birthday, or any other lovely occasion cards. But I didn’t want this card to be all about the gate. I wanted the background to be interesting, too. So I used a card in the 2017 Holiday Catalog as inspiration, and created a graveyard scene in Basic Gray and Basic Black, with the sky in Peekaboo Peach and Elegant Eggplant. I was going for a dark cloudy sky at sunset. How did I do?
Here’s what I made:
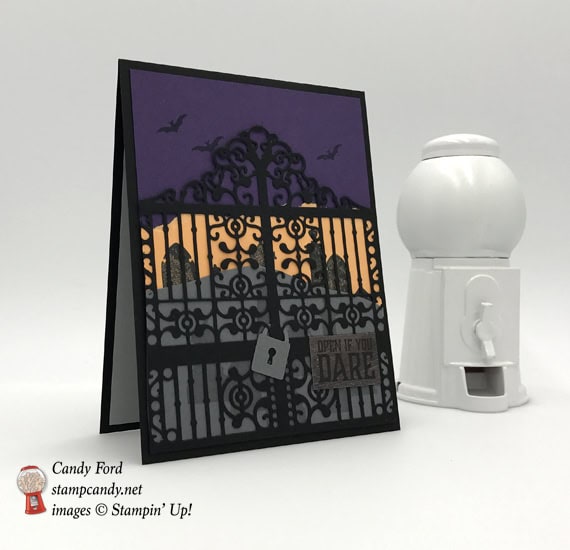
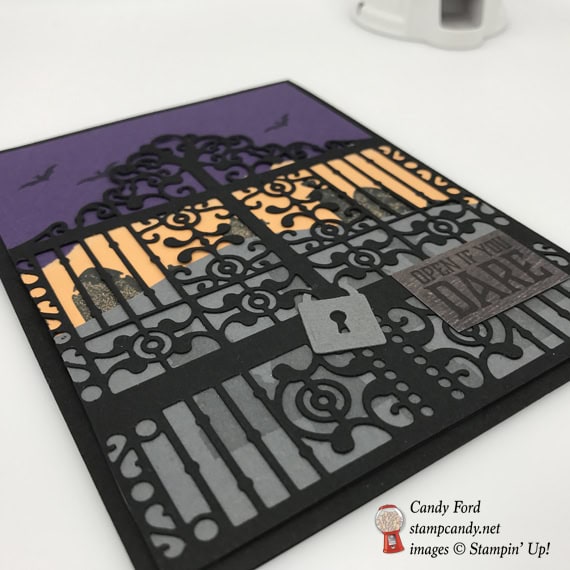
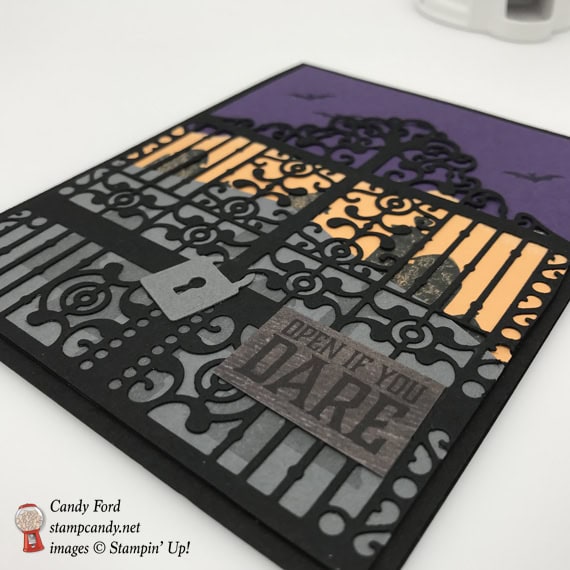
Here’s what I did:
Cut and scored with my Stampin’ Trimmer:
- Basic Black card stock (CS) cut to 8-1/2″ x 5-1/2″, then scored in half at 4-1/4″
- Elegant Eggplant CS cut to 4″ x 5-1/4″
- Peakaboo Peach CS cut to 4″ x 2-1/2″, then torn along the top 4″ side
- Basic Gray CS cut to 4″ x 2-1/2″, then cut into a curve with Paper Snips along the top 4″ side
- Wood Textures Designer Series Paper (DSP) cut to 1-1/2″ x 3/4″
- Smoky Slate CS cut to 4″ x 5-1/4″, for the inside
Stamped with the Graveyard Gate stamp set:
- 3 bats in Basic Black ink onto the top part of the Elegant Eggplant CS layer
- tombstones in Basic Gray ink onto the Peekaboo Peach CS
- NOTE: I drew a line onto the Peekaboo Peach CS piece along the curve of the Basic Gray CS piece, so I would know where to stamp the tombstones. Then the Basic Gray CS piece covered the line.
- tombstones in Basic Gray ink onto the Basic Gray CS
- sentiment in Basic Black in onto the DSP
Die cut using the Detailed Gate Thinlit dies:
- gate from Basic Black CS
- padlock from Basic Gray CS
Assembled the card:
- Basic Gray and Peekaboo Peach CS pieces glued onto the Elegant Eggplant CS layer, so that the Basic Gray CS piece lines up with the bottom of the Elegant Eggplant CS layer, and covers the bottom part of the Peekaboo Peach layer
- used Paper Snips to cut the loop of the padlock, then put it around the center gate post, and glued it to the gate
- gate glued to the top of the CS layers, then any extra trimmed from the sides
- sentiment glued onto the gate
- all layers glued onto the front of the Basic Black CS card base
- Smoky Slate CS glued to the inside of the card base
Here are today’s colors:
You can click on each one to see all the products that come in that color!
Here’s what I used:
Here are some key points to remember:
- Designer Series Paper Sale October 1-31, Buy 3 Get 1 FREE of select paper packs! See details HERE.
- Hostess Code for the month of October (HGB2HGXK)
Find out more about HOW, WHEN and WHY to use the code HERE. - October’s FREE gift
Mini Pizza Boxes
Find out more HERE. - New Merry Patterns Hostess Stamp Set – added to your Host Rewards.
There’s a brand new stamp set that isn’t in any catalog. You can’t buy it, but you can get if for free with a qualifying order! You can host a party, or place your own order, or join under me and get a 20% discount on your demonstrator order. Find out more HERE. - Gumball Rewards for all orders over $50
Find out more HERE.
Thanks for stopping by today, and Sweet Stamping!
Oct 11, 2017 | Cards, Gallery, Halloween, Holiday |
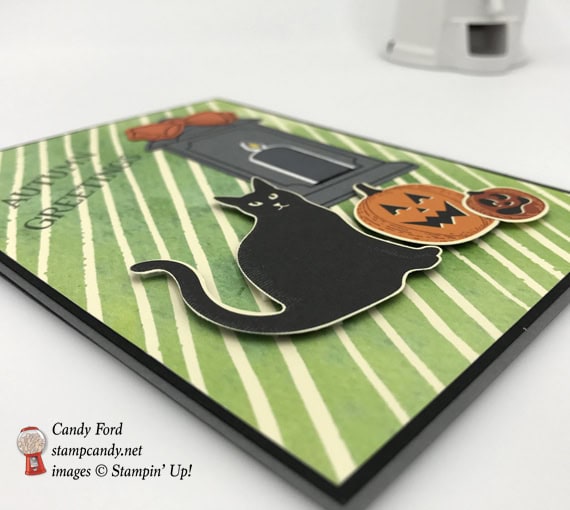
Autumn Greetings from Stamp Candy! Autumn (or Fall, as we call it here) is in the air and with it comes Halloween with its black cats and pumpkins and spooky lanterns. I made today’s card with the Spooky Cat Bundle, the Seasonal Lantern Bundle, and the Spooky Night and Painted Autumn Designer Series Papers (DSP.) And I used the Patterned Pumpkins Thinlits Dies to cut the pumpkins from the Spooky Night DSP. I love how there is so much crossover between products in the 2017!
Here’s what I made:
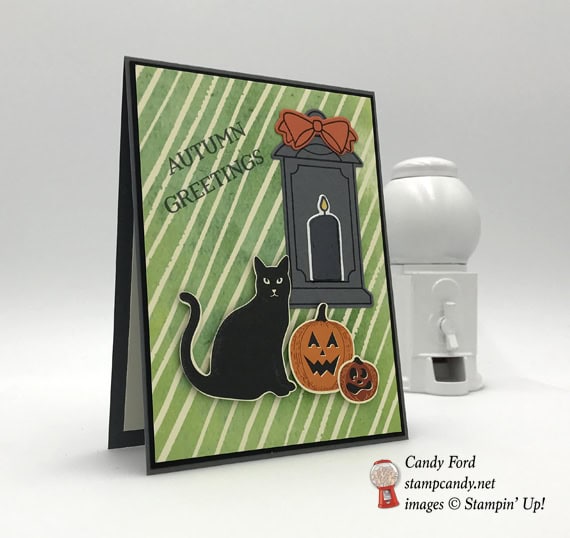
Here’s what I did:
Cut and scored with my Stampin’ Trimmer:
- Basic Gray card stock (CS) cut to 4-1/4″ x 11″, then scored in half at 5-1/2″
- Basic Black CS cut to 5-1/4″ x 4″
- Painted Autumn Designer Series Paper (DSP) cut to 5″ x 3-3/4″
- Very Vanilla CS cut to5″ x 3-3/4″ for the inside
Stamped with the Seasonal Lanterns stamp set:
- lantern in black ink* onto a scrap of Basic Gray CS
- bow in black ink* onto a scrap of Tangerine Tango CS
- candle outline in black ink* onto a scrap of Very Vanilla CS
- candle fill in black* ink
- flame fill in Daffodil Delight ink
- sentiment in black ink* onto the DSP layer
- *I used Memento black ink, but you can also use Archival Basic Black ink
- NOTE: for the sentiment, I inked up the first word and stamped, then cleaned it, inked up the second word, and stamped

Cut with the Patterned Pumpkins Thinlits:
- pumpkins from Spooky Night DSP
Punched using the Cat Punch:
- black cat from Spooky Night DSP
Cut using the Lantern Builder Framelits:
Assembled the card:
- lantern glued onto the DSP layer
- candle and bow glued to the lantern
- cat and pumpkins adhered to DSP layer with Stampin’ Dimensionals
- DSP layer glued onto the Basic Black CS layer
- Basic Black CS layer glued onto the front of the card base
- Very Vanilla CS glued to the inside of the card base
Here are today’s colors:
You can click on each one to see all the products that come in that color!
Here’s what I used:
Click on the images for more details and to purchase.
Here are some key points to remember:
- World Card Making Day Sale October 1-10, 15% off select card making essentials. See details HERE.
- Designer Series Paper Sale October 1-31, Buy 3 Get 1 FREE! See details HERE.
- Hostess Code for the month of October (HGB2HGXK)
Find out more about HOW, WHEN and WHY to use that HERE. - October’s FREE gift
Mini Pizza Boxes
Find out more HERE. - New Merry Patterns Hostess Stamp Set – added to your Host Rewards
There’s a brand new stamp set that isn’t in any catalog. You can’t buy it, but you can get if for free with a qualifying order! You can host a party, or place your own order, or join under me and get a 20% discount on your demonstrator order. Find out more HERE. - Gumball Rewards for all orders over $50
Find out more HERE.
Thanks for stopping by today, and Sweet Stamping!
