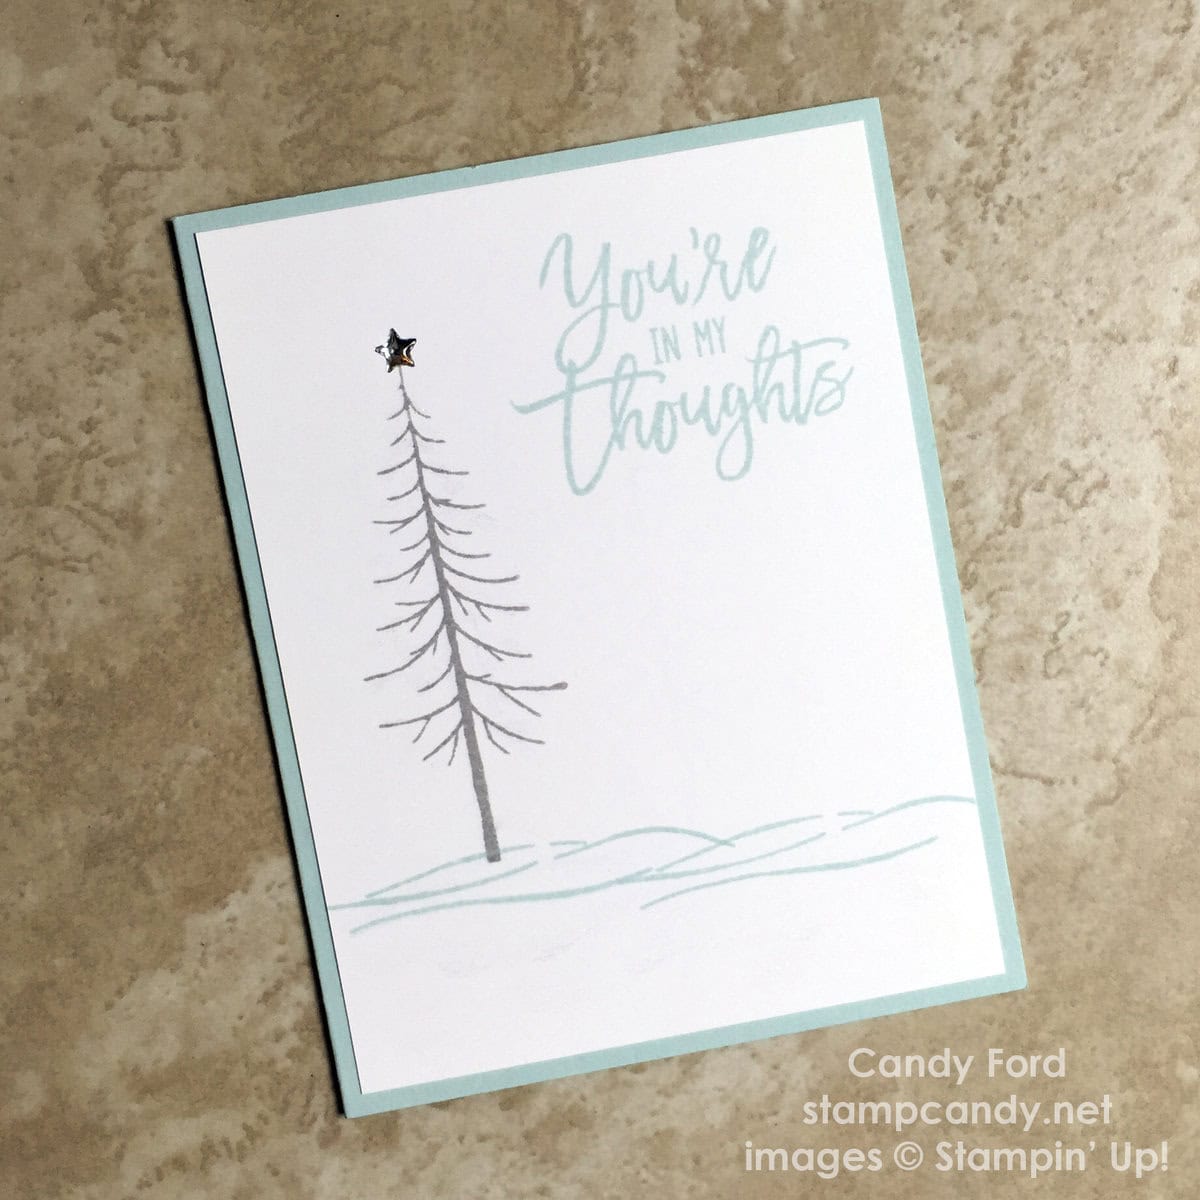
Aug 11, 2016 | Cards, Gallery, New Products |
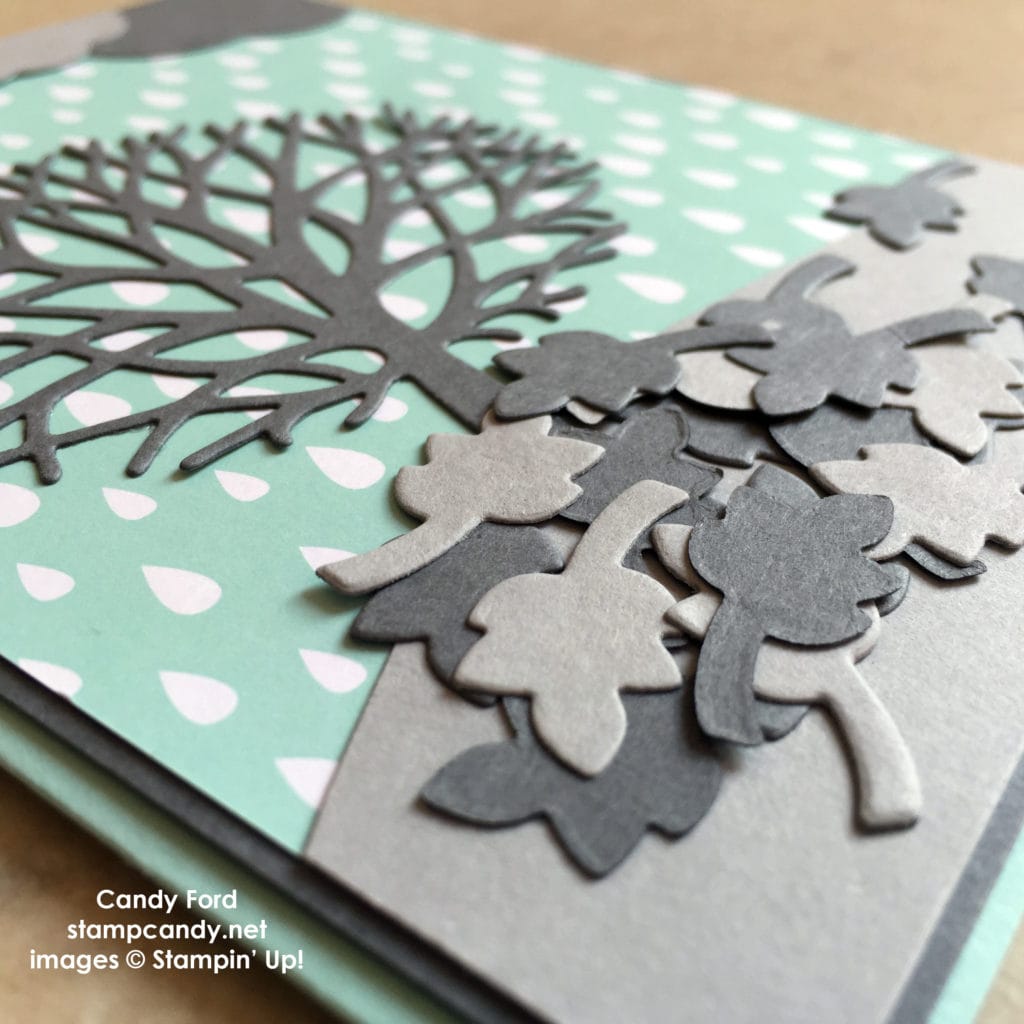
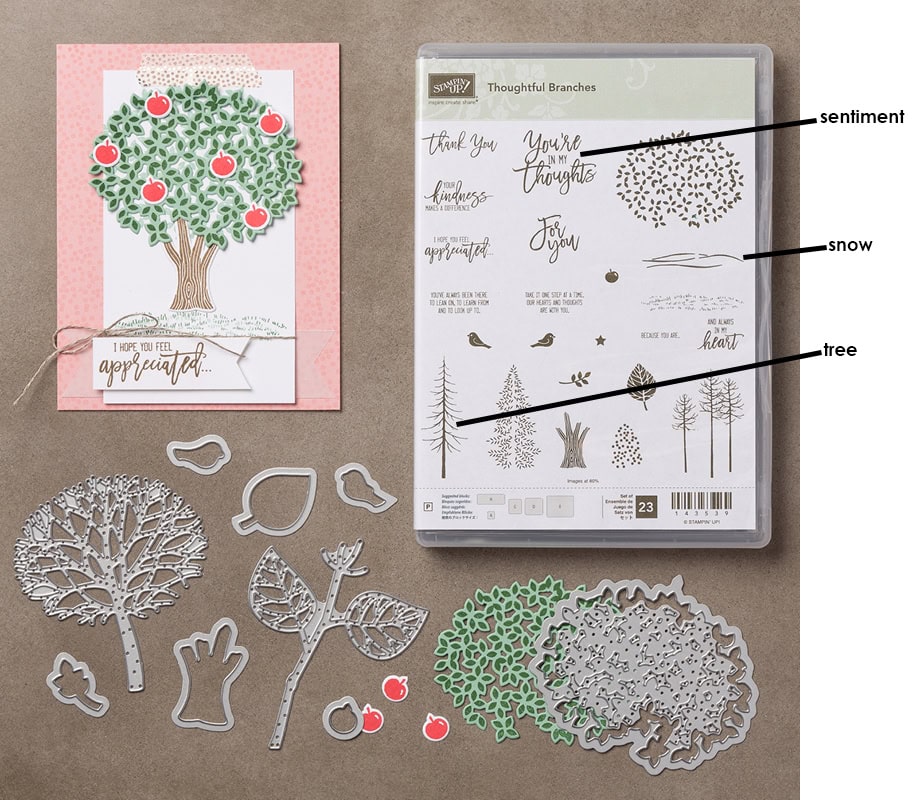
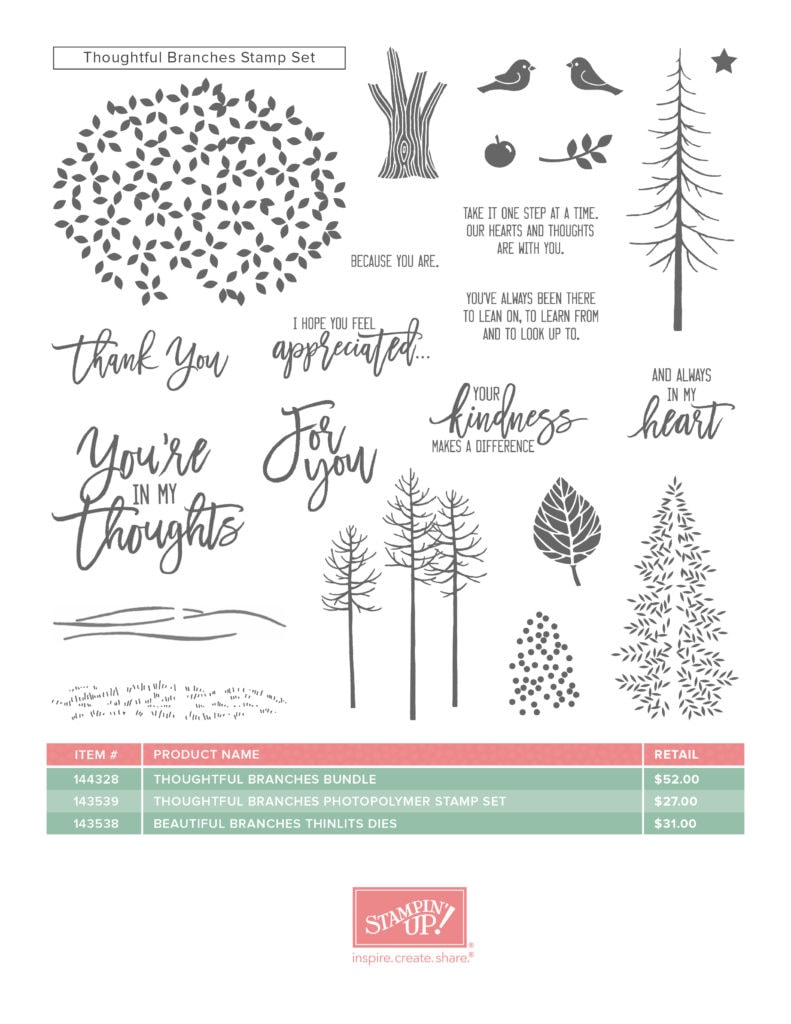
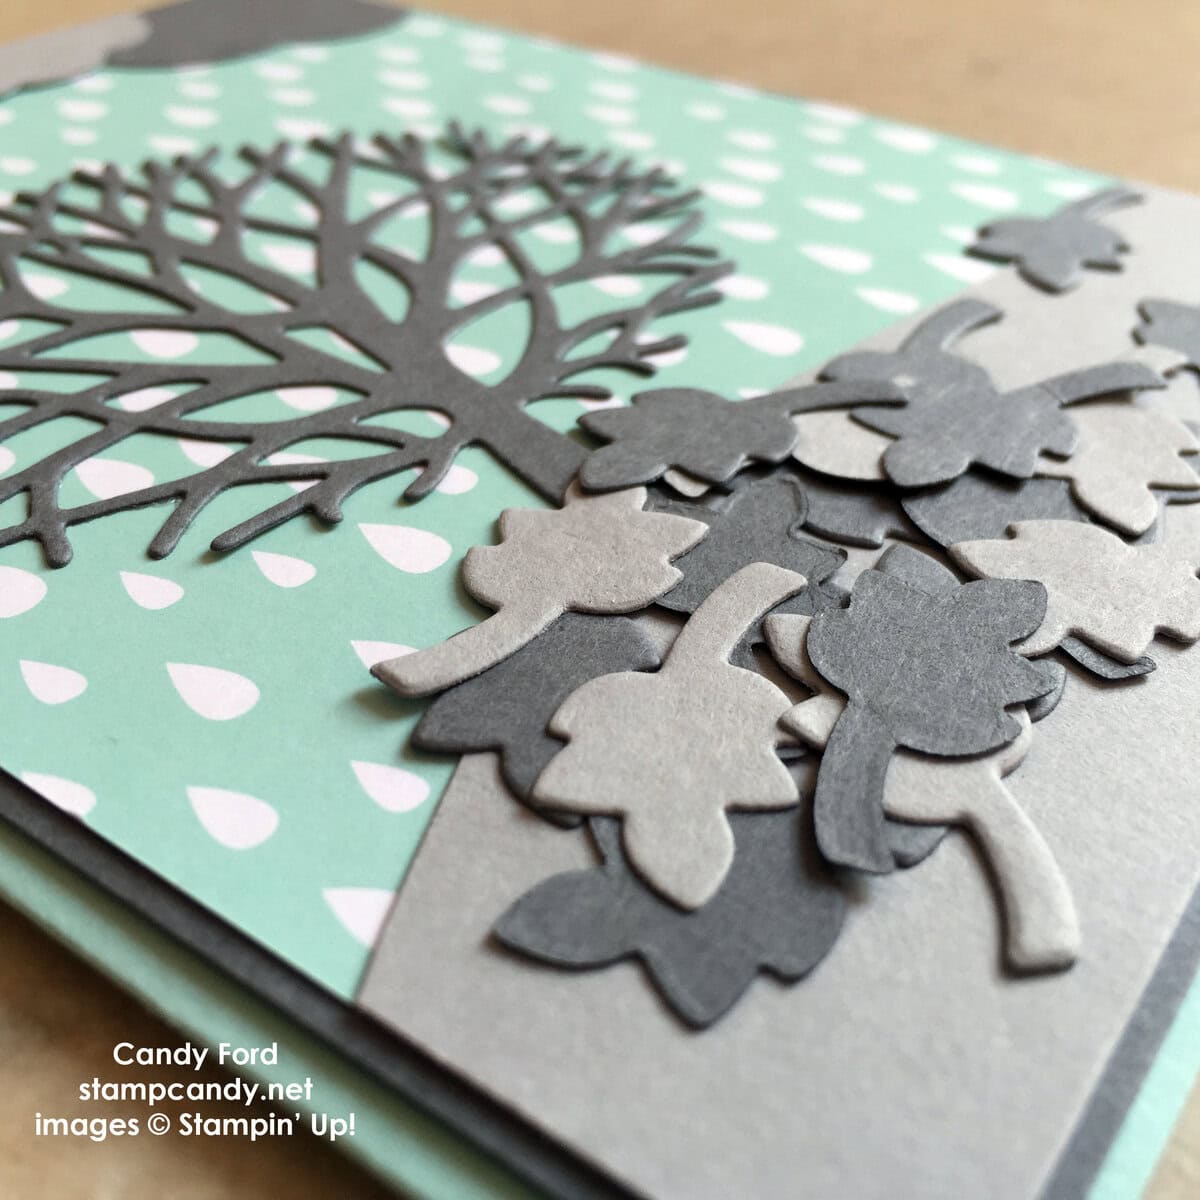
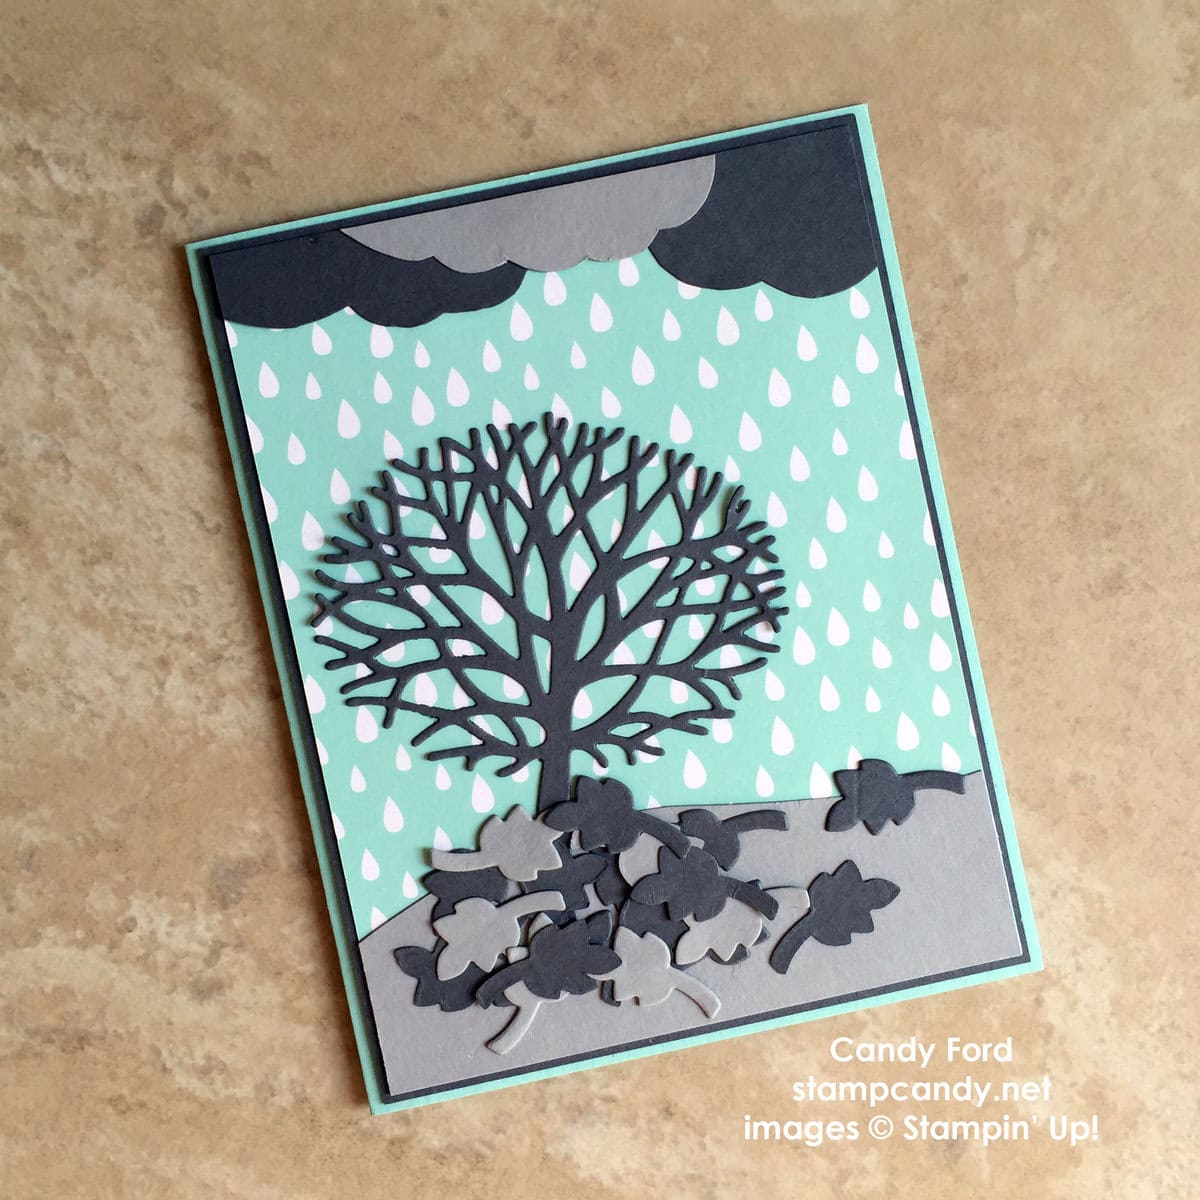
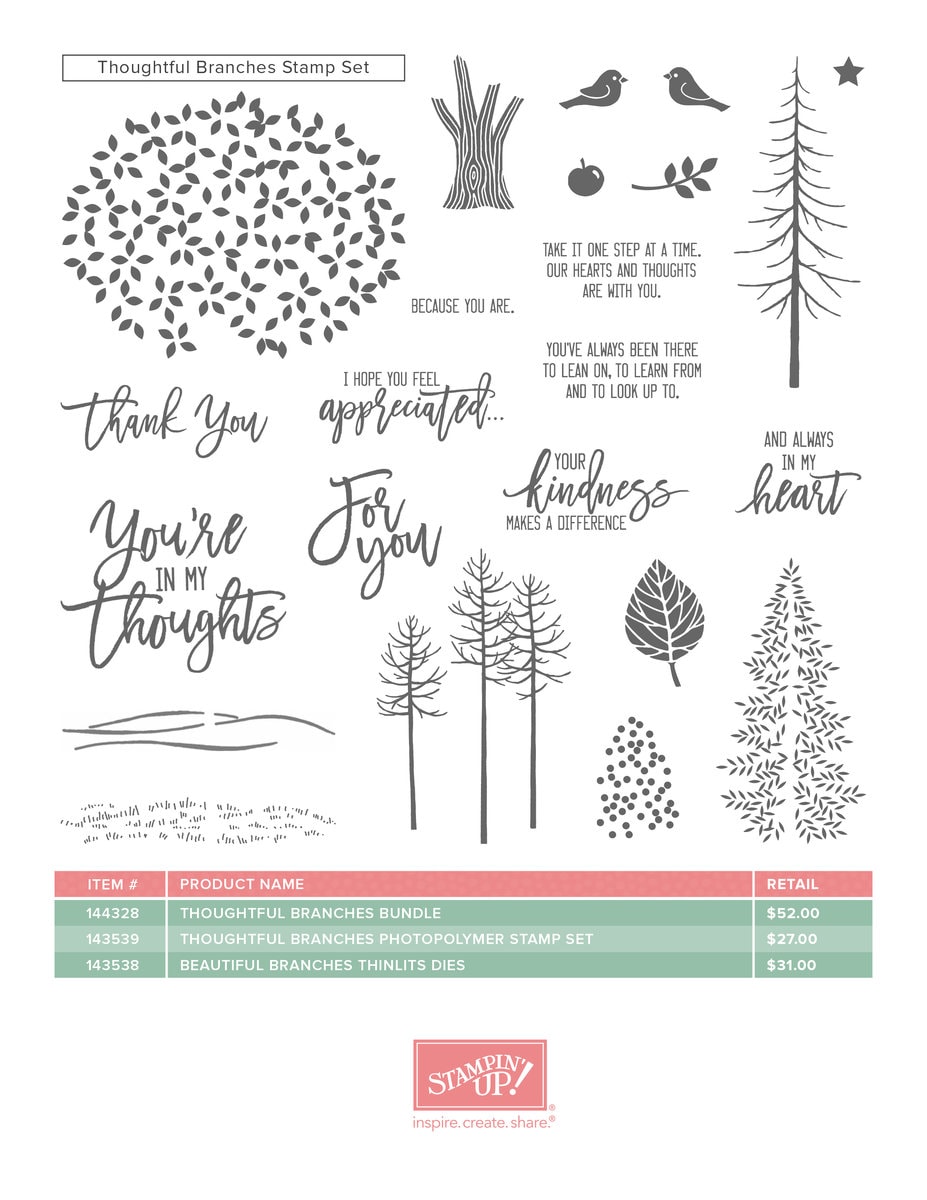
I used the Beautiful Branches Thinlits to make today’s card. It’s part of the Thoughtful Branches bundle that is only available until August 31, or while supplies last. Click here to get it now!

Here’s how I did it:
I used the dies to cut the tree and some leaves from Basic Gray card stock, and more leaves from Smoky Slate CS.
For the ground, I cut a piece of Smoky Gray CS to 4″ wide and used Paper Snips to cut curves along the top. I glued that to the bottom of a 4″ x 5-1/4″ piece for A Little Foxy Designer Series Paper.
For the clouds, I used Paper Snips to cut irregular scallops in two pieces of Basic Gray CS and one piece of Smoky Slate CS. I glued those to the top of the DSP.
I glued on the tree, then glued the leaves scattered around underneath.
I glued the DSP onto a piece of Basic Gray CS, then glued that onto a Pool Party card base.

I stamped the sentiment, from the Sprinkles of Life stamp set, inside the card with Smoky Slate ink.

Here’s what I used:
AUGUST HOSTESS CODE
PMTWBJMQ
If you are placing an order for less than $150, please use this Hostess Code. Click here for details on how to use the Hostess Code.If you are placing an order of $150 or more, you will receive Stampin’ Rewards on your order, so do not use the Hostess Code.
Thanks for stopping by today, and Sweet Stamping!

Aug 9, 2016 | Cards, Christmas, Gallery, Holiday, New Products |
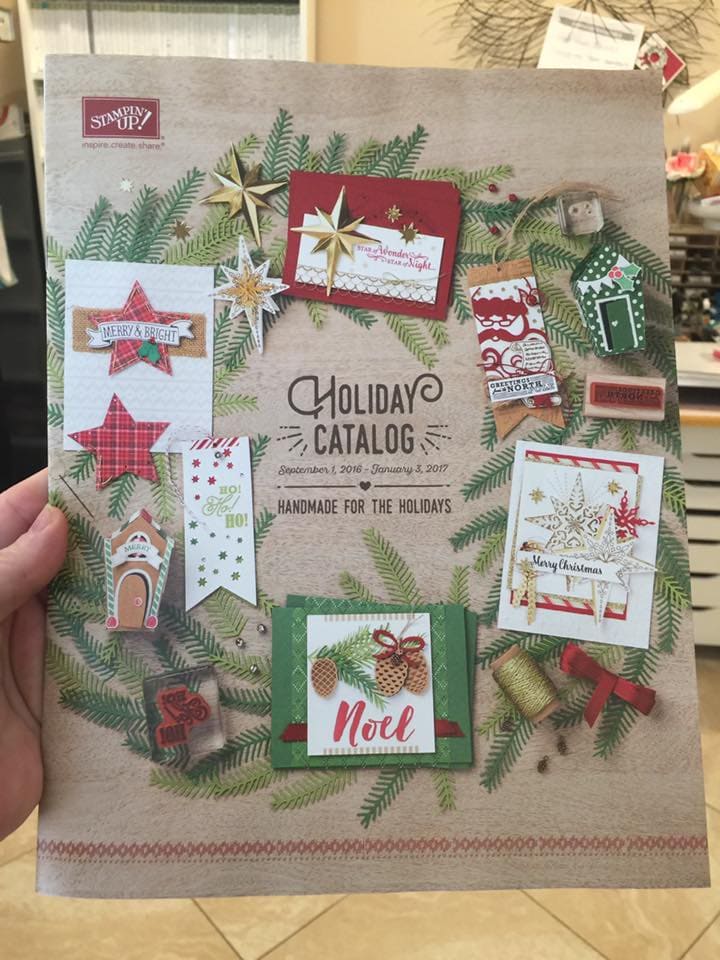
I know it may seem early, but I just had to share a little sneak peek of the upcoming Holiday catalog. I can’t show you the inside of the catalog online yet, but I can give you an actual catalog! Let me know if you need one. (If you already have a demonstrator, please get your catalog from them. Thanks!)
I’ve had these new products to play with for almost a week now and I couldn’t wait any longer. (Seeing, and getting, new products a month before everyone else is just one of the many awesome perks of being a Stampin’ Up! Demonstrator! Click on “Be a Candy Heart” above to get more details.)
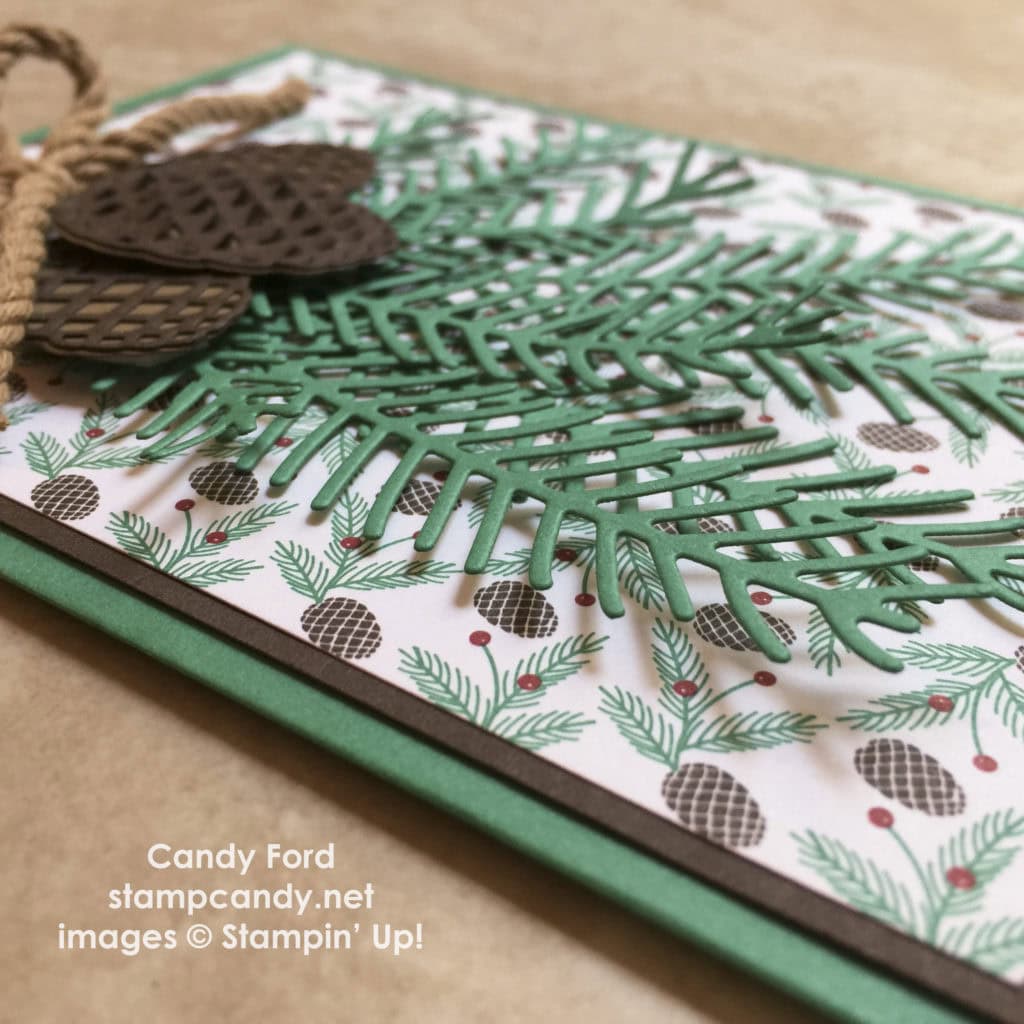
I have fallen in love with the new Presents & Pinecones suite of products, especially the Pretty Pines Thinlits Dies. I’m thrilled to be able to share this card that I made using some of these products.

Here’s how I did it:
The card base is Emerald Envy card stock with an Early Espresso layer, then a piece of the Presents & Pinecones Designer Series Paper on that.
I used the Pretty Pines Thinlits to cut pinecones from Soft Suede and Early Espresso card stock, and pine boughs from Emerald Espresso card stock. I glued the detailed Early Espresso pinecones onto the solid Soft Suede pinecones. I then glued the pine boughs and pinecones to the card front.
I tied a bow with the new Kraft Rope Trim and attached it to the card with Glue Dots.
Here’s what I used:
These are products from the upcoming 2016 Holiday Catalog that will be available September 1.
These are current products that you can get right now by clicking on the images below!
AUGUST HOSTESS CODE
PMTWBJMQ
If you are placing an order for less than $150, please use this Hostess Code. Click here for details on how to use the Hostess Code. If you are placing an order of $150 or more, you will receive Stampin’ Rewards on your order, so do not use the Hostess Code.
Thanks for stopping by today, and Sweet Stamping!
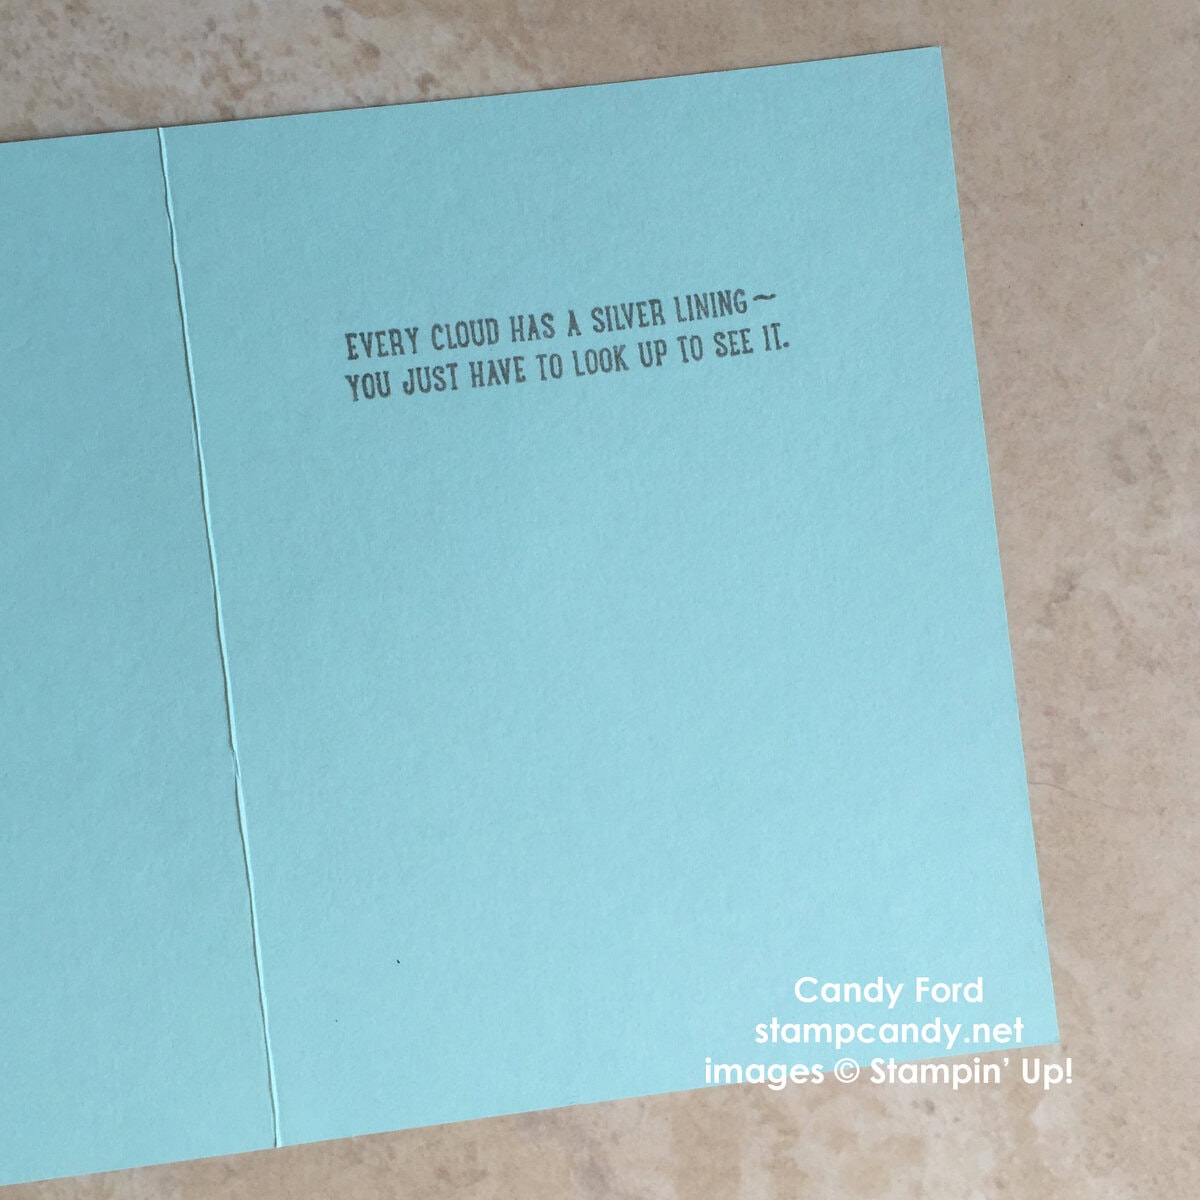
Aug 7, 2016 | Cards, Club, Gallery, Holiday, New Products |
This is the third card I made with the Thoughtful Branches bundle. You can see the first two here and here.
Don’t miss this bundle! It’s only available until August 31, or while supplies last! Click here to get it now!
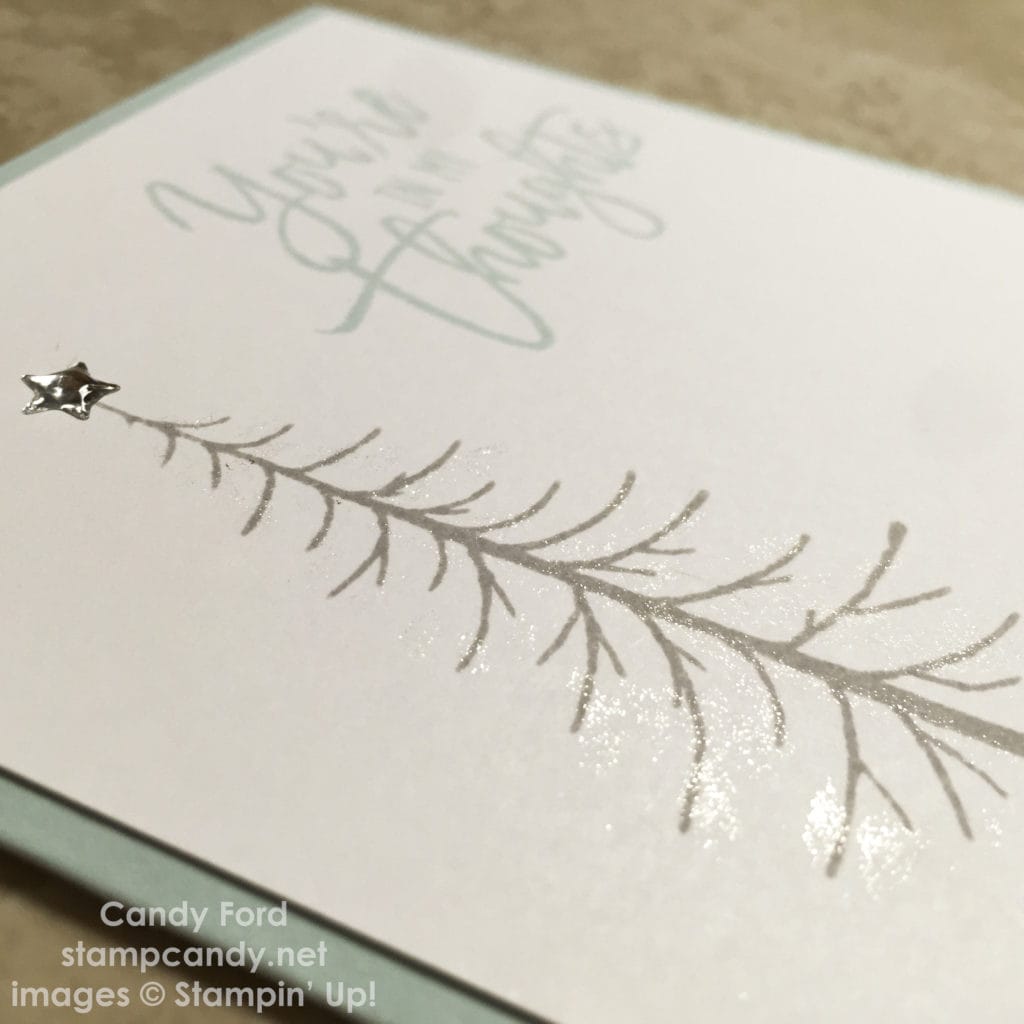
This could be a Christmas card, a Thinking About You card, or even a sympathy card. It’s cool tones of Soft Sky, Smoky Slate, and Whisper White are very soothing.
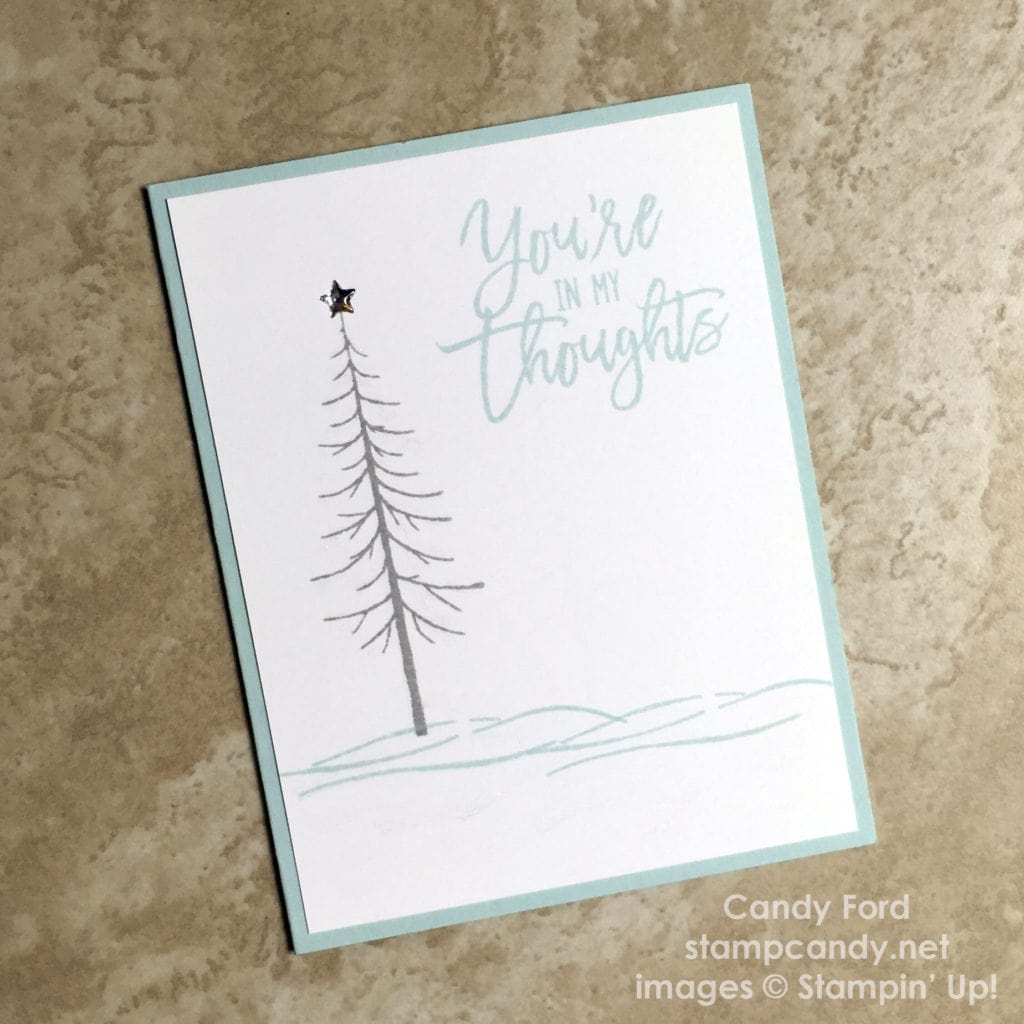
Here’s how I did it:
This is another very simple card.
I stamped the snow and the sentiment in Soft Sky ink and the tree in Smoky Slate ink onto Whisper White card stock cut to 4″ x 5-1/4″.
I added a silver star from the Metallic Enamel Shapes to the tree top. Then I added bits of Clear Wink of Stella for a little shimmer – you can see just a bit of it in the first photo.
I glued it onto a Soft Sky card base. Voila!
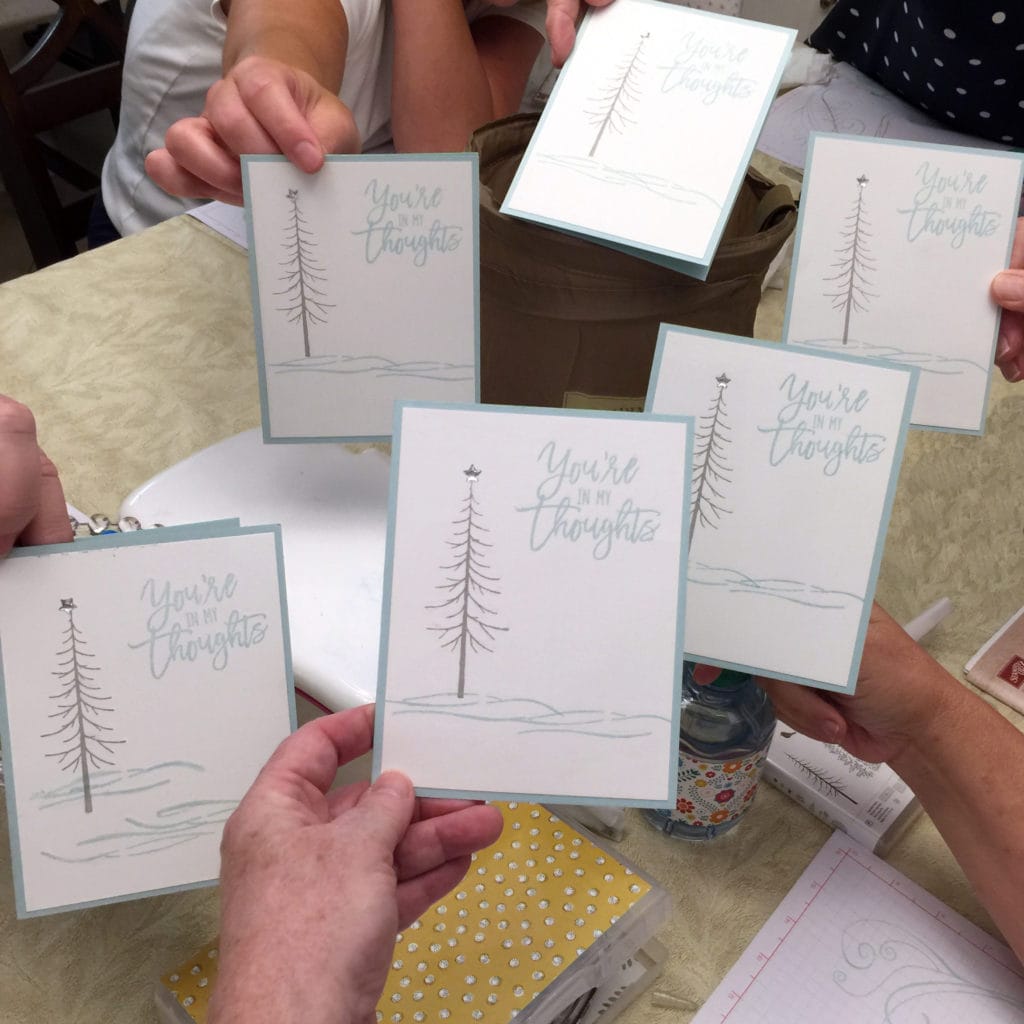
This was one of our August Stamp Club projects. Here’s a shot of everyone’s card:
Here’s what I used:
Get what you need to make this card. Click on the product images to go to my online store now!

AUGUST HOSTESS CODE
PMTWBJMQ
If you are placing an order for less than $150, please use this Hostess Code.
Click here for details on how to use the Hostess Code.
If you are placing an order of $150 or more, you will receive Stampin’ Rewards on your order, so do not use the Hostess Code.
Thanks for stopping by today, and Sweet Stamping!
Aug 6, 2016 | Cards, Gallery, New Products |
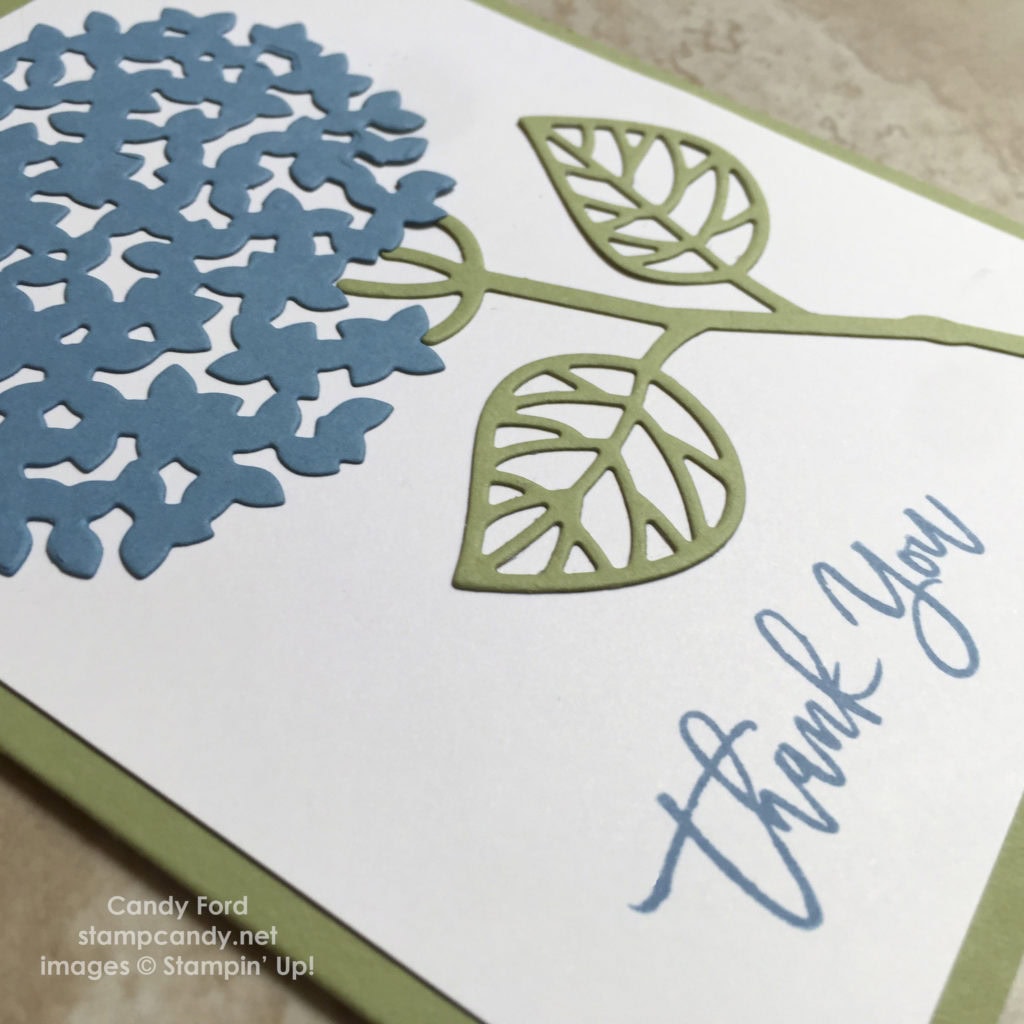
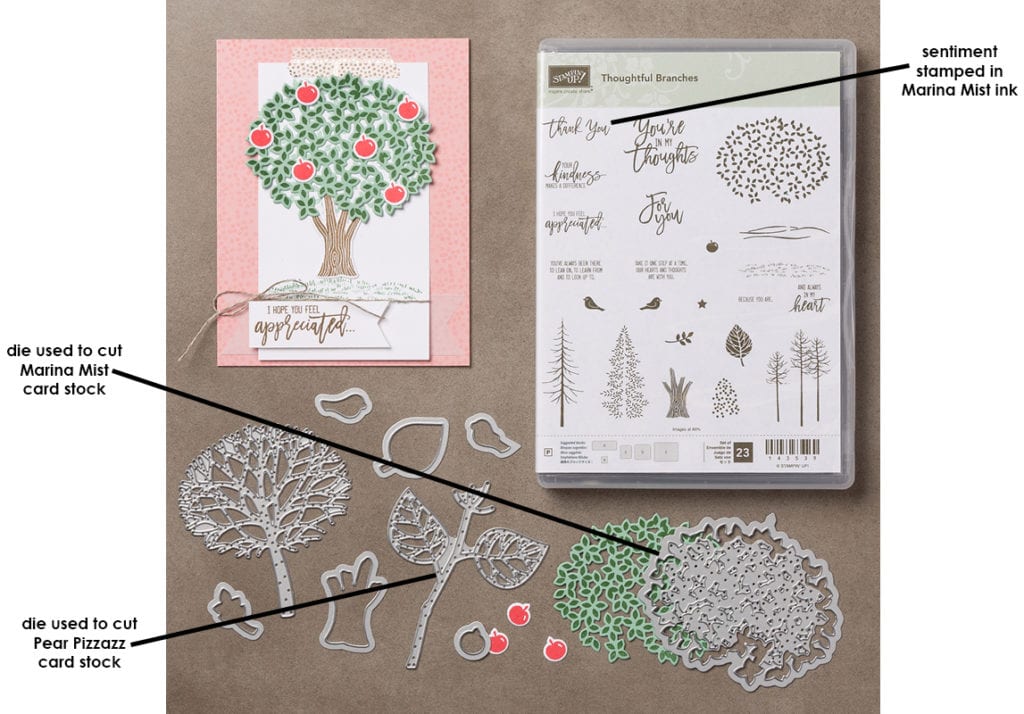
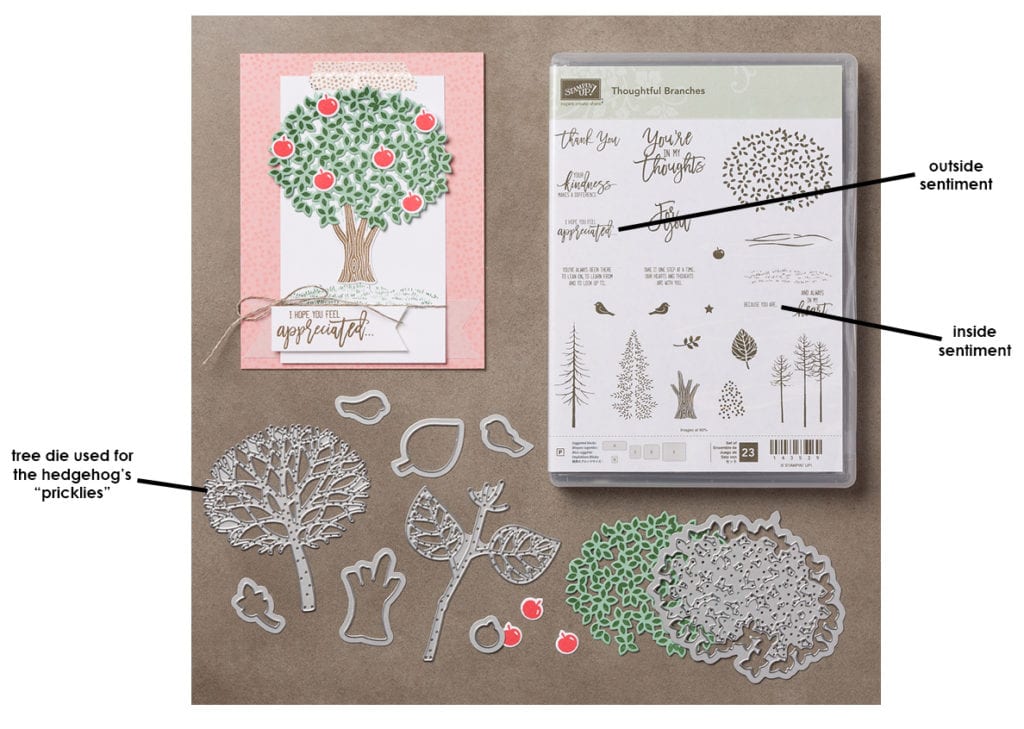
Today I’m sharing with you a second card made with the brand new Thoughtful Branches bundle. You can see the first one here.
Click here to get your bundle now! It is only available until August 31, or while supplies last!
This is such a versatile bundle. You can make different things with it: a tree, a flower, a hedgehog,… And you can use it any time of year, and for any occasion. This is a pretty Springy/Summery card, but you could really use it anytime, especially if you change the colors. Marina Mist is perfect for a blue hydrangea!

Here’s how I did it:
This card is oh so simple. I used the dies to cut a piece of Marina Mist card stock and a piece of Pear Pizzazz card stock. I glued the pieces to Whisper White card stock cut to 4″ x 5-1/4″. Then I stamped the sentiment in Marina Mist. I glued this to the Pear Pizzazz card base. And that is it!
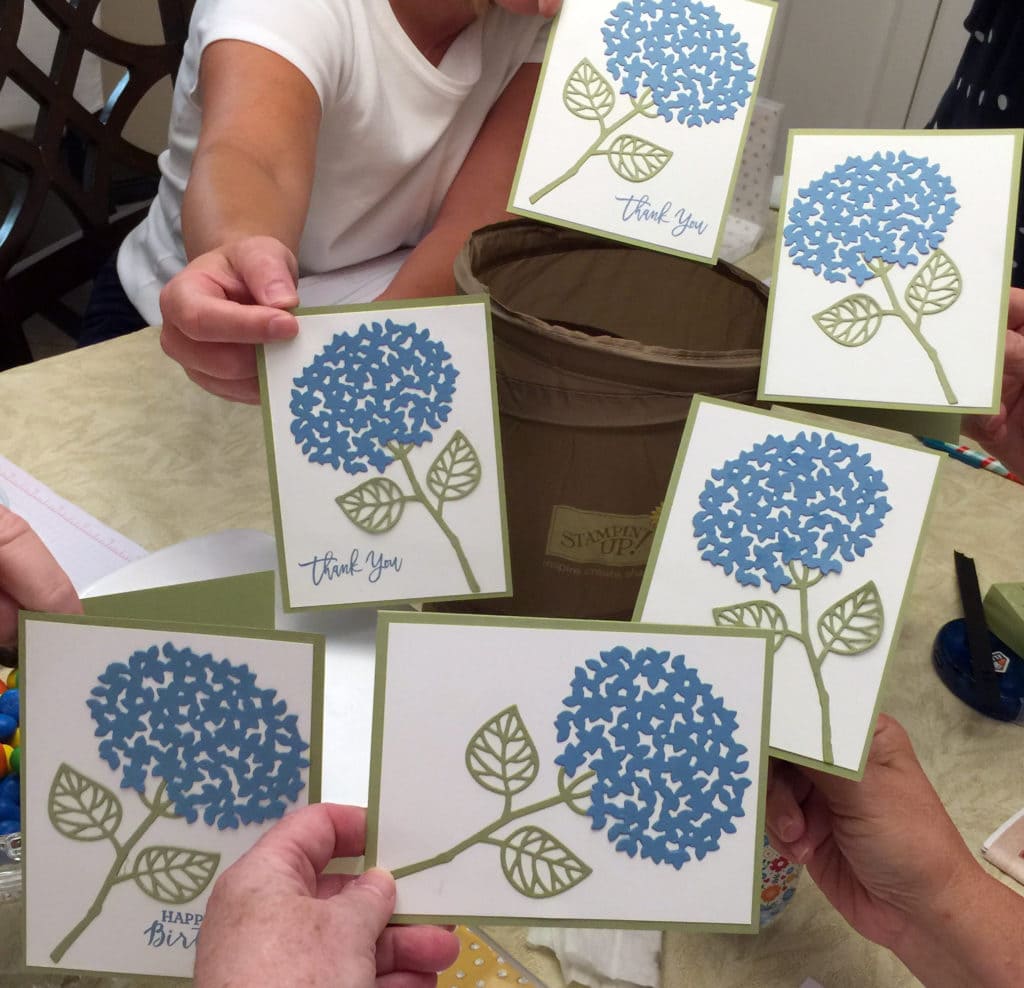
This was one of our August Stamp Club projects. Here are everyone’s cards:
Here’s what I used:
Get what you need to make this card. Click on the product images to go to my online store now.
AUGUST HOSTESS CODE
PMTWBJMQ
If you are placing an order for less than $150, please use this Hostess Code.
Click here for details on how to use the Hostess Code.
If you are placing an order of $150 or more, you will receive Stampin’ Rewards on your order, so do not use the Hostess Code.
Thanks for stopping by today, and Sweet Stamping!
Aug 5, 2016 | Cards, Gallery, New Products |

I’ve seen several different versions of this cute little hedgehog lately, all made from different pieces. Some were online and one I got in a card swap. All they had in common were the tree die for the “prickles” and a heart for the face. I decided to design my own, using a few of the same tools others used, and some different ones.
Here’s how I did it:
I used glue for the whole card. I felt there were so many layers of paper, it didn’t need any more dimension. Use Stampin’ Dimensionals if you would like yours to stand out more.
For the hedgehog:
For the “prickles” I cut a piece of Early Espresso card stock with the tree die from the Beautiful Branches Thinlits, then I cut off the tree trunk.
For the body, I cut a piece of Crumb Cake card stock with an oval die (that was just a little smaller that the Early Espresso piece) from the Layering Ovals Framelits.
I used the Flower Medallion Punch to cut a piece of Crumb Cake CS. I cut the shape into edges like a pie, in half, then quarters, then eighths, cutting between the petals and not through them. I used two of the larger pieces for the ears.

I used the same punch to cut a piece of Blushing Bride CS, cut it into eighths the same way, and used two of the smaller pieces for the insides of the ears, gluing them onto the Crumb Cake pieces.
For the feet, I used the Blossom Builder Punch to cut two of the second largest petal from Crumb Cake CS.

I used the Sweetheart Punch to cut a piece of Crumb Cake CS. Then I used a 1/4″ Circle Punch to cut three little pieces of Basic Black CS. I glued the black pieces onto the heart for the face.
To assemble, I glued the Early Espresso piece onto the Crumb Cake oval body. I glued the face over that. Then I glued the ears and feet to the back of the body with the ends showing.
For the card:
The card base is Crumb Cake CS with a layer of Blooms & Bliss Designer Series paper glued on the front.
I cut a piece of Whisper White CS to 3-1/4″ x 2-3/4″, matted it with a piece of Blushing Bride CS that’s only 1/16″ wider (3-5/16″ x 2-13/16″) and taller that the Whisper White, and glued the hedgehog on top. Another way to cut these two pieces would be to cut both pieces to 3-1/4″ x 2-3/4″, then cut just a tiny 1/16″ sliver off the top and one side of the Whisper White piece. The size is just 1/16″ smaller than the first one, which won’t make a difference in the card design, so cut them whichever way seems easier for you.
I cut a piece of Blushing Bride CS to 1″ x 2-1/2″, stamped the greeting from the Thoughtful Branches stamp set in Early Espresso ink, and glued it to the card front. I then glued on the hedgehog piece.
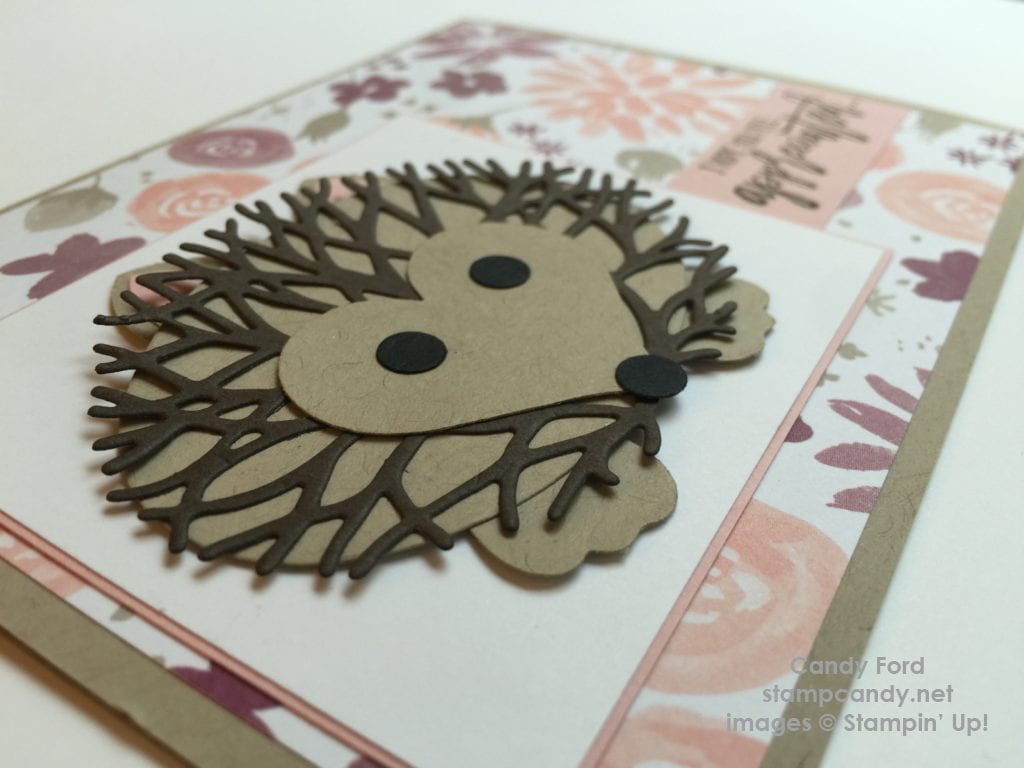
I stamped the second part of the sentiment inside the card in Early Espresso ink. And that’s it!

Explaining it in writing takes longer that making the card!
Here’s what I used:
Get what you need to make this project by clicking on the product images below!
AUGUST HOSTESS CODE
PMTWBJMQ
If you are placing an order for less than $150, please use this Hostess Code.
Click here for details on how to use the Hostess Code.
If you are placing an order of $150 or more, you will receive Stampin’ Rewards on your order, so do not use the Hostess Code.
Thanks for stopping by today, and Sweet Stamping!
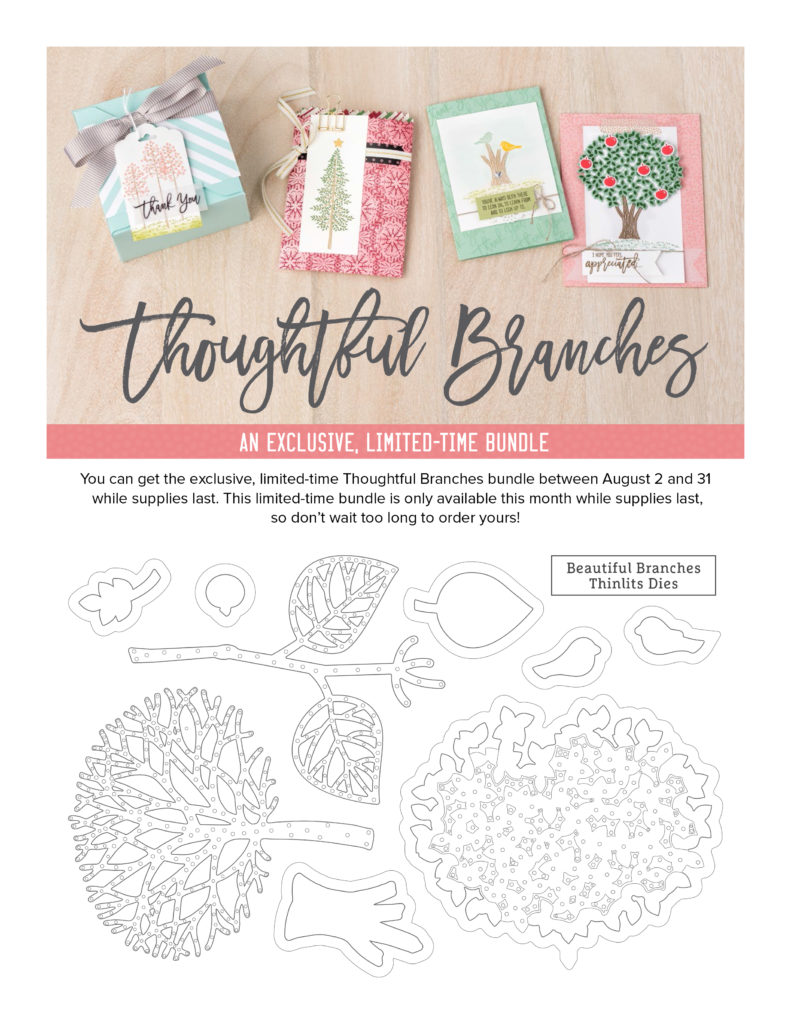
Aug 2, 2016 | Deals, Gallery, New Products |
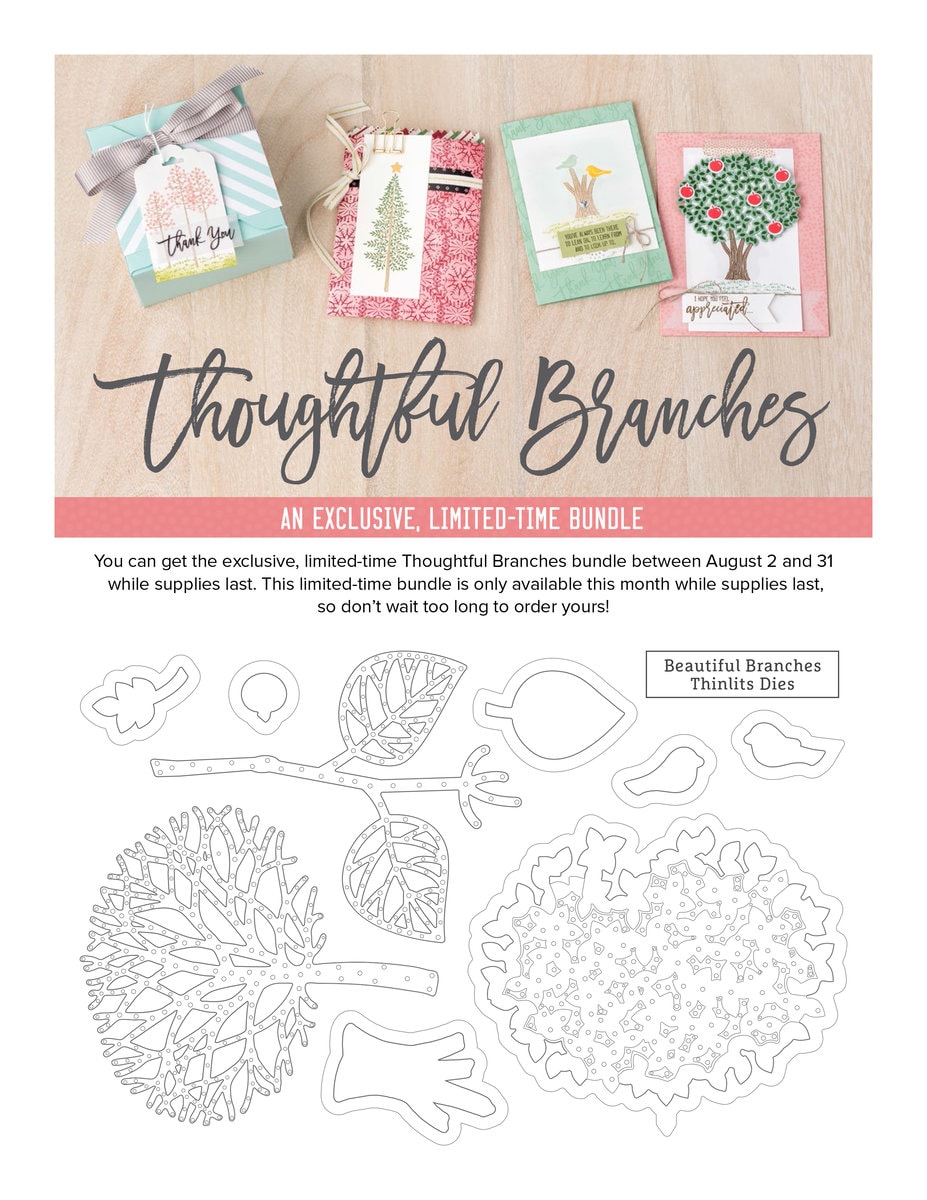
Today is a big day! I am thrilled to announce that the Thoughtful Branches bundle is now available for purchase. It will be available through August 31, or while supplies last. Don’t miss out on this exquisite bundle!
But that’s not all! Join me this Sunday at 2pm in my studio here in Atlanta to make the four projects pictured below. The class fee is only $10. If you order the bundle (Item #144328) at the class, your class is FREE!
See more class details here, including a Class-by-Mail option.
Register now!
AND
Today you can begin using your Bonus Days coupons that you earned in July! Place your online order as usual, and enter the coupon code during the check out process.
Click here to get the Thoughtful Branches bundle now!
Thank you, and Sweet Stamping!


