Dec 26, 2017 | Cards, Gallery, Holiday, New Year |
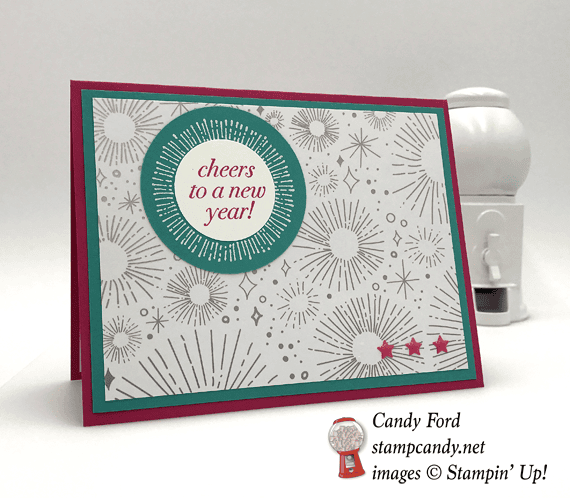
I love using products differently from the way you might initially think of. Like changing up the colors, as I have for today’s card. The metallic Year of Cheer Specialty Designer Series Paper (DSP) lends itself to metallics and neutrals, but I decided to pair it with a couple of bright colors: Melon Mambo and Bermuda Bay.
Here’s what I made:
Here’s what I did:
Cut and scored with my Stampin’ Trimmer:
- Melon Mambo card stock (CS) cut to 5-1/2″ x 8-1/2″, then scored in half at 4-1/4″
- Bermuda Bay CS cut to 5-1/4″ x 4″
- Year of Cheer Specialty Designer Series Paper (DSP) cut to 5″ x 3-3/4″
- Whisper White CS cut to 5-1/4″ x 4″, for the inside
Stamped with the Cheers to the Year stamp set:
- sentiment in Melon Mambo ink onto a scrap of Whisper White CS
- starburst design in Versamark ink onto a scrap of Bermuda Bay CS, then heat embossed in white
Die cut using the Layering Circle Framelits:
Assembled the card:
- sentiment glued onto the starburst
- starburst adhered to the DSP layer with Fast Fuse
- DSP layer adhered to the Bermuda Bay CS layer with Fast Fuse
- Bermuda Bay CS layer glued to the front of the card base
- 3 Melon Mambo star Enamel Shapes applies to the DSP, lower right corner
- Whisper White layer glued to the inside of the card base
Here are today’s colors:
You can click on each one to see all the products that come in that color!
Here’s what I used:
Click on the images for more details and to purchase.
Here’s some stuff you should know:
- Newsletter: subscribe for exclusive deals, projects, and more! Enter your email address and click SUBSCRIBE at the top right of this page, just under the picture of my smiling face.
- Gift Certificates are available in any U.S. dollar amount from me. Contact me – email: candy@stampcandy.net OR call/text: 404-661-5222
- Swatch Books and Product Shares from the 2018 Occasions and Sale-A-Bration Catalogs – you can order yours beginning December 27 HERE.
- Year End Sales Event – December 1, 2017 to January 2, 2018 – CLICK HERE for details. Order soon so you don’t miss your favorite retiring items!
- This is a great time to join my team! With the demonstrator discount of at least 20%, you can get Christmas gifts for all the stampers on your list! Plus you can order from the 2018 Occasions and Sale-A-Bration catalogs now! CLICK HERE for more information. Contact me with any questions: email candy@stampcandy.net or call/text 404-661-5222
- Sale-a-bration Stamp Fest coming January 20. Details and register HERE
- Check out My Events Calendar HERE
- Stampin’ Blends alcohol markers are now available! Click HERE for more info.
- Hostess Code for the month of December (HS67FXTS) Find out more about HOW, WHEN and WHY to use the code HERE.
- December’s FREE gift: Year of Cheer Specialty Washi Tape – Find out more HERE.
- Gumball Rewards for all orders over $50. Find out more HERE.
Thanks for stopping by today, and Sweet Stamping!

Dec 24, 2017 | Boxes, Cards, Christmas, Gallery, Gift Wrap, Gifts, Holiday, New Year |
Happy Christmas Eve! Santa is loading his sleigh and getting ready for his big ride tonight. Whether you are home or visiting, with family or friends, wherever you are, I wish you a very Merry and Safe Christmas!
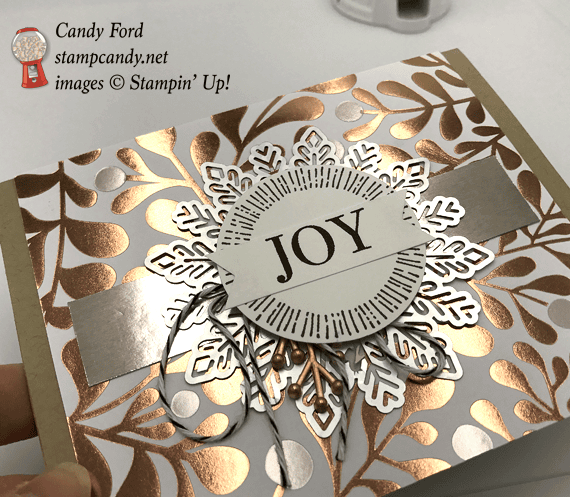
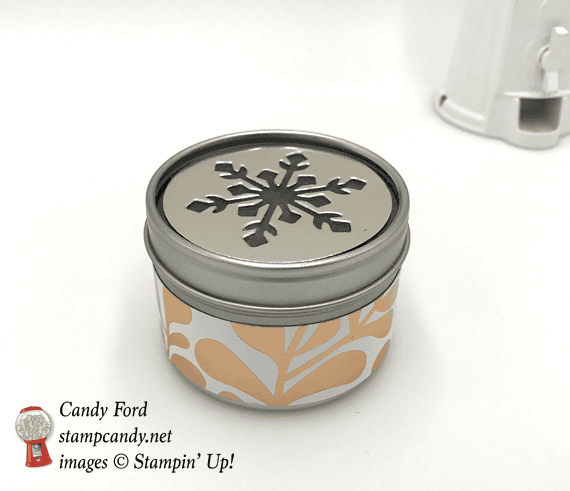
Last year I was fortunate enough to earn Stampin’ Up!’s incentive trip to Thailand. The trip was this past July. While we were there we were given the 2017 Holiday Catalog (a month before anyone else, and two months before the catalog went live for customers!) We also got to do some fantastic Make & Take projects using the new products. Today’s card made with products from the Year of Cheer Suite was one of those. I’ve used some of the same products to decorate a small tin with a clear top.
Here’s what I made:


Here’s what I did:
Cut and scored with my Stampin’ Trimmer:
- Crumb Cake card stock (CS) cut to 5-1/2″ x 8-1/2″, then scored in half at 4-1/4″
- Year of Cheer Designer Series Paper (DSP) cut to 5″ x 4-1/4″
- Champagne Foil Sheet cut to 4-1/2″ x 1″
- Whisper White CS cut to 2″ x 3/4″
- DSP cut to 1″ x 9″
Stamped with the Cheers to the Year stamp set:
- sentiment in Early Espresso ink onto the Whisper White CS strip
- starburst design in Early Espresso ink onto a scrap of Whisper White CS
Die cut using the Layering Circle Framelits:
- starburst design from the scrap of Whisper White CS
- a scrap of Champagne Foil Sheet
Die cut using the Trim Your Stocking Thinlits:
- snowflake from the Champagne Foil circle
Assembled the card:
- notches cut in the ends of the sentiment strip with Paper Snips
- large DSP layer adhered to the front of the card base with Fast Fuse
- Champagne Foil strip adhered to the DSP layer with Fast Fuse
- silver Foil Snowflake adhered to the foil strip with Fast Fuse (it’s easier to put the Fast Fuse on the strip, then stick the snowflake to it, instead of trying to apply the Fast Fuse to the snowflake)
- Basic Black Baker’s Twine tied in a bow and adhered to the snowflake with Mini Glue Dots, so it will stick out from under the upper layers
- a Year of Cheer Embellishment adhered to the snowflake with Mini Glue Dots, so it will stick out from under the upper layers
- starburst die cut adhered to the snowflake with Stampin’ Dimensionals
- sentiment glued to the starburst die cut
Decorated the tin:
- wrapped the DSP strip around the tin and secured it with Fast Fuse
- adhered the snowflake cut foil circle to the clear part of the lid with Fast Fuse
Here are today’s colors:
You can click on each one to see all the products that come in that color!
Here’s what I used:
Here’s some stuff you should know:
- Newsletter: subscribe for exclusive deals, projects, and more! Enter your email address and click SUBSCRIBE at the top right of this page, just under the picture of my smiling face.
- Gift Certificates are available in any U.S. dollar amount from me. Contact me – email: candy@stampcandy.net OR call/text: 404-661-5222
- Swatch Books and Product Shares from the 2018 Occasions and Sale-A-Bration Catalogs – you can order yours beginning December 27 HERE.
- Year End Sales Event – December 1, 2017 to January 2, 2018 – CLICK HERE for details. Order soon so you don’t miss your favorite retiring items!
- This is a great time to join my team! With the demonstrator discount of at least 20%, you can get Christmas gifts for all the stampers on your list! Plus you can order from the 2018 Occasions and Sale-A-Bration catalogs now! CLICK HERE for more information. Contact me with any questions: email candy@stampcandy.net or call/text 404-661-5222
- Sale-a-bration Stamp Fest coming January 20. Details and register HERE
- Check out My Events Calendar HERE
- Stampin’ Blends alcohol markers are now available! Click HERE for more info.
- Hostess Code for the month of December (HS67FXTS) Find out more about HOW, WHEN and WHY to use the code HERE.
- December’s FREE gift: Year of Cheer Specialty Washi Tape – Find out more HERE.
- Gumball Rewards for all orders over $50. Find out more HERE.
Thanks for stopping by today, and Sweet Stamping!
Dec 17, 2017 | Christmas, Food, Gallery, Gift Wrap, Gifts, Holiday, New Year |
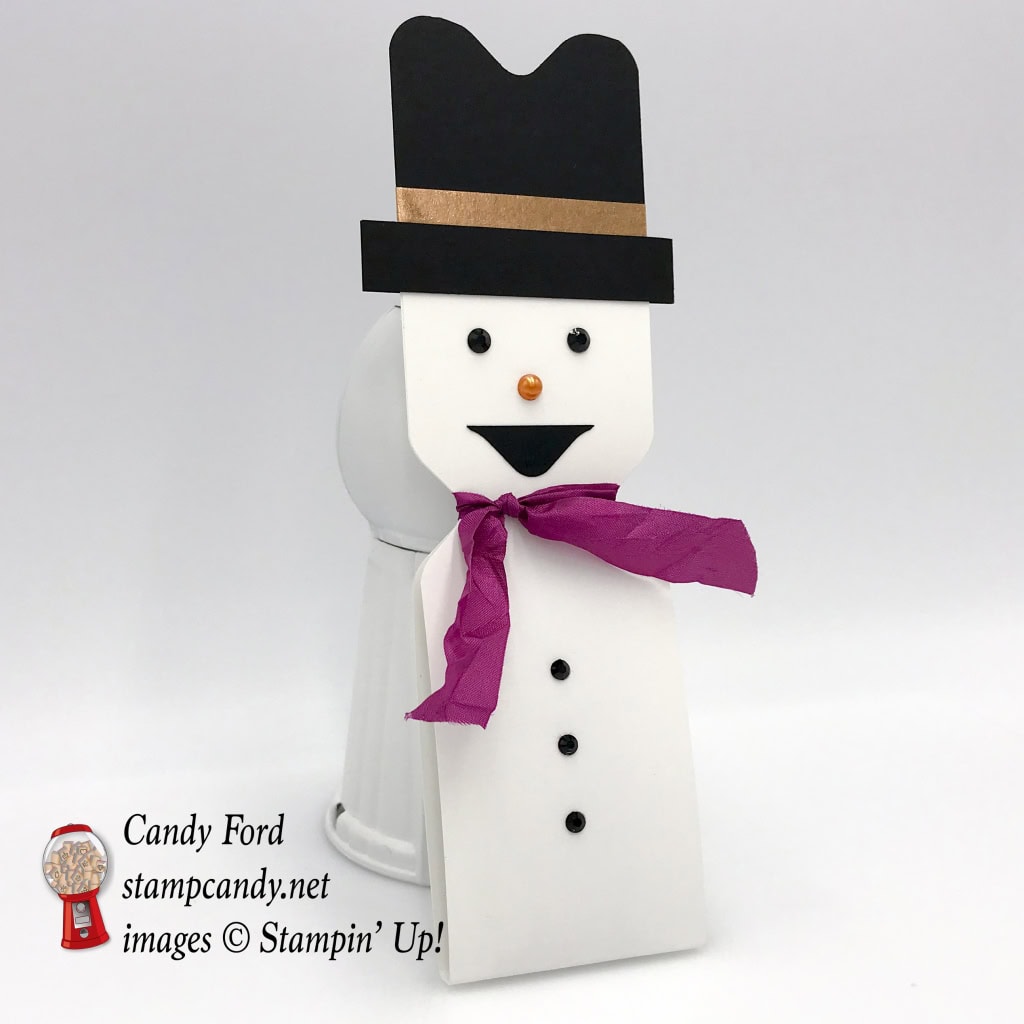
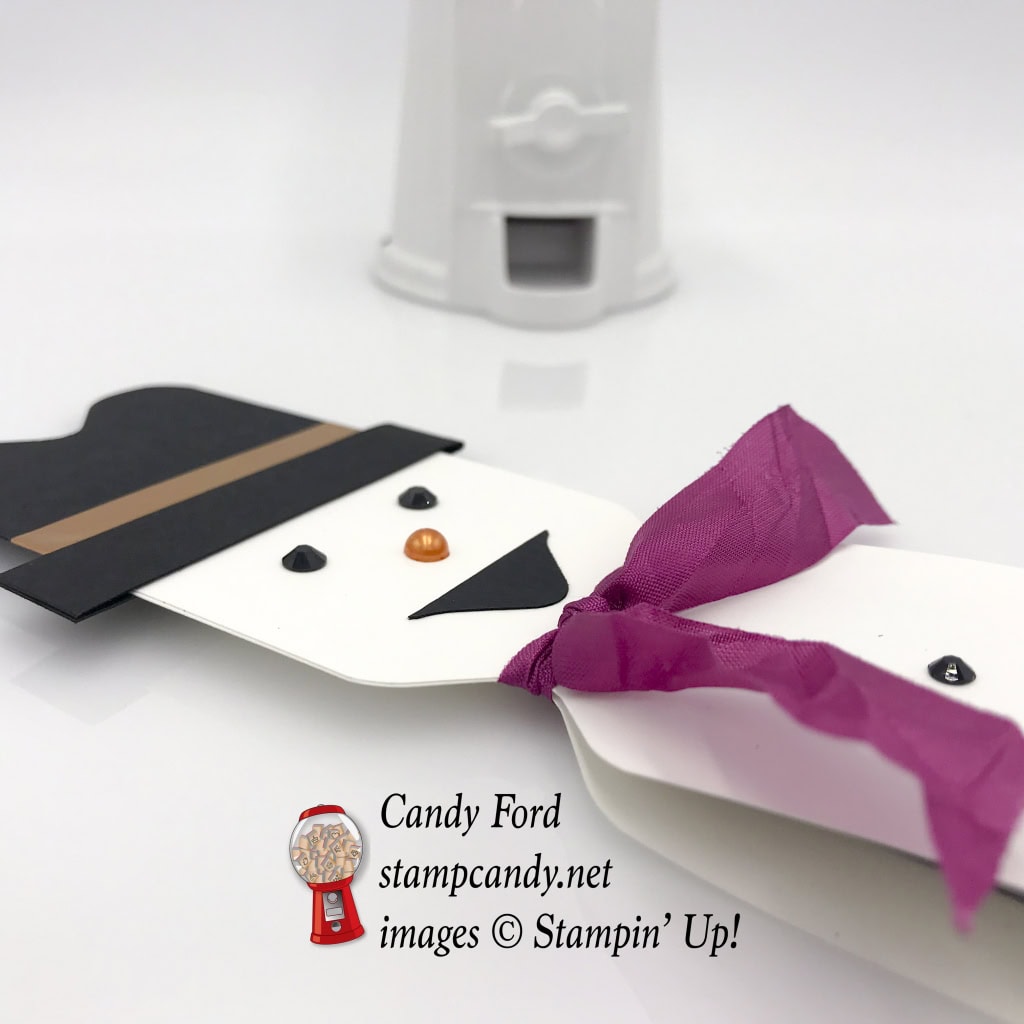
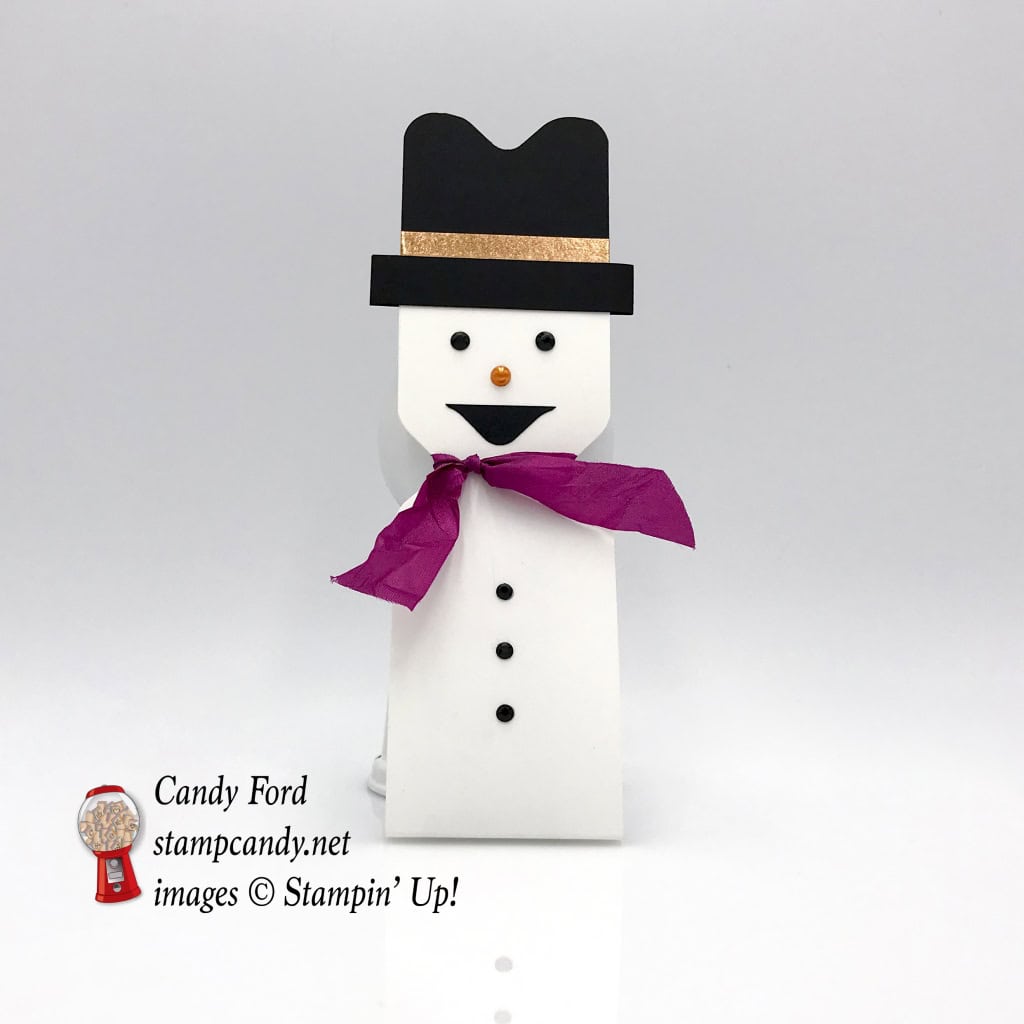
This cute little Snowman contains a snack size Hershey Bar, and makes a perfect small gift for your child’s classmates, the mail carrier, coworkers,… The Envelope Punch Board makes it really quick and easy, and you know I’m all about quick and easy projects. I CASEd this project from Lisa Bernard at Queen B Creations.
Here’s what I made:

Here’s what I did:
Cut and scored with my Stampin’ Trimmer:
- Whisper White card stock (CS) cut to 2″ x 11″, then scored at 5-3/8″ and 5-5/8″
- NOTE: You can use regular or thick Whisper White CS. I used regular.
- Basic Black CS cut to 2″ x 2″
- Basic Black CS cut to 1/2″ x 5″, and scored in half at 2-1/2″
Cut with the Envelope Punch Board:
- a notch 2″ from each end and on both sides of the Whisper White CS, to create the neck
- a notch from the top of the hat (save the piece that comes off)
- top two corners with the corner rounder on the back of the board
Colored with a Pumpkin Pie Stampin’ Blends Marker:
Assembled the gift:
- burnish all score lines with a Bone Folder
- snack size Hershey Bar adhered to the inside of the Whisper White CS with a small piece of Tear & Tape
- ribbon tied around the neck
- hat glued to the top of the snowman
- 1/2″ strip of Basic Black CS glued to the bottom of the hat, wrapping around to cover both sides where the hat meets the top of the snowman
- Year of Cheer Washi Tape applied all the way around the hat
- small piece of Basic Black CS that was punched off the hat glued onto the front of the snowman for the mouth (I trimmed the little paper threads at the very ends with my Paper Snips.)
- Black Rhinestones applied to the face: larger ones for the eyes and smaller ones for the buttons
- colored pearl applied for the nose
Here are today’s colors:
You can click on each one to see all the products that come in that color!
Here’s what I used:
Click on the images for more details and to purchase.
Here’s some stuff you should know:
- Gift Certificates are available in any U.S. dollar amount from me. Contact me – email: candy@stampcandy.net OR call/text: 404-661-5222
- Swatch Books and Product Shares from the 2018 Occasions and Sale-A-Bration Catalogs – you can order yours now HERE.
- Year End Sales Event – December 1, 2017 to January 2, 2018 – CLICK HERE for details. Order soon so you don’t miss your favorite retiring items!
- This is a great time to join my team! With the demonstrator discount of at least 20%, you can get Christmas gifts for all the stampers on your list! Plus you can order from the 2018 Occasions and Sale-A-Bration catalogs now! CLICK HERE for more information. Contact me with any questions: email candy@stampcandy.net or call/text 404-661-5222
- Sale-a-bration Stamp Fest coming January 20. Details and register HERE
- Check out My Events Calendar HERE
- Stampin’ Blends alcohol markers are now available! Click HERE for more info.
- Hostess Code for the month of December (HS67FXTS) Find out more about HOW, WHEN and WHY to use the code HERE.
- December’s FREE gift: Year of Cheer Specialty Washi Tape – Find out more HERE.
- Gumball Rewards for all orders over $50. Find out more HERE
Thanks for stopping by today, and Sweet Stamping!
Dec 8, 2017 | Cards, Christmas, Gallery, Holiday, New Year |
Silver and gold, silver and gold. Remember the song from the old Rudolph animated show? If you’re in the mood for some holiday glitz, you can make this very easy card using a Silver Foil Sheet, the metallic Year of Cheer Specialty Washi Tape, and Year of Cheer Embellishments. The Winter Wonder Textured Impressions Embossing Folder provides the focal point, and the greeting from the Cheers to the Year stamp set is heat embossed in gold to continue the shiny, metallic theme. Click on the image below to see the entire Year of Cheer Suite of products.
Gift Certificates:
Before I show you today’s project, I want to make sure you know about my Gift Certificates. They’re the perfect gift for you to give to stamping loved ones, and the perfect gift to you from loved ones. Contact me, or have your loved one contact me, for details. Gift Certificates can be for any amount.
call/text: 404-661-5222 OR email: candy@stampcandy.net
Here’s what I made:


Here’s what I did:
Cut and scored with my Stampin’ Trimmer:
- Whisper White Thick card stock (CS) cut to 5-1/2″ x 8-1/2″, then scored in half at 4-1/4″
- Silver Foil Sheet cut to 5-1/4″ x 4″
Stamped with the Cheers to the Year stamp set:
- greeting in Versamark ink onto a scrap of Whisper White CS, then heat embossed using Gold stampin’ emboss powder
- used Paper Snips to trim down to about 1/8″ from the greeting on all sides
Embossed using the Winter Wonder TIEF :
- Silver Foil Sheet, on the left side
Assembled the card:
- four different pieces of the washi tape wrapped around the right end of the Silver Foil Sheet
- Silver Foil Sheet glued onto the front of the card base
- two embellishments adhered to the washi tape with Mini Glue Dots
- greeting adhered the the washi tape, over the embellishments, using Stampin’ Dimensionals
- a small gold vinyl sticker adhered to the center of the big snowflake
Here are today’s colors:
You can click on each one to see all the products that come in that color!
Here’s what I used:
Click on the images for more details and to purchase.
Here are some key points to remember:
- Year End Sales Event – December 1, 2017 to January 2, 2018 – CLICK HERE for details
- This is a great time to join my team! With the demonstrator discount of at least 20%, you can get Christmas gifts for all the stampers on your list! CLICK HERE for more information. Contact me with any questions: email candy@stampcandy.net or call/text 404-661-5222
- Sale-a-bration Stamp Fest coming January 20. Details and register HERE
- Check out My Events Calendar HERE
- Stampin’ Blends alcohol markers are now available! Click HERE for more info.
- Hostess Code for the month of December (HS67FXTS) Find out more about HOW, WHEN and WHY to use the code HERE.
- December’s FREE gift: Year of Cheer Specialty Washi Tape – Find out more HERE.
- Gumball Rewards for all orders over $50. Find out more HERE
Thanks for stopping by today, and Sweet Stamping!
Nov 24, 2017 | Christmas, Food, Gallery, Gift Wrap, Gifts, Holiday, New Year |
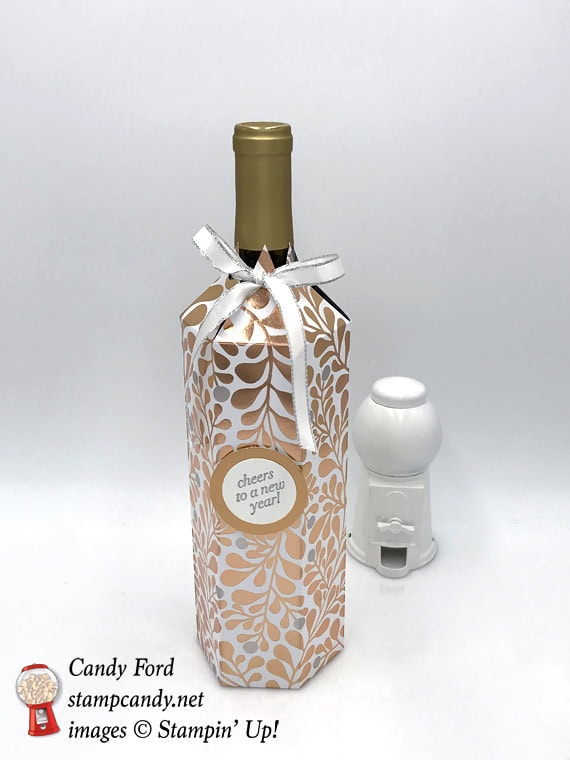
This time of year we all have lots of parties and events to attend. A bottle of wine (or fancy vinegar, or flavored oil, or…) is the most common host gift to take. Make it extra special with a beautiful cover you made yourself. You’ll feel proud to give the gift, and they will appreciate it so much more. And this cover is deceptively easy to make! You can see another one I made recently here.
Here’s what I made:
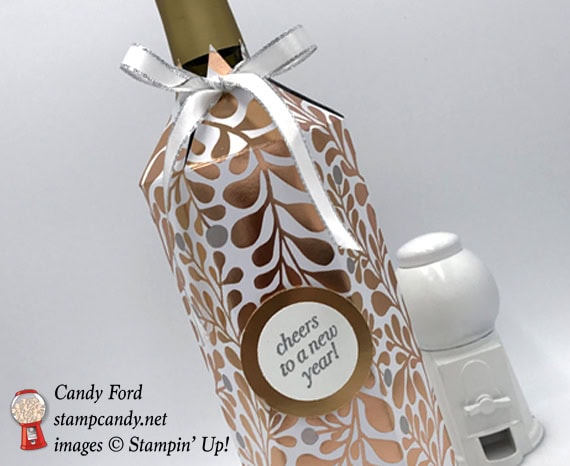
Here’s what I did:
Cut and scored with my Stampin’ Trimmer:
- Year of Cheer Specialty Designer Series Paper (DSP) cut to 11″ x 12
- scored along the 11″ side at 1-3/4″, 3-1/2″, 5-1/4″, 7″, 8-3/4″, 10-1/2″
- scored along the 12″ side at 2″ and 10″
Cut using Paper Snips, according to the diagram:
- removed two smallest rectangles, and angled the leftover tab (in blue)
- cut vertical score lines along the bottom just up to the first horizontal score line
- marked along the top side at 7/8″, 2-5/8″, 4-3/8″, 6-1/8″, 7-7/8″, and 9-5/8″
- cut from marks to the intersections of the vertical score lines and the first horizontal score line – this cuts away the green areas
- used a 1/4″ circle punch to cut a hole in each triangle, about 1/2″ or so from the top – you may want to use a smaller circle punch, like the 1/8″, depending on the size of your ribbon

Stamped with the Cheers to the Year stamp set:
- sentiment in Versamark ink onto a piece of Whisper White card stock (CS), then heat embossed in silver
Die cut using the Layering Circles Framelits:
- sentiment
- a scrap of Copper Foil Sheet
Assembled the project:
- skinny tab on one side of the bottle cover adhered to the inside of the other end of the cover with Fast Fuse
- bottle inserted into the cover to make the next step easier:
- folded in one of the bottom tabs, then adhered the opposite tab to it with Fast Fuse, making sure the tabs lined up with each other
- repeated this step for the remaining two pairs of tabs, adhering them all together
- ran a 22″ piece of ribbon through each hole in the top triangles, always front to back, then pulled it tight (not too hard or you’ll tear the paper) and tied a bow
- sentiment adhered onto the Copper circle with Fast Fuse
- adhered sentiment to the cover with Stampin’ Dimensionals
NOTE 1: I prefer to use dry adhesives (like Fast Fuse, Tear & Tape, and Stampin’ Dimensionals) on slick papers like the metallic foils.
NOTE 2: If you’d like to make the cover from solid color card stock, and add panels of DSP to it, each DSP panel should be 1-1/2″ x 7-3/4″.
Here are today’s colors:
You can click on each one to see all the products that come in that color!
Here’s what I used:
Click on the images for more details and to purchase.
Here are some key points to remember:
- Online Extravaganza is happening now through November 26! Click HERE to shop these amazing deals!
- Sale-a-bration Stamp Fest coming January 20. Details and register HERE
- Check out my events calendar HERE
- Stampin’ Blends alcohol markers are now available! Click HERE for more info.
- Hostess Code for the month of November (JBHB42YT)
Find out more about HOW, WHEN and WHY to use the code HERE. - November’s FREE gift: Stitched Felt Embellishments
Find out more HERE. - Gumball Rewards for all orders over $50. Find out more HERE
Thanks for stopping by today, and Sweet Stamping!
Jun 18, 2017 | Cards, Gallery, New Year |
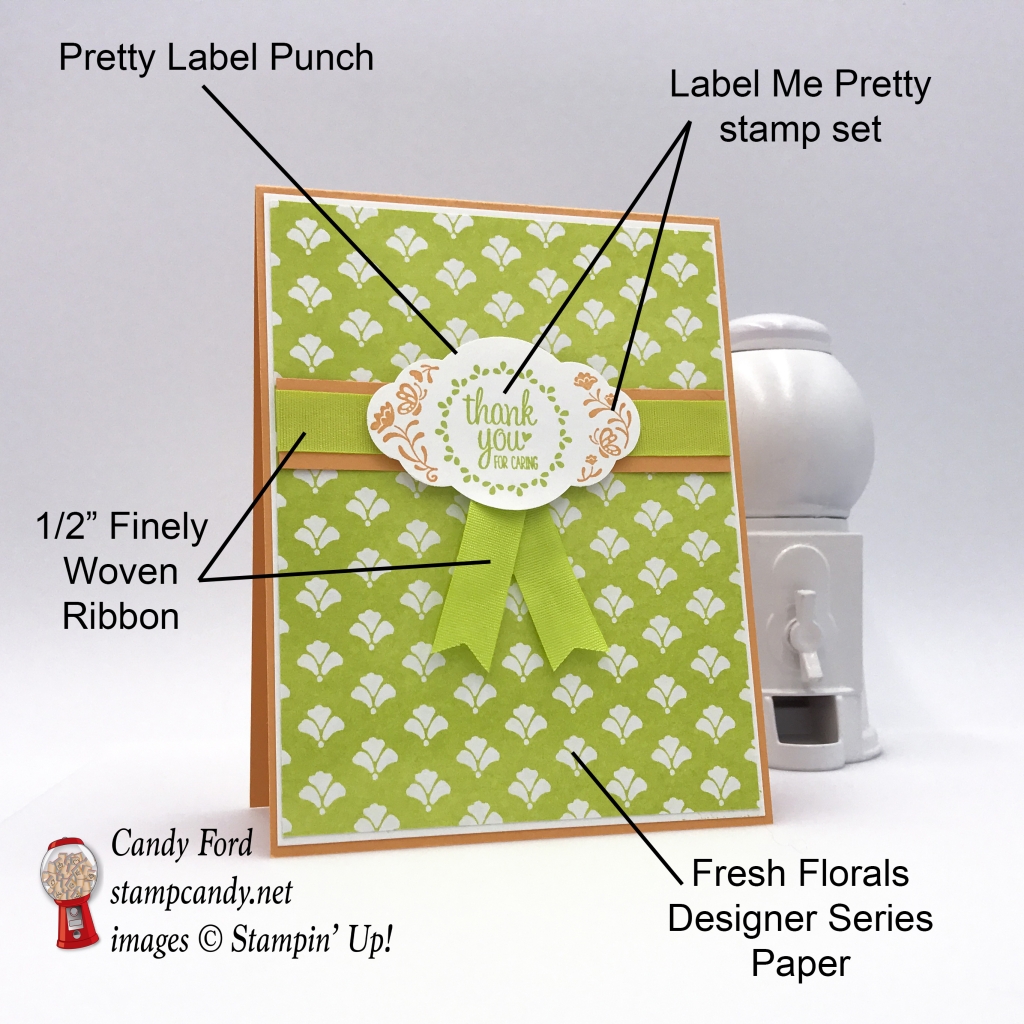
Today’s project is a sweet thank you card in Peekaboo Peach and Lemon Lime Twist. I used the new Label Me Pretty Bundle (Label Me Pretty stamp set and Pretty Label Punch), Fresh Florals Designer Series Paper, and 1/2″ Finely Woven Ribbon. I think it’s a pretty cute card, if I do say so myself.
Here’s what I made:
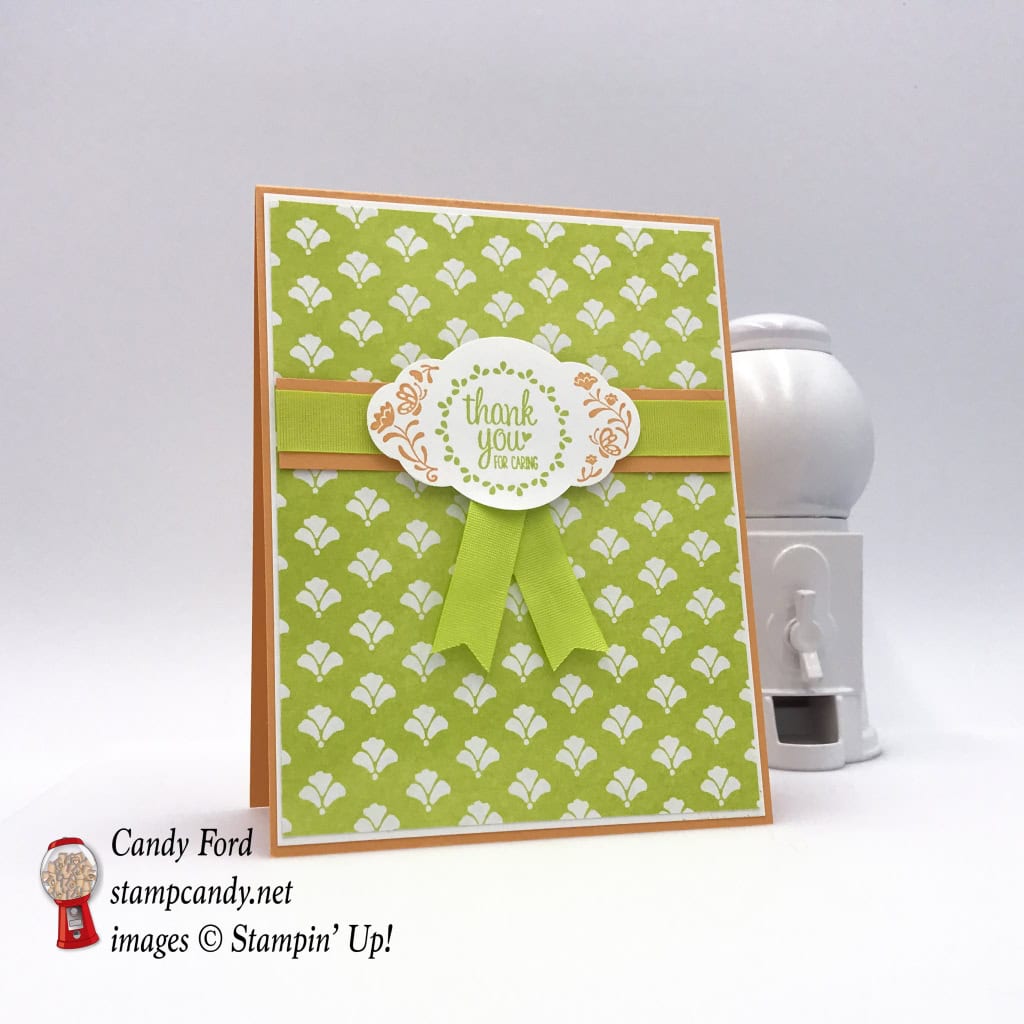
Here’s what I did:
Cut and scored with my Stampin’ Trimmer:
- Peekaboo Peach card stock (CS) cut to 4-1/4″ x 11″, then scored in half at 5-1/2″
- Whisper White CS cut to 4-1/8″ x 5-3/8″ (2 pieces)
- Fresh Florals Designer Series Paper (DSP) to 4″ x 5-1/4″
- Peekaboo Peach CS cut to 3/4″ x 4″
Stamped with the Label Me Pretty stamp set:
- flowers in Peekaboo Peach ink onto a piece of Whisper White CS
- circled sentiment in Lemon Lime Twist ink in center of flowers
Cut using the Pretty Label Punch:
Assembled the card:
- one Whisper White CS layer glued onto front of Peekaboo Peach card base
- Peekaboo Peach CS strip glued to DSP
- adhered a 4″ length of the ribbon to the Peekaboo Peach CS strip with Fast Fuse
- folded another piece of the ribbon and adhered it with Fast Fuse as shown, then notched the ends with Paper Snips
- punched piece adhered with Stampin’ Dimensionals
- DSP glued to Whisper White layer
- second Whisper White CS layer glued inside card base
Here are the colors I used:
You can click on each one to see all the products that come in that color.
Here’s what I used:
Click on the images for more details and to purchase.


Place an order (an individual order, a hosted workshop order, or even a demonstrator order) of at least $350 in the month of June and receive MORE Stampin’ Rewards! You can use the rewards toward free product, or toward a Starter Kit! No special code needed. Every qualifying order will automatically receive the extra rewards.
June Host Code
73VP9AQY
Use the Host Code on online orders less than $15o. See how to use a Host Code here.
Online orders of $75-149.99 placed with the Host Code will receive the FREE gift of the month!
Online orders of $150 or more will automatically receive the FREE gift of the month! Do not use the Host Code.
June’s FREE gift is a pack of the amazing new Color Theory Designer Series Paper! So many designs, so many colors, so many uses. Designed with a paint chip style color variation on one side, wood grain or paint crackle on the other side.
* Each sheet is double-sided for double the creative options
* Works beautifully on card fronts.
* 48 sheets: 4 each of 12 double-sided designs. 6” x 6”
* Acid-free
* Lignin free
* Coordinating colors: Berry Burst, Crushed Curry, Dapper Denim, Old Olive, Whisper White

“No Contact” orders are not eligible for the free gift.
(I can ship within US only.)

Swatch Books & Paper Shares
for the brand new
2017-2018 Annual Catalog
Designer Series Papers
are available to order now!
Click here to order yours now!
Gum Ball Rewards
 You always earn a Gum Ball for every $50 you spend on an order with me. Earn 10 Gum Balls and I’ll send you a free stamp set of your choice! See the Gum Ball Rewards page for details.
Click here to shop my online store!
Thanks for stopping by today, and Sweet Stamping!
