Feb 8, 2017 | Cards, Events, Gallery, Holiday, Occasions |
As a Stampin’ Up! demonstrator, I get to attend wonderful events where I get new catalogs, see and play with new products, and order them, all before anyone else. Back in November, I attended such an event and got to make some lovely projects. Today I’m sharing one of those with you.
Here’s what I made:
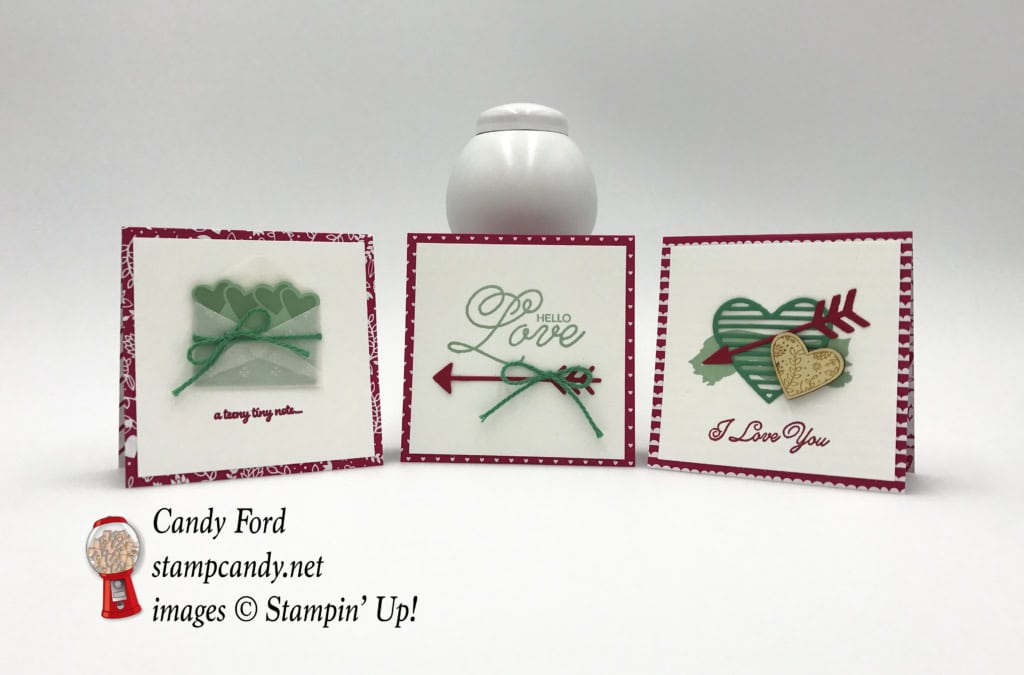
Here’s what I did:
Each card is half a piece of Sending Love DSP, folded in half to make a 3″ x 3″ card.
There is a 2-3/4″ square piece of Whisper White card stock glued onto the front of each one. Each piece is decorated differently, but with the same Sealed With Love bundle.
There is another 2-3/4″ square piece of Whisper White card stock glued to the inside for a handwritten note.
Here’s what I used:
Thanks for stopping by today, and Sweet Stamping!

Feb 7, 2017 | Cards, Gallery, Holiday, Occasions |
Today I’m sharing another very simple Valentine. It’s just card stock, a piece of Designer Series Paper, cut circles, and a stamp.
Here’s what I made:
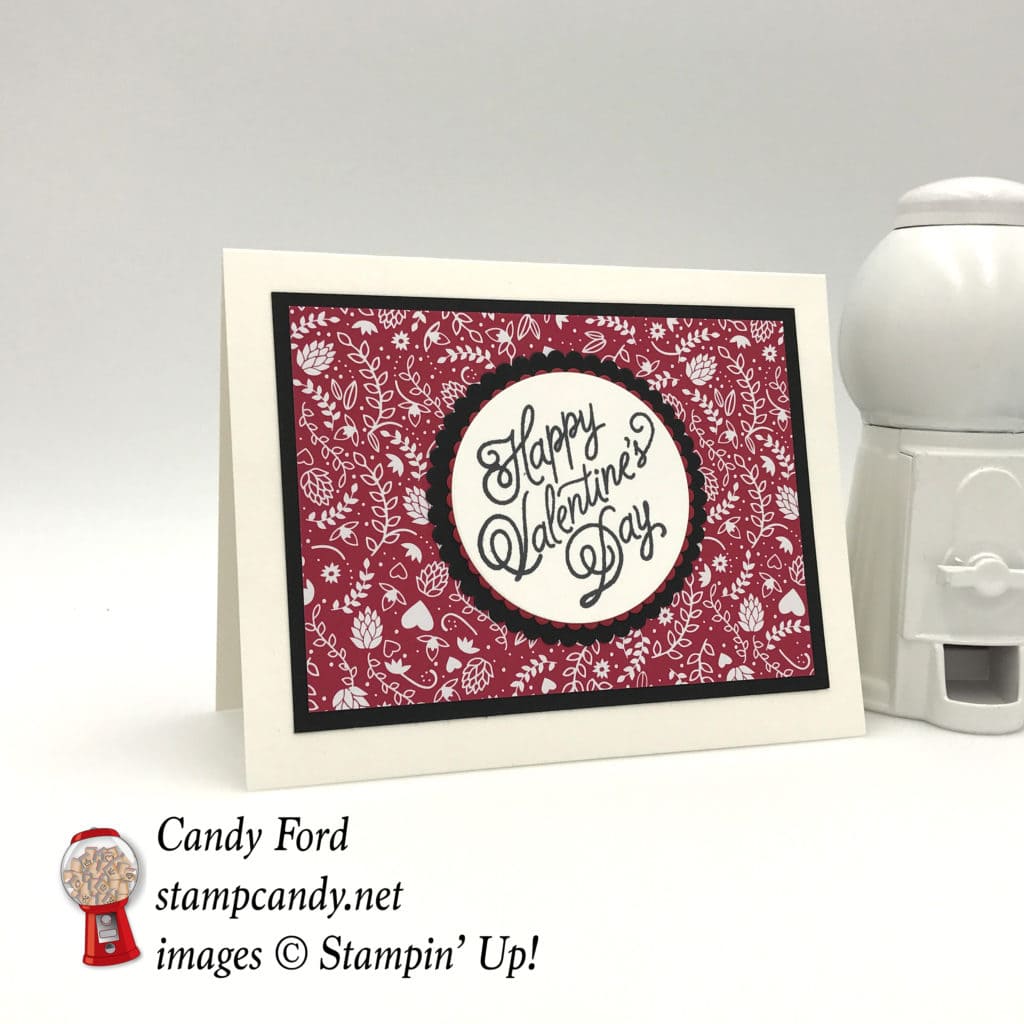
Here’s what I did:
The card base is Thick Whisper White CS, with a layer of Basic Black CS, and layer of Sending Love DSP.
I used the Layering Circles Framelits to cut three CS circles: one in Whisper White, one scalloped in Real Red, and one scalloped in Basic Black.
I used glue for the whole card, but you could pop up the circles with Stampin’ Dimensionals.
Here’s what I used:
Thanks for stopping by today, and Sweet Stamping!
Feb 6, 2017 | Cards, Gallery, Holiday, Occasions |
Valentine’s Day is just around the corner, but you still have time to get what you need to make cards for your sweethearts. If you’re looking for something easy, check out my card for today.
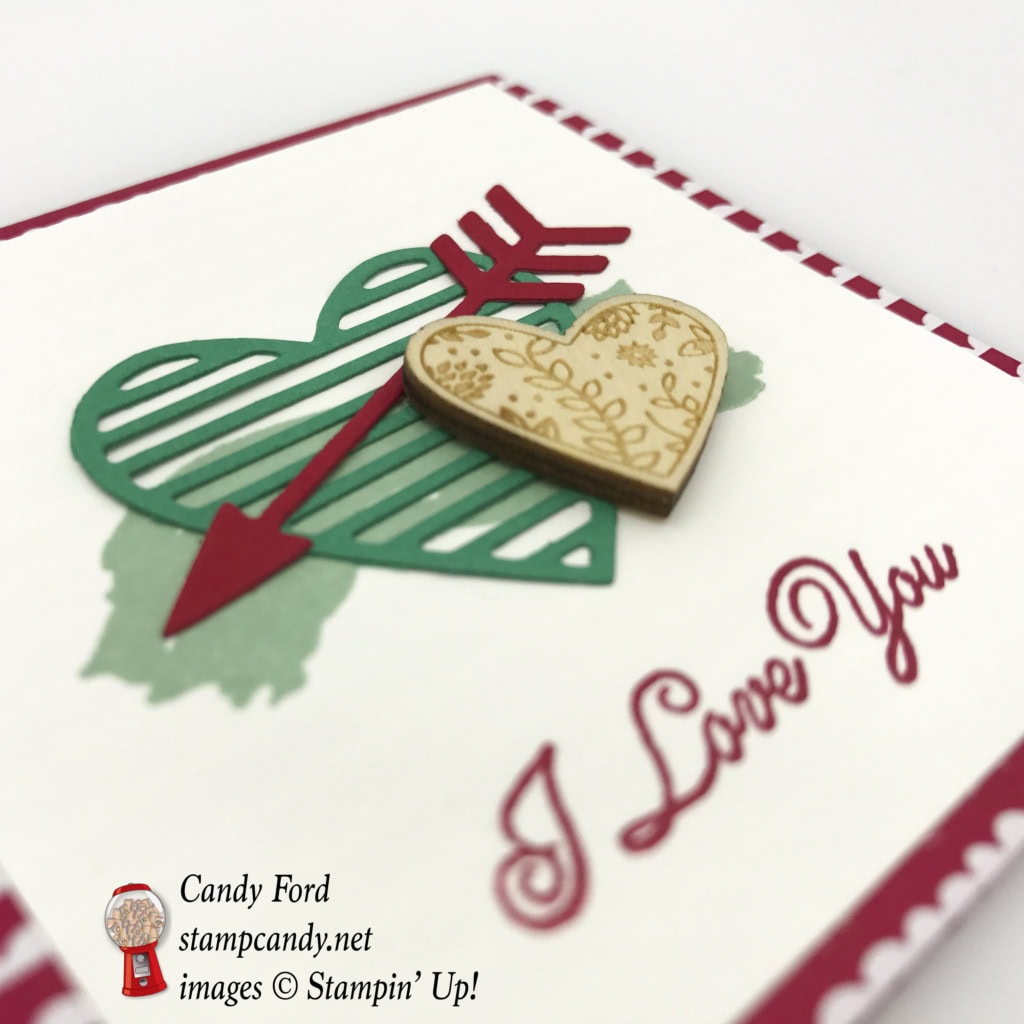
Here’s what I made:
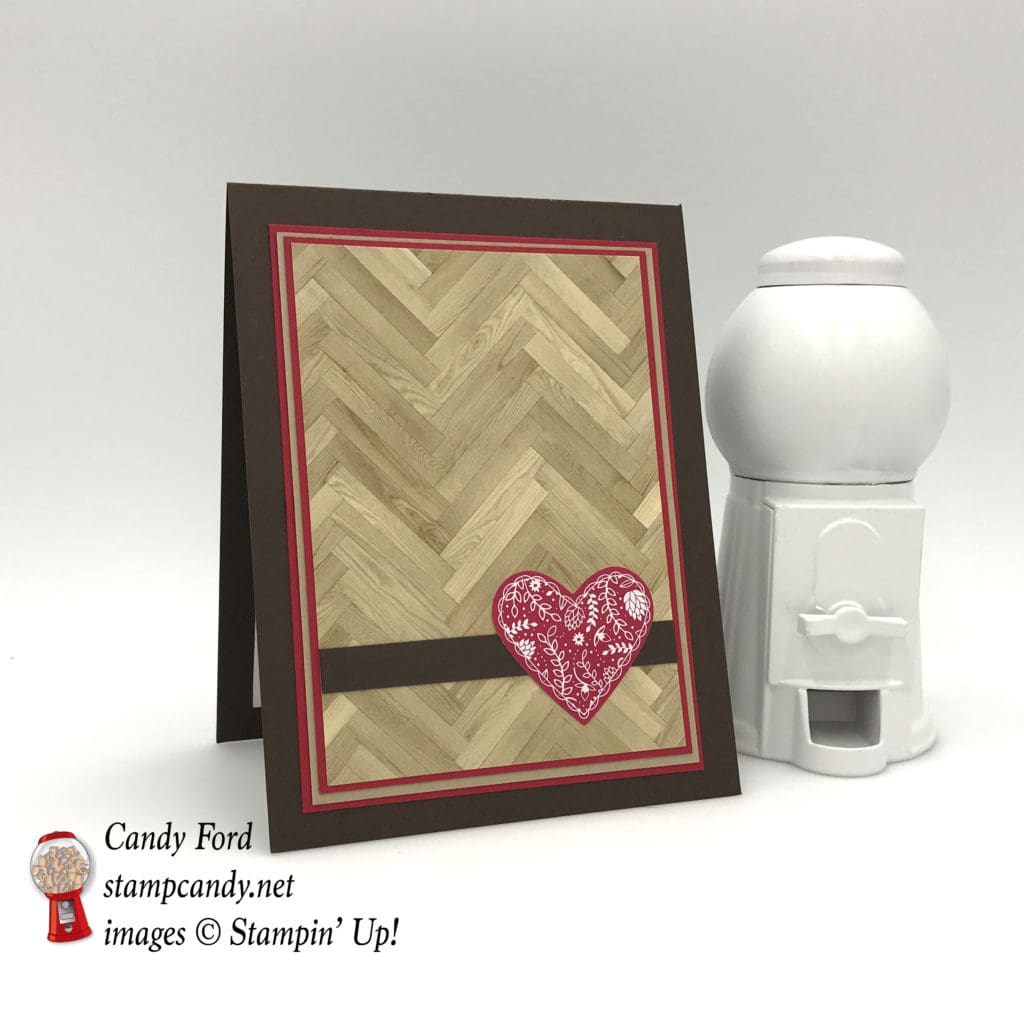
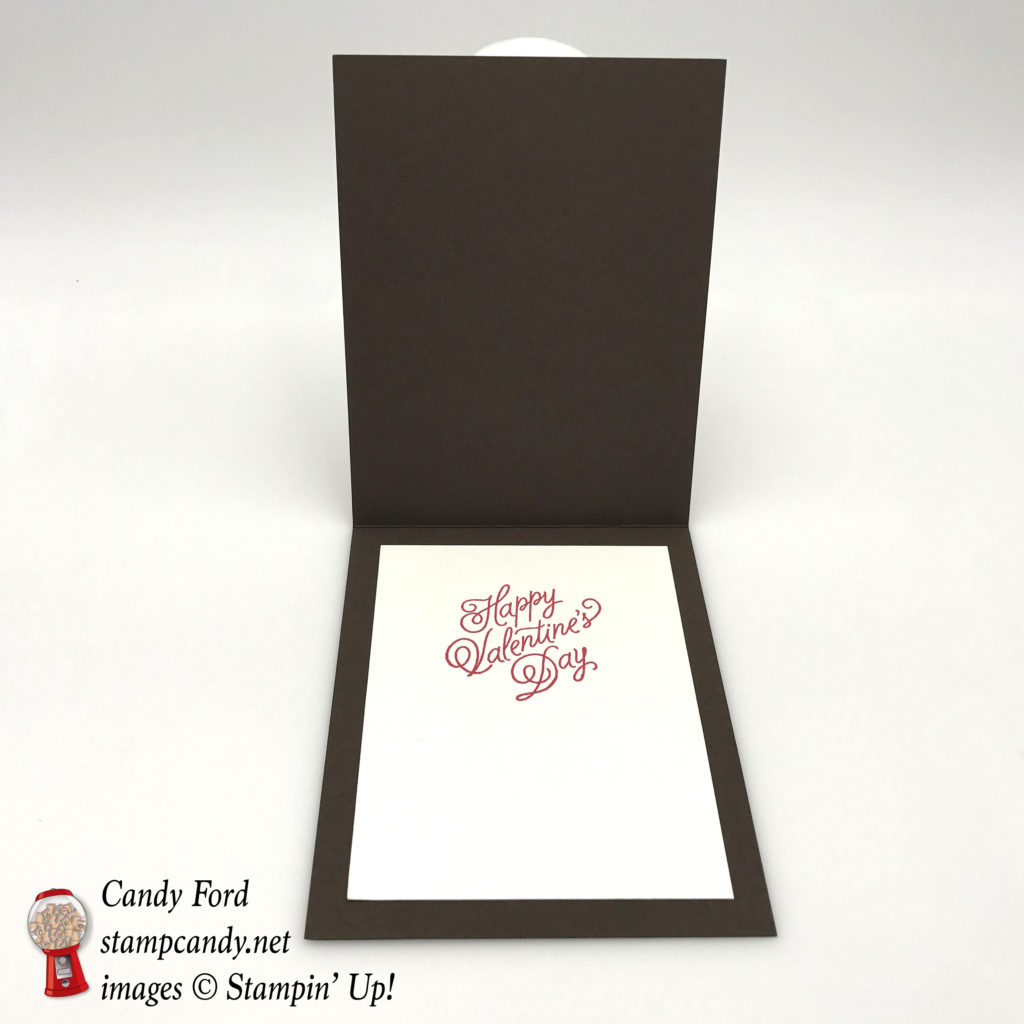
Here’s how I did it:
The card base is Chocolate Chip card stock (CS) which seemed like an appropriate color for a valentine, what with all the chocolates given every February 14. The layers on the card front are Real Red CS, Crumb Cake CS, Real Red CS, then a piece of Serene Scenery Designer Series Paper on top. The horizontal strip is Chocolate Chip CS. The heart is cut from a piece of Sending Love DSP with a die from the Sweet & Sassy Framelits.
For the inside, I stamped the sentiment from the Sealed With Love stamp set in Real Red ink onto Whisper White CS.
I used glue for everything on this card. If you want to pop up the heart with Stampin’ Dimensionals, I recommend first cutting the same size heart from a piece of CS and gluing it to the back of the heart to make it sturdier. Or you could cut the CS heart a bit larger, so the DSP heart is framed in that color.
Here’s what I used:
Thanks for stopping by today, and Sweet Stamping!
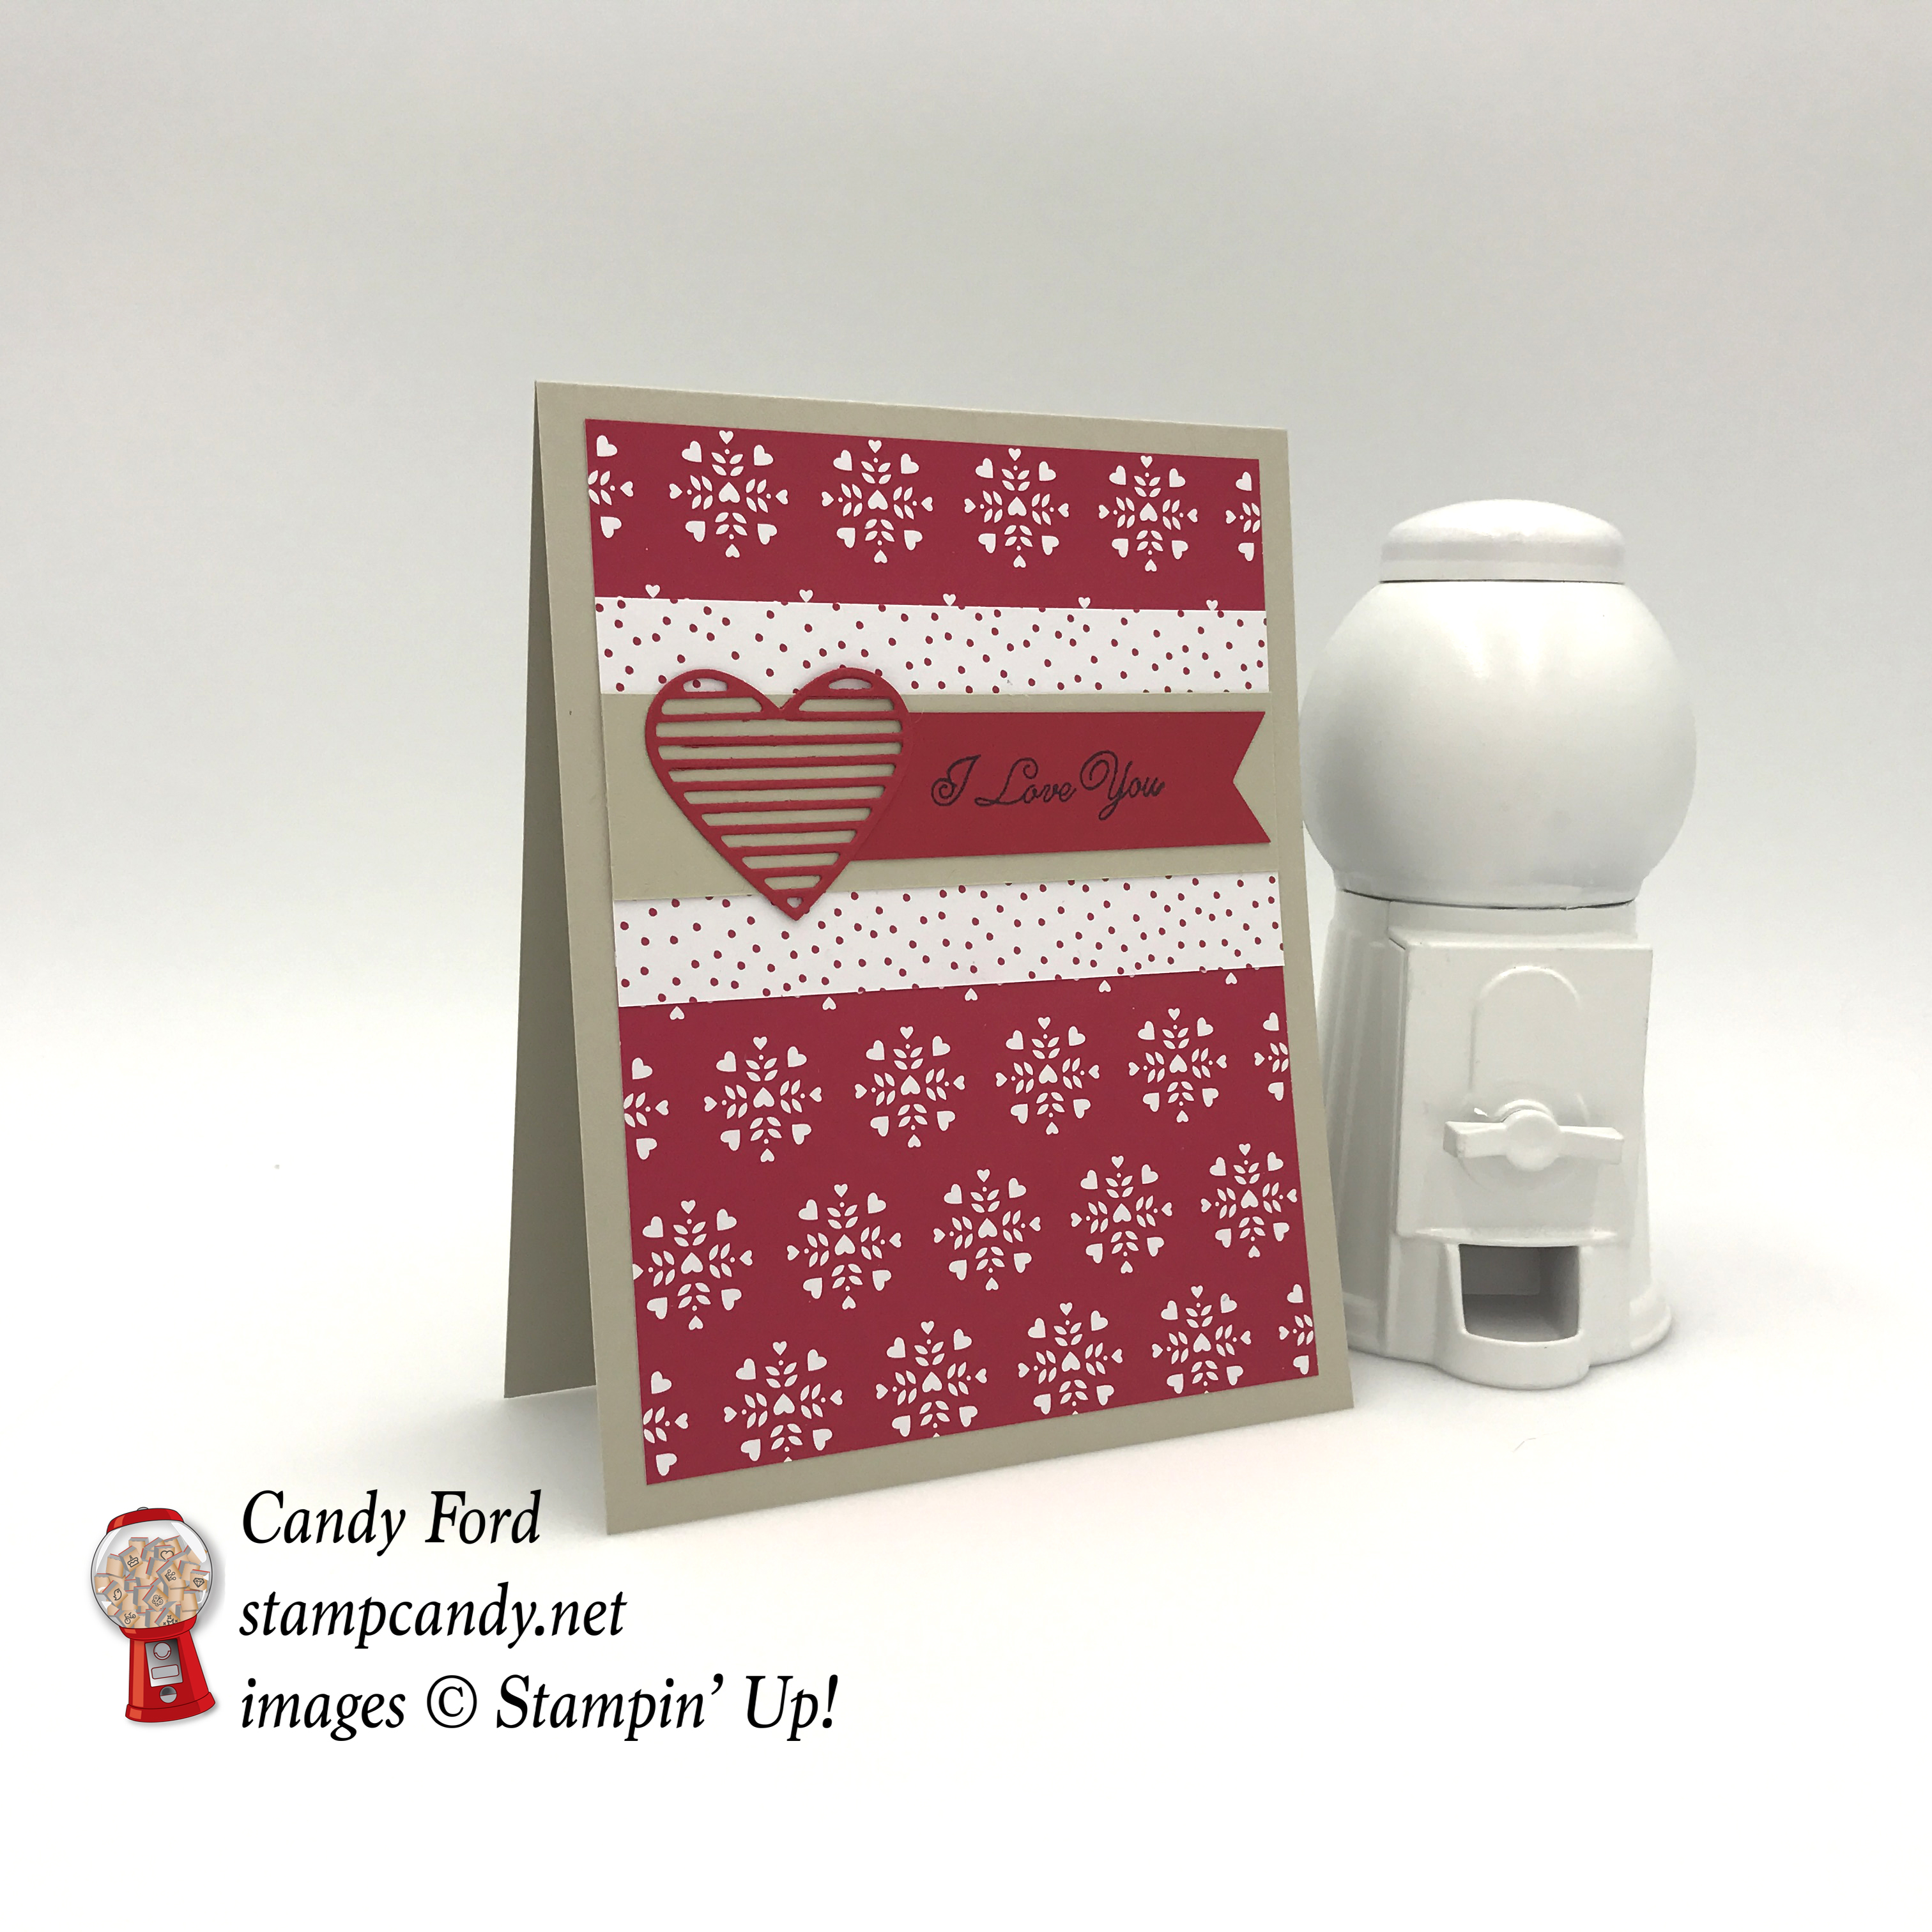
Jan 18, 2017 | Blog Hop, Cards, Gallery, New Products, Occasions |

Welcome to InKing Royalty’s January Blog Hop – our first hop of 2017! Today’s hop is filled with inspiring projects that feature each artist’s take on “Love is in the Air.” This is the best time of year to start planning your Valentine’s Day projects. There are amazing, new products in Stampin’ Up!’s 2017 Occasions Catalog – and NOW is the best time to get them. We are excited to share our projects with you and hope they inspire you! After you read my post, I hope you’ll hop over to the next person on the list at the base of this post, Shawn de Oliveira.
I have fallen in love with the products in the new 2017 Occasions Catalog and I’m excited to share them with you. Today’s project features the Sealed with Love suite of products on pages 14-15.
Here’s what I made:

Here’s how I did it:
I stamped the sentiment from the Sealed with Love stamp set in Memento Black ink onto a strip of Real Red card stock. I notched one end with the Banner Triple Punch.
I used the striped heart die from the Love Notes Framelits to cut a Real Read heart and to cut the other end of the strip so it would butt up against the heart. I glued the heart and strip onto a piece of Sahara Sand card stock.
I glued that onto a piece from the Sending Love Designer Series Paper Stack, then glued that onto a different, larger piece from the same DSP. Then I glued that onto the Sahara Sand card base.
The products I used today are at the bottom of this post.
Here’s the hop:
Thank you for hopping along with us! I hope you’ll hop along to the next stop, Shawn de Oliveira at ShawnStamps. There’s a lot of inspiration to be found in this group – and you don’t want to miss it! If you get stuck during the Blog Hop, please use this line-up as a guide:
- Brian King at Stamp with Brian
- Denise Hoepfner at The Mountain Magpie
- Karen Browning at StampWithMeKZB
- Natalie Lapakko at Stamp Witch Blog
- Lory Robinson at The Robin’s Nest Designs
- Candy Ford at Stamp Candy <– YOU ARE HERE
- Shawn de Oliveira at ShawnStamps
- Jennifer Spiller at Westside Paper Creations
- Lynn Kolcun at Avery’s Owlery
- Pam Morris at Tap Tap Stamp
- Robin Myren at Songbird Designs by Robin
- Lisa Pretto at InkBig Academy Stamps
Here’s what I used:
Thanks for stopping by today, and, as always, Sweet Stamping!
Jan 4, 2017 | Blog Hop, Cards, Gallery, New Products, Occasions, Sale-A-Bration |

Today is a big day! The brand new 2017 Occasions Catalog is live AND it’s the first day of Sale-a-bration 2017!!! So for the Inspire, Create, Share January Blog Hop, we are highlighting products from the new Sale-a-bration brochure.
At the bottom of this post is the list of items from the 2016 Holiday Catalog that have been carried over to the Occasions Catalog.
Here’s what I made:
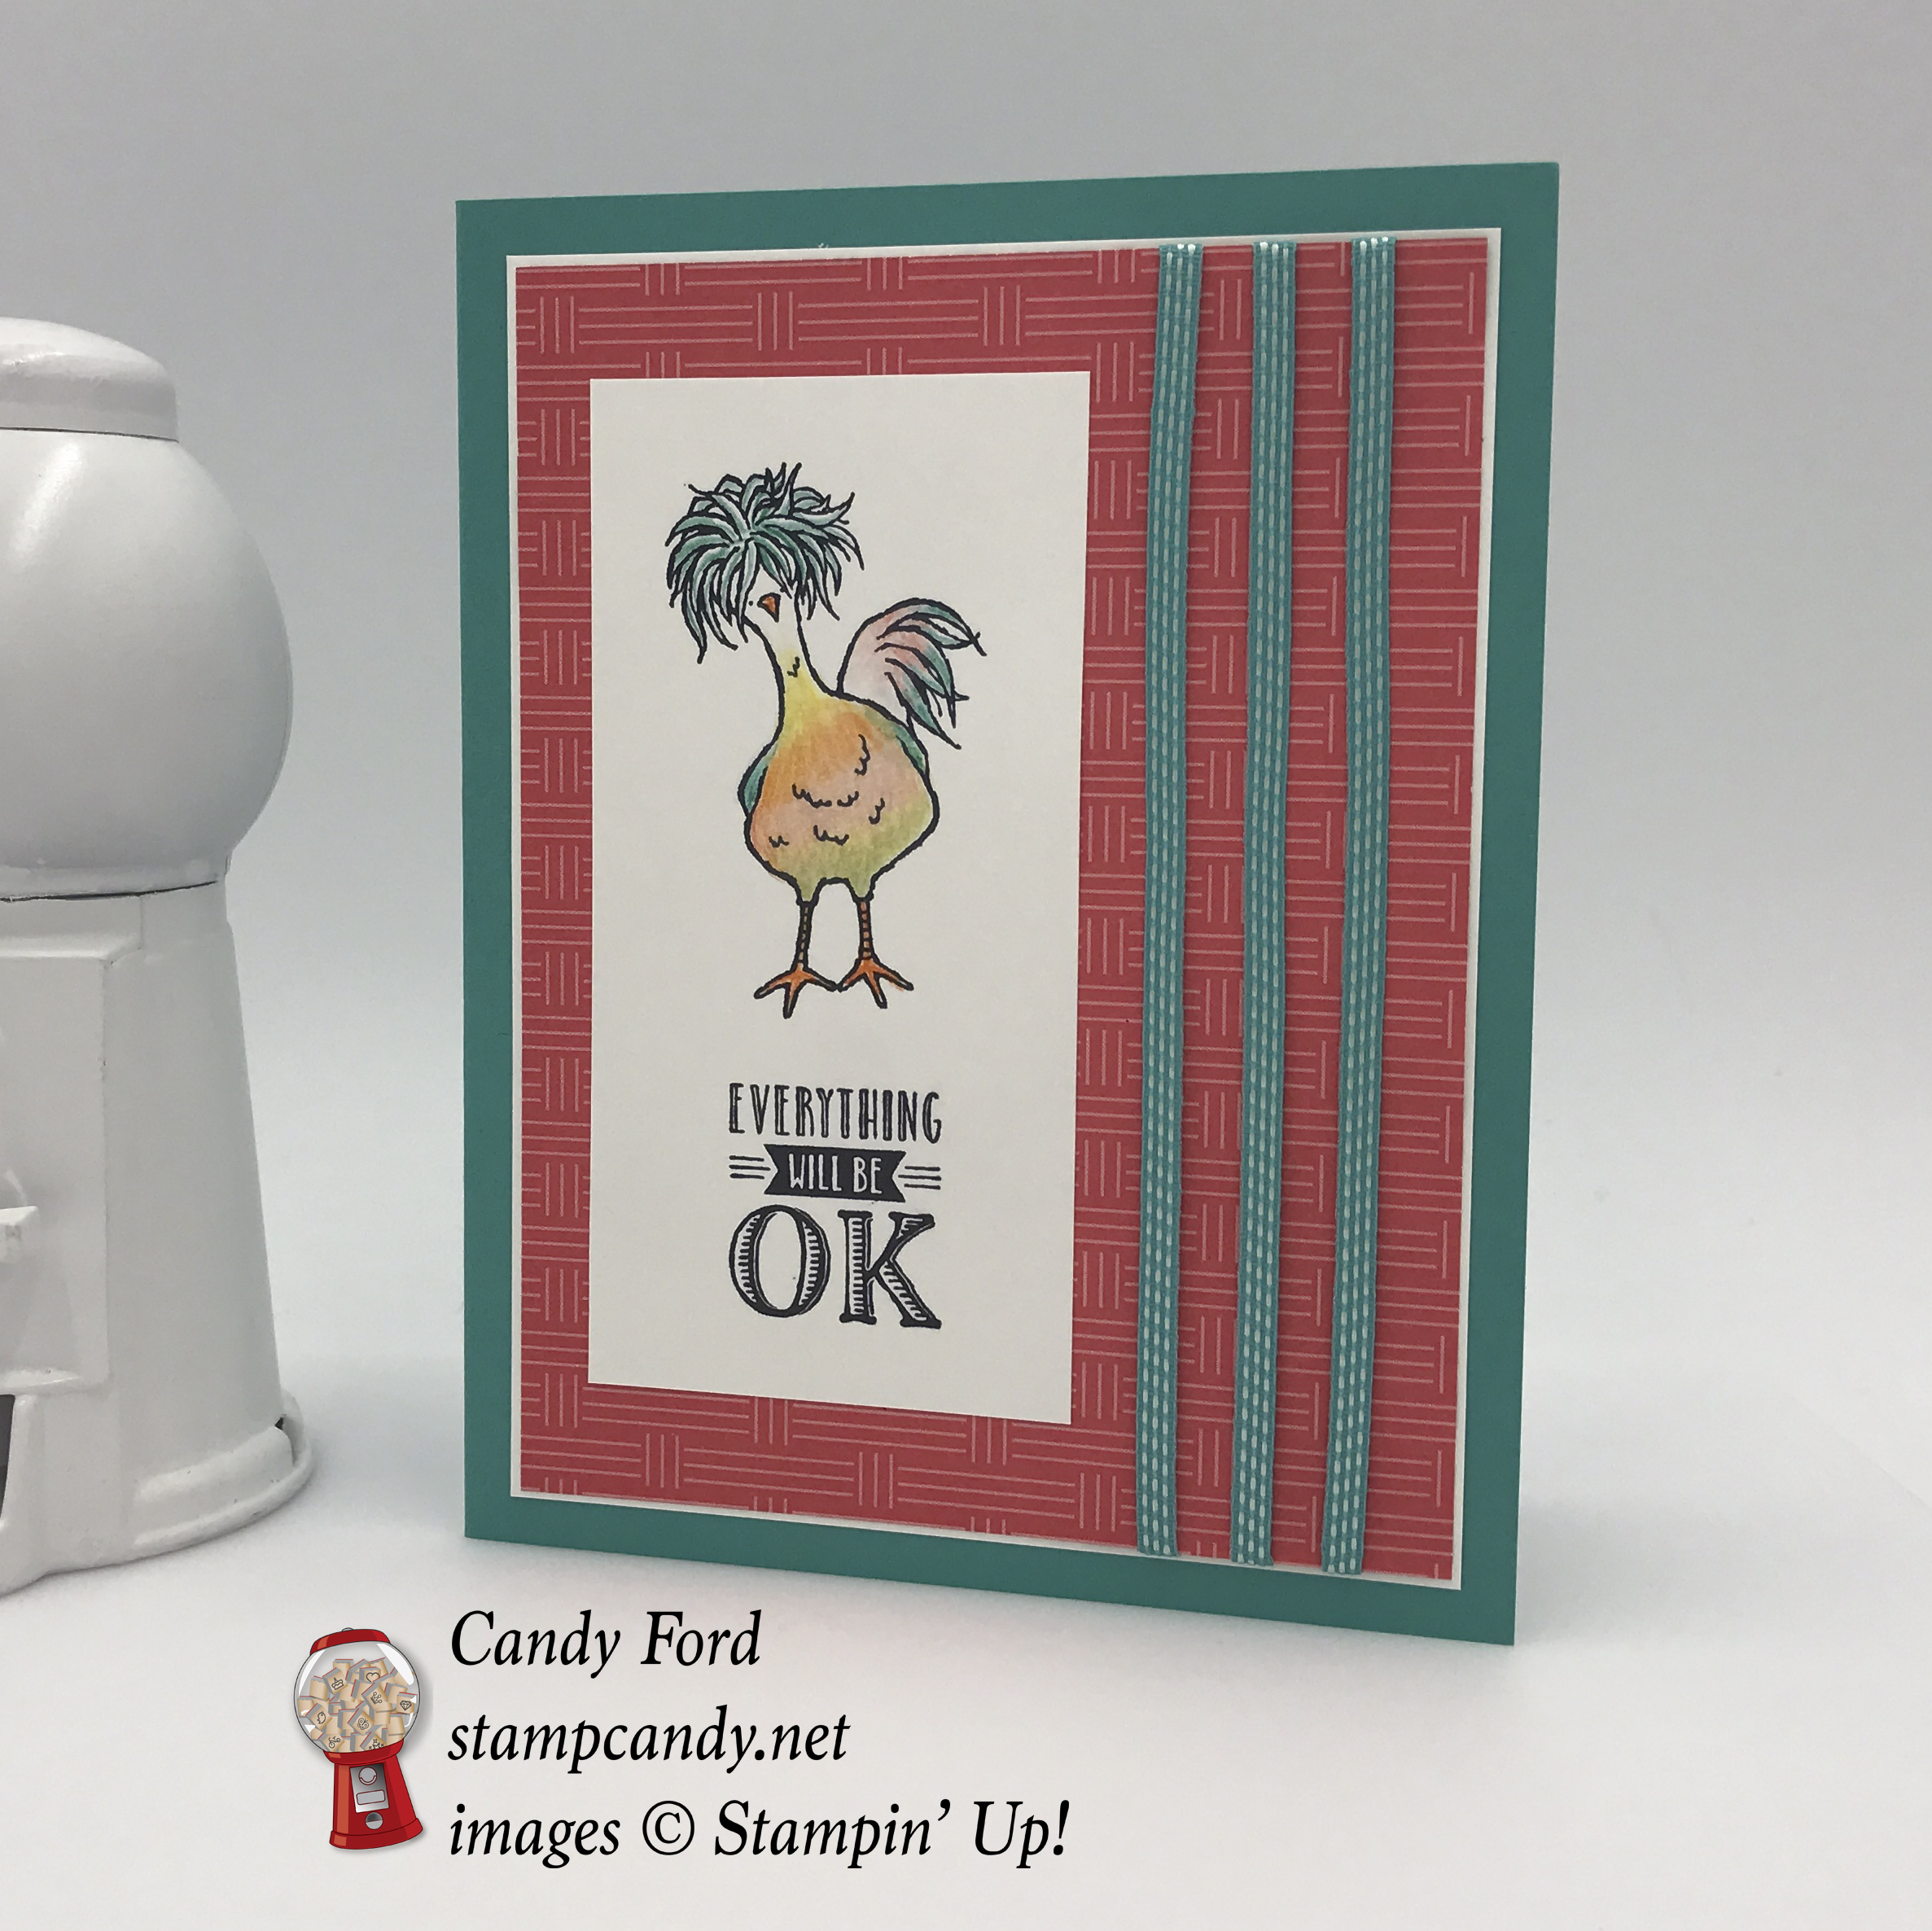
This funny chicken just makes my day. Talk about a bad hair day!
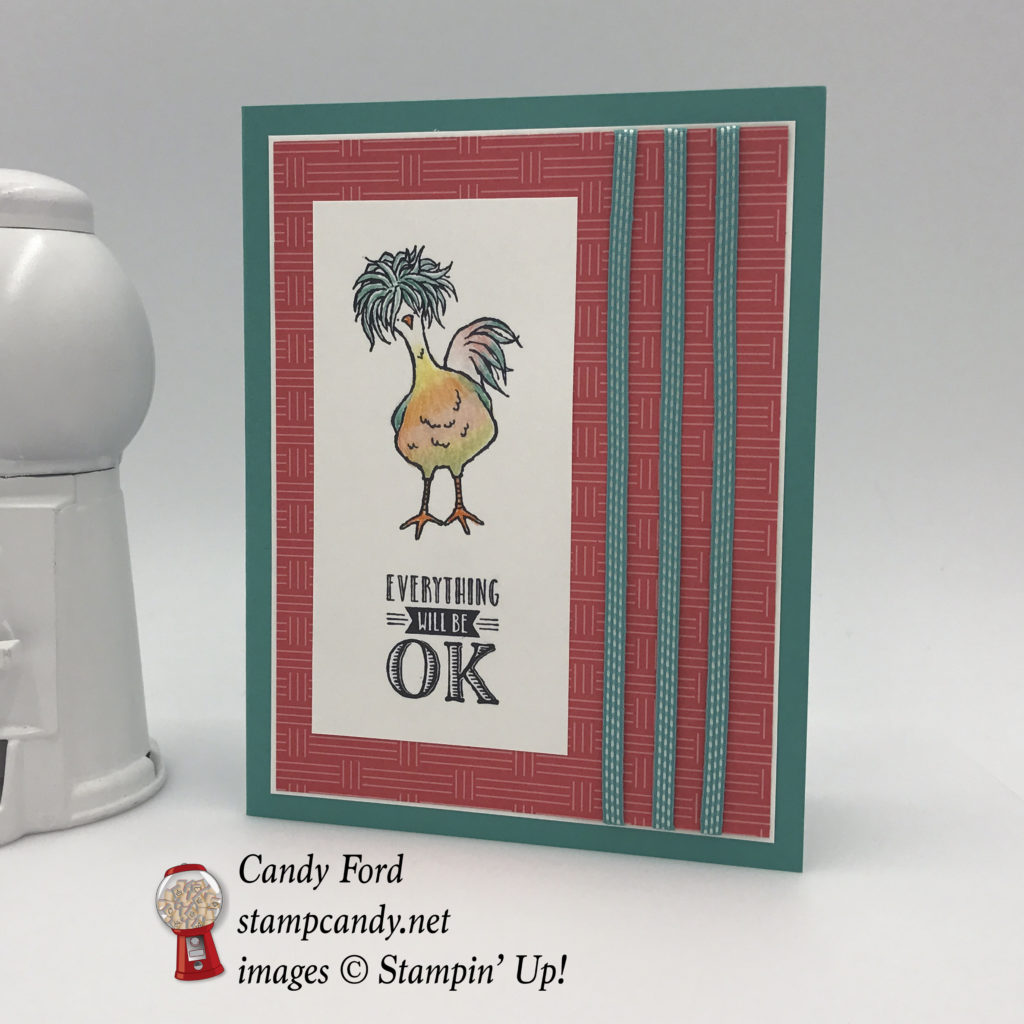
Here’s how I did it:
* Sale-a-bration item
I stamped the chicken from the *Hey, Chick stamp set, and the sentiment from the *Designer Tee stamp set, in Basic Black ink onto a piece of Whisper White card stock.
I colored the chicken with the new Watercolor Pencils in Bermuda Bay, Daffodil Delight, Calypso Coral, Melon Mambo, Old Olive, and Pumpkin Pie. I used an Aqua Painter to gently blend the colors. I probably should have used Shimmer White card stock, or a Blender Pen instead of an Aqua Painter, but I was very careful not to get it too wet.
I glued the stamped piece to a piece of *Carried Away Designer Series Paper. I also wrapped three pieces of Bermuda Bay ribbon around the DSP, adhering it on the back with Fast Fuse.
I glued the DSP to a piece of Whisper White card stock, and glued that to a Bermuda Bay card base. I also glued a piece of Whisper White CS to the inside of the card for a handwritten note. (Or you could write on the card base with a white pen.)
Click on the next button to go to the next blog on the hop, Deb Naylor of the Flying Stamper:

Here’s what I used:
Hey, Chick stamp set (#143328 wood, # 143331 clear mount) FREE with $50 purchase
Designer Tee stamp set (#143356 wood, #143359 clear mount)FREE with $50 purchase
Carried Away DSP (#143608)FREE with $50 purchase


| PAGE | ITEM | DESCRIPTION |
|---|
| Stamp Sets |
| 49 | 142200 | Basket of Wishes Photopolymer Stamp Set |
| 19 | 142887 | Sapins de Noël Photopolymer Stamp Set (French) |
| 19 | 142049 | Christmas Pines Photopolymer Stamp Set |
| 6 | 142043 | Cookie Cutter Christmas Photopolymer Stamp Set |
| 6 | 143018 | Emporte-pièce de Noël Photopolymer Stamp Set (French) |
| 22 | 142125 | Father Christmas Clear-Mount Stamp Set |
| 22 | 142122 | Father Christmas Wood-Mount Stamp Set |
| 42 | 142202 | Glamper Greetings Photopolymer Stamp Set |
| 15 | 143036 | Bas de Noël Photopolymer Stamp Set (French) |
| 15 | 142114 | Hang Your Stocking Photopolymer Stamp Set |
| 39 | 143040 | Saison Pétillante Clear-Mount Stamp Set (French) |
| 39 | 142101 | Here’s to Cheers Clear-Mount Stamp Set |
| 39 | 142098 | Here’s to Cheers Wood-Mount Stamp Set |
| 27 | 143046 | Houx Pour Noël Photopolymer Stamp Set (French) |
| 27 | 142061 | Holly Berry Happiness Photopolymer Stamp Set |
| 47 | 142196 | Paisleys & Posies Photopolymer Stamp Set |
| 24 | 143123 | Traîneau de Noël Photopolymer Stamp Set (French) |
| 24 | 142057 | Santa’s Sleigh Photopolymer Stamp Set |
| 26 | 143127 | Cloches de Circonstance Clear-Mount Stamp Set (French) |
| 26 | 142107 | Seasonal Bells Clear-Mount Stamp Set |
| 26 | 142104 | Seasonal Bells Wood-Mount Stamp Set |
| 9 | 143142 | Étoile Lumineuse Photopolymer Stamp Set (French) |
| 9 | 142110 | Star of Light Photopolymer Stamp Set |
| 40 | 143156 | Doux Foyer Photopolymer Stamp Set (French) |
| 40 | 140936 | Sweet Home Photopolymer Stamp Set |
| Accessories |
|---|
| 5 | 141982 | Real Red 12″ x 12″ Cardstock |
| 7 | 142635 | Real Red Glitter Stampin’ Emboss Powder |
| 7 | 142668 | Emerald Envy Glitter Stampin’ Emboss Powder |
| 7 | 142000 | White Gift Boxes |
| 31 | 142009 | Emerald Envy 6″ x 8″ Project Life Album |
| 31 | 142010 | Variety Pack 2 6″ x 8″ Project Life Photo Pocket Pages |
| 47 | 142020 | Copper Foil Sheets |
| 6 | 140396 | Cookie Cutter Builder Punch |
| 27 | 141843 | Holly Berry Builder Punch |
| 26 | 141846 | Bell Punch |
| 19 | 141851 | Pretty Pines Thinlits Dies |
| 9 | 141840 | Starlight Thinlits Dies |
| 46 | 141849 | Paisley Framelits Dies |
| 24 | 140278 | Santa’s Sleigh Thinlits Dies |
| 15 | 141841 | Christmas Stockings Thinlits Dies |
| 11 | 141836 | Detailed Santa Thinlits Dies |
| 40 | 141838 | Cheerful Tags Framelits Dies |
| 40 | 140279 | Home Sweet Home Thinlits Dies |
| 13 | 143537 | Cable Knit Dynamic Textured Impressions Embossing Folder |
| 39 | 142001 | 6″ x 17″ Gusseted Cellophane Bags |
Thanks for stopping by today, and Sweet Stamping!
Dec 28, 2016 | Cards, Gallery, New Products, Occasions |

I’m honored to be in an international group of Stampin’ Up! Demonstrators who are being highlighted today by Kylie Bertucci. I am in the US. The top ten winners will get to be part of an international blog hop, so please vote for my project here.
Our theme for this highlight is encouragement. We could all use a kind word now and then to build us up, right?
Here’s what I made:
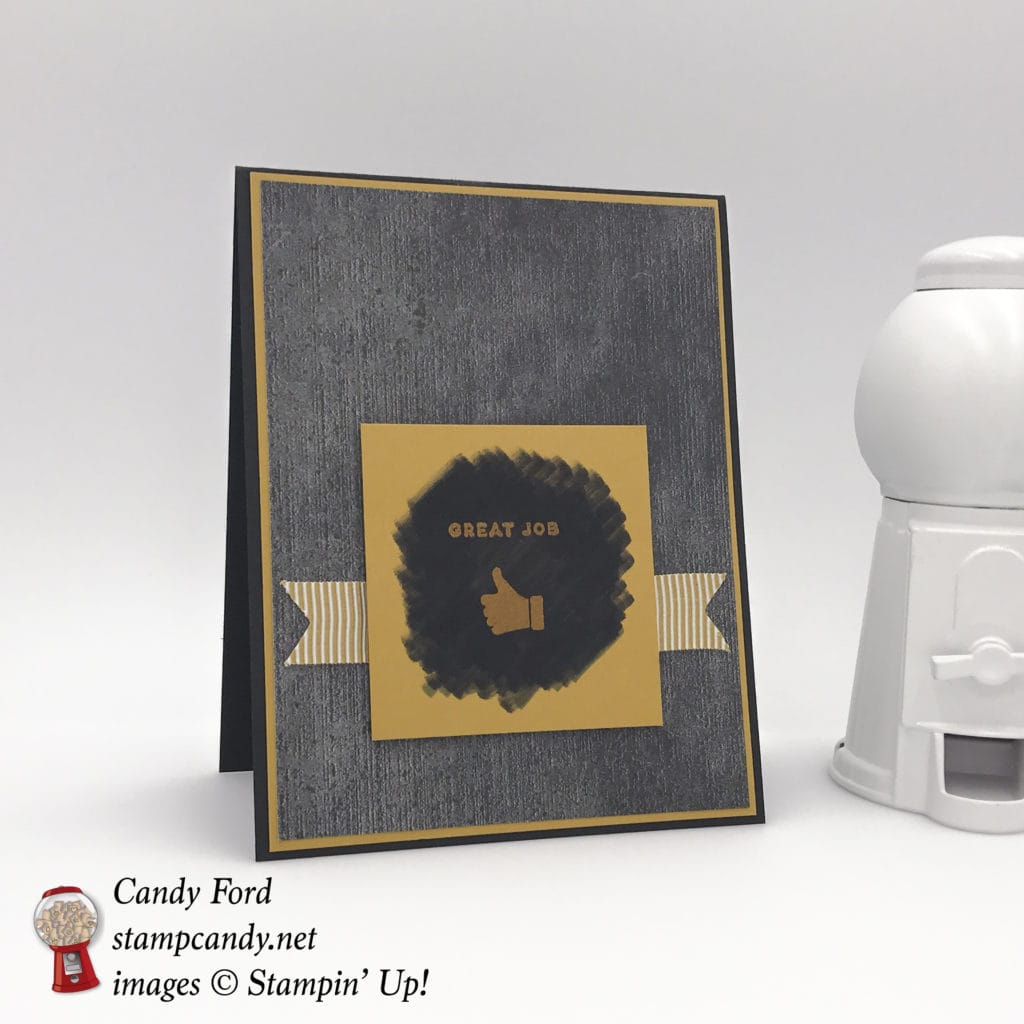
Here’s how I did it:
The card base is Basic Black card stock, with a piece of Very Vanilla CS glued to the inside for a handwritten note. The next layer up on the front is a piece of Delightful Dijon CS. Then there’s a layer of Urban Underground Designer Series Paper.
I adhered a piece of Delightful Dijon ribbon to the DSP with Fast Fuse.
I stamped the sentiment and thumbs up image, from the new Iconic Occasions host stamp set, in Versamark ink onto a small piece of Delightful Dijon CS, then heat embossed it in clear. I used Stampin’ Write Markers in Basic Gray and Basic Black to ink it up as shown, then wiped the excess ink off the embossed areas. I adhered this to the card front with Stampin’ Dimensionals.
Here’s what I used:
Iconic Occasions stamp set (#143196 wood $18, #143199 clear mount $13.50) Available January 4, 2017.
Please head over to Kylie’s blog to vote for my project. I would love to be chosen to do an international blog hop with her!
Thanks for stopping by today, and Sweet Stamping!


