Jan 20, 2015 | Club, Gift Wrap, Gifts, New Products, Occasions |
When I first saw the Hey, Valentine stamp set, I thought I’d never use it because it seemed juvenile, and since we only have fur babies, I have no need for elementary school classmate Valentine’s.

Then I started looking at it a bit more closely and realized that I can definitely use these images. Here’s the one we used at January’s Stamp Club.

It’s perfect for a gift of chocolates in the new Mini Treat Bag.
Front Back


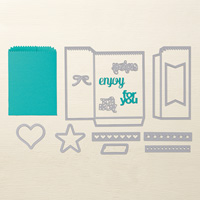
Cut both pieces of the bag with the Mini Treat Bag Framelits Dies and crease at the score lines.

Apply adhesive (we used Sticky Strip) to the left and right edges of the larger piece on the inner side of the bag, as well as to the bottom flap on the outer side of the bag.

Attach the smaller piece to the right side of the larger piece.

Fold over the left side of the larger piece and you have a treat bag.

Flip it over to see the front.

Score across the bag 4-1/2″ up from the bottom.

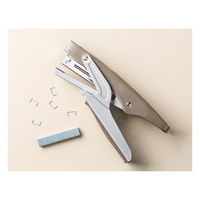
Now put some sweets in the bag, fold it over at the score line, and staple it closed off center – we stapled it at the vertical seam.

Wrap a piece of Whisper White twine a couple of times around the right side of the bag and tie a simple knot.

Lay a piece of Calypso Coral Pompom Trim across the knot and tie the twine again around it.

Now stamp the image on Whisper White card stock with Tuxedo Black Memento Ink, then color it with Blendabilities. Cut it out with the banner die from the Mini Treat Bag Framelits. Then score across it at the middle line in the image.


Apply adhesive (again we used Sticky Strip) and fold it over the bag to cover the staple.

Here’s what we used:
Thanks for stopping by today, and Sweet Stamping!
Jan 19, 2015 | Cards, Club, Deals, New Products, Occasions |
Here is another of the new 15% OFF Bundles from the Occasions Catalog. The You Plus Me stamp set and the Stacked With Love DSP Stack are a perfect pairing.

After stamping the sentiment in black and cutting it out with a die from the Mini Treat Bag Thinlits, we used a Sponge Dauber to ink the edges with Real Red ink to help it pop off the card.

Here’s a tip for lining envelopes. After cutting the liner with the Envelope Liner Framelits, score from one notch to the other, shown here at the 4-1/2″ mark.

Insert the liner into the envelope and line up the fold line you just created with the fold line of the envelope. Apply adhesive only to the top part of the liner – the part that sticks to the envelope flap. No need to adhere the rest of the liner. It will stay in place.

After lining the envelope, we stamped on the outside: on the front, a small heart from the You Plus Me stamp set in Real Red,

and on the back flap, a sentiment from the Hello Life stamp set in Calypso Coral.

Thanks for stopping by today, and Sweet Stamping!
Jan 18, 2015 | Cards, Club, Deals, New Products, Occasions |
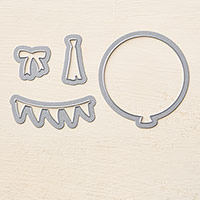
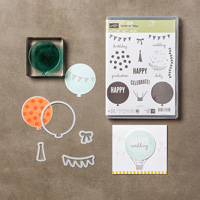
I do love a good deal. With Stampin’ Up’s bundles, you get two coordinating products at a 15% discount! There are seven new bundles in the Occasions Catalog. One of them was used to make this card: the Celebrate Today Photopolymer Bundle (138869) includes the Balloon Framelits Dies. I’m going to be using this bundle a LOT, I can already tell.

Here’s a tip for using multiple photopolymer stamps on the same acrylic block. Lay the stamps on your project as you want them to look.

Then press the block on top. The stamps stick to the block and they are lined up just as you want them to be.

Ink it up and stamp away!

After tying one end of the Whisper White Baker’s Twine onto the balloons, we used a small piece of Sticky Strip on the back of the Birthday Bash DSP to hold the other end in place.

This stamp on the card’s interior is from the Big On You stamp set.
Lately I’ve been using the Sophisticated Serifs stamp set to stamp the recipient’s initials onto the envelope. This only works if you’re hand delivering the card, but it makes a nice presentation.

Thanks for stopping by today, and Sweet Stamping!
Jan 17, 2015 | Cards, Club, Gift Wrap, Gifts, New Products, Occasions |
The Stamp Candy Stamp Club began the year with three projects: one birthday and two Valentine’s.
Linda & Caitlin

Margie & Martha


Check back for details on each project.
Thanks for stopping by today, and Sweet Stampin!
Jan 16, 2015 | Boxes, Gift Wrap, Gifts, New Products, Occasions |
Recently a dear friend of mine did something really wonderful for me. I wanted to do something for her to show my appreciation. I was in a cute little shop yesterday and found a cotton towel with a perfect saying on it, so I bought it for a thank you gift. The lady at the store offered to wrap it for me, but I declined because I knew I had my Stampin’ Up! stuff at home and could do a much better job of it.
I love the new products in the Occasions Catalog so much! For this project, I used all three products on page 19, plus the Ornate Tag Topper punch on page 35!

(By the way, see all those bright pink flags in my catty? Did you know that there are seven new bundles? SEVEN! You save 15% when you buy any of them. What a deal!)
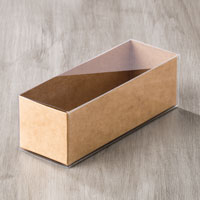
First I embossed the clear acetate sleeve of the Tag A Bag Gift Box with the new Spring Flowers embossing folder. I put the rolled up towel in the box – it fit perfectly! – and slipped on the sleeve.
The greenish stripes in the photo on the left are just an artifact of the light I was holding the box under to show the embossing.


I cut a 1″ wide strip of the Painted Blooms DSP and wrapped it around one end of the box. I creased it at the corners and adhered the ends together on the bottom with Sticky Strip. I didn’t attach the DSP to the box itself because I wanted it to slip off easily when the gift is opened. I wrapped a piece of Blackberry Bliss 3/8″ Satin Stitched ribbon around the paper and tied it in a knot.
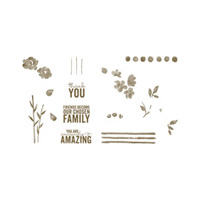
I pulled out the Painted Petals stamp set to make a tag. First I cut a 2″ wide strip of Whisper White card stock and punched one end with the new Ornate Tag Topper punch. Then I stamped Thank You in Daffodil Delight and flowers in Blackberry Bliss (using the colors in the DSP) then added Wild Wasabi leaves.This is so easy with the photopolymer stamps! Did you know that this stamp set is available in all three types? See my product list below to see the photopolymer, clear mount, and wood mount options.
I trimmed the end of the tag with the Scallop Edge Border punch.


There was another sentiment stamp in the set that I wanted to use, so I stamped it on the back of the tag, near the bottom, in Wild Wasabi. My friend is amazingly amazing, after all. I used another piece of the Blackberry Bliss ribbon to tie the tag to the first knot of ribbon.

This was super quick and easy. The Tag a Bag Gift Boxes look great, so they’re really easy to decorate with just a couple of doodahs.
Here’s what I used:
I also used these basic tools. (I use the Paper Snips for paper. I also have two pairs of Craft Scissors – one for paper and one for ribbon.)
Thanks for stopping by today, and Sweet Stamping!
Jan 14, 2015 | Blog Hop, Cards, New Products, Occasions, Techniques |

Welcome to the first Pals Blog Hop of 2015. We hope your new year is off to a great creative start. To celebrate the start of a new Stampin’ Up! year, we are showcasing products from our newest catalog this month – the Occasions catalog. You may also see new Sale-a-bration products too. If you don’t know how to earn free Sale-a-bration products – contact your Stampin’ Up! demonstrator to learn more.
You may just be starting the blog hop or may have come from Lisa Ann Bernard at Queen B Creations. Use the full lineup below to move along from blog to blog so you see all of the new projects.
Have I mentioned how much I love the new Occasions Catalog? I have? Well, let me say it again. I love this new stuff!!! And the fact that you get something FREE from the Sale-A-Bration catalog for every $50 you spend just makes it that much better!
Today’s card uses several of the new products – see the complete product list at the bottom of this post. It’s called an Infinity Card because it just goes on and on in an unending cycle as you keep unfolding it.
This is the card front:

Open it from the center to get this:

Open it from the center again to get this:

Open it from the center a third time to get this:

Open it from the center a fourth time to get back to the front.
( I tried to make the card lie flat to photograph it, but it’s an interactive card that definitely looks better in your hands. If I’d had a hand model available, I would’ve photographed it that way. But with one hand holding the camera, this was all I could do.)
TIP: For the sentiment on the back of the card, I masked off most of a stamp from the Balloon Bash photopolymer stamp set, revealing only HAPPYBIRTHDAY. I cut a piece of scratch paper to fit around the sentiment I wanted, and to cover the rest of the stamp. I inked the stamp, then removed the paper to stamp the image onto the card.

Come back tomorrow for the pattern and directions for this fun Infinity Card!
The next stop on the Pals Blog Hop is Dawn Tidd at Tiddbits From Dawn!
Thanks for stopping by today, and Sweet Stamping!


- Amy Whelan at Amy’s Inklings
- Maggie Mata at Maggie Made Cards
- Becky Gifford at The Social Stamper
- Kerry Willard Bray at Peonies and Paper Chains
- Debbie Crowley at expressivelydeb…
- Amy Williams at Stamps and Spice
- Rae Harper at WildWestPaperArts.com
- Sherrie Gross at Stampin’ Sunshine
- Wendy Klein at Doggone Delightful Stampin’
- Becky Volpp at InkBlossomwithBecky
- Nancy Gleason at My Stampin Space
- Jane Knudsen at www.seejanestamp.com
- Debbie Mageed at Secret Stamper
- Michelle Quinno at Shell’s Life
- Susan Lankford at Stamp and Create With Susan
- Karen Hallam at Karen’s Blog
- Kelly DeTommaso at Kelly’s Creative Corner
- Mary Fish at Stampin’ Pretty
- Laurie Chilton at Stampin’ Ink
- Brian King at Stamp with Brian
- Peggy Noe at prettypapercards.com
- Martie Pollard at The Crafty Bandit
- Kim Jolley at Stampin’ Artfully
- Beth Beard at My little craft blog
- Michelle Gleeson at StampinMojo
- Sue Becker at RnR Stamping
- Jackie Diediker at Stampin’ Jackie
- Natalie Bradley at Natalie Bradley Events
- Lisa Ann Bernard at Queen B Creations
- Candy Ford at Stamp Candy
- Dawn Tidd at Tiddbits From Dawn
- Angie Valle-Peters at Paperluxuries
- Amy Hoptay at Inking of You!
- Lynn Kolcun at Stamping with Avery’s Owlery
- Shannon K Jaramillo at Shannon Kay Paperie
- Liz Gautreaux at Kind Deeds Stampin
- Beth McCullough at Stamping Mom
- Nicole Watt at Pixel Maven’s Retreat
- Pamela Sadller at Stampin Pink Rose
- Jennifer Michalski at Stamping Serenity
- Shannon Hokanson at Paper Works by Shannon
Here’s what I used to make this card: