January 2022 InKing Royalty Blog Hop – Let’s Sale-a-Brate

Welcome to the January 2022 InKing Royalty Blog Hop! We are having so much fun with our new Sale-a-Bration products and are excited to share some of that fun with you today. This month’s projects feature papers or stamp sets (or both!) from Stampin’ Up!’s January – February 2022 Sale-a-Bration brochure. We are excited to share our creations with you today! After you read my post, I hope you’ll hop over to the next person on the list at the base of this post.

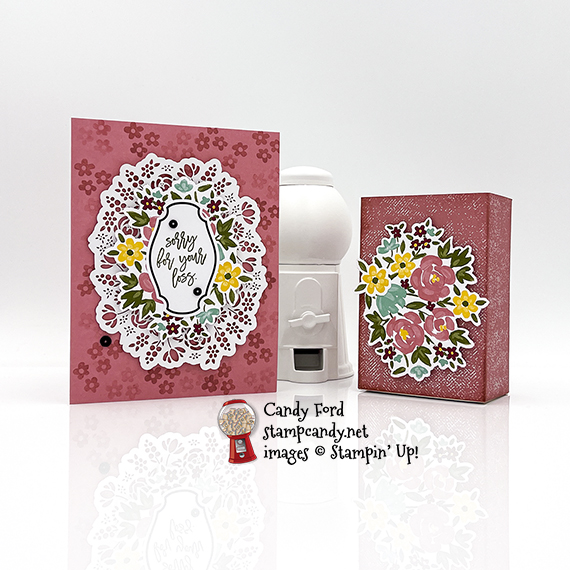
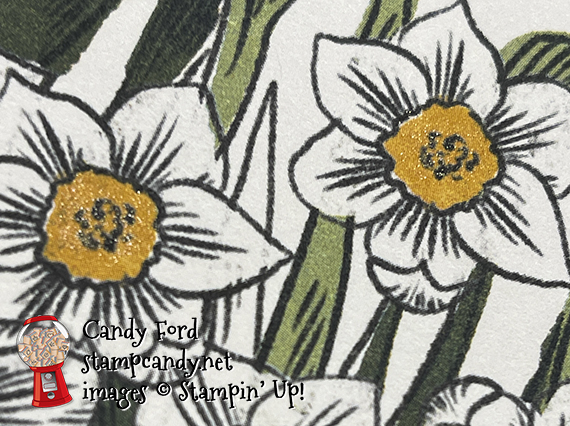
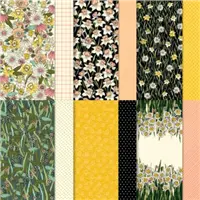
I used the gorgeous Daffodil Afternoon Designer Series Paper and the Special Moments stamp set from the SAB brochure to create today’s simple and lovely sympathy card.

If you are reading this in email, some photos may appear blurry, or may not appear at all. Please click here to see the post on my blog.

S January 2022 InKing Royalty January 2022 InKing Royalty 

Here’s what I made:

Daffodil Afternoon DSP, Special Moments stamp set, Sale-a-bration #stampcandy

S

Here’s what I did:

Cut and scored with my paper trimmer:

  • Mossy Meadow card stock (CS) cut to 4-1/4″ x 11″, then scored in half at 5-1/2″
  • Mossy Meadow CS layer cut to 3-7/8″ x 5-1/8″
  • Daffodil Afternoon Designer Series Paper (DSP) layer cut to 4″ x 5-1/4″

Stamped with the Special Moments stamp set:

  • sentiment in Crushed Curry ink onto the DSP layer

Colored using Clear Wink of Stella:

  • flower centers
  • It’s almost impossible to get Wink of Stella to show in a photo, but here’s what I got.
  • Daffodil Afternoon DSP, Special Moments stamp set, Sale-a-bration #stampcandy

Assembled the card:

  • burnished the fold in the card base with a Bone Folder
  • Mossy Meadow CS layer glued onto the back of the DSP layer. This is to give the DSP layer more strength.
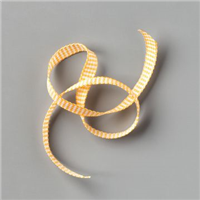
  • ribbon wrapped around the DSP layer and adhered using Stampin’ Seal +
  • another piece of ribbon tied in a bow and adhered over the first ribbon using Mini Glue Dots
  • DSP layer adhered onto the card front using scraps of Foam Adhesive Sheets
  • Basic White CS glued onto the inside of the card base

S

Here’s the January 2022 InKing Royalty Blog Hop:

Thank you for hopping along with us. If you get stuck during the Blog Hop, please use this line-up as a guide:

  1. Brian King at Stamp with Brian
  2. Jackie Beers at Blue Line Stamping
  3. Sue Jackson at Just Peachy Stamping
  4. Renae Novak at Blessed by Cards
  5. Candy Ford at Stamp Candy <——- YOU ARE HERE!
  6. Ann Murray at Murray Stamps Ink
  7. Robin Myren at Songbird Designs by Robin
  8. Joanne Whittington at The Inky Dragon
  9. Pam Morris at Tap Tap Stamp
  10. Jan Dufour at Stamp Me Silly
  11. Marilyn Jones at Stamp with MJ
  12. Sheryl Abernathy at Elegant Sentiments
  13. Lynn Kolcun at Avery’s Owlery

s

Here are today’s main colors:

You can click on each one to see all the products that come in that color!

S

Here’s what I used:

Click on these images for more details and to purchase. If you are reading this post in email, the product images may not show up. Please click here to see the post on my blog.


S

Here are some helpful links:

S

Thanks for stopping by today, and Sweet Stamping!

Bouquet of Hope for February 2021 PPPBH

PPP Paper Pumpkin Possibilities Blog Hop

Welcome to the February 2021 PPPBH. This month’s kit is called Bouquet of Hope and it makes beautiful sympathy cards. I know these aren’t the most fun cards to make, but in my experience, it’s best to have them already made and on hand when you need them. I altered the kit to make a shabby chic style card and box: cut the stems from the large bouquet die cuts from the kit, and added smaller flowers to cover the cut area; flipped the gold doily over to the white side; and created a pop up insert for the card.

If you are reading this in email, some photos may appear blurry, or may not appear at all. Please click here to see the post on my blog.

S February 2021 PPPBH February 2021 PPPBH February 2021 PPPBH February 2021 PPPBH

Here’s the Bouquet of Hope Kit:

Bouquet of Hope Paper Pumpkin Kit February 2021 #stampcandy

The stamp set:Bouquet of Hope Paper Pumpkin Kit February 2021 #stampcandy

What comes in the kit:Bouquet of Hope Paper Pumpkin Kit February 2021 #stampcandy

What the kit makes:Bouquet of Hope Paper Pumpkin Kit February 2021 #stampcandy

Click here to down load the pdf of the stamp case insert, so you can store your stamp set and any leftover parts for later use.

You can buy the cases here.

Watch the Stampin’ Up! video of this kit here:

S

Here’s what I made:

Bouquet of Hope February 2021 Paper Pumpkin kit alternative projects for #PPPBH #stampcandy

Bouquet of Hope February 2021 Paper Pumpkin kit alternative projects for #PPPBH #stampcandy

Bouquet of Hope February 2021 Paper Pumpkin kit alternative projects for #PPPBH #stampcandy

Bouquet of Hope February 2021 Paper Pumpkin kit alternative projects for #PPPBH #stampcandy

S

Here’s what I did:

Cut and scored with my paper trimmer:

  • Basic White card stock (CS) cut to 5-1/4″ x 8″, then scored in half at 4″, then scored at an angle along the top left corner (when it’s closed)
  • NOTE: make sure you score both sides to create the V in the middle of the card
  • 2019-2021 In Colors Designer Series Paper (DSP) cut to 4-1/8″ x 5-7/8″ (you may have to adjust a little for your box)

Stamped with the Bouquet of Hope stamp set:

  • outer sentiment in Mossy Meadow ink onto the included label
  • inner sentiment in Mossy Meadow ink onto the Basic White CS insert
  • small flowers in Rococo Rose ink onto the front of the Rococo Rose card base

Cut using Paper Snips:

  • the bow & stems cut from 2 large flower bouquets
  • about 1/2″ to 3/4″ or so from the bottom stems of another large bouquet

Colored using a wedge of a Stampin’ Sponge:

  • edges of Basic White CS card insert, DSP, and box

Assembled the card:

  • burnished the folds in the card base and the insert with a Bone Folder
  • insert glued onto the inside of the card base, being sure not to glue the top center portion
  • doily adhered onto the front of the card base using Stampin’ Seal (you can use the glue dots in the kit)
  • small yellow flower glued onto a large bouquet with no stems
  • bouquet adhered over the doily using Stampin’ Dimensionals
  • sentiment glued onto the bouquet
  • 3 sequins applied onto the card front
  • bouquet with a bit trimmed from the bottom glued onto the left side of the pop up inside the card
  • small cluster of flowers glued over the stems

Assembled the box:

  • burnished the folds in the box with a Bone Folder, then folded in the sides to assemble
  • DSP glued onto the box top, covering the top and 2 sides
  • small yellow flower glued onto a large bouquet with no stems
  • bouquet adhered onto the top of the box using Stampin’ Dimensionals

S

Here’s the February 2021 PPPBH:

Click on the Next button to hop to the next blog, Tricia Butts of Tricia’s Stamping Creations.

Paper Pumpkin Possibilities Blog Hop

S

Here are today’s main colors:

You can click on each one to see all the products that come in that color!

S

Here’s what I used, other that the kit:

Click on these images for more details and to purchase. If you are reading this post in email, the product images may not show up. Please click here to see the post on my blog.


S

Hey Chick is here!

The Hey Chick stamp set from 2017 Sale-a-bration was so popular, Stampin’ Up! has brought it back. But that’s not all! Now there are coordinating dies. AND there’s a second stamp set, Hey Birthday Chick, that also has coordinating dies. CLICK HERE to see them all. One thing though – they’re available for a limited time, so get them while you can!

Hey, Chick and Hey, Birthday Chick bundles

S

Basic White is here!

The facility that manufactures Whisper White paper is closed due to COVID-19. But don’t fret. The new Basic White products are here!

S

Here are some helpful links:

S

Thanks for stopping by today, and Sweet Stamping!