Aug 24, 2016 | Blog Hop, Cards, Gallery, Halloween, Holiday, New Products, Open House, Sales, Techniques |

Welcome to InKing Royalty’s August Blog Hop! Stampin’ Up! demonstrators have been actively ordering from the 2016 Holiday Catalog, before it opens to customers on September 1. We are excited to share some of our new goodies with you today! Today’s Blog Hop is filled with inspiring projects that feature each artist’s take on the Fall months – Halloween and Thanksgiving are just around the corner. After you read my post, I hope you’ll hop over to the next person on the list at the base of this post.
I’m always honored and humbled to participate in a blog hop with this amazing group. Today I am especially excited to participate in a blog hop with the fabulous Louise Sharp. I met Louise on the incentive trip in May, and just fell in love with her. She is adorable and sweet, and a very talented paper artist. Thank you, Louise, for joining us today!
Anyone who knows me knows that I love Halloween. It’s always been one of my favorite holidays. So today I’m sharing a Halloween card made with one of my favorite new stamp sets in the 2016 Holiday Catalog, Jar of Haunts. I knew I had to have it as soon as I saw the dripping ooze and the floating eyeballs!

And it coordinates perfectly with the Everyday Jars Framelits Dies.

Here’s what I came up with:

I love old horror movies. Not the gory slasher movies of today, but the old monster movies. With this card I was going for a mad scientist’s laboratory feel, with old wood, cob webs, and jars with icky oozy contents. This is the second day in a row I’ve made a 4″ x 8″ card. It just happens to be the size I needed to create the scenes of these two cards. You can see the other one here.
Here’s how I did it:
I stamped the mummy jar in Early Espresso ink onto Very Vanilla card stock. I used a Blender Pen to smear the ink a bit for shading. I used the Framelits to cut the stamped image, and to cut the jar shape from a Window Sheet. I then covered the image with glue from the Fine-Tip Glue pen and pressed the clear jar onto it. I did this on a Silicone Craft Sheet to catch the glue that oozed out. I held it for a moment, then curved it with my fingers and wrapped a small rubber band around it. I let it sit this way until the glue dried. This is how I got the rounded jars on the card. The glue made the ink run a bit, but I like the effect on this one.
For the jar of blood, I cut the jar shape from a Window Sheet and from Cherry Cobbler card stock. I glued the two pieces together, curved them, and let it sit with a rubber band wrapped around it, as I did the previous one. I stamped the ooze in Cherry Cobbler ink onto Cherry Cobbler card stock, lined it up with the jar die and cut it out, then used Paper Snips to cut away the part of the jar below the ooze. I covered this with the same glue and let it sit on the Silicone Craft Sheet until it was dry. It curled a bit on its own, which helped when I glued it onto the full jar.
For the green jar, I stamped the eyeballs in Smoky Slate ink onto Shimmery White card stock. I used this paper because I knew I wanted to watercolor. I lined up the jar die with the eyeball image and cut it out. I used the same die to cut a Window Sheet. I colored the eyeballs with Stampin’ Write Markers in Pacific Point, Cucumber Crush, Soft Suede, and Cherry Cobbler. I used an Aqua Painter and Old Olive ink to color the liquid in the jar. I used my Paper Snips to cut away the part of the jar above the eyeballs and waterline.
I was afraid to use the glue on this one, because I really didn’t want the colors to run like they did on the mummy. So I covered the image completely with Fast Fuse adhesive, then stuck on the clear jar. Again I curved it with my fingers and let it sit for a while with a rubber band wrapped around it.
While the jars sat curling, I made the jar lids. I stamped the image from the Jar of Love stamp set in Versamark ink onto a Gold Foil sheet, then heat embossed it in copper. I used the corresponding die to cut them out. I used a Sponge Dauber to apple black Staz-On ink to make them look old and rusty. I used Fast Fuse to adhere the lids onto the jar of eyeballs and the mummy jar. I used a Real Red Stampin’ Write Marker to add some “blood” to the rim of the third lid, and set it with the heat tool.
For the card, I cut a piece of Halloween Night Designer Series Paper (silver cobweb on black) to 4″ x 8″ and glued it to the front of a Basic Black card base the same size (8″ x 8″ scored at 4″.) I used the Hardwood stamp with Basic Black ink on Basic Grey card stock to create the dark wood. I cut the image in strips and glued them around the edges of the card front. I made the bottom wider to look like a window sill, and adhered it with Foam Adhesive Strips.
I put a line of Stampin’ Dimensionals down the center of each jar, three layers thick, and adhered them to the card to look like they’re sitting on the sill. I used Foam Adhesive strips to adhere the last jar lid next to the bloody jar.
I hope you can come to my Open House and BOGO Sale this Sunday to see this card in person. Photos really don’t do it justice. See the event details here.
Everything I used on today’s card is listed at the bottom of this post.
I hope you’ll hop along to the next stop on the blog hop, Karen Browning at StampWithMeKZB. There’s a lot of inspiration to be found in this group, and you don’t want to miss it!
Thank you for hopping along with us. If you get stuck during the Blog Hop, please use this line-up as a guide:
- Brian King at Stamp with Brian
- Imogene Thomas at MomoMakes.com
- Lynn Kolcun at Avery’s Owlery
- Louise Sharp at Louise Sharp.com
- Shawn de Oliveira at ShawnStamps
- Robin Myren at Songbird Designs by Robin
- Candy Ford at Stamp Candy <– YOU ARE HERE
- Karen Browning at StampWithMeKZB
- Becky Volpp at InkBlossom with Becky
- Jennifer Spiller at Westside Paper Creations
Here’s what I used today:
The holiday items will be available to purchase September 1, but you can look at them in my online store now. You can purchase everything else now by clicking on the images below!
Thanks for stopping by today, and Sweet Stamping!

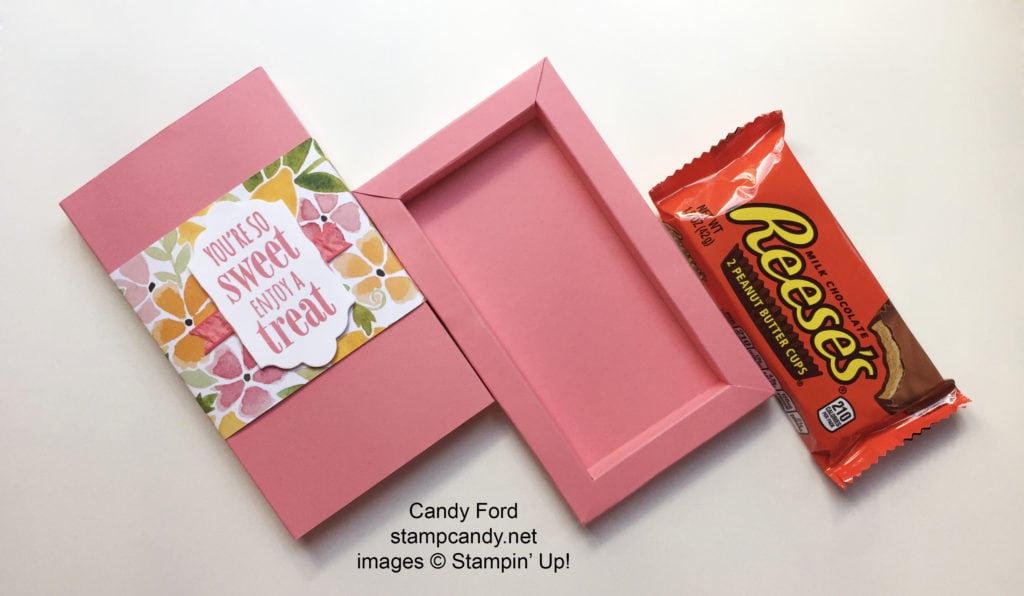
Aug 3, 2016 | Boxes, Events, Gallery, Gift Wrap, Gifts, Techniques |
Today’s project was one of the Make & Takes in our July Candy Hearts Team Meeting. It’s a cute little treat box with a sliding tray.
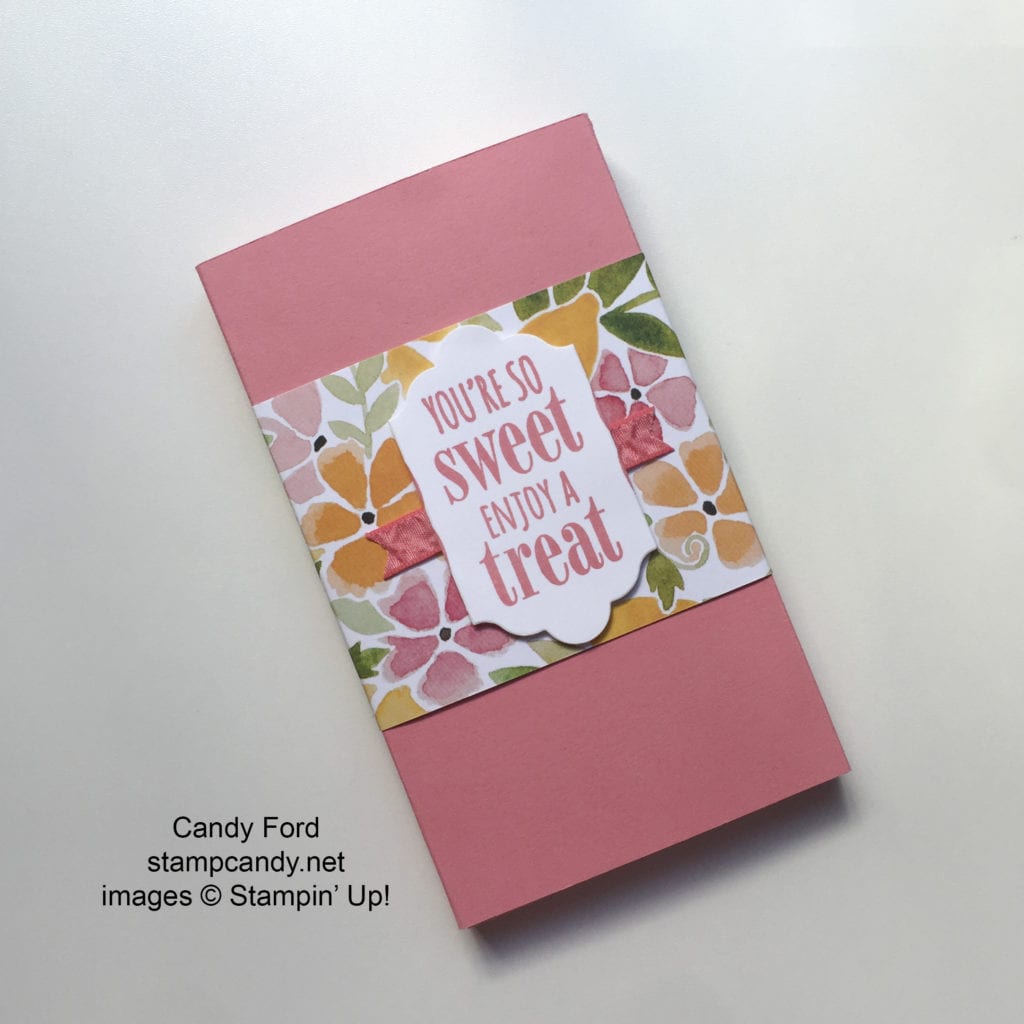
I designed this one to fit a pack of 2 large Reese Cups.
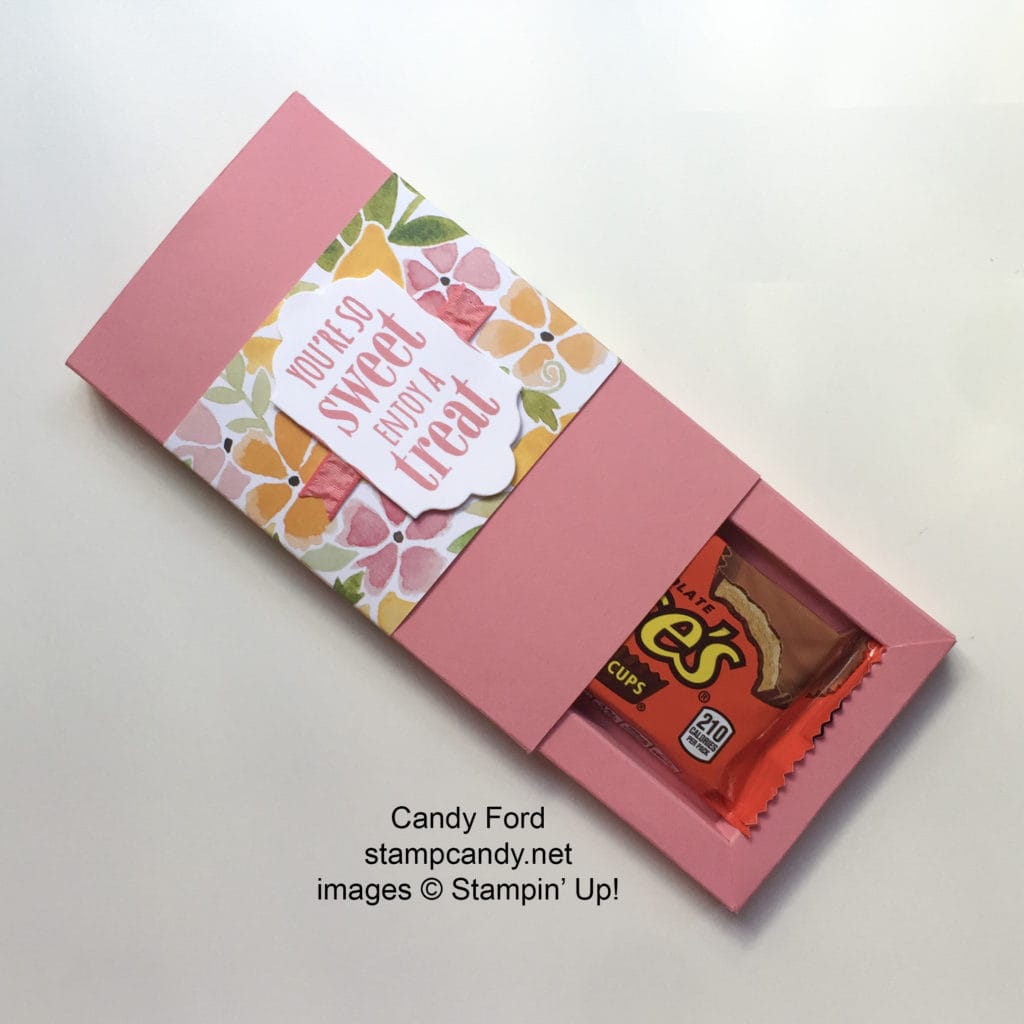
There are two parts to the box: the cover and the tray.
Here’s how I did it:
First determine the dimensions of your box. I measured a Reese’s cup package and determined I needed a box 2-1/2” wide x 5” long x 1/2” deep.
Create the tray:
Add the box depth x 10 to the width and to the length. So for the Reese cup box, the box depth is 1/2” and 1/2” x 10 = 5”. I added 5” to the width and to the length, so I cut my card stock to 7-1/2” x 10”.
Score 4 times from the edge of all four sides, the depth of the box each time. So I scored every 1/2” (the depth of my box.) I scored at 1/2”, 1”, 1-1/2”, and 2” on all four sides.
On the short sides, score one more time, 1/2” in from the last scores, but only down to the second score line. It should look something like this:
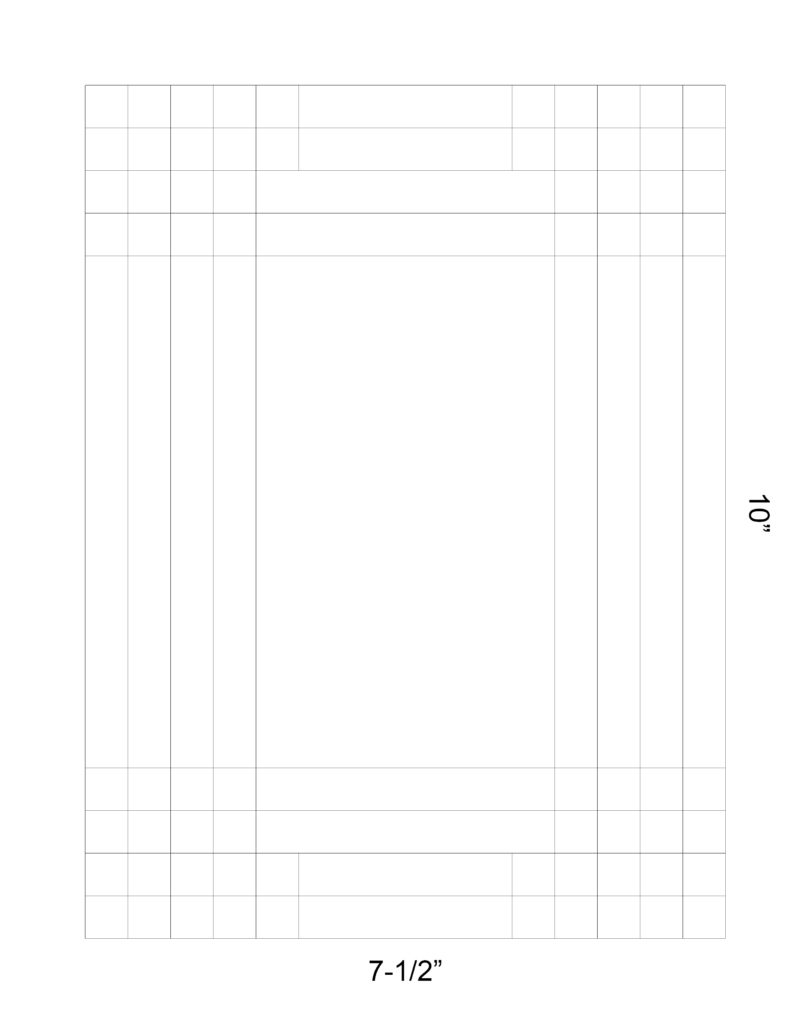
Cut the 16 (4 x 4) small squares made by the scored lines from each of the four corners (yellow areas.)
On the short sides cut down the two short scored lines, then cut diagonally down to the next corner (green areas.)

Discard all the pieces you have cut away.
Fold all score lines with a bone folder.
Now you’re ready to make the two long sides of the box. Turn up the scored side and put adhesive on the outermost strip. Roll toward the inside of the box, adhering that strip to the box bottom. Do the same thing on the other side.
Now make the two short sides of the box. Put adhesive on the outermost strip, just like before, and roll so that strip adheres to the box bottom. The skinnier center part will go between the two long sides, and the diagonal cut will lie on top of tip of the long side to create a mitered corner look. Do that on the other short side.
Create the cover:
Cut a piece of card stock the size you need to wrap around your tray and overlap by an inch or so. I cut mine to 6-1/8” wide (the length of my box plus 1/8”) by 10” long.
Wrap it around the tray, making sure it isn’t too snug, because it needs to slide on and off. Pinch where the bends need to be. Score and fold along the pinched areas. Wrap it around the tray and adhere the ends.
Now decorate:
I cut a piece of Fruit Stand Designer Series Paper to 3″ x 10″ and wrapped it around the cover, gluing it in place.
I stamped the sentiment from the You’re So Sweet stamp set in Flirty Flamingo ink onto Whisper White card stock, then cut it with a die from the Lots of Labels Framelits. I adhered a piece of Flirty Flamingo Ruched Ribbon to the cover with Fast Fuse, then adhered the sentiment over than with Stampin’ Dimensionals.
I realize these directions can seem a bit confusing. It’s much easier to show how to make this than to write it. Please contact me if you have any questions at all!
Here’s what I used:

AUGUST HOSTESS CODE
PMTWBJMQ
If you are placing an order for less than $150, please use this Hostess Code.
Click here for details on how to use the Hostess Code.
If you are placing an order of $150 or more, you will receive Stampin’ Rewards on your order, so do not use the Hostess Code.
Thanks for stopping by today, and Sweet Stamping!
Jul 16, 2016 | Cards, Club, Gallery, New Products, Techniques |
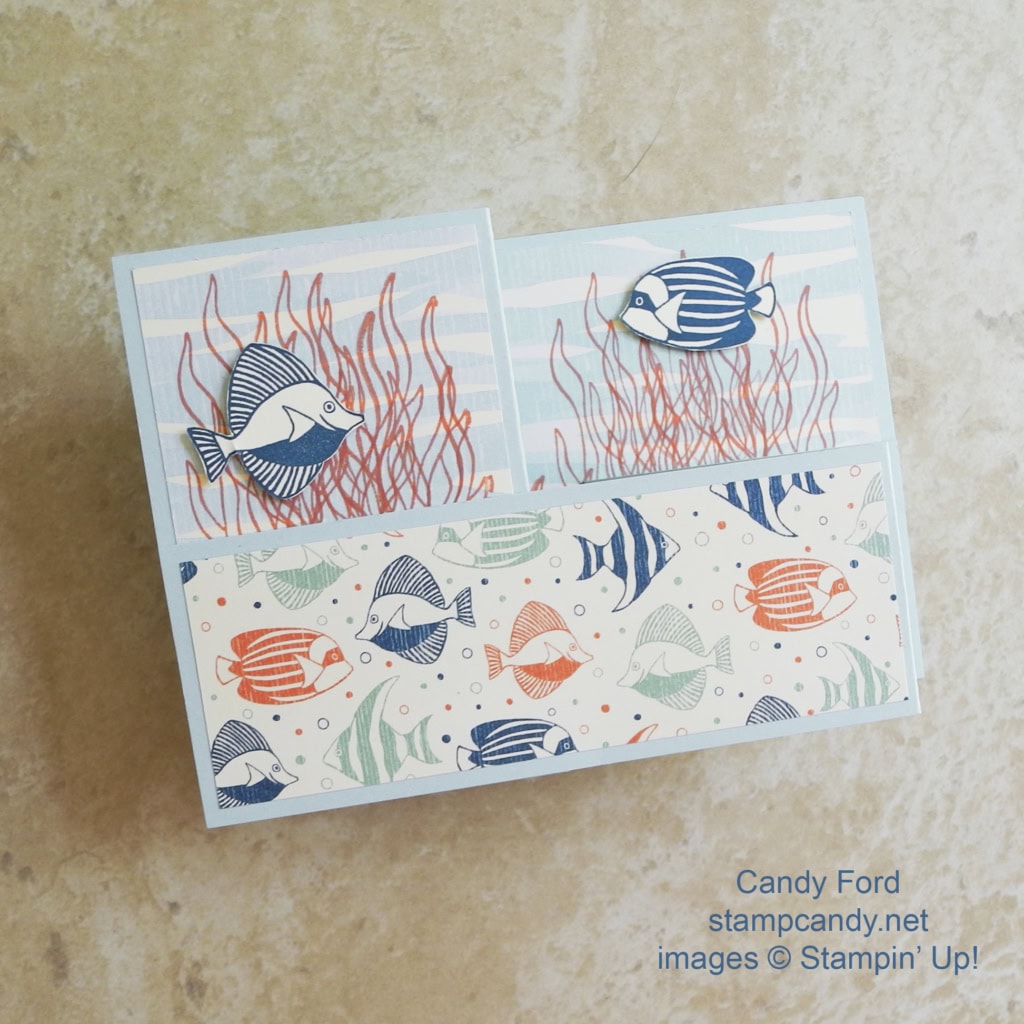
Today I’m sharing another project from July’s Stamp Club meeting. You can see the first one here. Today’s project is a Z-Fold card. When it first comes out of the envelope, it looks like this:

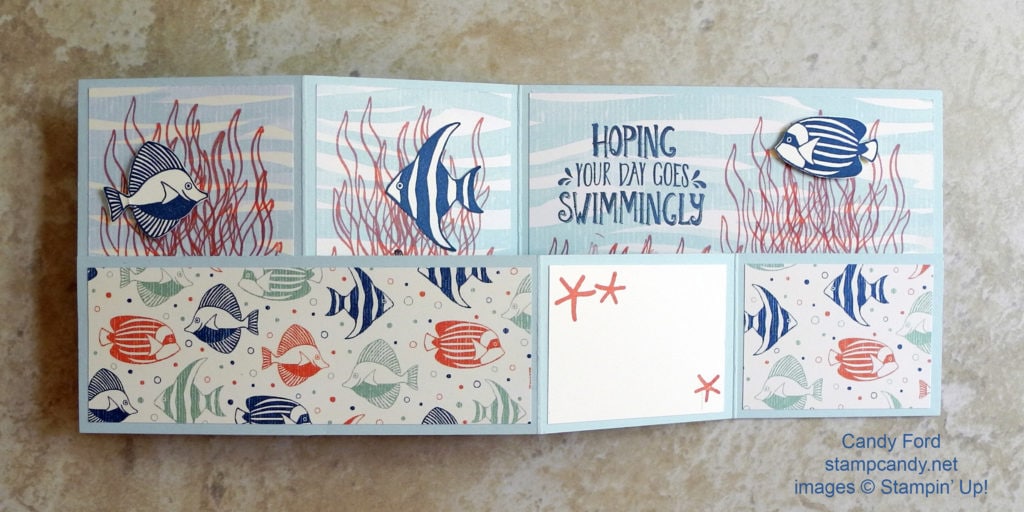
Then when it is opened, it looks like this:
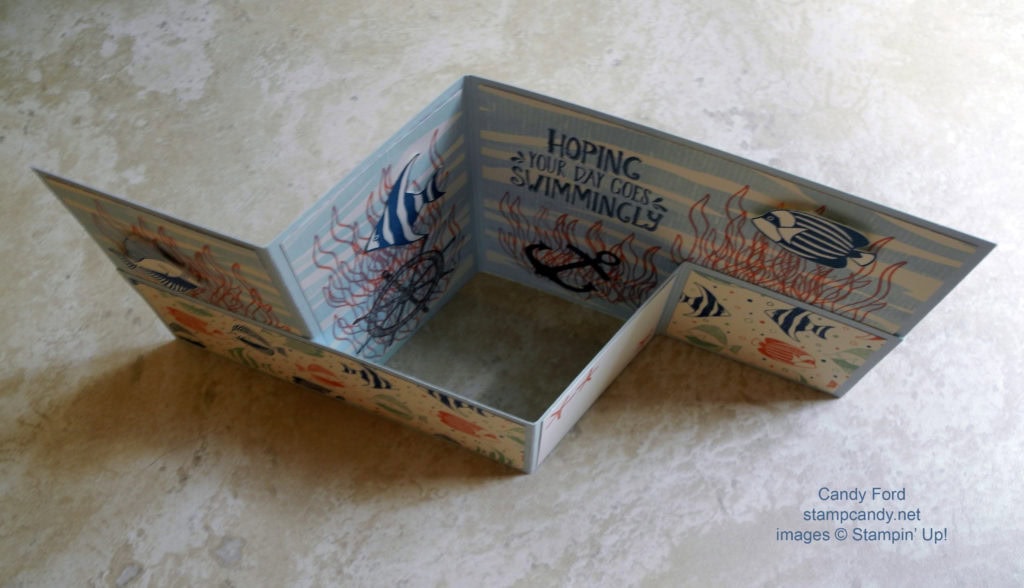
Here is a top view:
Here’s how we did it:
Cut a piece of Soft Sky card stock @ 4-1/4 x 11”. Cut another piece @ 2-1/8” x 11”. Score both pieces along the long side at 2-3/4” and at 5-1/2”. Flip the 2-1/8″ around to the other end. The taller piece will have an extra score line on the left and the shorter piece will have an extra score line on the right. See photos above.
Cut a piece of Very Vanilla card stock @ 2-1/2” x 1-7/8”.
Cut the following pieces of the By The Shore Designer Series Paper. Be sure to keep the patterns going in the right direction.
- water design: 1 piece @ 5-1/4” wide x 4” tall, and 2 pieces @ 2-1/2” wide x 4” tall.
- fish design: 1 piece @ 2-1/2” wide x 1-7/8” tall, and 1 piece @ 5-1/4” wide x 1-7/8” tall.
Stamp sentiment in Dapper Denim on the large water DSP as shown.
Stamp kelp in Calypso Coral on the water DSP pieces as shown. We stamped around the sentiment, but I think you could stamp over it, since the Dapper Denim ink is so much darker than the Calypso Coral.
Stamp three starfish in Calypso Coral onto the Very Vanilla piece. This is where your hand written message will go.
Stamp the anchor and the ship’s wheel in Early Expresso near the bottom of the 2 pieces of water DSP as shown.
Stamp three fish in Dapper Denim on an extra piece of Very Vanilla card stock. Use your Paper Snips to cut them out. We glued on the center one, since it is inside the card when it’s closed. The other two are attached with Stampin’ Dimensionals.
Now glue all the small pieces to the two Soft Sky card stock pieces. Then glue the 2-/18″ tall piece to the 4-1/4″ tall piece, only gluing in the two bottom corner areas. You can see where they are attached in the top view above.
It looks much more complicated than it really is. I hope my directions are easy to follow. If you have any questions at all, please let me know!
Here’s what we used:

Earn Bonus Days coupons in July!
Redeem Bonus Days coupons in August!
Details
- An email address is required to participate in this promotion; Bonus Days coupon codes can only be delivered to participants via email.
- We strongly recommend that participants both save emails containing their Bonus Days coupon codes AND write down the coupon codes in a safe place—the codes cannot be resent if the participant loses the email, and Demonstrator Support cannot recover lost codes.
- Participants will receive a $5 Bonus Days coupon code via email for every $50 they spend in a single order (catalog price before shipping and tax). There is no limit to the number of coupons participants can receive per order or throughout the duration of the promotion. There is no limit on the number of coupons participants can use on an order during redemption.
- Bonus Days coupons codes can be used in the checkout process during the redemption period.
- All order types qualify for this promotion. FOR FAX AND MAIL ORDERS, email addresses must still be provided in order to qualify for Bonus Days coupons during the promotion period. During redemption, be sure to include your coupon codes on your fax and mail orders.
- Bonus Days coupon codes can be redeemed for any product, excluding Starter Kits and Paper Pumpkin subscriptions. New prepaid Paper Pumpkin codes can be redeemed.
- Promotion period: July 7–31, 2016
- Promotion Deadlines:
- PHONE/FAX/MAIL: July 29, 2016 by 6:50 PM (MT)
- ONLINE: July 31, 2016 by 11:50 PM (MT)
- Redemption period: August 2–31, 2016
- Redemption Deadlines:
- PHONE/FAX/MAIL: August 31, 2016 by 6:50 PM (MT)
- OONLINE: August 31, 2016 by 11:50 PM (MT)
For Eastern time, add two hours to these times. For Central time add 1 hour. For Pacific time, subtract 1 hour.
Do you know what else you earn for every $50 you spend in a single order? Gum Balls! And they’re good for a year! Click on Gum Ball Rewards at the top of the page for details.
Place a $500 order with me in July (before tax and shipping) and you will receive 10 Bonus Days Coupons (that’s $50 off in August!) AND a FREE stamp set!
Thanks for stopping by today, and Sweet Stamping!

Jul 3, 2016 | Cards, Gallery, New Products, Techniques |
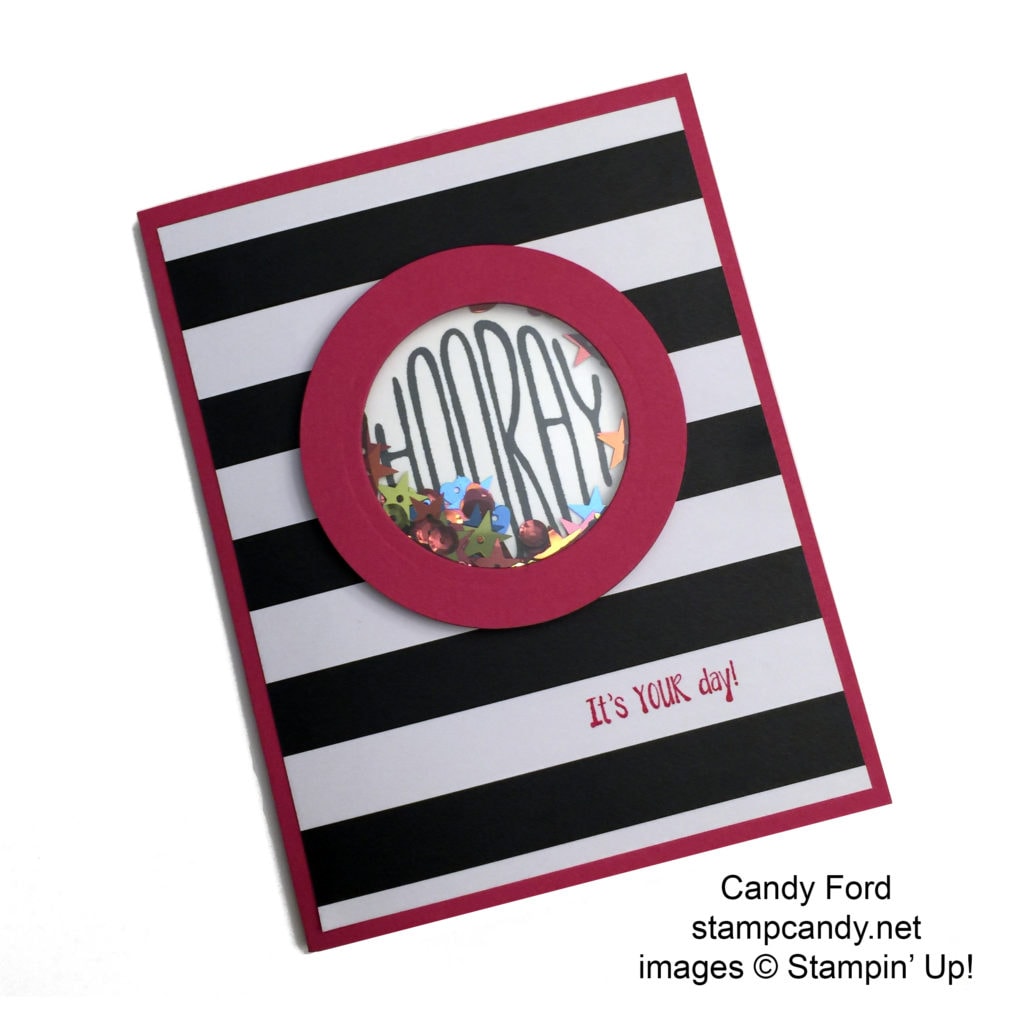
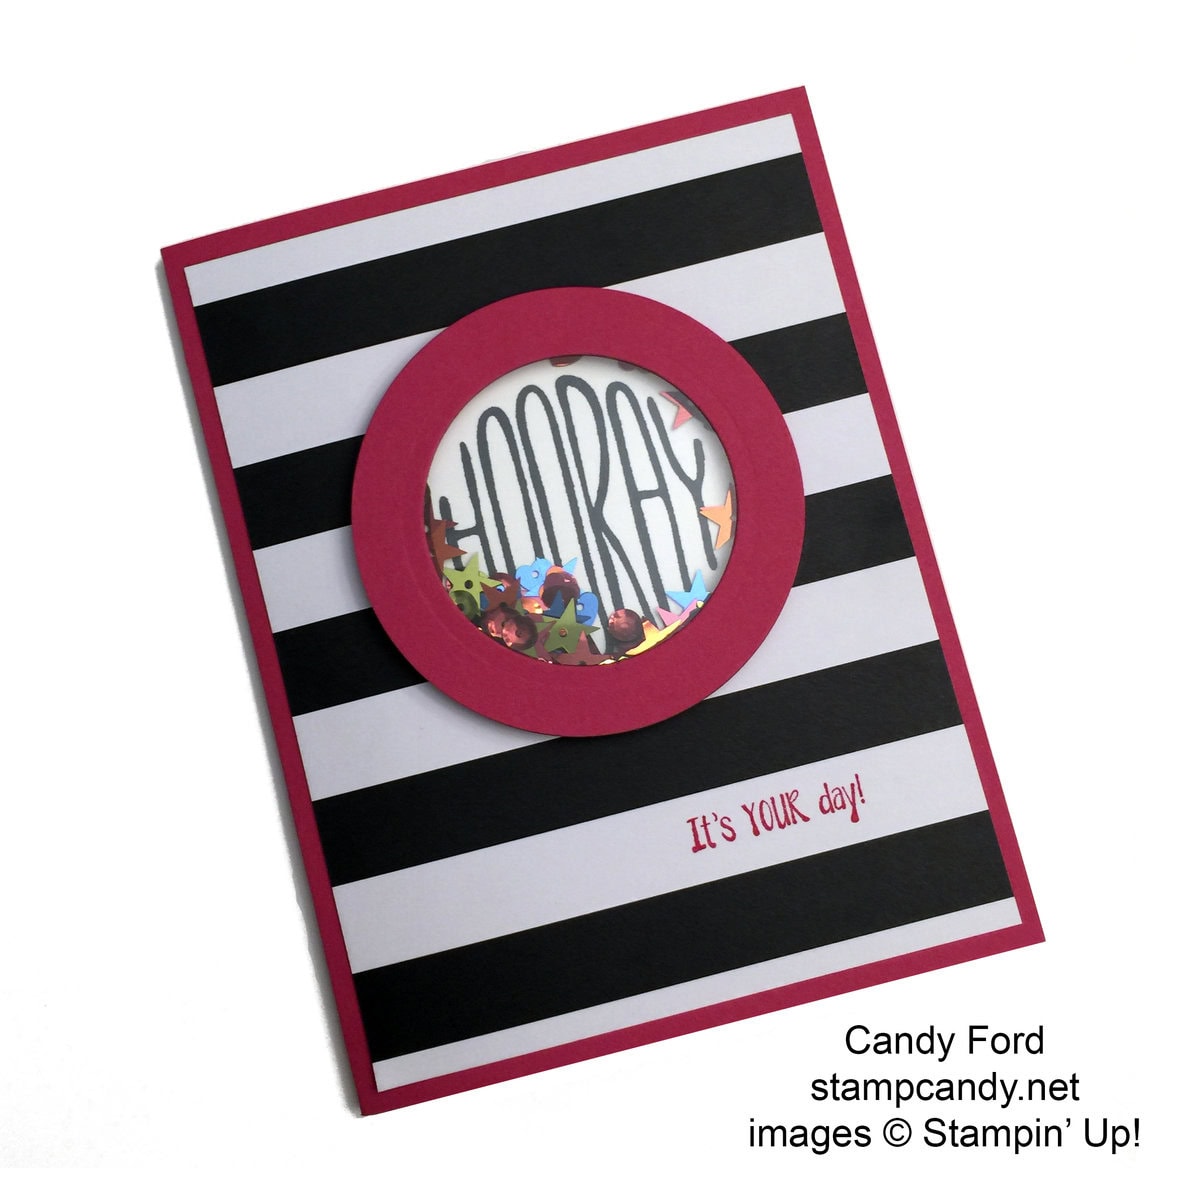
This card, another of the projects from June’s Stamp Club, uses a new stamp set, new Designer Series Paper, new Framelits Dies, and a new adhesive.
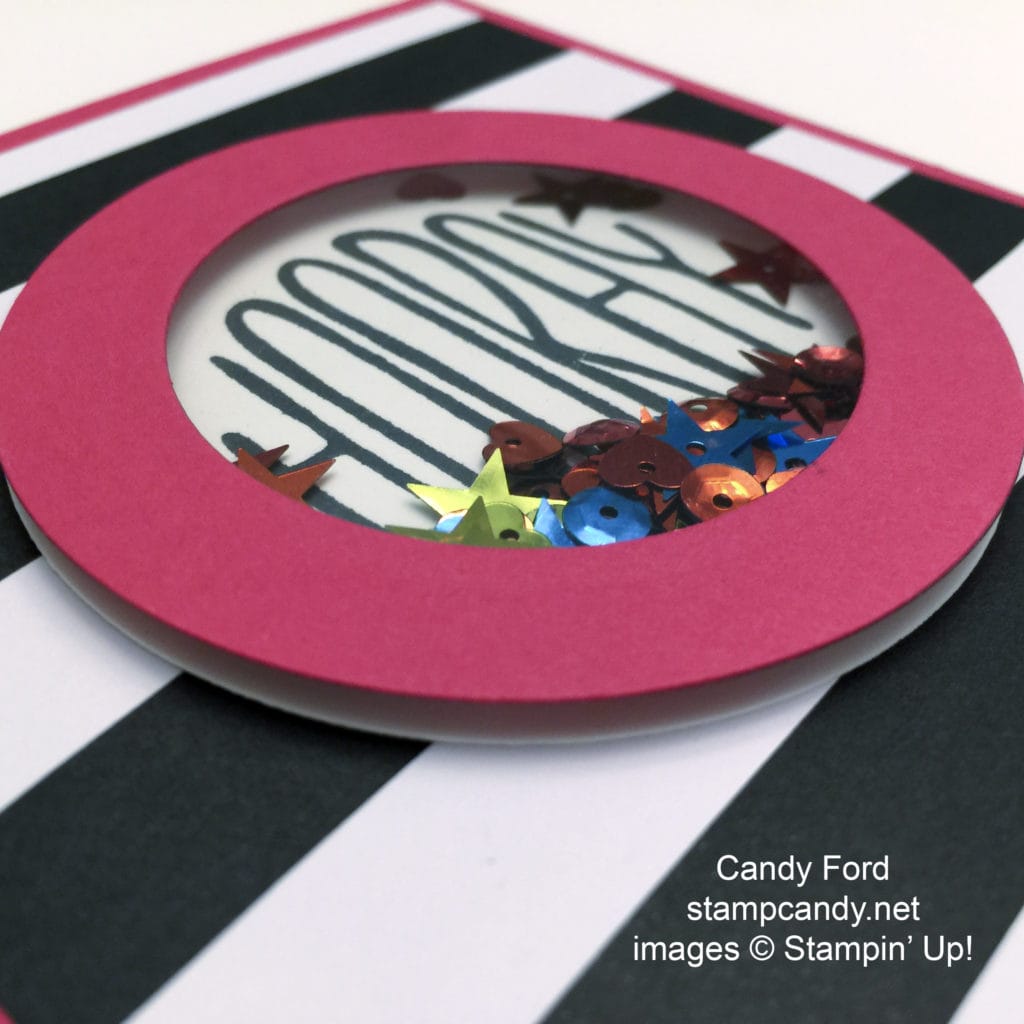
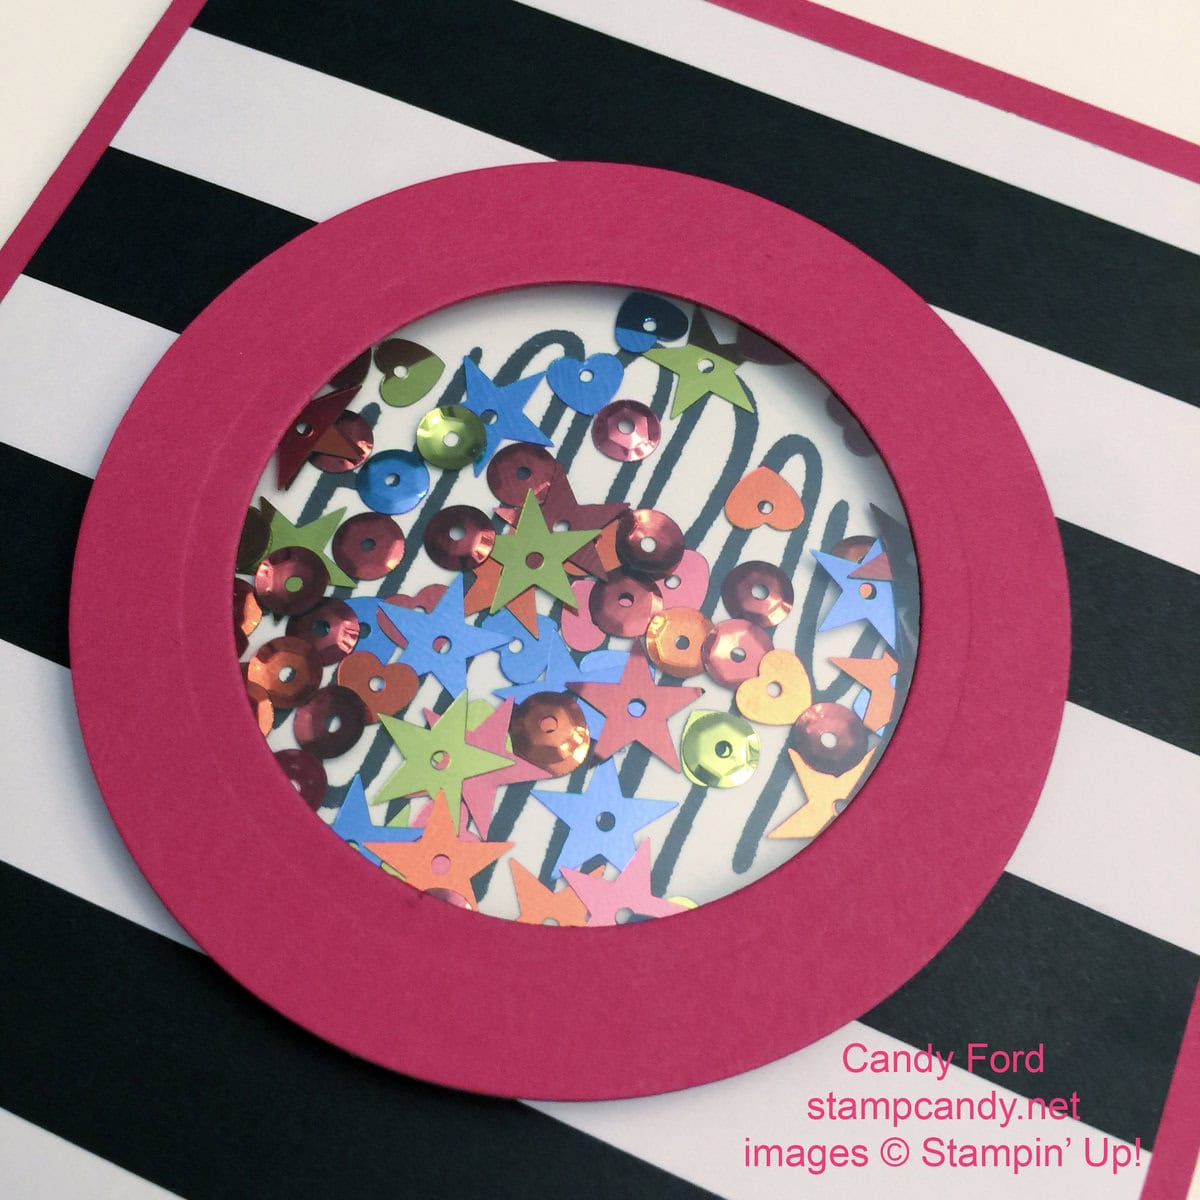
The Confetti Celebration stamp set is perfect for shaker cards. The sentiments are perfect for inside a round, square, or star shaped shaker. Today’s card uses the round “HOORAY” sentiment.
The new Pop of Pink Specialty DSP, is amazing. One side of each sheet is black and white, and the other side has Melon Mambo! There are also two specialty sheets of white with gold. For this card I used the black and white bold stripe.
I cut all the pieces of the shaker with the new Layering Circles Framelits. Did you know there are 16 dies in this set? 16!
The shaker is held together with the new Foam Adhesive Strips. These are 1/8″ wide by 9″ long foam strips, and you get 10 yards in a pack for only $8! They are perfect for shaker cards and for spinner cards.
 Here’s how I made it:
The card base is Melon Mambo card stock with a Pop of Pink DSP layer glued to it. I stamped the sentiment from the Confetti Celebration stamp set in Melon Mambo directly onto the DSP.
For the shaker, I cut a piece of Whisper White card stock, clear Window Sheet, and Melon Mambo card stock with the same circle die. I used a smaller die to cut the center out of the Melon Mambo piece, making sure the hole was big enough to show the whole stamped sentiment inside. I stamped the sentiment in Basic Black onto the Whisper White card stock piece.
I used Fast Fuse to adhere the Melon Mambo frame to the round Window Sheet piece. I think dry adhesives work better on the Window Sheet that liquids. I put the Foam Adhesive Strip around the perimeter of the white piece, cutting it so the two ends meet with no space between. I put a pinch of Brights Sequins in the middle, then lined up the front with the back and pressed them together. Then I glued the shaker onto the card front.
Here’s a reminder of the layers of the shaker – the sandwich – from top to bottom:
- card stock frame
- Fast Fuse or Tear & Tape adhesive
- window sheet
- Foam Adhesive Strip
- stamped card stock
There is a trick to preventing the sequins from sticking where they shouldn’t. Right before you put in the sequins and stick the two sides of the shaker together, wipe the Window Sheet and the inside of the shaker with the Embossing Buddy. It’s make to prevent static electricity when heat embossing, and it also helps prevent static in your shaker. This will help the sequins, glitter, or whatever you put inside, move freely inside.
Here’s what I used:
Be sure to check out the Cupcake Challenge on my Stamp Candy Facebook page! Make something with a cupcake on it and post a photo on my Facebook page by July 6 to be entered into a drawing to win the Perfectly Wrapped stamp set! I will randomly draw the name and announce the winner on July 7. And while you’re there, please “Like” my page. Thank you!
Thanks for stopping by today, and Sweet Stamping!
Jul 1, 2016 | Cards, Gallery, New Products, Techniques |
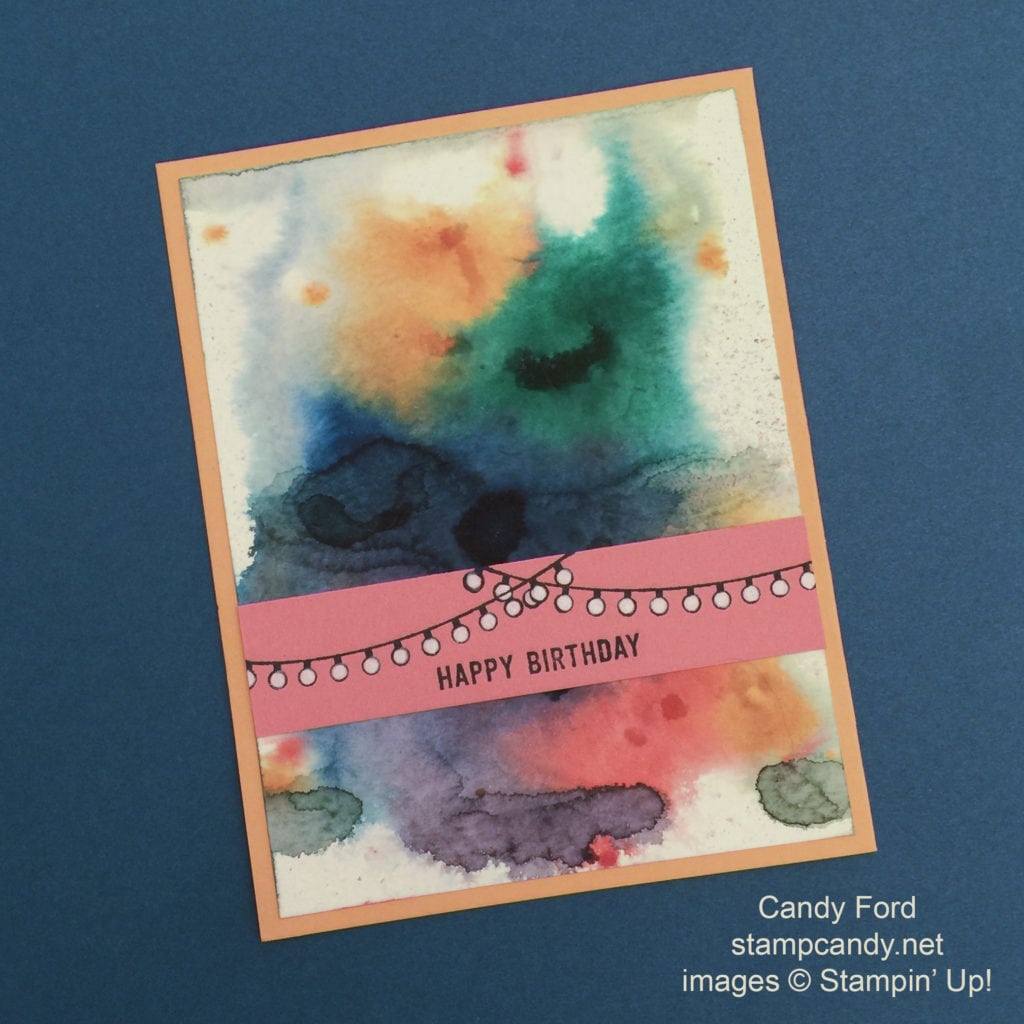
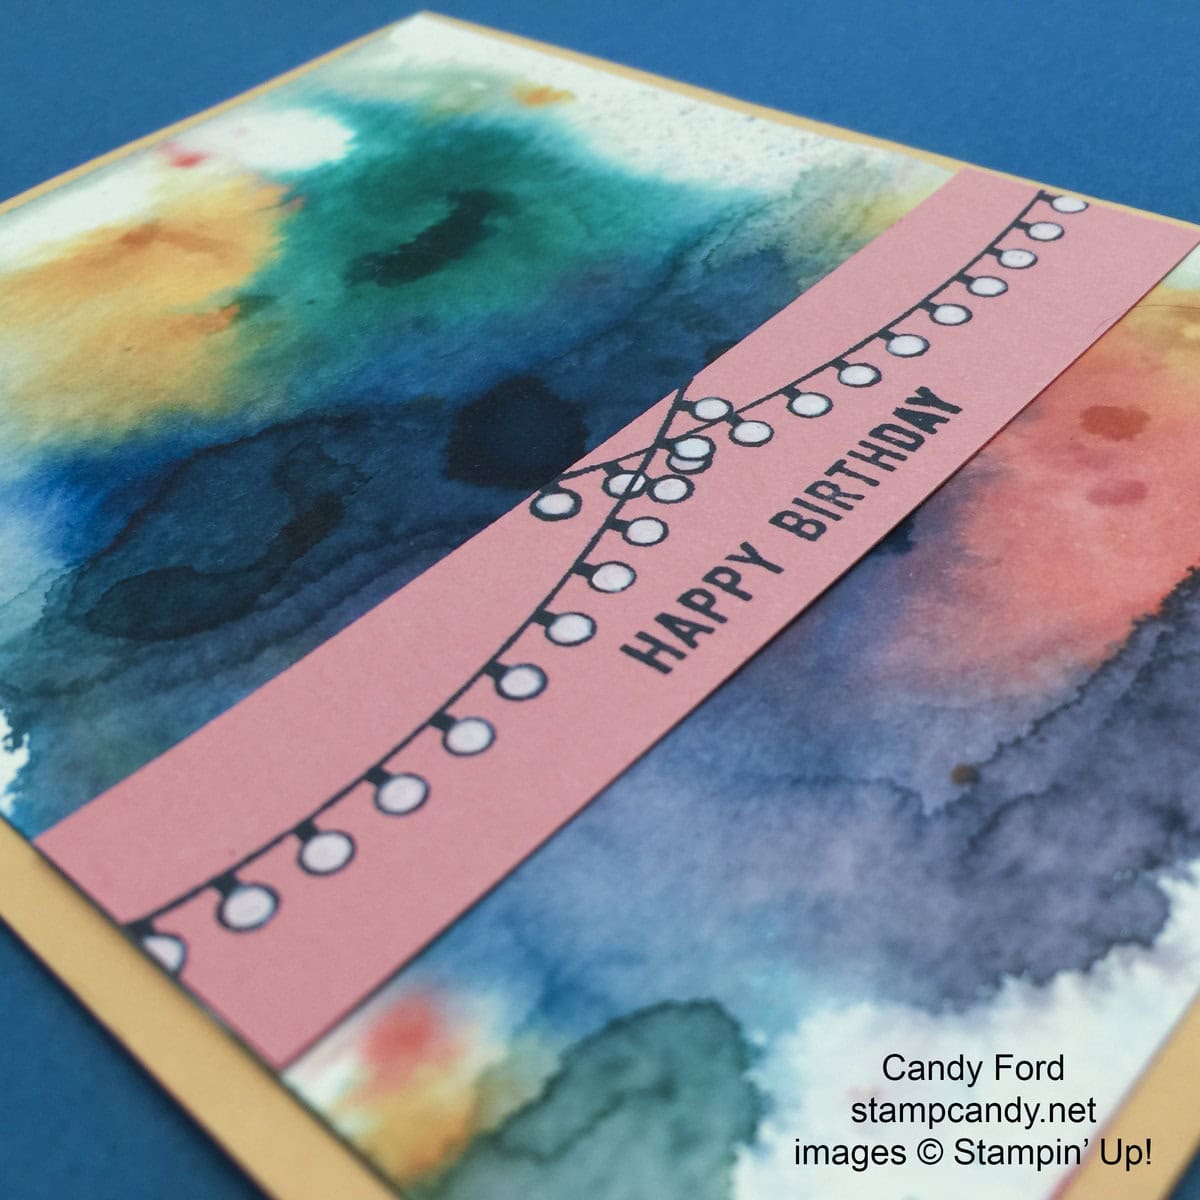
I’m back! I didn’t intend to take the whole month of June off from blogging, but sometimes life just works out that way. I have now accumulated a bunch of projects that I’m ready to blog about. Here’s the first:
I was in a watercoloring mood, so I got out my Watercolor Paper and started playing. I had no idea what I would end up with, but that’s sometimes the most fun process, just to play until you get something interesting. What do you think?
Here’s how I did it:
I cut the Watercolor Paper to 4″ x 5-1/4″. I used a spritzer filled with water to get the paper very wet. Then I used Ink Refills in the 5 new In Colors to drip onto the wet paper. I spritzed it some more to make the ink run more. At this point there were puddles on the paper that I was afraid would take too long to dry (too long = longer than I wanted to wait.) I took out my trusty Heat Tool and dried up those puddles in a jiffy.
I used Fast Fuse to adhere the Watercolor Paper to a Peekaboo Peach card base.
I stamped the sentiment and light strands from the Confetti Celebration stamp set in Basic Black onto a strip of Flirty Flamingo card stock. I filled in the lights with a Chalk Marker, going back over them a second time to make the white stronger. I used Fast Fuse to adhere the strip to the card front, and I was done!
Not only was this card easy to make, it was fun dripping the inks and making them run. I didn’t even get very much ink on me – a miracle in itself, as I’m a very messy crafter.
I hope you’ll try this technique. Be sure to let me know how it works for you!
Here’s what I used:
Thanks for stopping by today, and Sweet Stamping!

Jun 22, 2016 | Blog Hop, Cards, Gallery, New Products, Techniques |

Welcome to InKing Royalty’s June Blog Hop! Stampin’ Up!’s 2016 Annual Catalog introduced us to five new In Colors: Dapper Denim, Emerald Envy, Flirty Flamingo, Peekaboo Peach and Sweet Sugarplum. What a beautiful collection of versatile colors! Today’s Blog Hop is filled with inspiring projects that feature each artist’s favorite new In Color. After you read my post, I hope you’ll hop over to the next person on the list at the base of this post.
How did I choose my favorite In Color for this post? I punched out a piece of card stock in each color, put them in a bowl, swirled them around, and pulled one out. I mean really, how else could I choose just one of these amazing colors?

For the background I used a stamping method that has been around for many years, and was recently demonstrated at a Stampin’ Up! event by fellow demonstrator Brandy Cox.
I used the square piece from the inside of the easel stamp from the Painter’s Palette stamp set. This is more easily done with the clear mount set, since the wood mount stamps have permanent adhesive on the back, and there isn’t a wood block included for this extra square piece.
I stamped the square in Peekaboo Peach onto Whisper White card stock. I stamped the paper several times between re-inking to get the different shades. I also overlapped the squares to create darker areas. It reminds me of fabric from the 1970s.
I inked up the new Pineapple stamp in Emerald Envy and Early Espresso, then stamped directly on top of the stamped background. These two colors are deep enough to (mostly) cover the design under them.
Okay, maybe I cheated a little bit by sneaking in another of the new colors, but doesn’t it look awesome?
I cut the sentiment with the Hello You Thinlits from Whisper White card stock, then I covered it with Clear Wink of Stella and glued it to the card front. The card base is Thick Whisper White card stock.
I’m proud to say, “No Stampin’ Dimensionals were harmed in the making of this card.” Sometimes I force myself not to use them, just to be different. But this card really only needed Multipurpose Liquid Glue – my favorite paper crafting glue ever!
I hope you’ll hop along to the next stop on the blog hop, Robin Myren at Songbird Designs by Robin. There’s a lot of inspiration to be found in this group – and you don’t want to miss it!
Thank you for hopping along with us today, and Sweet Stamping!
If you get stuck during the Blog Hop, please use this line-up as a guide:
- Brian King at Stamp with Brian
- Lory Robinson at The Robin’s Nest Designs
- Lynn Kolcun at Avery’s Owlery
- Jennifer Spiller at Westside Paper Creations
- Imogene Thomas at MomoMakes.com
- Becky Volpp at Ink Blossom with Becky
- Candy Ford at Stamp Candy
- Robin Myren at Songbird Designs by Robin
- Natalie Bradley at NatalieBradley.com
- Shawn de Oliveira at ShawnStamps
- Lisa Pretto at InkBig Academy Stamps
- Karen Browning at StampWithMeKZB
Here’s what I used today:


