Jan 13, 2020 | Cards, Gallery, New Products |
Today’s card is made with the Country Club Suite, but using colors that might not immediately come to mind when you think of this set. While golf is usually considered a masculine sport, there are girly girl golfers, too. I used Petal Pink and Soft Sea Foam with a bit of clear Wink of Stella to froufrou it up a bit.
S
Here’s the Clubhouse bundle:

club club club club
Here’s what I made:
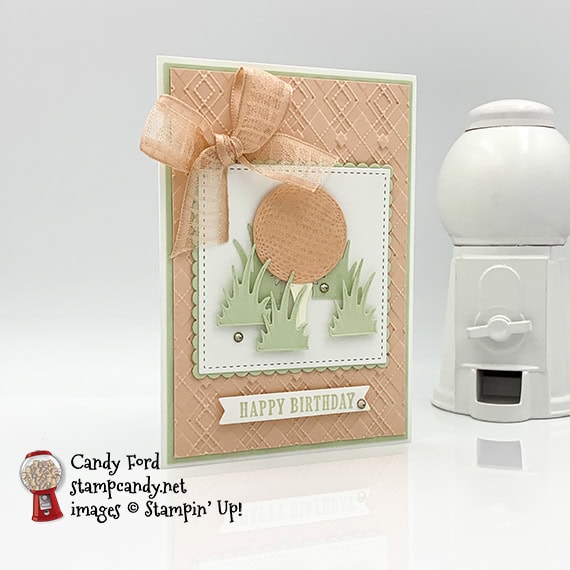
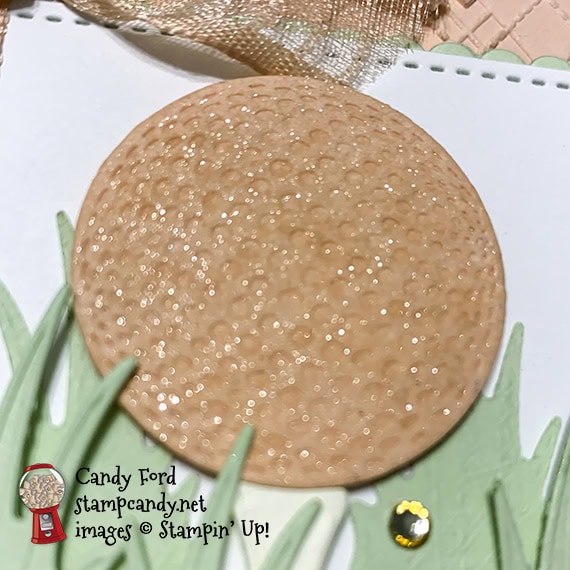
It’s hard to get Wink of Stella to show up in a photo, but I really laid it on thick here, so it does show a little at just the right angle. The golf ball die both cuts and embosses the ball at the same time!
Here’s what I did:
Cut and scored with my paper trimmer:
- Soft Sea Foam card stock (CS) layer cut to 3-3/8″ x 4-7/8″
- Petal Pink CS layer cut to 3-1/4″ x 4-3/4″
Stamped with the Clubhouse stamp set:
- sentiment in Soft Sea Foam ink onto a scrap of Whisper White Thick CS
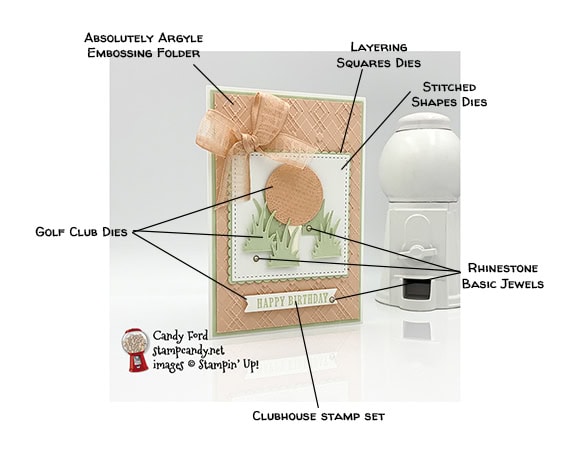
Embosssed using the Absolutely Argyle Embossing Folder:
Cut using the Layering Squares Dies:
- scalloped square from a scrap of Soft Sea Foam CS
Cut using the Stitched Shaped Dies:
- square from a scrap of Whisper White CS
Cut using the Golf Club Dies:
- large golf ball from a scrap of Petal Pink CS
- tee from a scrap of Very Vanilla Thick CS
- grass from a scrap of Soft Sea Foam CS
- sentiment
Colored using a Stampin’ Blends Marker:
- 3 rhinestones in Dark Petal Pink (The color doesn’t show well in the photos. You can also use the Petal Pink Rhinestone Gems, but I wanted something smaller for this card.)
Assembled the card:
- burnished the fold in the note card base with a Bone Folder
- Soft Sea Foam CS layer glued onto the front of the note card
- embossed Petal Pink CS layer glued onto the Soft Sea Foam CS layer
- 2 clumps of grass glued onto the Whisper White CS square
- ball, tee, and remaining clumps of grass adheres onto the Whisper White CS square using Stampin’ Dimentionsals.
- Whisper White square glued onto the Soft Sea Foam scalloped square
- Soft Sea Foam scalloped square glued onto the embossed Petal Pink CS layer
- sentiment banner adhered onto the embossed Petal Pink CS layer using Stampin’ Dimensionals
- 3 rhinestones applied onto the card front
- Petal Pink ribbon tied in a bow and adhered onto the embossed Petal Pink CS layer using Mini Glue Dots
S
Here are today’s colors:
You can click on each one to see all the products that come in that color!
S
Here’s what I used:
Click on these images for more details and to purchase.
Click “Supply List” for a clickable and printable list!
S
Here are some helpful links:
S
Thanks for stopping by today, and Sweet Stamping!
Jan 7, 2020 | Cards, Gallery, New Products |
Today I’m sharing with you another card I made using the new Country Club Suite. It’s a birthday card I made using the Clubhouse stamp set, Golf Club Dies, Country Club Designer Series Paper, and Country Club Twine Combo Pack.

Here’s what I made:
S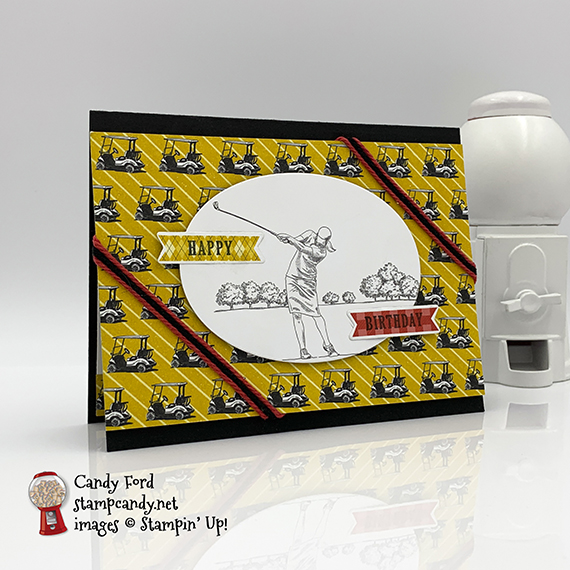

S
Here’s what I did:
Cut and scored with my paper trimmer:
- Basic Black card stock (CS) cut to 5-1/2″ x 8-1/2″, then scored in half at 4-1/4″
- Country Club Designer Series Paper (DSP) layer cut 5-1/2″ wide and about 3-3/4″ tall (cut between rows of golf carts)
- Whisper White CS cut to 5-1/4″ x 4″ for the inside of the cardstock
- one row of golf cards 5-1/2″ long cut from DSP
Stamped with the Clubhouse stamp set:
- each half of the sentiment onto a banner from the DSP
Cut using the Golf Club Dies:
Cut using the Layering Ovals Dies:
Assembled the card:
- burnished the fold in the card base with a Bone Folder
- sentiment banners glued onto the oval scene
- oval adhered onto the DSP layer using Black Stampin’ Dimensionals
- twine (one piece Basic Black between two pieces of Poppy Parade) adhered onto the bottom left and top right corners of the DSP layer using Tear & Tape
- DSP layer glued onto the front of the card base
- strip of golf carts glued onto the Whisper White CS
- Whisper White CS glued onto the inside of the card base
S
Here are today’s colors:
You can click on each one to see all the products that come in that color!
S
Here’s what I used:
Click on these images for more details and to purchase.
Click “Supply List” for a clickable and printable list of the products!
S
Here are some helpful links:
S
Thanks for stopping by today, and Sweet Stamping!
Sep 3, 2019 |
Register by December 6 to hold your spot, and so I’ll know how many project kits to prepare.
To attend as a guest, just to try it out, there is a $10 class fee, which is applied to your order if you join that night.
Here’s what we do:
– meet once a month, usually on the 2nd Monday (this month we’re meeting on the 1st Monday)
– make at least 2 projects each month, usually more
– learn new techniques
– laugh and have fun
– have light refreshments
– get new catalogs and see new products as I receive them (before they come out)
– place an order of $25 or more each month (before tax & shipping)
– members take turns receiving Stampin’ Rewards
– 6 month commitment so all members will get their Stampin’ Rewards
– bring your basic stamping kit (scissors, bone folder, adhesives) and I supply the rest. I have adhesives on hand you can buy.
Please park along the street (Woodcliff Dr.) behind the building. DO NOT park by of any of the units in the complex.
Email candy@stampcandy.net with any questions.
Remember to register by December 6!
Sep 3, 2019 |
Register by November 8 to hold your spot, and so I’ll know how many projects to prepare.
To attend as a guest, just to try it out, there is a $10 class fee, which is applied to your order if you join that night.
Here’s what we do:
– meet once a month, usually on the 2nd Monday (this month we’re meeting on the 1st Monday)
– make at least 2 projects each month, usually more
– learn new techniques
– laugh and have fun
– have light refreshments
– get new catalogs and see new products as I receive them (before they come out)
– place an order of $25 or more each month (before tax & shipping)
– members take turns receiving Stampin’ Rewards
– 6 month commitment so all members will get their Stampin’ Rewards
– bring your basic stamping kit (scissors, bone folder, adhesives) and I supply the rest. I have adhesives on hand you can buy.
Please park along the street (Woodcliff Dr.) behind the building. DO NOT park by of any of the units in the complex.
Email candy@stampcandy.net with any questions.
Remember to register by November 8!
Sep 3, 2019 |
Register by October 4 to hold your spot, and so I’ll know how many projects to prepare.
To attend as a guest, just to try it out, there is a $10 class fee, which is applied to your order if you join that night.
Here’s what we do:
– meet once a month, usually on the 2nd Monday (this month we’re meeting on the 1st Monday)
– make at least 2 projects each month, usually more
– learn new techniques
– laugh and have fun
– have light refreshments
– get new catalogs and see new products as I receive them (before they come out)
– place an order of $25 or more each month (before tax & shipping)
– members take turns receiving Stampin’ Rewards
– 6 month commitment so all members will get their Stampin’ Rewards
– bring your basic stamping kit (scissors, bone folder, adhesives) and I supply the rest. I have adhesives on hand you can buy.
Please park along the street (Woodcliff Dr.) behind the building. DO NOT park by of any of the units in the complex.
Email candy@stampcandy.net with any questions.
Remember to register by October 4!


