Apr 5, 2017 | Blog Candy, Blog Hop, Cards, Gallery, Occasions |
The Succulent Garden Designer Series Paper (DSP) has become one of my favorites. The colors are soft and serene, and the designs are just lovely. It’s even featured in the ICS Blog Hop banner below. Today’s card features it, along with the Oh, So Succulent stamp set, AND I’m giving away a pack of precut 4″ x 5-1/4″ pieces of it as Blog Candy! Scroll down for details on how to win.

Oh, So Succulent Bundle © Stampin’ Up!
I’ve probably mentioned this before, but I think it’s worth mentioning again – the Oh So Succulent stamp set is available in a bundle with the Succulent Framelits Dies to save you 10%!

Thank you for joining us for the Inspire, Create, & Share Blog Hop! This month the theme is Free for All! Every stop on the hop will feature a great project of the stamper’s choice. That means a lot of inspiration and fun ideas are in store for you as you hop along. In addition, be sure to check out how to win some blog candy! Every stop on the hop will have blog candy to give away.
Are you wondering how to enter to qualify to win the blog candy? Just subscribe to any of the blogs you want to follow and you will be entered to win that blog’s candy. Each blog on the hop will draw a name from their new subscribers to win their candy. Why subscribe? When you subscribe to a blog’s feed you will be notified every time there is a new post. You never have to miss out on any of the inspiration, fun or news.
Be sure to follow the hop all the way around to try to win as many as you can! And, of course, to see all the wonderful projects being shared by the hoppers.
Here’s what I made for today’s ICS Blog Hop:

The card’s layout is very simple and versatile. I chose to line up all the layers at the top right corner of the card base, but you could line them up at any of the four corners, or you could center them all. The banner could go in either direction as well.
Scroll down to see how I made today’s card and what I used.
To follow the Blog Hop, click on the arrow, and you will be taken to the next stop, Janey Backer at Inspired Stamping.

Here’s what I did:
Cut and scored with my Stampin’ Trimmer:
- Whisper White Thick card stock (CS) to 4-1/4″ x 11″, then scored it in half at 5-1/2″
- Succulent Garden Designer Series Paper (DSP) to 4-1/8″ x 5-3/8″
- Whisper White CS to 3-1/2″ x 4-3/4″
- Succulent Garden Designer Series Paper (DSP) to 3-3/8″ x 4-5/8″
- Whisper White CS to 2-7/8″ x 4-1/8″
- Succulent Garden Designer Series Paper (DSP) to 2-3/4″ x 4″
- Whisper White CS to 5/8″ x 4-1/2″
- Calypso Coral CS to 1/2″ x 4-1/2″
Sentiment from the Oh, So Succulent stamp set:
- dusted Calypso Coral CS strip with the Embossing Buddy
- stamped sentiment in Versamark ink onto the strip
- poured White Stampin’ Emboss Powder over sentiment, then flicked off the excess
- set with the Heat Tool – be sure to hold small pieces like this with a wooden clothes pin or metal tweezers, to prevent burning your fingers
Notched using the Banner Triple Punch:
- the right end of the Calypso Coral CS strip with the sentiment
- one end of the Whisper White CS strip
Assembled the card:
- the five rectangular layers glued together as shown then glued to card base. See the note below the photo about the layout.
- plain end of Calypso Coral CS strip trimmed with Paper Snips so the sentiment feels centered, then glued onto Whisper White CS strip, lining up the notched ends
- sentiment banner glued onto card front then the excess hanging over the edge trimmed away with Paper Snips.
- NOTE: I lined up the left edge of the Calypso Coral strip with the left edge of the largest DSP layer. Then I trimmed away the excess Whisper White with my Paper Snips. In determining how far from the top to put the banner, I aimed for about 1/3 down the length of the smallest DSP layer. I just eyeballed it, but I was shooting for twice as much space beneath the banner as above it (the space on the smallest DSP layer.) I think it’s actually a little higher than that. But it was already glued down. And I was too lazy to redo it. So there.
Here’s what I used:
Click on the images for more details and to purchase.
Here’s how to enter the drawing:
On the right side of this page, just under my photo, you’ll see the Get Notified area. Enter your email address, check the Daily blog email updates/Newsletter options, and click on Subscribe. That’s it!
Be sure to subscribe/comment by midnight, Monday, April 10. I will draw the winning name Tuesday, April 11, and I will announce the winner on my Wednesday, April 12 blog post and mail your blog candy out right away! Thanks for hopping with us and remember to join us on the first Wednesday of the month for the Inspire, Create & Share Blog Hop!

RETIRING IN COLORS
DID YOU KNOW the 2015-2017 In Colors will retire at the end of May? That means that they will no longer be available to order on June 1. Don’t wait until then to order them. At some point before the end of May, they will become available only while supplies last. So get what you need now.
***ALL 5 INK REFILLS ARE ALREADY ON BACKORDER!***
ORDER YOURS TODAY SO YOU CAN GET THEM WHEN THEY COME IN!
SPEAKING OF RETIRING PRODUCTS
The Designer Series Papers always retire, too. So these products won’t be available after May 31. And just like the retiring In Colors above, at some point before the end of May, these items will become available only while supplies last. Don’t wait until the last minute. Get them now!
Gum Ball Rewards
 You always earn a Gum Ball for every $50 you spend on an order with me. Earn 10 Gum Balls and I’ll send you a free stamp set of your choice! See the Gum Ball Rewards page for details.
Click here to shop my online store!
April Host Code
HV6MJT2X
Use the Host Code on online orders less than $15o. See how to use a Host Code here.
Online orders of $75-149.99 placed with the Host Code will receive the gift of the month!
Online orders of $150 or more will automatically receive the gift of the month! Do not use the Host Code.
April’s gift is a pack of Urban Underground Embellishments! Each pack contains 24 brushed silver embellishments – 8 each of 3 designs. (I can ship within US only.)
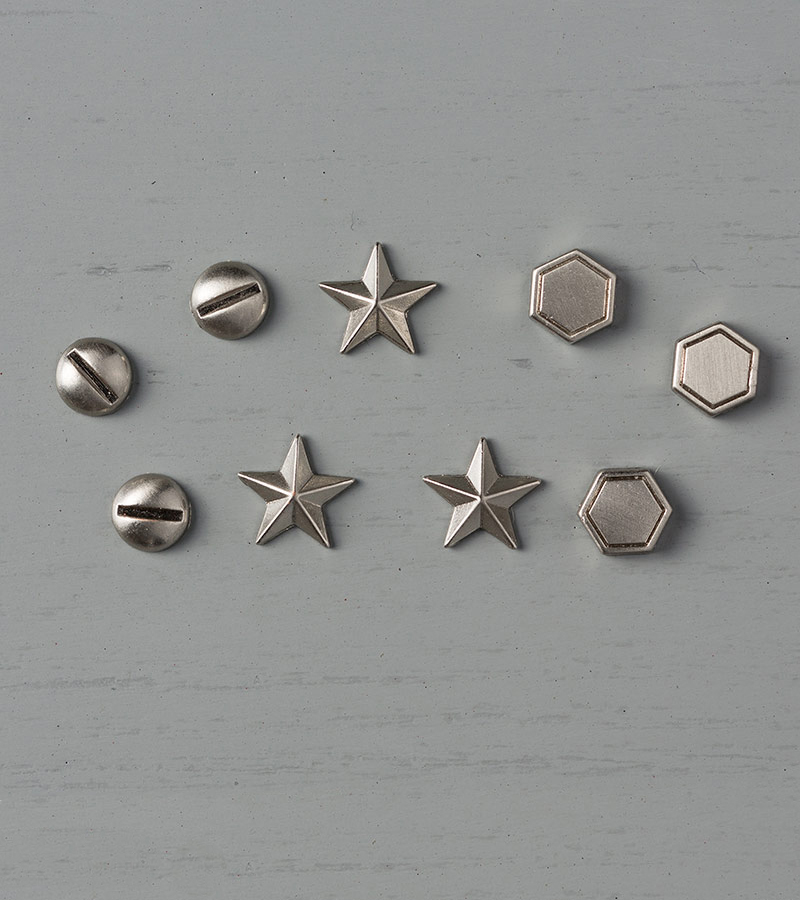
Urban Underground Embellishments © Stampin’ Up!
Thanks for stopping by today, and Sweet Stamping!

Feb 14, 2017 | Blog Candy, Cards, Gallery, Holiday, Occasions |
Happy Valentine’s Day, Sweet Stampers!
I was planning to post another Valentine card today, but then I thought, well, most people probably have their cards made already. And it’s too late to order anything for today anyway (but you can go ahead and order Valentine’s goodies for next year!) I really wanted to play with the Basket Bunch bundle, so I thought, lets start thinking about the next big holiday: Easter.
Actually it isn’t so odd that I would post an Easter card today. I mean, Valentine’s Day and Easter have quite a few things in common. To name just a couple: 1) we spend time with people we love, and 2) there’s always plenty of chocolate around.
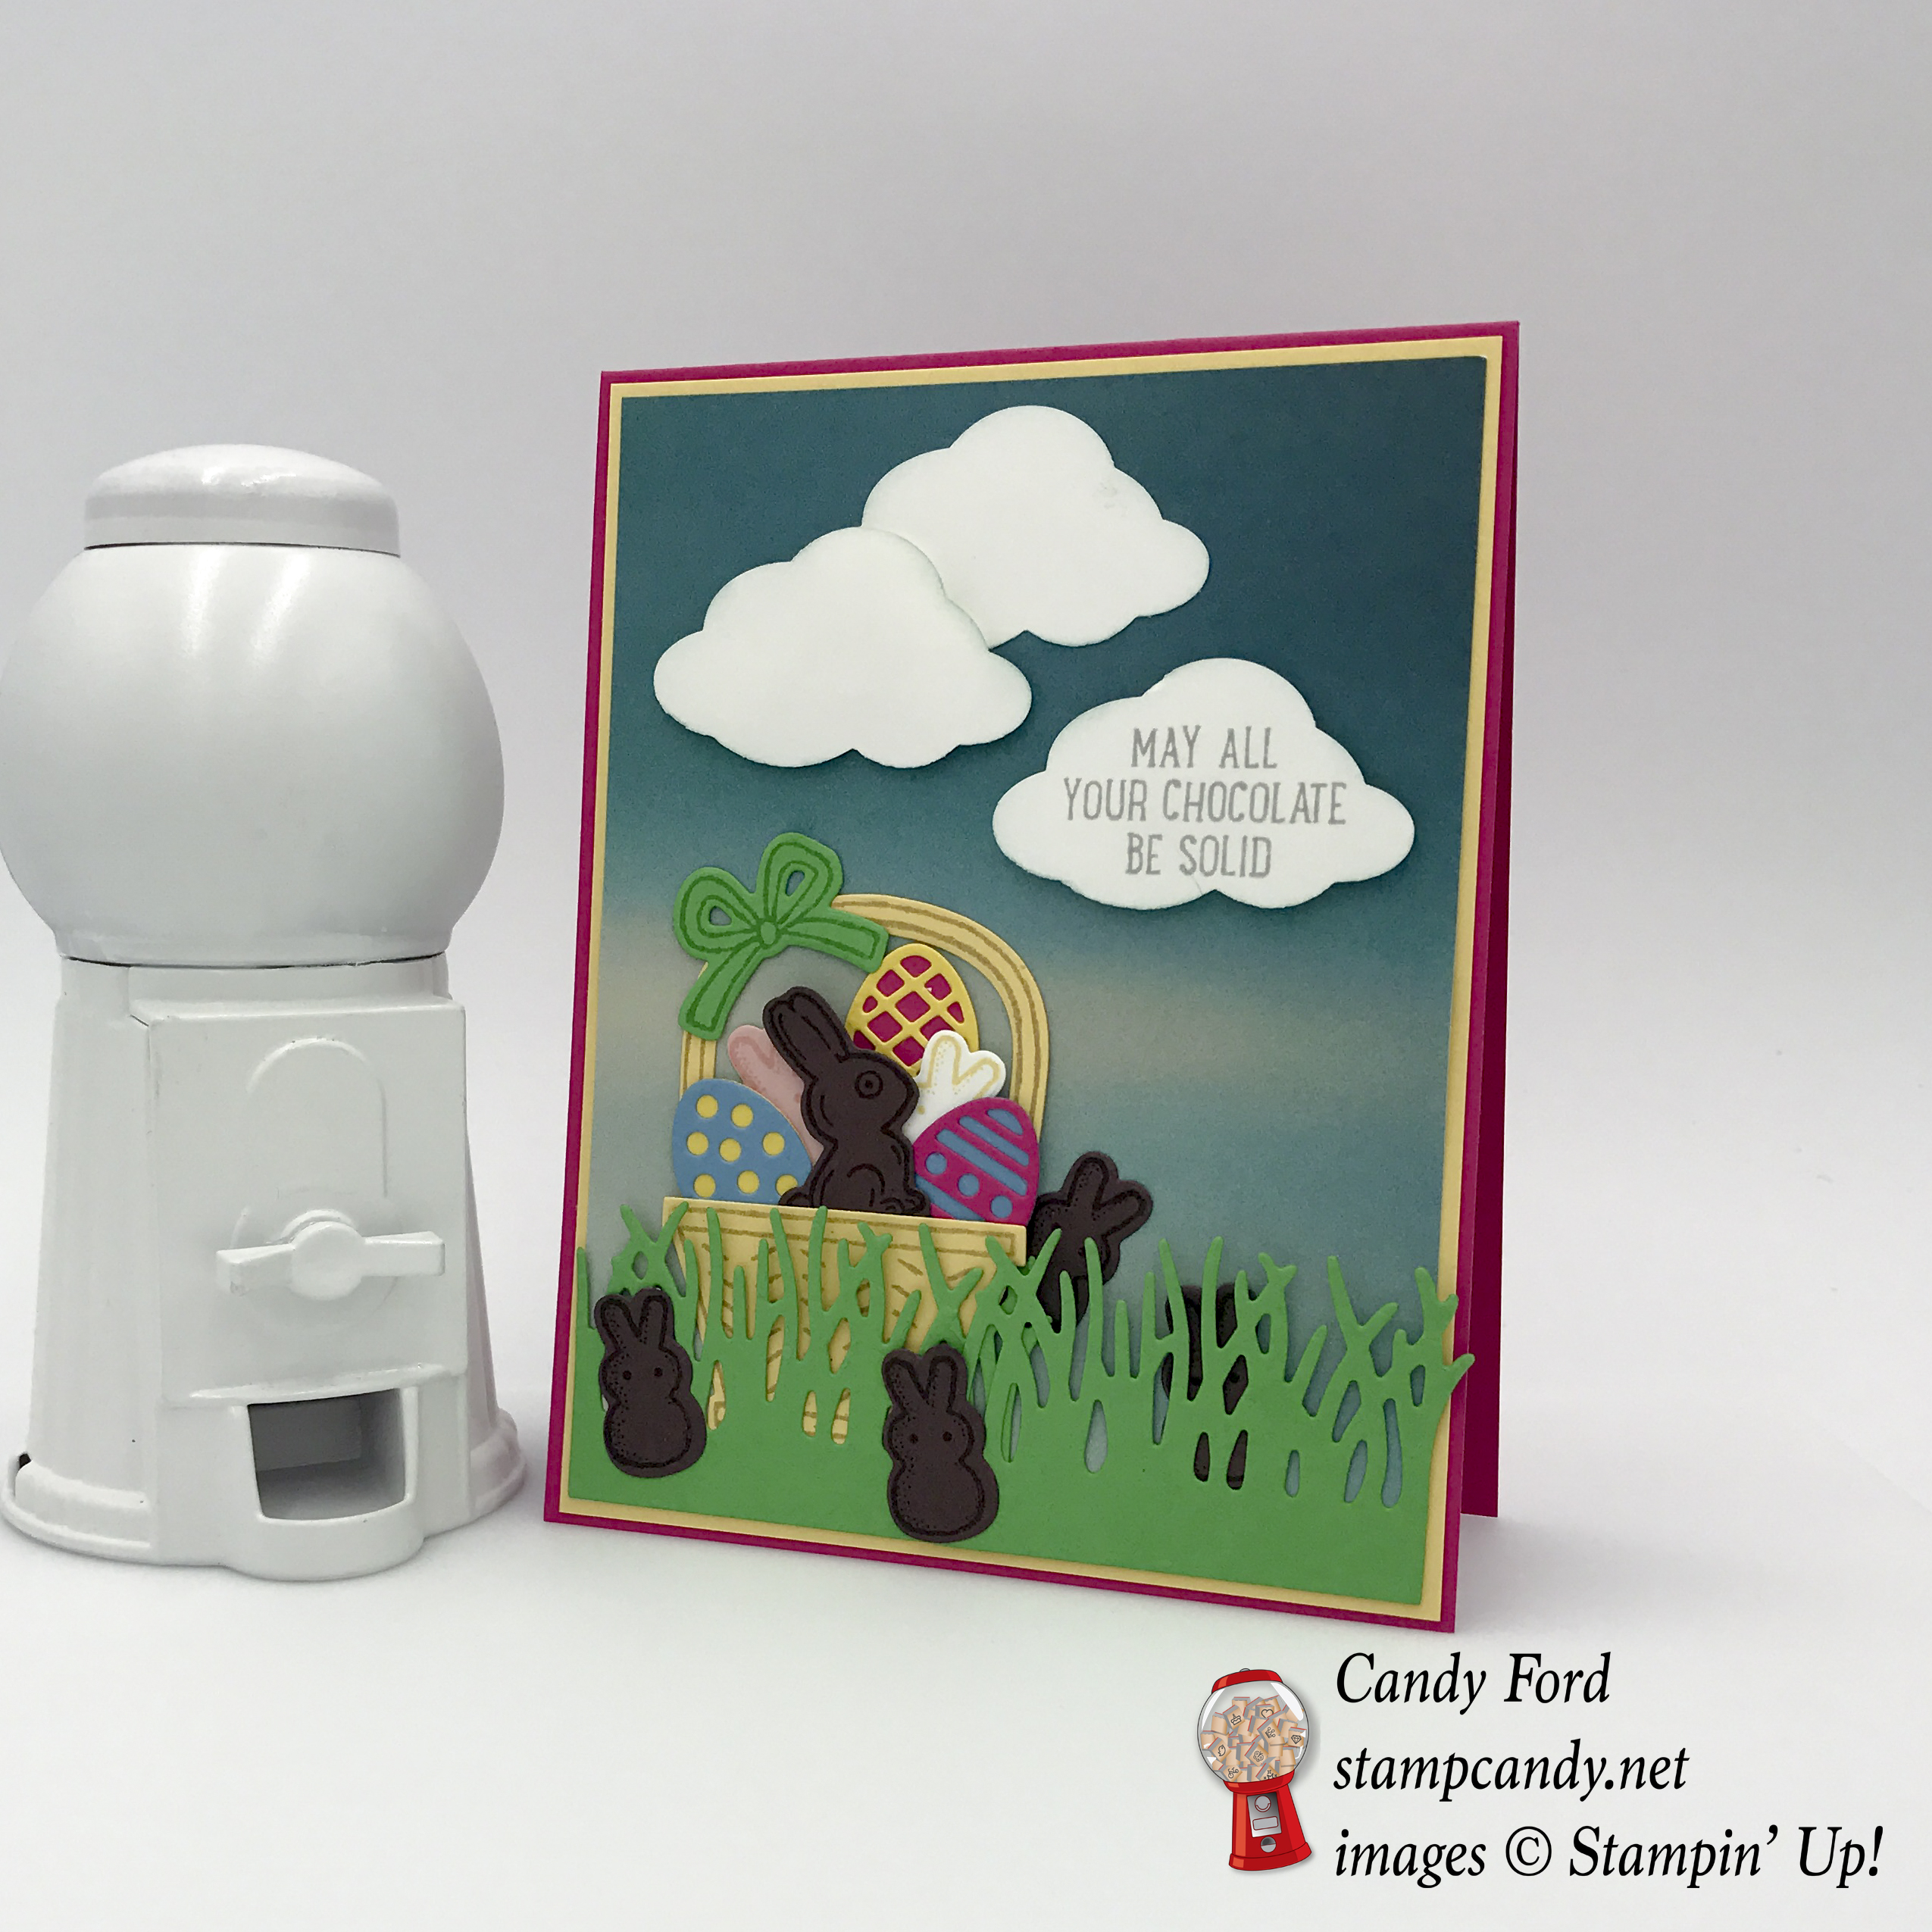
I hope you enjoy today’s card made with the Basket Bunch stamp set and Basket Builder Framelits, which are available in a bundle to save 10%! This set has so many possibilities, and not only for Easter – a basket full of flowers makes a lovely card any time!
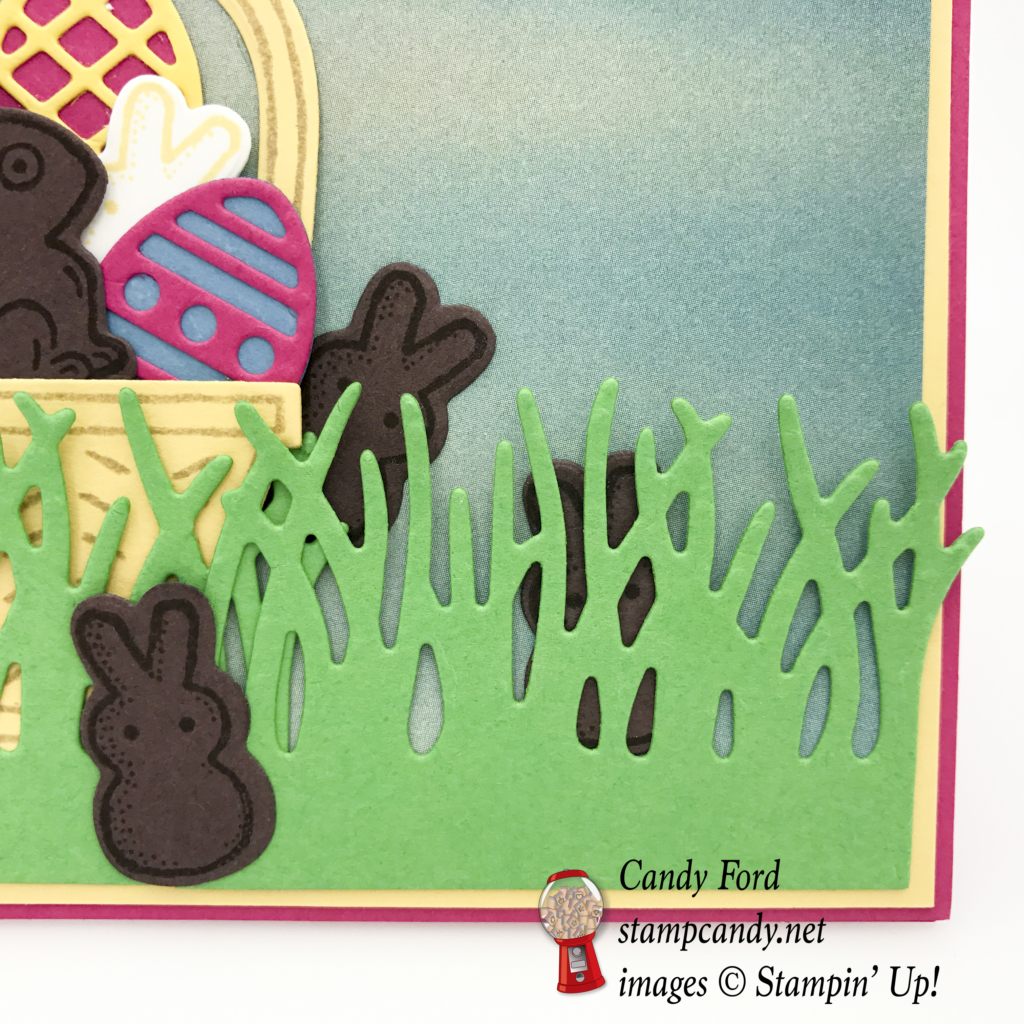
Here’s what I made:
This is a perfect project to use your card stock scraps on, since so many of the pieces are small.

Even though I didn’t use Stampin’ Dimensionals, there is still dimension to the basket and grass, because there are so many layers of card stock. I did use them under two of the clouds.

Here’s what I did:
Cut and scored with my Stampin’ Trimmer:
- Melon Mambo card stock (CS) to 4-1/4″ x 11″ and scored it at 5-1/2″ for the card base.
- So Saffron CS to 4-1/8″ x 5-3/8″ and glued it to the card base.
- Serene Scenery Designer Series Paper (DSP) to 4″ x 5-1/4″ and glued that to the card front.
Stamped with the Basket Bunch stamp set:
- the chocolate bunny in Chocolate Chip ink onto Chocolate Chip CS. I used the same ink and CS to stamp the little marshmallow bunny several times.
- the same marshmallow bunny in Blushing Bride ink onto Blushing Bride CS.
- the same marshmallow bunny in So Saffron ink onto Whisper White CS.
- the bow in Cucumber Crush ink onto, you guessed it, Cucumber Crush CS.
- the basket and handle in Crumb Cake ink onto So Saffron CS. *Scroll down for a tip on getting the handle lined up just right.
Die cut with the Basket Builder Framelits:
- all the stamped images.
- eggs and egg overlays from Melon Mambo, Tempting Turquoise, and Daffodil Delight CS.
- 2 pieces of grass from Cucumber Crush CS.
Made the clouds:
- punched 3 from Whisper White CS with the Tree Builder Punch.
- used a Sponge Dauber to lightly ink the edges with Soft Sky ink.
- stamped the sentiment from the Basket Bunch stamp set in Smoky Slate ink onto one of the clouds.
- glued one cloud to the card (the top one) and adhered the other two with Stampin’ Dimensionals.
Assembled the card front:
- glued the overlays to the eggs.
- arranged the items in the basket how I wanted them and glued them together, adding the handle last.
- determined how wide the grass needed to be to fit onto the DSP, then I glued the two pieces of grass together, overlapping them slightly. I glued the grass – just along the very bottom – to the DSP. (The little bunny at front and center is covering the line where the two pieces of grass overlap.)
- tucked the basket full of goodies behind the grass and glued it in place.
- glued some extra bunnies onto and behind the grass, making sure I could see the eyes of the shy ones in the back.
Making this card took a little more time than usual because of all the little pieces. But it’s still easy peasy to make! Also, I used quite a few different colors, but you can use as many, or as few, colors as you want. I know you’ll enjoy playing with this fantastic bundle!

Basket Bunch Bundle © Stampin’ Up!
TIP for the basket handle
When you pull the stamp off the clear storage sheet, it’s a little floppy. This can make it difficult to know exactly how to put it onto the clear block so the stamped image will line up with the die. Here’s how I solved that problem.
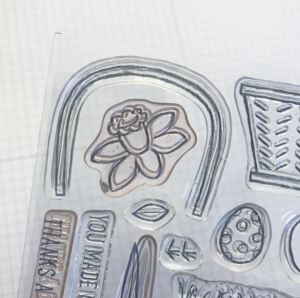
Lay the stamp on a Grid Sheet, or other paper, with the carved side up. It’s important to lay the stamp on paper, so you’ll be able to pick it up and keep it lined up with the die. If you lay it on a slick surface, like a clear block, it will stick and be much harder to lift off.

Lay the die, cutting side up, on top of the stamp, making sure the carved image is peeking up through the die.

Flip the whole thing over, so the stamp is now on top of the die, and the carved image is poking down through the die.

Set a clear block on top, then press gently to make sure the stamp sticks to it.

Flip the whole thing over again.
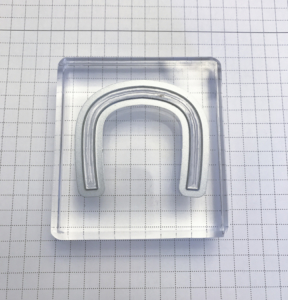
If the die sticks to the stamp, simply lift it off, and you’re ready to go!

Here’s what I used:
Click on the images for more details and to make a purchase.
During Sale-a-bration, for every $50 you spend on an order, you will receive a FREE Sale-a-bration item!
AND you will earn a Gum Ball from me! To learn more, click on “Gum Ball Rewards” at the top of this page.
For those of you who have taken the time to read all the way down to the bottom of this post, I have something special for you. Comment on this post by tomorrow (Wednesday) night at midnight, and mention the bundle by name. You will be entered in a drawing to win your very own Basket Bunch bundle! I will draw the name on Thursday, and announce the winner on Friday. Good luck!
Thanks for stopping by today, and Sweet Stamping!
Jan 2, 2016 | Blog Candy, Challenges, Christmas, CYCI |

A couple weeks ago, CanYouCaseIt.com posted our 100th challenge! To celebrate, and to thank all of you for following along, the design team had a Blog Hop with Blog Candy on each of our blogs. It was a two week challenge. To see my post, click here.
Here is what I offered as my Blog Candy: Versatile Christmas stamp set, Winter Wonderland Designer Vellum Stack, Metallic Silver Baker’s Twine, Home For Christmas Enamel Dots, and Season of Cheer Washi Tape. That’s a $45 value! Most of these items will retire in two days, so if you don’t win today, click on the images at the bottom of this post to get yours while you can!

The lucky winner of this Blog Candy, and belated Christmas gift, is Julie “Jules2Jems” Curtis !!! Julie’s comment: “This is a great card for a guy!”
Congratulations, Julie! Please email your mailing address to me at candy@stampcandy.net, and I’ll get these goodies right out to you!
Here’s where everyone can get these products:
Check back tomorrow for the first CYCI challenge of 2016!
If you’re in the Atlanta area tomorrow, be sure to stop by my Open House! Details are in yesterday’s post here.
Thanks for stopping by today, and Sweet Stamping!

Dec 20, 2015 | Blog Candy, Blog Hop, Cards, Challenges, CYCI, Occasions |

This week’s CanYouCaseIt.com challenge is a very special one. For the 100th CYCI challenge we are doing a Blog Hop AND Blog Candy!
Here is this week’s sketch…
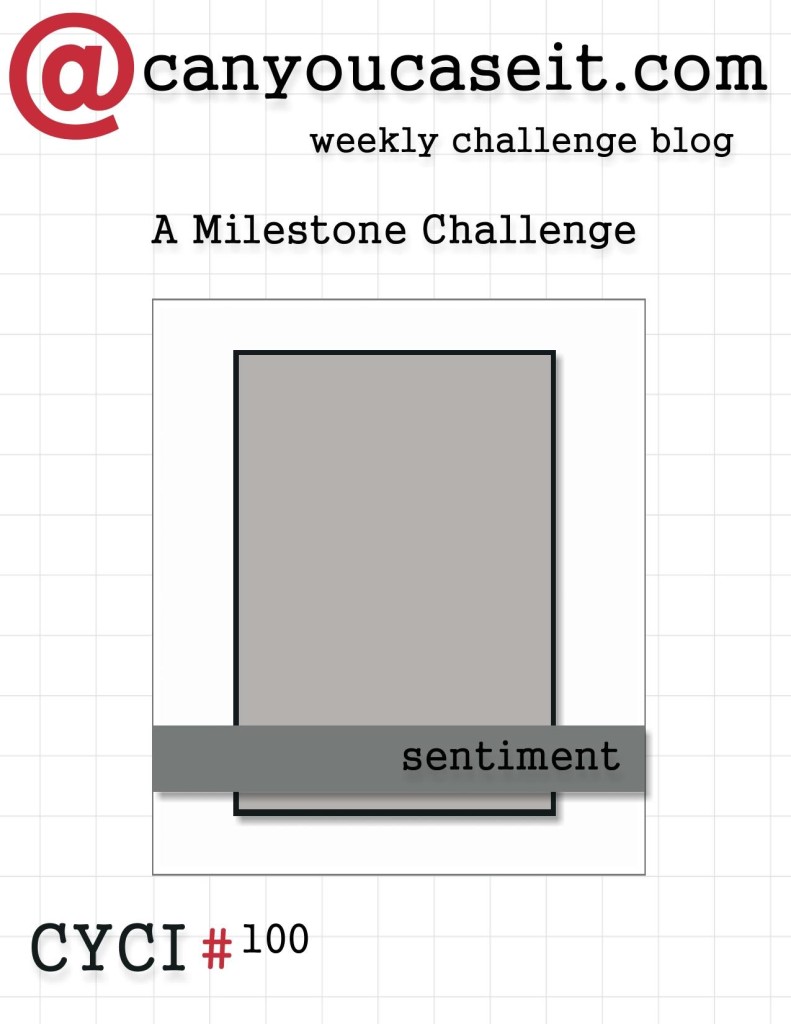
…and here is my card.
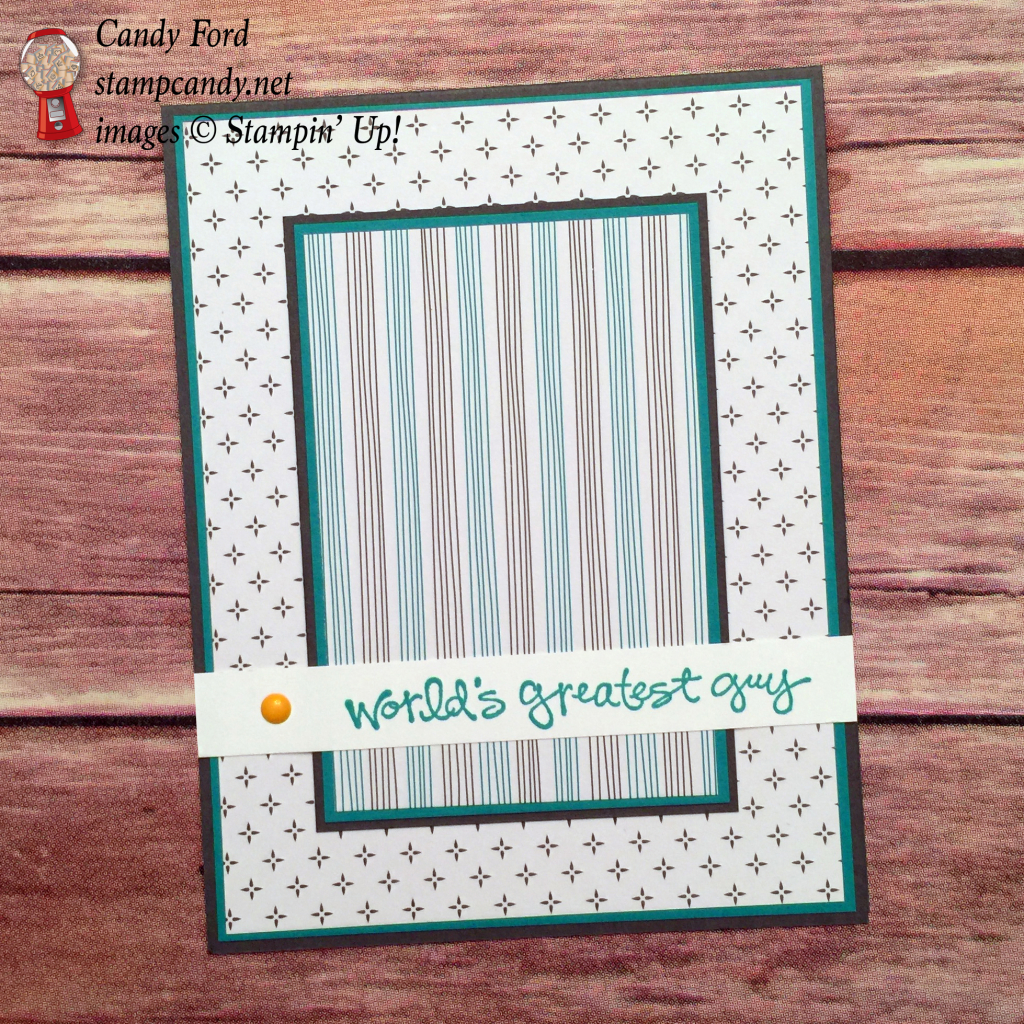
To make it even more special, I’m giving you a sneak peek at some of the new products that will be available to order on January 5 from the 2016 Occasions Catalog.
Both patterned papers are from the new Have a Cuppa Designer Series Paper Stack. The stack is very colorful, but these two patterns look stately, calm, and rather masculine.
The Crushed Curry dot, from the new It’s My Party Enamel Dots, adds a little pop of color.
The sentiment is from the new Greatest Greetings stamp set, which has 15 different sentiments in an adorable font:

The card base and mats for both panels are Basic Grey and Bermuda Bay card stock. The sentiment is stamped in Bermuda Bay on Whisper White.
Here’s what I used:
FREE STUFF
Here is my blog candy: Versatile Christmas stamp set, Winter Wonderland Designer Vellum Stack, Metallic Silver Baker’s Twine, Home For Christmas Enamel Dots, and Season of Cheer Washi Tape. That’s a $45 value!
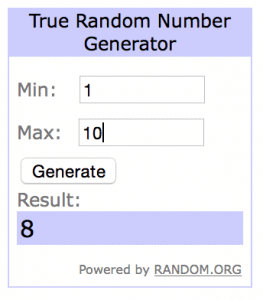
To enter the drawing for this blog candy, simply leave a comment below by January 1. On January 2, I will announce who the winner is – chosen using the random number generator at random.org. Be sure to check back to see if you’ve won an extra Christmas gift! (I will ship anywhere in the US.)
Everyone on the blog hop is offering blog candy, so be sure to comment on each post to enter all the different drawings.
And don’t forget to join us on canyoucaseit.com by posting your project for a chance to be a winning pick of our Design Team Members!
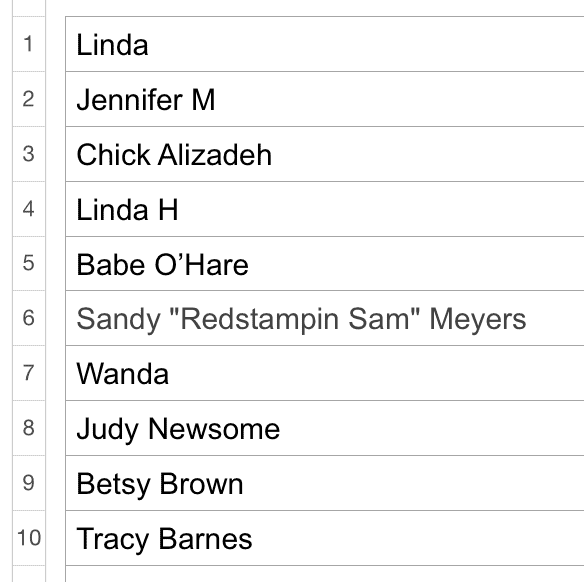
If you lose your place along the hop, refer to this list:
Thanks for stopping by today, and Sweet Stamping!

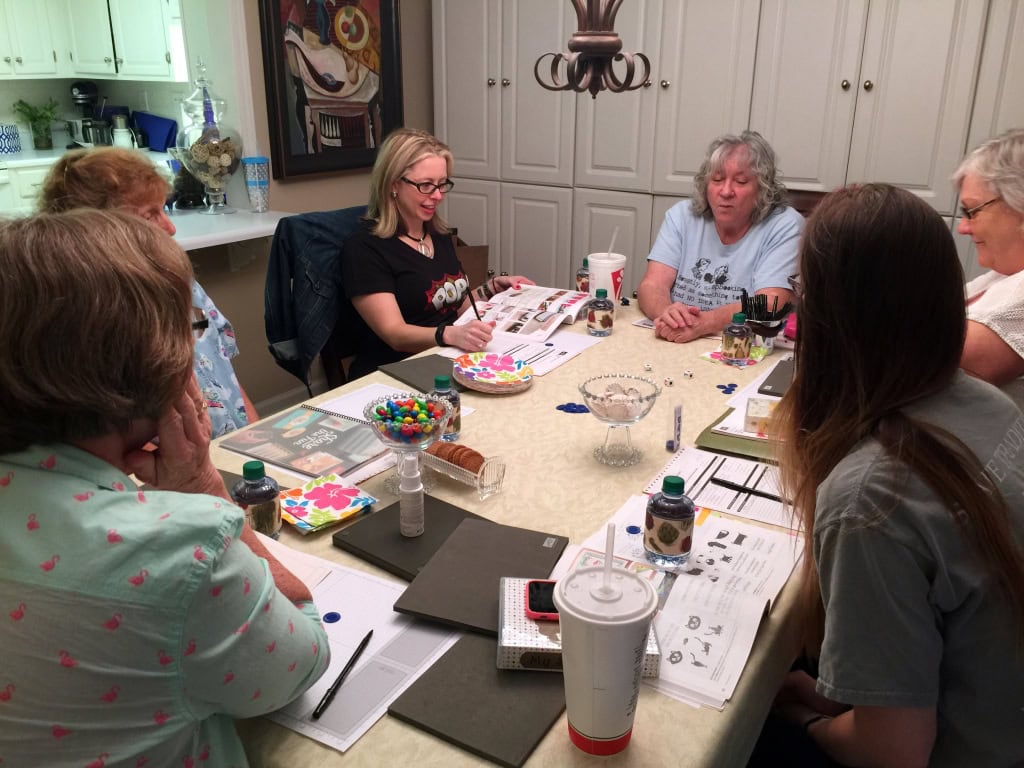
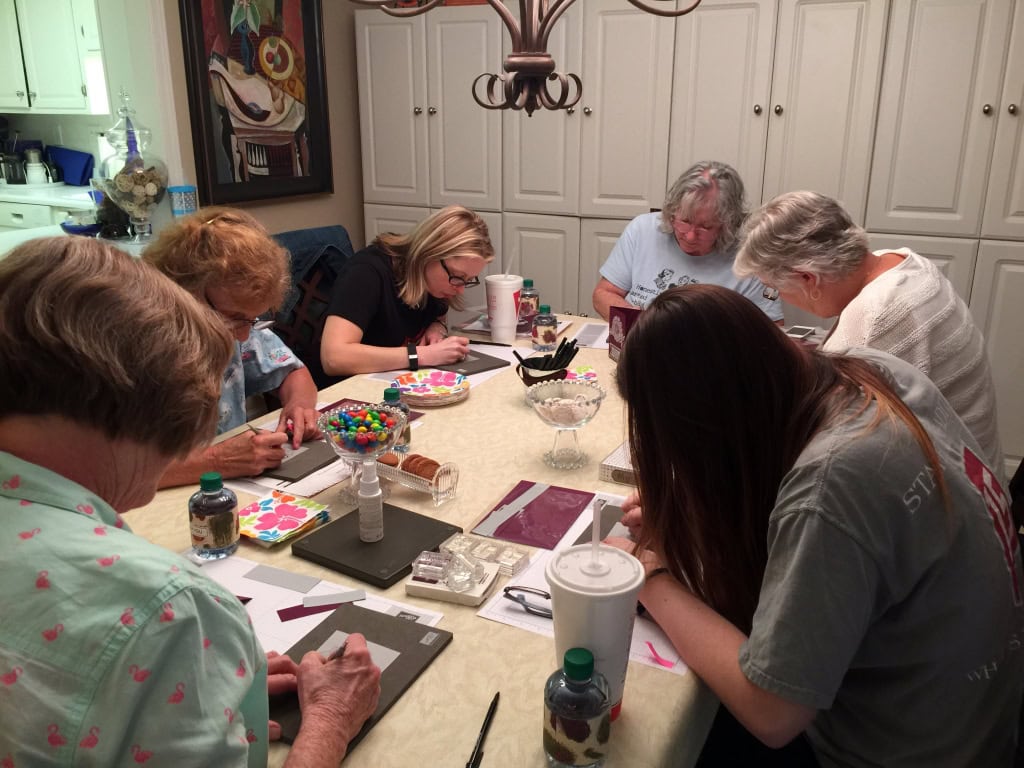
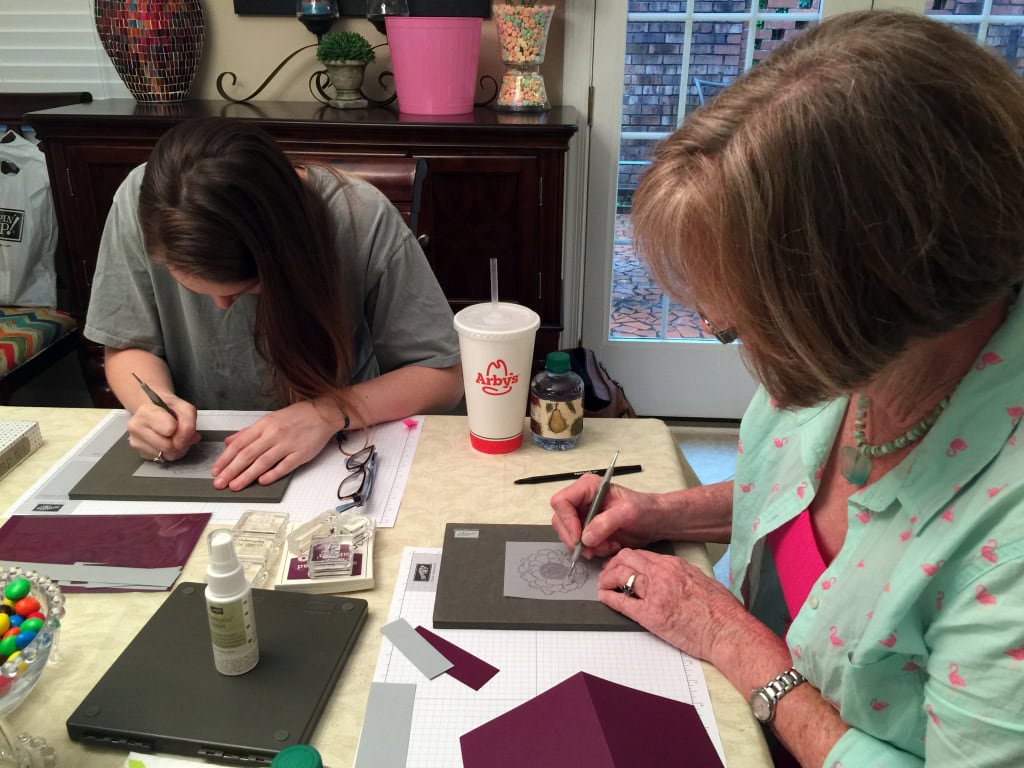
Jul 4, 2015 | Blog Candy, Cards, Club, Techniques |
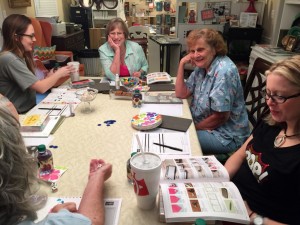
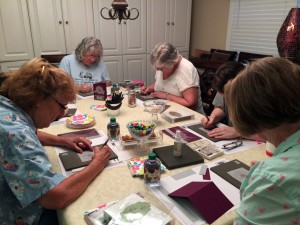
We had a lot of fun this month at Stamp Club. Of course, we always do! You can see the two cards we made here and here. On one we used the dry embossed vellum technique, and on the other we used the three tier stamping technique.
Judy was guest instructor this month, showing how to make the vellum flower on the first card. She also brought her LCR game. Tuesday she won my blog candy – 5 Classic Stampin’ Pads, one in each of the new 2015-2017 In Colors. Since she had already ordered them, she generously gave them to the winner of the LCR game.
Here are some action shots of the fun we had.
Playing LCR

Good roll!


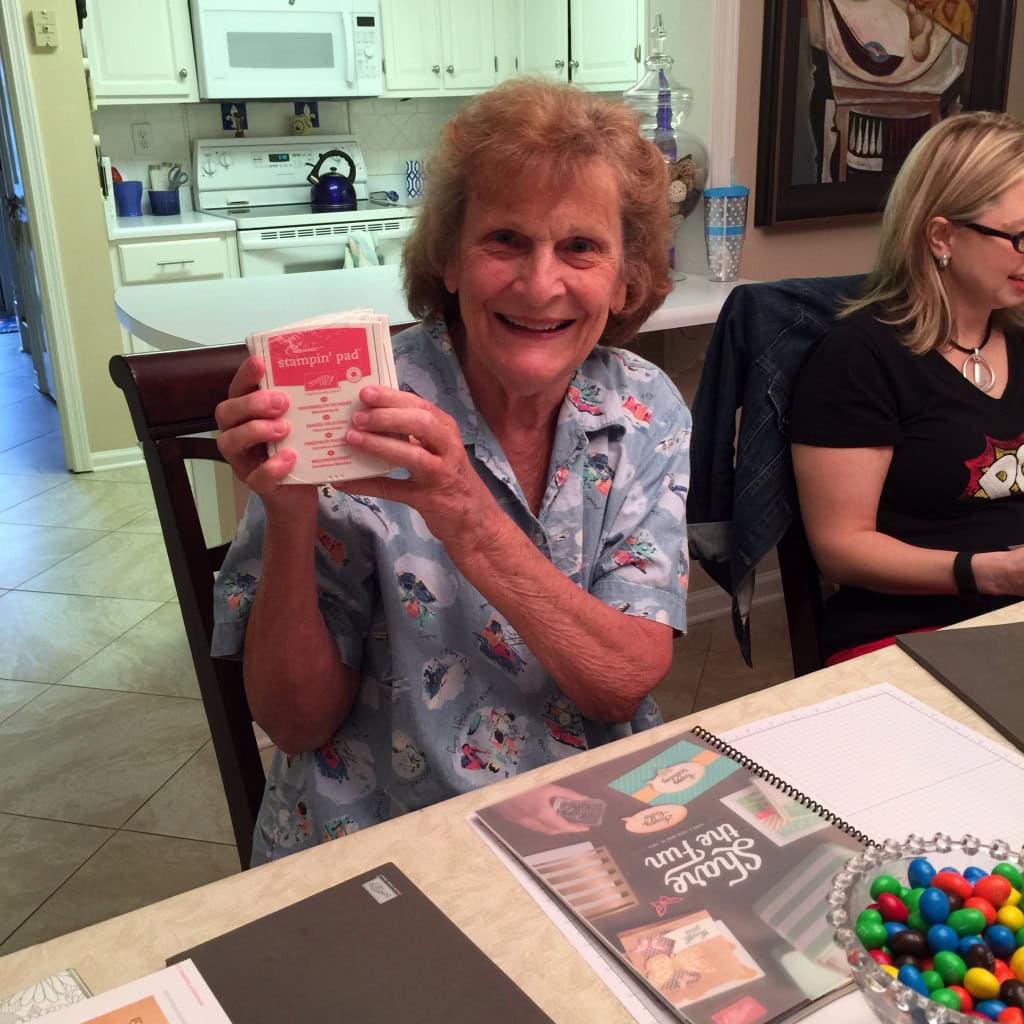
Margie won!
All heads down, working on that vellum flower.


If you think you might be interested in joining Stamp Club, please contact me: candy@stampcandy.net or 404-661-5222. I’ll be happy to tell you all about it.
– We meet on the first Wednesday of each month at 6:30PM. (You may come at 11AM – you just need to let me know so I’ll be ready for you, since most everyone comes at 6:30.)
– We make at least two projects each month.
– Members take turns receiving Stampin’ Rewards (host benefits.)
– Minimum order each month is only $25 (before tax & shipping.)
Come join us!
Thanks for stopping by today, and Sweet Stamping!
Jun 30, 2015 | Blog Candy |
The winner of the blog candy is…….. Judy Newsome! Congratulations, Judy! You are the proud owner of 5 new Classic Stampin’ Pads in the brand new In Colors: Cucumber Crush, Delightful Dijon, Mint Macaron, Tip Top Taupe, and Watermelon Wonder.
Judy’s favorite color combo: Tip Top Taupe with Watermelon Wonder

Here’s what she won. Click on the images below to purchase your own.
Sweet Stamping!


