Nov 12, 2020 | Blog Hop, Boxes, Cards, Christmas, Gallery, Gift Wrap, Gifts, Holiday |

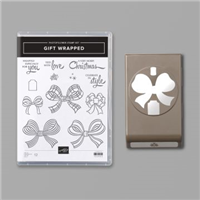
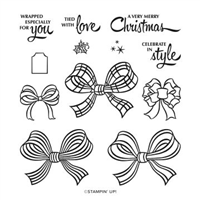
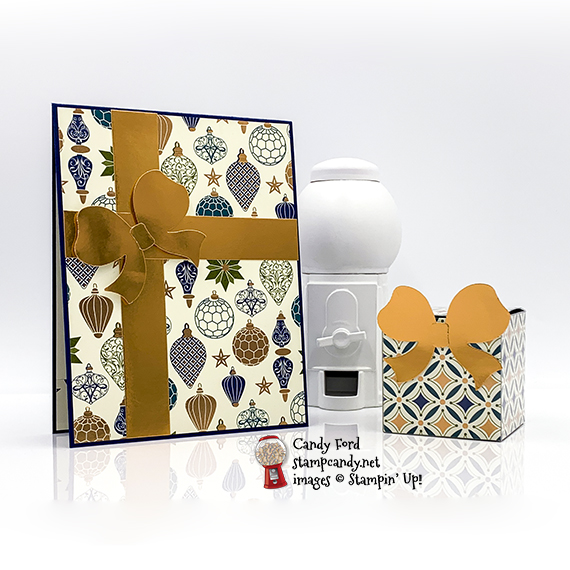
Welcome to the November 2020 OSAT Blog Hop! This month’s theme is Glad Tidings We Bring, so we’re featuring Christmas projects. I used the Gift Wrapped Bundle (Gift Wrapped stamp set ad Gift Bow Builder Punch) and Brightly Gleaming Designer Series Paper to create a Christmas card and Tiny Treat/Gift Box.
Be sure to hop all the way around to all the stops to see all the wonderful Christmas projects this team has created for you today!
If you are reading this in email, some photos may appear blurry, or may not appear at all. Please click here to see the post on my blog.
S November 2020 OSAT November 2020 OSAT November 2020 OSAT
Here’s what I made:

S
Here’s what I did:
Cut and scored with my paper trimmer:
- Night of Navy card stock (CS) cut to 4-1/4″ x 11″, then scored in half at 5-1/2″
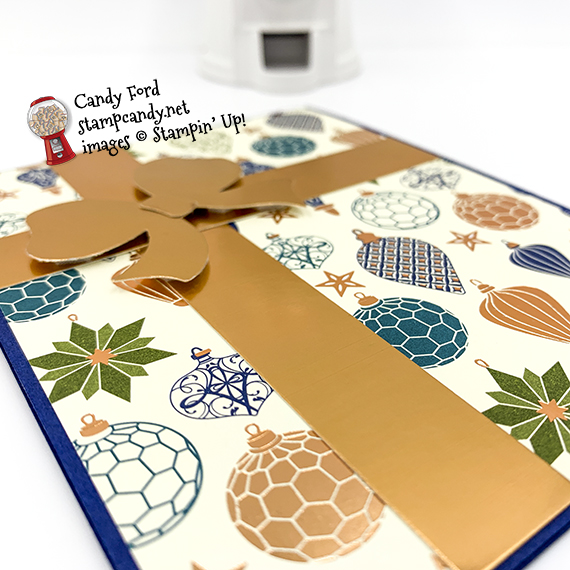
- Brightly Gleaming Designer Series Paper (DSP) layer cut to 4-1/8″ x 5-3/8″
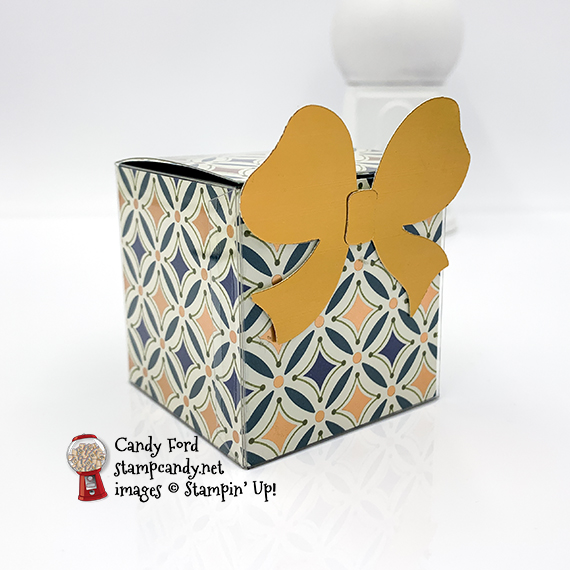
- DSP cut to 8-1/2″ x 2″, then scored at 2″, 4″, 6″, and 8″
- DSP cut to 2″ x 6″, then scored at 2″ and 4″
- Copper Foil strips cut to 3/4″ x 4-1/8″ and 3/4″ x 5-3/8″
- Very Vanilla CS cut to 4-1/8″ x 5-3/8″ for the inside of the card base
- DSP strip cut to 4-1/8″ x 3/4″
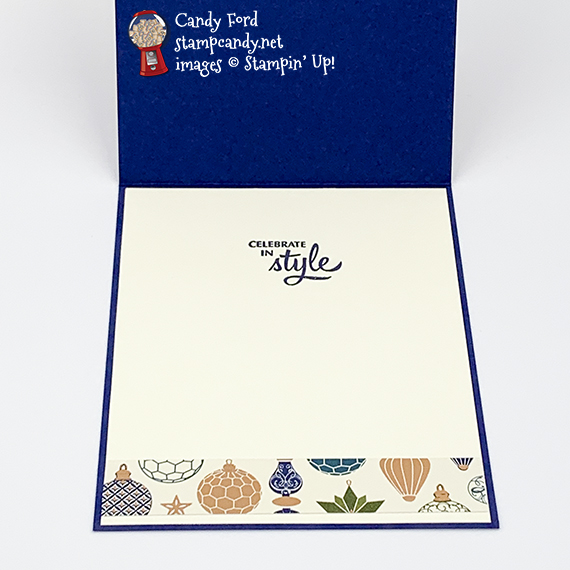
Stamped with the Gift Wrapped stamp set:
- sentiment in Night of Navy ink onto the Very Vanilla CS for the inside
Cut using the Gift Bow Builder Punch:
- 2 bows and “knots” from a scrap of Copper Foil Sheet
Assembled the card:
- burnished the fold in the card base with a Bone Folder
- DSP layer glued onto the front of the card base
- 2 Copper Foil strips adhered onto the DSP layer using Stampin’ Seal+
- a punched knot adhered onto a punched bow using Stampin’ Seal+
- punched bow adhered over the intersection of the foil strips using Stampin’ Dimensionals
- Very Vanilla CS glued onto the inside of the card base
- 3/4″ DSP strip glued onto the Very Vanilla CS, near the bottom
Assembled the box:
- burnished the folds in a Clear Tiny Treat Box with a Bone Folder, and folded to assemble
- burnished the folds in the two 2″ DSP strips
- longer DSP put into the box to line all four sides
- shorter DSP put into the box to line the bottom, back side, and top
- gift or treats put into the box and closed the lid
- second knot adhered onto the second punched bow using Stampin’ Seal+
- bow adhered onto the front of the box using Stampin’ Seal+
S
Here’s the November 2020 OSAT Blog Hop:
S
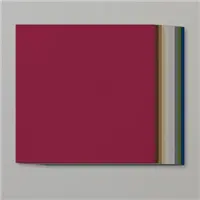
Here are today’s main colors:
You can click on each one to see all the products that come in that color!
S
Here’s what I used:
Click on these images for more details and to purchase. If you are reading this post in email, the product images may not show up. Please click here to see the post on my blog.
Supply List. <— Click for a clickable and printable list of the products!
S
Here’s the new Curvy Celebrations offering:
Click the image below to see it in my online store

S
Here are some helpful links:
S
Thanks for stopping by today, and Sweet Stamping!
Nov 10, 2020 | Blog Hop, Cards, Christmas, Gallery, Holiday |

Welcome t the November 2020 ICS Blog Hop! This month’s theme is Christmas is coming, so we’re featuring Christmas cards. I used the Gift Wrapped Bundle (Gift Wrapped stamp set and Gift Bow Builder Bunch) and Snowflake Splendor Designer Series Paper to create a Slimline card. This is one of the projects we made at my November Stamp Club gathering.
Be sure to hop around to all the stops to see all the great Christmas cards this team have made for you today!
If you are reading this in email, some photos may appear blurry, or may not appear at all. Please click here to see the post on my blog.
S November 2020 ICS November 2020 ICS November 2020 ICS November 2020 ICS. https://stampcandy.net/cards/November-2020-ICSBH-Christmas/ https://bit.ly/37WSEbl
Here’s what I made:


S
Here’s what I did:
Cut and scored with my paper trimmer:
- Balmy Blue card stock (CS) cut to 8-1/2″ x 7″, then scored in half at 3-1/2″
- Snowflake Splendor Designer Series Paper (DSP) layer cut to 8-1/4″ x 3-1/4″
- Whisper White CS cut to 8-1/4″ x 3-1/4″ for the inside of the card base
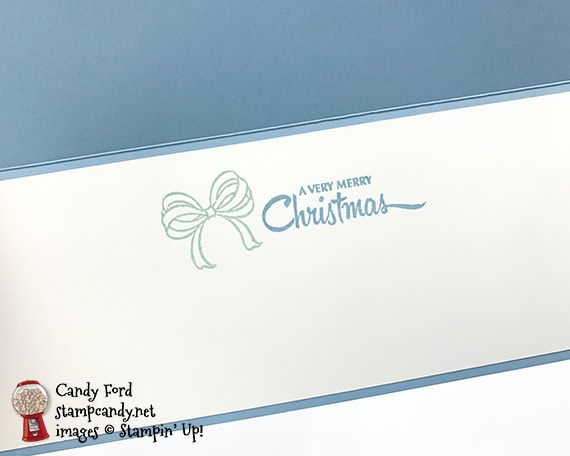
Stamped with the Gift Wrapped stamp set:
- 3 bows in Balmy Blue ink and 2 bows in Pool Party ink onto a scrap of Whisper White Thick CS
- sentiment in Balmy Blue ink onto the Whisper White CS for the inside
- small bow in Pool Party ink next to the sentiment
Cut using the Gift Bow Builder Punch:
Assembled the card:
- burnished the fold in the card base with a Bone Folder
- DSP layer glued onto the front of the card base
- 5 punched bows glued onto the DSP layer
- Adhesive Backed Snowflakes applied onto the DSP layer, on the visible centers of the snowflakes, using a Take Your Pick tool (they don’t show in the photos)
- Whisper White CS glued onto the inside of the card base
S
Here’s the November 2020 ICS Blog Hop:
Click the Next button to hop to Tricia Butts of Tricia’s Stamping Creations.
 S
S
Here are today’s colors:
You can click on each one to see all the products that come in that color!
S
Here’s what I used:
Click on these images for more details and to purchase. If you are reading this post in email, the product images may not show up. Please click here to see the post on my blog.
Supply List <— Click for a clickable and printable list of the products!
S
S
Here are some helpful links:
S
Thanks for stopping by today, and Sweet Stamping!
Nov 9, 2020 | Blog Hop, Cards, Christmas, Gallery, Holiday |

Welcome to the November 2020 Candy Hearts Blog Hop! Today we are sharing Christmas themed projects. After reading my post, I hope you will hop to the next person on the list below. Be sure to hop around to see ALL the great projects the Candy Hearts have created for you!
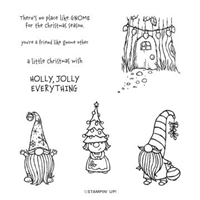
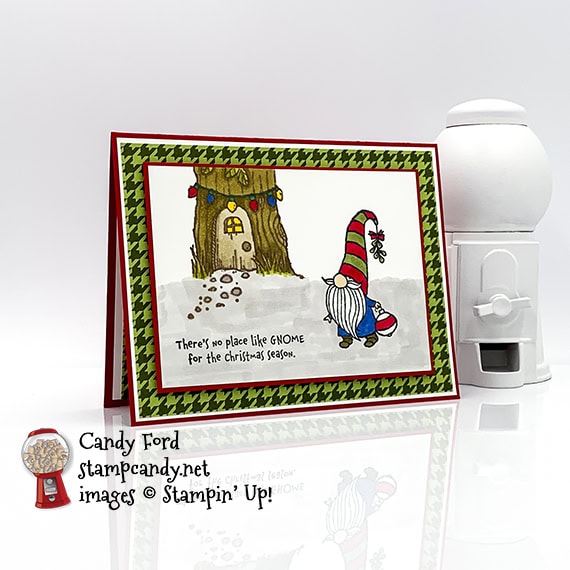
I used the Gnome for the Holidays stamp set and Stampin’ Blends Markers to create a holiday scene on my card for today. I just love this little gnome with the ornament, and his hat with mistletoe dangling from the tip. Don’t you?
If you are reading this in email, some photos may appear blurry, or may not appear at all. Please click here to see the post on my blog.
S November 2020 Candy Hearts November 2020 Candy Hearts November 2020 Candy Hearts November 2020 Candy Hearts
Here’s what I made:

S
Here’s what I did:
Cut and scored with my paper trimmer:
- Real Red card stock (CS) cut to 5-1/2″ x 8-1/2″, then scored in half at 4-1/4″
- Whisper White CS layer cut to 5-3/8″ x 4-1/8″
- Heartwarming Hugs Designer Series Paper (DSP) layer cut to 5-1/4″ x 4″
- Real Red CS layer cut to 4-5/8″ x 3-3/8″
- Whisper White CS layer cut to 4-1/2″ x 3-1/4″
- DSP strip cut to 3/4″ x 4″
- Whisper White CS cut to 5-1/4″ x 4″ for the inside of the card base
Stamped with the Gnome for the Holidays stamp set:
- tree house in Early Espresso ink at the top of the smaller Whisper White CS layer
- gnome and sentiment in Tuxedo Black Memento ink onto the same Whisper White CS layer
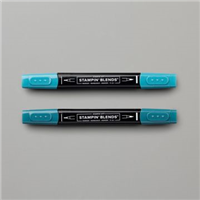
Colored using Stampin’ Blends Markers:
- gnome in Old Olive, Real Red, Night of Navy, Soft Suede, and Ivory
- tree in Soft Suede, Old Olive, Crumb Cake, Real Red, Night of Navy, and Daffodil Delight
- ground and rocks in Gray Granite
Assembled the card:
- burnished the fold in the card base with a Bone Folder
- larger Whisper White CS layer glued onto the front of the card base
- DSP layer glued onto the Whisper White CS layer
- Real Red CS layer adhered onto the DSP layer using strips cut from a Foam Adhesive Sheet
- stamped layer glued onto the Real Red CS layer
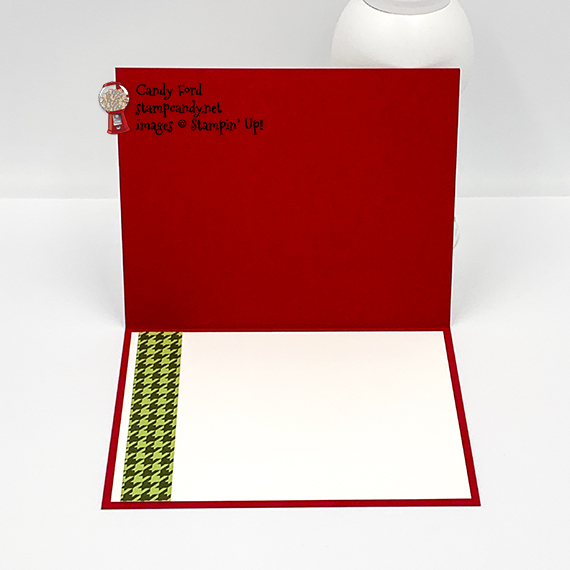
- DSP strip glued onto the Whisper White CS for the inside
- Whisper White CS glued onto the inside of the card base
S
Here’s the November 2020 Candy Hearts Blog Hop:
Thank you for hopping with the Hearts today! Be sure to hop around to all the stops. You do not want to miss any of the creativity in this talented group of stampers!
S
Here are today’s main colors:
You can click on each one to see all the products that come in that color!
S
Here’s what I used:
Click on these images for more details and to purchase. If you are reading this post in email, the product images may not show up. Please click here to see the post on my blog.
Supply List. <— Click for a clickable and printable list of the products!
S
S
Here are some helpful links:
S
Thanks for stopping by today, and Sweet Stamping!
Oct 29, 2020 | Blog Hop, Boxes, Cards, Christmas, Gallery |
 Welcome to the October 2020 APPT Blog Hop featuring alternate projects made with the Joy to the World Paper Pumpkin kit. I made a card and a little treat box that is the perfect size for one Ferrerro Rocher chocolate candy.
Be sure to hop around to all the stops to see all the great alternate projects this group has created for you today.x https://stampcandy.net/cards/october-2020-appt-blog-hop-joy-to-the-world/
If you are reading this in email, some photos may appear blurry, or may not appear at all. Please click here to see the post on my blog.
S October 2020 APPT October 2020 APPT October 2020 APPT October 2020 APPT
Here’s what I made:
S
Here’s what I did:
Cut and scored with my paper trimmer:
- Just Jade card stock (CS) cut to 5-1/2″ x 8-1/2″, then scored in half at 4-1/4″
- Cherry Cobbler CS layer cut to 5-1/4″ x 4″
- Whisper White CS layer cut to 4-3/8″ x 2-3/8″
- front of a card base from the kit cut to 4-1/8″x 2-1/8″
- Whisper White CS layer cut to 2-3/4″ x 2-3/4″
- Whisper White CS cut to 5-1/4″ x 4″ for the inside of the card base
- front of a card base cut to 2-13/16″ x 2-13/16″, and scored 3/4″ from each edge, for the box lid
- back of a card base cut to 3-3/4″ 3-3/4″, and scored 1-1/4″ from each edge, for the box
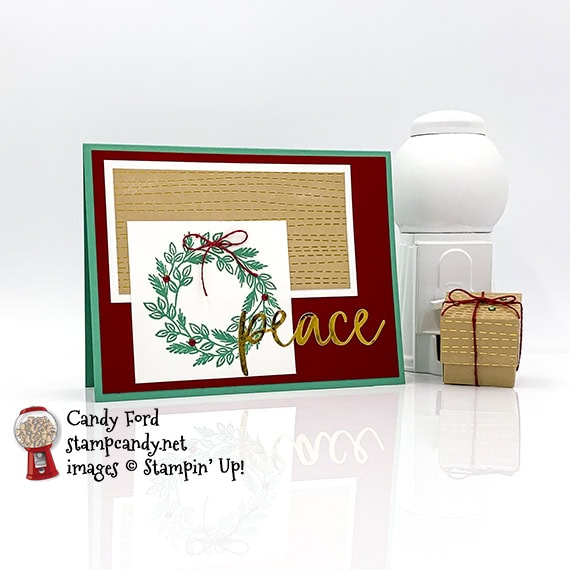
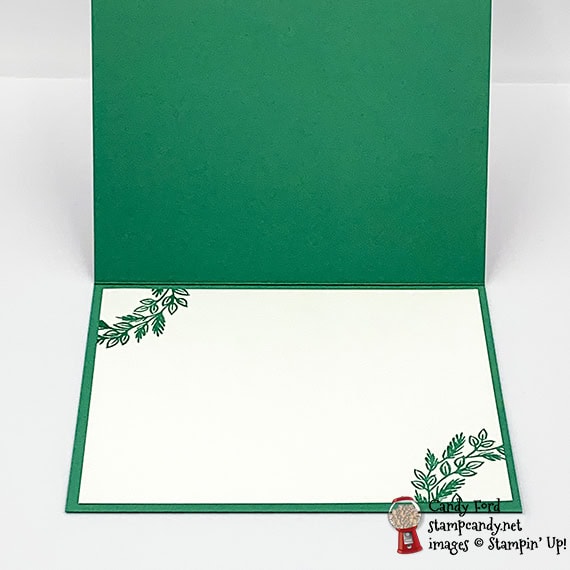
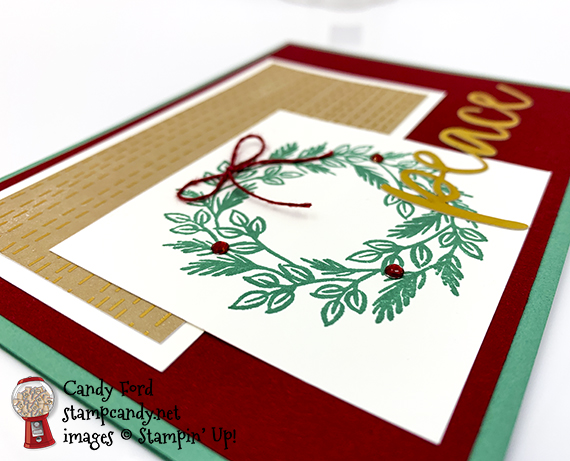
Stamped with the Joy to the World stamp set:
- wreath in Just Jade ink onto the 2-3/4″ x 2-3/4″ Whisper White CS layer
- wreath in Just Jade ink onto two corners of the Whisper White CS for the inside
Cut using Paper Snips:
- box and lid according to diagram
- the diagram is not to scale for this project, but the score and cut lines are in the same places
- click on the diagram to see it larger

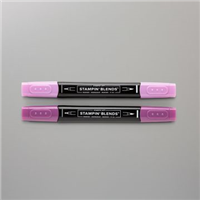
Colored with Stampin’ Blends Markers:
- 3 rhinestones in Just Jade
- If you don’t have the Holiday Rhinestones, you can color 3 more clear rhinestones with a Cherry Cobbler Stampin’ Blends Marker
Assembled the card:
- burnished the fold in the card base with a Bone Folder
- Cherry Cobbler CS layer glued onto the front of the card base
- piece cut from card front glued onto the corresponding Whisper White CS layer
- Whisper White CS layer glued onto the Cherry Cobbler CS layer
- square Whisper White CS layer glued over the other layers
- gold “peace” glued over the layers
- 3 Cherry Cobbler rhinestones applied onto the wreath using a Take Your Pick tool
- Cherry Cobbler twine from the kit tied in a bow and adhered onto the wreath using a Mini Glue Dot that I rolled up between my fingers to make it very skinny
- Whisper White CS glued onto the inside of the card base
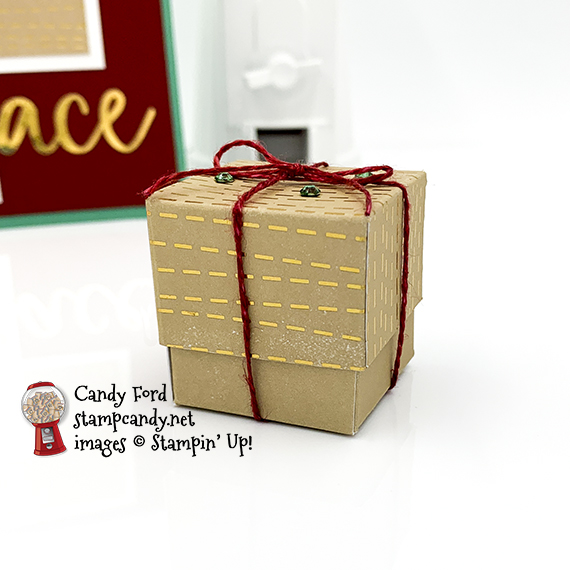
Assembled the box:
- burnished the folds in the box and lid with a Bone Folder
- glued the four small flaps of the lid onto the inside of the adjacent side
- folded up the sides of the box – you can glue the flaps onto the inside of the adjacent side, but I like the way it flops open when I remove the lid, so I don’t glue them
- insert treat and put lid on top of box to hold it closed
- Cherry Cobbler twine wrapped around the box and tied in a bow
- 3 Just Jade rhinestones applied onto the top of the lid using a Take Your Pick tool
S
Here’s the October 2020 APPT Blog Hop:
S
Here are today’s colors:
You can click on each one to see all the products that come in that color!
S
Here’s what I used:
Click on these images for more details and to purchase. If you are reading this post in email, the product images may not show up. Please click here to see the post on my blog.
Supply List. <— Click for a clickable and printable list of the products!
S
Designer Series Paper Sale Ends Saturday!
Click the image to see the sale:
S
Here are some helpful links:
S
Thanks for stopping by today, and Sweet Stamping!
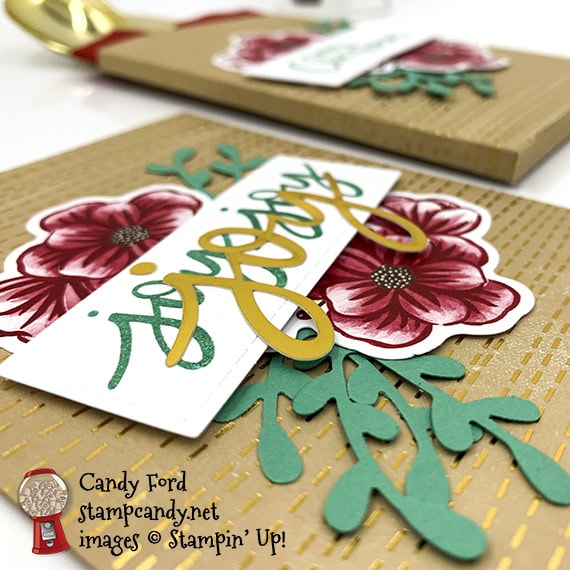
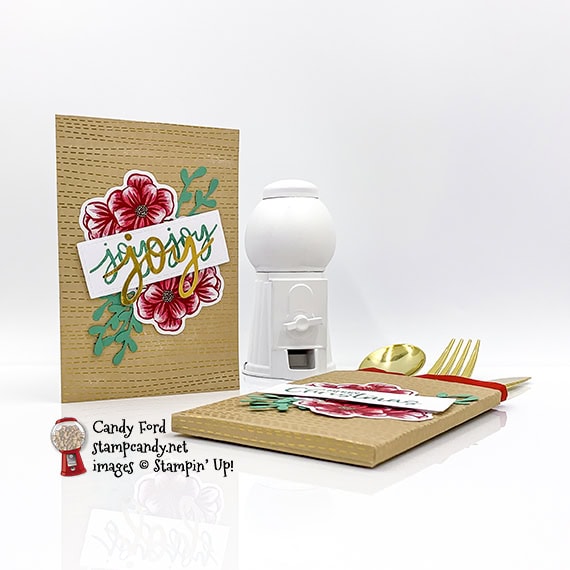
Oct 27, 2020 | Blog Hop, Cards, Christmas, Food, Gallery, Gift Wrap, Holiday, Paper Pumpkin |

Welcome to the October 2020 PPP Blog Hop! This month’s kit is called Joy to the World and it makes lovely holiday cards in two designs. I used the kit to make a card and a flatware/napkin holder for a holiday table setting. I used the Sprig Punch to add some greenery to the die cut flowers that come with the kit.
Be sure to hop around to all the stops, to see all the great alternative projects made for you by this group!
If you are reading this in email, some photos may appear blurry, or may not appear at all. Please click here to see the post on my blog.
S October 2020 PPP October 2020 PPP October 2020 PPP October 2020 PPP
Here’s what I made:

S
Here’s what I did:
Scored with my paper trimmer:
- 1/4″ cut from the right side of an open card base
- then scored horizontally 1/4″ from the bottom
- and scored vertically 1/4″ from each end
- and scored vertically 1/4″ to the right of the card’s original score line
Stamped with the Joy to the World stamp set:
- “Merry Christmas” and “Joy Joy” onto the labels in Just Jade ink
- inner sentiment in Just Jade ink onto the inside of another card base
Cut using the Sprig Punch:
- 6 sprigs from a scrap of Just Jade card stock
Cut using Paper Snips:
- 1/4″ up from the bottom along the 4 vertical score lines
Assembled the card:
- burnished the fold in the card base with a Bone Folder
- two flower die cuts adhered onto the front of the card base
- three punched sprigs tucked and adhered under the flower edges
- sentiment adhered over the center part of the die cuts using Stampin’ Dimensionals
- gold “joy” glued onto the sentiment, over the stamped words
Assembled the holder:
- burnished the folds with a Bone Folder
- folded up and adhered the bottom flaps
- two flower die cuts adhered onto the front of the holder
- three punched sprigs tucked and adhered under the flower edges
- sentiment adhered over the center part of the die cuts using Stampin’ Dimensionals
- napkin and flatware tucked inside
S
Here’s the October 2020 PPP Blog Hop:
Click the pumpkin to hop to the next stop, Elizabeth Ames of Cards by Elizabeth.

S
Here are today’s colors:
You can click on each one to see all the products that come in that color!
S
Here’s what I used, other than the kit:
Click on these images for more details and to purchase. If you are reading this post in email, the product images may not show up. Please click here to see the post on my blog.
Supply List. <— Click for a clickable and printable list of the products!
S
S
Designer Series Paper Sale ENDS THIS SATURDAY!
Don’t miss this opportunity to stock up on your favorite paper packs! Click the image to see the sale:
S
Here are some helpful links:
S
Thanks for stopping by today, and Sweet Stamping!
Oct 27, 2020 | Blog Hop, Decor, Frames, Gallery, Halloween, Holiday |

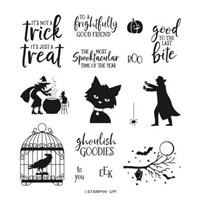
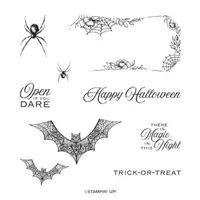
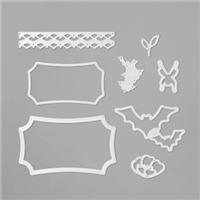
Welcome to the Home Decor SU Style Blog Hop October 2020! This month we’re featuring home decor items you can give as a gift. I made a framed Halloween sampler featuring the Ghoulish Goodies stamp set and the Magic in This Night Designer Series Paper, along with Everything Essential stamp set, Hallows Night Magic stamp set, Ornate Frames Dies, and Halloween Magic Dies. While I thought I ordered a black 12×12 frame, a white one came instead. I didn’t have time to get another one, so please try to imagine this in a black frame. Thanks!
Please be sure to hop around to all the stops, to see all the projects this group has made for you today. You will find the list below.
If you are reading this in email, some photos may appear blurry, or may not appear at all. Please click here to see the post on my blog.
S Style Blog Hop October 2020 Style Blog Hop October 2020 Style Blog Hop October 2020 Style Blog Hop October 2020
Here’s what I made:
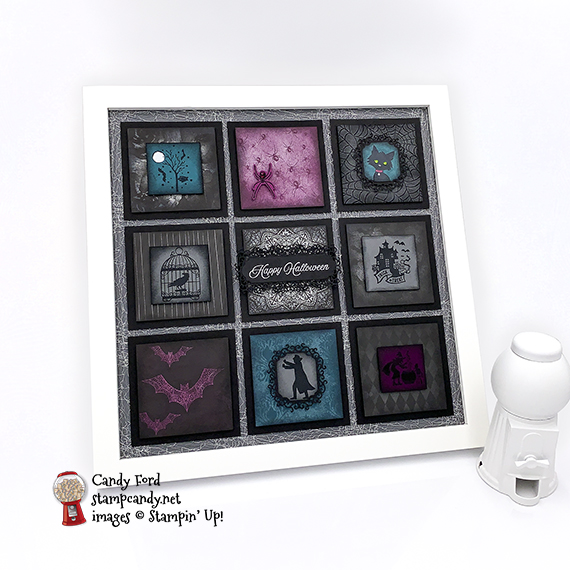
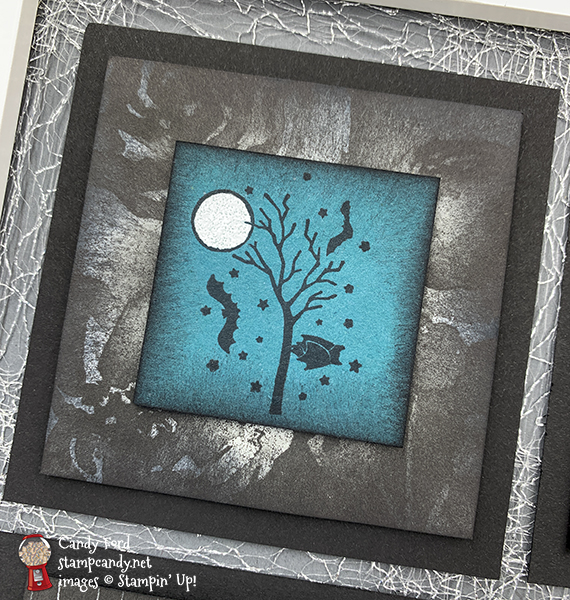
I don’t know why I thought this was a tree, when it is clearly a branch with a bat hanging from it. I’m going to try to pull this piece off and rotate it 90 degrees, but I was afraid to try it before I took the photos. By the way, I love how the metallic Mesh Ribbon over the Basic Gray background looks like cobwebs.
I might redo this panel on Rich Razzleberry cardstock instead of Blackberry Bliss, so it would be easier to see. What do you think?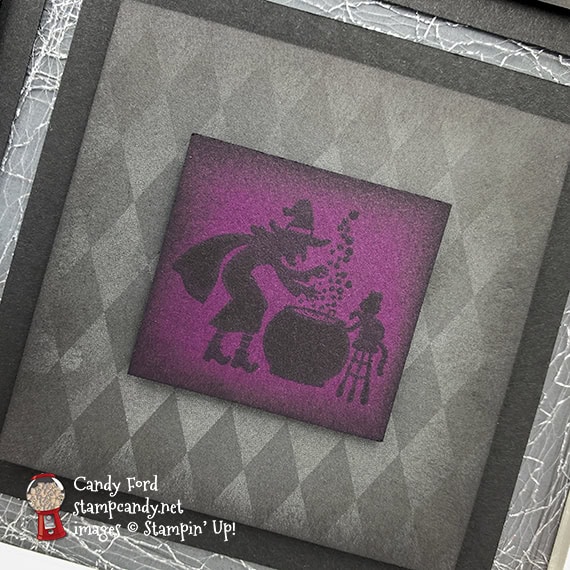
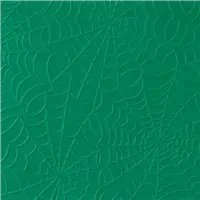
I sponged black ink very lightly all over this embossed layer, which really made the cobwebs show up.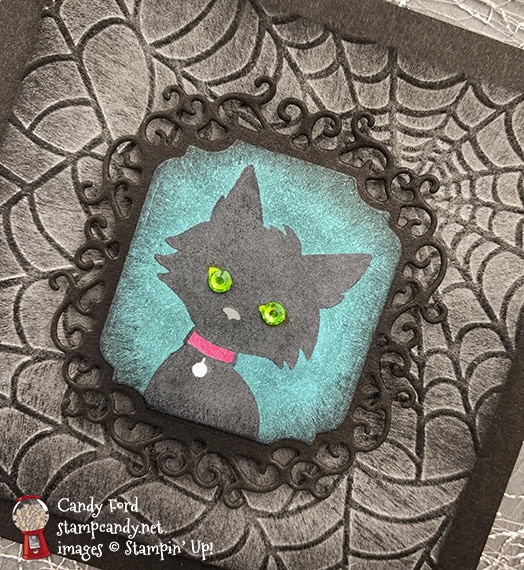
 S
S
Here’s what I did:
Cut and scored with my paper trimmer:
- Basic Black card stock (CS) layers cut 3-1/2″ x 3-1/2″ (9 pieces)
- Magic in This Night Designer Series Paper (DSP) layers cut to 3″ x 3″ (8 different patterns)
- Basic Gray CS layer cut to 3-1/2″ x 3-1/2″
- Pretty Peacock CS layer cut to 1-7/8″ x 1-7/8″
- Basic Gray CS layer cut to 2″ x 2″ (2 pieces)
- Blackberry Bliss CS layer cut to 1-5/8″ x 1-5/8″
Stamped with the Ghoulish Goodies stamp set in black Memento ink *:
- branch onto the Pretty Peacock CS layer
- cat onto a scrap of Whisper White CS
- raven in cage onto a 2″ Basic Gray CS layer
- vampire onto a scrap of Basic Gray CS
- witch onto the Blackberry Bliss CS layer
Stamped using the Everything Essential stamp set *:
- house in black Memento ink onto the other 2″ Basic Gray CS layer
* For all the images with solid areas, I used the Stamparatus so I could stamp multiple times, to make sure I got good solid coverage.
Stamped using the Hallows Night Magic stamp set:
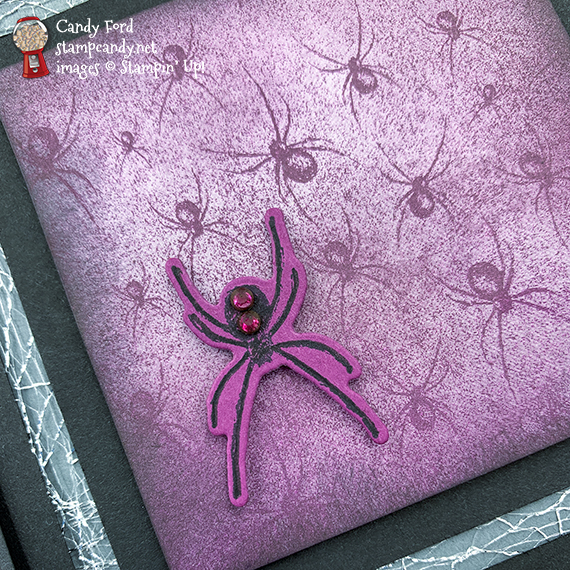
- spider in black Memento ink onto a scrap of Rich Razzleberry CS
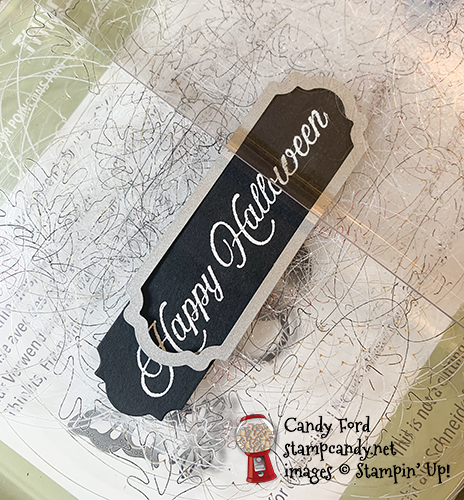
- sentiment in Versamark onto a scrap of Basic Black CS, then heat embossed in white
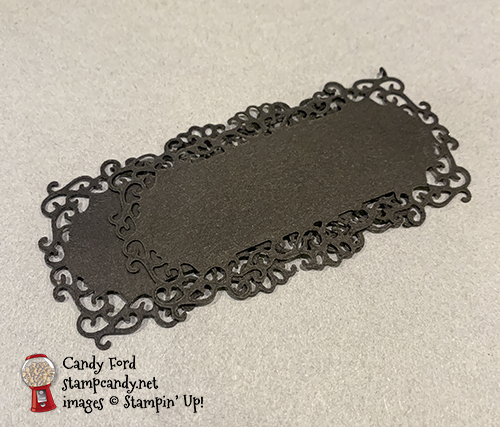
Cut using the Ornate Frames Dies:
- cat and vampire using the same die
- two frames from a scrap of Basic Black CS for the cat and vampire
- two frames from a scrap of Basic Black CS for the sentiment
- sentiment – The sentiment is longer than the die, so I cut the strip to 7/8″, then die cut one end at a time. I lined up the die with one end of the sentiment and covered only that end with the top cutting plate. Then did the same thing on the other end.
Cut using the Halloween Magic Dies:
Colored using Stampin’ Blends Markers:
- eyes of cat in Granny Apple Green
- cat’s nose in Smoky Slate
- cat’s collar in Blackberry Bliss
- background of cat in Pretty Peacock
- 2 rhinestones in Granny Apple Green
- 2 rhinestones in Blackberry Bliss
- the DSP layer with bats in Blackberry Bliss (I started by coloring just the bats, but I could see where the ink got on the black background, so I colored the entire layer.)
Embossed the moon:
- colored the moon using a Stampin’ Blends Marker dipped in Versamark ink, then heat embossed it in white
- NOTE: this moon is on the top left layer
Embossed using the Cobweb 3D Embossing Folder:
Inked using a Stampin’ Sponge:
- edges of all layers (except the Basic Black CS ones) in black Memento ink
- front of Basic Gray CS layer in black Memento ink, very lightly just to accentuate the embossed cobweb
- NOTE: I cut each sponge into 8 wedges, so they go much farther
Assembled the card:
- cat and vampire glued onto their die cut frames
- sentiment glued onto one frame, lining up one end
- second frame glued onto the back of the sentiment, lining it up with the other end
- Here it is from the back:
- Metallic Mesh Ribbon adhered onto a 12″ x 12″ piece of Basic Gray CS, so it will show between the layers and around the edges, using Tear & Tape
- 3-1/2″ Basic Black CS layers adhered onto the Basic Gray background, over the ribbon, using Stampin’ Seal
- 3″ layers adhered onto the Basic Black CS layers using Black Stampin’ Dimensionals
- all remaining pieces adhered onto their respective 3″ layers using Black Stampin’ Dimensionals
- Granny Apple Green rhinestones applied onto the cat’s eyes using my Take Your Pick tool
- Blackberry Bliss rhinestones applied onto the spider (to approximate an hourglass, like a black widow spider) using my Take Your Pick tool
S
Here’s the Home Decor SU Style Blog Hop October 2020:
S
Here are today’s main colors:
You can click on each one to see all the products that come in that color!
S
Here’s what I used:
Click on these images for more details and to purchase. If you are reading this post in email, the product images may not show up. Please click here to see the post on my blog.
Supply List. <— Click for a clickable and printable list of the products!
S
S
Only 4 Day Left to Take Advantage of the Designer Series Paper Sale!
Click the image to see the sale:
S
Here are some helpful links:
S
Thanks for stopping by today, and Sweet Stamping!