Nov 5, 2020 | Cards, Gallery, New Products |
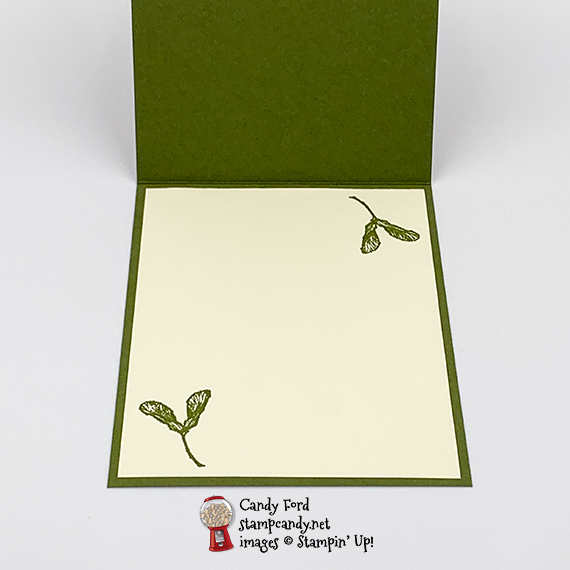
Today I’m sharing another card I made with the Enjoy the Moment stamp set, which will be in the January – June 2021 Mini Catalog. You can see the first one I made here. For today’s card I also used the Banners Pick a Punch and Gold Glitter Enamel Dots.
The image stamp I used is of a winged seed produced by maple trees, called a samara. They are commonly referred to as whirlers, twisters, whirligigs, or helicopters.
If you are reading this in email, some photos may appear blurry, or may not appear at all. Please click here to see the post on my blog.
S moment moment moment moment
Here’s what I made:

S
Here’s what I did:
Cut and scored with my paper trimmer:
- Mossy Meadow card stock (CS) cut to 4-1/4″ x 11″, then scored in half at 5-1/2″
- Very Vanilla CS strip cut to 2-1/2″ x 1/2″ for the sentiment
- Very Vanilla CS cut to 4″ x 5-1/4″ for the inside of the card base
Stamped with the Enjoy the Moment stamp set:
- sentiment in Mossy Meadow ink onto the Very Vanilla CS strip
- samara in Versamark ink all over the front of the card base (You could use Mossy Meadow ink if you wanted it to be darker.)
- 2 samaras in Mossy Meadow ink onto the Very Vanilla CS for the inside
Cut using the Banners Pick a Punch:
- the right end of the sentiment strip
Assembled the card:
- burnished the fold in the card base with a Bone Folder
- sentiment glued onto the front of the card base
- gold dot applied onto the sentiment using my Take Your Pick tool
- Very Vanilla CS glued onto the inside of the card base
S
Here are today’s colors:
You can click on each one to see all the products that come in that color!
S
Here’s what I used:
Click on these images for more details and to purchase. If you are reading this post in email, the product images may not show up. Please click here to see the post on my blog.
Supply List. <— Click for a clickable and printable list of the products!
S
S
Here are some helpful links:
S
Thanks for stopping by today, and Sweet Stamping!
Nov 4, 2020 | Cards, Gallery, New Products |
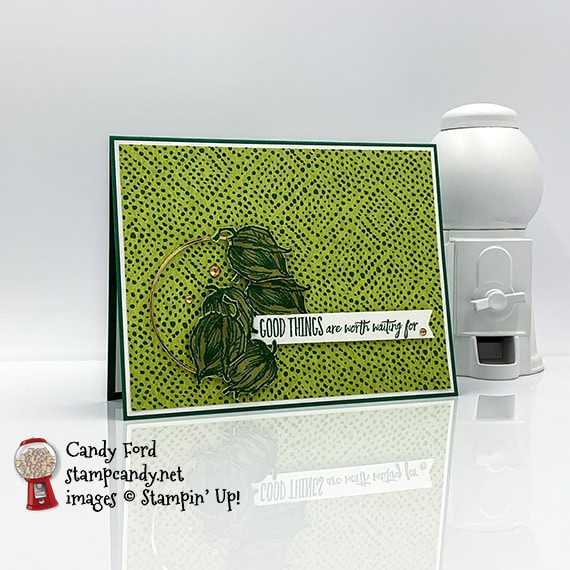
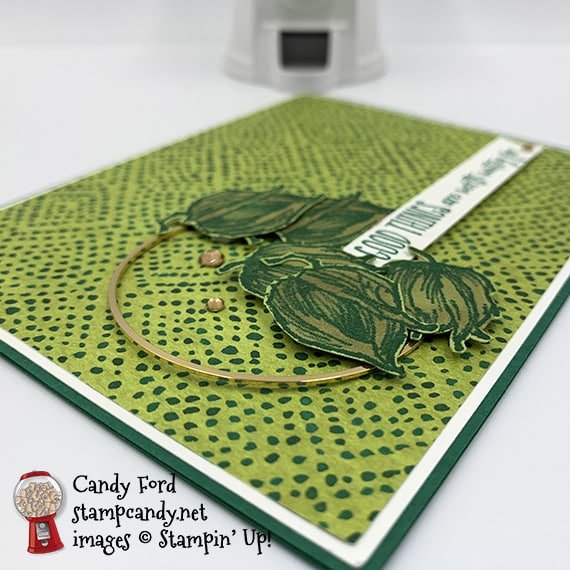
Today’s card features the Enjoy the Moment stamp set, which will be in the January – June 2021 Mini Catalog. I also used the Forever Greenery Designer Series Paper and Banners Pick a Punch along with the Gold Hoop Embellishments and Champagne Rhinestone Basic Jewels.
If you are reading this in email, some photos may appear blurry, or may not appear at all. Please click here to see the post on my blog.
S enjoy enjoy enjoy enjoy
Here’s what I made:

S
Here’s what I did:
Cut and scored with my paper trimmer:
- Shaded Spruce card stock (CS) cut to 5-1/2″ x 8-1/2″, then scored in half at 4-1/4″
- Whisper White CS layer cut to 5-3/8″ x 4-1/8″
- Forever Greenery Designer Series Paper (DSP) layer cut to 5-1/4″ x 4″
- Whisper White Thick CS strip cut to 4″ x 1/2″ for the sentiment
- Whisper White CS cut to 5-1/4″ x 4″ for the inside of the card base
Stamped with the Enjoy the Moment stamp set:
- sentiment in Shaded Spruce ink onto the Whisper White Thick CS strip
- 5 pods in Shaded Spruce ink onto a scrap of Pear Pizzazz CS
- 1 pod in Shaded Spruce ink onto the Whisper White CS for the inside of the card base
Colored using Stampin’ Blends Markers:
- all 6 pods in Old Olive and Crumb Cake
Cut using Paper Snips:
- fussy cut the 5 pods on Pear Pizzazz CS
Cut using the Banners Pick a Punch:
- the right end of the sentiment strip
Assembled the card:
- burnished the fold in the card base with a Bone Folder
- Whisper White CS layer glued onto the front of the card base
- DSP layer glued onto the Whisper White CS layer
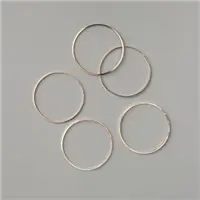
- Gold Hoop adhered onto the DSP layer using Mini Glue Dots, putting the dots only on the right side of the hoop, where they will be covered up
- adhered the sentiment onto the DSP layer, overlapping the hoop, using Stampin’ Dimensionals
- layered and adhered the 5 pods, to cover the left end of the sentiment and the glue dots under the hoop, using Stampin’ Dimensionals
- 3 Champagne Rhinestones applied onto the sentiment and DSP layer using my Take Your Pick tool
- Whisper White CS glued onto the inside of the card base
S
Here are today’s main colors:
You can click on each one to see all the products that come in that color!
S
Here’s what I used:
Click on these images for more details and to purchase. If you are reading this post in email, the product images may not show up. Please click here to see the post on my blog.
The Enjoy the Moment stamp set (Item 154452) will be available in January 2021. Stampin’ Up! Demonstrators will be able to preorder from the new Mini Catalog in December. Click here for information about joining.
Supply List. <— Click for a clickable and printable list of the products!
S
S
Here are some helpful links:
S
Thanks for stopping by today, and Sweet Stamping!
Nov 3, 2020 | Cards, Gallery, New Products, Techniques |
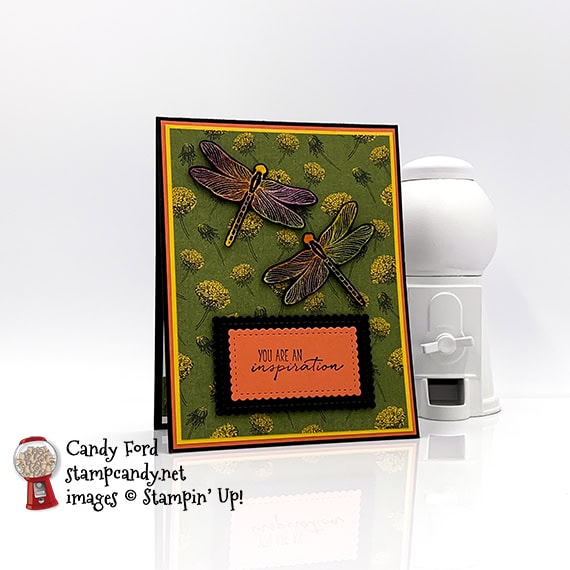
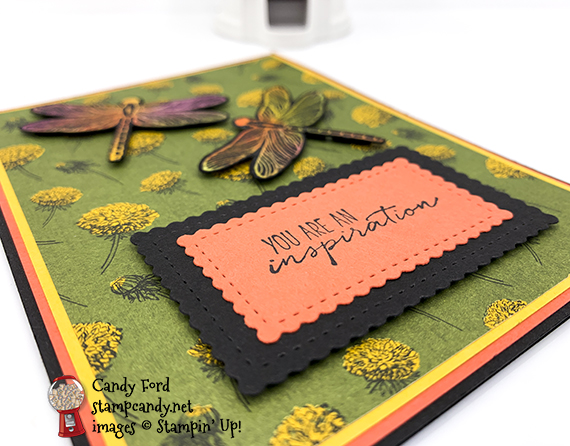
Today I’m giving you a sneak peek of the new Dragonfly Garden stamp set and Dandy Garden Designer Series Paper. As a Stampin’ Up! Demonstrator, I got to order the Dandy Garden Collection this month, instead of having to wait until January! It’s one of the many perks of being a Demo.
If you are reading this in email, some photos may appear blurry, or may not appear at all. Please click here to see the post on my blog.
S dragonfly dragonfly dragonfly dragonfly
Here’s what I made:
S
Here’s what I did:
Cut and scored with my paper trimmer:
- Basic Black card stock (CS) cut to 4-1/4″ x 11″, then scored in half at 5-1/2″
- Calypso Coral CS layer cut to 4-1/8″ x 5-3/8″
- Bumblebee CS layer cut to 4″ x 5-1/4″
- Dandy Garden Designer Series Paper (DSP) layer cut to 3-7/8″ x 5-1/8″
- DSP strip cut to 4″ x 3/4″
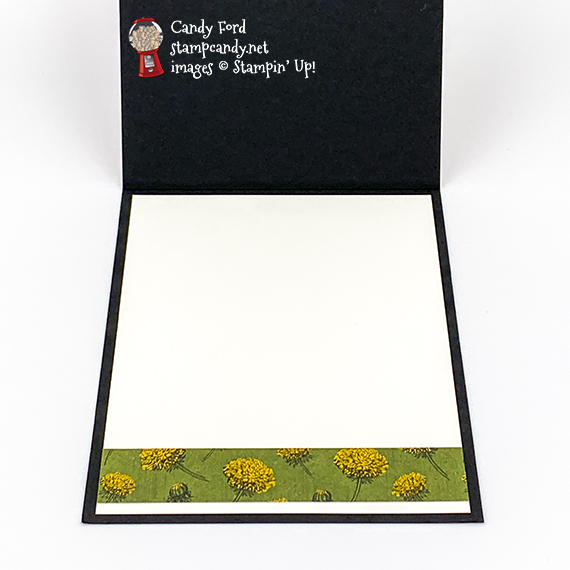
- Whisper White CS cut to 4″ x 5-1/4″ for the inside of the card base
Colored using Stampin’ Sponges:
- a scrap of Whisper White Thick CS in splotches of Calypso Coral, Bumblebee, Blackberry Bliss, and Mossy Meadow inks
Stamped with the Dragonfly Garden stamp set:
- sentiment in Memento black ink onto a scrap of Calypso Coral CS
- 2 dragonflies in Versamark ink onto the sponged CS, then heat embossed in Clear
Cut using the Stitched So Sweetly Dies:
- sentiment
- a scrap of Basic Black CS with the next size larger die
Cut using the Dragonfly Punch:
Colored using a Stampin’ Write Marker:
- dragonflies in Basic Black, then wiped ink away from embossed areas with a paper towel
Assembled the card:
- burnished the fold in the card base with a Bone Folder
- Calypso Coral CS layer glued onto the front of the card base
- Bumblebee CS layer glued onto the Calypso Coral CS layer
- DSP layer glued onto the Bumblebee CS layer
- sentiment glued onto the Basic Black CS die cut
- Basic Black CS die cut adhered onto the DSP layer using Black Stampin’ Dimensionals
- dragonflies adhered onto the DSP layer using Black Stampin’ Dimensionals
- Whisper White CS glued onto the inside of the card base
- DSP strip glued onto the Whisper White CS
S
Here are today’s colors:
You can click on each one to see all the products that come in that color!
S
Here’s what I used:
The Dandy Garden Collection will be available to purchase beginning in January 2021.
Click on these images for more details and to purchase. If you are reading this post in email, the product images may not show up. Please click here to see the post on my blog.
Supply List. <— Click for a clickable and printable list of the products!
S
S
Here are some helpful links:
S
Thanks for stopping by today, and Sweet Stamping!
Nov 2, 2020 | Cards, Gallery, Origami, Techniques |
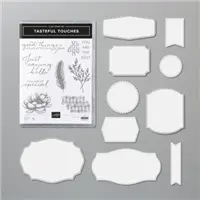
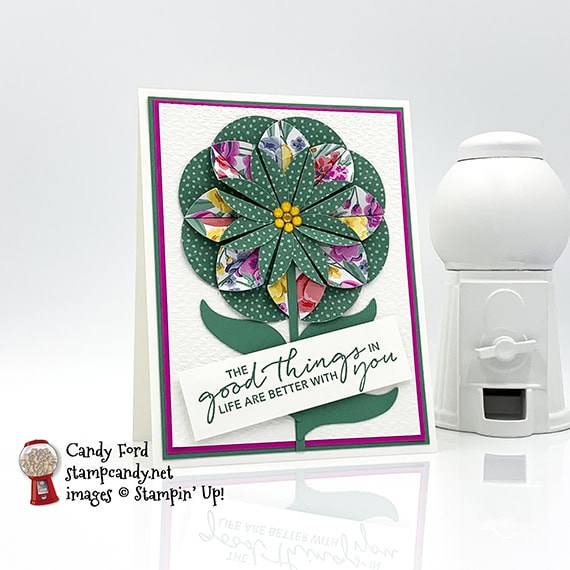
I made this Origami flower card using the Tasteful Touches stamp set, Tasteful Textile 3D Embossing Folder, Tulip Builder Punch, and Flowers for Every Season Designer Series Paper. Last week I hosted another Mystery Stamping Party on Facebook, and this is was my example. I enjoy these parties. I post clues that folks follow to create the mystery project, then everyone posts a photo of their project. It’s wonderful to see all the creative ways people interpret the clues. You can go ahead and join the Facebook group now to see what we do. Then you can participate in the next party on Wednesday, December 2 at 8:00 PM (ET.)
If you are reading this in email, some photos may appear blurry, or may not appear at all. Please click here to see the post on my blog.
S Tasteful Touches Tasteful Touches Tasteful Touches Tasteful Touches
Here’s what I made:
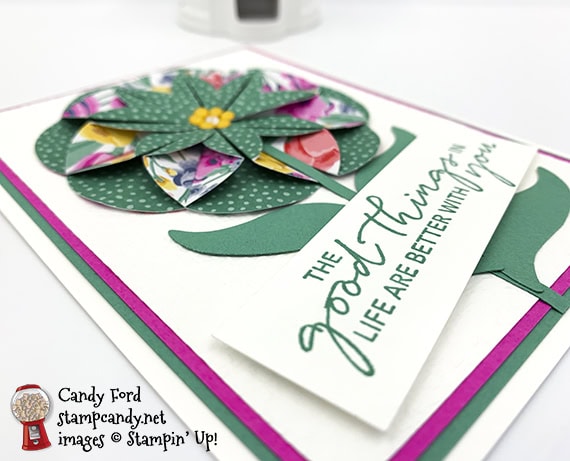 S
S
Here’s what I did:
Cut and scored with my paper trimmer:
- Whisper White Thick card stock (CS) cut to 4-1/4″ x 11″, then scored in half at 5-1/2″
- Just Jade CS layer cut to 4″ x 5-1/4″
- Magenta Madness CS layer cut to 3-7/8″ x 5-1/8″
- Whisper White Thick CS layer cut to 3-3/4″ x 5″
- Just Jade CS cut to 1/8″ x 4″
- Whisper White Thick CS cut to 3-1/2″ x 1″ for the sentiment
Stamped with the Tasteful Touches stamp set:
- sentiment in Just Jade ink onto the 3-1/2″ x 1″ Whisper White Thick CS
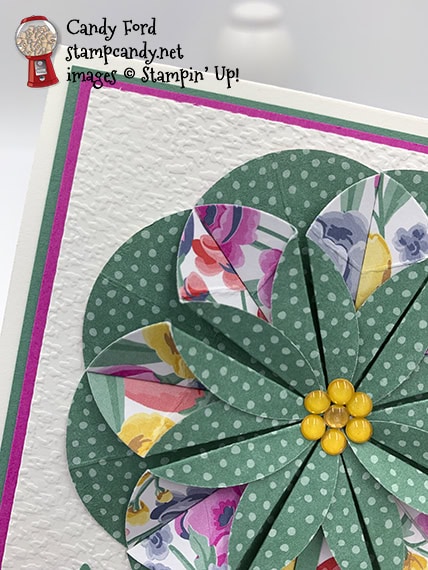
Cut using the Layering Circle Dies:
- 8 circles (appr. 1-5/8″ diameter) from a piece of Flowers for Every Season Designer Series Paper (DSP)
- 1 circle from a scrap of Whisper White CS
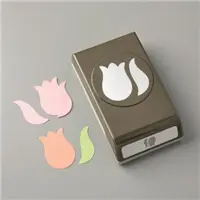
Cut using the Tulip Builder Punch:
- 3 leaves from a scrap of Just Jade CS
Embossed using the Tasteful Textile 3D Embossing Folder:
- the Whisper White Thick CS layer
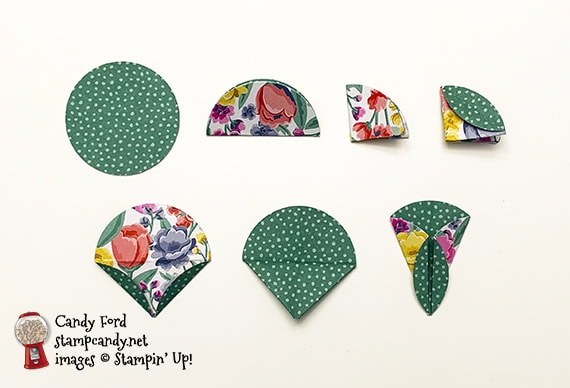
Folded the flower petals:
- folded the 8 DSP circles in half, then in half again, to make quarter circles
- on each side, folded down one curved edge (one layer only)
- unfolded except for the small curved folds
- flipped over so the curved folds were face down
- folded both straight edges to the center
- burnished using a Bone Folder
Assembled the card:
- burnished the fold in the card base with a Bone Folder
- Just Jade CS layer glued onto the front of the card base
- Magenta Madness CS layer glued onto the Just Jade CS layer
- Whisper White CS layer glued onto the Magenta Madness CS layer
- tips of DSP petals glued onto the Whisper White CS circle, side by side, with the points touching in the center, to create the flower
- back of flower glued onto the Whisper White CS layer, near the top
- 1/8″ Just Jade CS strip glued onto the Whisper White CS layer, with the end tucked under the edge of the flower (I’m not sure why I glued mine on top of the flower. Just a brain cramp, I guess.)
- leaves glued onto the Whisper White CS layer with the tips touching the 1/8″ strip
- sentiment adhered over the leaves/stem using Stampin’ Dimensionals
- 7 Bumblebee enamel dots applied onto the center of the flower using my Take Your Pick tool
S
Here are today’s colors:
You can click on each one to see all the products that come in that color!
S
Here’s what I used:
Click on these images for more details and to purchase. If you are reading this post in email, the product images may not show up. Please click here to see the post on my blog.
Supply List. <— Click for a clickable and printable list of the products!
S
S
Here are some helpful links:
S
Thanks for stopping by today, and Sweet Stamping!
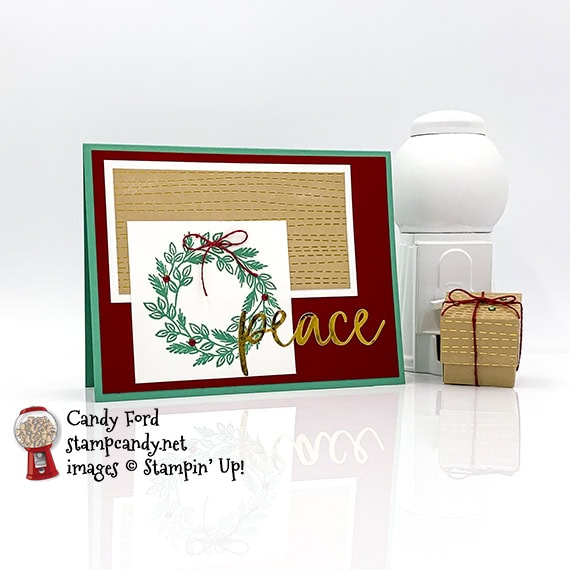
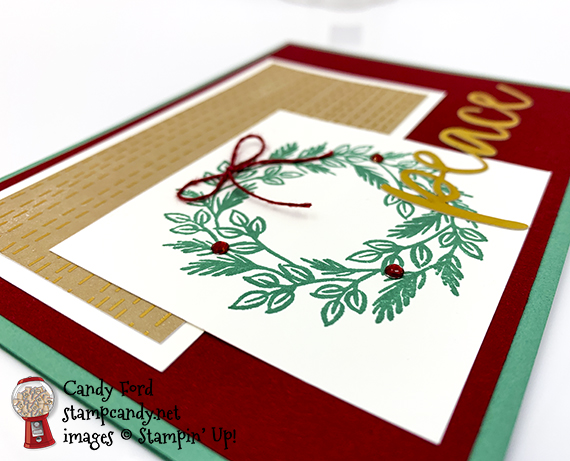
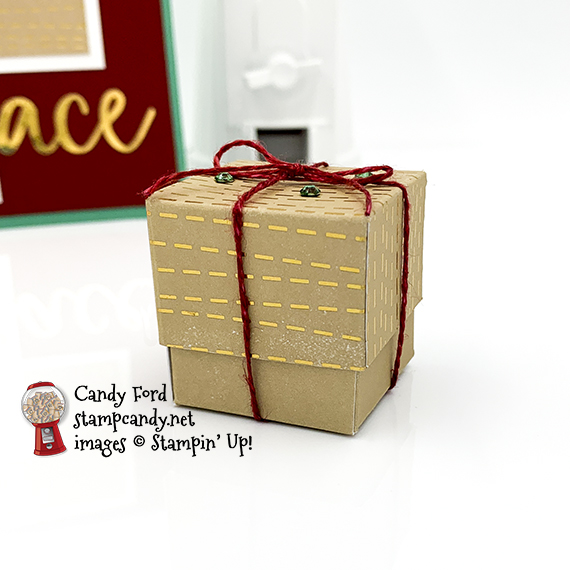
Oct 29, 2020 | Blog Hop, Boxes, Cards, Christmas, Gallery |
 Welcome to the October 2020 APPT Blog Hop featuring alternate projects made with the Joy to the World Paper Pumpkin kit. I made a card and a little treat box that is the perfect size for one Ferrerro Rocher chocolate candy.
Be sure to hop around to all the stops to see all the great alternate projects this group has created for you today.x https://stampcandy.net/cards/october-2020-appt-blog-hop-joy-to-the-world/
If you are reading this in email, some photos may appear blurry, or may not appear at all. Please click here to see the post on my blog.
S October 2020 APPT October 2020 APPT October 2020 APPT October 2020 APPT
Here’s what I made:
S
Here’s what I did:
Cut and scored with my paper trimmer:
- Just Jade card stock (CS) cut to 5-1/2″ x 8-1/2″, then scored in half at 4-1/4″
- Cherry Cobbler CS layer cut to 5-1/4″ x 4″
- Whisper White CS layer cut to 4-3/8″ x 2-3/8″
- front of a card base from the kit cut to 4-1/8″x 2-1/8″
- Whisper White CS layer cut to 2-3/4″ x 2-3/4″
- Whisper White CS cut to 5-1/4″ x 4″ for the inside of the card base
- front of a card base cut to 2-13/16″ x 2-13/16″, and scored 3/4″ from each edge, for the box lid
- back of a card base cut to 3-3/4″ 3-3/4″, and scored 1-1/4″ from each edge, for the box
Stamped with the Joy to the World stamp set:
- wreath in Just Jade ink onto the 2-3/4″ x 2-3/4″ Whisper White CS layer
- wreath in Just Jade ink onto two corners of the Whisper White CS for the inside
Cut using Paper Snips:
- box and lid according to diagram
- the diagram is not to scale for this project, but the score and cut lines are in the same places
- click on the diagram to see it larger

Colored with Stampin’ Blends Markers:
- 3 rhinestones in Just Jade
- If you don’t have the Holiday Rhinestones, you can color 3 more clear rhinestones with a Cherry Cobbler Stampin’ Blends Marker
Assembled the card:
- burnished the fold in the card base with a Bone Folder
- Cherry Cobbler CS layer glued onto the front of the card base
- piece cut from card front glued onto the corresponding Whisper White CS layer
- Whisper White CS layer glued onto the Cherry Cobbler CS layer
- square Whisper White CS layer glued over the other layers
- gold “peace” glued over the layers
- 3 Cherry Cobbler rhinestones applied onto the wreath using a Take Your Pick tool
- Cherry Cobbler twine from the kit tied in a bow and adhered onto the wreath using a Mini Glue Dot that I rolled up between my fingers to make it very skinny
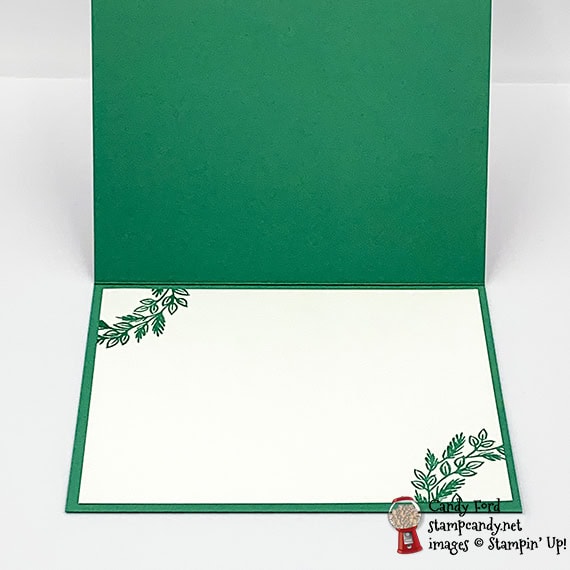
- Whisper White CS glued onto the inside of the card base
Assembled the box:
- burnished the folds in the box and lid with a Bone Folder
- glued the four small flaps of the lid onto the inside of the adjacent side
- folded up the sides of the box – you can glue the flaps onto the inside of the adjacent side, but I like the way it flops open when I remove the lid, so I don’t glue them
- insert treat and put lid on top of box to hold it closed
- Cherry Cobbler twine wrapped around the box and tied in a bow
- 3 Just Jade rhinestones applied onto the top of the lid using a Take Your Pick tool
S
Here’s the October 2020 APPT Blog Hop:
S
Here are today’s colors:
You can click on each one to see all the products that come in that color!
S
Here’s what I used:
Click on these images for more details and to purchase. If you are reading this post in email, the product images may not show up. Please click here to see the post on my blog.
Supply List. <— Click for a clickable and printable list of the products!
S
Designer Series Paper Sale Ends Saturday!
Click the image to see the sale:
S
Here are some helpful links:
S
Thanks for stopping by today, and Sweet Stamping!
Oct 27, 2020 | Blog Hop, Cards, Christmas, Food, Gallery, Gift Wrap, Holiday, Paper Pumpkin |

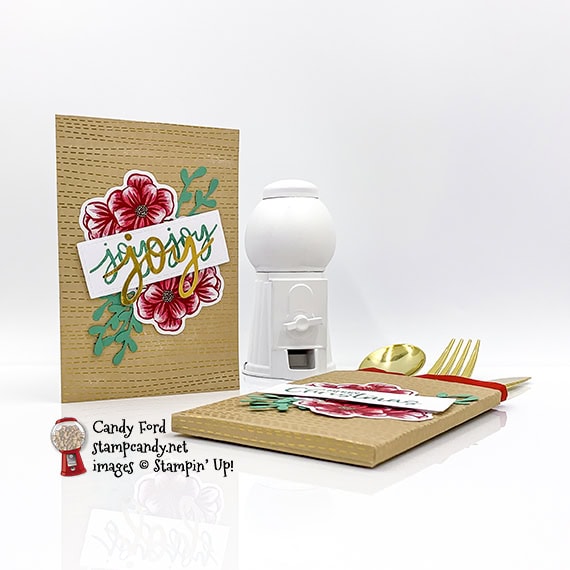
Welcome to the October 2020 PPP Blog Hop! This month’s kit is called Joy to the World and it makes lovely holiday cards in two designs. I used the kit to make a card and a flatware/napkin holder for a holiday table setting. I used the Sprig Punch to add some greenery to the die cut flowers that come with the kit.
Be sure to hop around to all the stops, to see all the great alternative projects made for you by this group!
If you are reading this in email, some photos may appear blurry, or may not appear at all. Please click here to see the post on my blog.
S October 2020 PPP October 2020 PPP October 2020 PPP October 2020 PPP
Here’s what I made:

S
Here’s what I did:
Scored with my paper trimmer:
- 1/4″ cut from the right side of an open card base
- then scored horizontally 1/4″ from the bottom
- and scored vertically 1/4″ from each end
- and scored vertically 1/4″ to the right of the card’s original score line
Stamped with the Joy to the World stamp set:
- “Merry Christmas” and “Joy Joy” onto the labels in Just Jade ink
- inner sentiment in Just Jade ink onto the inside of another card base
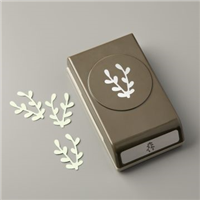
Cut using the Sprig Punch:
- 6 sprigs from a scrap of Just Jade card stock
Cut using Paper Snips:
- 1/4″ up from the bottom along the 4 vertical score lines
Assembled the card:
- burnished the fold in the card base with a Bone Folder
- two flower die cuts adhered onto the front of the card base
- three punched sprigs tucked and adhered under the flower edges
- sentiment adhered over the center part of the die cuts using Stampin’ Dimensionals
- gold “joy” glued onto the sentiment, over the stamped words
Assembled the holder:
- burnished the folds with a Bone Folder
- folded up and adhered the bottom flaps
- two flower die cuts adhered onto the front of the holder
- three punched sprigs tucked and adhered under the flower edges
- sentiment adhered over the center part of the die cuts using Stampin’ Dimensionals
- napkin and flatware tucked inside
S
Here’s the October 2020 PPP Blog Hop:
Click the pumpkin to hop to the next stop, Elizabeth Ames of Cards by Elizabeth.

S
Here are today’s colors:
You can click on each one to see all the products that come in that color!
S
Here’s what I used, other than the kit:
Click on these images for more details and to purchase. If you are reading this post in email, the product images may not show up. Please click here to see the post on my blog.
Supply List. <— Click for a clickable and printable list of the products!
S
S
Designer Series Paper Sale ENDS THIS SATURDAY!
Don’t miss this opportunity to stock up on your favorite paper packs! Click the image to see the sale:
S
Here are some helpful links:
S
Thanks for stopping by today, and Sweet Stamping!