Dec 23, 2017 | Cards, Christmas, Gallery, Holiday |
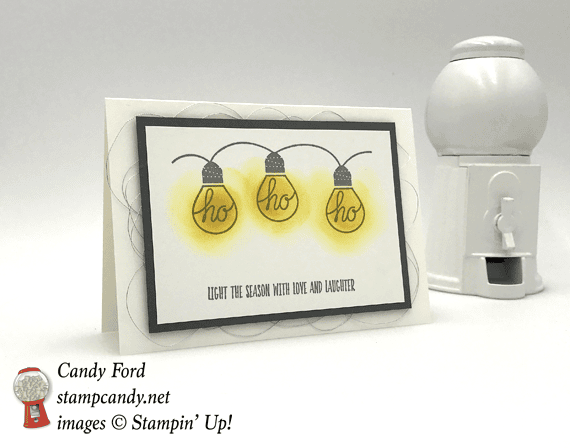
Here’s another card made with the Wishes All Aglow stamp set. You can see my first two here and here. For today’s card, I used the image with three large bulbs that say Ho Ho Ho. Silver Metallic Thread adds just a little something something. And the precut and scored Note Cards make it even a faster project.

Wishes All Aglow Stamp Set @ Stampin’ Up!
Here’s what I made:

Here’s what I did:
Cut and scored with my Stampin’ Trimmer:
- Basic Gray card stock (CS) cut to 4-1/4″ x 3″
- Whisper White CS cut to 4″ x 2-3/4″
Stamped with the Wishes All Aglow stamp set:
- bulbs and sentiment in Basic Gray ink onto the Whisper White CS
Colored using a Sponge Dauber:
- the bulbs in Crushed Curry ink
Assembled the card:
- stamped layer glued onto the Basic Gray layer
- Stampin’ Dimensionals applied to the back of the Basic Gray layer
- Silver Thread looped over and over, adhering it to the Stampin’ Dimensionals and letting the loops show out from under the CS layer
- CS layer adhered to the front of a Whisper White Note Card
- Remember to burnish the score line of the Note Card with a Bone Folder for a crisp crease.
Here are today’s colors:
You can click on each one to see all the products that come in that color!
Here’s what I used:
Click on the images for more details and to purchase.
Here’s some stuff you should know:
- Newsletter: subscribe for exclusive deals, projects, and more! Enter your email address and click SUBSCRIBE at the top right of this page, just under the picture of my smiling face.
- Gift Certificates are available in any U.S. dollar amount from me. Contact me – email: candy@stampcandy.net OR call/text: 404-661-5222
- Swatch Books and Product Shares from the 2018 Occasions and Sale-A-Bration Catalogs – you can order yours beginning December 27 HERE.
- Year End Sales Event – December 1, 2017 to January 2, 2018 – CLICK HERE for details. Order soon so you don’t miss your favorite retiring items!
- This is a great time to join my team! With the demonstrator discount of at least 20%, you can get Christmas gifts for all the stampers on your list! Plus you can order from the 2018 Occasions and Sale-A-Bration catalogs now! CLICK HERE for more information. Contact me with any questions: email candy@stampcandy.net or call/text 404-661-5222
- Sale-a-bration Stamp Fest coming January 20. Details and register HERE
- Check out My Events Calendar HERE
- Stampin’ Blends alcohol markers are now available! Click HERE for more info.
- Hostess Code for the month of December (HS67FXTS) Find out more about HOW, WHEN and WHY to use the code HERE.
- December’s FREE gift: Year of Cheer Specialty Washi Tape – Find out more HERE.
- Gumball Rewards for all orders over $50. Find out more HERE.
Thanks for stopping by today, and Sweet Stamping!

Dec 22, 2017 | Cards, Christmas, Gallery, Holiday |
Today I’m sharing another card I’ve made with the Wishes All Aglow stamp set. See one on yesterday’s post here. I used the small light stamp over and over to create my own Designer Series Paper. Garden Green Washi Tape finishes off the simple design.
This stamp set is on the Retiring List and will be available only through January 2, 2018, or while supplies last.
Wishes All Aglow Stamp Set @ Stampin’ Up!
Here’s what I made:

Here’s what I did:
Cut and scored with my Stampin’ Trimmer:
- Cherry Cobbler card stock (CS) cut to 4-1/4″ x 11″, then scored in half at 5-1/2″
- Very Vanilla CS cut to 4″ x 5-1/4″ (2 pieces)
- Very Vanilla CS cit to 4″ x 1/2″
Stamped with the Wishes All Aglow stamp set:
- light bulb in Cherry Cobbler ink onto one of the Very Vanilla CS layers, distributing them all over the paper
- sentiment in Cherry Cobbler ink onto the Very Vanilla CS strip
Assembled the card:
- sentiment glued onto the stamped Very Vanilla CS layer
- Garden Green washi tape applied along the top and bottom edges of the sentiment strip, and near the top and bottom of the layer
- stamped layer glued onto the front of the card base
- remaining Very Vanilla CS piece glued to the inside of the card base
- Remember to burnish the score line of the card base with a Bone Folder for a clean, crisp crease!
Here are today’s colors:
You can click on each one to see all the products that come in that color!
Here’s what I used:
Click on the images for more details and to purchase.
Here’s some stuff you should know:
- Newsletter: subscribe for exclusive deals, projects, and more! Enter your email address and click SUBSCRIBE at the top right of this page, just under the picture of my smiling face.
- Gift Certificates are available in any U.S. dollar amount from me. Contact me – email: candy@stampcandy.net OR call/text: 404-661-5222
- Swatch Books and Product Shares from the 2018 Occasions and Sale-A-Bration Catalogs – you can order yours beginning December 27 HERE.
- Year End Sales Event – December 1, 2017 to January 2, 2018 – CLICK HERE for details. Order soon so you don’t miss your favorite retiring items!
- This is a great time to join my team! With the demonstrator discount of at least 20%, you can get Christmas gifts for all the stampers on your list! Plus you can order from the 2018 Occasions and Sale-A-Bration catalogs now! CLICK HERE for more information. Contact me with any questions: email candy@stampcandy.net or call/text 404-661-5222
- Sale-a-bration Stamp Fest coming January 20. Details and register HERE
- Check out My Events Calendar HERE
- Stampin’ Blends alcohol markers are now available! Click HERE for more info.
- Hostess Code for the month of December (HS67FXTS) Find out more about HOW, WHEN and WHY to use the code HERE.
- December’s FREE gift: Year of Cheer Specialty Washi Tape – Find out more HERE.
- Gumball Rewards for all orders over $50. Find out more HERE.
Thanks for stopping by today, and Sweet Stamping!
Dec 21, 2017 | Cards, Christmas, Gallery, Holiday |
The Wishes All Aglow stamp set is very festive and all about Christmas lights. For today’s card I used the tree made of light strings and the titular sentiment. Instead of the traditional red and green, I used Flirty Flamingo and Old Olive for a cuter and more casual feel.
By the way, this stamp set is on the Retiring List and will be available only through January 2, 2018, or while supplies last.
Wishes All Aglow Stamp Set @ Stampin’ Up!
Here’s what I made:

Here’s what I did:
Cut and scored with my Stampin’ Trimmer:
- Whisper White Thick card stock (CS) cut to 4-1/4″ x 11″, then scored in half at 5-1/2″
- Flirty Flamingo CS cut to 4-1/8″ x 5-3/8″
- Merry Little Christmas Designer Series Paper (DSP) cut to 4″ x 5-1/4″
- Whisper White CS cut to 2-1/8″ x 3″
- Flirty Flamingo CS cut to 2-1/4″ x 3-1/8″
Stamped with the Wishes All Aglow stamp set:
- tree image in Old Olive ink onto the 2-1/8″ x 3″ Whisper White CS
- sentiment in Flirty Flamingo ink onto a scrap of Whisper White CS
Cut using Circle Punches:
- 1-1/2″ Flirty Flamingo CS circle
- 1-3/8″ Old Olive CS circle
- 1-1/4″ sentiment
Assembled the card:
- stamped tree glued onto the 2-1/4″ x 3-1/8″ Flirty Flamingo CS
- 2-1/4″ x 3-1/8″ Flirty Flamingo CS glued onto the DSP
- sentiment glued onto the Old Olive circle
- Old Olive circle glued onto the Flirty Flamingo circle
- Flirty Flamingo circle glued over the top right corner of the piece with the tree
- DSP glued onto the Flirty Flamingo CS layer
- Flirty Flamingo CS layer glued onto the front of the card base
- Flirty Flamingo 3/8″ Striped Grosgrain Ribbon tied into a bow and adhered to the card front with Mini Glue Dots
- Remember to burnish the score line of the card base with a Bone Folder for a clean, crisp crease.
Here are today’s colors:
You can click on each one to see all the products that come in that color!
Here’s what I used:
Click on the images for more details and to purchase.
Here’s some stuff you should know:
- Newsletter: subscribe for exclusive deals, projects, and more! Enter your email address and click SUBSCRIBE at the top right of this page, just under the picture of my smiling face.
- Gift Certificates are available in any U.S. dollar amount from me. Contact me – email: candy@stampcandy.net OR call/text: 404-661-5222
- Swatch Books and Product Shares from the 2018 Occasions and Sale-A-Bration Catalogs – you can order yours beginning December 27 HERE.
- Year End Sales Event – December 1, 2017 to January 2, 2018 – CLICK HERE for details. Order soon so you don’t miss your favorite retiring items!
- This is a great time to join my team! With the demonstrator discount of at least 20%, you can get Christmas gifts for all the stampers on your list! Plus you can order from the 2018 Occasions and Sale-A-Bration catalogs now! CLICK HERE for more information. Contact me with any questions: email candy@stampcandy.net or call/text 404-661-5222
- Sale-a-bration Stamp Fest coming January 20. Details and register HERE
- Check out My Events Calendar HERE
- Stampin’ Blends alcohol markers are now available! Click HERE for more info.
- Hostess Code for the month of December (HS67FXTS) Find out more about HOW, WHEN and WHY to use the code HERE.
- December’s FREE gift: Year of Cheer Specialty Washi Tape – Find out more HERE.
- Gumball Rewards for all orders over $50. Find out more HERE.
Thanks for stopping by today, and Sweet Stamping!
Dec 20, 2017 | Blog Hop, Christmas, Gallery, Gift Wrap, Gifts, Holiday, Tags |
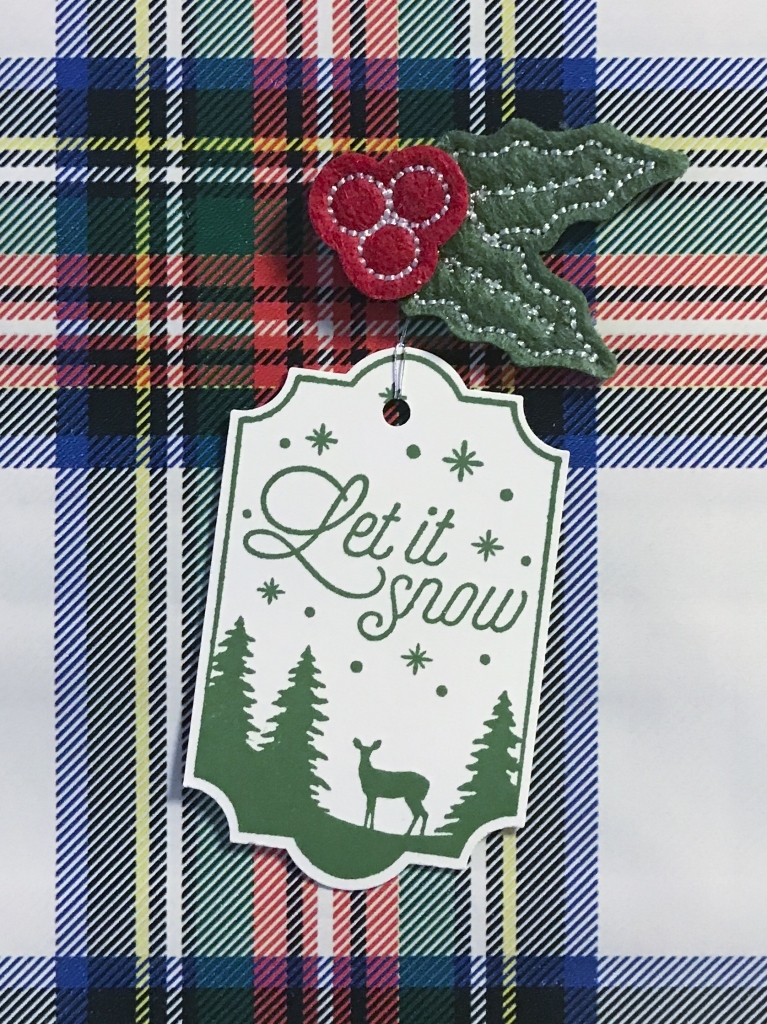
It’s time for the InKing Royalty December blog hop. This month we’re sharing how we wrap it up for the holidays, using our Stampin’ Up! products in gift wrapping. Since my husband and I spend Christmas at the homes of relatives, we have a lot of Christmas gifts to fit into the trunk of our car. I knew that any kind of bows would be crushed, so I decided to decorate the wrapped gifts with flat ornamentation. I’ve used a few different stamp sets and embellishments. I’m sharing a few of them with you today.

After reading my post, be sure to check out all the other stops on the hop. You don’t want to miss any of the talent in this group. Plus Jenny Hall is joining us as guest hopper this month!
Here’s what I made:


Here’s what I did:
Stamped with the Merry Little Labels stamp set:
- Let It Snow tag onto Whisper White Thick card stock (CS) – some in Garden Green ink and some in Real Red ink
- No Peeking tag onto Whisper White Thick card stock (CS) – some in Garden Green ink and some in Real Red ink
- Just For You tag (not shown) onto Whisper White Thick card stock (CS) – some in Garden Green ink and some in Real Red ink
Stamped with the Labels to Love stamp set:
- Merry Christmas tag onto Whisper White Thick card stock (CS) – some in Garden Green ink and some in Real Red ink
Stamped with the Festive Phrases stamp set:
- Merry & Bright image onto Whisper White Thick card stock (CS) in Basic Black ink
- Happy Holidays elf image onto Whisper White Thick card stock (CS) in Basic Black ink
Colored using Stampin’ Write Markers:
- lights on the Merry & Bright tags in Garden Green and Real Red
- Happy Holidays elf tags in Real Red and Basic Gray
Cut using the Everyday Label Punch:
- Let It Snow tags, No Peeking tags, Just For You tags, and Merry Christmas tags
Die cut using the Stitched Shapes Framelits:
- Merry & Bright tags with a square die
Die cut using the Layering Ovals Framelits:
Attached to the gifts:
- punched holes in all the tags with a 1/16″ Circle Punch
- ran a double strand of Silver Metallic Thread through each hole and tied onto the tag
- thread adhered to the gift with Fast Fuse
- Fast Fuse covered with an embellishment, such as a ribbon bow, or Green Sprigs, or a Stitched Felt Embellishment
Here’s the Wrap It Up blog hop:
If you get stuck during the hop, please use this line-up as a guide:
- Brian King at Stamp with Brian
- Jenny Hall at Jenny Hall Designs
- Candy Ford at Stamp Candy <– YOU ARE HERE
- Sheryl Sharp at Sharp Notes by Sheryl
- Jackie Beers at Blue Line Stamping
- Shawn de Oliveira at Shawn Stamps
- Robbye Hamilton at Miss Hammie’s Crafts
- Sue Jackson at Just Peachy Stamping
- Julie DiMatteo at The Paper Pixie
Here are today’s colors:
Click on each one to see everything that comes in that color!
Here’s what I used:
Click on the images for more details and to purchase.
Here’s some stuff you should know:
- Newsletter: subscribe for exclusive deals, projects, and more! Enter your email address and click SUBSCRIBE at the top right of this page, just under the picture of my smiling face.
- Gift Certificates are available in any U.S. dollar amount from me. Contact me – email: candy@stampcandy.net OR call/text: 404-661-5222
- Swatch Books and Product Shares from the 2018 Occasions and Sale-A-Bration Catalogs – you can order yours beginning December 27 HERE.
- Year End Sales Event – December 1, 2017 to January 2, 2018 – CLICK HERE for details. Order soon so you don’t miss your favorite retiring items!
- This is a great time to join my team! With the demonstrator discount of at least 20%, you can get Christmas gifts for all the stampers on your list! Plus you can order from the 2018 Occasions and Sale-A-Bration catalogs now! CLICK HERE for more information. Contact me with any questions: email candy@stampcandy.net or call/text 404-661-5222
- Sale-a-bration Stamp Fest coming January 20. Details and register HERE
- Check out My Events Calendar HERE
- Stampin’ Blends alcohol markers are now available! Click HERE for more info.
- Hostess Code for the month of December (HS67FXTS) Find out more about HOW, WHEN and WHY to use the code HERE.
- December’s FREE gift: Year of Cheer Specialty Washi Tape – Find out more HERE.
- Gumball Rewards for all orders over $50. Find out more HERE.
Thanks for stopping by today, and Sweet Stamping!
Dec 18, 2017 | Christmas, Food, Gallery, Gift Wrap, Gifts, Holiday |
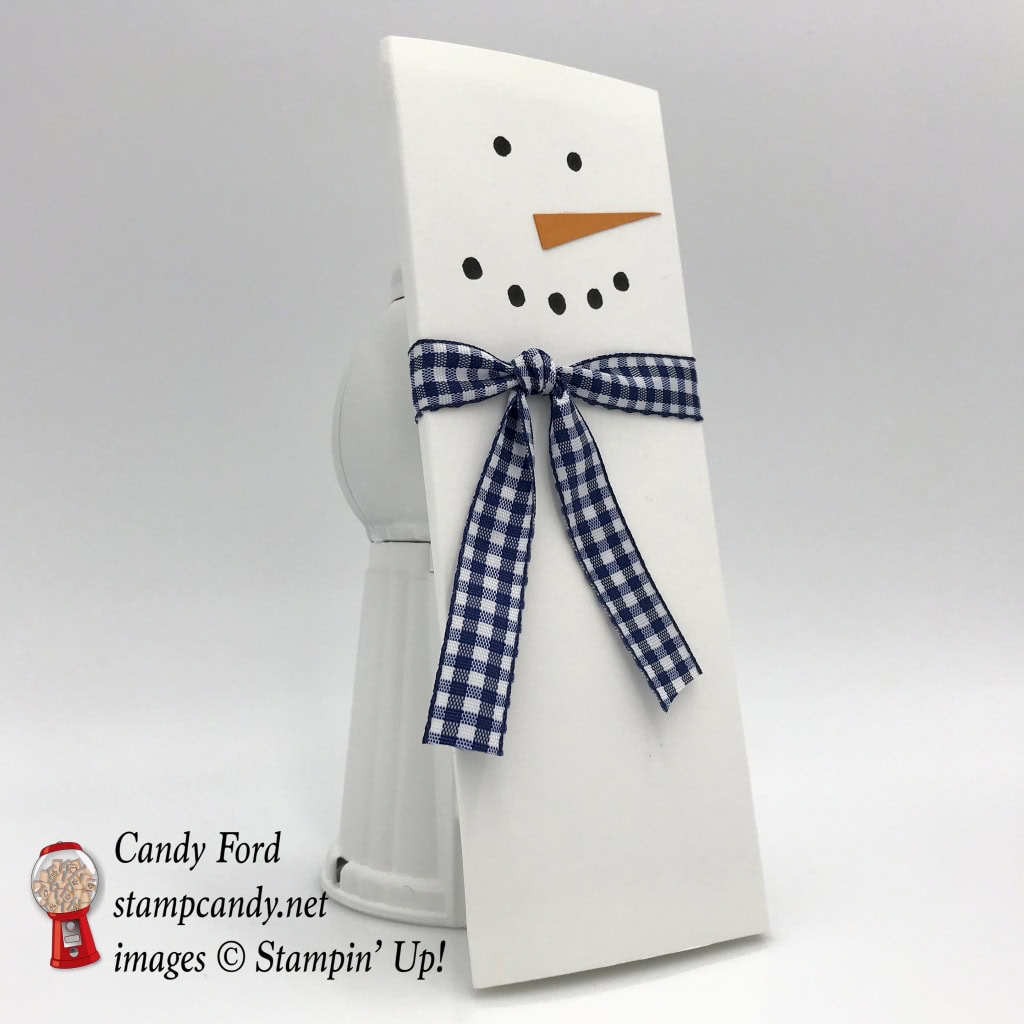
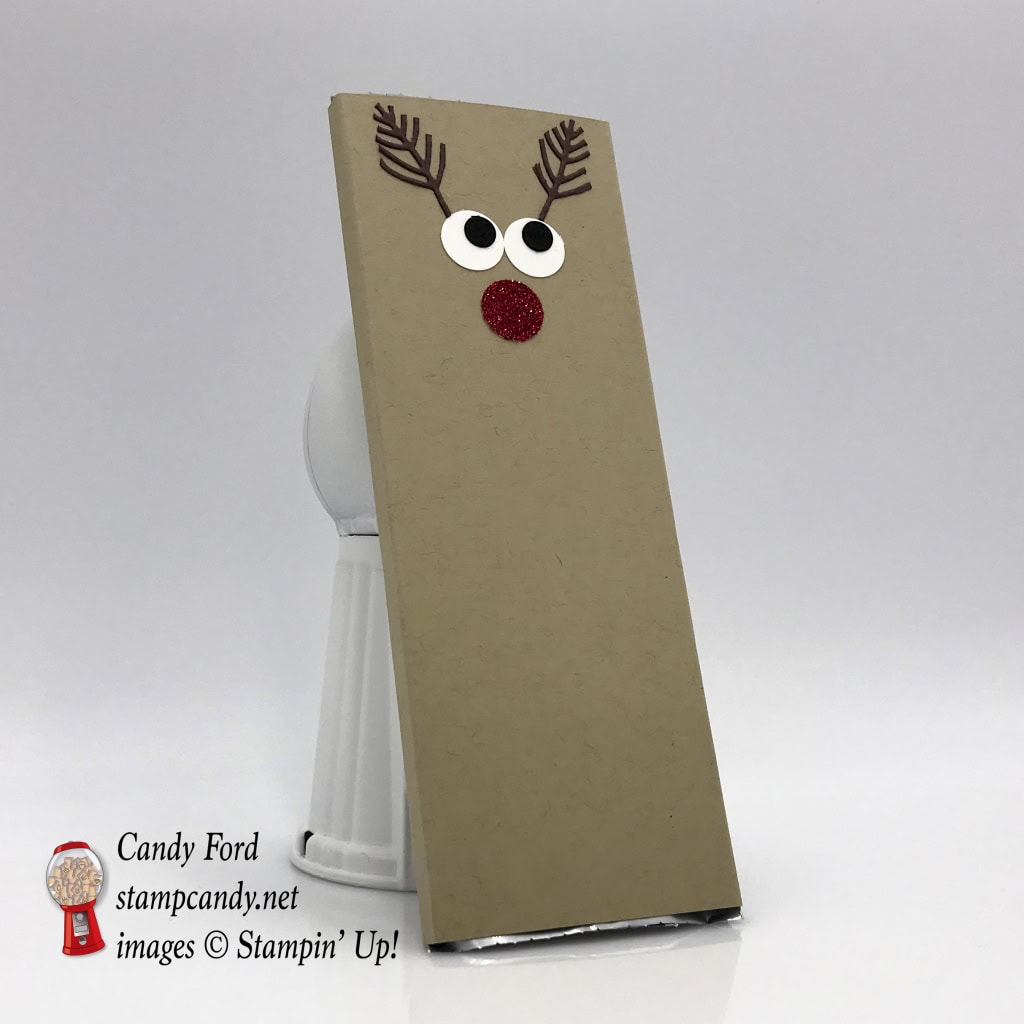
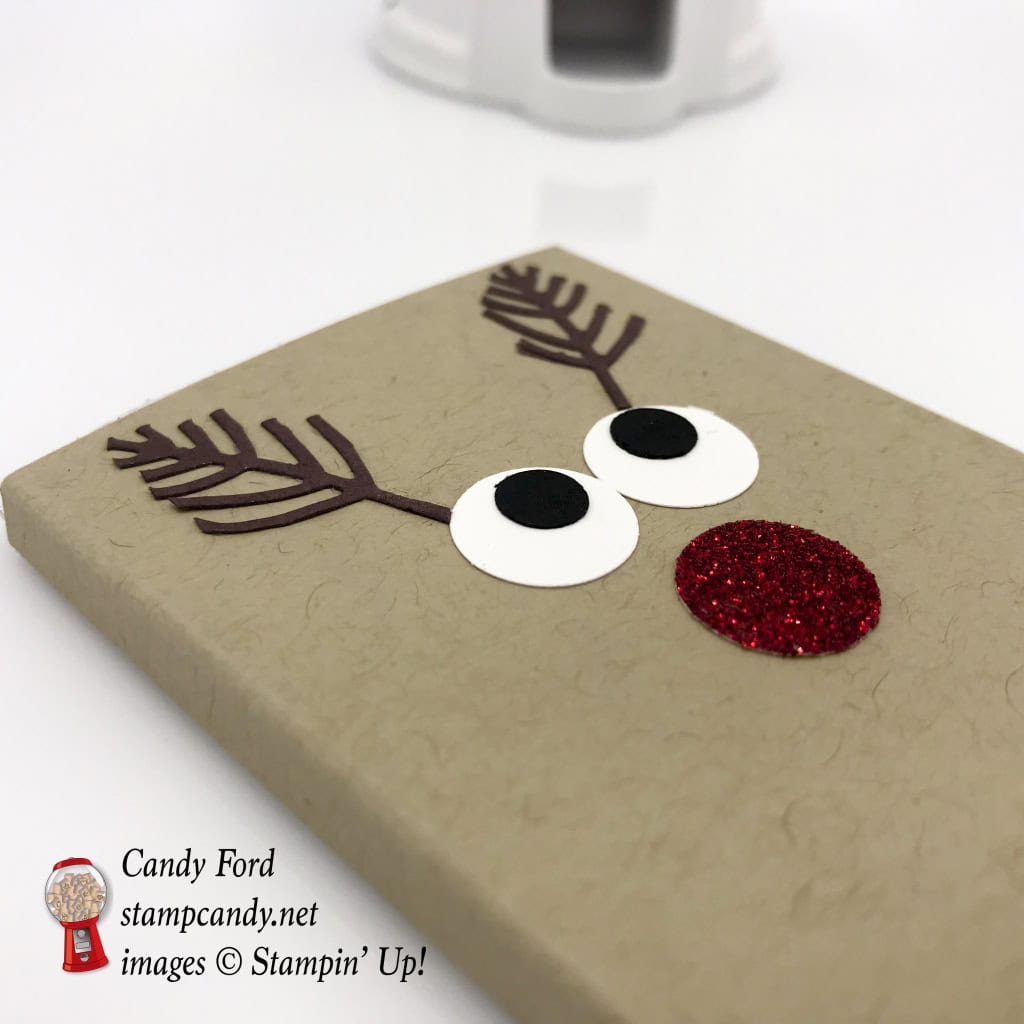
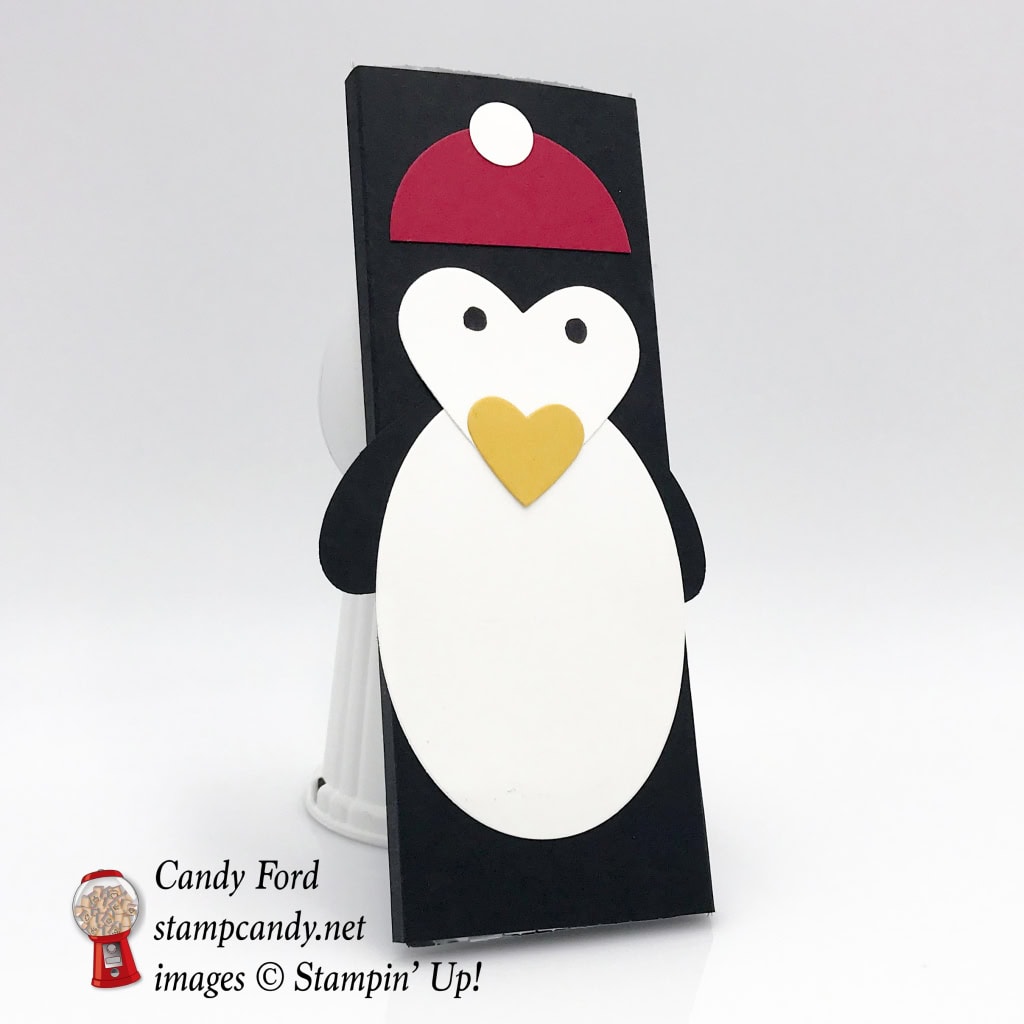
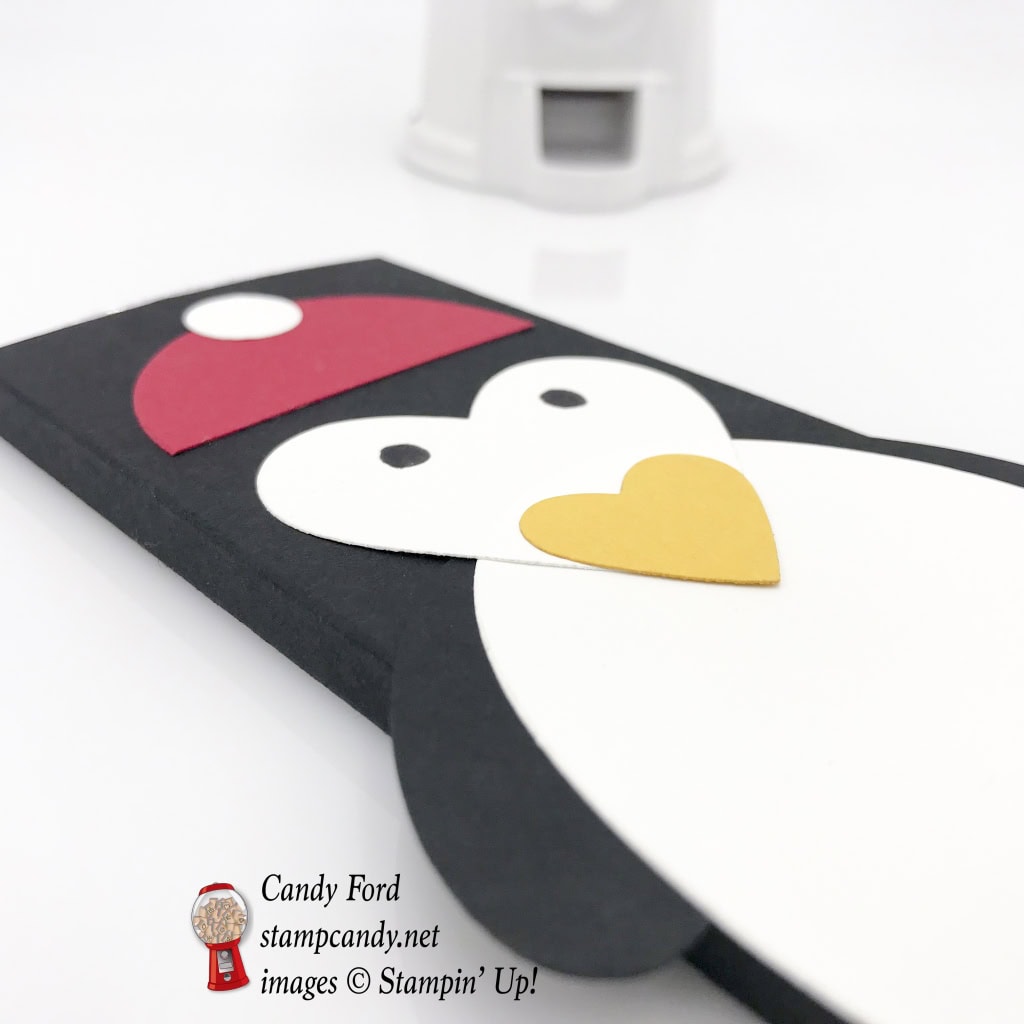
Yesterday I showed you how to make a Snowman that holds a snack size Hershey Bar. You can see that post here. Today I’m sharing three different covers for full size Hershey Bars: a snowman, a reindeer, and a penguin. These make terrific stocking stuffers, or small last minute gifts. And again, there’s no stamping. The Big Shot makes these super quick and easy (the magic words.) The reindeer antlers are made from the leaf die from the Seasonal Layers Thinlits, and the Penguin is made from the Layering Circles, Layering Ovals, and Sweet & Sassy Framelits Dies.
Here’s what I made:
Here’s what I did:
Cut and scored with my Stampin’ Trimmer:
- Whisper White card stock (CS) cut to 5-3/8″ x 6-1/4″, then scored along the shorter side at 1-1/2”, 1-3/4”, 4”, and 4-1/4”
- Crumb Cake CS cut to 5-3/8″ x 6-1/4″, then scored along the shorter side at 1-1/2”, 1-3/4”, 4”, and 4-1/4”
- Basic Black CS cut to 5-3/8″ x 6-1/4″, then scored along the shorter side at 1-1/2”, 1-3/4”, 4”, and 4-1/4”
Die cut using the Seasonal Layers Thinlits:
- leaf from a scrap of Early Espresso CS
Die cut using the Layering Circles Framelits:
- circle from Real Red CS, for the penguin’s hat
Die cut using the Layering Ovals Framelits:
- large Whisper White CS oval for penguin’s body
- 2 small Basic Black CS ovals for penguin’s flippers
Die cut using the Sweet & Sassy Framelits:
- larger Whisper White CS heart, for penguin’s face
- smaller Crushed Curry CS heart, for penguin’s beak
Cut using Paper Snips:
- long skinny triangle from a scrap of Pumpkin Pie CS
- antlers from the die cut leaf
- Real Red circle cut in half
Cut with the 1/2″ Circle Punch:
- 3 circles from Whisper White CS
- 1 circle from Red Glimmer Paper
Cut using a 1/4″ Circle Punch:
Assembled the Snowman cover:
- burnished all score lines with a Bone Folder
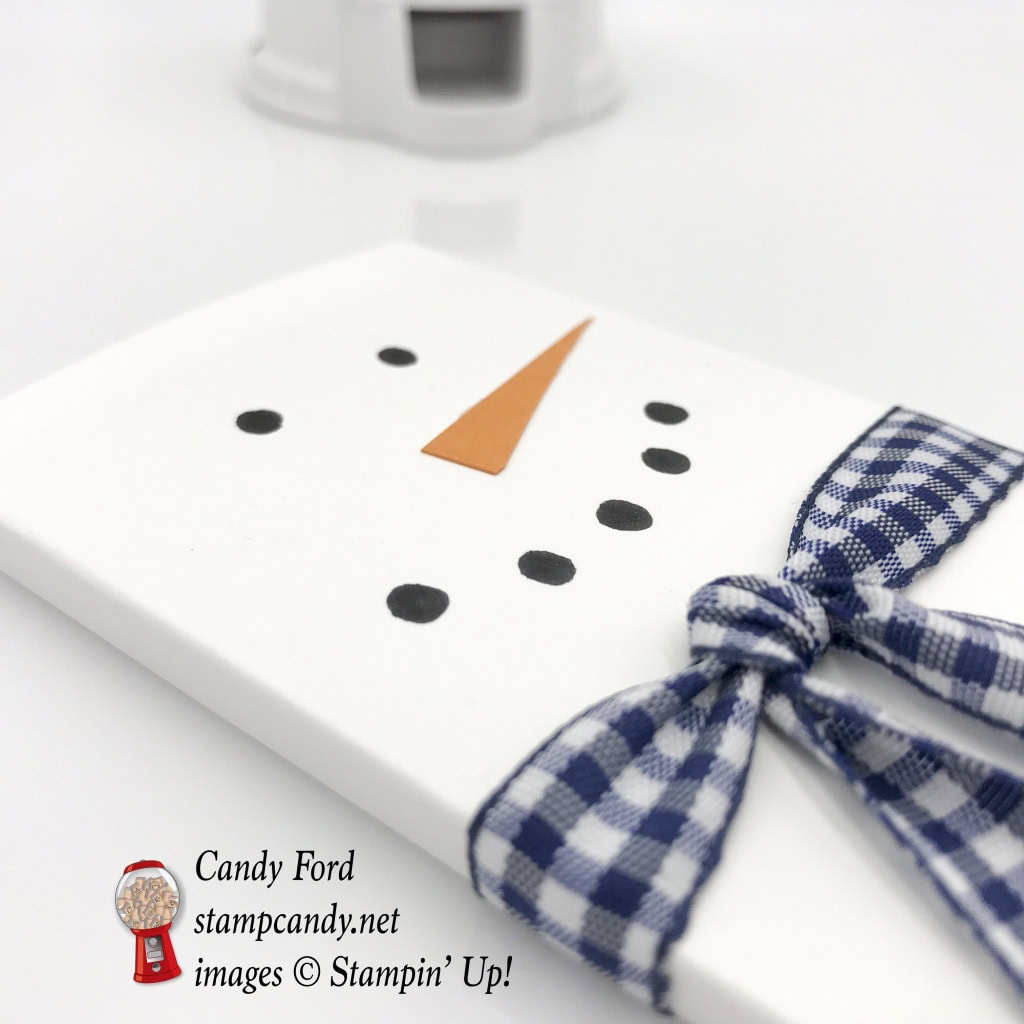
- Whisper White CS wrapped around Hershey bar and glued together on the back, being careful not to glue it to the Hershey Bar itself
- tiny Pumpkin Pie CS triangle glued to the front for the nose
- face drawn on using a Basic Black Stampin’ Write Marker
- Night of Navy 1/2″ Gingham Ribbon tied around neck and secured in place with a couple of Mini Glue Dots
Assembled the Reindeer cover:
- burnished all score lines with a Bone Folder
- Crumb Cake CS wrapped around Hershey bar and glued together on the back, being careful not to glue it to the Hershey Bar itself
- 2 Whisper White CS 1/2″ circles glued onto the front for the eyes
- 2 Basic Black 1/4″ circles glued onto the Whisper White CS 1/2″ circles
- Red Glimmer Paper circle glued on below the eyes
- 2 Early Espresso CS antlers glued on above the eyes
Assembled the Penguin cover:
- burnished all score lines with a Bone Folder
- Basic Black CS wrapped around Hershey bar and glued together on the back, being careful not to glue it to the Hershey Bar itself
- 1/2″ Whisper White CS circle glued onto the top of the Real Red CS half circle for the hat
- hat glued onto the front of the Basic Black CS cover, at the top
- 2 small Basic Black CS ovals glued to the back of the large Whisper White CS oval, so that they stick out on either side
- small Crushed Curry CS heart glued onto the bottom point of the Whisper White CS heart
- hearts glued onto the top of the large Whisper White CS oval
- penguin glued onto the front of the cover, below the hat
Here are today’s colors:
You can click on each one to see all the products that come in that color!
Here’s what I used:
Click on the images for more details and to purchase.
Here’s some stuff you should know:
- Gift Certificates are available in any U.S. dollar amount from me. Contact me – email: candy@stampcandy.net OR call/text: 404-661-5222
- Swatch Books and Product Shares from the 2018 Occasions and Sale-A-Bration Catalogs – you can order yours now HERE.
- Year End Sales Event – December 1, 2017 to January 2, 2018 – CLICK HERE for details. Order soon so you don’t miss your favorite retiring items!
- This is a great time to join my team! With the demonstrator discount of at least 20%, you can get Christmas gifts for all the stampers on your list! Plus you can order from the 2018 Occasions and Sale-A-Bration catalogs now! CLICK HERE for more information. Contact me with any questions: email candy@stampcandy.net or call/text 404-661-5222
- Sale-a-bration Stamp Fest coming January 20. Details and register HERE
- Check out My Events Calendar HERE
- Stampin’ Blends alcohol markers are now available! Click HERE for more info.
- Hostess Code for the month of December (HS67FXTS) Find out more about HOW, WHEN and WHY to use the code HERE.
- December’s FREE gift: Year of Cheer Specialty Washi Tape – Find out more HERE.
- Gumball Rewards for all orders over $50. Find out more HERE.
Thanks for stopping by today, and Sweet Stamping!
Dec 17, 2017 | Christmas, Food, Gallery, Gift Wrap, Gifts, Holiday, New Year |
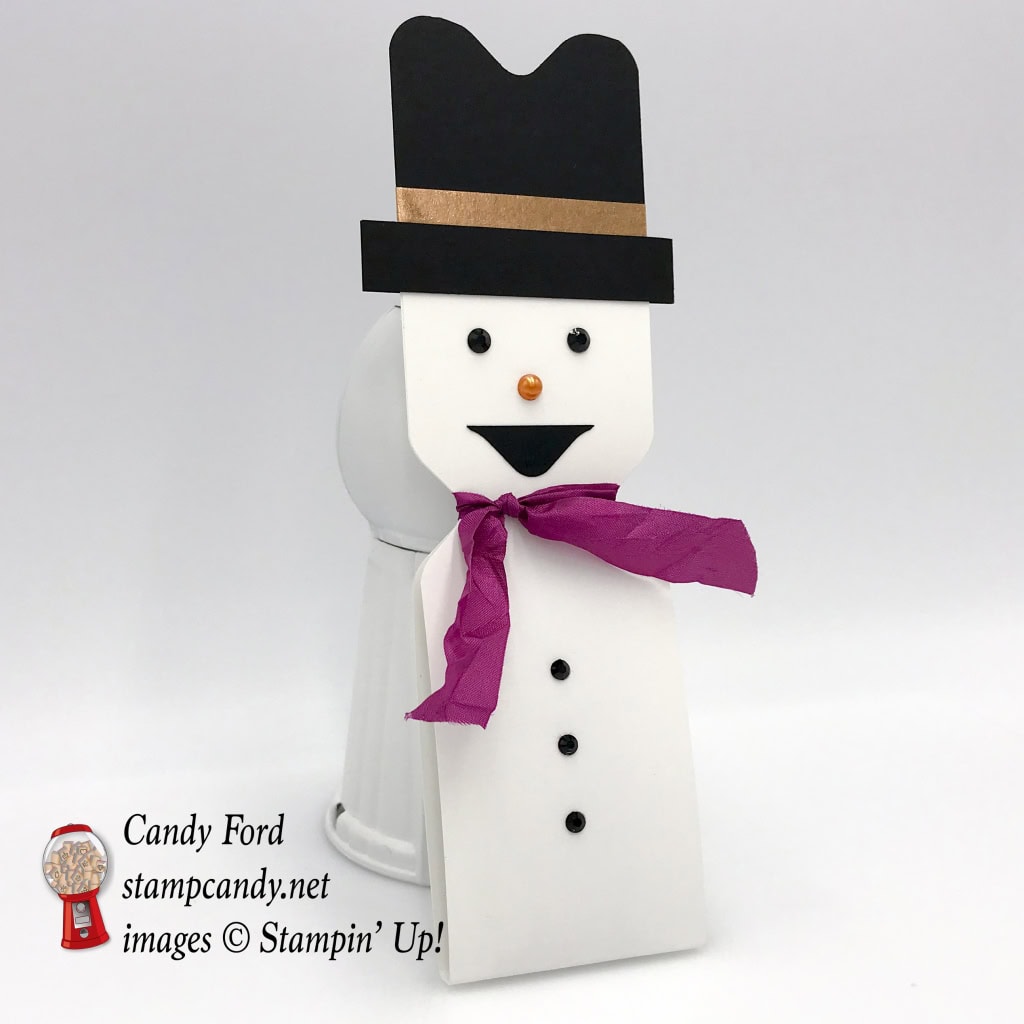
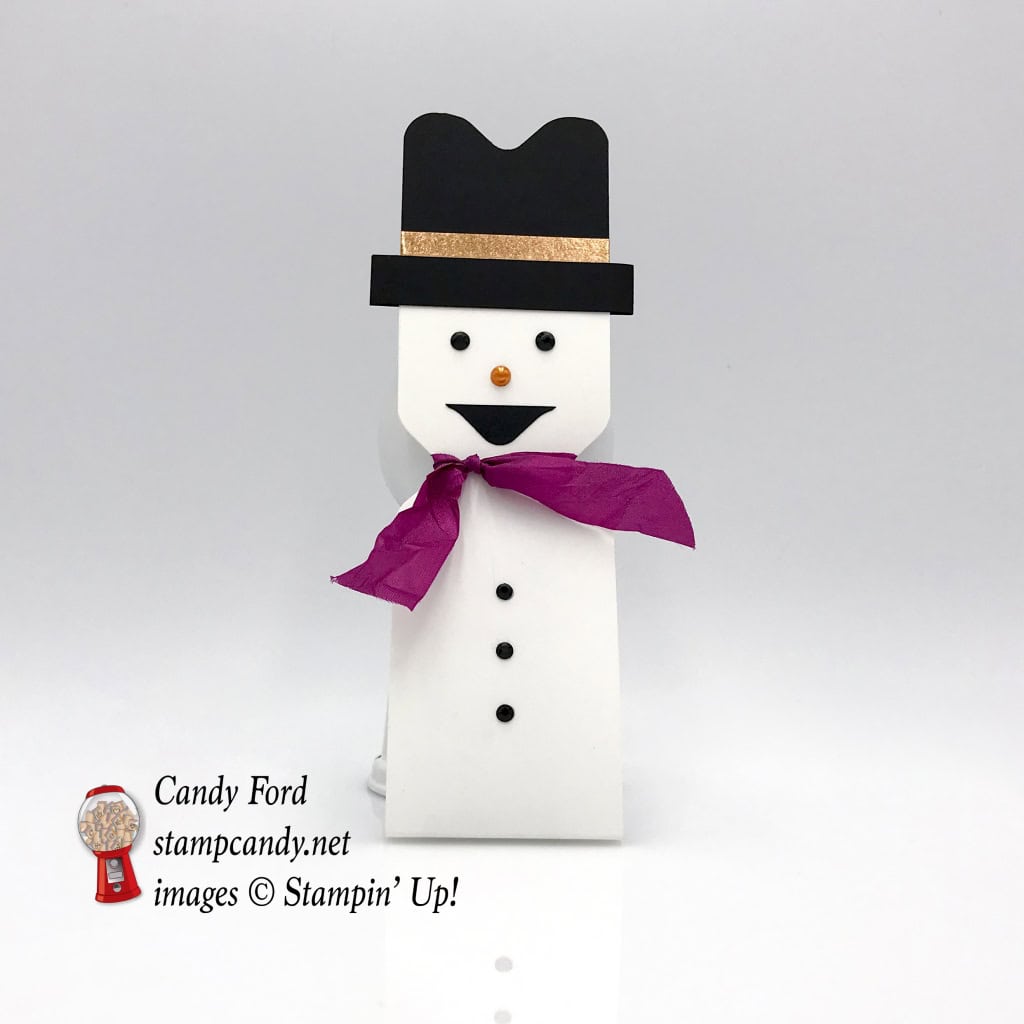
This cute little Snowman contains a snack size Hershey Bar, and makes a perfect small gift for your child’s classmates, the mail carrier, coworkers,… The Envelope Punch Board makes it really quick and easy, and you know I’m all about quick and easy projects. I CASEd this project from Lisa Bernard at Queen B Creations.
Here’s what I made:

Here’s what I did:
Cut and scored with my Stampin’ Trimmer:
- Whisper White card stock (CS) cut to 2″ x 11″, then scored at 5-3/8″ and 5-5/8″
- NOTE: You can use regular or thick Whisper White CS. I used regular.
- Basic Black CS cut to 2″ x 2″
- Basic Black CS cut to 1/2″ x 5″, and scored in half at 2-1/2″
Cut with the Envelope Punch Board:
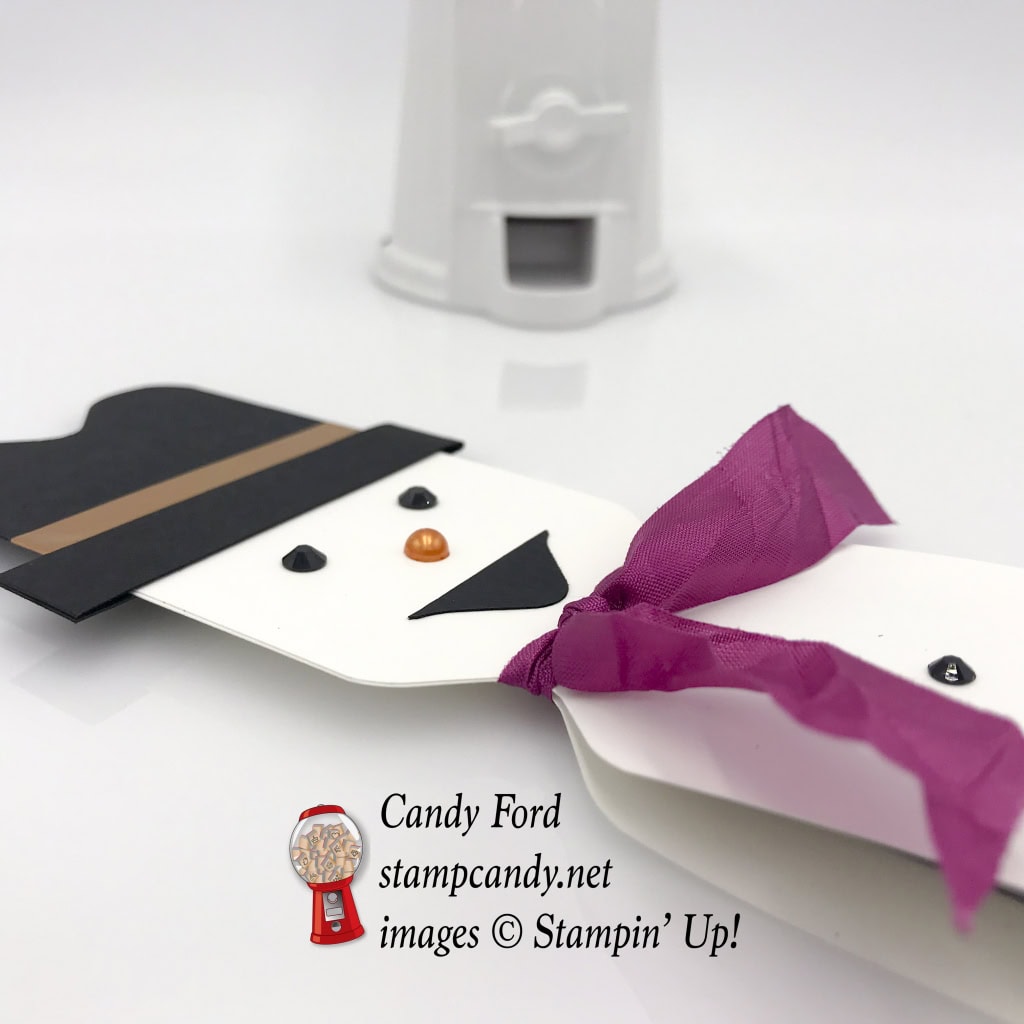
- a notch 2″ from each end and on both sides of the Whisper White CS, to create the neck
- a notch from the top of the hat (save the piece that comes off)
- top two corners with the corner rounder on the back of the board
Colored with a Pumpkin Pie Stampin’ Blends Marker:
Assembled the gift:
- burnish all score lines with a Bone Folder
- snack size Hershey Bar adhered to the inside of the Whisper White CS with a small piece of Tear & Tape
- ribbon tied around the neck
- hat glued to the top of the snowman
- 1/2″ strip of Basic Black CS glued to the bottom of the hat, wrapping around to cover both sides where the hat meets the top of the snowman
- Year of Cheer Washi Tape applied all the way around the hat
- small piece of Basic Black CS that was punched off the hat glued onto the front of the snowman for the mouth (I trimmed the little paper threads at the very ends with my Paper Snips.)
- Black Rhinestones applied to the face: larger ones for the eyes and smaller ones for the buttons
- colored pearl applied for the nose
Here are today’s colors:
You can click on each one to see all the products that come in that color!
Here’s what I used:
Click on the images for more details and to purchase.
Here’s some stuff you should know:
- Gift Certificates are available in any U.S. dollar amount from me. Contact me – email: candy@stampcandy.net OR call/text: 404-661-5222
- Swatch Books and Product Shares from the 2018 Occasions and Sale-A-Bration Catalogs – you can order yours now HERE.
- Year End Sales Event – December 1, 2017 to January 2, 2018 – CLICK HERE for details. Order soon so you don’t miss your favorite retiring items!
- This is a great time to join my team! With the demonstrator discount of at least 20%, you can get Christmas gifts for all the stampers on your list! Plus you can order from the 2018 Occasions and Sale-A-Bration catalogs now! CLICK HERE for more information. Contact me with any questions: email candy@stampcandy.net or call/text 404-661-5222
- Sale-a-bration Stamp Fest coming January 20. Details and register HERE
- Check out My Events Calendar HERE
- Stampin’ Blends alcohol markers are now available! Click HERE for more info.
- Hostess Code for the month of December (HS67FXTS) Find out more about HOW, WHEN and WHY to use the code HERE.
- December’s FREE gift: Year of Cheer Specialty Washi Tape – Find out more HERE.
- Gumball Rewards for all orders over $50. Find out more HERE
Thanks for stopping by today, and Sweet Stamping!
