Apr 7, 2016 | Bags, Boxes, Classes, Occasions |
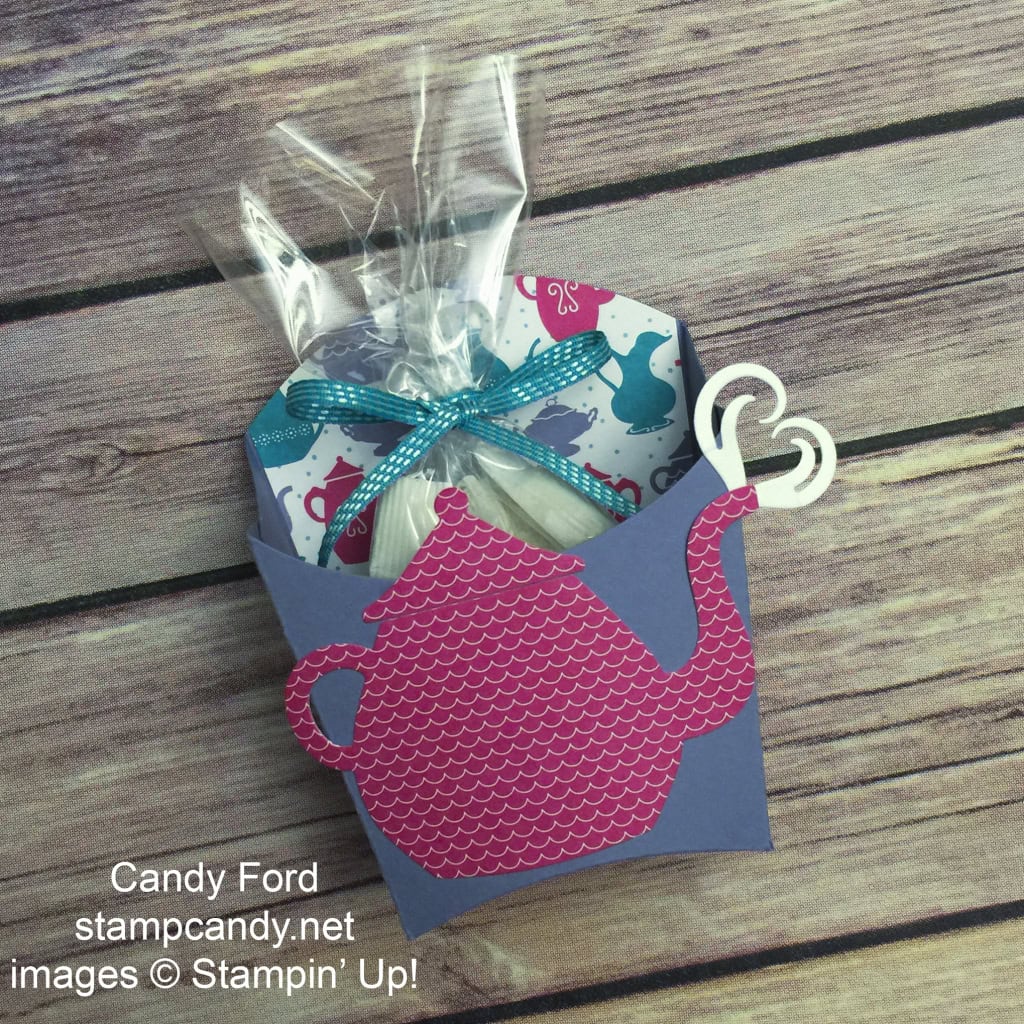
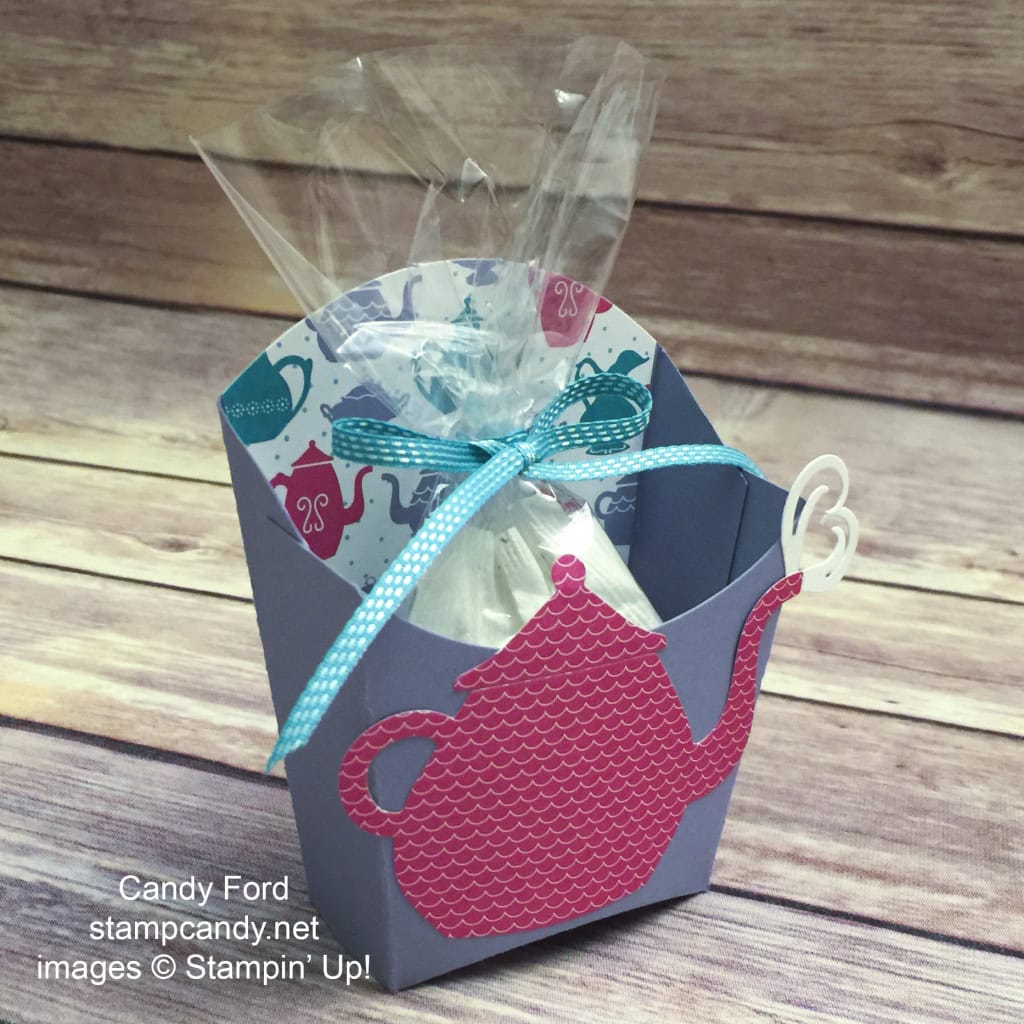
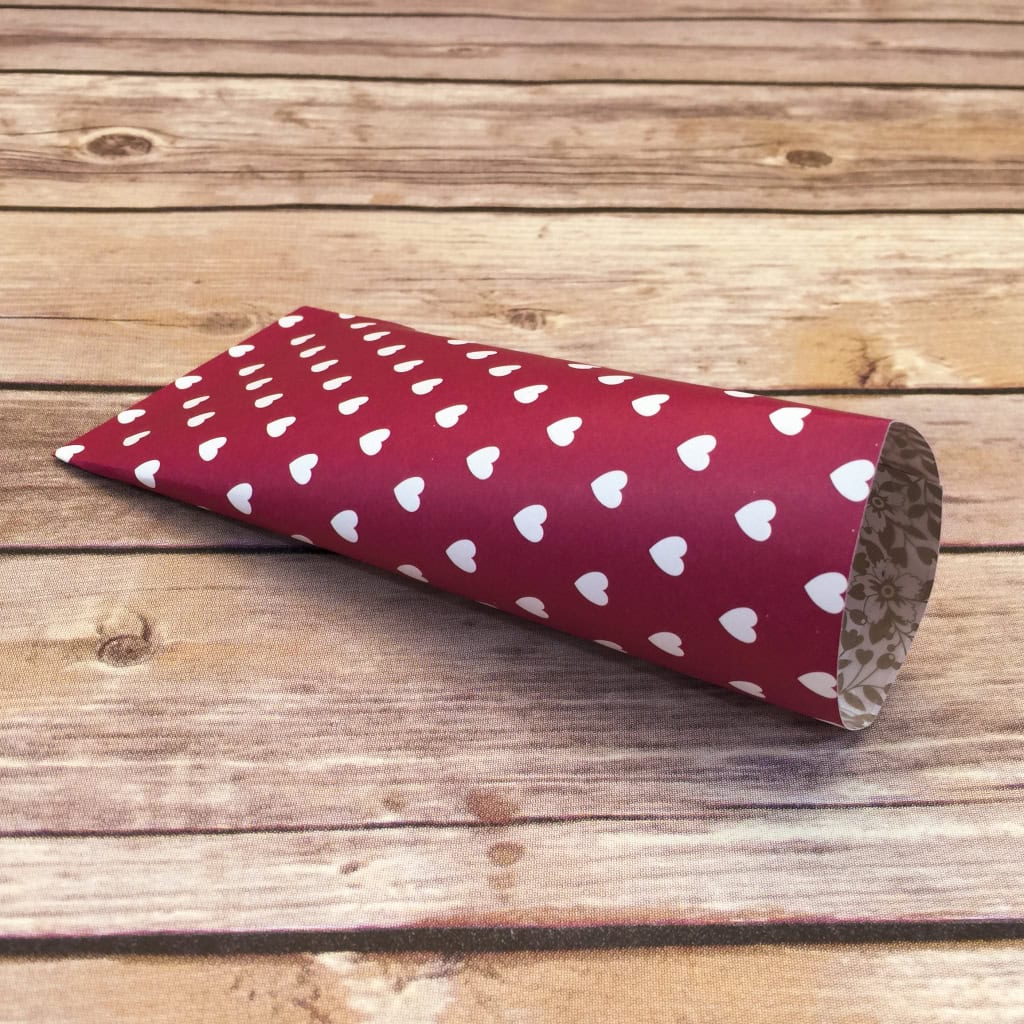
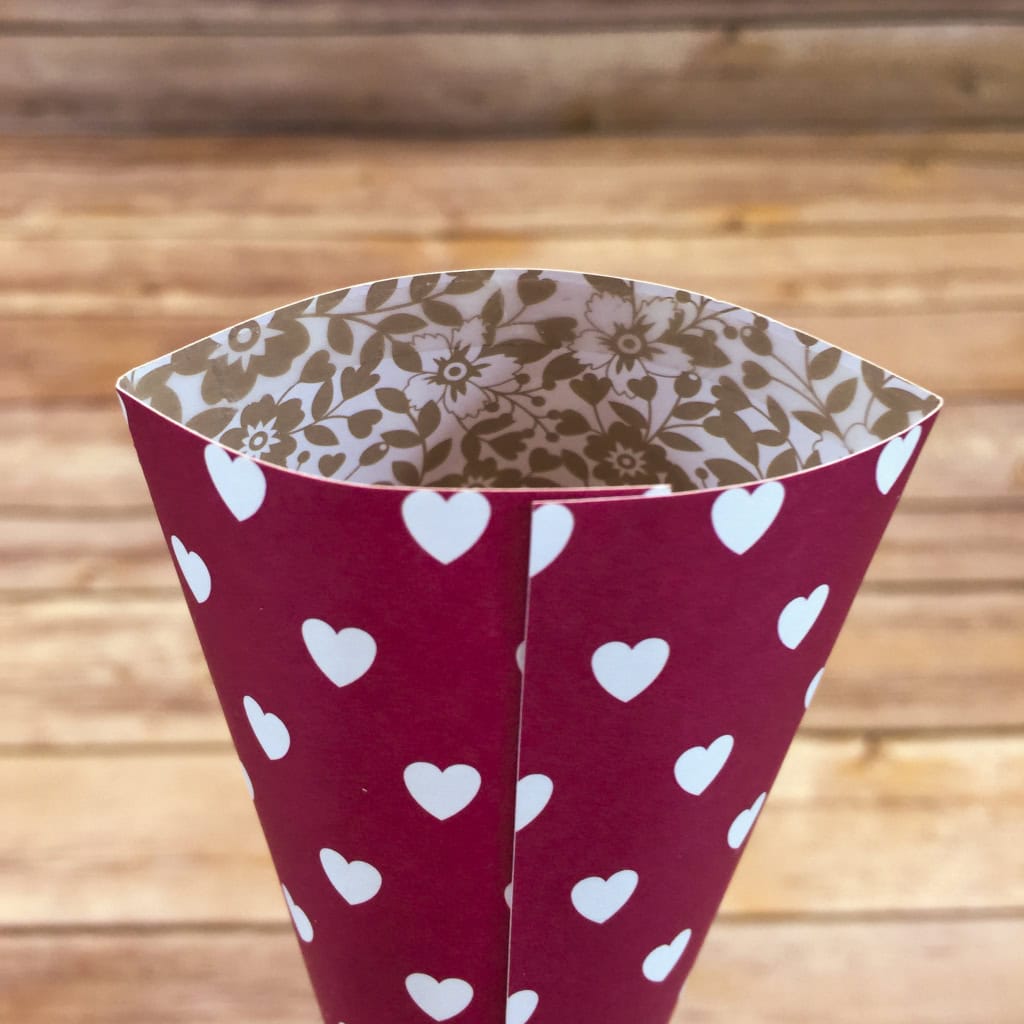
Today I’m sharing the fourth and final project from my A Nice Cuppa Bundle Class. It’s a Fry Box holding a treat of herbal tea bags.
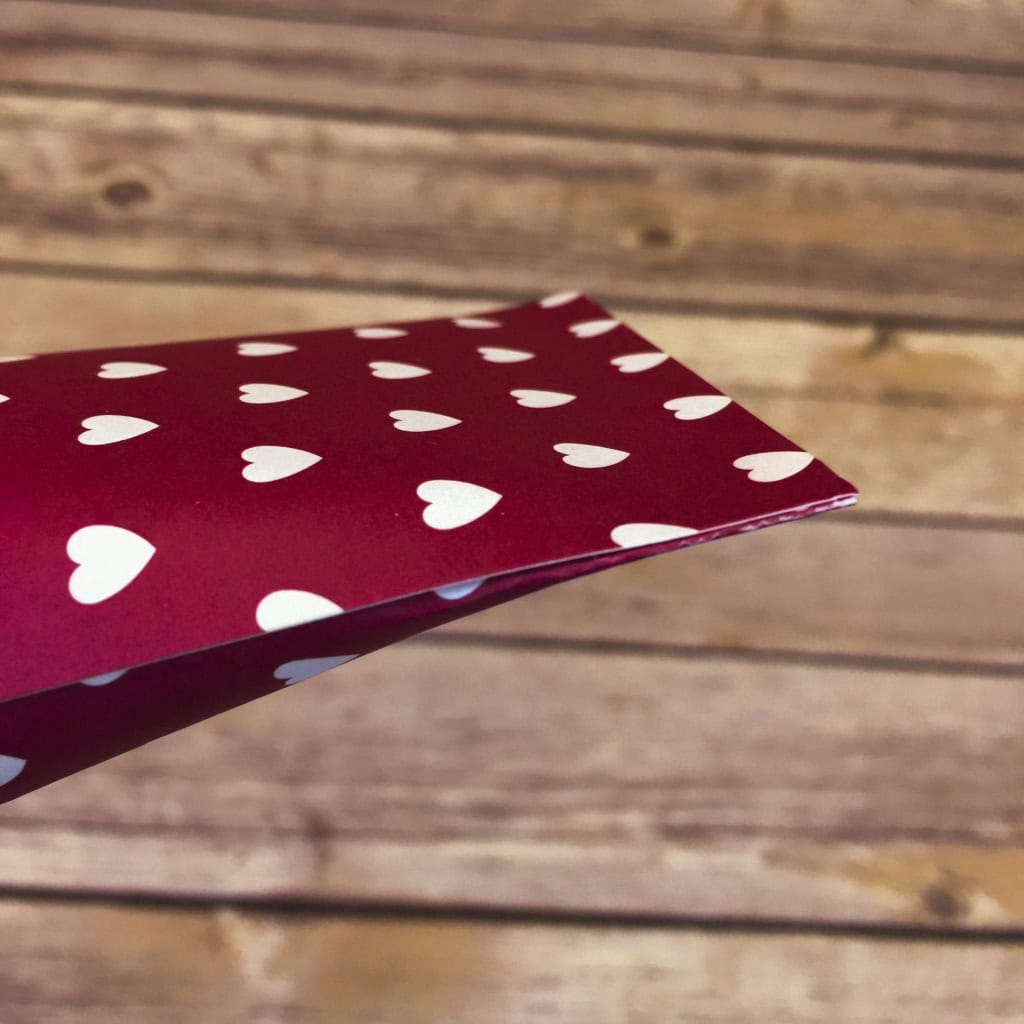
I cut the box from Wisteria Wonder card stock with the Fry Box Bigz L Die, then assembled it with Multipurpose Liquid Glue.
I cut a piece of Have a Cuppa Designer Series Paper with the same die, trimmed it, and glued it into the box.
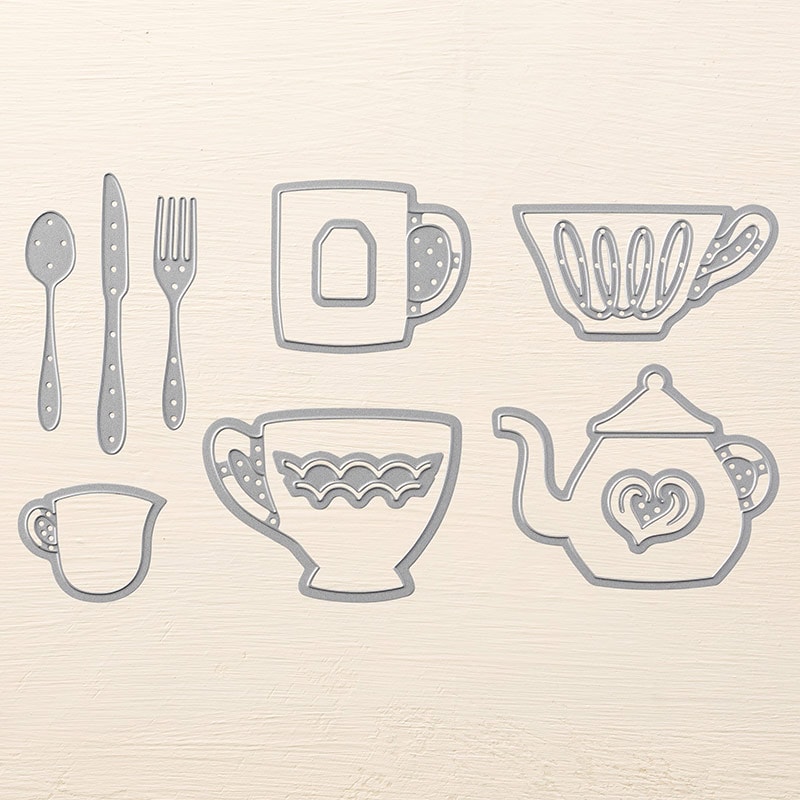
I cut the teapot from another piece of Have a Cuppa DSP, and the heart from Whisper White card stock, using the Cups & Kettle Framelits Dies. I glued the pieces onto the front of the box.
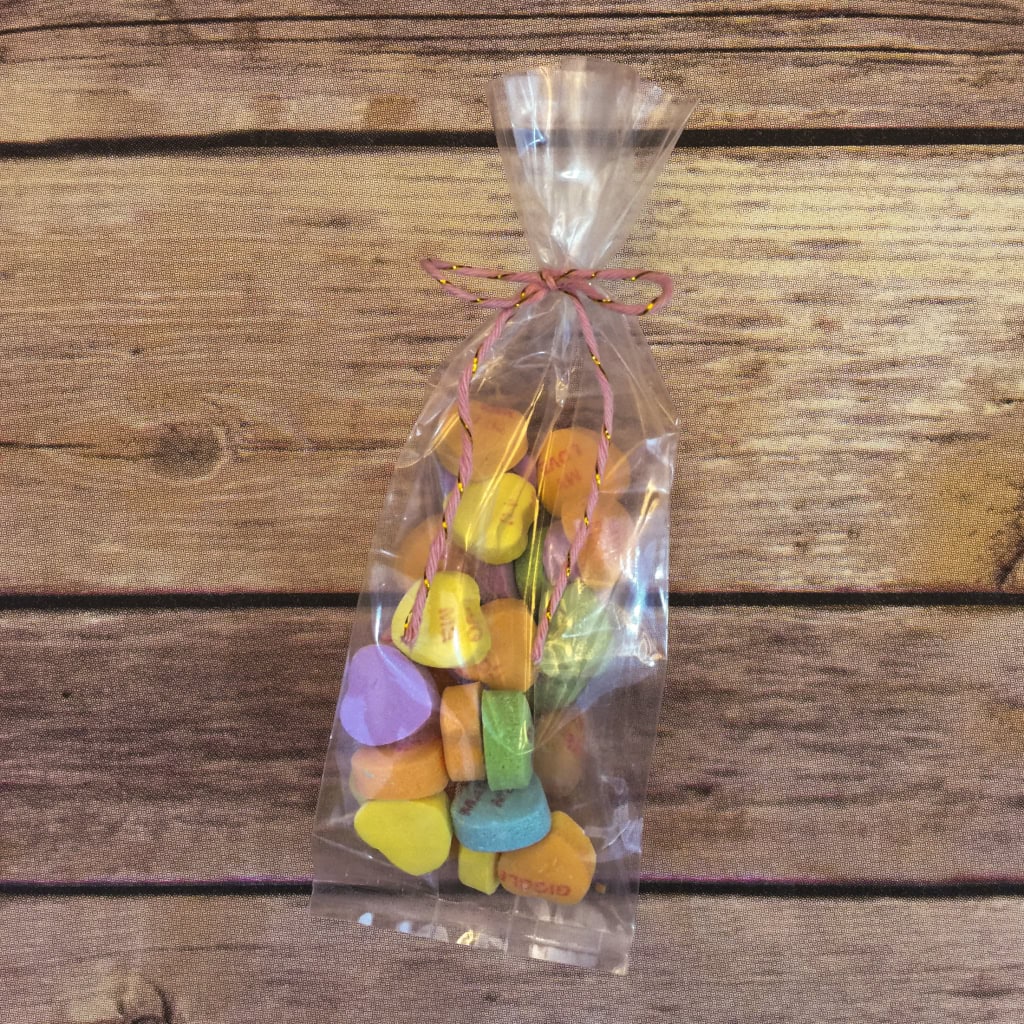
I put some herbal tea bags in a 4×6 Cellophane Bag and tied it with a piece of Bermuda Bay 1/8″ Stitched Ribbon.
Here’s what I used:
Thanks for stopping by today, and Sweet Stamping!

Apr 6, 2016 | Cards, Classes, Occasions, Techniques |
Today I’m sharing yet another project from my A Nice Cuppa Bundle Class. This card has a little surprise inside. I CASEd this card from Maria Fennelly of Maria’s Creative Place.
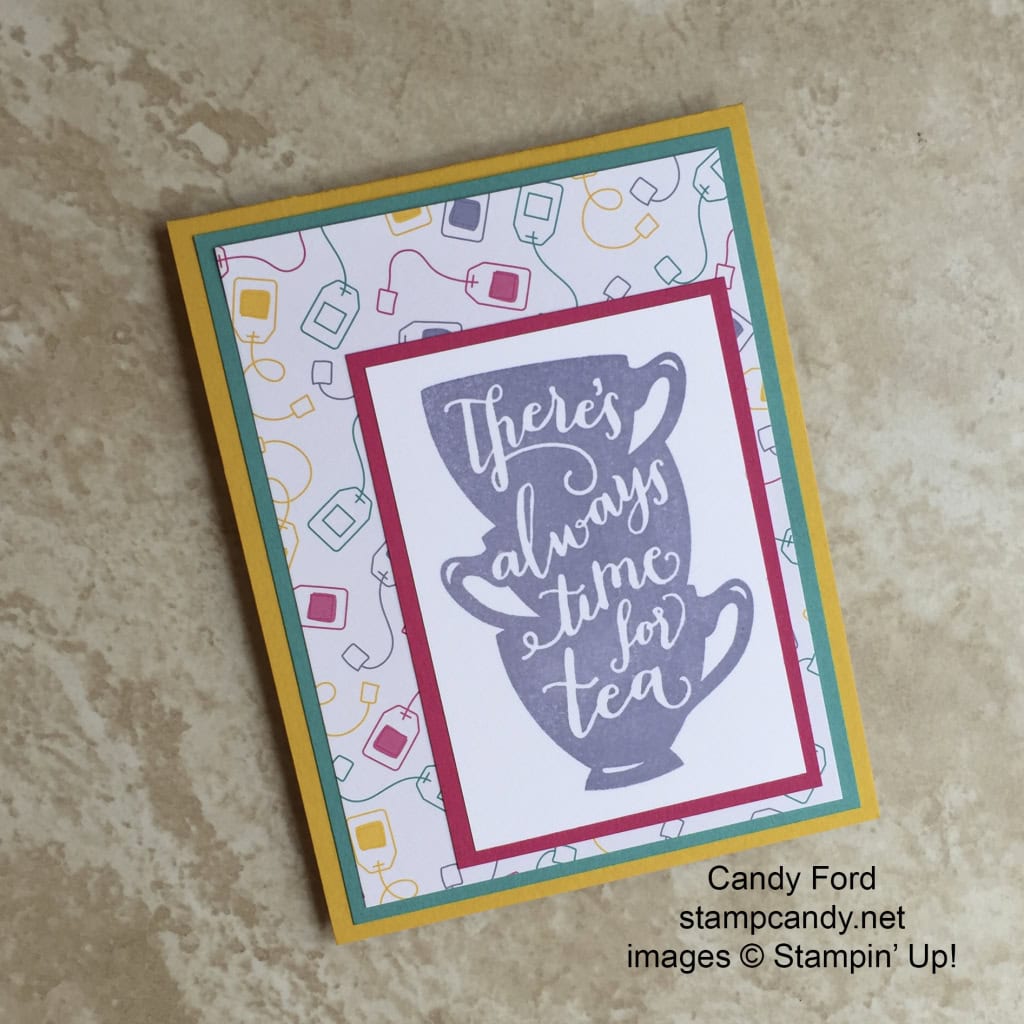
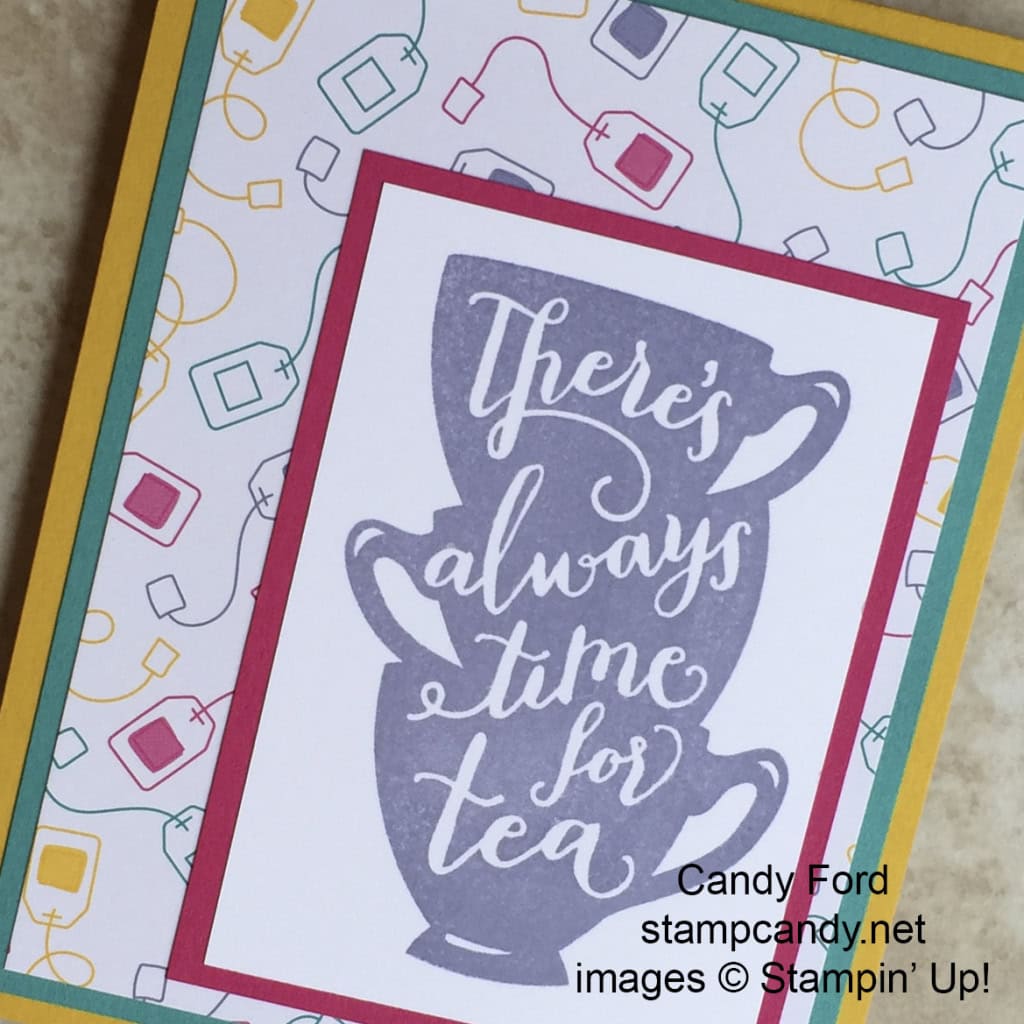
The card base is Crushed Curry card stock, with a Bermuda Bay layer, and a piece of Have a Cuppa Designers Series Paper on top of that.
The top panel is Whisper White card stock with the image stamped in Wisteria Wonder, then matted on Melon Mambo card stock.
Here’s the surprise: a pop up tea cup on a saucer and doily.
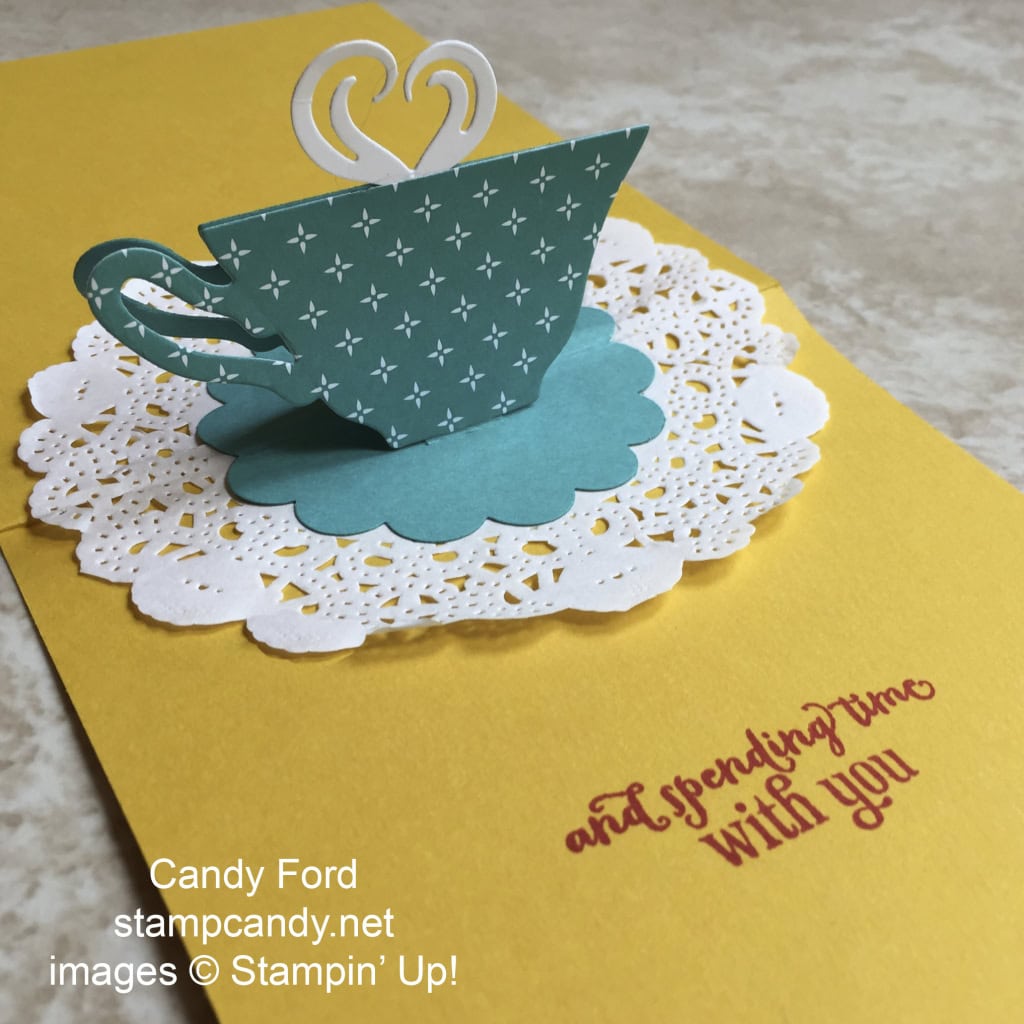
Fold a Tea Lace Paper Doily in half and adhere it to the inside of the card base, lining up the doily’s fold with the score line of the card.
Using the Cups & Kettle Framelits, cut two cups (one from Bermuda Bay card stock and one from the DSP) and one heart from Whisper White card stock. Put adhesive along the top edge of one of the cups. Stick the bottom tip of the heart onto it, then stick on the other cup, lining the two cups up with each other. You now have two cups stuck together along the top with the heart shaped steam coming out, but not stuck together at the bottom.
For the saucer, cut a piece of Bermuda Bay card stock with the 2-3/8″Scalloped Circle Punch. Fold it in half. Using Paper Snips, cut two slits into the piece, perpendicular to the fold. Then cut a slit along the fold between the two cuts. Fold up the two little flaps.
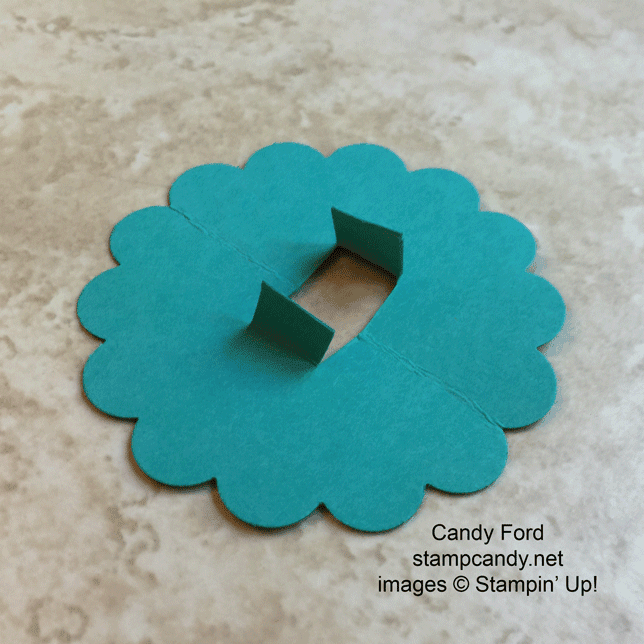
Adhere one flap to the inside of each of the cups. This will make the cup stand up. Now fold the saucer in half and adhere it onto the doily. The whole thing will now fold flat inside the card, and the cup will stand up when the card is open.
The rest of the sentiment is stamped directly onto the card base interior in Melon Mambo ink.

Here’s what I used:
Thanks for stopping by today, and Sweet Stamping!
Apr 5, 2016 | Cards, Classes, Occasions |
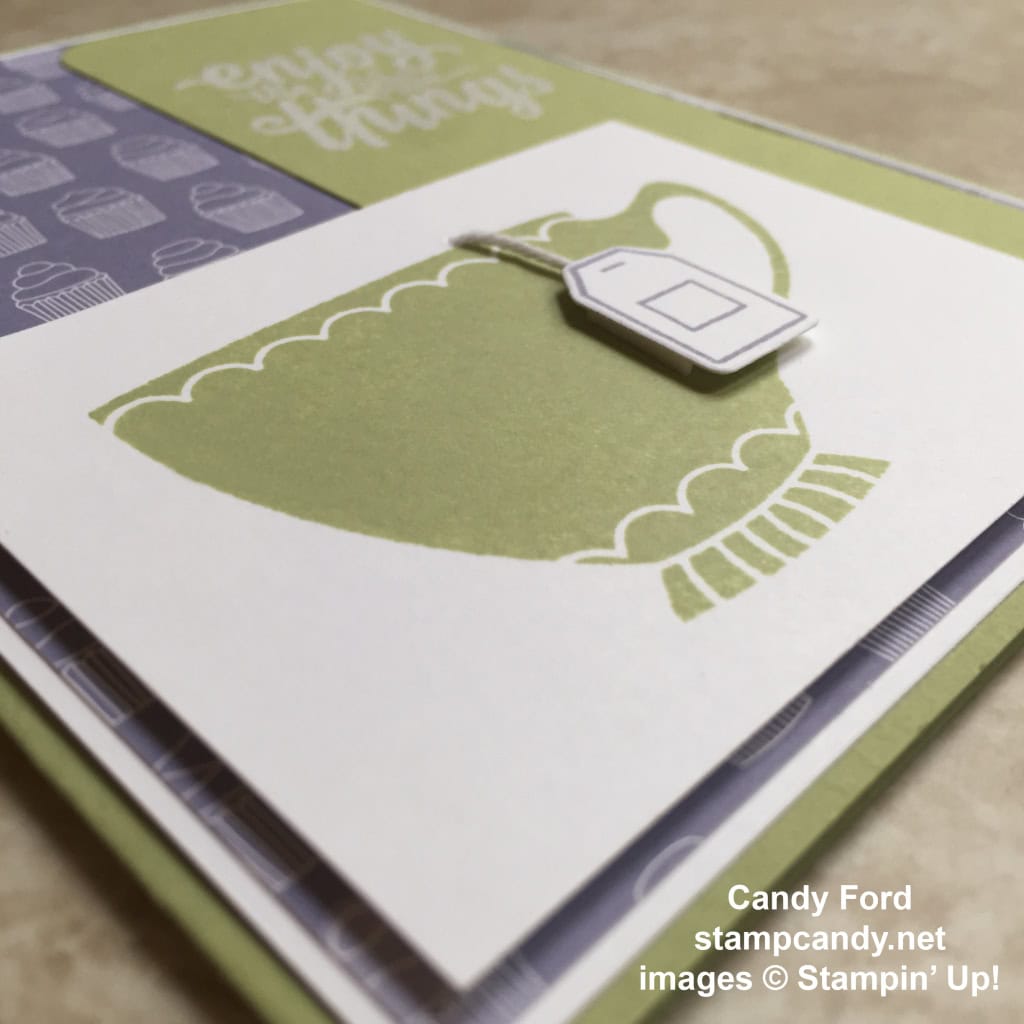
Today I’m sharing another card from my A Nice Cuppa Bundle Class.
The card base is Pear Pizzazz card stock. It has a Whisper White layer below a layer of Have a Cuppa Designer Series Paper.
On a strip of Pear Pizzazz CS I stamped the sentiment from the Enjoy the Little Things stamp set in Versamark ink. I then heat embossed it in white.
On a piece of Whisper White CS, I stamped the tea cup in Pear Pizzazz. I used my Paper Piercing Tool and Piercing Mat to poke a tiny hole at the top of the cup. I then threaded a piece of Whisper White Bakers Twine through the hole. This is easily done using a floss threader (available at most stores that sell toothbrushes and floss.) I adhered the twine to the back of the card stock.
I stamped the tag in Wisteria Wonder on Whisper White CS and cut it with the Cups & Kettle Framelits. I glued the exposed piece of twine down the center of the back of the tag. I then cut a Stampin’ Dimensional in half and put a piece on each side of the twine, then adhered the tag to the cup.
I used the Project Life Corner Punch to round the top left and lower right corners of every piece of paper on the card, including the card base. All the pieces are glued together except the piece with the teacup and the tag, which were attached with Stampin’ Dimensionals.

Here’s what I used:
Thanks for stopping by today, and Sweet Stamping!
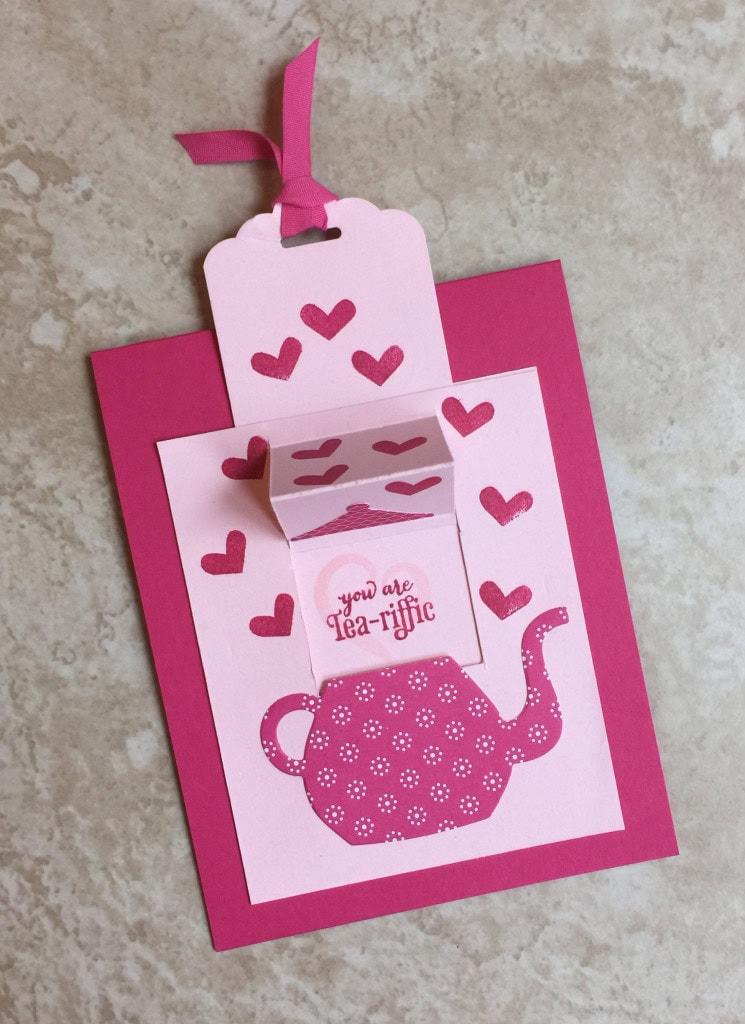
Apr 4, 2016 | Cards, Classes, Events, Occasions, Techniques |
I recently held a Bundle Class using A Nice Cuppa stamp set + Cups & Kettle Framelits Dies bundle.
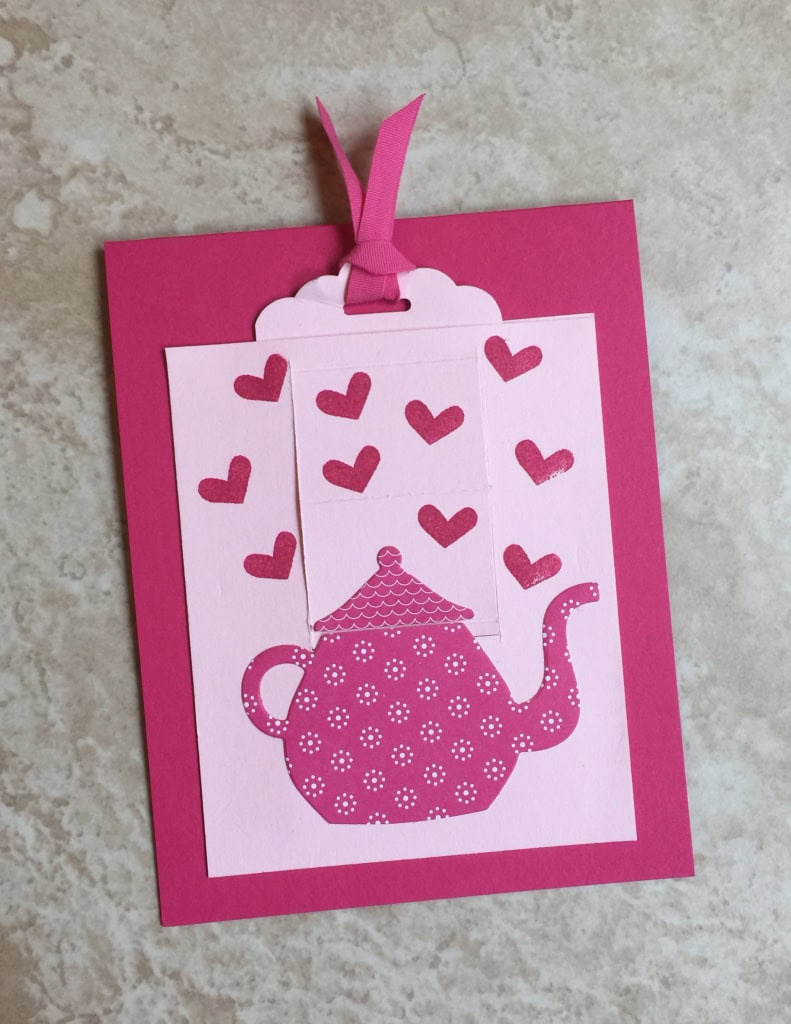
Today I’m sharing one of the projects from that class: a slider card. When you pull the slider up, the lid lifts off the teapot to reveal the sentiment. This example is in Pink Pirouette and Melon Mambo. I CASEd this card from Catherine Carroll at Ideas Inkorporated.

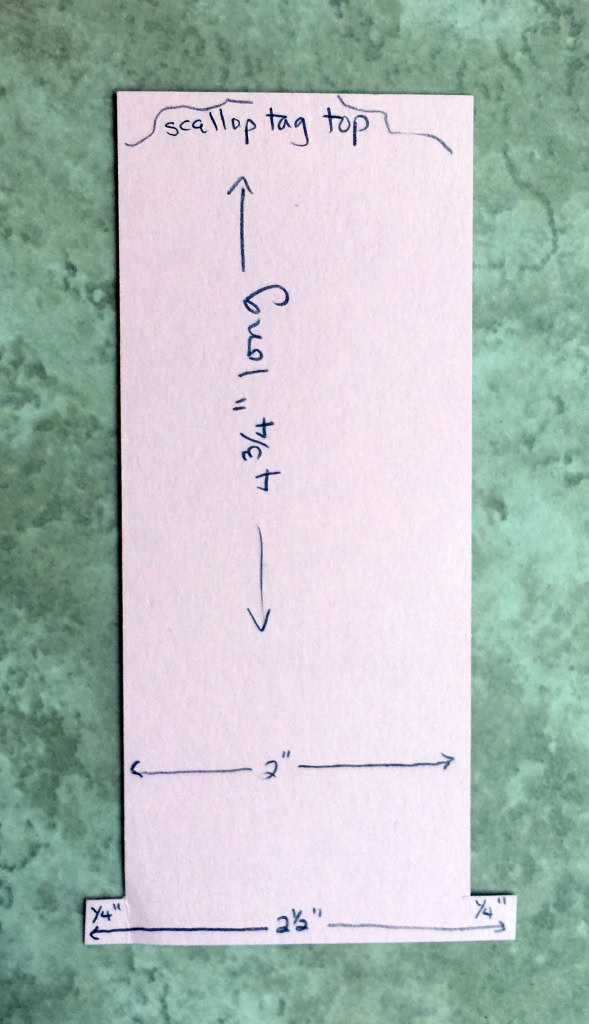
For the slider, cut 1 piece of card stock 4.75 x 2.5. Cut ¼” in from sides, from the top down to ¼” from the bottom. Punch the top with the Scalloped Tag Topper Punch.

Cut 2 pieces of card stock 3.5 x 4.25 each. Cut one piece from 1/4″ to down to 2-1/2″(1” from each side.) Then cut across this area 2-1/2” down. This creates a flap.
Score across the flap at 1/4”, 1-5/16”, and 2-3/8” from the top. The Stampin’ Trimmer makes all this very easy, since you can trim and score without having to change blades.
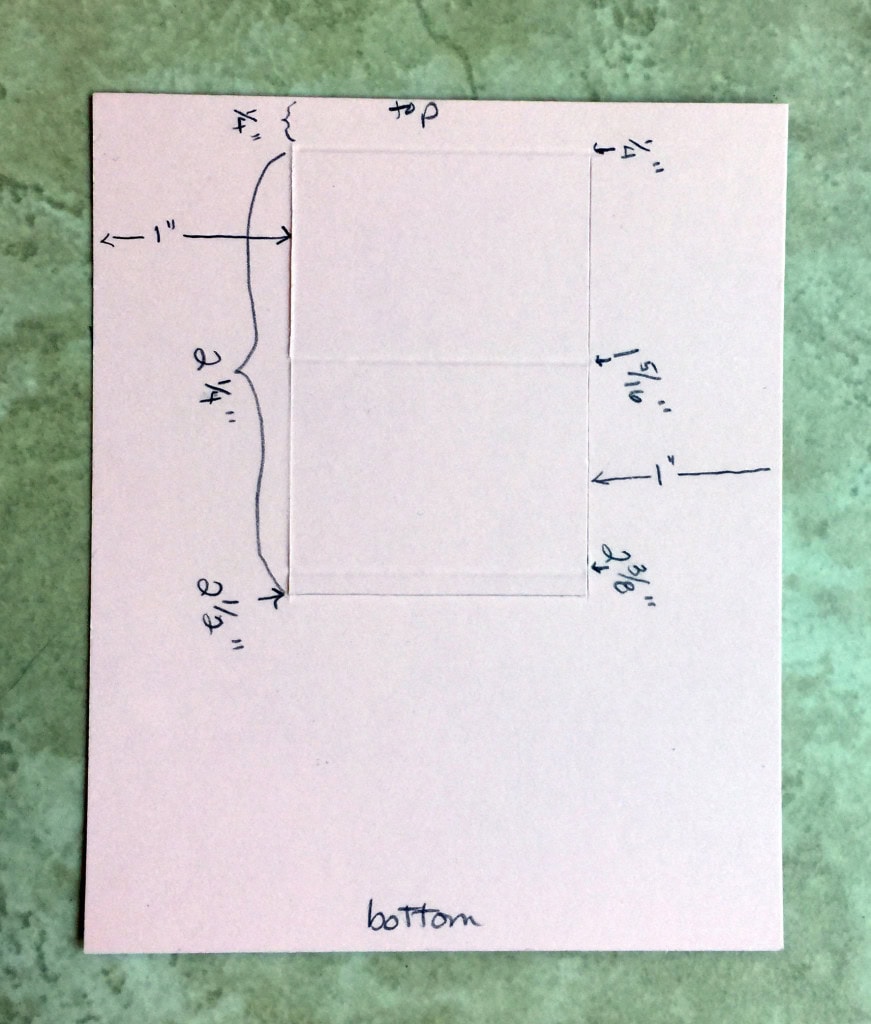
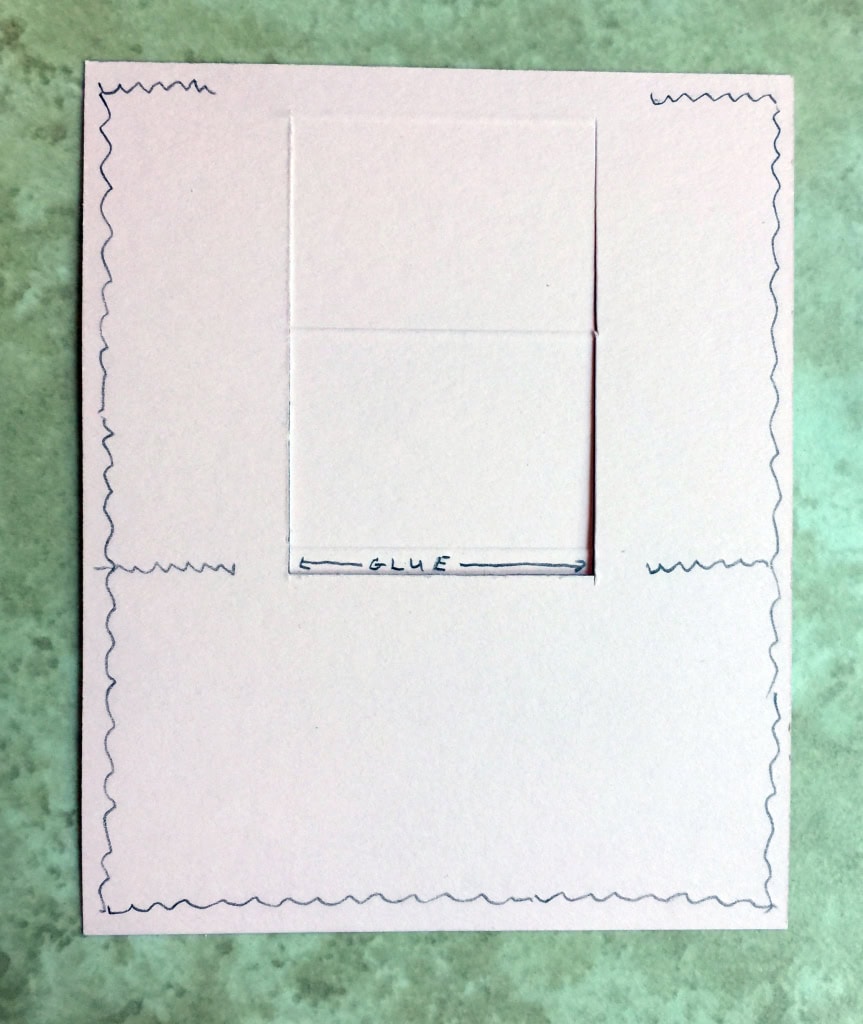
Put adhesive along both sides and the bottom. Put glue on the tiny bottom piece of the scored center flap and glue slider in place. Put adhesive on sides beside the bottom of the flap, and along the top as far in as the slider. This is to keep the slider moving up and down, and not side to side, and to keep it from pulling out to far.

Adhere the other (solid) large piece to the back. Be sure you can move the slider up and down.
Stamp on slider bottom area. Here I’ve stamped the heart in the lighter color and the sentiment in the darker color.
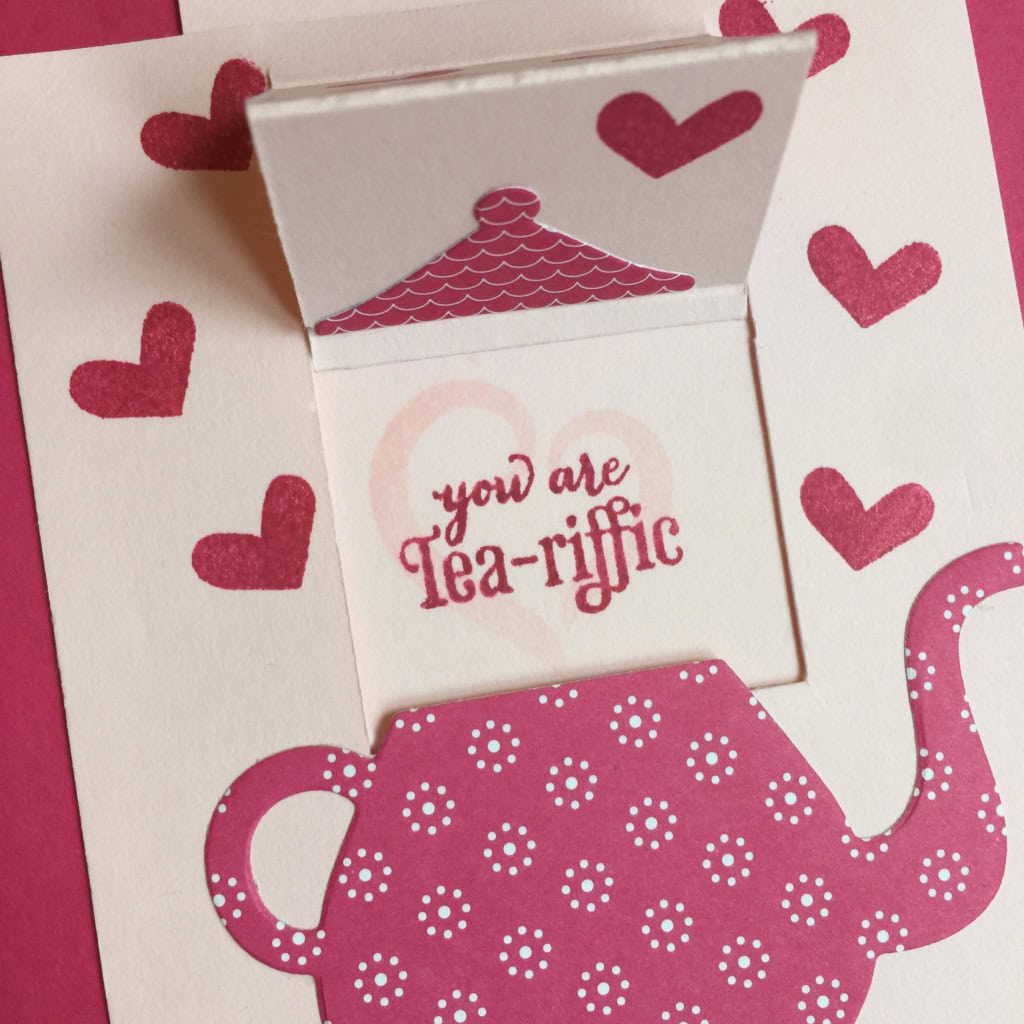
Cut the teapot and lid from Have a Cuppa Designer Series Paper Stack with the Cups & Kettle Framelits Dies. Glue the teapot onto the card and the lid onto the slider, meeting at the bottom score line on the slider. Be careful not to put glue under the very top of the teapot, so it won’t stick to the slider.

Stamp hearts on the card front in Melon Mambo. Tie the ribbon through the tag top. Adhere the whole thing to the front of a Melon Mambo card base. You have the inside of the card base to write a note.
Email me for a free .pdf of these instructions: candy@stampcandy.net.
Here’s what I used:
Please don’t hesitate to ask questions! I love hearing from you!!!
Thanks for stopping by today, and Sweet Stamping!
Feb 5, 2016 | Boxes, Classes, Gift Wrap, Gifts, New Products, Occasions, Paper Pumpkin |
This weekend I’m in Phoenix, AZ, spending some quality time with, and learning a lot from, some wonderful Stampin’ Up! Demonstrators from all over the country. Lisa Pretto of InkBig Academy is the organizer and leader of the weekend. I thought one of the projects we made in the January Bloomin’ Love Bundle Class would be a perfect thank you gift for her, so today I’m sharing that with you.

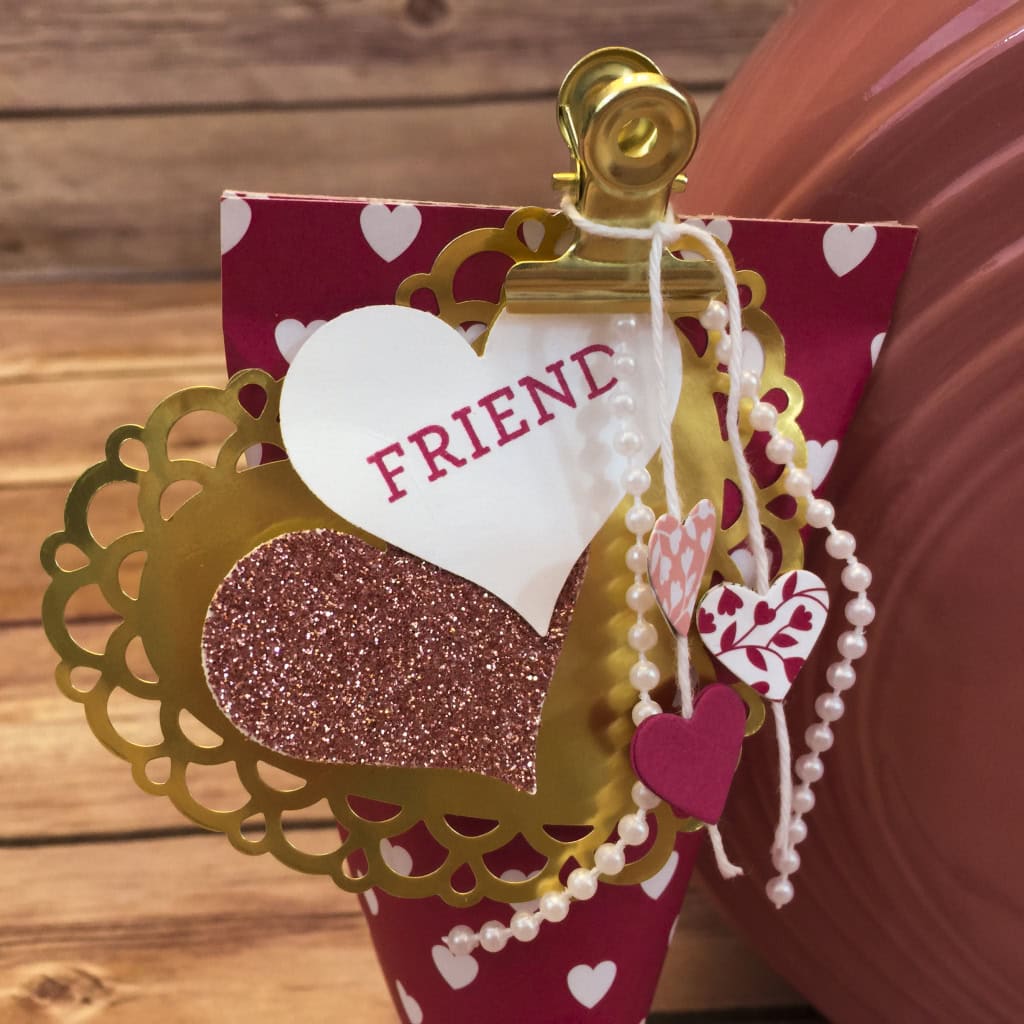
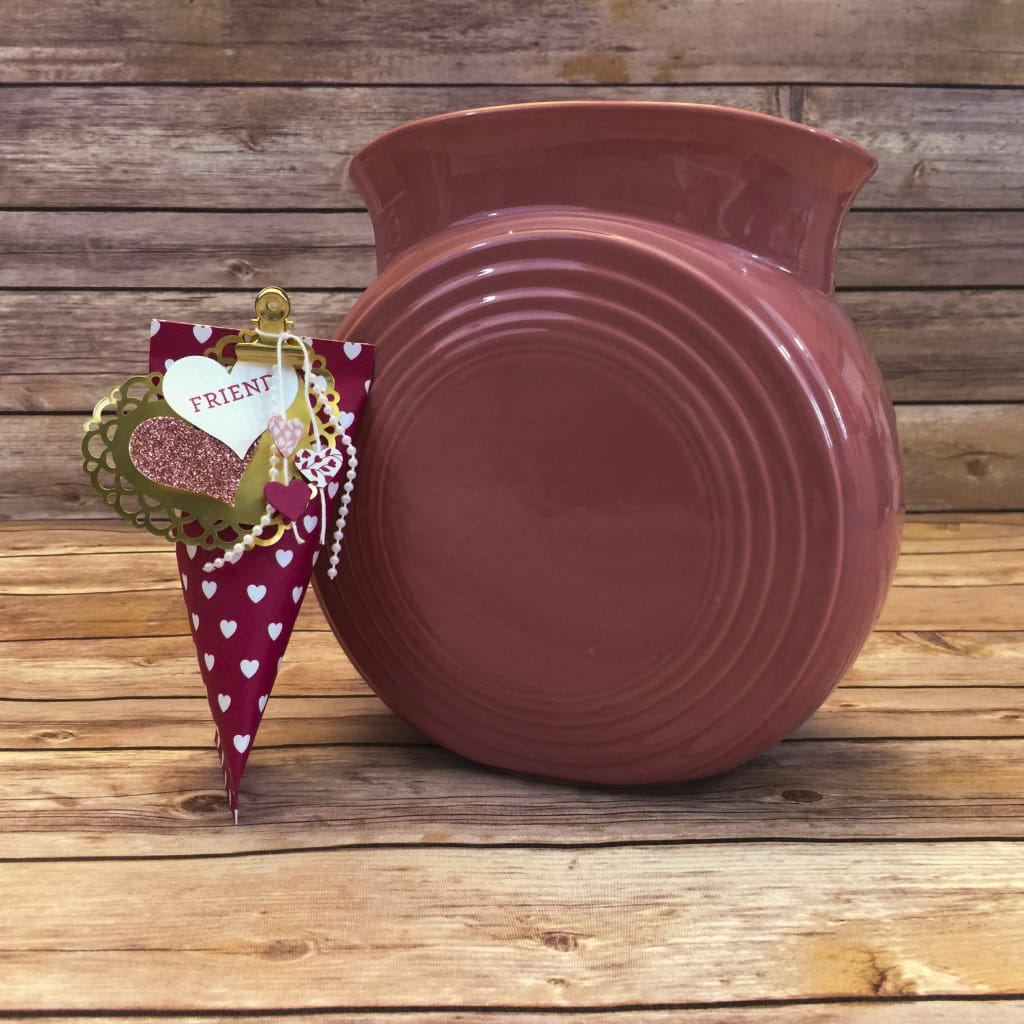
The sour cream containers – so called because single servings of sour cream usually come in containers shaped like this – are incredibly easy to make, even though they look much more complicated.
For today’s container, I started with a sheet from the Love Blossoms Designer Series Paper Stack. The 6″x6″ size is perfect for this project, so no cutting required!
On the side of the paper that will be on the inside of the container, I put strong adhesive (I recommend Tear & tape or Fast Fuse) along three of the edges. Then I rolled the paper and adhered the two sides together to create a tube.
NOTE: If the paper design has a definite direction, make sure you put the adhesive along the top and bottom edges and along one side edge.
I pinched the bottom end closed, with the seam along one edge of the bottom.
I used a gusseted bag and twine from the Filled With Love Paper Pumpkin Kit Refill and filled it with Candy Hearts. This and other past Paper Pumpkin kits and refills are available for purchase to any current Paper Pumpkin subscriber.
I pinched the top of the container closed, with the seam in the center of the top. This created the interesting shape, with one end flat in one direction and the other end flat in the other direction.
NOTE: Don’t over fill the bag before putting it into the container. It should be skinny enough to insert without it getting caught on the adhesive around the interior edge of the container.

I stamped the word FRIEND, from the Bloomin’ Love stamp set, in Rose Red on a piece of Whisper White card stock, then punched it out with the Sweetheart Punch. I used the same punch to cut a heart out of Blushing Bride Glimmer Paper. Then I glued the two hearts together.
I used the heart punch from the Itty Bitty Accents Punch Pack to cut two hearts each from two different designs in the Love Blossoms DSP Stack and from Rose Red CS. I glued them together along a length of Whisper White Baker’s Twine, sandwiching the twine between the two hearts, and tied the twine around one of the gold clips from the same Filled With Love PP kit refill.
I used the clip to attach the two glued-together hearts as well as a gold heart doily and length of pearl trim from the Love Blossoms Embellishment Kit. The layers make it look much more complicated that it really is.
Here’s what I used today. Click on the images below to get what you need to make your own sweet sour cream container!
Thanks for stopping by today, and Sweet Stamping!

Jan 23, 2016 | Classes, Deals, Events, Kits, New Products, Paper Pumpkin, Parties, Sale-A-Bration, Sales |
Can you believe January is almost over? I have only a few spots left in my classes this week. Click on the Events button at the top of this page to sign up now!
Tuesday, Jan 26 – Bloomin’ Love Bundle Class
We’ll make some projects with this beautiful bundle and you keep the stamp set AND the dies! Only $45!

Thursday, Jan 28 – Paper Pumpkin Party – RSVP by Jan 26
Bring your January Paper Pumpkin kit and we’ll assemble them together.
$5 Class Fee (FREE if you are my subscriber or my team member)

Save during Sale-a-bration, now through March 31, 2016.
3-Month Prepaid Subscription (137859) $59.85 $55
Save on a 3-month prepaid subscription and instantly qualify for a FREE Sale-A-Bration item!
12-Month Prepaid Subscription (137861) $215.40
Take it to the next level with a 12-month prepaid subscription. Save $24 a year with the everyday awesome price, earn Stampin’ Rewards, AND instantly qualify for 4 FREE Sale-A-Bration items!
Saturday, Jan 30, 1-3PM – Perpetual Calendar Kit Class
We’ll assemble this great kit together. Only $50 and you keep the kit AND the coordinating stamp set!

And don’t forget…
BOGO Sale tomorrow, Sunday, Jan 24, 1-4PM
Buy my retired items, and I’ll give you the same amount in current products!
Earn Sale-a-bration items and Gum Ball Rewards!
Please contact me with any questions. Email: candy@stampcandy.net Call/Text: 404-661-5222
You may also RSVP by clicking on the Events button at the top of this page.
Thanks for stopping by, and Sweet Stamping!