Feb 4, 2015 | Blog Hop, Club, Food, Gift Wrap, Gifts, Kits, New Products, Occasions, Paper Pumpkin |

Welcome to the February InKing Royalty Blog Hop. We’re excited to share projects that share inspiration for Valentine’s Day and our love of Stampin’ Up! products. This hop is all about love.
You may have started the Blog Hop here or may have hopped over from Amy Whelan at Amy’s Inklings. After you read my post, I hope you’ll hop over to the next. If you get off track at any point during the blog hop, there’s a complete list of participants at the end of this post.
At each month’s Stamp Club meeting, I like to give the members a little something, just to show my love and appreciation. For the February meeting, which is today, I decorated water bottles and filled the January Paper Pumpkin bags with Valentine colored M&Ms. Aren’t they adorable?


Anyone who subscribes to Paper Pumpkin knows how amazing the kits are. Everything you need to create the project is included, except scissors and adhesive. Actually, sometimes they even include the adhesive! The projects are easy peasy, especially with included pictures and instructions. All the shapes are pre-cut. All I had to do was use the stamps and ink (included) to decorate some of the pieces and attach them to the clear bags (also included.) Such a cute way to give folks a sweet little treat!
The bottles are sooooo easy. Take the original belly band off the bottle and measure it. Cut a new belly band to fit and decorate as desired.

This particular bottle takes a 1-3/8″ wide band. I cut Basic Black background paper into 8-1/2″ x 1-3/8″ strips and adhered them with Fast Fuse. I used the Sweetheart Punch and the Modern Label Punch to cut Stacked With Love DSP. The sentiment from Teeny Tiny Wishes is stamped in Memento black ink and cut with the Word Window punch. I used Stampin’ Dimensionals behind the Modern Label shape. Everything else was adhered with Fast Fuse or Multipurpose Liquid Glue.
Thank you for stopping by today. I hope you’ll hop along to the next stop on the blog hop, Pam Morris at Tap Tap Stamp. You certainly won’t want to miss any of these projects.
And as always, Sweet Stamping!
- September Gray at SeptemberGray.com
- Brian King at Stamp with Brian
- Amy Whelan at Amy’s Inklings
- Candy Ford at StampCandy
- Pam Morris at Tap Tap Stamp
- Lynn Kolcun at Avery’s Owlery
- Becky Volpp at Ink Blossom with Becky
- Angie Coleman at Coastal Stamping
- Kelly DeTommaso at Kelly’s Creative Corner
- Katie Ferguson at Cottage Paper
Dec 11, 2014 | Cards, Christmas, Food, Gift Wrap, Gifts |
There are always folks you want to do a little something for during the holidays, like your delivery man, dry cleaner, and others you see on a regular basis. Here’s an idea for a yummy little treat to keep them warm during the holidays. It holds an individual pack of hot cocoa mix.
The Garden Green card stock base is the standard 4-1/4″ x 5-1/2″. The DSP is from the Trim The Tree stack. The mats are Cherry Cobbler card stock. I used the Scoring Tool with the Diagonal Scoring Plate to create the flap at the top right of the card, just to give them a peek inside. I sealed the bottom shut with Sticky Strip.
The Bearing Gifts stamp is a friendly way to let folks know there’s something inside for them. I stamped the image in Tuxedo Black Memento Ink and colored it with Blendabilities (Cherry Cobbler, Daffodil Delight, Old Olive, Calypso Coral, Smoky Slate, and Skin Tone Assortment.)
I used Cherry Cobbler Bakers Twine to attach the marshmallows to the card. I punched 6 holes through both layers of the card base with the 1/8″ Handheld Circle Punch, then laced the twine through them.

Here it is from the back.

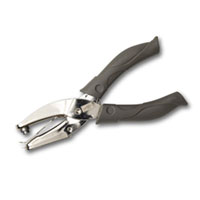
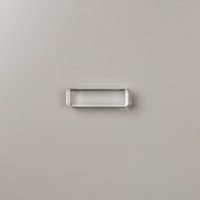
The 1×8 Cellophane Bags fit miniature marshmallows perfectly – I happened to find peppermint flavored ones. For the toppers, I punched bits of Garden Green and Cherry Cobbler card stock with the Modern Label Punch. Then I stamped greetings from the Teeny Tiny Wishes stamp set on Whisper White card stock, and punched them out with the Word Window Punch. I used the Hand Held Stapler to attach the green and red pieces to the top of the bag, then I glued the white pieces on top to cover the staple.

Thanks for stopping by, and Sweet Stamping!
Nov 23, 2014 | Food, Gift Wrap, Paper Pumpkin |
As soon as I saw October’s Paper Pumpkin kit, I knew I wanted to make it for both the family gatherings I’ll be attending this month. I ordered refills almost immediately so I would have enough slices for everyone. This one is for the gathering with my brother and sister and their families. I’m not sure who all will be there, so I made up two whole pies worth – 16 slices – and stacked them in two layers on a cake stand.

Inside each little treat box is a bag of nut clusters tied with the Two-Tone Trim in either Tangerine Tango/White or Old Olive/Natural. I got a little carried away with the nut clusters, stuffing the boxes a bit too full, so I had to use tape to keep them shut.
Because I would be transporting it a long way, and I made two layers, I decided not to use the pompoms – well, except for the one on the top. So I used buttons instead: some from the Brights Designer Buttons and some from the Very Vintage Designer Buttons. Everything else is just like the photo on the kit – if it ain’t broke don’t fix it, right?
I wrapped the whole thing in plastic wrap to keep it together on the trip. Tip: I wrapped the plastic wrap around the sides first, then over the top, like movers wrap furniture nowadays. To keep it upright, I put the whole thing in a cardboard box filled with packing material.

Thanks for stopping by today, and Sweet Stamping!
Nov 8, 2014 | Christmas, Club, Food |
For our Stamp Club meetings, I like to keep refreshments simple (chocolates and bottled water) but that doesn’t mean they have to be boring.

I always use a label from one of the bottles as a template for my hand stamped labels. For these I used Whisper White card stock, Pear Pizzazz and Soft Sky ink pads, the Ornamental Pine stamp set, and the Sassy Salutations stamp set for the sentiment. Fast Fuse adheres the labels.
This is such an easy way to take something as mundane as a bottle of water and turn it into something much more special and personal.
Thanks for stopping by today, and Sweet Stamping!
Oct 2, 2014 | Cards, Club, Food, Techniques |
We had a great Stamp Club meeting. We made the three projects I showed you yesterday. I love seeing how folks change things up from my samples. Such a creative group! I promised details on the projects today, so here they are.
***********
Caramel Apple Curvy Keepsake Box
Cut two box pieces of Baked Brown Sugar card stock with the Curvy Keepsake Box Thinlits Die. Adhere the two pieces together at the bottom, with like sides opposite each other. Use a bone folder to get nice sharp creases.
Using a 2-1/2″ circle punch, cut a Whisper White card stock circle. Adhere it to the center of a Tea Lace Paper Doily. Then adhere that to the bottom of the box, so that, when assembled, it will resemble a caramel apple sitting on a doily.
Cut a paper straw to 6-1/2″ long. Using a bone folder, flatten 2-3 inches of one end.
Assemble the box, filling it with caramels or other treats of your choice. Stick the flattened end of the straw between the two “handles” on top of the box, and down into the box all the way to the bottom.
Using the round tag die from the Curvy Keepsake Box die set, cut a Real Red card stock tag. Using Paper Snips, cut the bottom of the tag to resemble an apple. (I’m not sure of a better way to describe it than saying to cut a little “derriere” at the bottom.)
Using the small leaf from the Fun Fall Framelits Dies, cut a Pear Pizzazz leaf. Adhere it to the Real Red apple tag.
Run two 10″ pieces of Whisper White Bakers Twine through the apple tag and tie it onto the straw just above the box handles.
From the For All Things stamp set, stamp Hello Fall! on Whisper White cardstock with Baked Brown Sugar ink. Cut it into a strip, apply adhesive, and wrap it around the straw, just above the twine, to make a flag. Using one corner from the Hexagon Punch, notch the end of the flag.
Be sure to lift the box from the bottom and not by the straw.
Again, many thanks to Cindy Schuster at Nutmeg Creations for the project idea!

Club members Martha, Marenda, Judy & Angela with their Caramel Apple Treat Boxes
***********
Halloween Post-It Note Cover
Cut a piece of Motley Monsters DSP to 2-15/16″ x 9-3/16″. On the long side, score at 2-15/16″, 3-1/8″, 6-1/16″, and 6-1/4″. Use bone folder to make sharp creases at all four score lines. (These are the dimensions for the note pads I bought at Target: 2-15/16″ square and 3/16″ thick. You may need to adjust for yours.)
For the brad closure: Insert one end of the DSP into the Scalloped Tag Topper Punch. It is wider that the 2″ tray, but it will go in on top of the tray. Make sure it’s centered, then punch. You’ll end up with extra arms on each side, which you can just trim off with Paper Snips.

Angela using the Scalloped Tag Topper Punch
Wrap the cover around your note pad with the punched end on top. Mark through the hole onto the other end of the cover where the brad should go. Unwrap and make the hole with a Paper Piercing Tool. Stick a brad through the hole and flatten on the back (inside) of the cover. We used a Candy Dot Brad Base and a Candy Dot.


Judy applying the brad
Adhere the back of your note pad to the inside of the cover. Close the cover, pulling the hole over the brad until it catches.
Adhere stamped images to the front of the cover.*
For the belly band closure: Adhere the back of your note pad to the inside of the cover. Cut a strip of DSP or card stock of your choice 1/2″ x 7-1/2″ and wrap it around the covered note pad. Adhere the ends together in the back. It should be snug, but not so tight that you can’t slide it on and off.
Adhere stamped images to the front of the belly band.*
*Stamped images: Using the Fall Fest stamp set, stamp a couple of pumpkins in Tangerine Tango, their faces in Tuxedo Black Memento Ink, and a few leaves in Bermuda Bay and/or Crushed Curry – all on Whisper White card stock. Cut out the pumpkins and leaves with the Fun Fall Framelits die set.


Martha and Angela stamping their pumpkins

Marenda stamped her pumpkins in Bermuda Bay and used the ghost side of the DSP for her cover.


Martha and Angela show off their new Note Pad Covers. Angela used what would have been a belly band to make little ribbons coming off the top of hers.
***********
Thanks Card
Use the same technique here with the Seasonally Scattered stamp that I used on the pumpkin from a previous post (which you can see here) except with Sahara Sand, Cajun Craze, and Mossy Meadow ink pads. After stamping on Whisper White card stock, cut it out with the Apothecary Framelits, then ink the edge with a sponge dauber and a Soft Suede ink pad.
 Martha daubing inks on the Thanks stamp.
The card base is 8-1/2″ x 5-1/2″ Sahara Sand card stock, scored and folded at 4-1/4″. There’s a 5-1/4″ x 4″ Mossy Meadow card stock layer, then a 5″ x 3-3/4″ Soft Suede card stock layer, then a 4-3/4″ x 3-1/2″ piece of Color Me Autumn DSP.
Adhere the stamped piece on top with Stampin’ Dimensionals.
More action shots from yesterday


(I’ve mentioned before what a huge deal Halloween is in our household. As you can see in some of the photos, Halloween prep is well under way.)