Feb 4, 2015 | Blog Hop, Club, Food, Gift Wrap, Gifts, Kits, New Products, Occasions, Paper Pumpkin |

Welcome to the February InKing Royalty Blog Hop. We’re excited to share projects that share inspiration for Valentine’s Day and our love of Stampin’ Up! products. This hop is all about love.
You may have started the Blog Hop here or may have hopped over from Amy Whelan at Amy’s Inklings. After you read my post, I hope you’ll hop over to the next. If you get off track at any point during the blog hop, there’s a complete list of participants at the end of this post.
At each month’s Stamp Club meeting, I like to give the members a little something, just to show my love and appreciation. For the February meeting, which is today, I decorated water bottles and filled the January Paper Pumpkin bags with Valentine colored M&Ms. Aren’t they adorable?


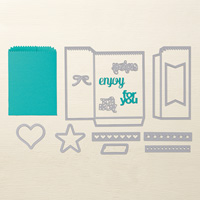
Anyone who subscribes to Paper Pumpkin knows how amazing the kits are. Everything you need to create the project is included, except scissors and adhesive. Actually, sometimes they even include the adhesive! The projects are easy peasy, especially with included pictures and instructions. All the shapes are pre-cut. All I had to do was use the stamps and ink (included) to decorate some of the pieces and attach them to the clear bags (also included.) Such a cute way to give folks a sweet little treat!
The bottles are sooooo easy. Take the original belly band off the bottle and measure it. Cut a new belly band to fit and decorate as desired.

This particular bottle takes a 1-3/8″ wide band. I cut Basic Black background paper into 8-1/2″ x 1-3/8″ strips and adhered them with Fast Fuse. I used the Sweetheart Punch and the Modern Label Punch to cut Stacked With Love DSP. The sentiment from Teeny Tiny Wishes is stamped in Memento black ink and cut with the Word Window punch. I used Stampin’ Dimensionals behind the Modern Label shape. Everything else was adhered with Fast Fuse or Multipurpose Liquid Glue.
Thank you for stopping by today. I hope you’ll hop along to the next stop on the blog hop, Pam Morris at Tap Tap Stamp. You certainly won’t want to miss any of these projects.
And as always, Sweet Stamping!
- September Gray at SeptemberGray.com
- Brian King at Stamp with Brian
- Amy Whelan at Amy’s Inklings
- Candy Ford at StampCandy
- Pam Morris at Tap Tap Stamp
- Lynn Kolcun at Avery’s Owlery
- Becky Volpp at Ink Blossom with Becky
- Angie Coleman at Coastal Stamping
- Kelly DeTommaso at Kelly’s Creative Corner
- Katie Ferguson at Cottage Paper
Jan 20, 2015 | Club, Gift Wrap, Gifts, New Products, Occasions |
When I first saw the Hey, Valentine stamp set, I thought I’d never use it because it seemed juvenile, and since we only have fur babies, I have no need for elementary school classmate Valentine’s.

Then I started looking at it a bit more closely and realized that I can definitely use these images. Here’s the one we used at January’s Stamp Club.

It’s perfect for a gift of chocolates in the new Mini Treat Bag.
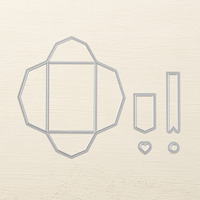
Front Back


Cut both pieces of the bag with the Mini Treat Bag Framelits Dies and crease at the score lines.

Apply adhesive (we used Sticky Strip) to the left and right edges of the larger piece on the inner side of the bag, as well as to the bottom flap on the outer side of the bag.

Attach the smaller piece to the right side of the larger piece.

Fold over the left side of the larger piece and you have a treat bag.

Flip it over to see the front.

Score across the bag 4-1/2″ up from the bottom.

Now put some sweets in the bag, fold it over at the score line, and staple it closed off center – we stapled it at the vertical seam.

Wrap a piece of Whisper White twine a couple of times around the right side of the bag and tie a simple knot.

Lay a piece of Calypso Coral Pompom Trim across the knot and tie the twine again around it.

Now stamp the image on Whisper White card stock with Tuxedo Black Memento Ink, then color it with Blendabilities. Cut it out with the banner die from the Mini Treat Bag Framelits. Then score across it at the middle line in the image.


Apply adhesive (again we used Sticky Strip) and fold it over the bag to cover the staple.

Here’s what we used:
Thanks for stopping by today, and Sweet Stamping!
Jan 17, 2015 | Cards, Club, Gift Wrap, Gifts, New Products, Occasions |
The Stamp Candy Stamp Club began the year with three projects: one birthday and two Valentine’s.
Linda & Caitlin

Margie & Martha


Check back for details on each project.
Thanks for stopping by today, and Sweet Stampin!
Jan 16, 2015 | Boxes, Gift Wrap, Gifts, New Products, Occasions |
Recently a dear friend of mine did something really wonderful for me. I wanted to do something for her to show my appreciation. I was in a cute little shop yesterday and found a cotton towel with a perfect saying on it, so I bought it for a thank you gift. The lady at the store offered to wrap it for me, but I declined because I knew I had my Stampin’ Up! stuff at home and could do a much better job of it.
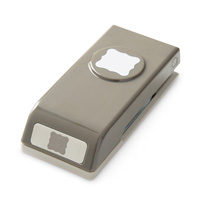
I love the new products in the Occasions Catalog so much! For this project, I used all three products on page 19, plus the Ornate Tag Topper punch on page 35!

(By the way, see all those bright pink flags in my catty? Did you know that there are seven new bundles? SEVEN! You save 15% when you buy any of them. What a deal!)
First I embossed the clear acetate sleeve of the Tag A Bag Gift Box with the new Spring Flowers embossing folder. I put the rolled up towel in the box – it fit perfectly! – and slipped on the sleeve.
The greenish stripes in the photo on the left are just an artifact of the light I was holding the box under to show the embossing.


I cut a 1″ wide strip of the Painted Blooms DSP and wrapped it around one end of the box. I creased it at the corners and adhered the ends together on the bottom with Sticky Strip. I didn’t attach the DSP to the box itself because I wanted it to slip off easily when the gift is opened. I wrapped a piece of Blackberry Bliss 3/8″ Satin Stitched ribbon around the paper and tied it in a knot.
I pulled out the Painted Petals stamp set to make a tag. First I cut a 2″ wide strip of Whisper White card stock and punched one end with the new Ornate Tag Topper punch. Then I stamped Thank You in Daffodil Delight and flowers in Blackberry Bliss (using the colors in the DSP) then added Wild Wasabi leaves.This is so easy with the photopolymer stamps! Did you know that this stamp set is available in all three types? See my product list below to see the photopolymer, clear mount, and wood mount options.
I trimmed the end of the tag with the Scallop Edge Border punch.


There was another sentiment stamp in the set that I wanted to use, so I stamped it on the back of the tag, near the bottom, in Wild Wasabi. My friend is amazingly amazing, after all. I used another piece of the Blackberry Bliss ribbon to tie the tag to the first knot of ribbon.

This was super quick and easy. The Tag a Bag Gift Boxes look great, so they’re really easy to decorate with just a couple of doodahs.
Here’s what I used:
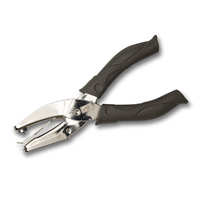
I also used these basic tools. (I use the Paper Snips for paper. I also have two pairs of Craft Scissors – one for paper and one for ribbon.)
Thanks for stopping by today, and Sweet Stamping!
Dec 29, 2014 | Boxes, Christmas, Gift Wrap, Gifts |
I hope you’ve had a wonderful holiday season. I certainly have. The best part was spending time with family I don’t get to see very often.
Wowee, I can’t believe it’s been 10 days since I posted. The holiday really took a toll on my stamping schedule. I still have some Christmas themed projects I had planned to post before the 25th. Until I get back in the full swing of all things stamping, I’ll continue to post a few of those.
For birthdays and Christmas, my sister and I always get each other a charm for our bracelets. This year we got each other the same charm – we are so alike! I discovered that a Pandora charm box fits perfectly inside one of the Stampin’ Up! Tiny Treat boxes. I’m sure a ring box would fit, too!
I covered this one in Santa and Co. DSP. The box is a 2″ cube, so I cut the DSP to 1-3/4″ squares – 5 pieces for the four sides and the top, 6 pieces if you want to cover the bottom. The piece on the front has a notch cut out with the 3/4″ Circle Punch to accommodate the notch in the box. A adhered the DSP to the box with Multipurpose Liquid Glue. I tied a piece of Marina Mist 1/4″ cotton ribbon around the box and tied a simple bow. I looooove the cotton ribbon! Such a nice texture and feel.


For the tag I punched out two scallop ovals from the same DSP and glued them back to back. I stamped the sentiment from the Visions of Santa stamp set in Tuxedo Black Memento Ink onto Whisper White card stock. I cut it with the Large Oval Punch and adhered it with Stampin’ Demensionals. I used the 1/16″ Handheld Circle Punch to make a hole in the tag, threaded Whisper White Bakers Twine through, then tied it around the bow. Easy peasy lemon squeezy.
Of course, I had to mark “fabulous” with my Marina Mist Stampin’ Write Marker.

Here’s what I used:
Thanks for stopping by today, and Sweet Stamping!
Dec 18, 2014 | Christmas, Club, Gift Wrap, Gifts |
This is the second of three projects we made at December’s Stamp Club meeting. Super simple but oh so cute!
Gift cards are such a common and convenient gift nowadays. Here’s a way to give them in holiday style. Who wouldn’t appreciate this Santa gift card holder?
(I didn’t have a gift card handy, so I used my Kroger card to demonstrate how to attach it to the back of the insert with glue dots.)


The envelope – Use the Gift Card Envelope Thinlits Die to cut the holder. Fold on the score lines and adhere three sides to make an envelope. Cut a piece of Whisper White card stock to 1″ x 2-3/4″. Adhere to the front of the envelope.
The belt – Cut a piece of Basic Black card stock to 3/4″ x 8-1/2″. Use the Curly Label Punch to cut a piece of Silver Foil Sheet. Use the Petite Curly Label Punch to cut a piece of Basic Black card stock.
Wrap the long black piece around the envelope, overlapping in the center of the envelope front. Make sure the belt is loose enough to slip on and off the envelope, but snug enough so it doesn’t just fall off. Adhere the ends. Glue the black petite label onto the center of the silver curly label, then adhere that to the belt, covering the overlap.
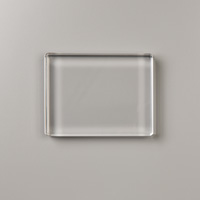
The insert – Cut a piece of Whisper White card stock to 3-3/4″ x 2-1/2″. Stamp on one side – we placed the Seasons Greetings stamp and the To/From stamp on the large acrylic block together, and stamped in Read Red. We placed the holly stamp on the small acrylic block and inked it with Real Red and Garden Green Stampin’ Write Markers. Adhere gift card to the other side with a couple of mini glue dots. Slide into the envelope and slip the belt over.
Margie & Linda


Caitlin


Martha & Judy


Here’s what we used:
Here are some other inserts I made using the Visions of Santas stamp set.

Here’s what I used for these:
Thanks for stopping by today, and Sweet Stamping!