Jun 22, 2018 | Cards, Gallery, New Products |
Today I’m sharing a card that was a lot of fun to put together. The images and shapes in the Sea of Textures bundle (Sea of Textures stamp set and Under the Sea Framelits Dies) can be anything from whimsical to realistic. Combined with the Tranquil Textures Designer Series Paper, they help you create amazing underwater scenes.
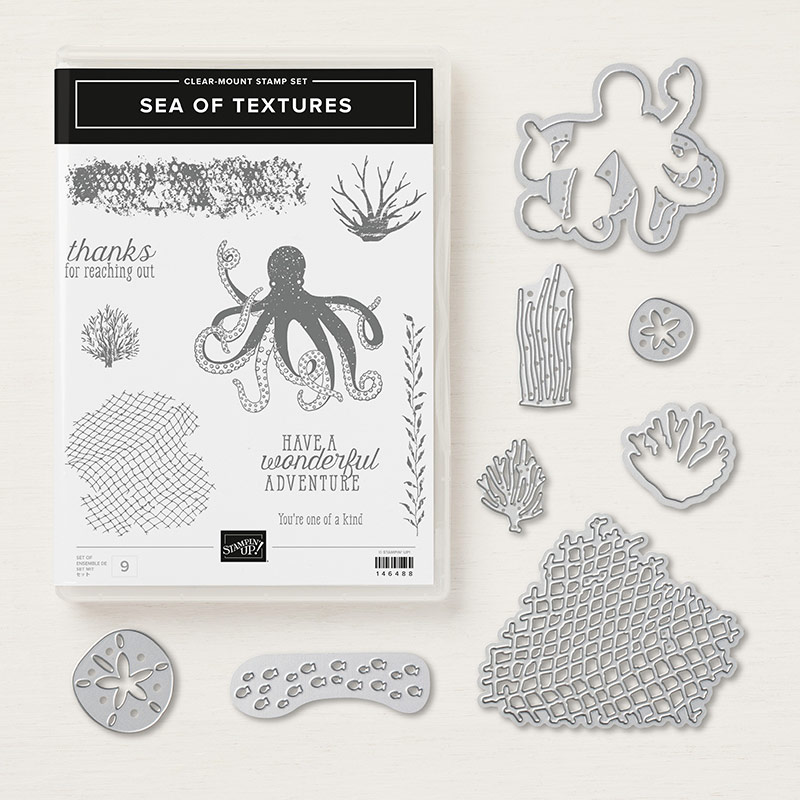
Sea of Textures Bundle © Stampin’ Up!
Here’s what I made:


Here’s what I did:
Cut and scored with my Stampin’ Trimmer:
- Shaded Spruce card stock (CS) cut to 8-1/2″ x 5-1/2″, then scored in half at 4-1/4″
- Mint Macaron CS cut to 4-1/8″ x 5-3/8″
- Tranquil Textures Designer Series Paper (DSP) cut to 4″ x 5-1/4″
- Whisper White CS cut to 4″ x 5-1/4″ for the inside of the card
Stamped with the Tranquil Tide stamp set:
- tall kelp image in Shaded Spruce ink onto the DSP layer along the bottom
- sentiment and octopus in Shaded Spruce ink onto a scrap of Soft Sea Foam CS
Die cut using the Under The Sea Framelits:
- octopus
- netting from scraps of Fresh Fig and Mint Macaron CS
- various coral shapes from Balmy Blue, Mint Macaron, and Shaded Spruce CS
- one large and one small sand dollar from Sahara Sand CS
- school of fish from Fresh Fig CS
Cut using the Classic Label Punch:
- sentiment – Cut it close to one end, then stuck it back into the punch and cut it near the other end.
Assembled the card:
- burnished the fold in the card base with a Bone Folder
- die cut fish, large sand dollar, corals, nets, and octopus glued onto the DSP layer – trimming extra bits of netting with Paper Snips
- sentiment adhered to the DSP layer using Stampin’ Dimensionals
- small sand dollar glued onto the Whisper White CS
- Whisper White CS glued onto the inside of the card base
An easier way:
- It took a few minutes to glue all those tiny Fresh Fig fish onto the card front. There’s a simpler way to get essentially the same effect. Place the die on the DSP layer and cut the fish from it. Then put a layer of Fresh Fig CS under the DSP so it shows through the tiny fish shaped holes.
Here are today’s colors:
You can click on each one to see all the products that come in that color!
Here’s what I used:
Click on these images for more details and to purchase.
Here’s some information you should check out:
Thanks for stopping by today, and Sweet Stamping!
Jun 21, 2018 | Cards, Gallery, Guest Stamper, New Products, Techniques |
Today I’m sharing another swap card I received at our May Candy Hearts team meeting. It was made by Judy Newsome from Lafayette, GA. She used the new Varied Vases Bundle and Share What You Love Designer Series Paper to make this super duper diagonal gate fold card.
Here’s what she made:


Here’s what she did:
Cut and scored with my Stampin’ Trimmer:
- Mint Macaron card stock (CS) cut to 8-1/4″ x 5-1/2″, then scored at 2-3/4″ and 5-1/2″, then scored diagonally on both end sections

- 2 different patterns Share What You Love Designer Series Paper (DSP) cut to 2-1/2″ x 5-1/4″ then cut in half diagonally
- Whisper White CS cut to 2-1/2″ x 5-1/4″
Stamped with the Varied Vases stamp set:
- inside sentiment and flowers in Rich Razzleberry ink onto the Whisper White CS
- stems in Mint Macaron ink onto the Whisper White CS
- Birthday sentiment and flowers in Rich Razzleberry ink onto a scrap of Whisper White CS
- stems in Mint Macaron ink onto the scrap of Whisper White CS
Cut using the Vases Builder Punch:
- one vase from a scrap of Rich Razzleberry CS
Cut using the Stitched Shapes Framelits:
Cut using the Layering Squares Framelits:
- a scalloped square from Rich Razzleberry CS
- a scalloped square from Mint Macaron CS
Assembled the gate fold card:
- burnished the folds in the card base with a Bone Folder – The two vertical lines will fold toward the inside of the card, and the two diagonal lines will fold toward the outside of the card.
- larger Whisper White CS glued onto the inside center of the card base
- two halves of one DSP pattern glued onto the outer most diagonal sections of the card base
- flip over the card base and glued the two halves of the other DSP pattern onto the inner diagonal sections of the card base
- sentiment glued onto the Rich Razzleberry die cut square
- Rich Razzleberry die cut square glued onto the Mint Macaron die cut square
- half of the Mint Macaron square glued onto the left most diagonal DSP, with the center sentiment facing up
- a Faceted Dot applied to the sentiment square
Here are today’s main colors:
You can click on each one to see all the products that come in that color!
Here’s what she used:
Click on these images for more details and to purchase.
Here’s some information you should check out:
Thanks for stopping by today, and Sweet Stamping!
Jun 20, 2018 | Blog Hop, Cards, Gallery, New Products |

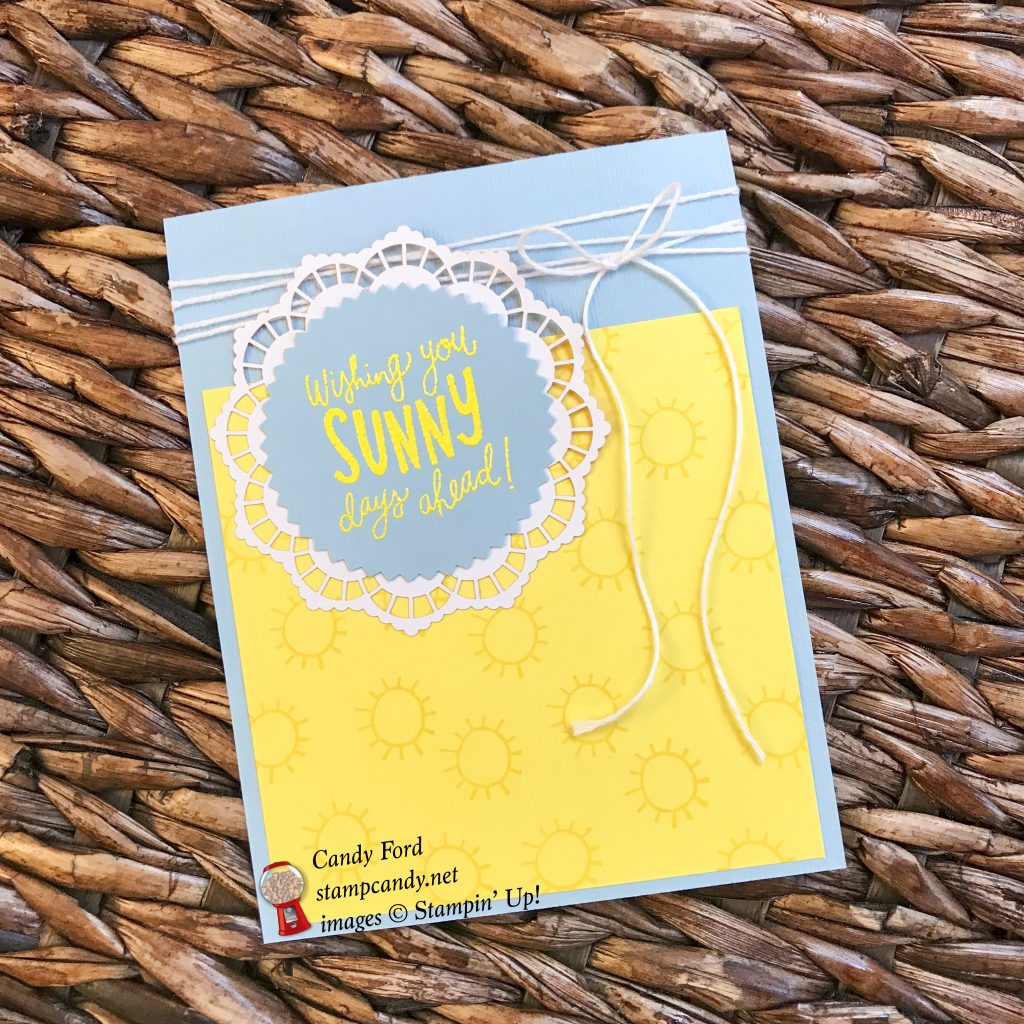
It’s time for the InKing Royalty Blog Hop for June! This year’s Blog Hop themes are inspired by popular songs, and this month’s theme song is “Here Comes the Sun.”As you can guess, our Blog Hop today is filled with projects that are inspired by the joy of the summer sun. We are excited to share our creations with you today! After you read my post, I hope you’ll hop over to the next person on the list at the base of this post. I chose the new stamp set aptly named Sunny Days for my card. The new In Color called Pineapple Punch the perfect color for sunshine. It’s so very bright and cheerful, you can’t help but smile. And Balmy Blue makes a sweet soft sky.
Here’s the song by George Harrison:
https://www.youtube.com/watch?v=GwmVfewqu7I
Here’s my sunny card:

Here’s what I did:
Cut and scored with my Stampin’ Trimmer:
- Balmy Blue card stock (CS) cut to 4-1/4″ x 11″, then scored in half at 5-1/2″
- Pineapple Punch CS cut to 4″ x 4″
- Optional: Whisper White CS cut to 4″ x 5-1/4″ for the inside of the card
Dry embossed using the Subtle Dynamic Embossing Folder:
- the front of the Balmy Blue card base
Stamped with the Sunny Days stamp set:
- sentiment in Versamark ink onto a scrap of Balmy Blue CS, then heat embossed in Pineapple Punch
- tiny suns in Pineapple Punch ink onto the Pineapple Punch CS layer
Cut using the Starburst Punch:
Assembled the card:
- fold in card base burnished using a Bone Folder
- Pineapple Punch CS layer glued onto the front of the card base
- Whisper White Solid Twine wrapped several times around the front of the card base and tied in a bow
- sentiment glued onto the back of a colored doily (It doesn’t matter which color. They’re all white on the back.)
- sentiment and doily glued onto the card front, over the twine
- Optional: You can glue a 4″ x 5-1/4″ piece of Whisper White CS onto the inside of the card base, but the Balmy Blue is light enough to write on without it.
Here’s the hop:
Thank you for hopping along with us. If you get stuck during the Blog Hop, please use this line-up as a guide:
- Brian King at Stamp with Brian
- Shawn de Oliveira at Shawn Stamps
- Nina King at InkPaperSequins
- Imogene Thomas at MomoMakes.com
- Denise Hoepfner at The Mountain Magpie
- Robin Myren at Songbird Designs by Robin
- Candy Ford at Stamp Candy <——————— YOU ARE HERE!
- Jennifer Spiller at Westside Paper Creations
- Lynn Kolcun at Avery’s Owlery
- Julie DiMatteo at The Paper Pixie
- Sandra Cornejo at Madly Crafting
- Sheryl Sharp at Sharp Notes by Sheryl
- Sue Jackson at Just Peachy Stamping
- Pam Morris at Tap Tap Stamp
- Rachael Shedeed at Bluebonnet Stampin’
- Robbye Hamilton at Miss Hammie’s Crafts
- Jackie Beers at Blue Line Stamping
Here are today’s colors:
You can click on each one to see all the products that come in that color!
Here’s what I used:
Click on these images for more details and to purchase.
Here’s some stuff you should check out:
Thanks for stopping by today, and Sweet Stamping!

Jun 19, 2018 | Cards, Gallery, New Products |
Have you seen the new color, Gorgeous Grape? It is aptly named, because it is indeed a gorgeous color. For today’s card, I’ve used it with Whisper White to create a card that looks like it has lots of parts, but it’s really quite simple to make. I used the Abstract Impressions Bundle and the Stitched Labels Framelits Dies make this sweet thank you card.
Here’s what I made:


Here’s what I did:
Cut and scored with my Stampin’ Trimmer:
- Whisper White Thick card stock (CS) cut to 8-1/2″ x 5-1/2″, then scored in half at 4-1/4″
- Gorgeous Grape CS cut to 4″ x 5-1/4″
Stamped with the Abstract Impressions stamp set:
- sentiment in Gorgeous Grape ink onto a scrap of Whisper White CS
Die cut using the Stitched Labels Framelit Dies:
Die cut using the Springtime Impressions Thinlit Dies:
- butterfly from Gorgeous Grape CS
Punched using the Detailed Trio Punch:
- all four corners of the Gorgeous Grape CS layer
Assembled the card:
- burnished the fold in the card base with a Bone Folder
- sentiment glued onto the Gorgeous Grape CS layer
- Whisper White Polka Dot Tulle Ribbon wrapped around the Gorgeous Grape CS layer and tied in a bow
- body of the die cut butterfly glued onto the Gorgeous Grape CS layer, leaving the wings free
Here are today’s colors:
You can click on each one to see all the products that come in that color!
Here’s what I used:
Click on these images for more details and to purchase.
Here’s some information you should check out:
Thanks for stopping by today, and Sweet Stamping!
Jun 15, 2018 | Cards, Gallery, New Products |
I used two new stamp sets and three new colors on today’s card. The Handwritten background stamp has so many different words in it’s adorable font, that it’s perfect for many different projects. The sentiment is from the Stitched All Around stamp set. Balmy Blue, Granny Apple Green, and Pineapple Punch join to make this card bright and cheerful.
Here’s what I made:


Here’s what I did:
Cut and scored with my Stampin’ Trimmer:
- Granny Apple Green card stock (CS) cut to 4-1/4″ x 11″, then scored in half at 5-1/2″
- Whisper White CS cut to 4″ x 5-1/4″ (2 pieces)
- Balmy Blue CS cut to 3-3/4″ x 5″
- Granny Apple Green CS cut to 3-3/4″ x 3/8″
Stamped with the Handwritten stamp set:
- background image in Balmy Blue ink onto the Balmy Blue CS layer
Stamped with the Stitched All Around stamp set:
- sentiment in Granny Apple Green ink onto a scrap of Whisper White CS
Cut using the 1-1/2″ Circle Punch:
Cut using the 1-3/4″ Circle Punch:
Cut using the Starburst Punch:
- a scrap of Pineapple Punch CS
Colored using a Dark Daffodil Delight Stampin’ Blends Marker:
- 3 Rhinestone Basic Jewels
Assembled the card:
- burnished the fold in the card base with a Bone Folder
- Granny Apple Green CS strip glued onto the back of the sentiment, lining it up with the center of the image
- sentiment glued onto the Balmy Blue CS circle, with the strip in between them
- Balmy Blue CS circle glued onto the Pineapple Punch CS piece
- Pineapple Punch CS piece, and strip, glued onto the Balmy Blue stamped layer, so the strip
- Balmy Blue layer glued onto one of the Whisper White CS pieces
- Whisper White CS layer glued onto the front of the card base
- 3 yellow rhinestones applied to the Balmy Blue layer
- the other Whisper White CS piece glued onto the inside of the card base
Here are today’s colors:
You can click on each one to see all the products that come in that color!
Here’s what I used:
Click on these images for more details and to purchase.
Here’s some information you should check out:
Thanks for stopping by today, and Sweet Stamping!
Jun 13, 2018 | Boxes, Decor, Gallery, New Products |
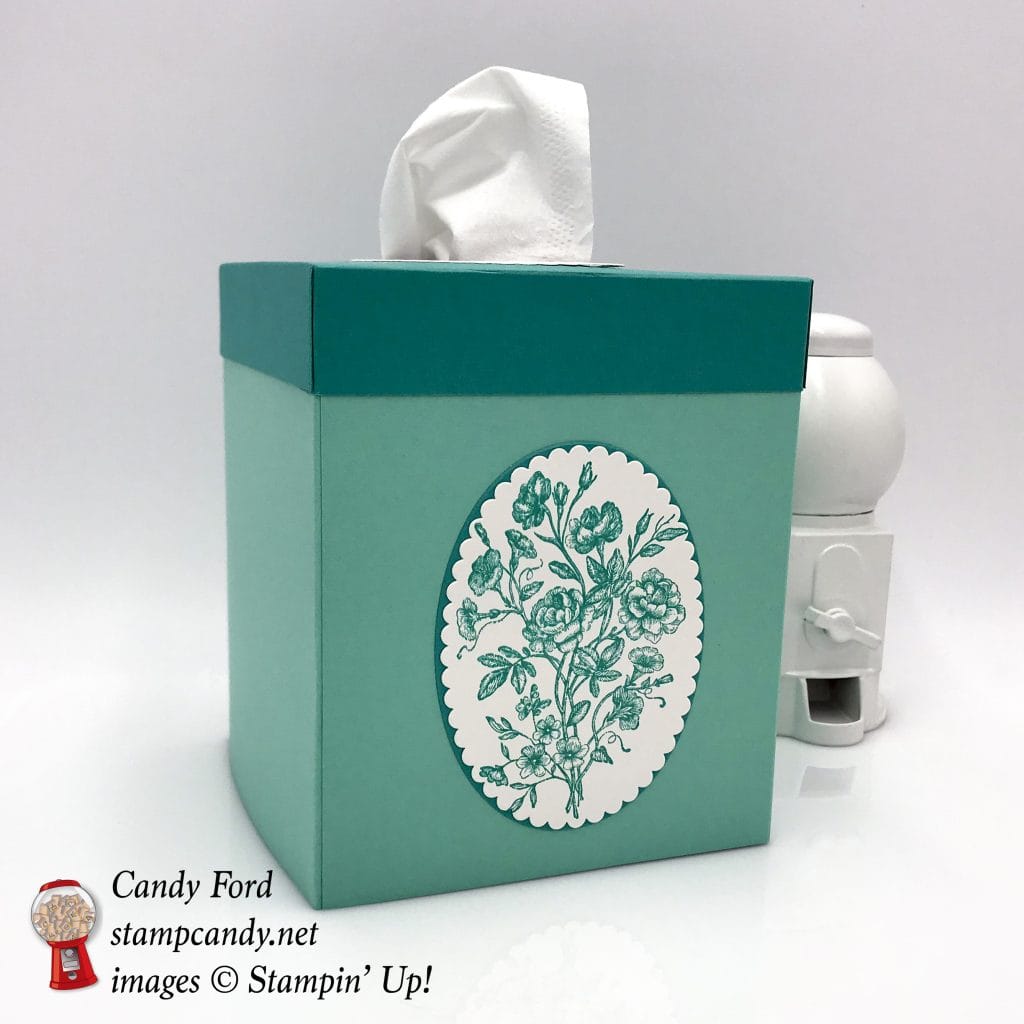
I can’t seem to get enough of the Very Vintage host stamp set. Especially the large floral image I’ve used today…..and the last few days. At least today’s project is a little different in that it isn’t even a card. It’s a tissue box cover. I like to make at least one whenever a new catalog comes out.
A tissue box cover comes in really handy when you want to match the decor of your room, or when you order a case of what you think are solid color boxes of tissues but instead receive a case with cartoon characters on them. Nothing against the cartoon characters, but they aren’t what I had planned on.
Here’s what I made:


Here’s what I did:
Cut and scored with my Stampin’ Trimmer:
- Coastal Cabana card stock (CS) cut to 9-1/2″ x 5-1/4″, then scored at 4-1/2″ and 9″ (2 pieces)
- Bermuda Bay CS cut to 6-9/16″ x 6-9/16″, and scored 1″ from each of the four edges
Stamped with the Very Vintage stamp set:
- floral image into Bermuda Bay ink onto a scrap of Whisper White CS
Die cut using the Layering Ovals Framelits:
- stamped image using a scalloped oval die
- a scrap of Bermuda Bay CS using a large plain oval die
- a scrap of Whisper White CS using a plain oval die and a larger scalloped oval die
- a hole in the Bermuda Bay box top using a plain oval die
- NOTE: the box top is wider than the Big Shot platform, so I folded in two opposite sides and used them to center the die
Cut using Paper Snips:
- one score line at each corner of the Bermuda Bay box top to create tabs
Assembled the cover:
- folded and burnished the score lines with a Bone Folder
- glued the skinny tab on each Coastal Cabana piece onto the inside of the other one, to create the main box
- glued the tabs onto the inside of the adjacent sides of the box top
- glued the die cut Whisper White oval frame around the hole in the box top
- the stamped image onto the die cut Bermuda Bay CS oval
- slipped the box top over the box, gluing the inside of the box top sides to the outside of the box sides
- glued the Bermuda Bay CS oval onto the front of the box, centering it between the bottom edge of the box top and bottom edge of the box
Here are today’s colors:
You can click on each one to see all the products that come in that color!
Here’s what I used:
Click on these images for more details and to purchase.
Here’s some information you should check out:
Thanks for stopping by today, and Sweet Stamping!
