Feb 15, 2017 | Blog Hop, Cards, Gallery, Guest Stamper, Occasions, Sale-A-Bration |
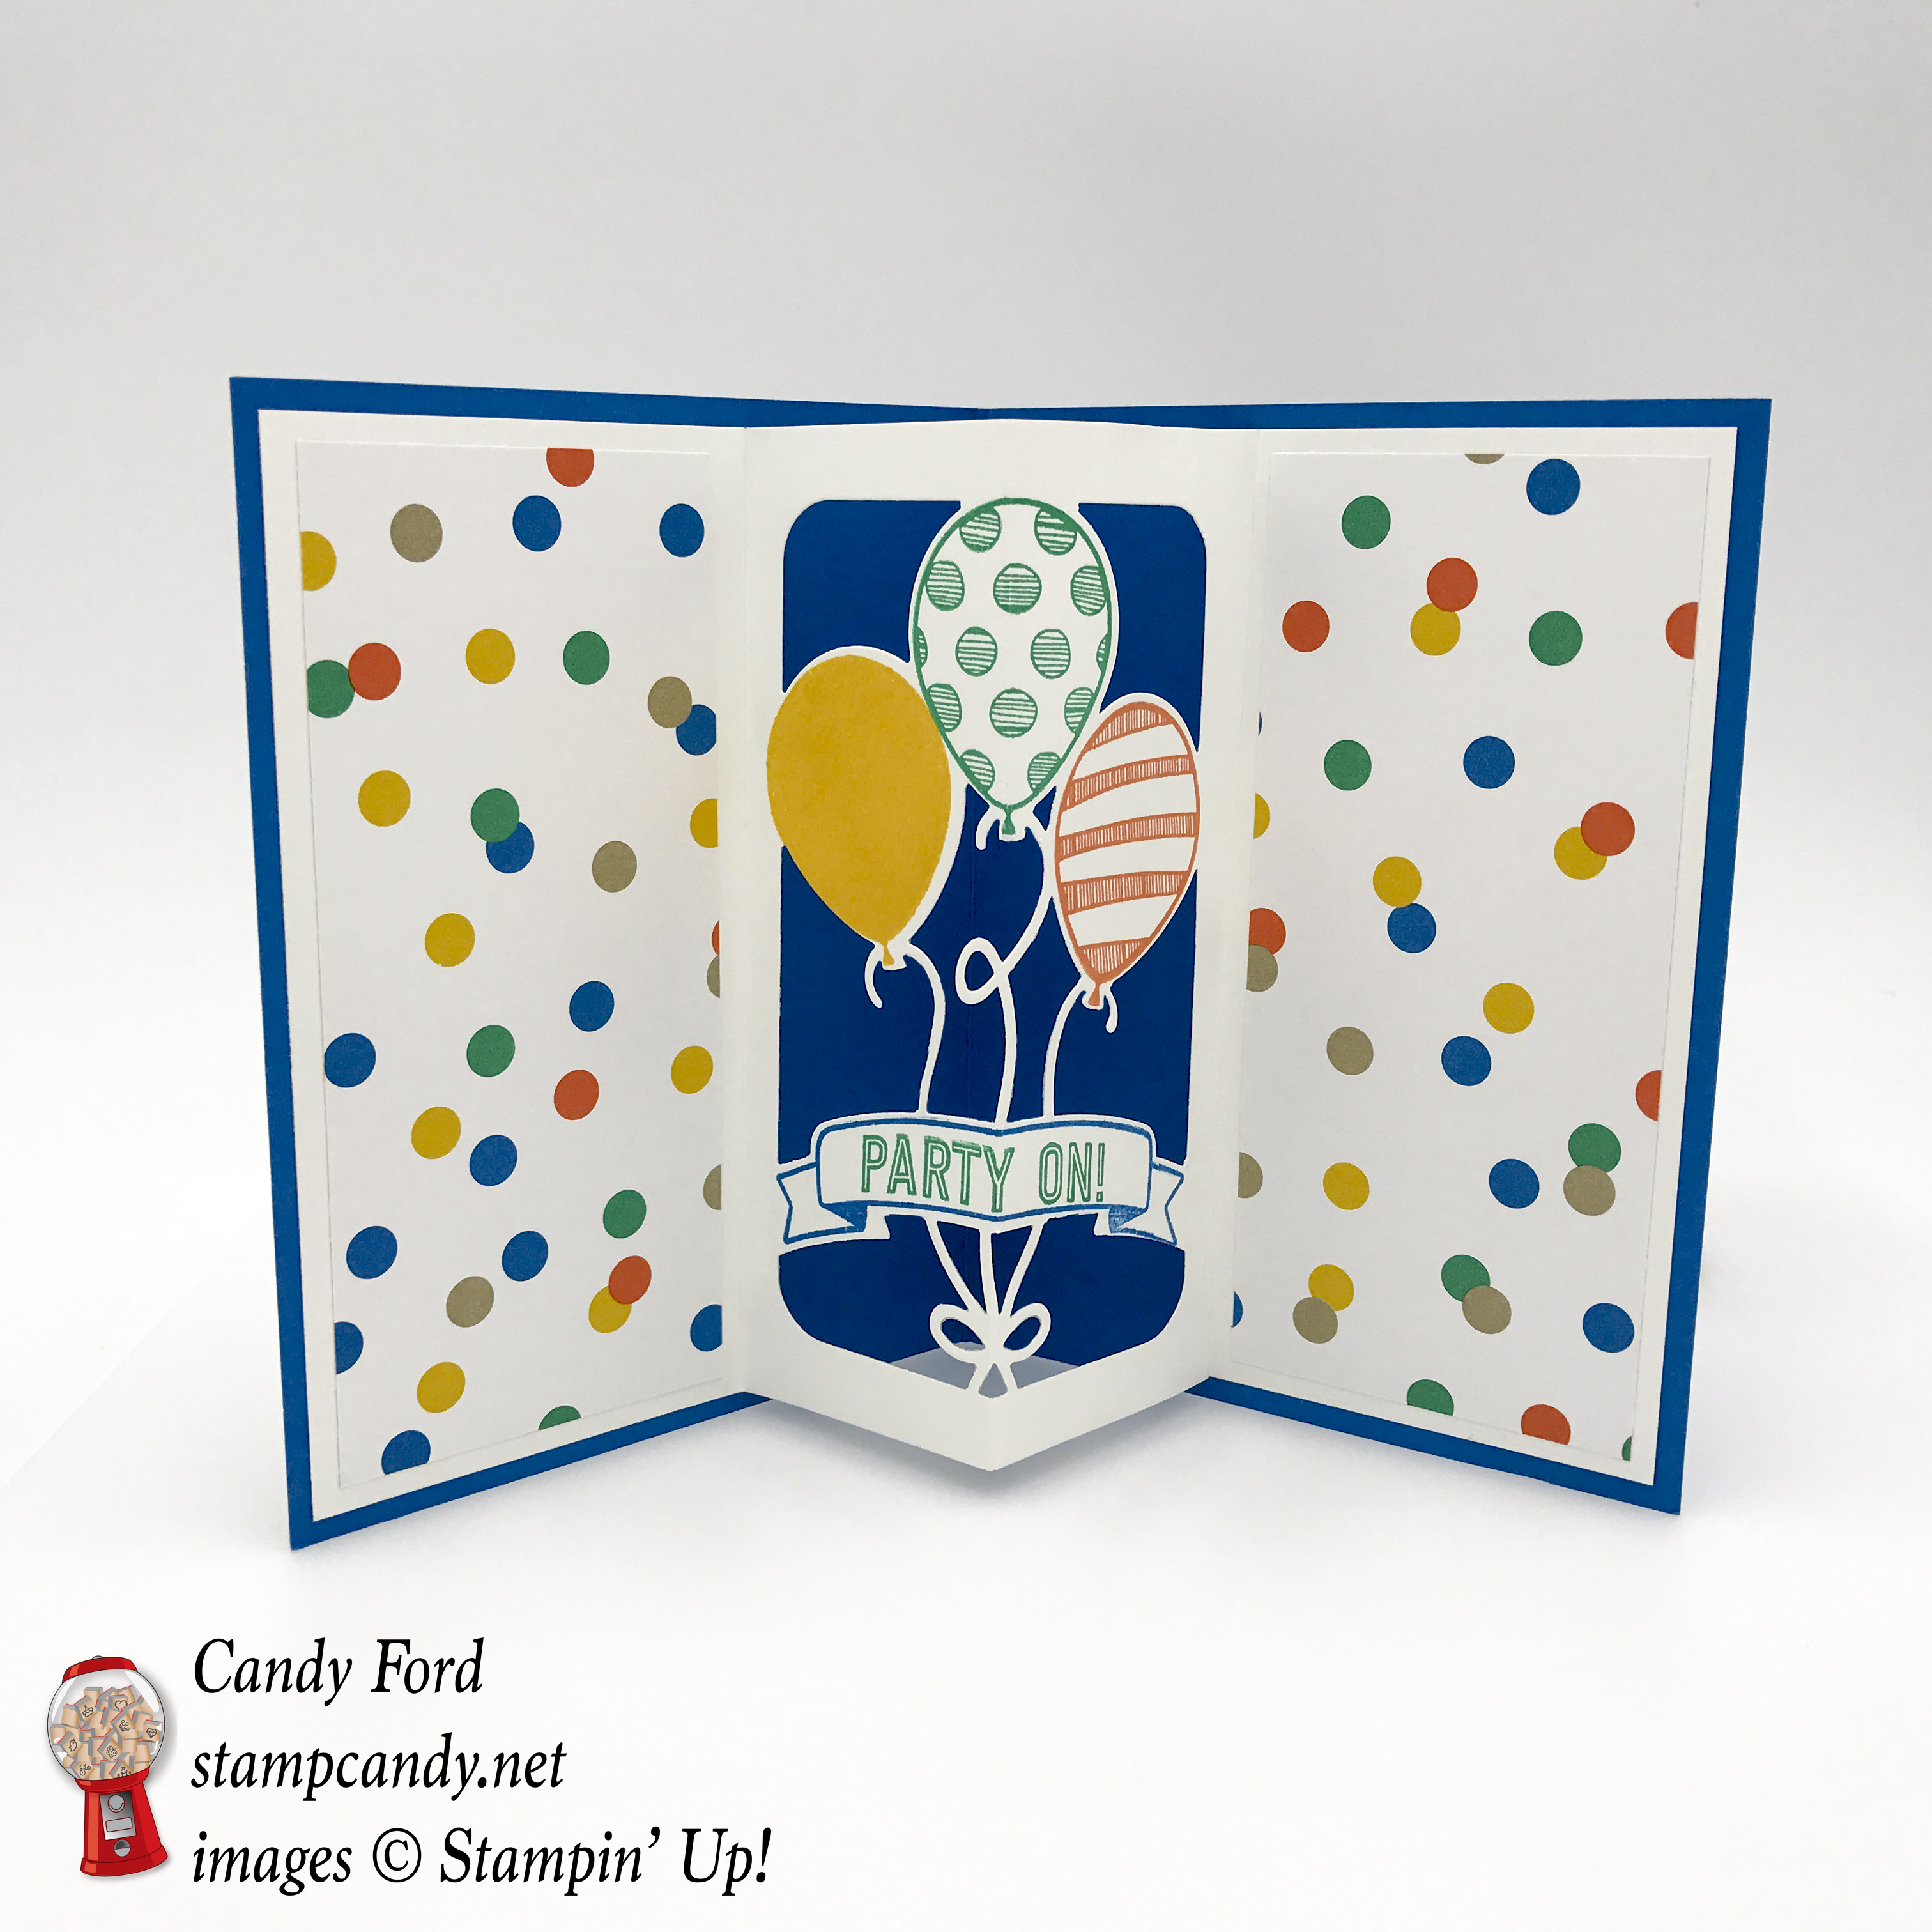
Welcome to InKing Royalty’s February Blog Hop! Today’s hop is filled with projects inspired by a Birthday Bliss theme. What fun! When I learned the hop’s theme, I knew I had to make a pop up card with the Balloon Adventures bundle and the Party Animal Designer Series Paper (DSP.)


Balloon Adventures bundle © Stampin’ Up!

Party Animal DSP © Stampin’ Up!
Stampin’ Up! catalogs are filled with fun, festive and beautiful ways to make birthdays special, and we are excited to share our creations with you today. We are also excited to welcome guest designer Michelle Last to our team hop this month. After you read my post, I hope you’ll hop over to the next person on the list at the base of this post.
Here’s what I made:


Scroll down for directions and the products I used.
I’m so glad you’re hopping with us today! I hope you’ll hop along to the next stop, Karen Browning at StampWithMeKZB. Thank you for hopping along with us. If you get stuck during the Blog Hop, please use this line-up as a guide:
- Brian King at Stamp with Brian
- Julie DiMatteo at The Paper Pixie
- Denise Hoepfner at The Mountain Magpie
- Candy Ford at Stamp Candy
- Karen Browning at StampWithMeKZB
- Katie Ferguson at Cottage Paper
- Imogene Thomas at MomoMakes.com
- Michelle Last at MichelleLast.co.uk
- Jennifer Spiller at Westside Paper Creations
- Lory Robinson at The Robins Nest Designs
- Shawn de Oliveira at ShawnStamps
- Pam Morris at Tap Tap Stamp
- Lisa Pretto at Ink Big Academy Stamps
Here’s what I did:
Cut and scored with my Stampin’ Trimmer:
- Pacific Point card stock (CS) cut to 5-1/2″ x 8-1/2″, and scored in half at 4-1/4″.
- Crushed Curry CS cut to 4″ x 5-1/4″.
- Whisper White CS cut to 3-3/4″ x 5″.
- Whisper White CS cut to 5-1/4″ x 8-1/4″ then scored in half at 4-1/8″.
- Party Animals DSP (front) to 3-3/4″ x 2-1/2″.
- 2 pieces of Party Animals DSP to __” x 5″.
Die cut with theBalloon Pop-Up Thinlits:
- I laid the largest die from the set on the larger (5-1/4″ x 8-1/4″) piece of Whisper White CS, lining up the center markers of the die with the score line on the paper, and ran it through my Big Shot. The die cuts out the balloons and scores the lines on either side.
Stamped with the Balloon Adventures stamp set:
Front:
- sentiment in Emerald Envy ink onto the top half of the smaller (3-3/4″ x 5″) piece of Whisper White CS.
Inside:
- balloons from the Balloon Adventures stamp set in Crushed Curry, Emerald Envy, and Tangerine Tango onto the die cut piece.
- banner in Pacific Point onto the die cut piece.
- banner sentiment in Emerald Envy onto the die cut piece.
Colored:
- filled in the letters on the front with a Tangerine Tango Stampin’ Write Marker.
Assembled card:
Front:
- glued a piece of Party Animal DSP to the bottom half of the smaller piece of Whisper White CS.
- wrapped a piece of Emerald Envy Taffeta Ribbon along the line and adhered the ends to the back. Adhere the first piece of ribbon only to the back and not to the front, so you can slide the second piece under it to tie the knot.
- slid a smaller piece of the ribbon under the first piece and tied a simple knot.
- glued card front to the Crushed Curry CS.
- glued the Crushed Curry CS to the front of the Pacific Point CS card base.
Inside:
- folded the die cut piece on the score lines and made sure it would fold flat inside the card base, then glued the panel at each end to the inside of the card base. Do not worry about folding the loop in the balloon string in the center. It will be hidden when the card is closed.
- glued the two remaining pieces of DSP to the white panels on each side.
Here’s what I used :
Click on the images for more details and to purchase.

Sale-a-brate good times, come on! It’s a

Now through March 31, you will earn a FREE item from the Sale-a-bration catalog for each $50 you spend on an order. See the items you can earn here.
PLUS you always earn a Gum Ball for every $50 you spend on an order from me. Earn 10 Gum Balls and I’ll send you a free stamp set of your choice! Click on Gum Ball Rewards at the top of this page for details.
If you haven’t already, be sure to read yesterday’s post for a chance to win some blog candy! You only have until midnight tonight.
Thanks for stopping by today, and Sweet Stamping!

Feb 14, 2017 | Blog Candy, Cards, Gallery, Holiday, Occasions |
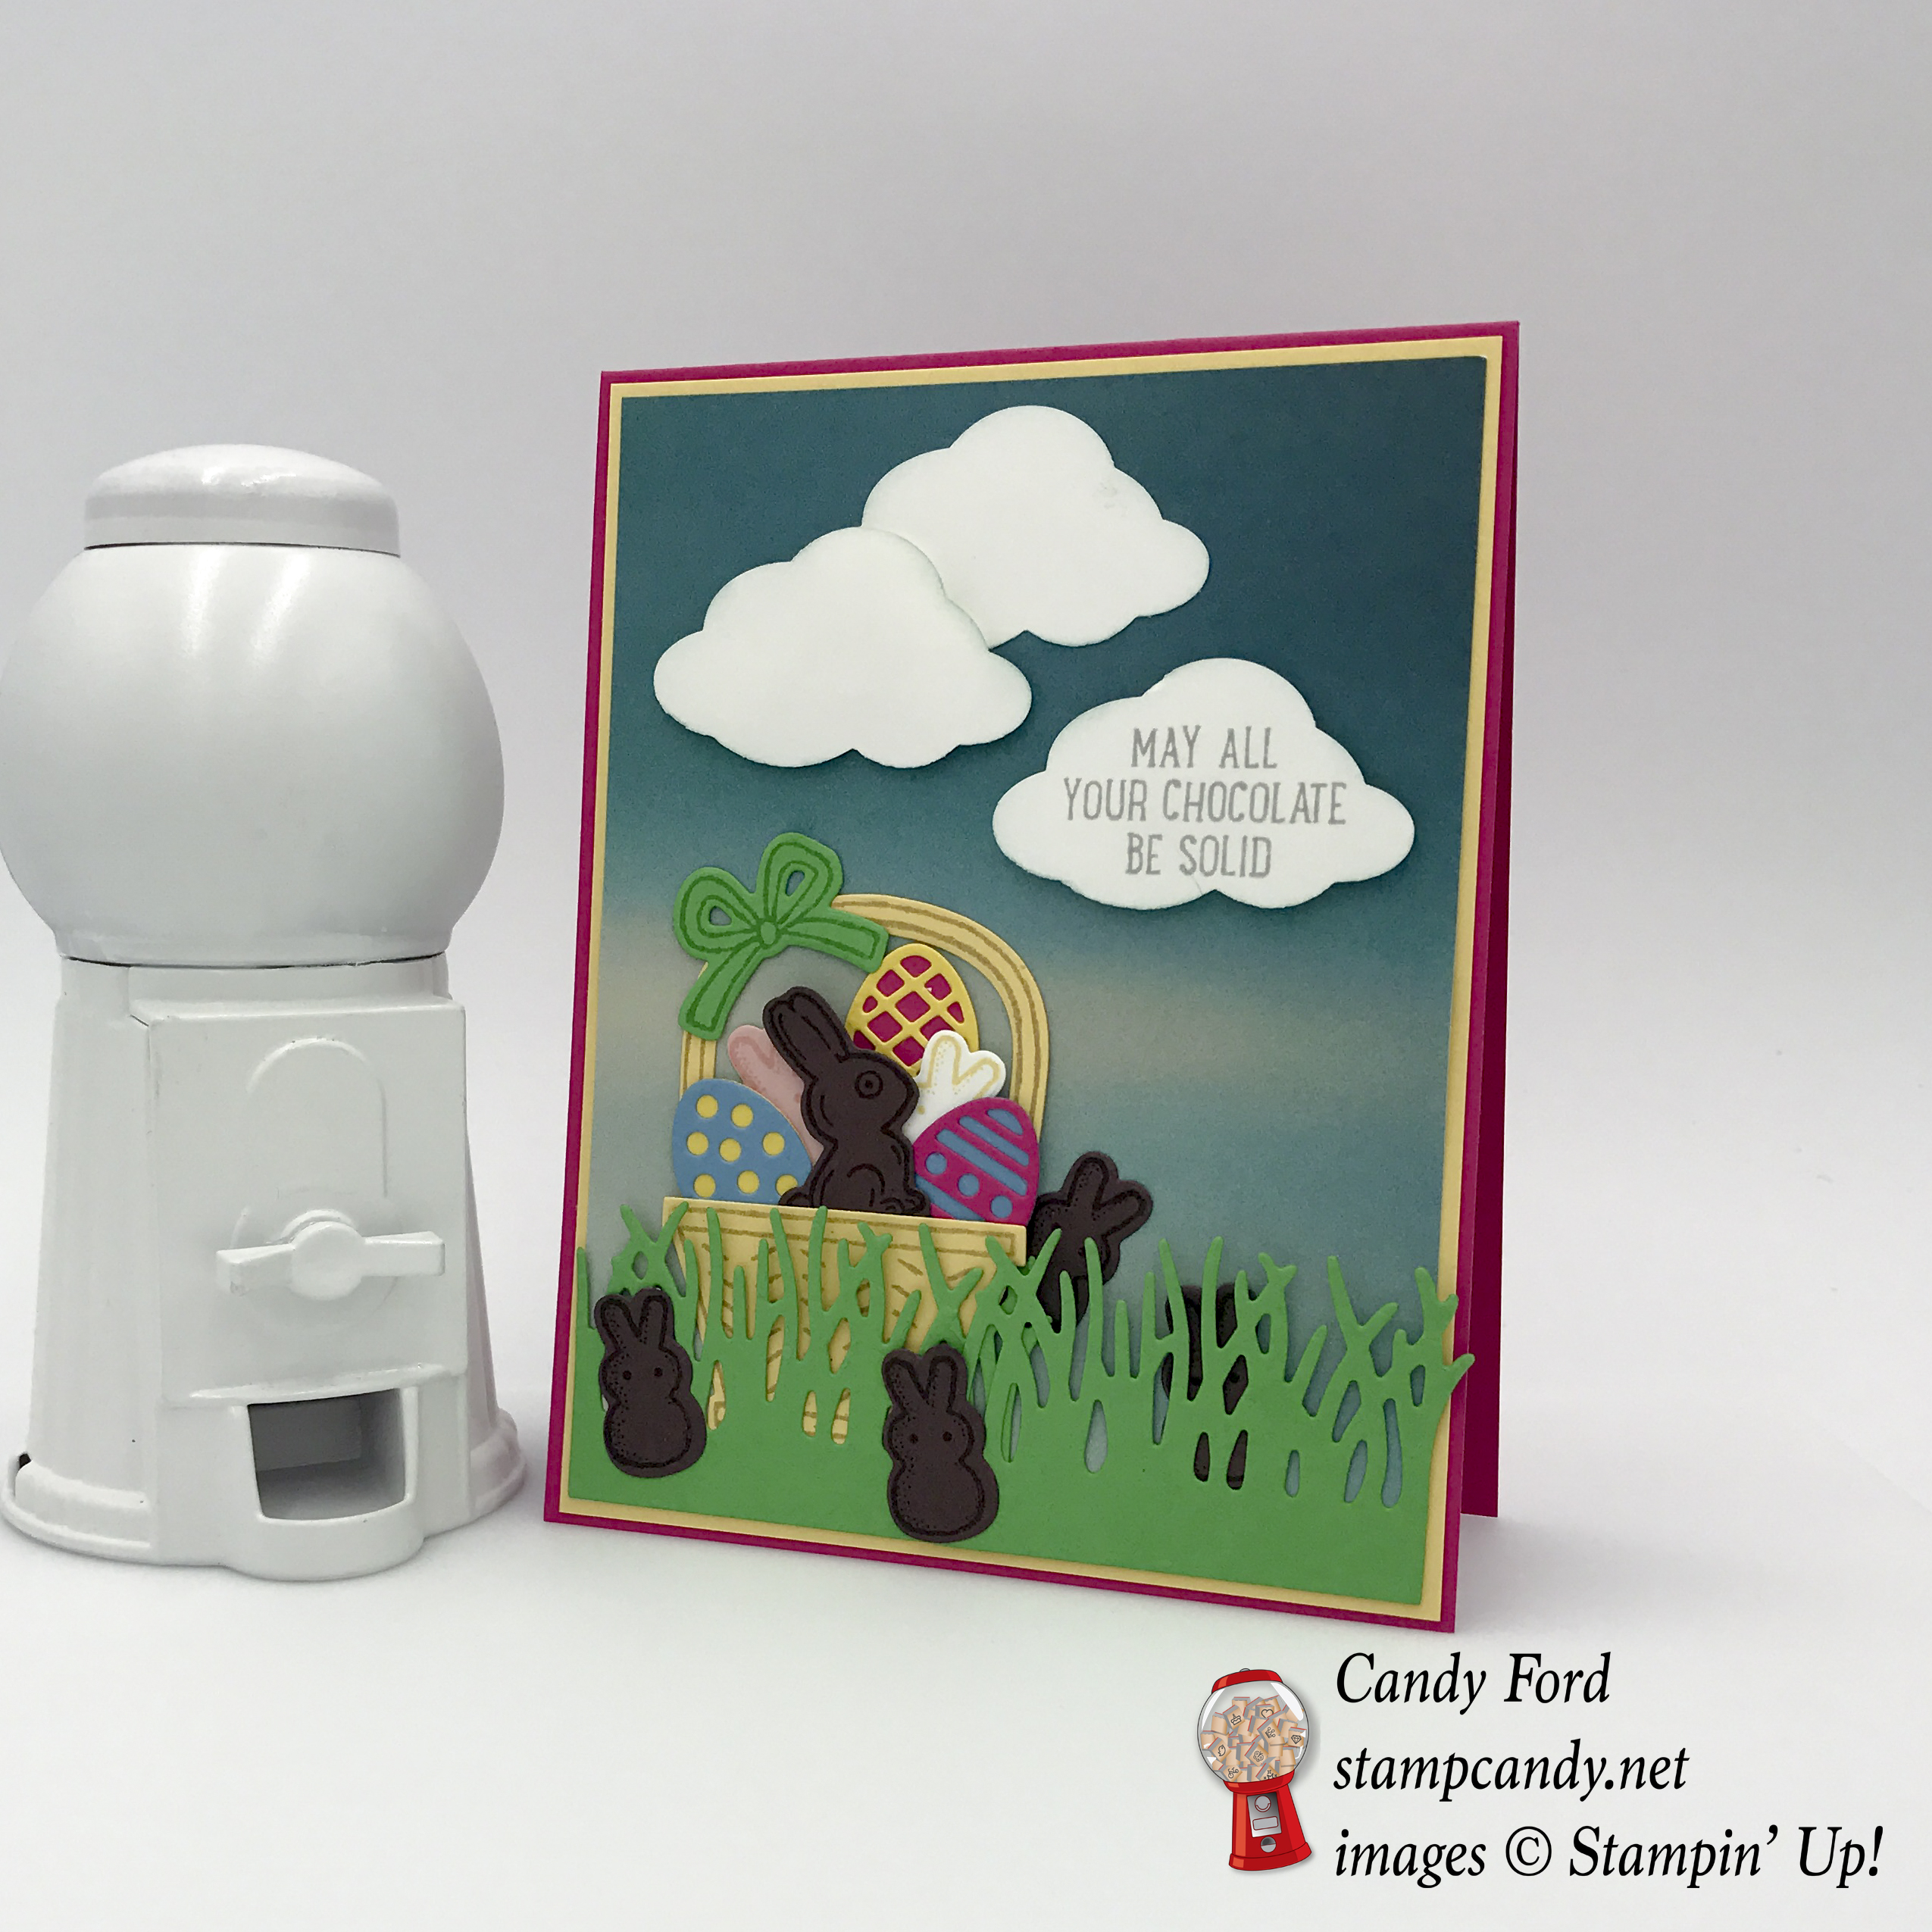
Happy Valentine’s Day, Sweet Stampers!
I was planning to post another Valentine card today, but then I thought, well, most people probably have their cards made already. And it’s too late to order anything for today anyway (but you can go ahead and order Valentine’s goodies for next year!) I really wanted to play with the Basket Bunch bundle, so I thought, lets start thinking about the next big holiday: Easter.
Actually it isn’t so odd that I would post an Easter card today. I mean, Valentine’s Day and Easter have quite a few things in common. To name just a couple: 1) we spend time with people we love, and 2) there’s always plenty of chocolate around.
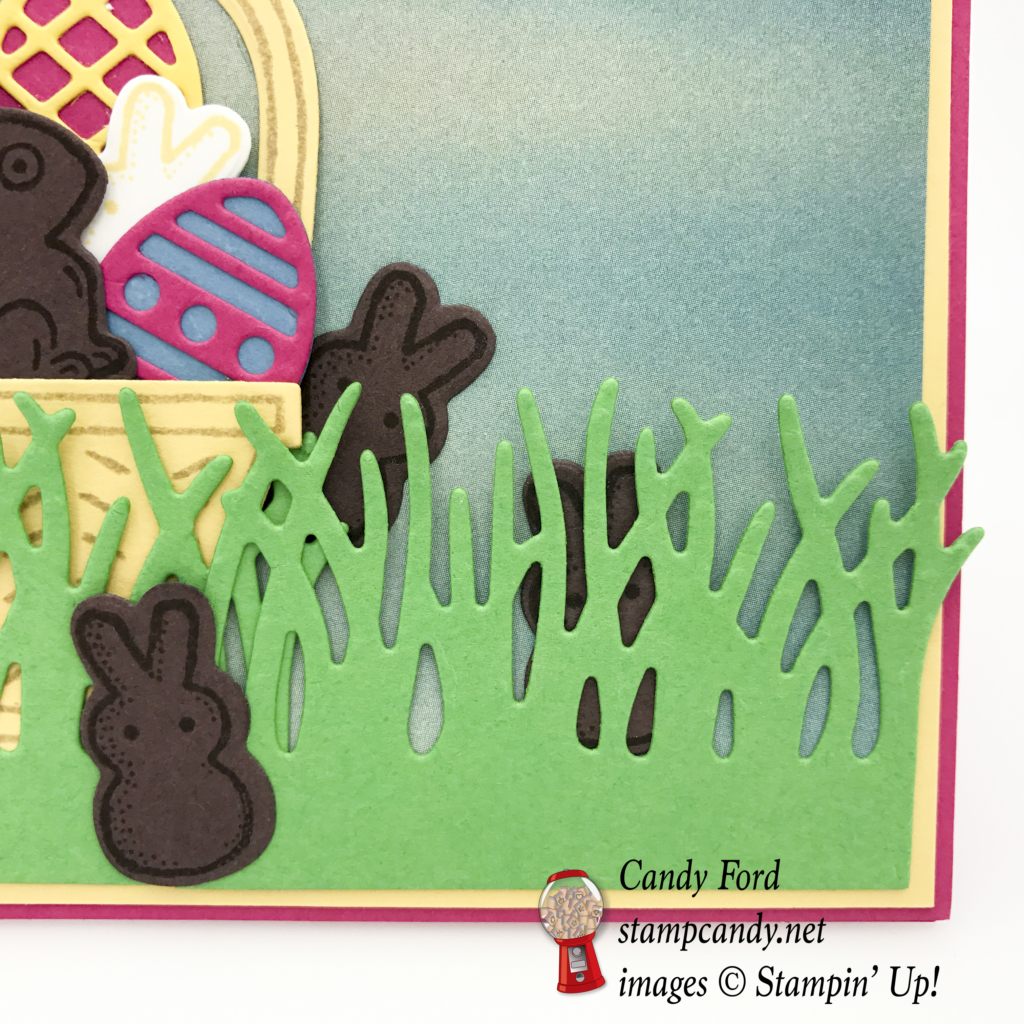
I hope you enjoy today’s card made with the Basket Bunch stamp set and Basket Builder Framelits, which are available in a bundle to save 10%! This set has so many possibilities, and not only for Easter – a basket full of flowers makes a lovely card any time!
Here’s what I made:
This is a perfect project to use your card stock scraps on, since so many of the pieces are small.

Even though I didn’t use Stampin’ Dimensionals, there is still dimension to the basket and grass, because there are so many layers of card stock. I did use them under two of the clouds.

Here’s what I did:
Cut and scored with my Stampin’ Trimmer:
- Melon Mambo card stock (CS) to 4-1/4″ x 11″ and scored it at 5-1/2″ for the card base.
- So Saffron CS to 4-1/8″ x 5-3/8″ and glued it to the card base.
- Serene Scenery Designer Series Paper (DSP) to 4″ x 5-1/4″ and glued that to the card front.
Stamped with the Basket Bunch stamp set:
- the chocolate bunny in Chocolate Chip ink onto Chocolate Chip CS. I used the same ink and CS to stamp the little marshmallow bunny several times.
- the same marshmallow bunny in Blushing Bride ink onto Blushing Bride CS.
- the same marshmallow bunny in So Saffron ink onto Whisper White CS.
- the bow in Cucumber Crush ink onto, you guessed it, Cucumber Crush CS.
- the basket and handle in Crumb Cake ink onto So Saffron CS. *Scroll down for a tip on getting the handle lined up just right.
Die cut with the Basket Builder Framelits:
- all the stamped images.
- eggs and egg overlays from Melon Mambo, Tempting Turquoise, and Daffodil Delight CS.
- 2 pieces of grass from Cucumber Crush CS.
Made the clouds:
- punched 3 from Whisper White CS with the Tree Builder Punch.
- used a Sponge Dauber to lightly ink the edges with Soft Sky ink.
- stamped the sentiment from the Basket Bunch stamp set in Smoky Slate ink onto one of the clouds.
- glued one cloud to the card (the top one) and adhered the other two with Stampin’ Dimensionals.
Assembled the card front:
- glued the overlays to the eggs.
- arranged the items in the basket how I wanted them and glued them together, adding the handle last.
- determined how wide the grass needed to be to fit onto the DSP, then I glued the two pieces of grass together, overlapping them slightly. I glued the grass – just along the very bottom – to the DSP. (The little bunny at front and center is covering the line where the two pieces of grass overlap.)
- tucked the basket full of goodies behind the grass and glued it in place.
- glued some extra bunnies onto and behind the grass, making sure I could see the eyes of the shy ones in the back.
Making this card took a little more time than usual because of all the little pieces. But it’s still easy peasy to make! Also, I used quite a few different colors, but you can use as many, or as few, colors as you want. I know you’ll enjoy playing with this fantastic bundle!

Basket Bunch Bundle © Stampin’ Up!
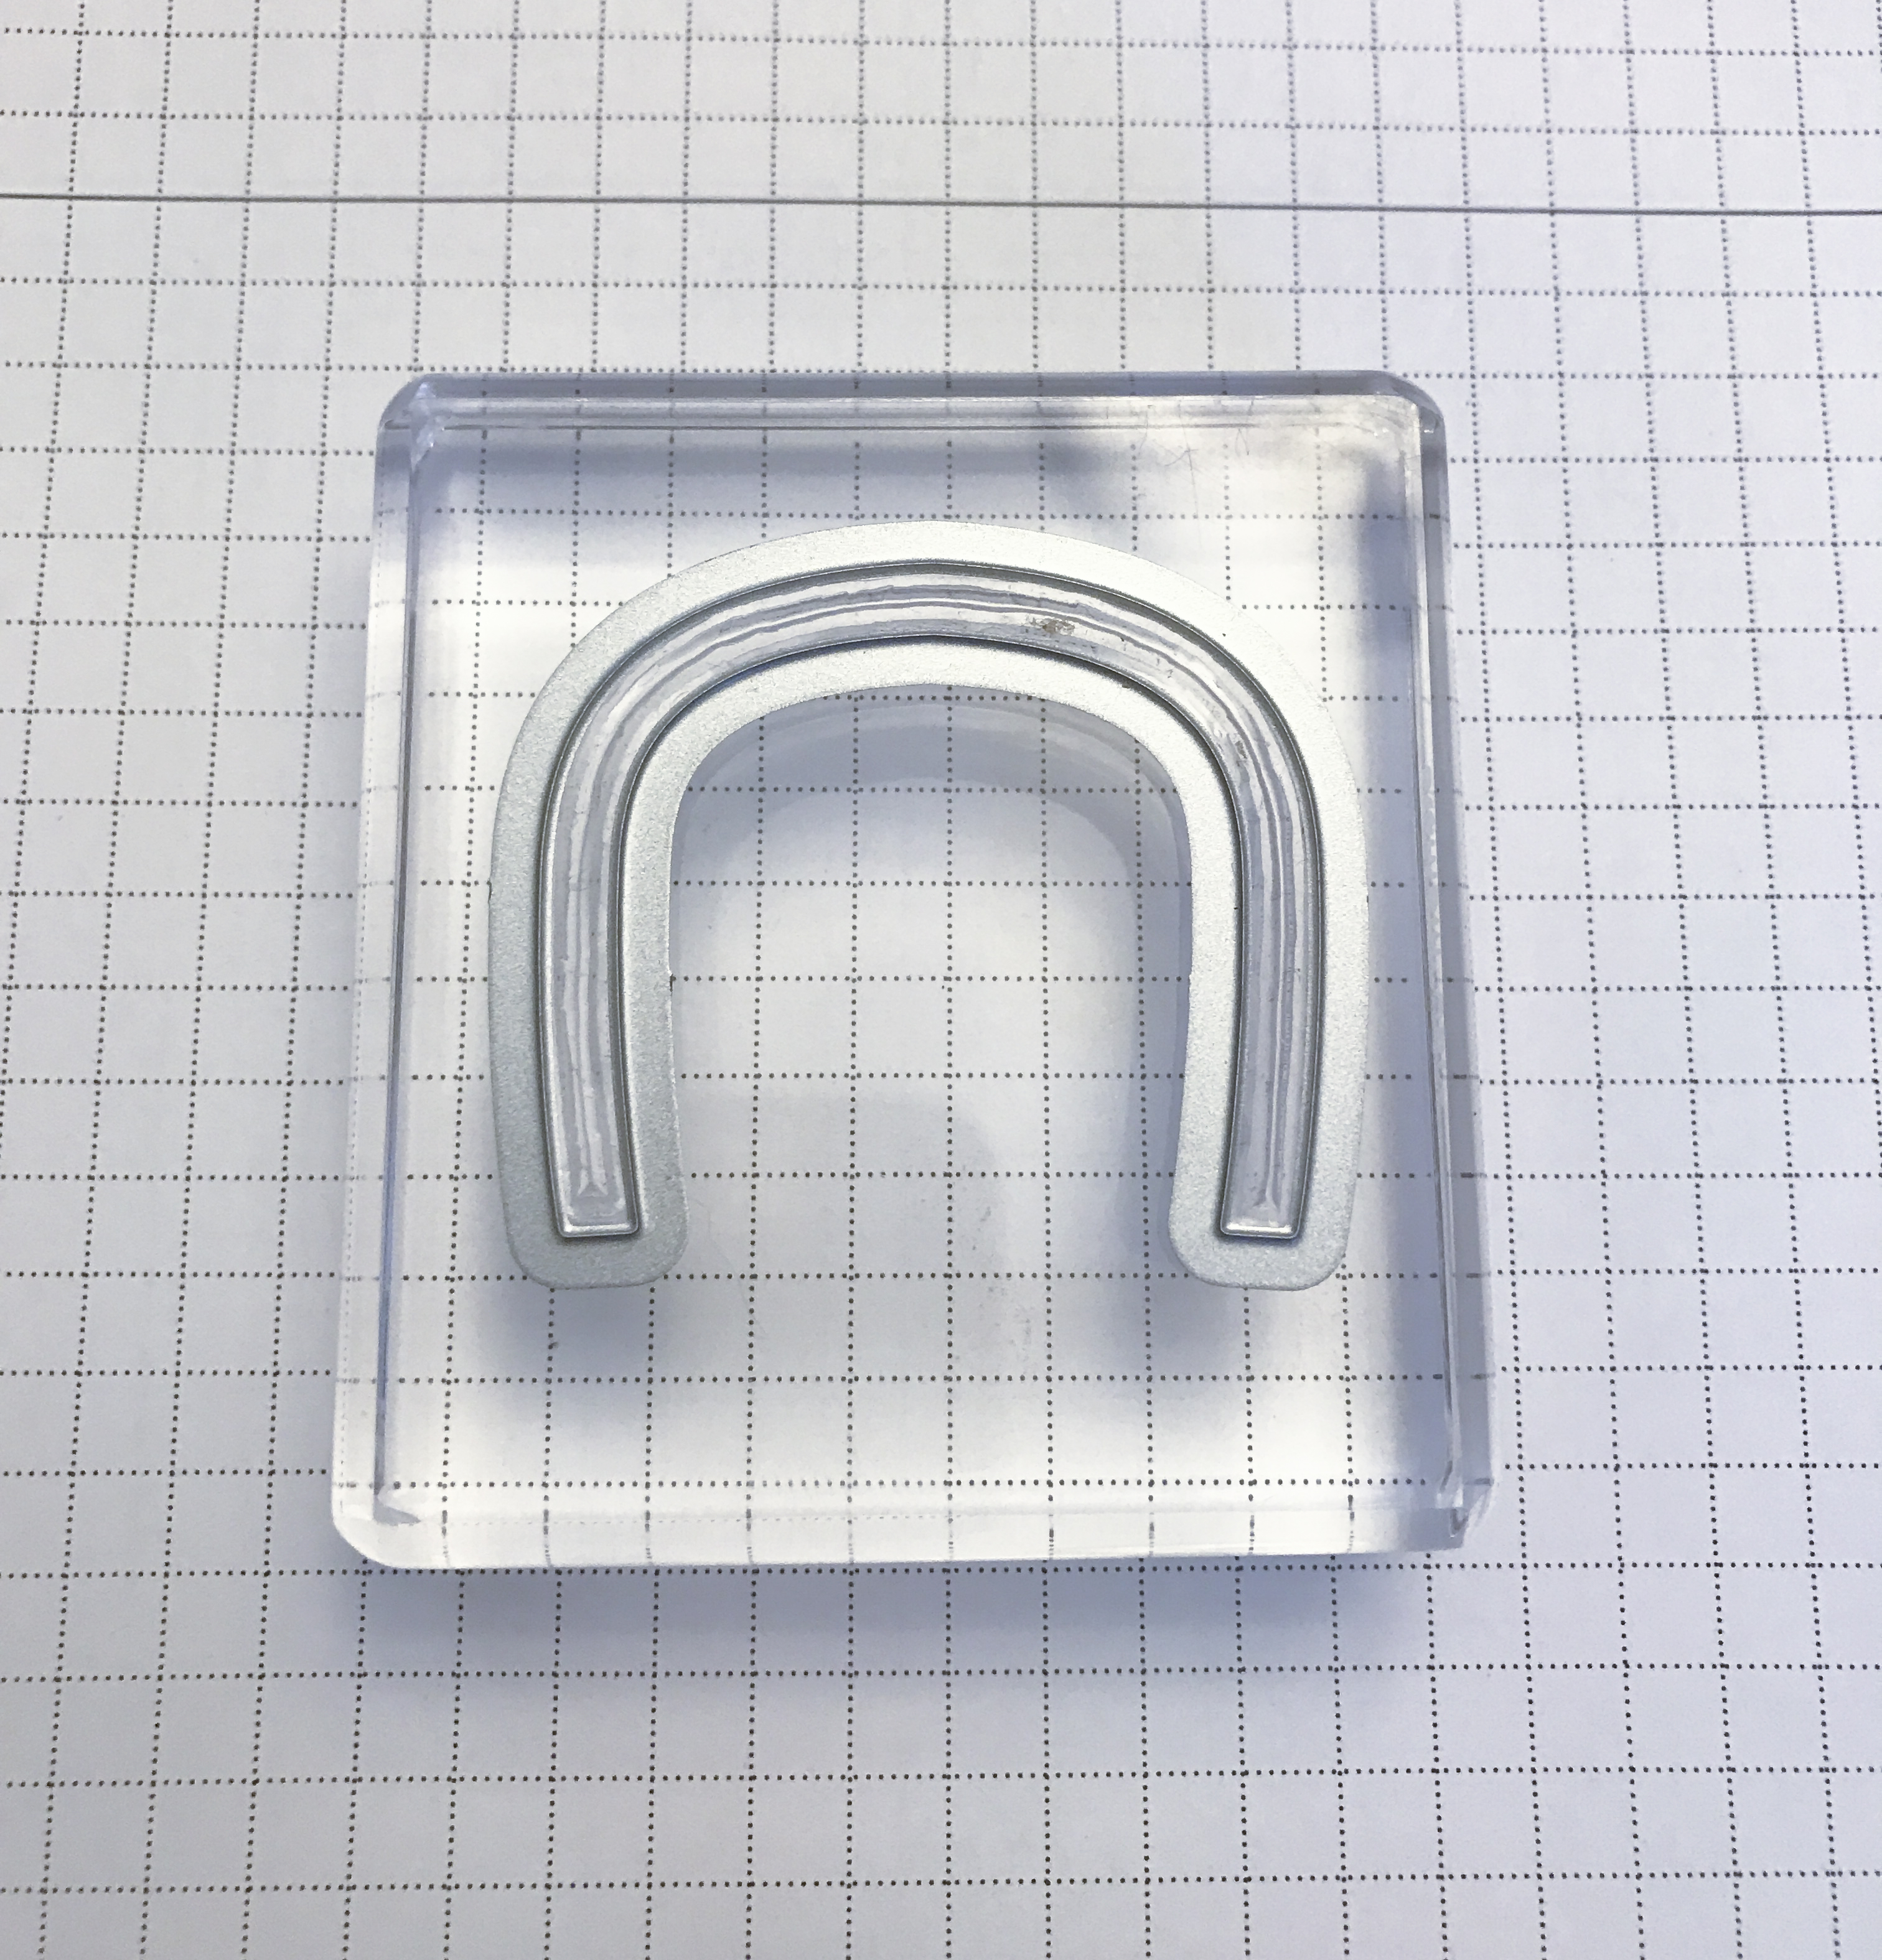
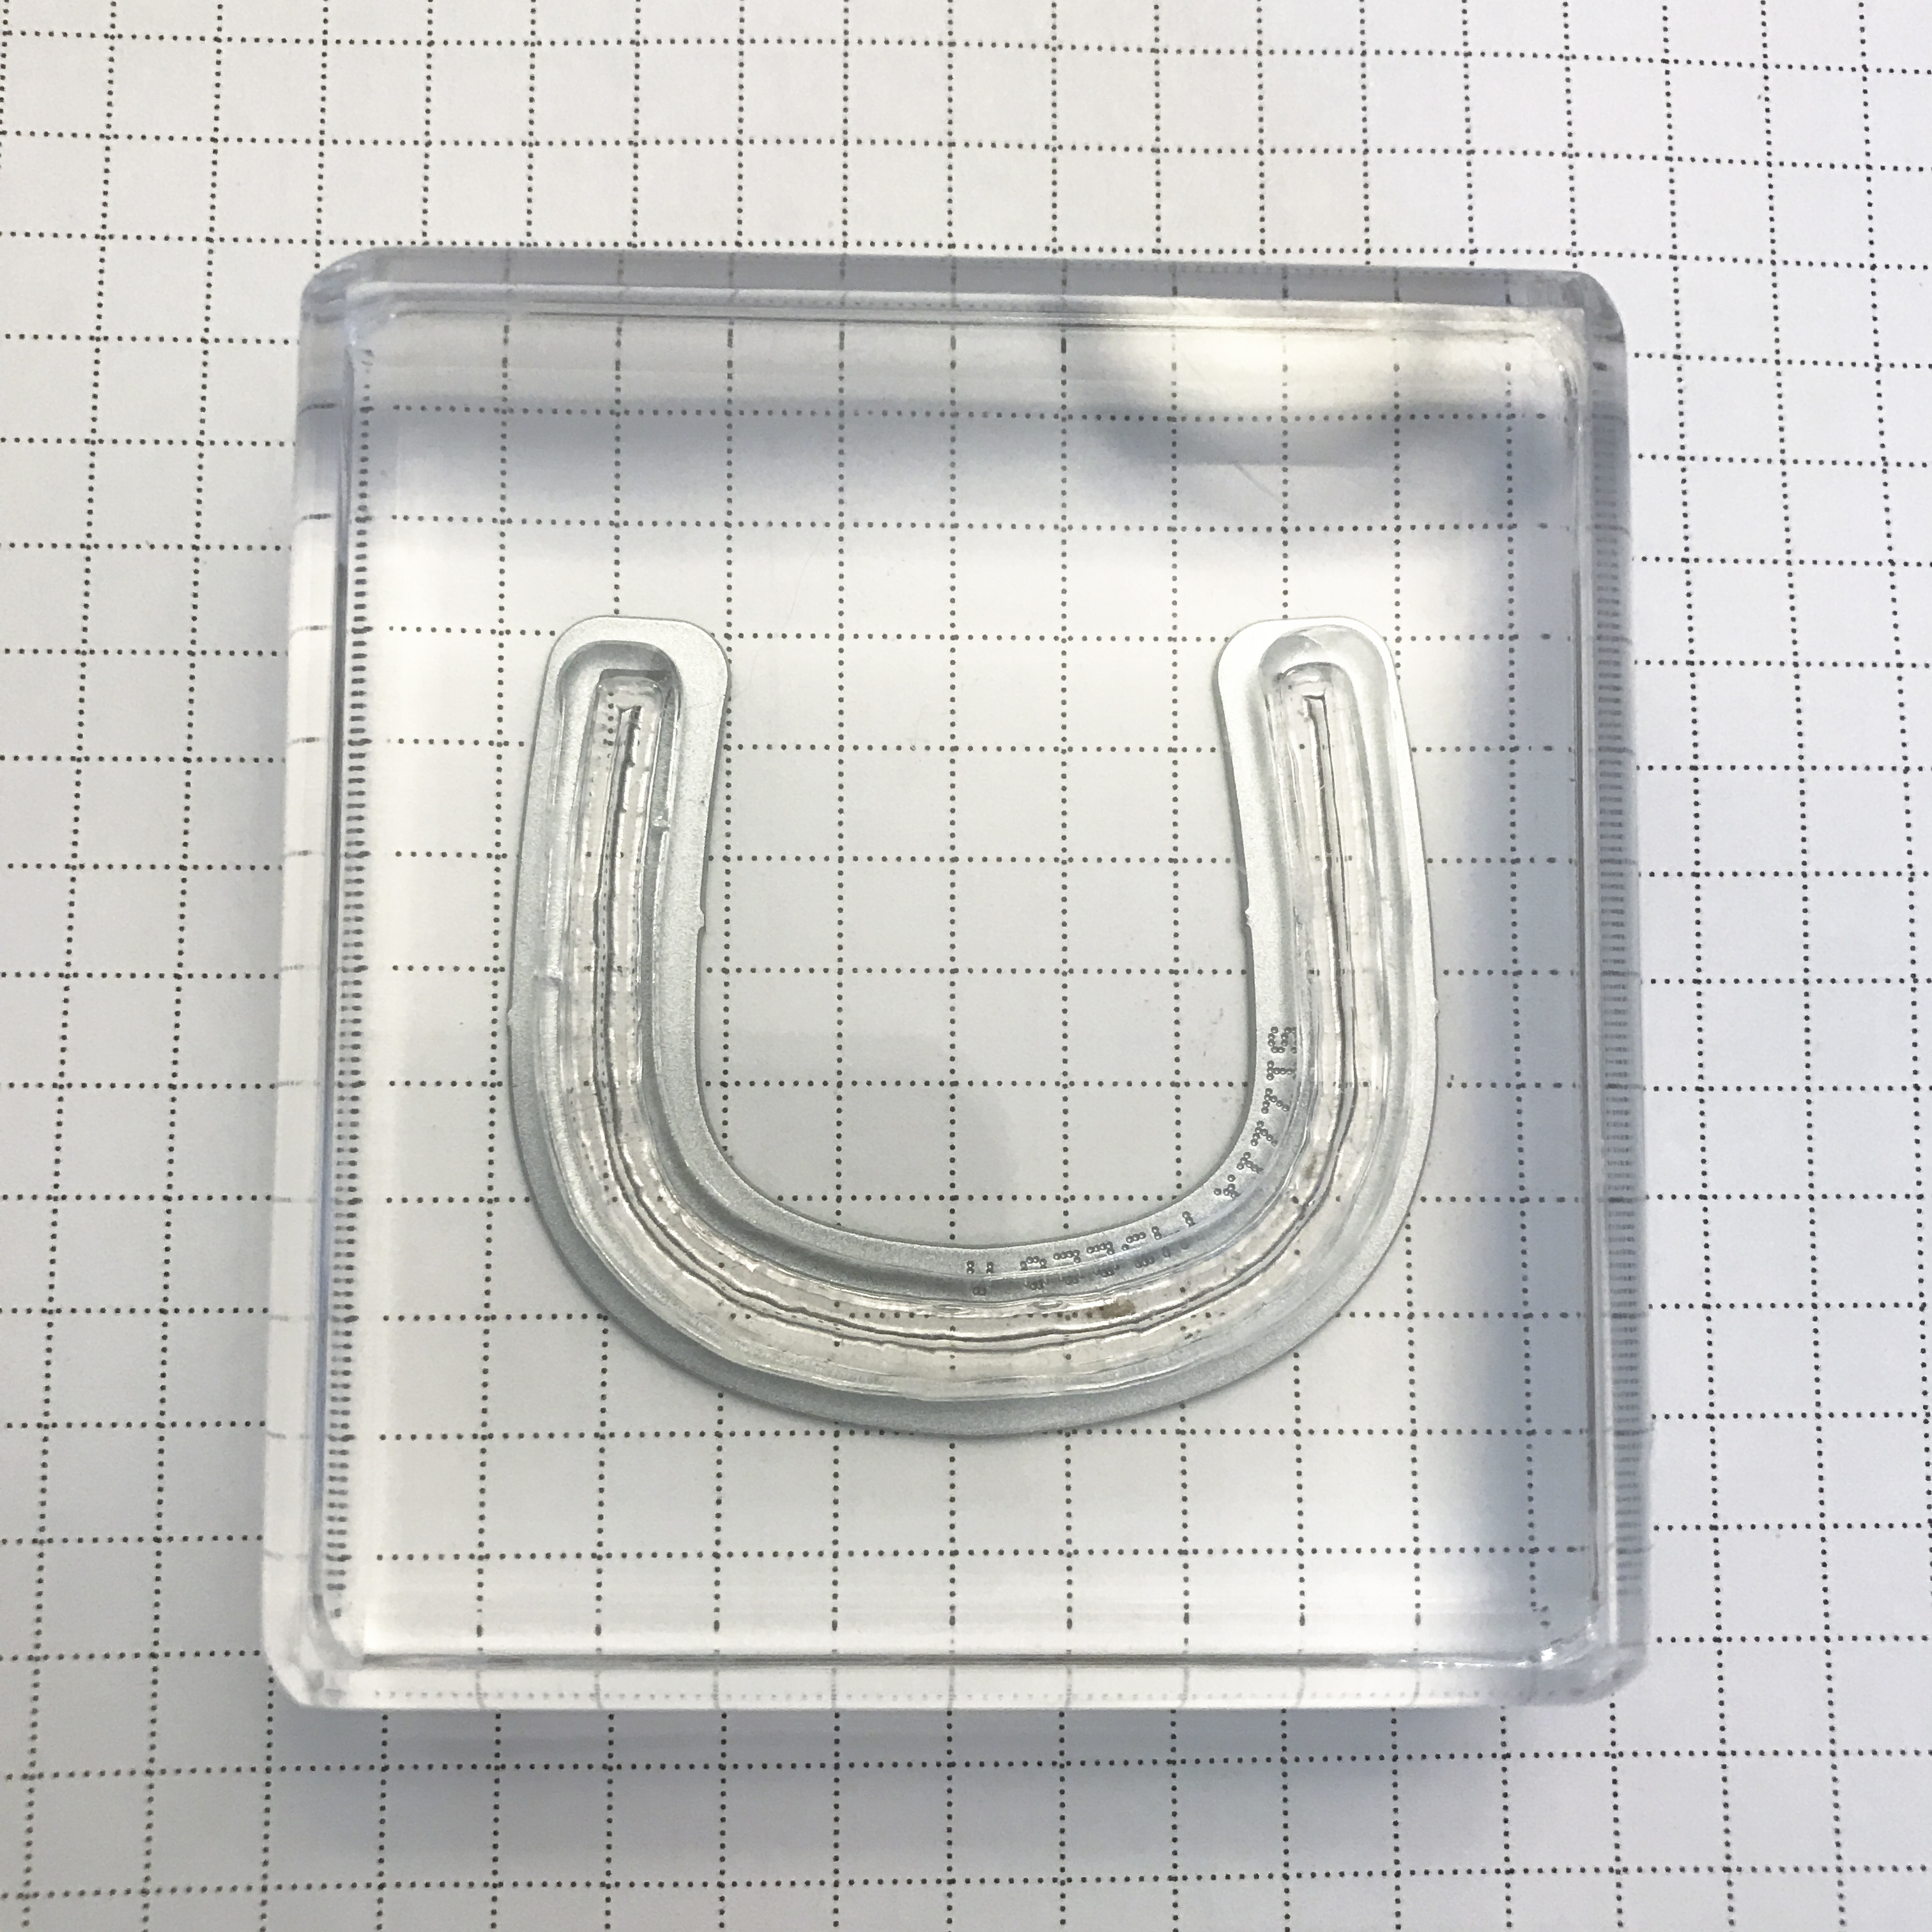
TIP for the basket handle
When you pull the stamp off the clear storage sheet, it’s a little floppy. This can make it difficult to know exactly how to put it onto the clear block so the stamped image will line up with the die. Here’s how I solved that problem.
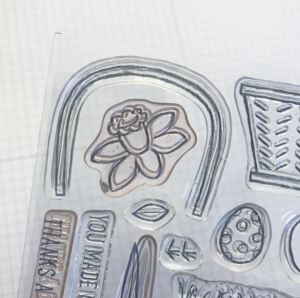
Lay the stamp on a Grid Sheet, or other paper, with the carved side up. It’s important to lay the stamp on paper, so you’ll be able to pick it up and keep it lined up with the die. If you lay it on a slick surface, like a clear block, it will stick and be much harder to lift off.

Lay the die, cutting side up, on top of the stamp, making sure the carved image is peeking up through the die.

Flip the whole thing over, so the stamp is now on top of the die, and the carved image is poking down through the die.

Set a clear block on top, then press gently to make sure the stamp sticks to it.

Flip the whole thing over again.
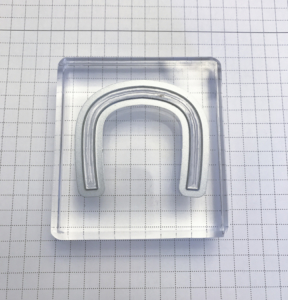
If the die sticks to the stamp, simply lift it off, and you’re ready to go!

Here’s what I used:
Click on the images for more details and to make a purchase.
During Sale-a-bration, for every $50 you spend on an order, you will receive a FREE Sale-a-bration item!
AND you will earn a Gum Ball from me! To learn more, click on “Gum Ball Rewards” at the top of this page.
For those of you who have taken the time to read all the way down to the bottom of this post, I have something special for you. Comment on this post by tomorrow (Wednesday) night at midnight, and mention the bundle by name. You will be entered in a drawing to win your very own Basket Bunch bundle! I will draw the name on Thursday, and announce the winner on Friday. Good luck!
Thanks for stopping by today, and Sweet Stamping!
Feb 13, 2017 | Cards, Gallery, Occasions |
When I first got the Chase Your Dreams stamp set, I wasn’t sure what I was going to do with it. I just knew I had to have it. I mean, it has L’Arc de Triomphe and The Tower Bridge! Paris and London are two of my favorite places in the world. (The other images are nice, too.)
Here’s what I made:
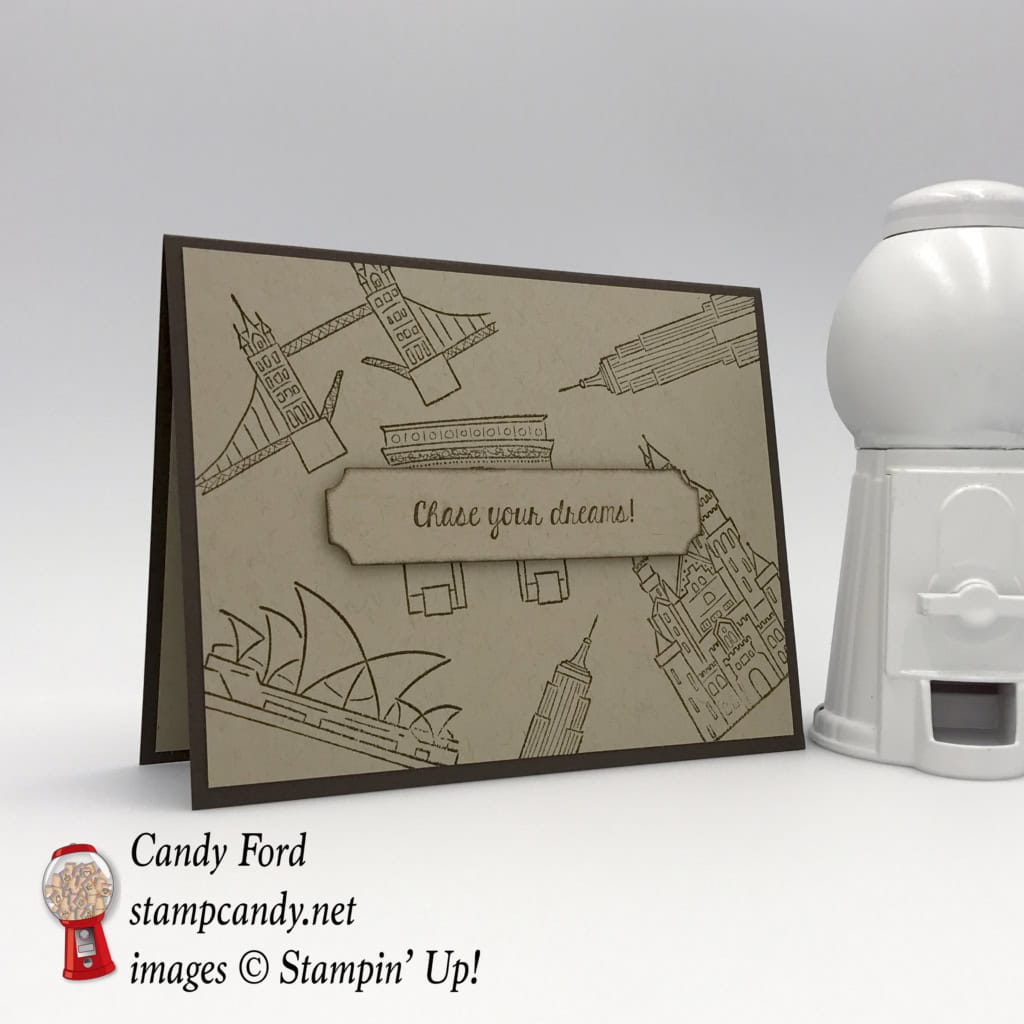
Here’s what I did:
I stamped the images from the Chase Your Dreams stamp set in Early Espresso ink onto a piece of Crumb Cake card stock (CS) then glued that to the Early Espresso card base.

Chase Your Dreams stamp set © Stampin’ Up!
I stamped the sentiment from the same stamp set in Early Espresso ink onto a smaller piece of Crumb Cake CS, then cut it out with a die from the Project Life Cards & Labels Framelits. I used a Sponge Dauber to ink the edges with Early Espresso ink. I adhered it to the card front with Stampin’ Dimensionals.
I glued another piece of Crumb Cake CS to the inside of the card, for a handwritten note.
Here’s what I used:
Thanks for stopping by today, and Sweet Stamping!
Feb 11, 2017 | Cards, Gallery, Occasions |
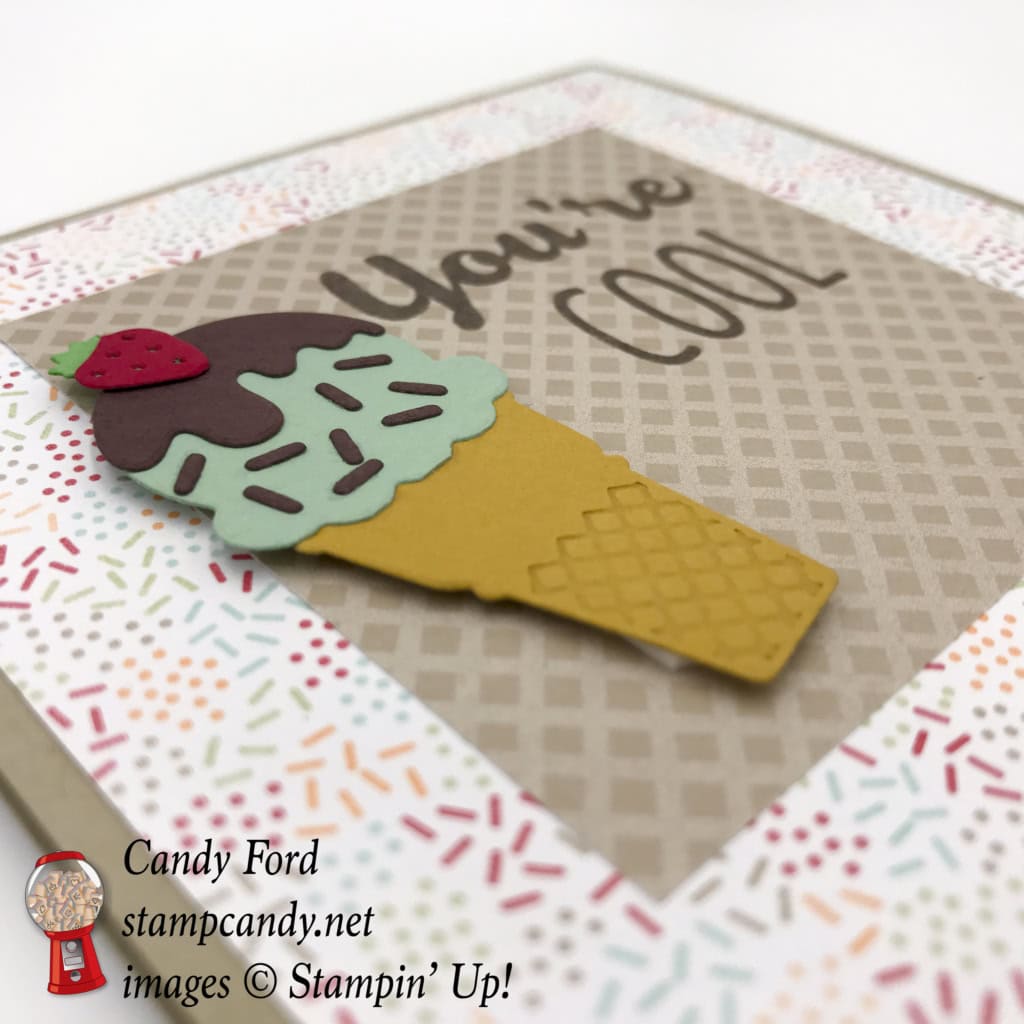
I finally got around to playing with the new Cool Treats bundle, and I like it. I like it a lot. I was afraid it would be too cutesy. It certainly can be cute, but it depends on the colors you use. Check out this 4-1/4″ square card I made with it. I think it’s cute without being overly “cutesy.” Does that make sense?
Here’s what I made:
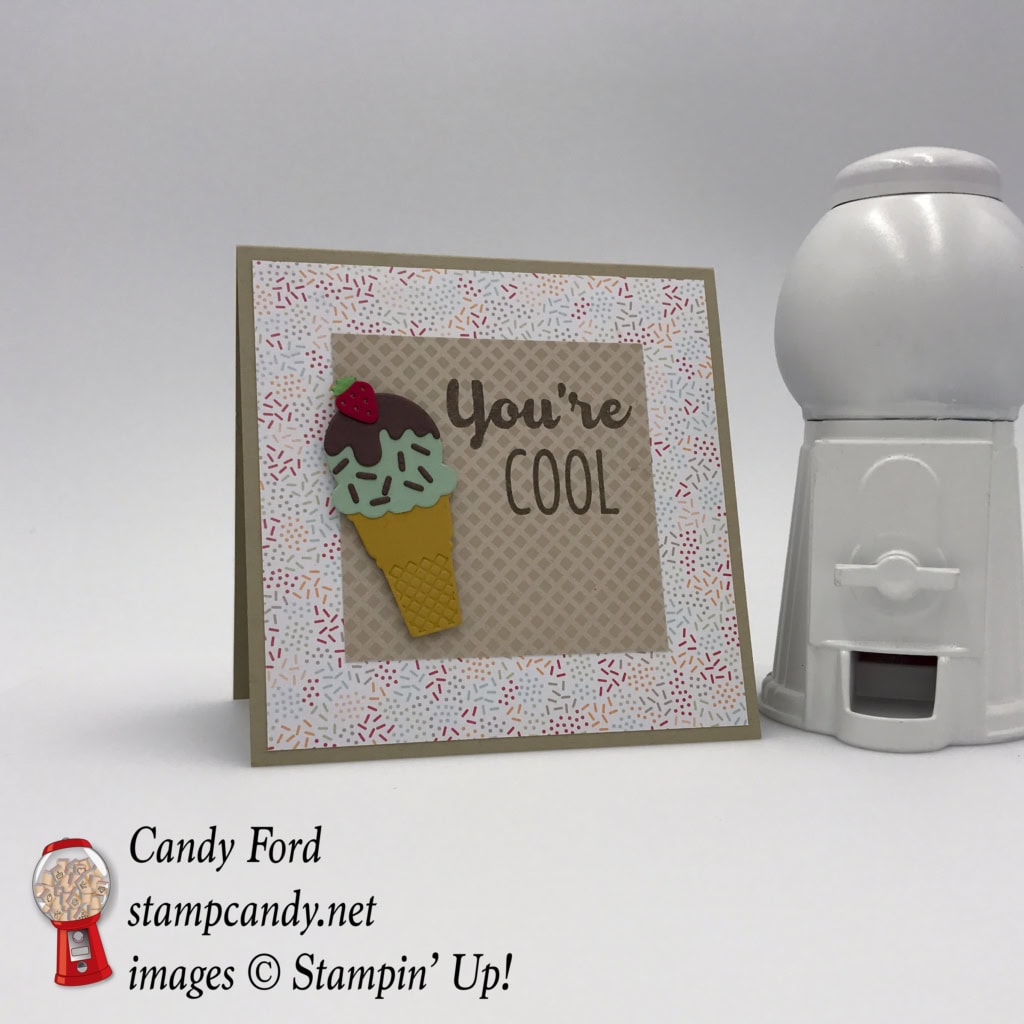
Here’s what I did:
The card base is Crumb Cake card stock (CS) with a piece of Tasty Treats Designer Series Paper (DSP) glued to the front.
I stamped the sentiment from the Cool Treats stamp set in Chocolate Chip ink onto another piece of DSP, and glued it to the card front.
I used the Frozen Treats Framelits to cut the ice cream pieces from Delightful Dijon, Mint Macaron, Chocolate Chip, Real Red, and Cucumber Crush CS. I glued them all together, then adhered the whole thing to the card front with Stampin’ Dimensionals.
Note: For the tiny strawberry, I cut out one in Real Red and one in Cucumber Crush. I cut off the top of the red one and glued it onto the green one. This is how I got the green top on the red strawberry. This also makes the seeds show as green – a happy accident.
Here’s what I used:
Thanks for stopping by today, and Sweet Stamping!
Feb 10, 2017 | Cards, Gallery, Occasions |

At the beginning of each year, I start working on greeting cards for the rest of the year. I like to have a supply of birthday and anniversary cards on hand. Today I’m sharing a card that’s perfect for someone of a “certain age.”
Here’s what I made:
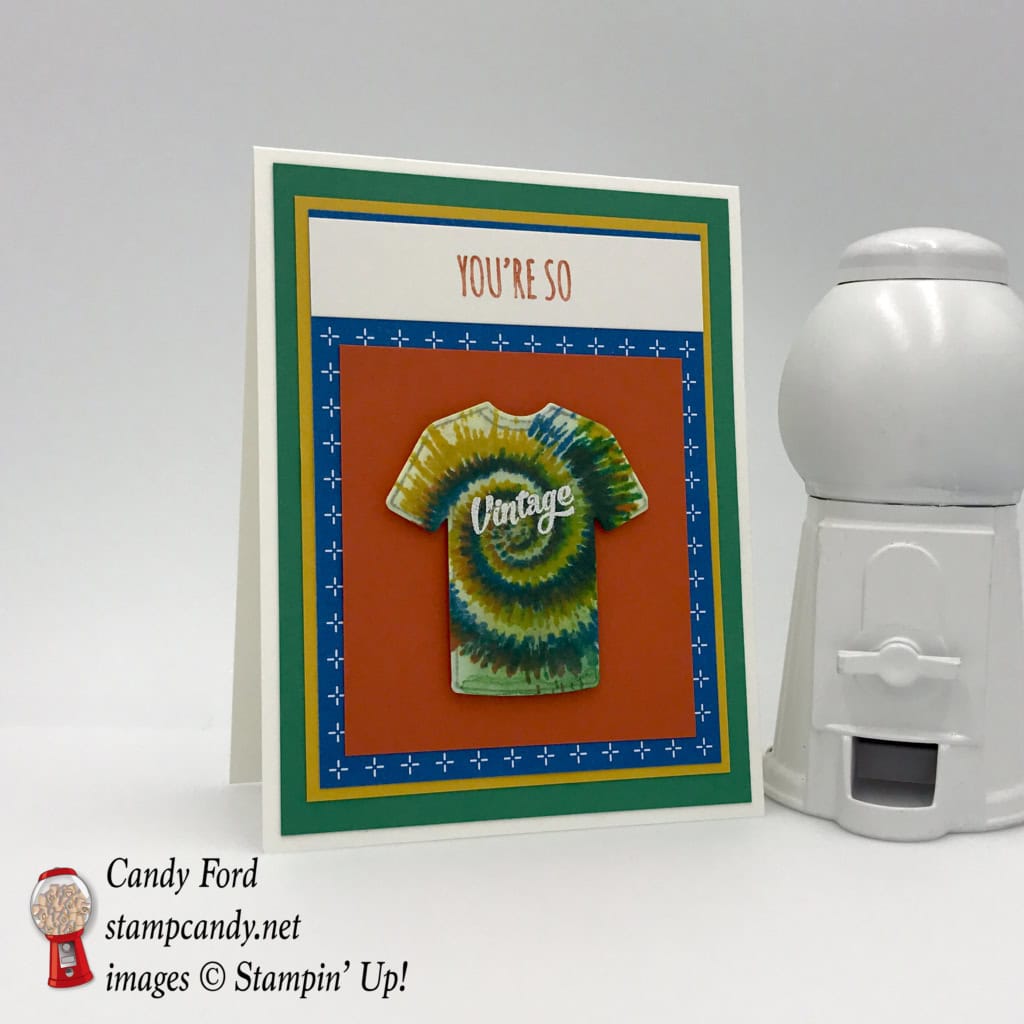
Here’s what I did:
On a piece of Shimmery White card stock (CS) I stamped the swirl from the Tie Dyed stamp set in Crushed Curry, Tangerine Tango, Emerald Envy, and Pacific Point – cleaning the stamp between each color. I tried to line up the stamp each time, then spin it a little, so I didn’t stamp each color on top of the others. I very lightly spritzed it with water, to give a more smeared, bled look.
I stamped the shirt outline from the Custom Tee stamp set in Crumb Cake ink over the Tie Dyed image, then cut it out with the T-Shirt Builder Framelits.
Once I was sure it was completely dry (you can use a heat tool to hurry the drying process) I used the Embossing Buddy on the surface, then stamped the word Vintage from the Custom Tee stamp set in Versamark Ink. I then heat embossed it in white.
On a strip of Whisper White CS, I stamped the words You’re So in Tangerine Tango. The words are from a larger stamp in the You’re So Sweet stamp set. I used a Tangerine Tango Stampin’ Write Marker to color just the part of the stamp I wanted to use.

I adhered the shirt to a piece of Tangerine Tango CS with Stampin’ Dimensionals. I glued this piece, and the stamped strip, to a piece of Party Animal Designer Series Paper (DSP.)
I glued the DSP to a piece of Crushed Curry CS, and glued that to a piece of Emerald Envy CS, and glued that to the Whisper White Thick CS card base.

Here’s what I used:
Thanks for stopping by today, and Sweet Stamping!
Feb 9, 2017 | Cards, Club, Gallery, Holiday, Occasions |
I’ve had so much fun playing with the new love themed products in the Occasions Catalog! It’s always fun making a card for someone you love. Today I’m sharing a Valentine I designed for one of my classes.
Here’s what I made:
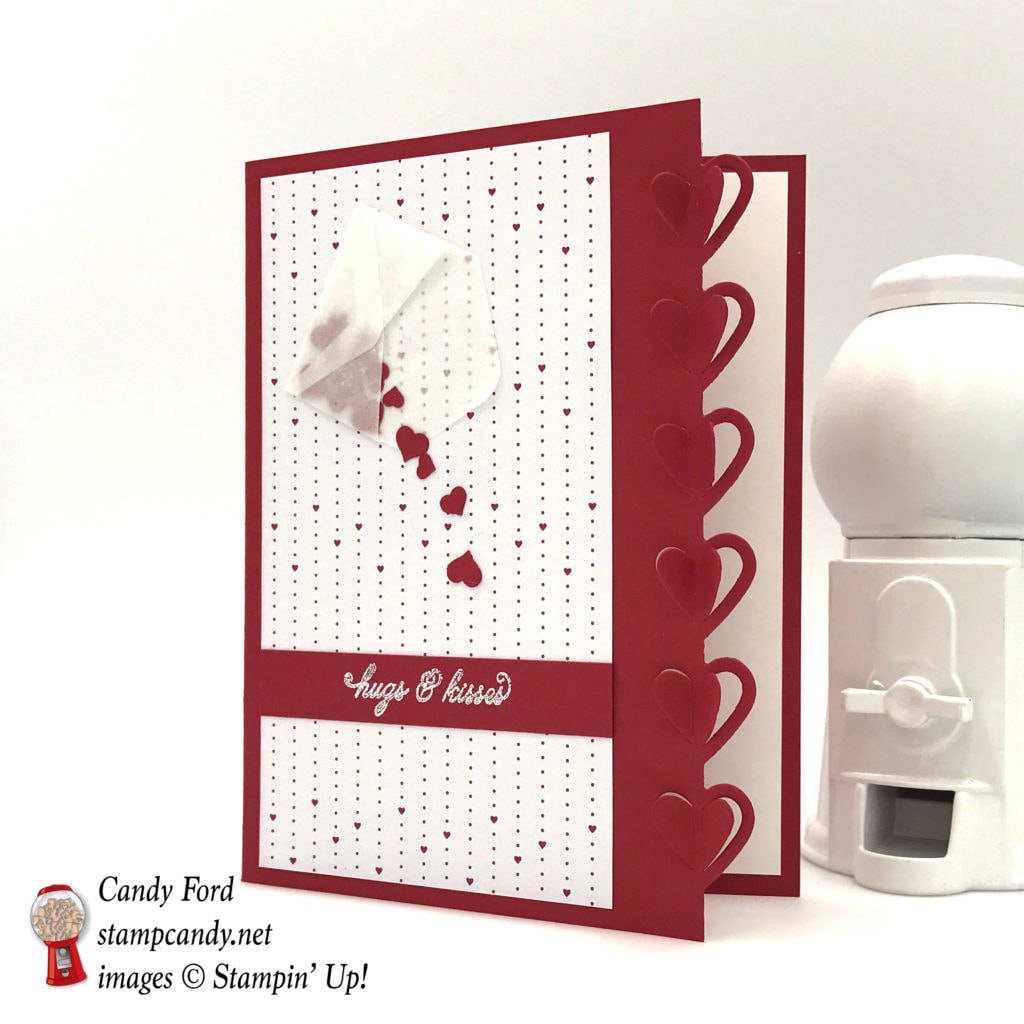
Here’s what I did:
The card base is Real Red card stock (CS) – I used the edge die from the Love Notes Framelits to cut the front edge of the card base. I glued a piece of Whisper White CS to the inside, which helps the heart edge show up better.
I glued a piece of Sending Love Designer Series Paper (DSP) to the card front.
I stamped the sentiment, from the Sealed with Love stamp set, in Versamark ink onto a strip of Real Red CS, then heat embossed it in white. I glued this to the DSP.
I used another die from the Love Notes Framelits to cut the tiny envelope out of a Sending Love Glassine Sheet. I glued the envelope to the DSP.
I used the Confetti Hearts Border Punch to cut tiny heart from Real Red CS. I glued them in the envelope and spilling out.
Here’s what I used:
Thanks for stopping by today, and Sweet Stamping!


