Mar 19, 2016 | Bags, Boxes, Cards, Challenges, Occasions, Sale-A-Bration |

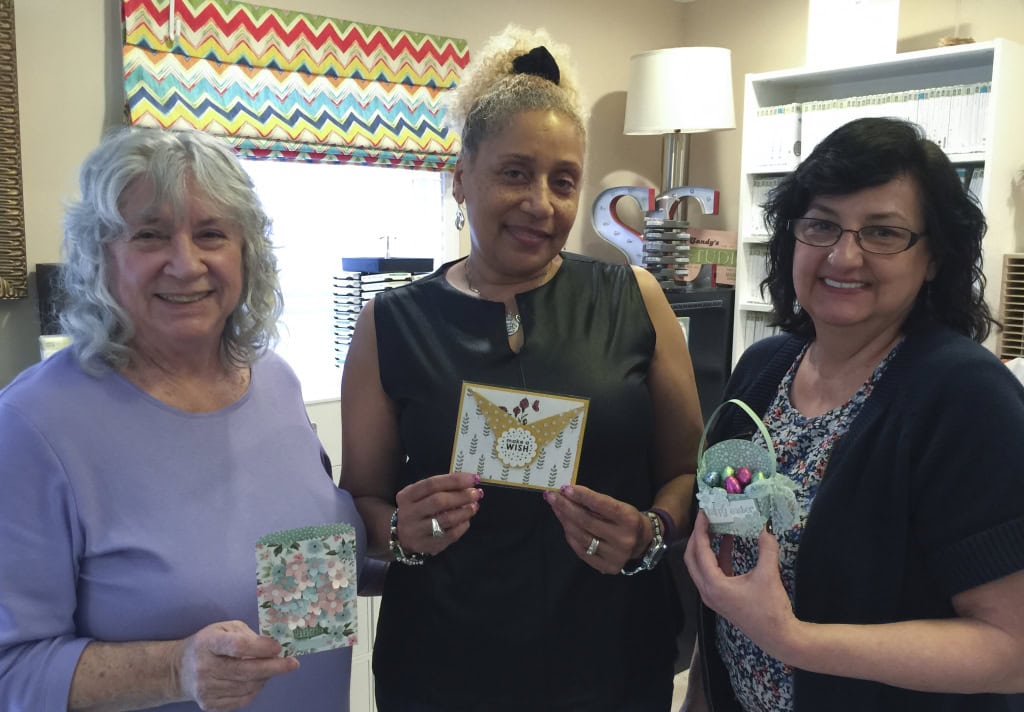
Yesterday I told you about our March Candy Hearts team meeting. You can see that post here. Today I’m sharing the Creative Challenge entries with you. March’s challenge was to create something with FLOWERS.
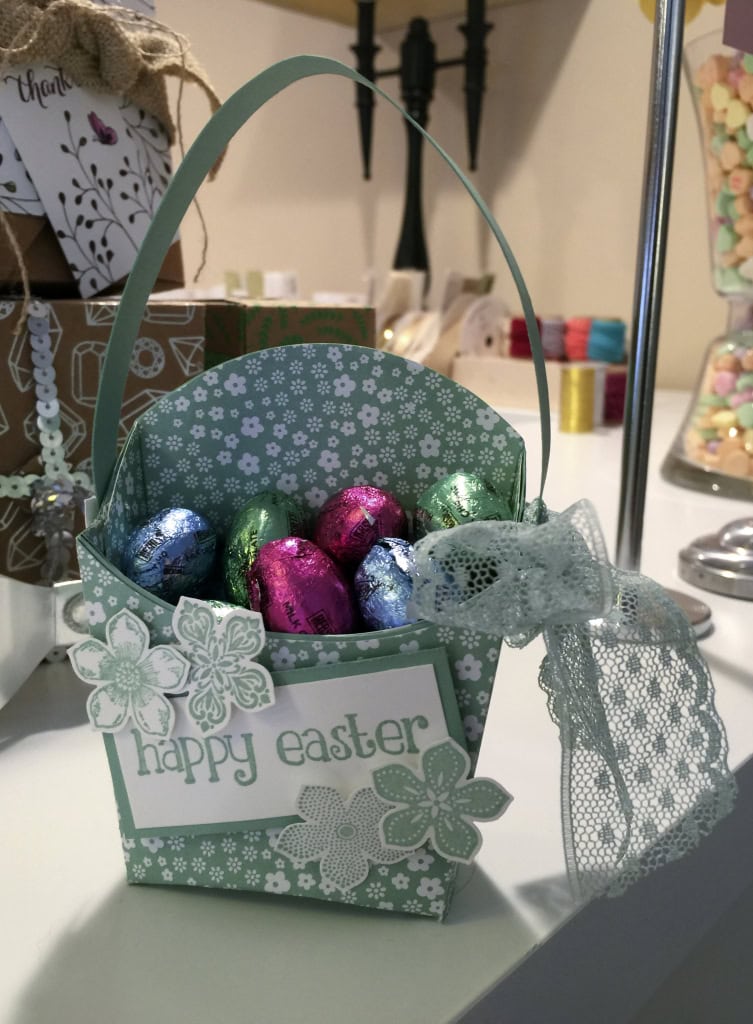
Debbie created an Easter Basket by attaching a long handle to a Fry Box that she covered with Designer Series Paper.The flowers are from Petite Petals.

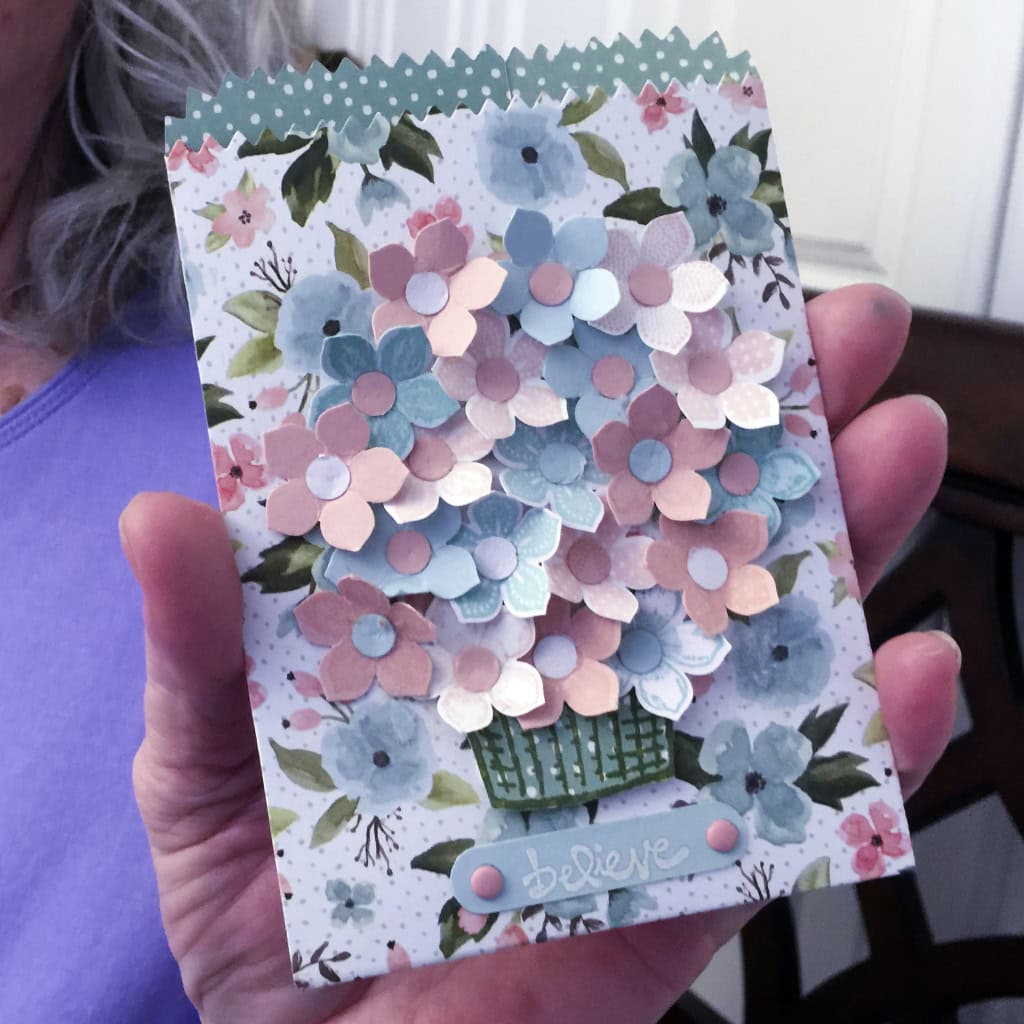
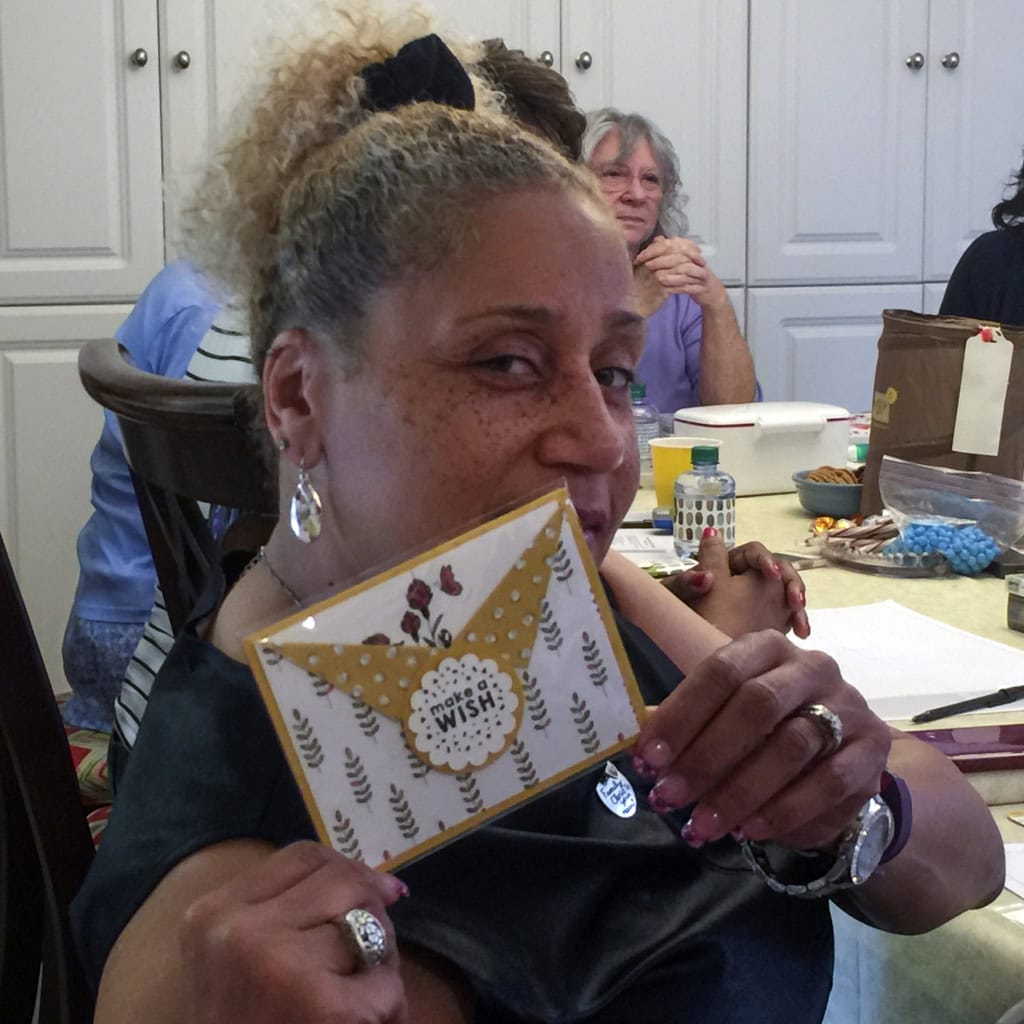
Judy used the Mini Treat Bag Framelits Dies to cut Birthday Bouquet DSP. She covered the bag in Petite Petals flowers and a basket from the Sprinkles of Life stamp set. Her entry won her the Flower Patch stamp set.
Tamara made a card with coordinating Sale-a-bration items: Wildflower Fields DSP and Flowering Fields stamp set.
I have such a talented team! Wouldn’t you like to come play with us? Just buy the Starter Kit! Until March 31 it’s just $99 and you get to choose $155 in product plus you get free shipping! After that you get at least a 20% discount on all your orders. Click here for more information and to join now!
Thanks for stopping by today, and Sweet Stamping!

Mar 17, 2016 | Holiday, Occasions, Sale-A-Bration |
Top o’ the mornin’ to ye! And Happy St. Patrick’s Day!
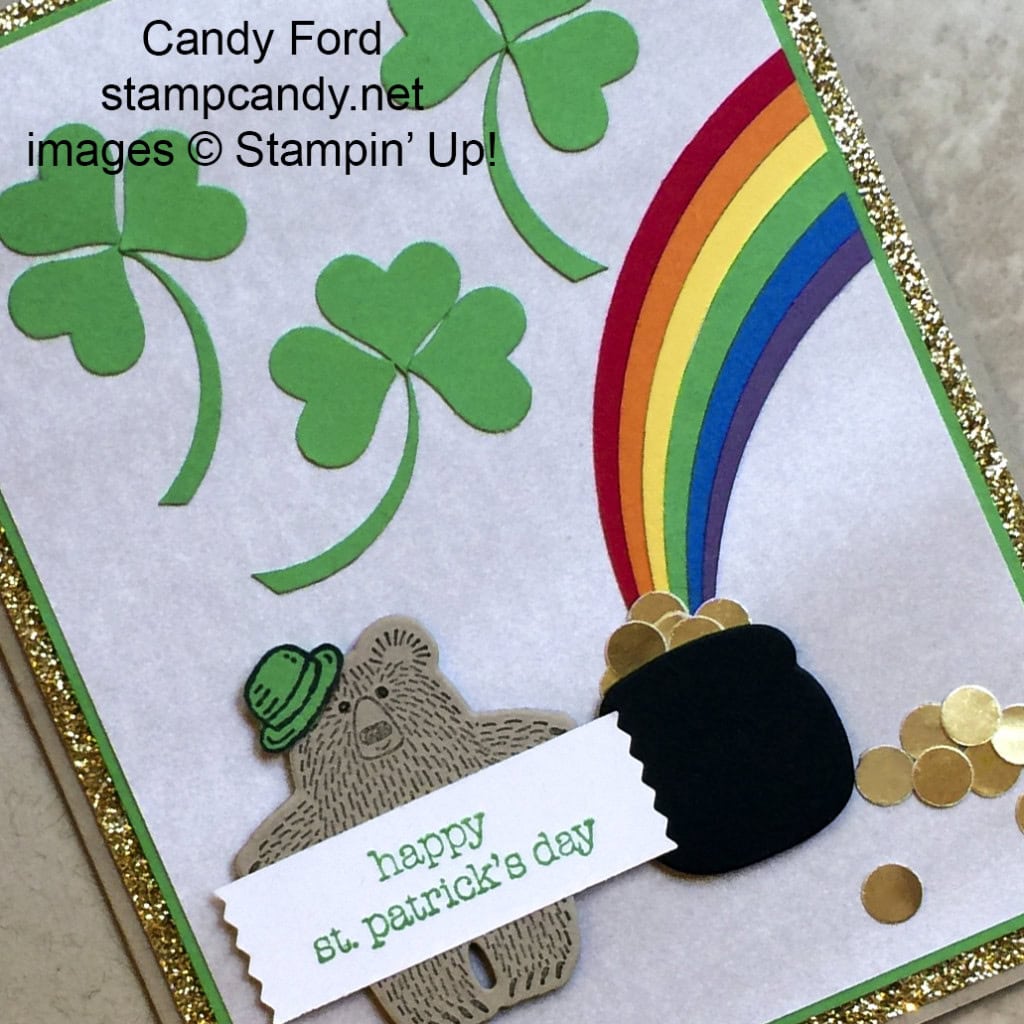
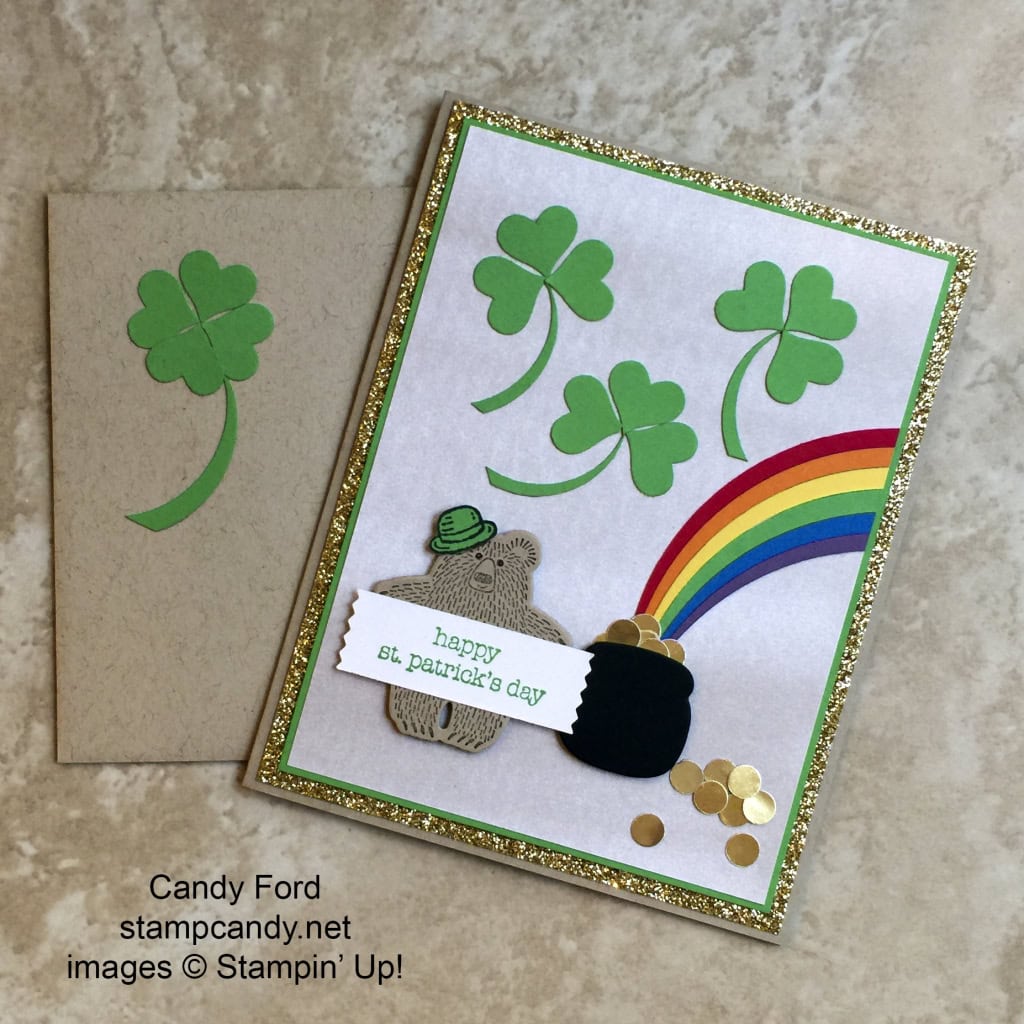
My sister’s birthday is March 17. Every year I swear to myself I’ll make her a birthday card without a St. Patrick’s Day theme, but every year I make her, you guessed it, a birthday card with a St. Patrick’s Day theme. And 2016 is no exception. I just can’t help myself.
I’ve been playing with the Bear Hugs Bundle lately, and I decided to use it on her card. Isn’t he dapper in his little green derby? And his outstretched arms are perfect for holding a sign.
Here’s how I did it:
The card base is Crumb Cake card stock. On top of that is a layer of Gold Glimmer Paper, then a layer of Cucumber Crush CS, then a piece of Perfectly Artistic Designer Series Paper.
I created the shamrocks by cutting hearts with the Itty Bitty Punch Pack, then cutting the stems with the 1-3/8″ Circle Punch. I used my Paper Snips to angle the ends of the stems.
I used the largest of the Circles Collection Framelits Dies (without scallops) to cut arcs of CS in Real Red, Pumpkin Pie, Daffodil Delight, Cucumber Crush, Pacific Point, and Elegant Eggplant. I glued them next to each other onto the card front.
I used the Bear Hugs Framelits Dies to cut the pot from Basic Black CS. I used the 1/4″ Circle Punch to cut the coins from a Gold Foil Sheet. Then I glued the pot and coins over the end of the rainbow.
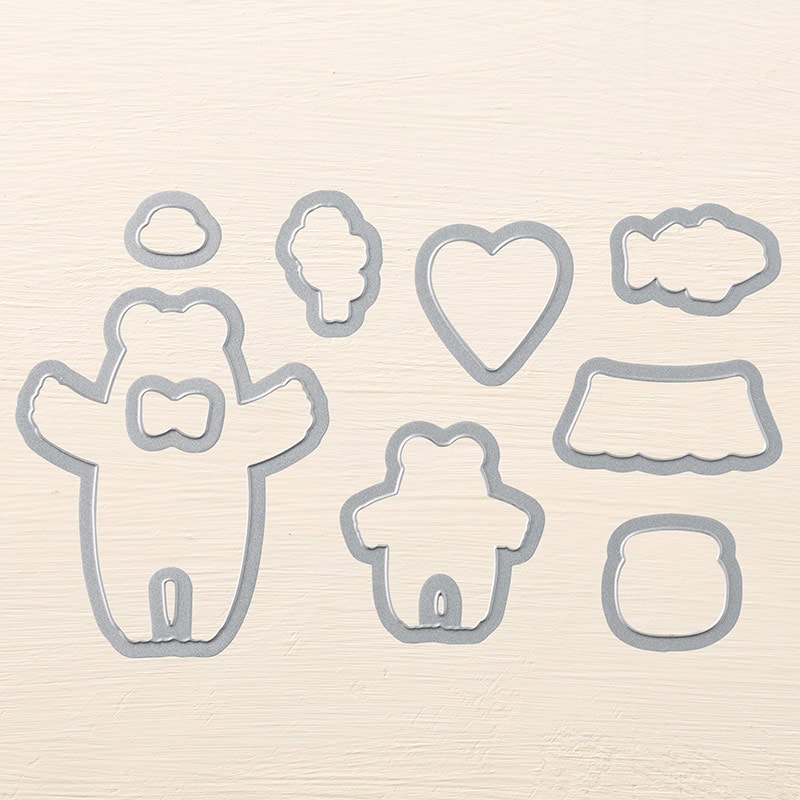
I stamped the smaller of the two bears from the Bear Hugs stamp set in Basic Black onto Crumb Cake CS, and I stamped his hat onto Cucumber Crush CS, then I cut them out with the Bear Hugs Framelits Dies.
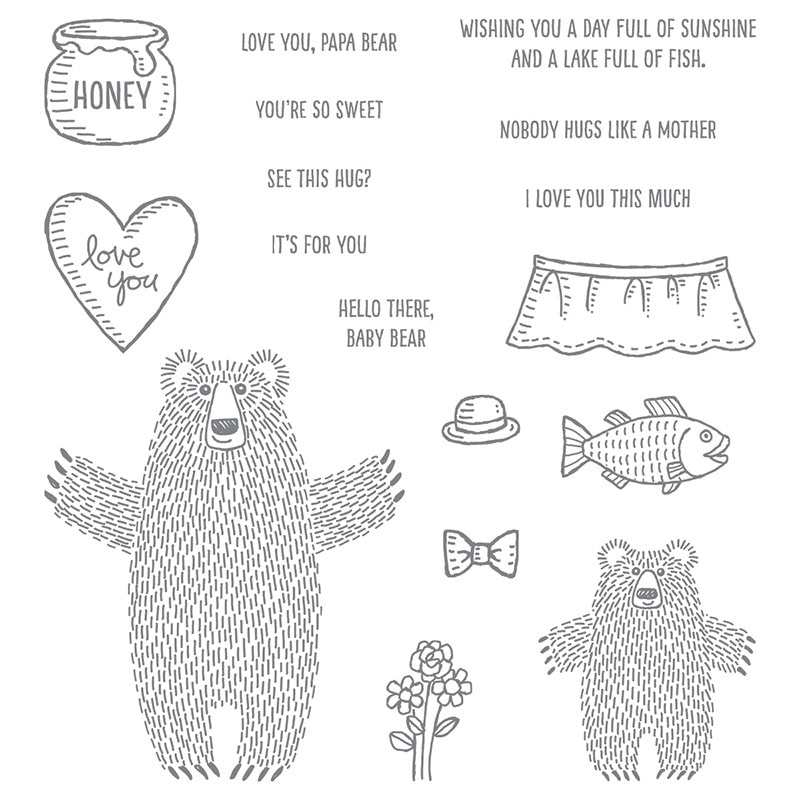
I stamped the sentiment from the Teeny Tiny Wishes stamp set in Cucumber Crush onto Whisper White CS and cut it with the Washi Label Punch. I glued it and the hat onto the bear, then attached him to the card front with Stampin’ Dimensionals.

The Crumb Cake Medium Envelope has a four leaf clover, made the same way as the shamrocks on the card.
Here’s what I used:
Thanks for stopping by today, and Sweet Stamping!
Mar 15, 2016 | Blog Hop, Cards, Occasions |

Welcome to InKing Royalty’s March Blog Hop! Stampin’ Up!’s Occasions Catalog and Annual Catalog are filled with amazing products that help you celebrate Spring with style. With floral stamp sets, dies and printed papers, you can’t go wrong as you have fun with flowers. Today’s Fun with Flowers Blog Hop is filled with inspiring projects that share some great ideas – we are excited to share what we’ve made and hope you’ll find great inspiration from our talented team members in this hop. After you read my post, I hope you’ll hop over to the next person on the list at the base of this post.

One of our activities at our monthly Candy Hearts team meetings is a swap. Today I’m sharing my swap card for the March meeting.

I used Shimmery White Cardstock for the whole card: card base, layers, and die cut pieces.
I used the Botanical Builder Framelits Dies to cut all the leaves and flower pieces. There are actually Framelits and Thinlits in the set:

I used the Magnetic Platform and two clear cutting plates with the Framelits. I used the Mulitpurpose Platform, Precision Base Plate, and one clear cutting plate with the Thinlits. Then I used the Big Shot Die Brush to remove the die cuts pieces from the Thinlits.
I punched the ovals with the Extra Large Oval Punch. Then I set up my assembly line area.

I began each card with an oval.

I glued the leaves onto the oval.

I gave dimension to the flowers by curling the petals with a bone folder.

I pulled the inner petals toward the center of the flowers.

I used my Big Shot Die Brush sponge mat and the round end of a marker to give dimension to the smallest flowers and to the flower centers.

Once all the the pieces were glued to the oval, I put Stampin’ Dimensionals on the back of the whole thing.

Then I adhered it to the card front.

I will probably hand deliver this card, but if I do mail it, I will put it in a small box loosely packed with tissue.
Thanks for stopping by today, and Sweet Stamping!

Mar 9, 2016 | Cards, Color Palette, Occasions |
I’m a scrap saver. I save almost every scrap of paper – card stock and Designer Series Paper – if I think I might be able to use it for anything. My scrap drawers are getting pretty full, so I thought maybe I should use some of them.
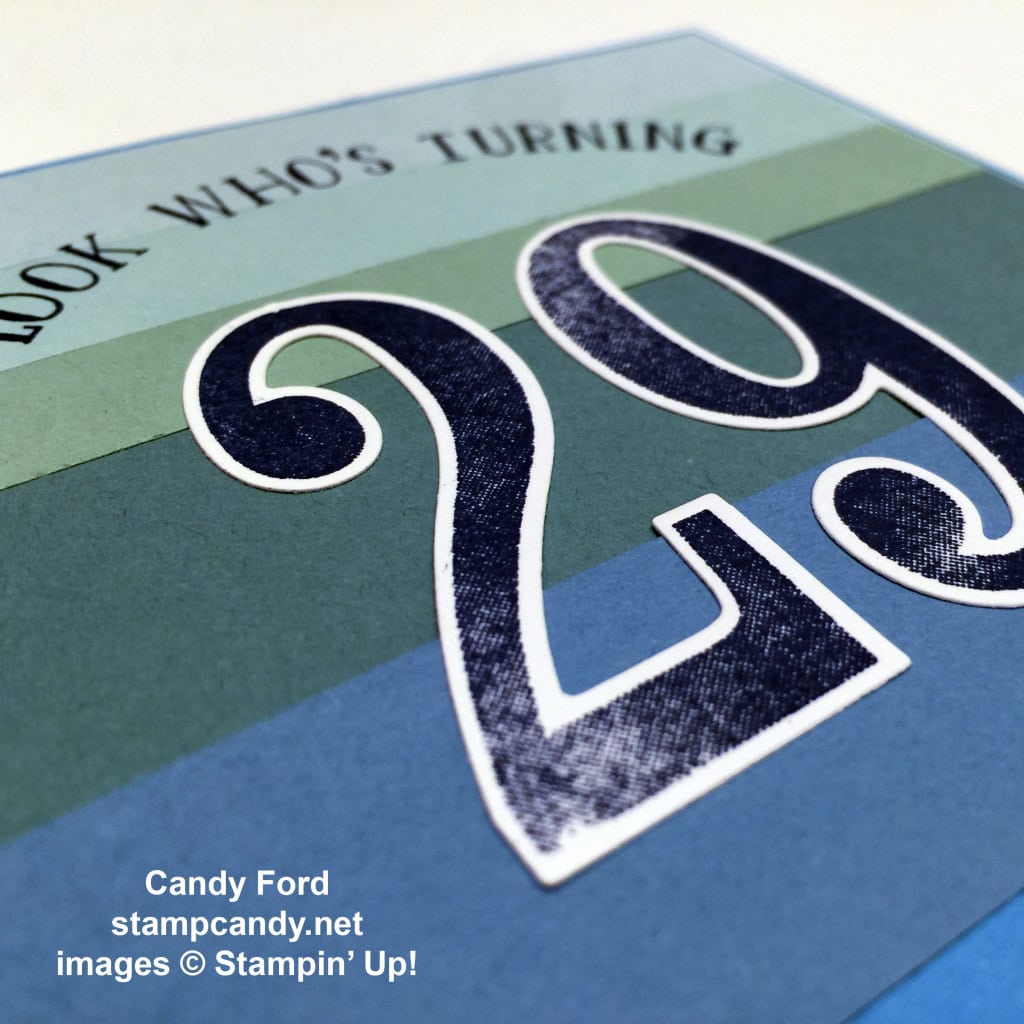
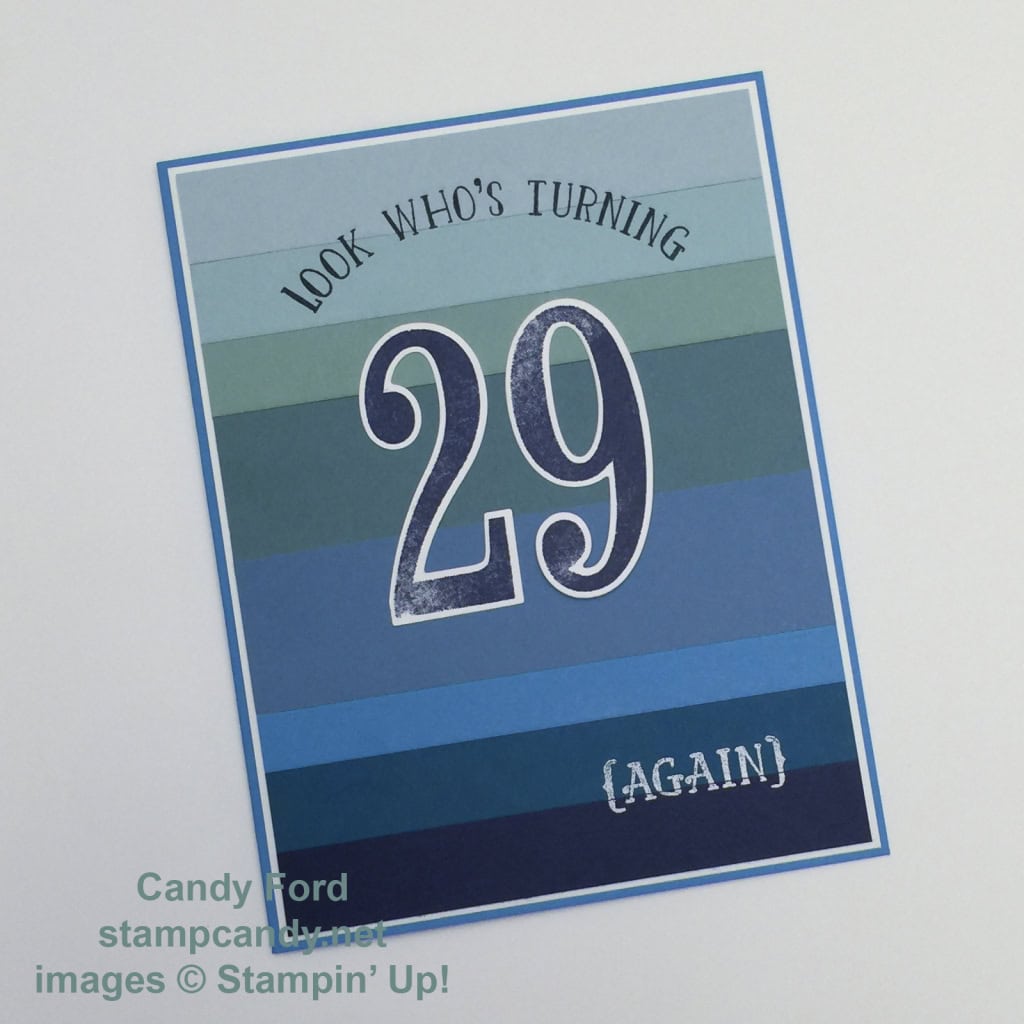
Today I’m sharing a card I made with strips of card stock from some of the blue drawers: Soft Sky, Pool Party, Mint Macaron, Lost Lagoon, Marina Mist, Tempting Turquoise, Island Indigo, and Night of Navy. I glued the strips onto a 4″ x 5-1/4″ piece of Whisper White card stock, then trimmed along the sides.
I glued it onto a 4-1/8″ x 5-3/8″ piece of Whisper White CS, then glued that onto the Tempting Turquoise card base.
I stamped the top sentiment in Night of Navy directly onto the card front. I stamped the bottom sentiment in Versamark directly onto the card front, then heat embossed it in White.
I stamped the numbers in Night of Navy onto a piece of Whisper White CS, cut them with the Large Numbers Framelits Dies, then glued them onto the card front.
What can you make with your scraps? I’d love to see.
Post your photos to my Facebook page.
Here’s what I used:
Thanks for stopping by today, and Sweet Stamping!
Mar 8, 2016 | Cards, Club, Occasions |
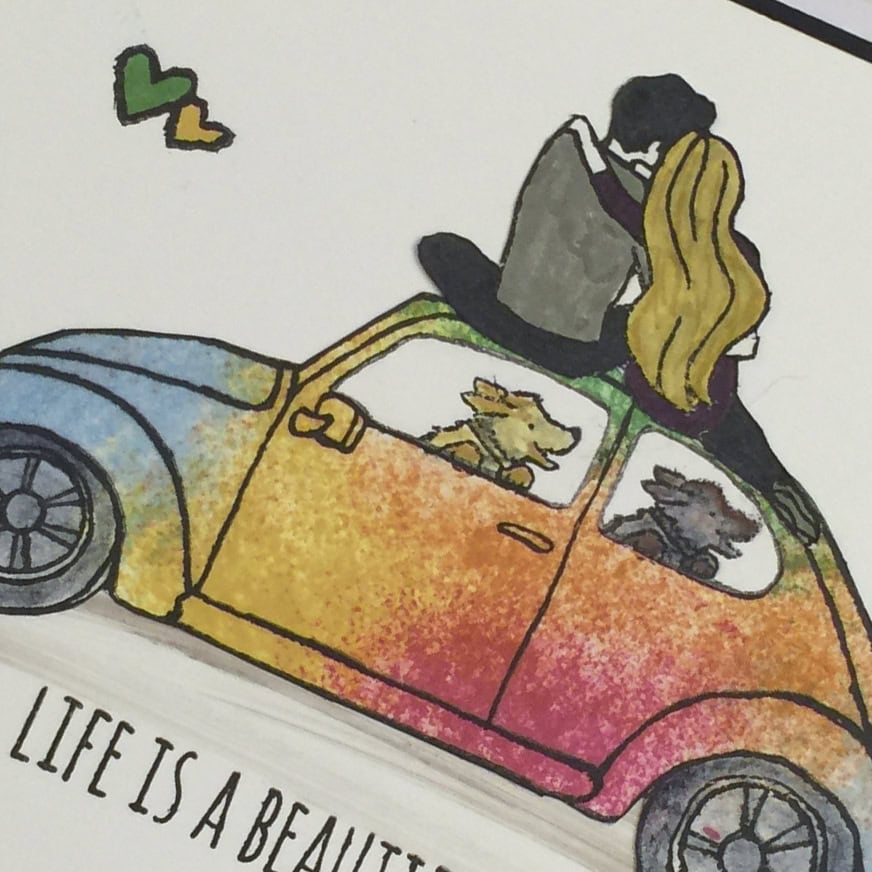
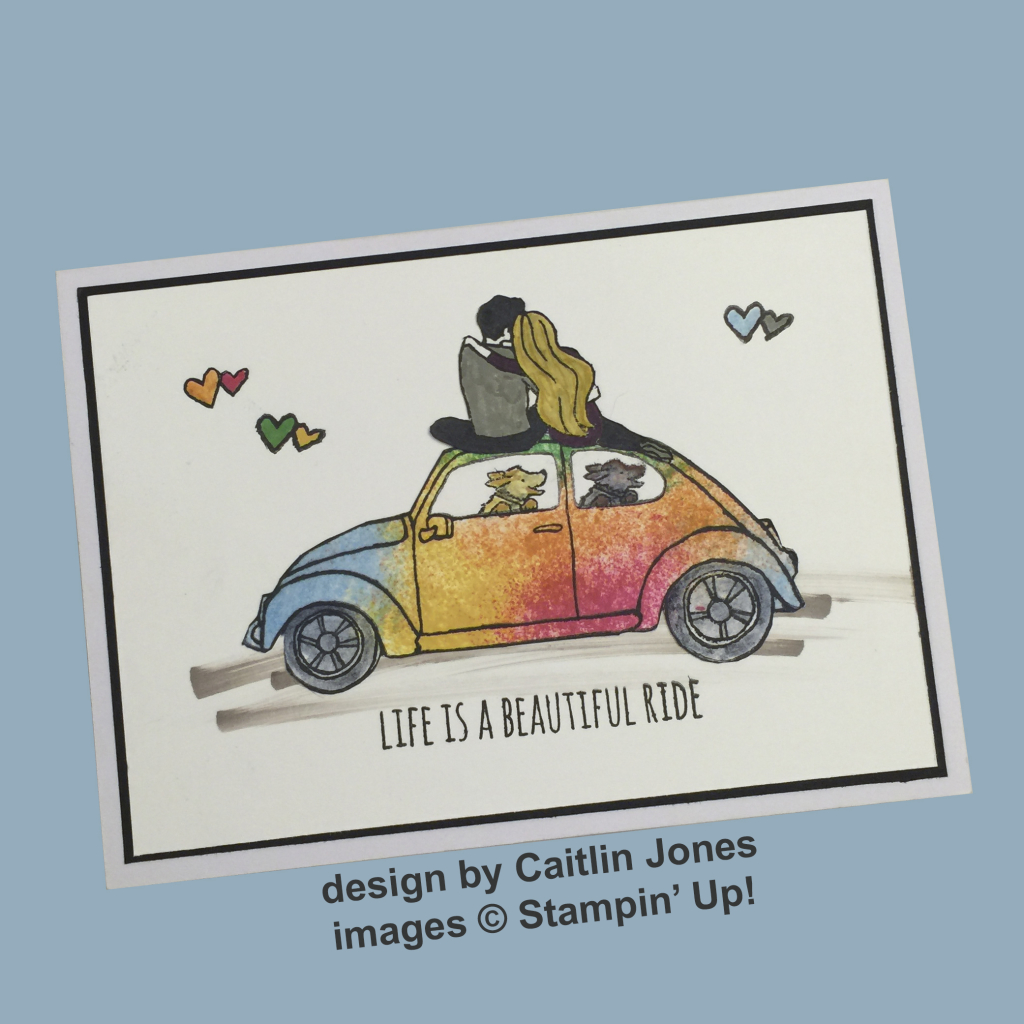
Today I am excited to share with you a card made by one of my Stamp Club members, Caitlin Jones. She is extremely talented in the design of, and skilled in the execution of, handmade cards. She brought this card to show us at our last meeting, and I just had to show it off.
She used a mostly-dry wet wipe to tie-dye the car image from the Beautiful Ride stamp set, then fussy cut it and the people. Didn’t she do an outstanding job?
Caitlin is a delight and I’m thrilled to have her in my club. I hope she’ll sign up one day and share her talents with more people!
Thanks for stopping by today, and Sweet Stamping!
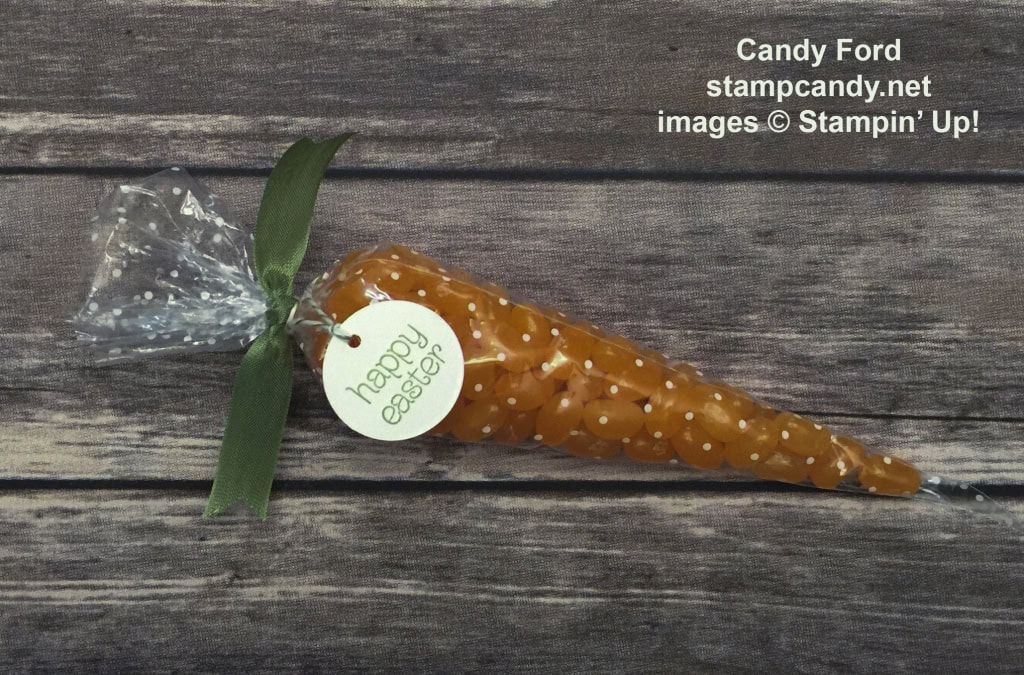
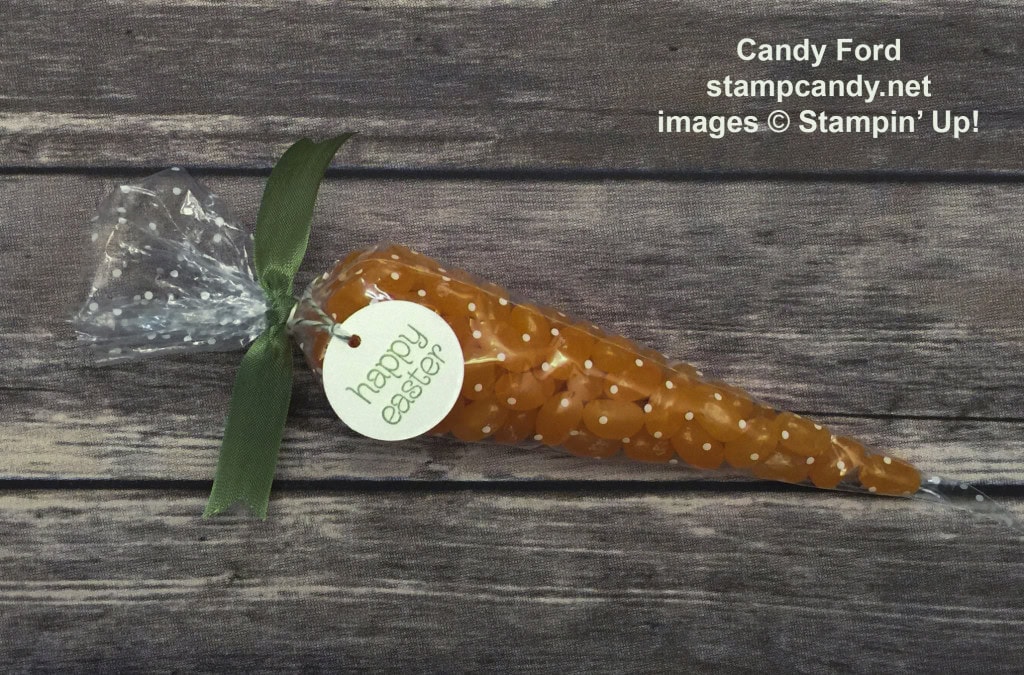
Mar 7, 2016 | Bags, Club, Food, Gifts, Occasions, Tags |
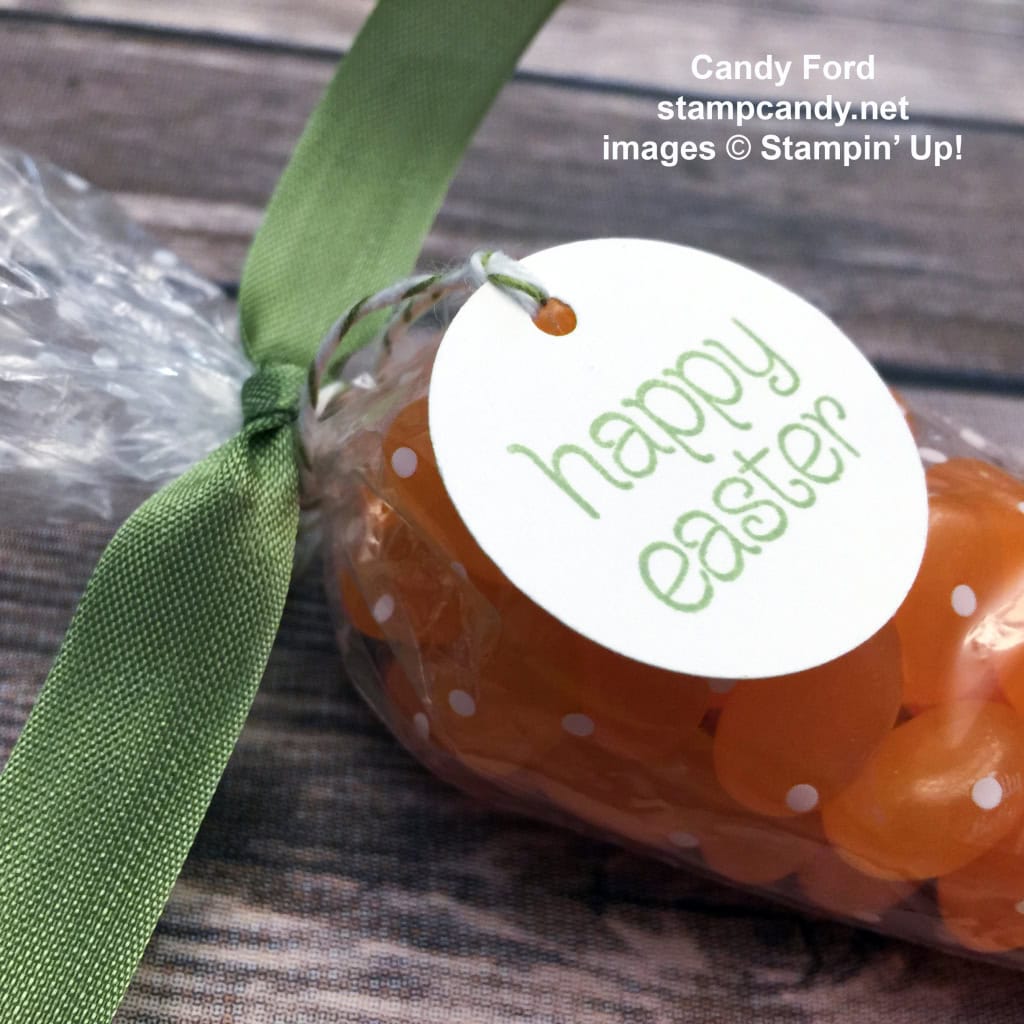
No, it isn’t an exotic dish you’d see on one of those cooking challenge shows. It’s much simpler. It’s a Polka Dot Cone Bag filled with Tangerine flavored jelly beans, and tied with Wild Wasabi Seam Binding and Old Olive Baker’s Twine, to look like a carrot.
This is the third and final Easter project from the March Stamp Club gathering. To see the previous two, click here and here.
This is just about as quick and easy as they come. Put a level 1/3 cup of jelly beans, or other small treats, into the bag. Twist the top to close, and tie with a piece of Wild Wasabi Seam Binding Ribbon.
Stamp the sentiment (we used this one from the Circle of Spring stamp set) on a piece of Whisper White card stock and cut it with the 1-1/4″ Circle Punch. Punch a small hole with the 1/8″ Circle Punch to make a tag. Use Old Olive Baker’s Twine to tie the tag onto the bag.
And that’s it! These provide a lot of bang for the buck. They’re super quick and easy, and make wonderful favors.
Here’s what we used:
Thanks for stopping by today, and Sweet Stamping!