Apr 12, 2017 | Bags, Cards, Deals, Gallery, Retiring Products, Sales |
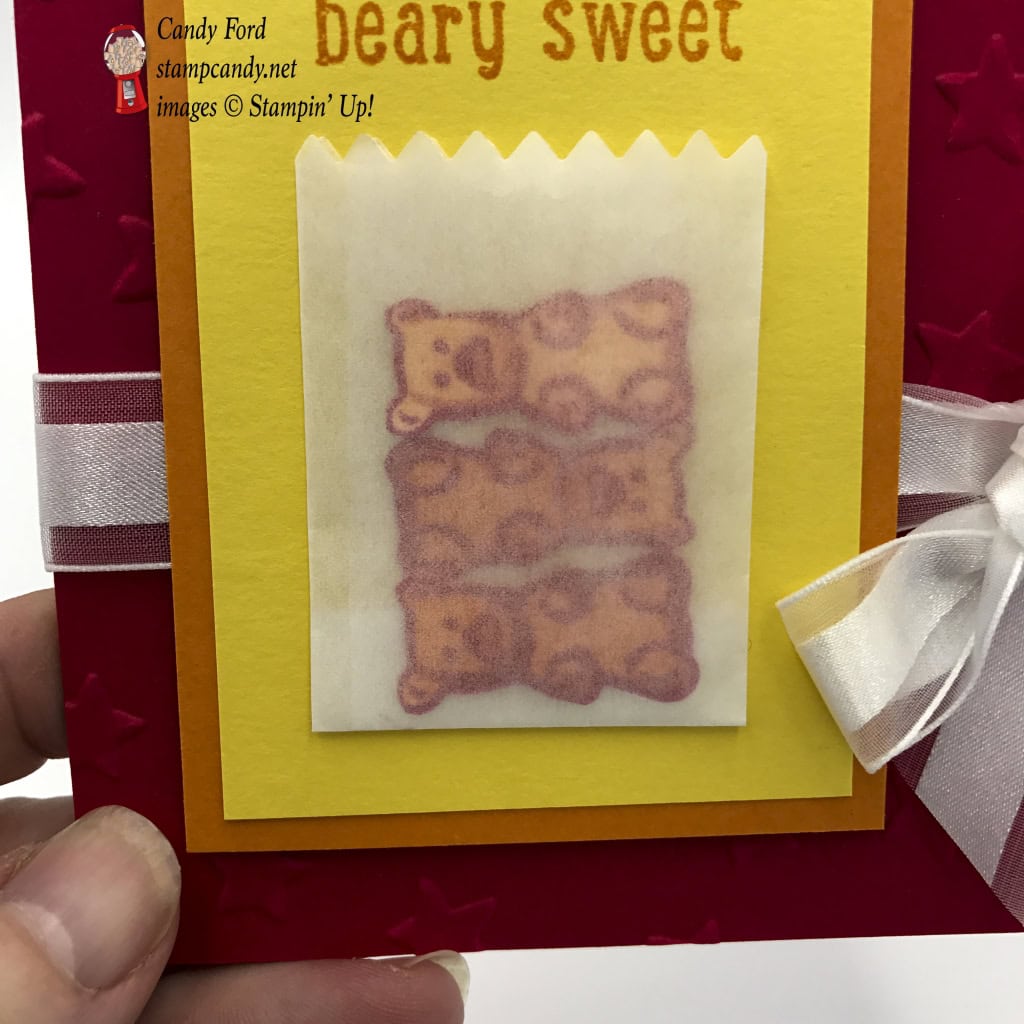
I like gummy bears. Well, I like gummy worms, so I assume I would like gummy bears. Aren’t all the gummy critters made of the same stuff? I prefer the yellow/orange/red ones (as opposed to the clear/red/green ones) so those are the ones I tried to replicate for today’s card made with the Just Keep Swimming stamp set.

Just Keep Swimming © Stampin’ Up!
The winner of the blog candy from my April 5 post is jamesmominwa@aol.com! I will email you today to get your mailing information, and will get your blog candy right out to you! Congratulations, jamesmominwa@aol.com!
Stampin’ Up! has released the list of retiring products from the 2016-2017 Annual Catalog and the 2017 Occasions Catalog. Scroll down for more information!
Here’s what I made:
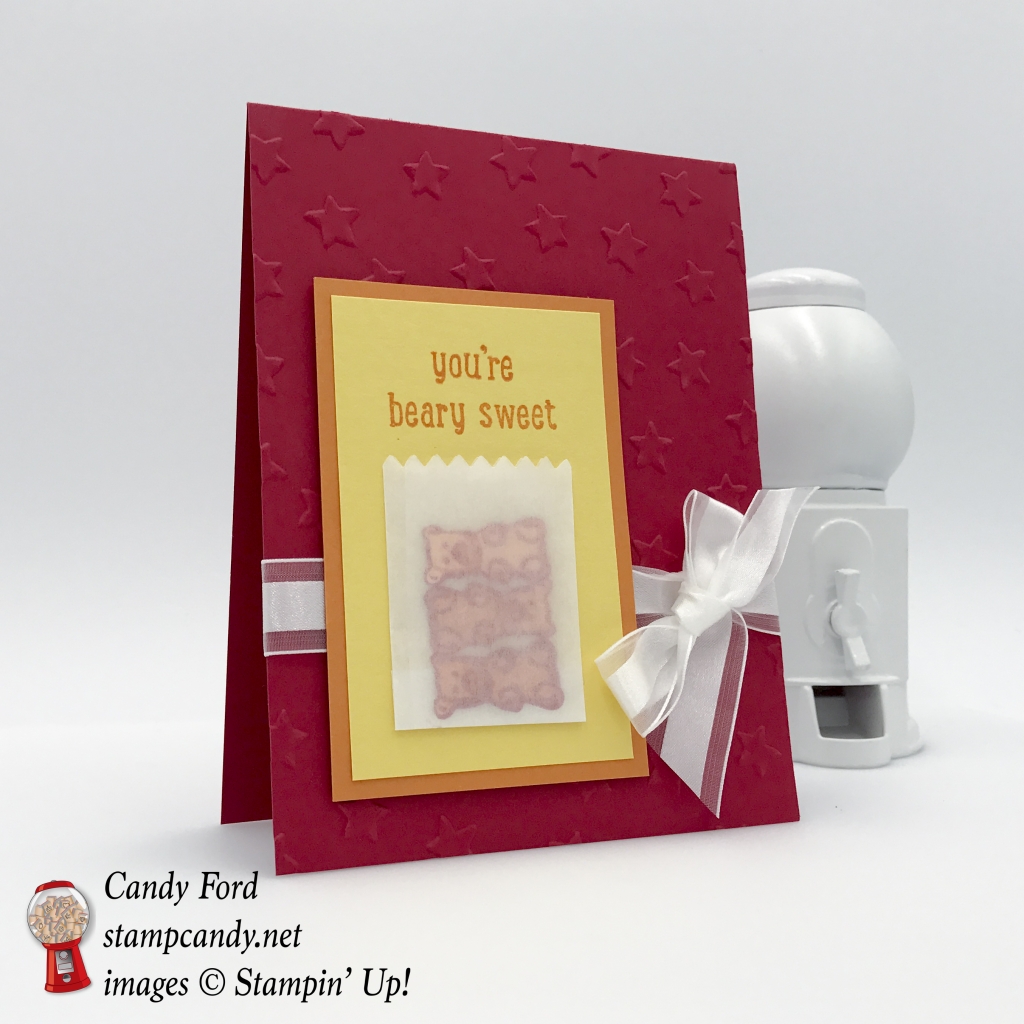
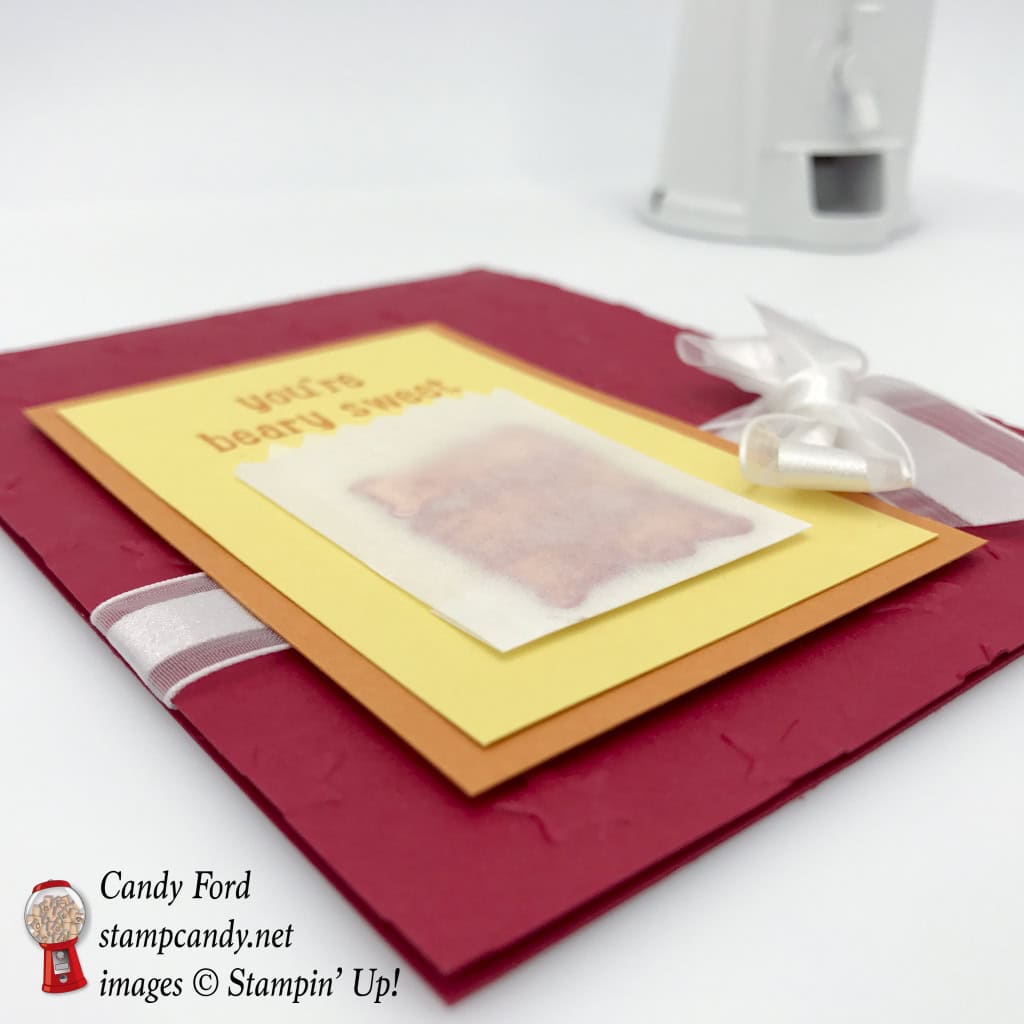
Here’s what I did:
Cut and scored with my Stampin’ Trimmer:
- Real Red card stock (CS) to 4-1/4″ x 11″, then scored in half at 5-1/2″
- Pumpkin Pie CS to 3-1/2″ x 3-3/4″
- Daffodil Delight CS to 2-1/4″ x 3-1/2″
- Glassine Sheet to 3-1/2″ x 2-1/2″
- Whisper White CS to 4′ x 5-1/2″ for the inside
Stamped with the Just Keep Swimming stamp set:
- 3 gummy bears in Pumpkin Pie and Real Red onto a scrap of Peekaboo Peach CS – this is a three step stamp, but I used the CS as the base color, and stamped the second stamp in Pumpkin Pie, then the last stamp in Real Red
- sentiment in Pumpkin Pie ink onto the Daffodil Delight CS
Die cut using the Mini Treat Bag Framelits:
- just the top of the little glassine bag
Fussy cut with Paper Snips:
Embossed with Lucky Stars TIEF:

Lucky Stars TIEF © Stampin’ Up!
Assembled the card:
- glassine sheet folded into a bag big enough for the gummy bears, 1-1/2″ wide and bottom folded up 1/2″ – you can cut the top with the Mini Treat Bag Framelits either before or after you fold it
- bears adhered to inside of bag with Mini Glue Dots – I opened up the bag, placed the glue dots on the bears’ backs, arranged them face down on the inside front of the bag, then closed the bag, so the bears were adhered to the back part of the bag and the glue dots wouldn’t show
- folded the bag back into shape and sealed it shut in the back with Fast Fuse
- bag adhered to Daffodil Delight CS with Fast Fuse
- Daffodil Delight CS glued onto Pumpkin Pie CS
- Whisper White Organza Ribbon wrapped around front of card base, adhered with Fast Fuse, and tied in a bow
- Pumpkin Pie CS adhered to card front with Stampin’ Dimensionals
- Whisper White CS glued to the inside of the card base
Here’s what I used:
Click on the images for more details and to purchase.

Here’s the official Retiring List from Stampin’ Up!:
Items are available through May 31, 2017 OR while supplies last. Many items are marked down, up to 50% off. So get them now while you still can. Please go to my online store and use the Host Code below.
Click here for the pdf.
Click here for the sortable Excel spreadsheet.
Click here to see the Retiring List in my online store.
Gum Ball Rewards
 You always earn a Gum Ball for every $50 you spend on an order with me. Earn 10 Gum Balls and I’ll send you a free stamp set of your choice! See the Gum Ball Rewards page for details.
Click here to shop my online store!
April Host Code
HV6MJT2X
Use the Host Code on online orders less than $15o. See how to use a Host Code here.
Online orders of $75-149.99 placed with the Host Code will receive the gift of the month!
Online orders of $150 or more will automatically receive the gift of the month! Do not use the Host Code.
April’s gift is a pack of Urban Underground Embellishments! Each pack contains 24 brushed silver embellishments – 8 each of 3 designs. (I can ship within US only.)
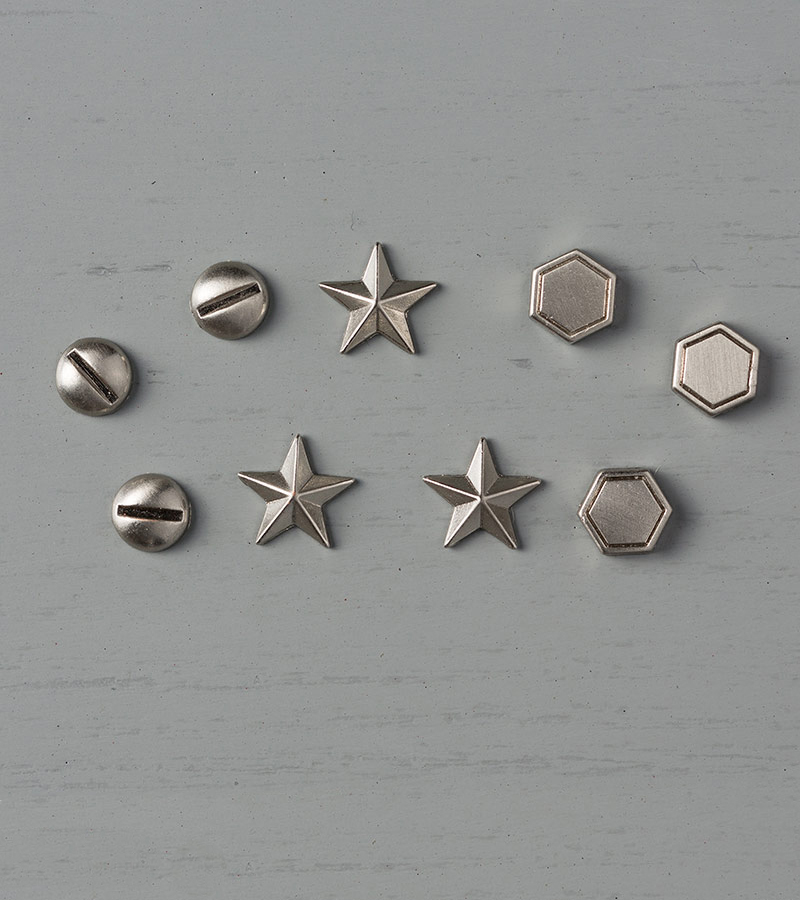
Urban Underground Embellishments © Stampin’ Up!
Thanks for stopping by today, and Sweet Stamping!

Apr 7, 2017 | Cards, Gallery, Retiring Products |
Someone just took the lid off the jar and set it out on the porch for the fireflies to escape into the night. Today I’m sharing another card I made recently with the Jar of Love bundle. The Jar of Love stamp set and the Everyday Jars Framelits Dies are available separately, but why not get both and save 10%?

Jar of Love Bundle © Stampin’ Up!
Here’s what I made:

Here’s what I did:
Cut and scored with my Stampin’ Trimmer:
- So Saffron card stock (CS) to 4-1/4″ x 11″, then scored in half at 5-1/2″
- Bermuda Bay CS to 4″ x 5-1/4″
- Night of Navy CS to 3-3/4″ x 5″
- Serene Scenery Designer Series Paper (DSP) to 3-3/4″ x ___
Stamped with the Jar of Love stamp set:
- fireflies in Basic Black ink onto Whisper White CS
- jar in Basic Gray ink onto a Window Sheet
- sentiment in Versamark ink onto Night of Navy CS, making sure it will be above where the DSP will be (see sentiment details below)
Die cut using the Everyday Jars Framelits:
- fireflies
- jar, then I inked the edges with Basic Gray ink, to help it show up better
Cut using the 1/2″ Circle Punch:
- one circle per firefly from a scrap of So Saffron CS
Embossed the sentiment:
- dusted Night of Navy CS with Embossing Buddy
- stamped sentiment in Versamark ink
- sprinkled of White Stampin’ Emboss Powder
- used Heat Tool to set the powder
Colored using Stampin’ Write Markers:
- firefly backsides in So Saffron
- firefly bodies in Basic Black
Assembled the card:
- DSP glued onto the bottom of Night of Navy CS
- So Saffron circles glued onto Night of Navy CS, where you want the fireflies
- fireflies glued onto circles and Night of Navy CS
- jar adhered using Fast Fuse around the edges
- Night of Navy CS glued onto Bermuda Bay CS
- Bermuda Bay CS glued onto card base
Here’s what I used:
Click on the images for more details and to purchase.
RETIRING IN COLORS
DID YOU KNOW the 2015-2017 In Colors will retire at the end of May? That means that they will no longer be available to order on June 1. Don’t wait until then to order them. At some point before the end of May, they will become available only while supplies last. So get what you need now.
SPEAKING OF RETIRING PRODUCTS
The Designer Series Papers always retire, too. So these products won’t be available after May 31. And just like the retiring In Colors above, at some point before the end of May, these items will become available only while supplies last. Don’t wait until the last minute. Get them now!
Gum Ball Rewards
You always earn a Gum Ball for every $50 you spend on an order with me. Earn 10 Gum Balls and I’ll send you a free stamp set of your choice! See the Gum Ball Rewards page for details.
Click here to shop my online store!
April Host Code
HV6MJT2X
Use the Host Code on online orders less than $15o. See how to use a Host Code here.
Online orders of $75-149.99 placed with the Host Code will receive the gift of the month!
Online orders of $150 or more will automatically receive the gift of the month! Do not use the Host Code.
April’s gift is a pack of Urban Underground Embellishments! Each pack contains 24 brushed silver embellishments – 8 each of 3 designs. (I can ship within US only.)
Urban Underground Embellishments © Stampin’ Up!
Thanks for stopping by today, and Sweet Stamping!
Mar 25, 2017 | Boxes, Events, Gallery, Gift Wrap, Gifts, Retiring Products, Sale-A-Bration, Swaps |
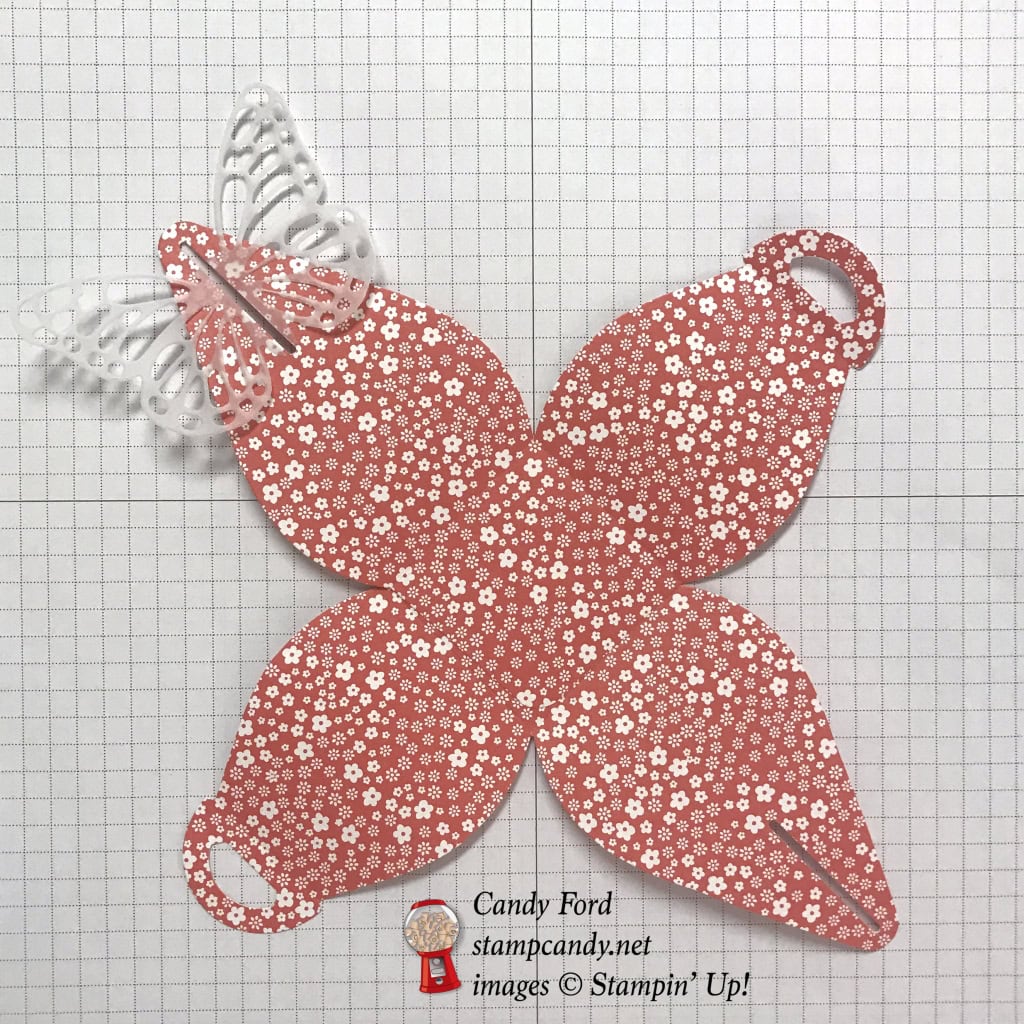
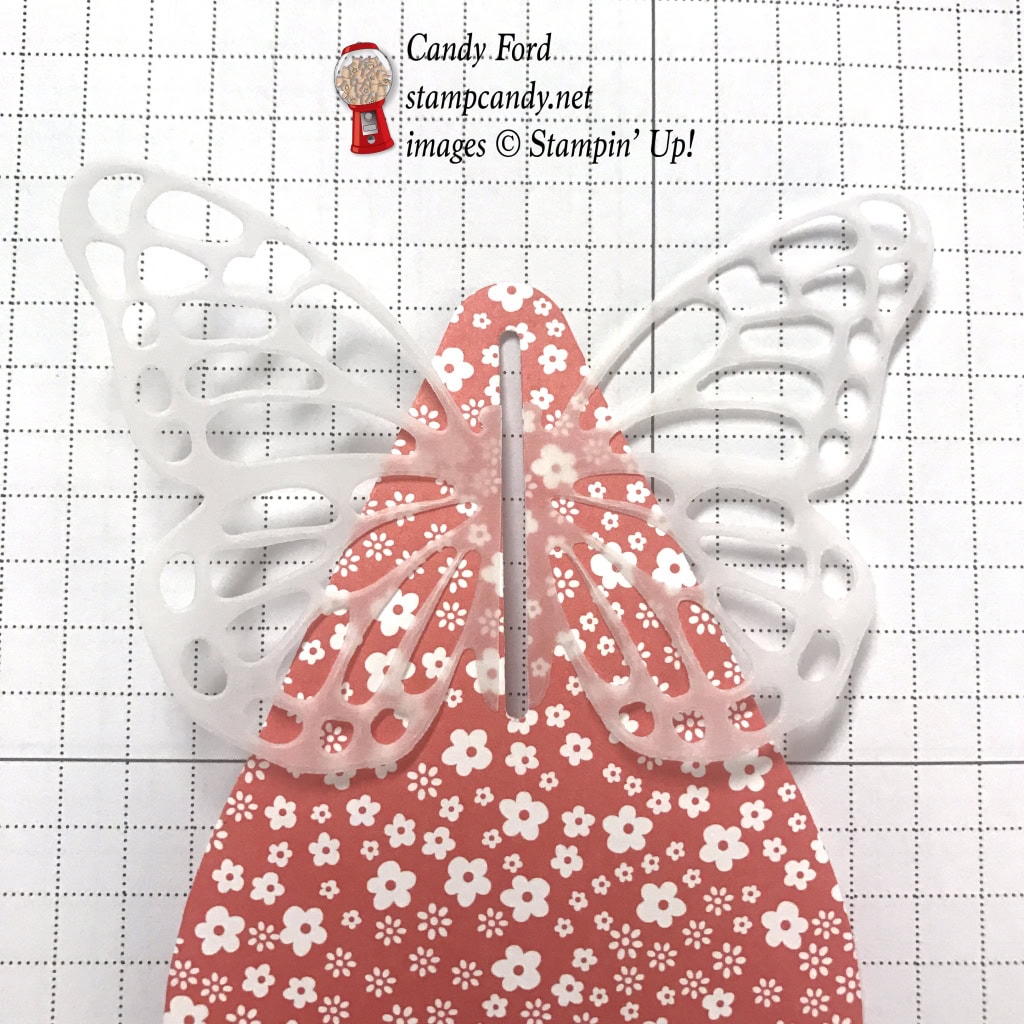
Today I’m sharing my 3D Swap from our March Candy Hearts team meeting, which you can read about here. It’s really super simple. I used the Curvy Keepsake Box Framelits to make the box, and added a vellum butterfly. That’s it! Well, other than filling them with chocolates. Aren’t they pretty? They look like the butterflies are about to fly away with them.
Here’s what I made:

Here’s what I did:
Cut and scored with my Stampin’ Trimmer:
- 2015-2017 In Color Designer Series Paper (DSP) to 6″ x 12″
- Vellum card stock (CS) to 3-1/2″ wide strips
- cut each die-cut butterfly in half, up through the body*
Die cut using the Curvy Keepsake Box Framelits:
- DSP cut with the box die (2 per box)
Die cut using the Butterflies Thinlits:
- *butterflies from Vellum – one per box
Assembled the box:
- two box pieces glued together at the bottom
- glued a butterfly half on each side of the slot, as shown – make sure this part gets closed last
- close three sides of the box, fill with goodies, then close the fourth part with the butterfly


Here’s what I used:
Click on the images for more details and to purchase.
MORE SALE-A-BRATION ITEMS!
ONLY UNTIL MARCH 31!!!

Now through March 31, you will earn a FREE item from the Sale-a-bration catalog for each $50 you spend on an order. Sale-a-bration items are now available only while supplies last. So don’t wait if there’s anything you still want!
Here are the Sale-a-bration items still available:
CORRECTION: the Seaside and the Sparkle Textured Impressions Embossing Folders are no longer available as free SAB items.

Paper Pumpkin 3 month prepaid subscription is only $55, but only through March 31! It’s the easiest way to earn a FREE Sale-a-bration item! Get it here.
Take it to the next level with a 12-month prepaid subscription. Save over $2 per month with the everyday awesome price, earn Stampin’ Rewards, and instantly qualify for 4 FREE Sale-A-Bration items! Get it here.
RETIRING IN COLORS
DID YOU KNOW the 2015-2017 In Colors will retire at the end of May? But don’t wait until then to order them. At some point they will become available only while supplies last. So get what you need now.
SPEAKING OF RETIRING PRODUCTS
The Designer Series Papers always retire, too. None of us will know for sure until the retiring list comes out, but here are the DSPs and related products that I believe will be retiring at the end of May:
You always earn a Gum Ball for every $50 you spend on an order with me. Earn 10 Gum Balls and I’ll send you a free stamp set of your choice! See the Gum Ball Rewards page for details.
Click here to shop my online store!
March Host Code
BDF43VHE
Use the Host Code on online orders less than $15o. See how to use a Host Code here.
Online orders of $75-149.99 placed with the Host Code will receive the gift of the month!
Online orders of $150 or more will automatically receive the gift of the month! Do not use the Host Code.
March’s gift is a pack of Metallic Foil Doilies! Each pack contains 24 doilies: 6 each of 2 sizes in 2 colors.

Metallic Foil Doilies © Stampin’ Up!
Click here to shop my online store!
Thanks for stopping by today, and Sweet Stamping!
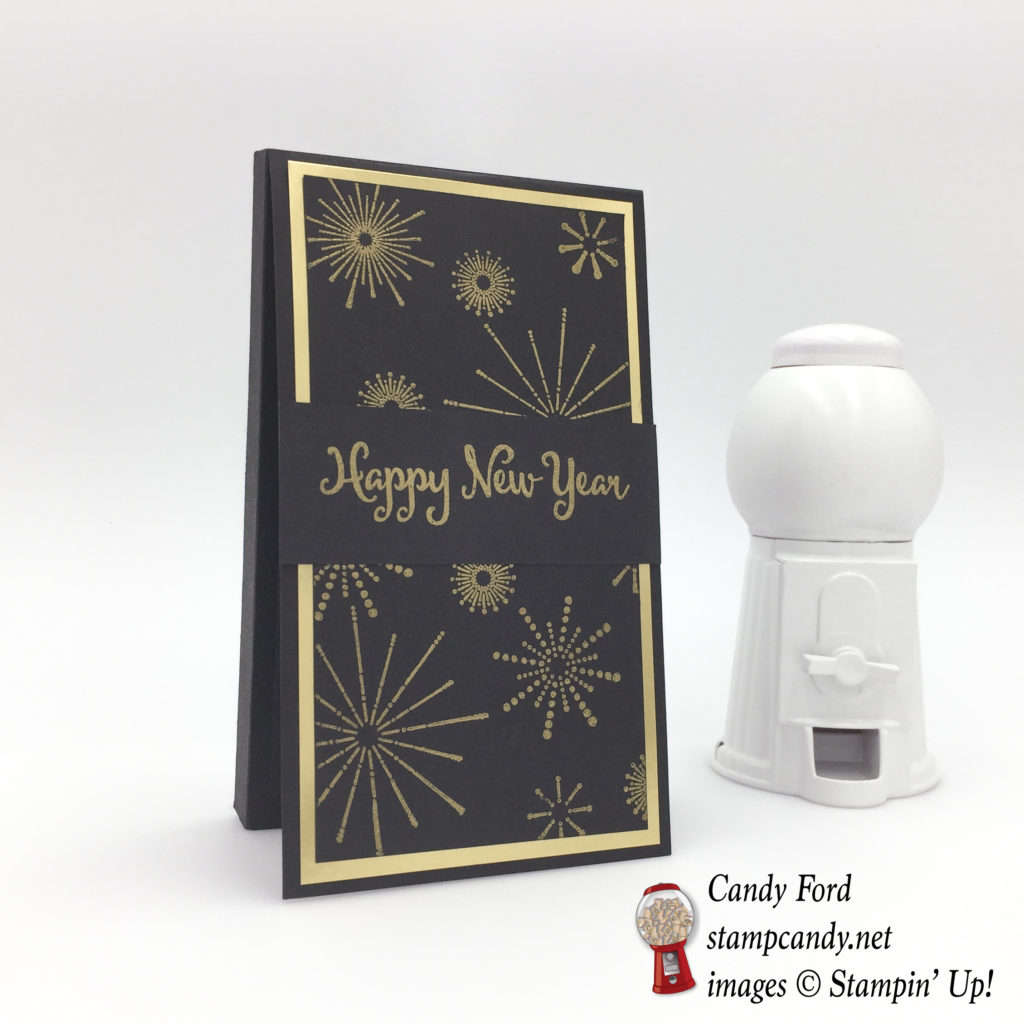
Dec 31, 2016 | Boxes, Cards, Gallery, Gifts, Holiday, New Year, Retiring Products, Tags |
Today I’m sharing a project that I presented at a stamping event in November, and that my downline requested we make at our next meeting. It’s a Sliding Treat Box with a Twist Pop-Up Panel Card attached.
Here’s what I made:
2017
The card opens to show fireworks and a panel with 2017, and the box slides open to reveal the goodies inside.
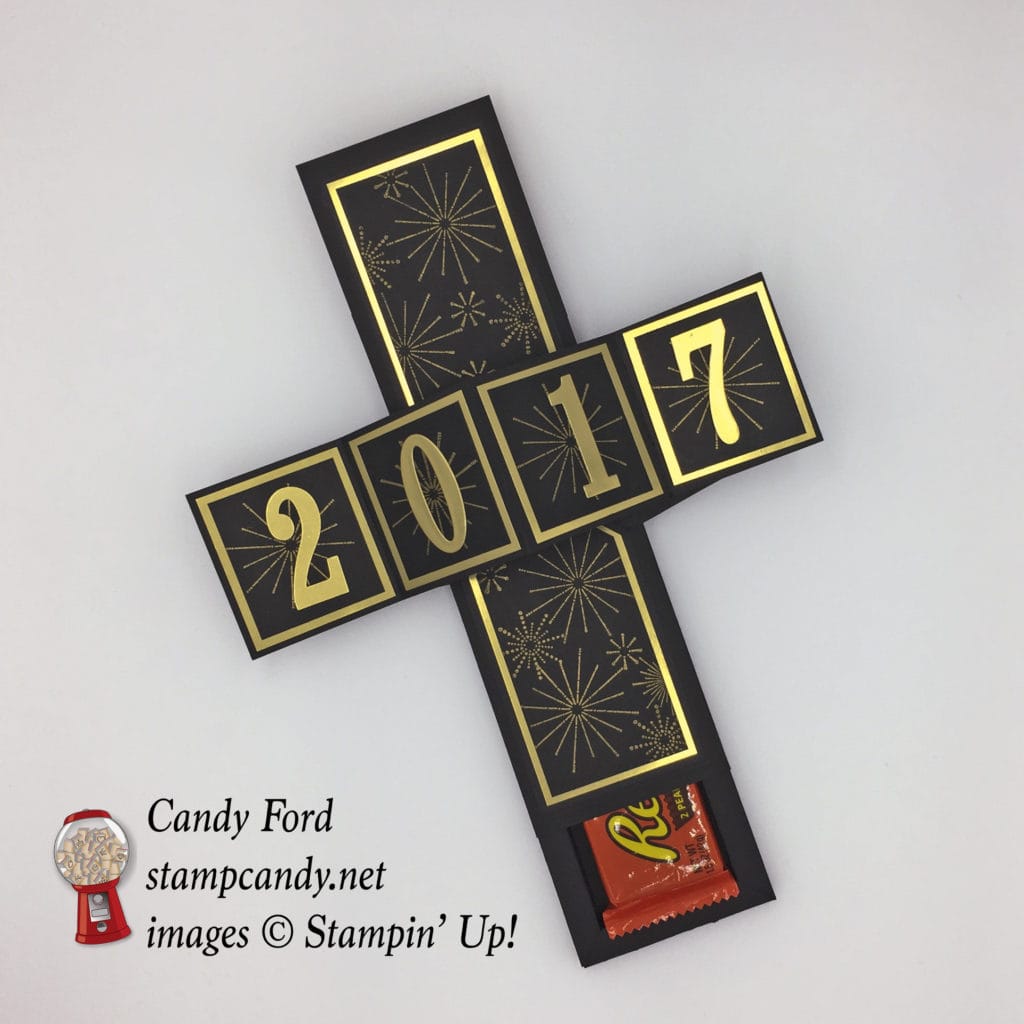
I made the one for my presentation (above) to fit a package of Reese Cups.
To simplify things, I made the one for our team meeting (below) the size of a standard 4-1/4″ x 5-1/2″ card. I gave this one to my sister-in-law with a gift card inside, But 9 Hershey’s Nuggets fit nicely.

Here’s how I did it:
Click here for instructions on building the sliding box. Begin where it says “Score 4 times from the edge of all four sides,…” You will start with a piece of Basic Black card stock cut to 8-1/4″ x 9-1/2″, and the score lines should be every 1/2″. The cover is Basic Black card stock cut to 5-9/16″ x 11″
Click here for instructions on building the Twist Pop Up Panel Card. Build the entire card with Basic Black card stock, and the decorative pieces are Gold Foil Sheets.
Here’s how I did the extra decoration:
Cut 4 pieces of Basic Black card stock to 2-1/2″ x 2-1/4″. Stamp the largest firework from the It’s A Celebration stamp set in Versamark ink onto each piece, then heat emboss in gold. Adhere one of these to the gold foil piece on each section of the panel. Using the Large Numbers Framelits, cut out 2017 from a piece of Gold Foil Sheet. Adhere the numbers to the panel as shown.
Cut two pieces of Basic Black card stock to 3-1/2″ x 4-3/4″. Use the folded up mechanism to trace the point onto each piece. Stamp assorted fireworks from the same stamp set in Versamark ink onto both pieces, then heat emboss in gold. Adhere these to the two gold foil pieces on the inside of the mechanism.
Cut one piece of Basic Black card stock to 3-3/4″ x 5″.Stamp assorted fireworks from the same stamp set in Versamark ink onto both pieces, then heat emboss in gold. Adhere this to the gold foil piece on the front of the card base.
Cut one piece of Basic Black card stock to 1″ x 4-1/4″. Stamp the sentiment from the same stamp set in Versamark ink and heat emboss it in gold. Adhere it to the front of the card as shown.
Adhere the back of the finished card to the top of the sliding box cover – I like to cover the line where the two ends of the cover overlap. Put a treat inside the box. Then tie a piece of gold cord from the Baker’s Twine Trio Pack around it.
I also made a gift tag by cutting a piece of Gold Foil Sheet to 2″ x 4″, scoring it at 2″, and folding it in half. I punched the top corner with the 1/8″ Circle Punch and threaded another piece of the gold twine through the hole to tie it to the box.
Here’s what I used:
Thanks for stopping by today, and Sweet Stamping!
Dec 16, 2016 | Bags, Christmas, Food, Gallery, Gifts, Holiday, Retiring Products |
Christmas is only 10 days away! Today’s project is another gift you can make for all those people in your life you want to recognize with just a little something. They are snowmen made from Hershey’s Nuggets.
Here’s what I made:
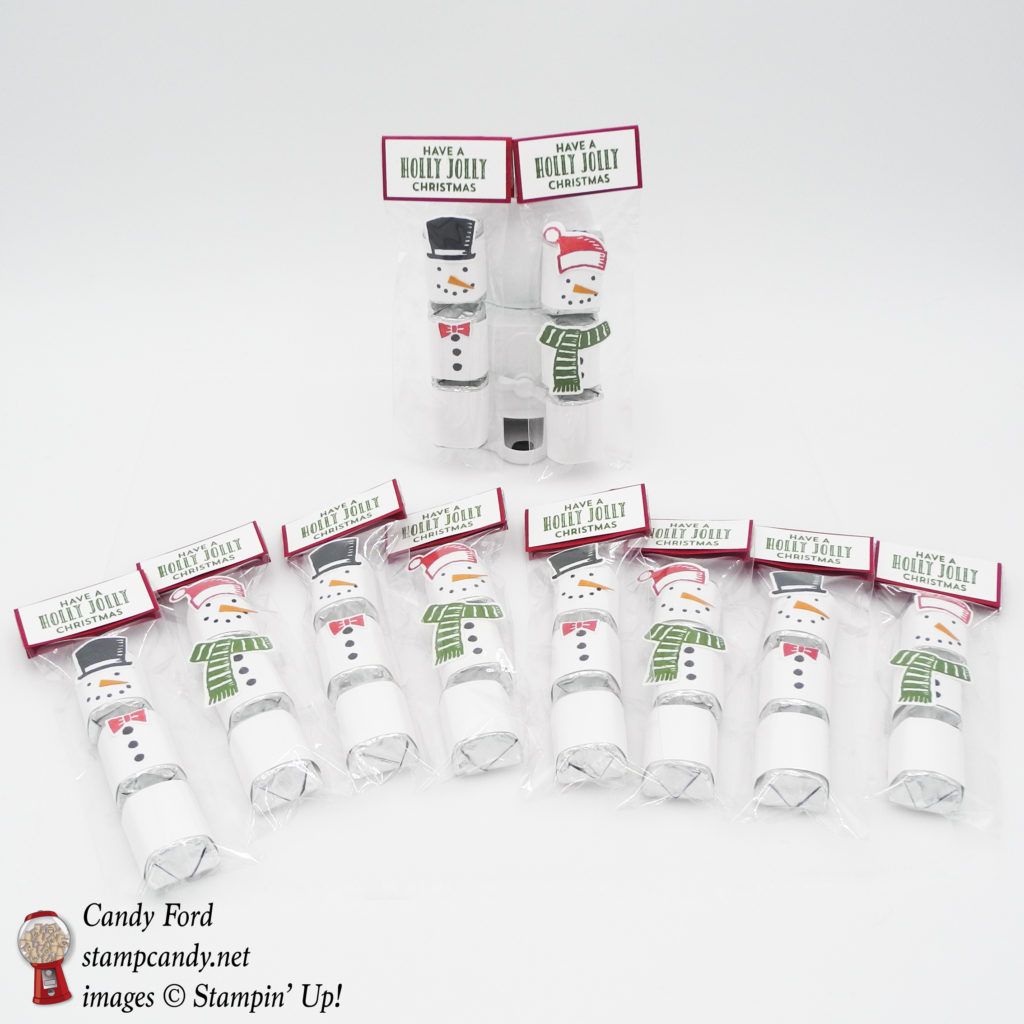
Here’s how I did it:
For the snowmen:
I cut strips of Whisper White card stock to 1″ x 3″. This is the perfect size to wrap around Hershey’s Nuggets.
I left the bottom strip blank.
On the center strip, I stamped buttons from the Snow Place stamp set in Memento Black ink.
On the top strip, I stamped the face using one eye from one of the faces in the Foxy Friends stamp set. I stamped it twice for the eyes, and 5 times for the mouth.
I wrapped the strips around Nuggets.
On a separate piece of Whisper White card stock, I stamped the hats, tie, and scarf from the Snow Friends stamp set in Memento Black, Real Red, and Garden Green inks. Then I cut them out with the Snow Friends Framelits Dies. I glued these pieces to the Nuggets as shown.
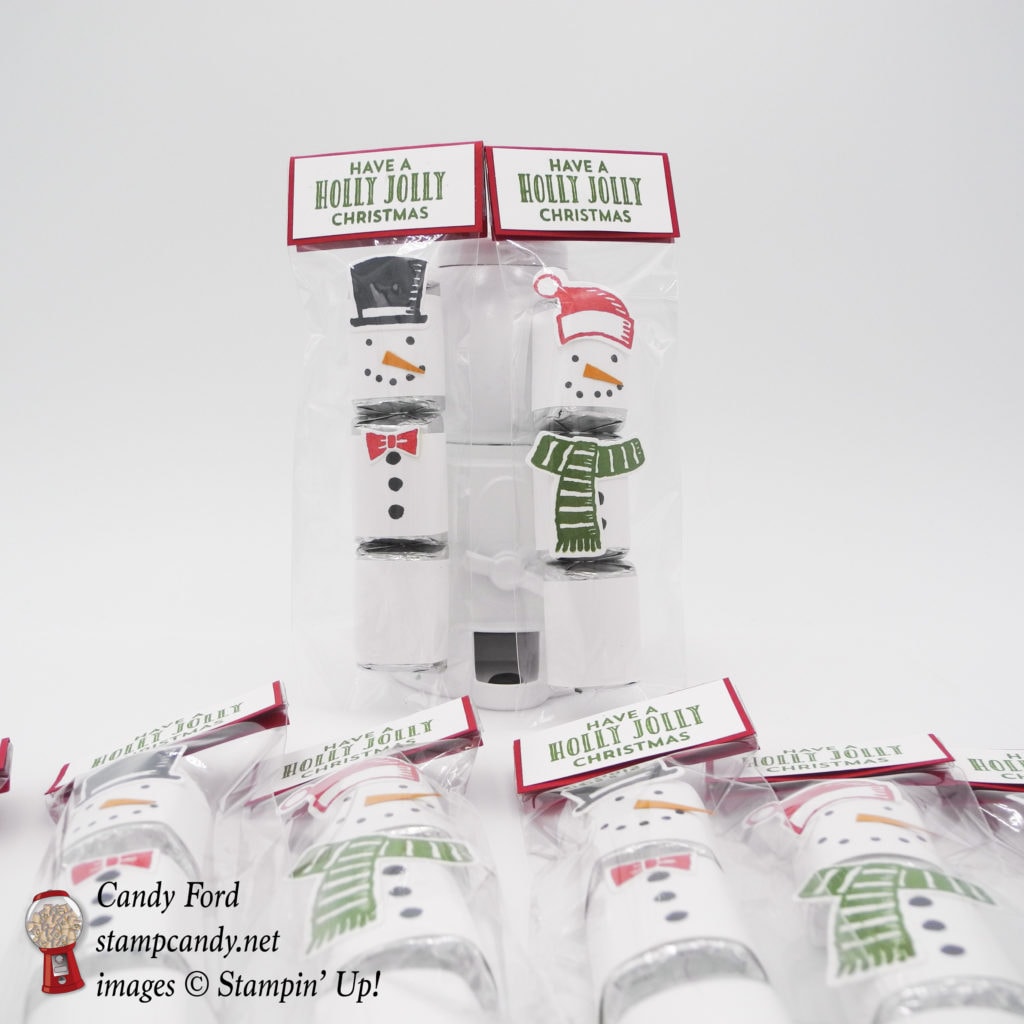
For the nose, I used Paper Snips to cut a tiny wedge from a piece of Pumpkin Pie card stock. I glued that onto the face.
For the bags:
I dropped the Nuggets into a 2″ x 6″ Cellophane Bag, and folded over the top.
I cut a piece of Real Red card stock to 2″ x 2″ and scored it at 1″ to fold it in half. I stapled it to the top of the bag. The Handheld Stapler is available only while supplies last!
I stamped the sentiment from the Stitched With Cheer photopolymer stamp set in Garden Green ink onto a 1-7/8″ x 7/8″ piece of Whisper White card stock, then glued it to the Real Red bag top. The Stitched With Cheer stamp set is retiring soon, so get it while you can!
Note: I cut a lot of strips at once, laid them out, and stamped them all. This assemble line method enabled me to make a whole bunch of these in very little time.
Here’s what I used:
Thanks for stopping by today, and Sweet Stamping!
Dec 15, 2016 | Cards, Christmas, Gallery, Holiday, Retiring Products |
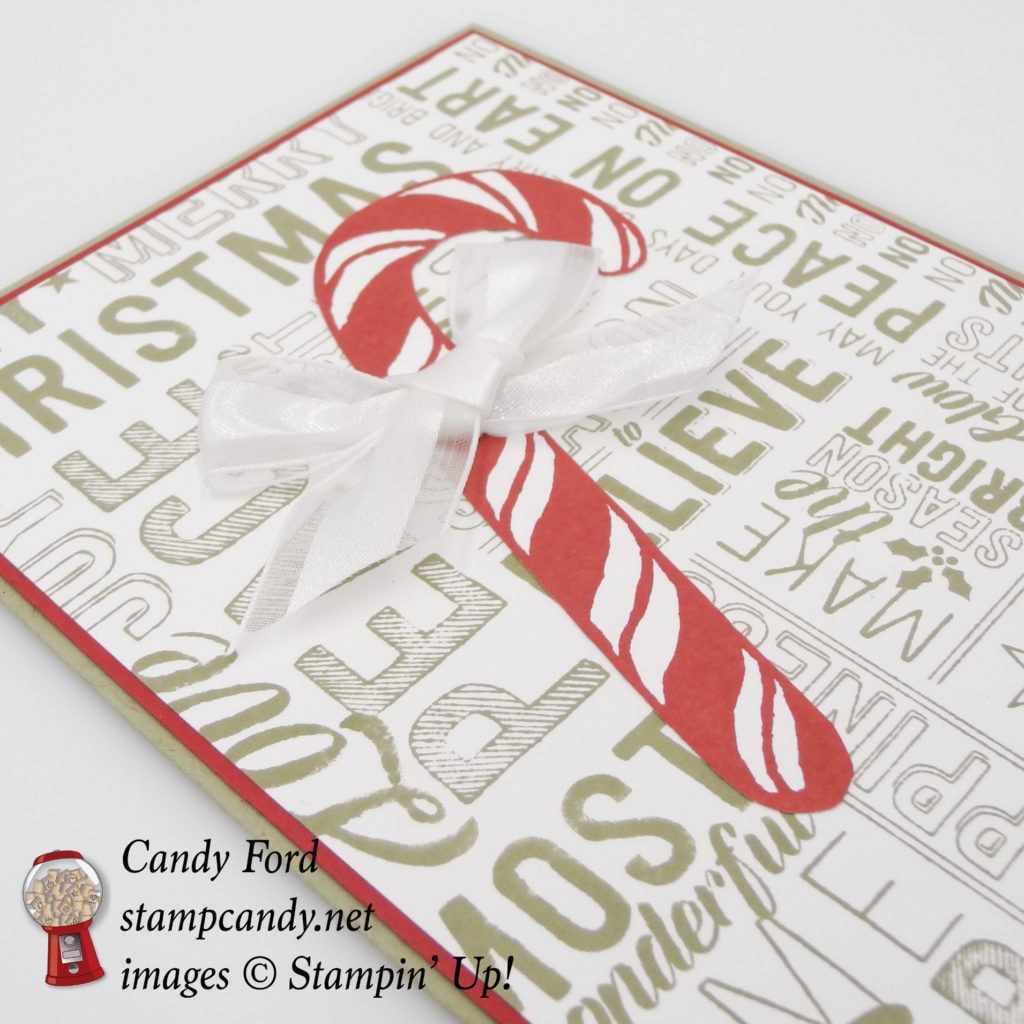
Today’s Christmas card is a CASE of a card made my by very talented team member Lonita Barron. It uses two stamp sets that are retiring very soon, so get them while you can!
Here’s what I made:
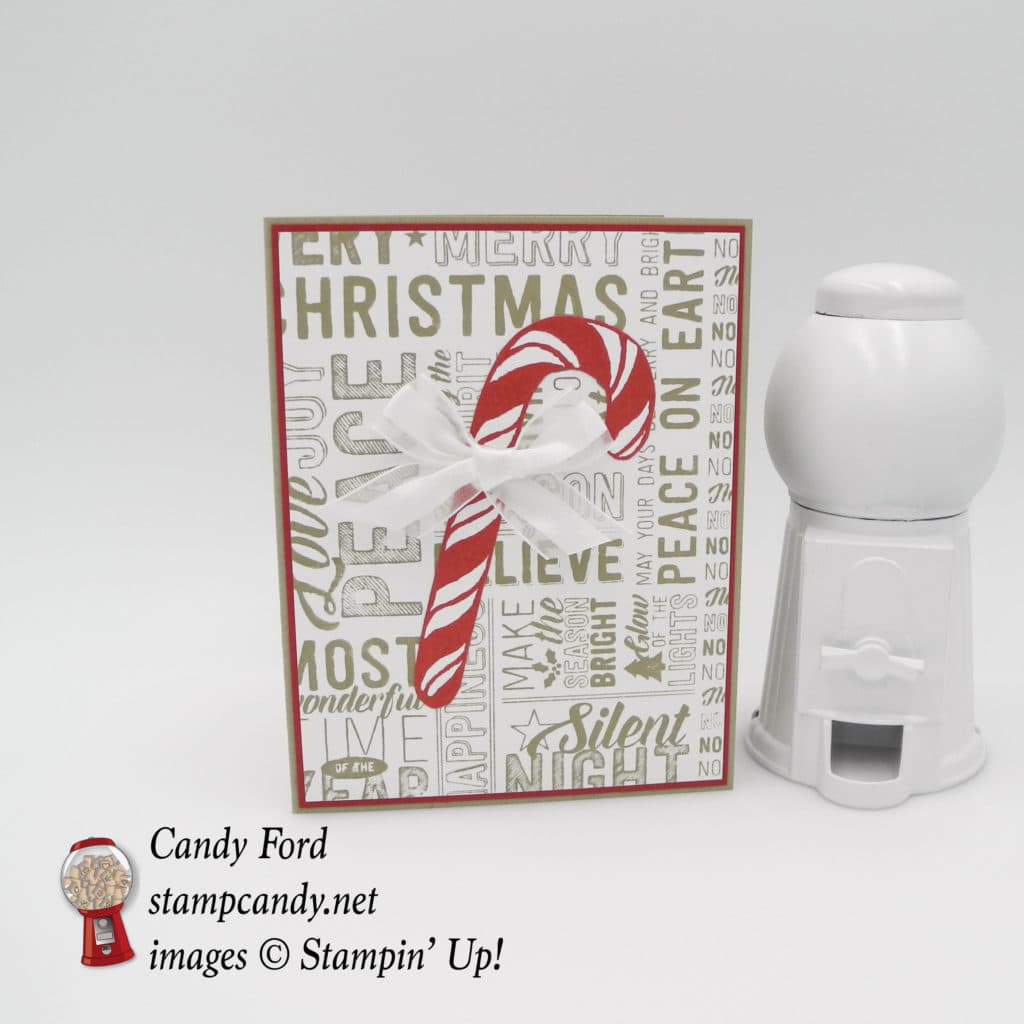
Here’s how I did it:
The card base is Real Red card stock, with a Real Red CS layer on top.
The card front is a piece of Whisper White CS stamped in Crumb Cake ink with the Merry Medley stamp.

The candy cane from the Banners for Christmas stamp set is stamped in Real Red in ink onto Whisper White CS, then cut out with Paper Snips. All layers are glued together.
The bow is tied with Whisper White 5/8″ Organza Ribbon and adhered to the candy cane with a couple Mini Glue Dots.
You can glue a piece of Whisper White CS to the inside of the card for a handwritten note, or you can write directly onto the Real Red card. I prefer the latter, with a white pen.
Here’s what I used:

YEAR-END CLOSEOUT!
Details:
• Promotion period: December 1, 2016 – January 3, 2017
• All products (and discounts, if any) can be found in the Year-End Closeouts category of the online store beginning.
• Year-end closeout items may be added to all orders.
• Clearance Rack items are only available while supplies last.
• Following the Year-End Closeouts promotion, some products may remain on the Clearance Rack; other items may be removed from the Clearance Rack to be added at another undetermined time.
• High-inventory items will only be discounted through January 3; beginning January 4, they will still be available, but at regular price.
• Retiring stamp sets are guaranteed available until December 21, after which they will be only available while supplies last.
• Retiring accessories will only be available while supplies last.
• Retiring items will only be available while supplies last. All retiring items will be discontinued after January 3.
Other Year-End Closeouts products and applicable discounts can be found in the online store.
• No minimum purchase is required to participate in Year-End Closeouts.
• Year-End Closeouts are eligible for Stampin’ Rewards with qualifying orders.
• New demonstrators may add Year-End Closeouts items to their Starter Kit! Click on Be a Candy Heart at the top of the page!
Thanks for stopping by today, and Sweet Stamping!


