Dec 14, 2014 | Decor, Kits, New Products, Organization, Studio, Techniques |
The Occasions and Sale-A-Bration (OC/SB) catalogs begin on January 6 – the day after the Holiday Catalog and Supplement end. If you don’t have a Stampin’ Up! Demonstrator to give you the new catalogs, please contact me and I’ll get them in the mail to you!
One of the MANY perks of being a Stampin’ Up! Demonstrator is getting to pre-order from new catalogs. (To join my team, go to stampcandy.stampinup.net and click on Join the Fun at the top right!)
I received my first shipment of pre-ordered merchandise from the new OC/SB catalogs and I just had to start working on this new kit first thing.

It’s the Hello Life Simply Created Project Kit. You get this awesome wire frame and all the goodies you need to decorate it, including specialty papers, die cuts, twine, clothespins, and more. As I said, it will be available for everyone to order on January 6.

Here’s a little tip. When you’re separating the die cut shapes from their sheets, it can be hard to see them from the front side. Can you see the die cut hearts in the polka dot area?

There’s one.

I found that turning them over to the back side makes them much easier to see.

I haven’t completed the kit yet – I’m still waiting to get the coordinating stamp set – but I just had to share what I’ve done so far. I plan to print black & white photos of hubby to add to it. I love the combination of Basic Black, Whisper White, Crushed Curry, and Silver in the kit.
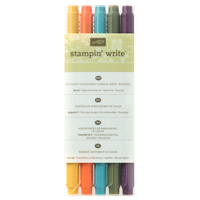
Oh, by the way, all the solid black pieces you see are chalkboard paper – even the stick on letters! The White Stampin’ Chalk Marker (132133) works great with it.

I think I will keep this hanging in my stamping studio for a very long time, changing the components and colors as I choose. I may even add a second one, hanging it from the bottom of this one. It’s a fun way to have a “bulletin board” without having to poke holes in everything with push pins!
Thanks for stopping by today, and Sweet Stamping!
P.S. Remember that tonight at midnight EST is the deadline to enter the Blog Candy drawing. To enter, go to yesterday’s post here and leave a comment telling me what your favorite items are from the Holiday Catalog and Supplement. I will post the winner tomorrow. The winner will then have until midnight EST to email me their shipping address.
Dec 12, 2014 | Christmas, Gifts, Techniques |

It seems a lot of people come down with colds or flu this time of year. Whether you have the sniffles or an allergy – or you’re just messy like me – it’s always nice to have some tissues handy. This is a nice way to give folks something useful and pretty at the same time.
I used Kleenex pocket tissue packs. I imagine most brands are the same size, but you may need to adjust the dimensions a little. These measured just under 4-1/2 x 2-1/2 x 1 inch, so those are the dimensions of my box. I used card stock to make the boxes and DSP to decorate them.
Start with a piece of card stock cut to 7 x 7-1/2 inches. Score along the longer side at 1, 3-1/2, 4-1/2, and 7 inches. Rotate counter-clockwise and score along the shorter side at 1/2, 1-1/2, and 6 inches. You’ll end up with something that looks like this.

Now cut along the dark lines. The parts colored in will be gone.

You’ll have something that looks like this:

Cut DSP like so: one piece at 4-1/4 x 2-1/4 inches, two pieces at 4-1/4 x 3/4 inch, and two pieces at 2-1/4 x 3/4 inch. In the middle of the largest piece, cut a hole large enough to pull a tissue through. I used my Decorative Label punch (120907.) You could also use another punch, your paper trimmer, or scissors.

Center the cut/punched piece of DSP on the top area of the box, but do not adhere it yet.

Holding the DSP in place, use a pen or pencil to mark the outline of the cut/punched out area on the box.

Now cut out this area from the box, making sure to make the hole larger than the markings, but also making sure to leave enough paper around the hole to glue. (Please forgive the different colors used in these photos. I made several different colors, and I remembered to take photos at different points during the process on each one.)

Now glue the DSP over the hole. Here is one from the back. See how the hole in the box is larger than the decorative hole in the DSP? You don’t want the card stock to show.

Now glue the other pieces of DSP on the 4 sides of the box.

I used Multipurpose Liquid Glue because I wanted to make sure everything would hold together in a pocket or purse.
Now assemble the box. Make sure the wider side panel goes over the skinny side panel.

I like to lay it flat so I can fold the wider panel over the skinny panel. Apply glue to the skinny panel, then fold the wider panel over it to adhere.


On the end with 4 flaps, fold in the two smallest and apply glue to the top of them.


Fold in the bottom flap to adhere to the small flaps. Apply glue to it, then fold down the last flap to finish the end of the box.


Now you have a box with one open end.

Prepare tissues. Option #1:
Put the pack of tissues inside the box, then mark around the opening.


Take them out and cut a hole in the plastic wrapper a little bigger than the marking. Insert the pack into the box.

Prepare tissues. Option #2:
Remove the wrapper from the tissues and insert them into the box.


Now close the box and you’re done! I don’t glue this end of the box closed, so tissues can be added once it’s empty.

Of course, you can continue to decorate it with punched shapes, bling, etc., but I chose to keep mine simple.
Thanks for stopping by today, and Sweet Stamping!
Nov 9, 2014 | Cards, Techniques |
I’ve been wanting to make some of the stair step cards I’ve seen lately. I looked online and found lots of different templates, but never found what I really wanted. So I decided to figure it out myself. Below are templates I’ve created for three different stair step cards.
Please remember the photos are of prototypes, so please forgive the odd score line or rough edge. Sometimes I get in the zone trying to figure something out and don’t even want to take the time to put a new blade on my trimmer!
You can click on each template to see it larger. Cut on solid lines and score on dotted lines.
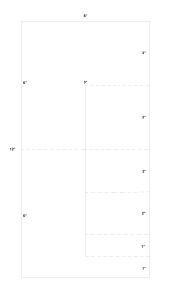
6″ x 6″ INCH SQUARE CARD
Begin with a 6″ x 12″ piece of card stock.
With the short side at the top of the trimmer, put the blade at 3″ and cut from 3″ down to 11″.
Turn the paper counter-clockwise so the long side is at the top. Starting at the left, score only down to the cut line at 3″, 8″, 10″ and 11″. At 6″ score all the way down the paper.
If you want the steps on the right side of the card, you’ll be looking at the top side of the paper. If you want the steps on the left, flip it over.
Now fold at all the score lines to create the steps. Notice the score line a 6″ will be a valley fold on the step side and a mountain fold on the tall side.
It’s ready to decorate.

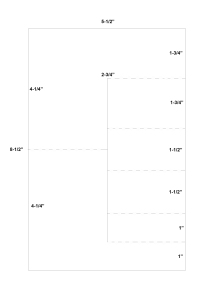
5-1/2″ WIDE x 4-1/4″ TALL CARD
Begin with a 5-1/2″ x 8-1/2″ piece of card stock.
With the short side at the top of the trimmer, put the blade at 2-3/4″” and cut from 1-3/4″” down to 7-1/2″”.
Turn the paper counter clockwise so the long side is at the top. Starting at the left, score only down to the cut line at 1-3/4″, 3-1/2″, 5″, 6-1/2″, and 7″.
Rotate the paper 180 degrees and score only down to the cut line at 4-1/4″.
If you want the steps on the right side of the card, you’ll be looking at the top side of the paper. If you want the steps on the left, flip it over.
Now fold at all the score lines to create the steps.
It’s ready to decorate.

4-1/4″ WIDE x 5-1/2″ TALL CARD
Begin with a 4-1/4″ x 11″ piece of card stock.
With the short side at the top of the trimmer, put the blade at 2-1/8″” and cut from 1-3/4″” down to 7-1/2″”.
Turn the paper counter clockwise so the long side is at the top. Starting at the left, score only down to the cut line at 2-3/4″, 7-1/4″, 9″, and 10″. At 5-1/2″ score all the way down the paper.
If you want the steps on the right side of the card, you’ll be looking at the top side of the paper. If you want the steps on the left, flip it over.
Now fold at all the score lines to create the steps. Notice the score line a 5-1/2″” will be a valley fold on the step side and a mountain fold on the tall side.
It’s ready to decorate.

Thanks for stopping by today, and Sweet Stamping!
Nov 7, 2014 | Cards, Club, Gift Wrap, Techniques |
Hello, everyone!
The Stamp Candy Stamp Club had our November meeting this week. We always laugh and have lots of fun. This month we made projects in preparation for the upcoming Christmas season.

I love the color scheme of the All Is Calm DSP. Soft Sky, Lost Lagoon and Pear Pizzazz have such a calming, Wintery feel. We used these colors, along with Whisper White, for all the projects.
First, we used 1″ strips of DSP to make bows and belly bands for Kraft Gift Boxes. I highly recommend using Liquid Multipurpose Glue for assembling the bow. Here’s a link to the instructions: http://www.stampinup.com/us/documents/paper_bows(contact).pdf


Next we made the tags. We stamped the snowflakes in Soft Sky, and the To/From in Lost Lagoon.

Margie & Judy each added a touch of All Is Calm Designer Washi Tape to their tags. (I forgot to take any photos at the evening meeting, but Martha and Linda did an excellent job on their projects, too.)


Now, of course, we needed cards to match, right? We stamped the sentiment in Lost Lagoon and Pear Pizzazz. Normally we would color each area of the stamp with a Stampin’ Write Marker, but we did something a little different this time. When I was designing this project, I used markers at first, but realized there was a lot of ground to cover with the Lost Lagoon. So I inked up the whole stamp image with the Lost Lagoon ink pad, then used a baby wipe to remove the ink only where I wanted to color it in with the Pear Pizzazz marker. If I accidentally removed too much Lost Lagoon with the wipe, I simply filled it in with the Lost Lagoon marker. And that’s how we did it at Club.
After embossing the card front with the Filigree Frame TIEF, it was beautiful, but it seemed just a little too calm. We used a Cherry Cobbler Candy Dot to dot the “i” in Christmas. It added just that little pop of something that it needed. We adhered the card front to a Soft Sky card base and rounded all four corners with the Project Life corner rounder punch.

We stamped the envelope with the same Soft Sky Snowflakes as on the tag.

Here are the products we used:
Thanks for stopping by today, and Sweet Stamping!
Oct 2, 2014 | Cards, Club, Food, Techniques |
We had a great Stamp Club meeting. We made the three projects I showed you yesterday. I love seeing how folks change things up from my samples. Such a creative group! I promised details on the projects today, so here they are.
***********
Caramel Apple Curvy Keepsake Box
Cut two box pieces of Baked Brown Sugar card stock with the Curvy Keepsake Box Thinlits Die. Adhere the two pieces together at the bottom, with like sides opposite each other. Use a bone folder to get nice sharp creases.
Using a 2-1/2″ circle punch, cut a Whisper White card stock circle. Adhere it to the center of a Tea Lace Paper Doily. Then adhere that to the bottom of the box, so that, when assembled, it will resemble a caramel apple sitting on a doily.
Cut a paper straw to 6-1/2″ long. Using a bone folder, flatten 2-3 inches of one end.
Assemble the box, filling it with caramels or other treats of your choice. Stick the flattened end of the straw between the two “handles” on top of the box, and down into the box all the way to the bottom.
Using the round tag die from the Curvy Keepsake Box die set, cut a Real Red card stock tag. Using Paper Snips, cut the bottom of the tag to resemble an apple. (I’m not sure of a better way to describe it than saying to cut a little “derriere” at the bottom.)
Using the small leaf from the Fun Fall Framelits Dies, cut a Pear Pizzazz leaf. Adhere it to the Real Red apple tag.
Run two 10″ pieces of Whisper White Bakers Twine through the apple tag and tie it onto the straw just above the box handles.
From the For All Things stamp set, stamp Hello Fall! on Whisper White cardstock with Baked Brown Sugar ink. Cut it into a strip, apply adhesive, and wrap it around the straw, just above the twine, to make a flag. Using one corner from the Hexagon Punch, notch the end of the flag.
Be sure to lift the box from the bottom and not by the straw.
Again, many thanks to Cindy Schuster at Nutmeg Creations for the project idea!

Club members Martha, Marenda, Judy & Angela with their Caramel Apple Treat Boxes
***********
Halloween Post-It Note Cover
Cut a piece of Motley Monsters DSP to 2-15/16″ x 9-3/16″. On the long side, score at 2-15/16″, 3-1/8″, 6-1/16″, and 6-1/4″. Use bone folder to make sharp creases at all four score lines. (These are the dimensions for the note pads I bought at Target: 2-15/16″ square and 3/16″ thick. You may need to adjust for yours.)
For the brad closure: Insert one end of the DSP into the Scalloped Tag Topper Punch. It is wider that the 2″ tray, but it will go in on top of the tray. Make sure it’s centered, then punch. You’ll end up with extra arms on each side, which you can just trim off with Paper Snips.

Angela using the Scalloped Tag Topper Punch
Wrap the cover around your note pad with the punched end on top. Mark through the hole onto the other end of the cover where the brad should go. Unwrap and make the hole with a Paper Piercing Tool. Stick a brad through the hole and flatten on the back (inside) of the cover. We used a Candy Dot Brad Base and a Candy Dot.


Judy applying the brad
Adhere the back of your note pad to the inside of the cover. Close the cover, pulling the hole over the brad until it catches.
Adhere stamped images to the front of the cover.*
For the belly band closure: Adhere the back of your note pad to the inside of the cover. Cut a strip of DSP or card stock of your choice 1/2″ x 7-1/2″ and wrap it around the covered note pad. Adhere the ends together in the back. It should be snug, but not so tight that you can’t slide it on and off.
Adhere stamped images to the front of the belly band.*
*Stamped images: Using the Fall Fest stamp set, stamp a couple of pumpkins in Tangerine Tango, their faces in Tuxedo Black Memento Ink, and a few leaves in Bermuda Bay and/or Crushed Curry – all on Whisper White card stock. Cut out the pumpkins and leaves with the Fun Fall Framelits die set.


Martha and Angela stamping their pumpkins

Marenda stamped her pumpkins in Bermuda Bay and used the ghost side of the DSP for her cover.


Martha and Angela show off their new Note Pad Covers. Angela used what would have been a belly band to make little ribbons coming off the top of hers.
***********
Thanks Card
Use the same technique here with the Seasonally Scattered stamp that I used on the pumpkin from a previous post (which you can see here) except with Sahara Sand, Cajun Craze, and Mossy Meadow ink pads. After stamping on Whisper White card stock, cut it out with the Apothecary Framelits, then ink the edge with a sponge dauber and a Soft Suede ink pad.
 Martha daubing inks on the Thanks stamp.
The card base is 8-1/2″ x 5-1/2″ Sahara Sand card stock, scored and folded at 4-1/4″. There’s a 5-1/4″ x 4″ Mossy Meadow card stock layer, then a 5″ x 3-3/4″ Soft Suede card stock layer, then a 4-3/4″ x 3-1/2″ piece of Color Me Autumn DSP.
Adhere the stamped piece on top with Stampin’ Dimensionals.
More action shots from yesterday


(I’ve mentioned before what a huge deal Halloween is in our household. As you can see in some of the photos, Halloween prep is well under way.)
Sep 28, 2014 | Decor, Techniques |
I so enjoyed making the Halloween washi tape pumpkin from yesterday’s post, I decided to see what else I can do with my Stampin’ Up! supplies. Let me know what you think about these.

For the smaller pumpkin, I used Color Me Autumn Designer Washi Tape to create a belly band around the middle. I used the Autumn Accents Bigz Die to cut the leaves and acorn from card stock, then embossed the details freehand with my Simply Scored Stylus and Stampin’ Pierce Mat. I attached the pieces with Fast Fuse adhesive.

For the larger pumpkin, I cut 3/8″ x 12″ strips of Color Me Autumn Designer Series Paper, then glued them to the pumpkin, much like the washi tape from yesterday’s post, from stem to bottom. I happened to have a jar of ModPodge, so that’s what I used to attach the strips – I would have preferred matte but all I had on hand was glossy. The DSP is thicker than most other papers you might use for decoupage, so it’s a little harder to get the strips to lie down perfectly around the curves. There are a few places that may need a touch up of glue, but all in all I’m very pleased with how it turned out.
I cut three 5/8″ x 12″ strips of Cajun Craze card stock and glued that around the middle for the belly band base. (Say that several times really fast: belly band base belly band base belly band base.)
Using the new Seasonally Scattered stamp set, I stamped “thanks” onto a 2″ strip of Whisper White card stock in three colors: Crushed Curry, then Cajun Craze, then Mossy Meadow, applying each color to the stamp with a Sponge Dauber. Be sure to start with the lightest color and end with the darkest. (See this technique in my Open House post here.) I punched each end of the card stock with the Scalloped Tag Topper Punch.
I topped Mossy Meadow 3/8″ Satin Stitched Ribbon with Crushed Curry 1/8″ Taffeta Ribbon. I ran that through both ends of the tag and glued the whole thing over the Cajun Craze belly band.

Here’s a close up of the tag.

Here are some strips left over from the large decoupaged pumpkin.

Check back tomorrow to see how I made the matching napkin rings.

Thanks for stopping by today!
Here’s what I used for the smaller pumpkin:
Here’s what I used for the larger pumpkin: