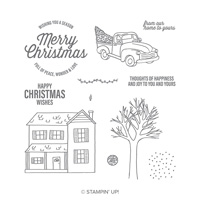
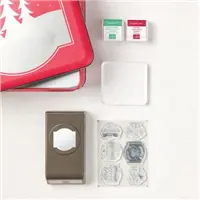
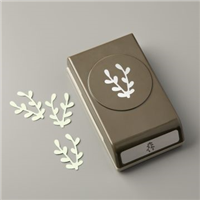
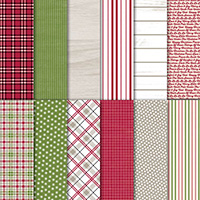
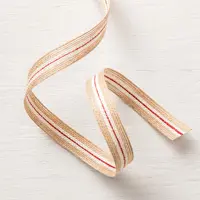
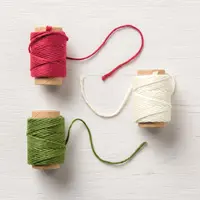
Today I’m sharing Make & Take projects I designed for our Candy Hearts August team meeting. I used several new products from the 2018 Holiday catalog (which goes live in just 5 days!): Christmas Traditions Punch Box, Farmhouse Christmas stamp set, Sprig Punch, Corrugated Dynamic embossing folder, Festive Farmhouse Designer Series Paper, 5/8″ Striped Burlap Trim, and Festive Farmhouse Cotton Twine. I designed the projects in two different color schemes, because I didn’t have enough of one for everyone at the meeting. Other that the colors, they are identical.
I learned how to make the Mini Self Close Boxes from Hilary Sosebee, who got it from Dani Dziama, who got it from Jana Trautmann. I have no idea who originated the design. If you know, please tell me so I can give them credit. The way the box is scored and folded keeps it closed at the top. You just squeeze the sides in to open it. It will hold 1 or 2 chocolate candies, depending on their size.
Here’s what I made:
Here’s how I made the cards:
Cut and scored with my Stampin’ Trimmer:
Cherry Cobbler card stock (CS) cut to 4-1/4″ x 11″, then scored in half at 5-1/2″
Mossy Meadow CS cut to 4-1/4″ x 11″, then scored in half at 5-1/2″
Festive Farmhouse Designer Series Paper (DSP) cut to 4″ x 5-1/4″ (one for each card – I used a red/black design for the red card base and a red/green design for the green card base
Crumb Cake CS cut to 2-1/2″ x 4-1/4″ (one for each card)
Very Vanilla CS cut to 4″ x 5-1/4″ for the inside of the card base (one for each card)
Stamped with the Farmhouse Christmas stamp set:
sentiment in Memento black ink onto a scrap of Very Vanilla CS
sentiment in Mossy Meadow onto a scrap of Very Vanilla CS
Embossed using the Corrugated Dynamic TIEF:
the Crumb Cake CS pieces
Die cut using the Layering Circles Framelits:
sentiments
Cut using the Sprig Punch:
two pieces from a scrap of Basic Black CS
two pieces from a scrap of Mossy Meadow CS
Assembled the cards:
burnished the fold in the card bases with a Bone Folder
DSP layers glued onto the fronts of the card bases
embossed Crumb Cake CS layers glued onto the DSP layers
striped burlap ribbon adhered over the Crumb Cake CS layers using Tear & Tape
punched twigs glued to the back of the sentiments
sentiment/twigs glued onto the Crumb Cake CS layers
Very Vanilla CS glued onto the inside of the card bases
Here’s how I made the boxes:
Cut and scored with my Stampin’ Trimmer:
DSP cut to 4-1/4″ x 2-7/8″
on the longer side, scored at 2″ and 4″
on the shorter side, scored at 1/2″ from each side
along the bottom (long side with the 1/4″ section at the right) scored at 1″ and 3″ – only up to the first horizontal score line
cut along the short score lines along the bottom (at 1″, 2″, 3″ and 4″) and along the top (at 2″)
cut away the two tiny rectangles, one at top right and one at bottom right
scored diagonally from the top left corner (on the upper horizontal score line) down to the cut at 1″ (on the lower horizontal score line)*
scored 3 more diagonal lines, between the two horizontal lines, as shown in the photo below*
* You may find the diagonal score lines easier using a ruler and stylus
optional: cut a piece of coordinating card stock (CS) to 1″ x 1″
Cut using the Detailed Trio Punch:
folded the DSP in the middle and rounded the two top corners
Stamped using the Christmas Traditions stamp set:
sentiment in Memento black ink onto a scrap of Whisper White CS
sentiment in Mossy Meadow ink onto a scrap of Whisper White CS
Cut using the Christmas Traditions Punch:
sentiments
Assembled the boxes:
burnished all the score lines using a Bone Folder
applied Tear & Tape to the small tab (on the outside) and adhered it to the inside of the opposite end
opened the bottom, folded in the four flaps, and glued in place
optional: glued the 1″ x 1″ CS to the bottom of the box
tied a piece of twine (Basic Black/Mossy Meadow) around the tops of the boxes (You might want to secure it using a Mini Glue Dot.)
glued sentiments onto the fronts of the boxes
To open the box, just squeeze in the two sides.
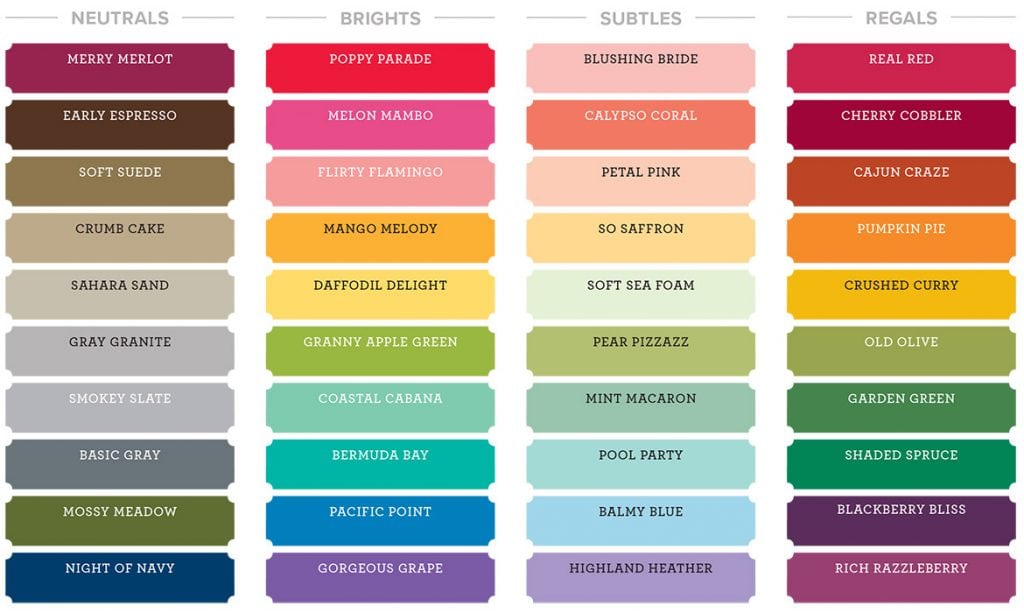
Here are today’s colors:
You can click on each one to see all the products that come in that color!
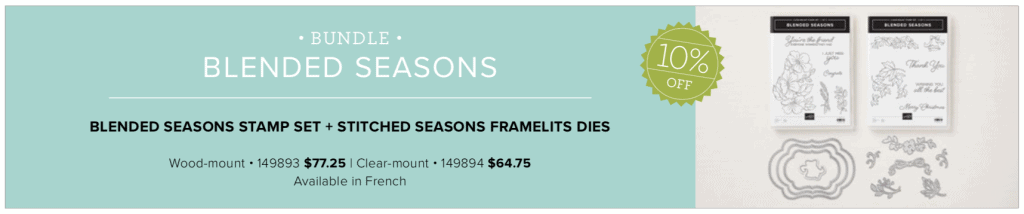
Stampin’ Up!’s® Blended Seasons Stamp Set, coordinating Framelits™ Dies, and Watercolor Pencils are perfect for every season of creating! Plus, save 10% when you buy the stamp set and Framelits in a bundle! But don’t wait—these exclusive products are only available until August 31 while supplies last. So get in the mood to create something full of colors and seasons!
Introducing the all-new, limited-time Color Your Season products:
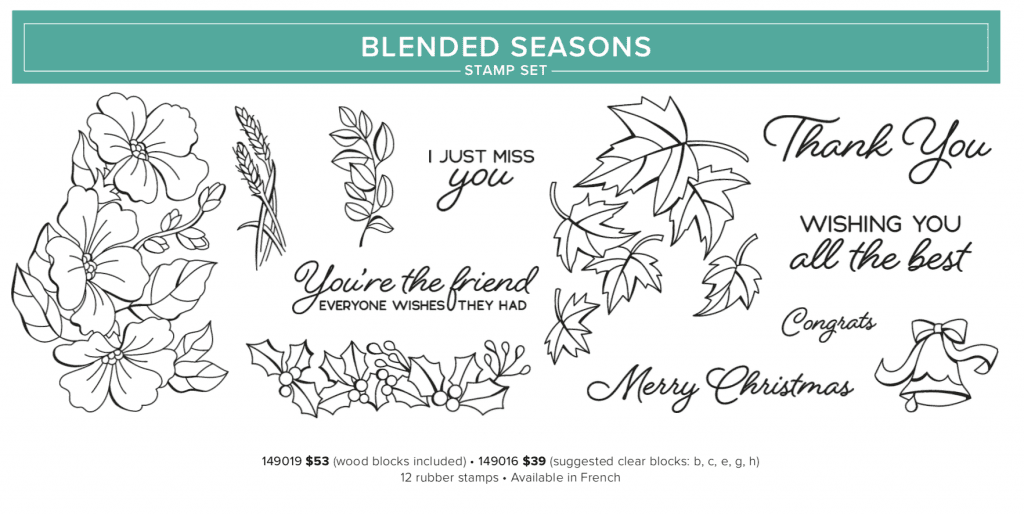
Blended Seasons Stamp Set, an exclusive 12-piece wood- or clear-mount stamp set with images for every season – #149019 @ $53 (wood blocks included); #149016 @ $39 (suggested clear blocks: b, c, e, g, h)
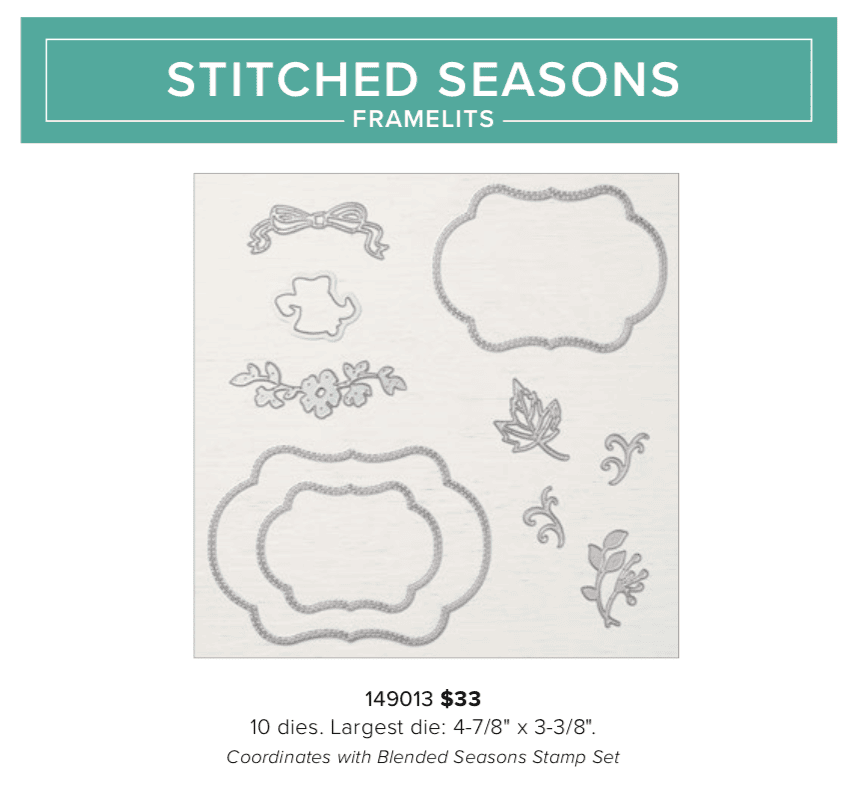
Stitched Season Framelits Dies, a coordinating stitched die that includes stitching on both the positive and negative images! #149013 @ $33. Has10 dies. Largest die: 4-7/8″ x 3-3/8″.
Save 10%! Blended Seasons BUNDLE – BLENDED SEASONS STAMP SET + STITCHED SEASONS FRAMELITS DIES – Wood-mount #149893 @ $77.25, Clear-mount #149894 @ $64.75
Watercolor Pencils in 10 new colors! #149014 @ $12.50. Acid free, lignin free.10 pencils in Stampin’ Up! colors: Balmy Blue, Cajun Craze, Cherry Cobbler, Coastal Cabana, Crushed Curry, Flirty Flamingo, Garden Green, Gorgeous Grape, Granny Apple Green, Night of Navy
Products available while supplies last until August 31, 2018 – while supplies last
Items may be included as part of a new demonstrator’s Starter Kit.
2) Bonus Days
For every $50 you spend on an order in August, you will receive a $5 coupon to use in September!
There is no limit to the number of coupons you may earn.
An email address is required to participate; Bonus Days coupon codes can be delivered only via email.
Bonus Days coupon codes may be redeemed for any product (excluding Starter Kits, demonstrator supply items, and Paper Pumpkin subscriptions.) Although new prepaid Paper Pumpkin codes may be discounted with Bonus Days coupon codes.
3) Buy 10 Stampin’ Ink pads in August and get one FREE!!
Buy any 10 ink pads from me in August, I will give you another one FREE!
Contact me to place your order, so I can add your FREE ink pad!
Here’s the new Dashing Along special that begins tomorrow!
Receive one pack of Dashing Along Designer Series Paper with any $250 order in September!
Item number 149903
Promotion period: September 1–30
Dashing Along Designer Series Paper is exclusive to the host promotion and will not be available after September 30.
In order to qualify, the event merchandise total must reach $250 (before shipping and handling).
One package of Designer Series Paper may be redeemed per qualifying order, with no limit on how many packages of Designer Series Paper can be earned.
All order types qualify, whether it’s a workshop with a host, and individual order, and online order, or a demonstrator order.
Dashing Along Designer Series Paper may not be redeemed using Stampin’ Rewards. You will receive this FREE gift with a qualifying order in addition to any Stampin’ Rewards you may earn.
Dashing Along Designer Series Paper may not be exchanged for other paper.
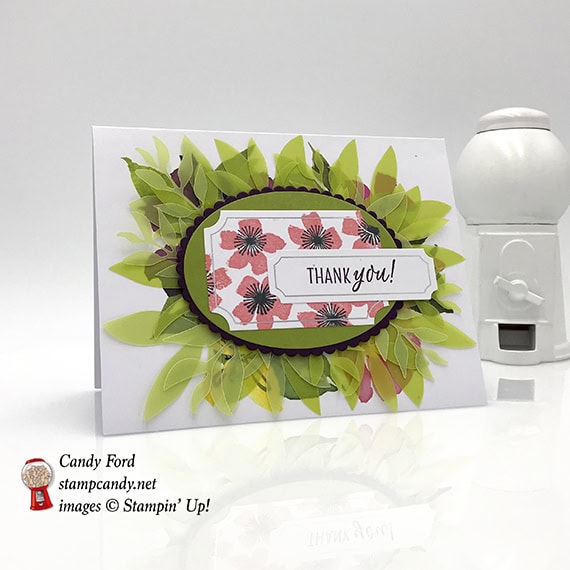
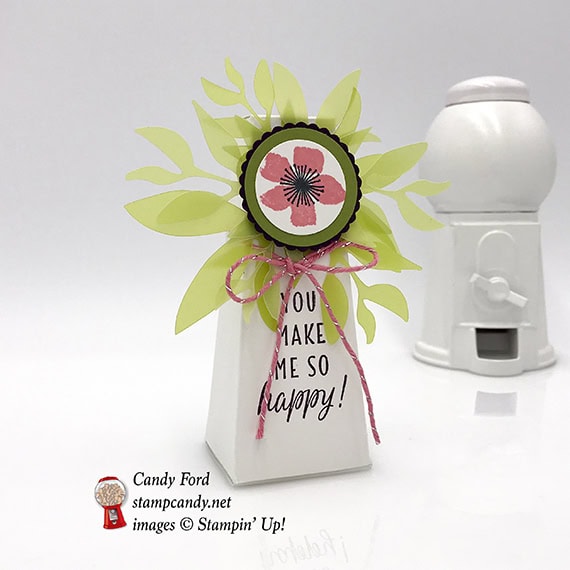
It’s time for the August 2018 A Paper Pumpkin Thing (APPT) Blog Hop. This month’s kit is called Blissful Blooms, and it is very aptly named. It includes everything you need to make 10 gorgeous floral cards. For the hop, we are using the kit to create alternate projects: one card and one 3D item.
When I was in a hotel room in Seattle, right after the Stampin’ Up! Incentive Trip in July, the toiletries included an unusually shaped box with an asymmetrically shaped bar of soap in it. Of course, I had to bring it home to try to make one. And I thought today’s post was the perfect time to try it. I hope you like what I’ve made.
Here’s a video from Stampin’ Up! about this month’s kit:
Here’s what I made:
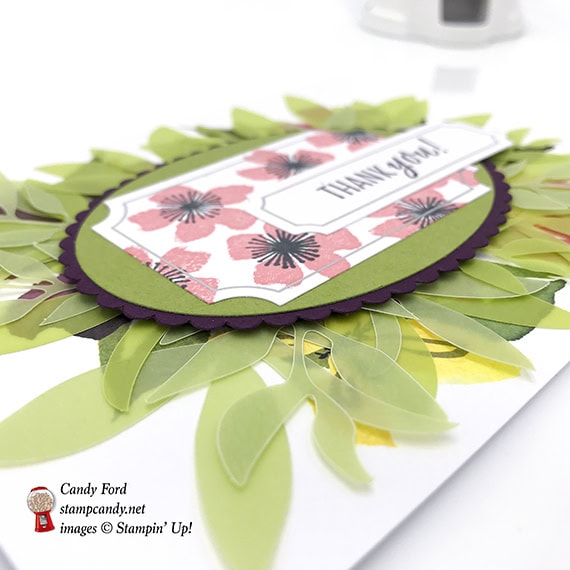
I was afraid I had stamped the sentiment too low on the front of the box, but I think it might look better even lower. What do you think?
Here’s how I made the card:
Stamped with the Blissful Blooms stamp set:
flowers in Flirty Flamingo ink onto the larger label
flower centers in Memento black ink
sentiment in Blackberry Bliss ink onto the smaller label
Die cut using the Layering Ovals Framelits:
a plain oval from a scrap from of Old Olive CS
a scalloped oval from a scrap of Blackberry Bliss CS
Assembled the card:
burnished the fold in the card base (with printed flowers in the center of the front) with a Bone Folder
all but about 5 of the green vellum leaves adhered onto the card front, with stems toward the center, larger ones first, then smaller ones over those
Old Olive CS oval adhered to the Blackberry Bliss CS oval
flower stamped label adhered to the Old Olive CS oval
sentiment label adhered to the flower label and ovals
ovals/labels grouping adhered over the leaves using Stampin’ Dimensionals
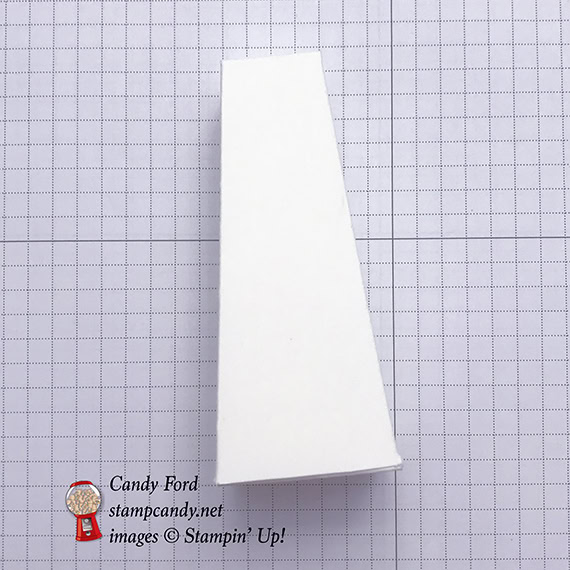
Here’s how I made the box:
Stamped with the Blissful Blooms stamp set:
flower in Flirty Flamingo ink onto a scrap of Whisper White CS
flower center in Memento black ink
sentiment in Blackberry Bliss ink onto the front of the box**
Cut using Circle Punches:
flower with a 1″ circle punch
a scrap of Old Olive CS with a 1-1/4″ circle punch
a scrap of Blackberry Bliss CS with a 1-3/8″ scallop circle punch
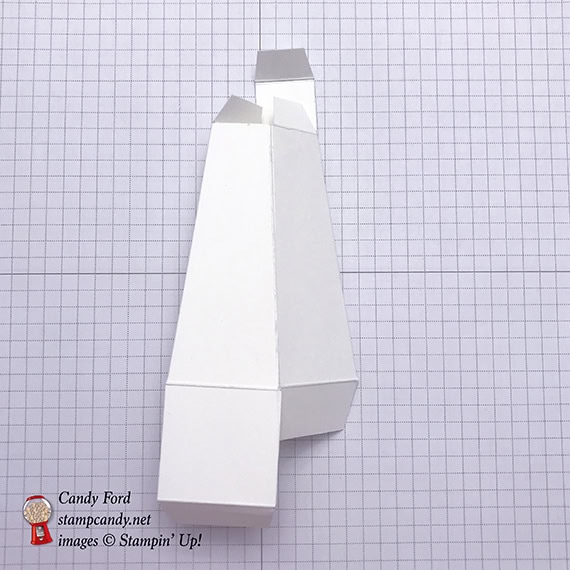
Assembled the box:
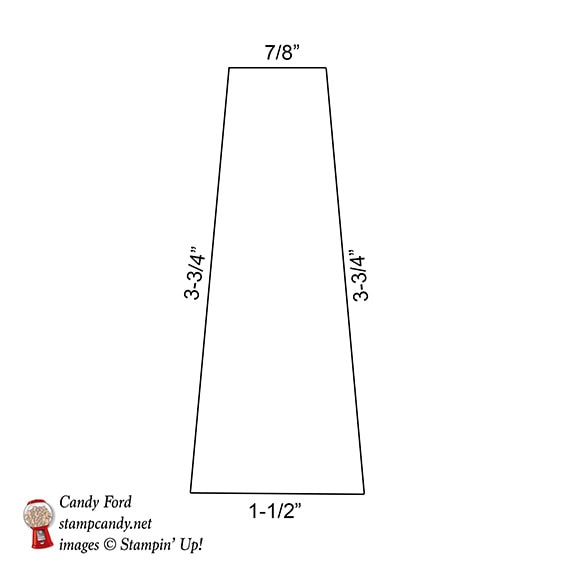
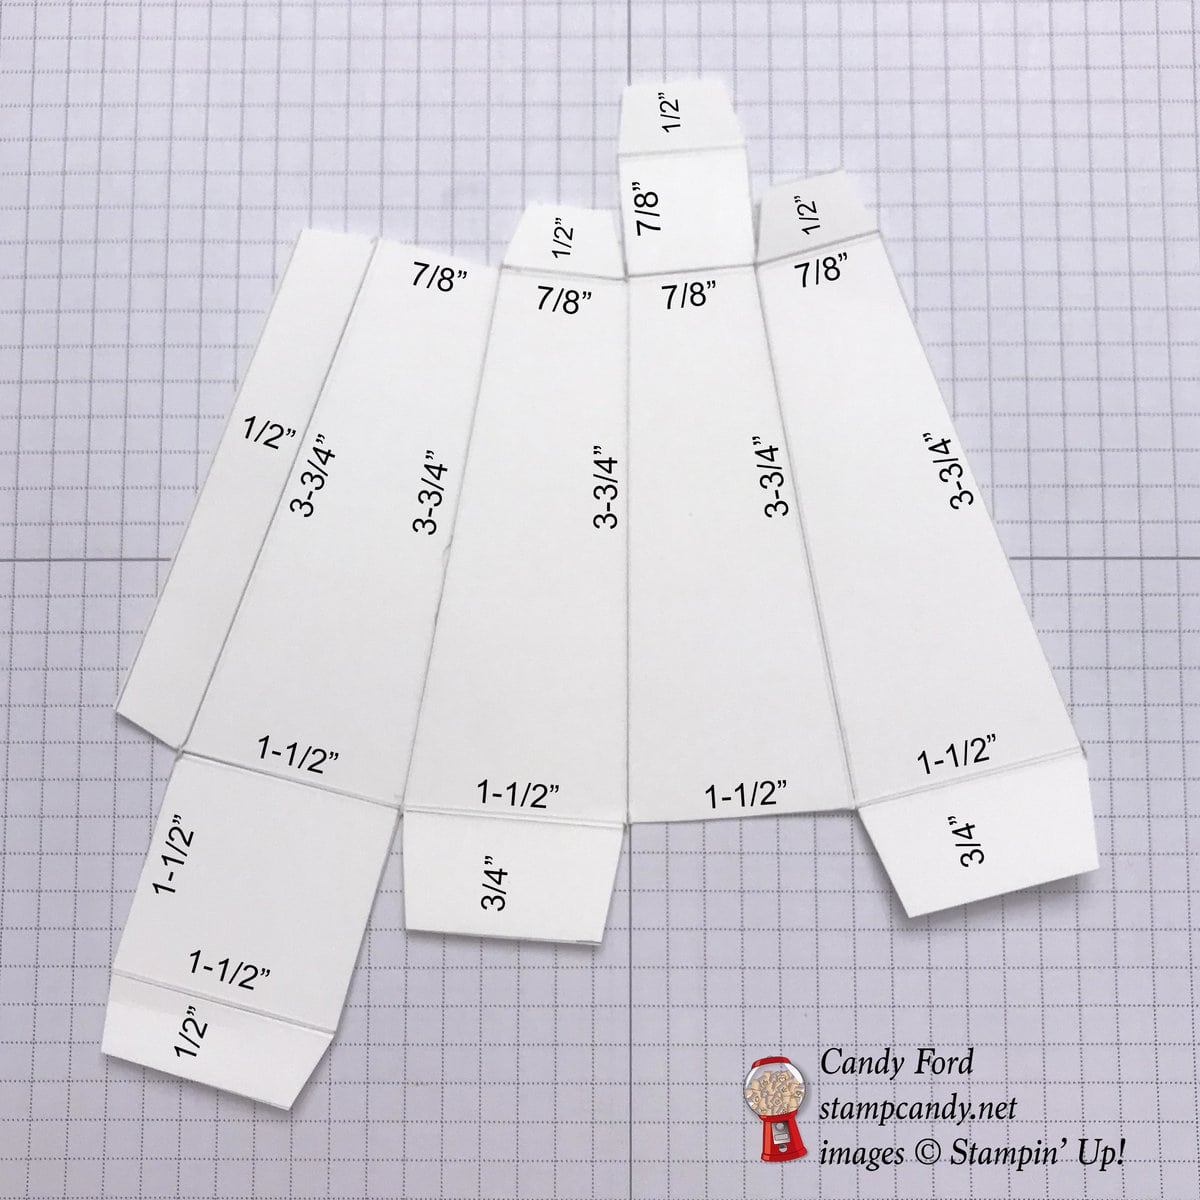
made a template: 7/8″ across the top, 1-1/2″ across the bottom, and 3-3/4″ sides
drew around the template four times, side by side, onto a piece of Whisper White Thick CS
added tabs, according to the template below
scored all inner lines using my Stampin’ Trimmer
cut out the box using Paper Snips
burnished all score lines with a Bone Folder
**stamped sentiment onto the front panel of the box
added adhesive to the long flap along one side of the box, and adhered the flap to the inside of the opposite end
folded in all flaps (adding in your small gift, of course)
about 5 of the green vellum leaves adhered around the top of the front panel of the box
punched flower adhered onto the Old Olive CS circle
Old Olive CS circle adhered onto the Blackberry Bliss CS circle
Blackberry Bliss circle adhered over the leaves using Stampin’ Dimensionals
tied a piece of the Flirty Flamingo twine from the kit around the box and tied in a bow
Here’s the APPT Blog Hop:
Click on Next to go to the next stop, or use the list below to navigate the hop.
Here are today’s colors:
You can click on each one to see all the products that come in that color!
Stampin’ Up!’s® Blended Seasons Stamp Set, coordinating Framelits™ Dies, and Watercolor Pencils are perfect for every season of creating! Plus, save 10% when you buy the stamp set and Framelits in a bundle! But don’t wait—these exclusive products are only available until August 31 while supplies last. So get in the mood to create something full of colors and seasons!
Introducing the all-new, limited-time Color Your Season products:
Blended Seasons Stamp Set, an exclusive 12-piece wood- or clear-mount stamp set with images for every season – #149019 @ $53 (wood blocks included); #149016 @ $39 (suggested clear blocks: b, c, e, g, h)
Stitched Season Framelits Dies, a coordinating stitched die that includes stitching on both the positive and negative images! #149013 @ $33. Has10 dies. Largest die: 4-7/8″ x 3-3/8″.
Save 10%! Blended Seasons BUNDLE – BLENDED SEASONS STAMP SET + STITCHED SEASONS FRAMELITS DIES – Wood-mount #149893 @ $77.25, Clear-mount #149894 @ $64.75
Watercolor Pencils in 10 new colors! #149014 @ $12.50. Acid free, lignin free.10 pencils in Stampin’ Up! colors: Balmy Blue, Cajun Craze, Cherry Cobbler, Coastal Cabana, Crushed Curry, Flirty Flamingo, Garden Green, Gorgeous Grape, Granny Apple Green, Night of Navy
Products available while supplies last until August 31, 2018 – while supplies last
Items may be included as part of a new demonstrator’s Starter Kit.
2) Bonus Days!
For every $50 you spend on an order in August, you will receive a $5 coupon to use in September!
There is no limit to the number of coupons you may earn.
An email address is required to participate; Bonus Days coupon codes can be delivered only via email.
Bonus Days coupon codes may be redeemed for any product (excluding Starter Kits, demonstrator supply items, and Paper Pumpkin subscriptions.) Although new prepaid Paper Pumpkin codes may be discounted with Bonus Days coupon codes.
3) Buy any 10 Classic Stampin’ Ink pads and get one FREE!!
Buy any 10 ink pads from me in August, I will give you another one FREE!
Contact me to place your order, so I can add your FREE ink pad!
Today I’m sharing one of the projects my stamp club members made at our July gathering, a copper tea tin decorated with the Tea Room Suite of products.
Here’s what we made:
Here’s what I did:
Cut and scored with my Stampin’ Trimmer:
Tea Room Specialty Designer Series Paper (DSP) cut to 12″ x ___
Stamped with the Time For Tea stamp set:
sentiment in Calypso Coral ink onto a scrap of Very Vanilla card stock (CS)
cup in Calypso Coral ink onto a scrap of Calypso Coral CS
Die cut using the Spot of Tea Framelit Dies:
sentiment and cup
Applied Tea Room Copper Vinyl Stickers:
small design on cup
long design onto the front of the tin lid (I cut the sticker to the correct length.)
Decorated the tin:
DSP wrapped around the tin and adhered using Tear & Tape (I put some at each end and a tiny piece in the very middle
cup glued onto the sentiment piece
cup/sentiment adhered to the DSP (covering the seam where the two DSP ends met) using Stampin’ Dimensionals
laced Coastal Cabana ribbon through the hole on the left side of the sentiment, ran both ends around the back, laces one end through the hole on the right side, and tied a bow
Here are today’s colors:
You can click on each one to see all the products that come in that color!
It’s time for the July OSAT Blog Hop. This month’s theme is Creature Comforts. and we’re featuring animal themed projects. For my projects today, I used the Kindness & Compassion stamp set with the Graceful Glass Designer Vellum to create a thank you card and a box for the bird lover in your life.
There is an accidental technique used on these projects. I colored the vellum on the back with Stampin’ Write Markers and let them dry. Then I used a sponge to spread glue all over the back, and the ink smeared and created a marbled effect. I liked it so much that I repeated it on the second one.
Here’s what I made:
Here’s what I did:
Cut and scored with my Stampin’ Trimmer:
Petal Pink card stock (CS) cut to 5-1/2″ x 8-1/2″, then scored in half at 4-1/4″
Petal Pink CS cut to 2-1/2″ x 7/8″
Basic Black CS cut to 2-5/8″ x 1″
Graceful Glass Designer Vellum cut to 5-1/4″ x 2″ (birds)
Graceful Glass Designer Vellum cut to 5-1/4″ x 1″ (grid, 2 pieces)
Basic Black CS cut to 4″ x 2″
Petal Pink CS cut to 3-7/8″ x 1-7/8″
Graceful Glass Vellum cut to 3-7/8″ x 1-7/8″ (birds)
Stamped with the Kindness & Compassion stamp set:
sentiment in Memento black ink onto the 2-1/2″ x 7/8″ Petal Pink CS
Colored using Stampin’ Write Markers:
birds in Real Red, Soft Sea Foam, Calypso Coral, Blueberry Bushel, and Pineapple Punch
NOTE: color on the back of the vellum and let dry (can use Heat Tool to speed drying)
Assembled the card:
burnished the fold in the card base with a Bone Folder
vellum birds glued onto the front of the card base
two vellum grids glued onto the front of the card base, above and below the birds
sentiment glued onto the 2-5/8″ x 1″ Basic Black CS
2-5/8″ x 1″ Basic Black CS adhered to the card front using Stampin’ Dimensionals
Assembled the box:
3-7/8″ x 1-7/8″ vellum birds glued onto the 3-7/8″ x 1-7/8″ Petal Pink CS
3-7/8″ x 1-7/8″ Petal Pink CS glued onto the 4″ x 2″ Basic Black CS
4″ x 2″ Basic Black CS glued onto the gable box side
black satin ribbon tied in a bow around the top of the box
Here’s the hop:
Click on the Next button to hop to the next stop, Jo Anne Hewins of Luv 2 Create:
Use this list if you get lost along the hop:
Here are today’s colors:
You can click on each one to see all the products that come in that color!
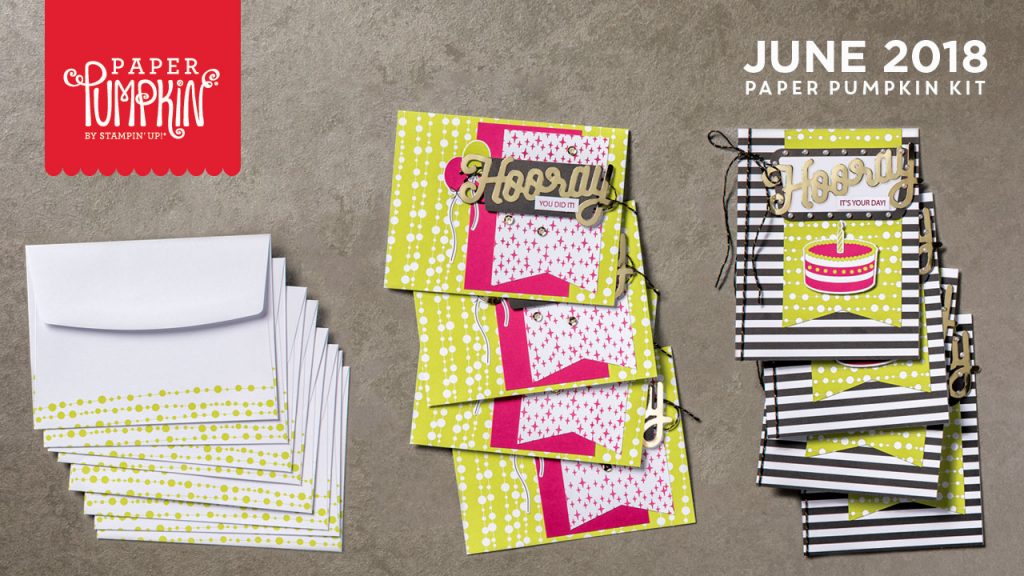
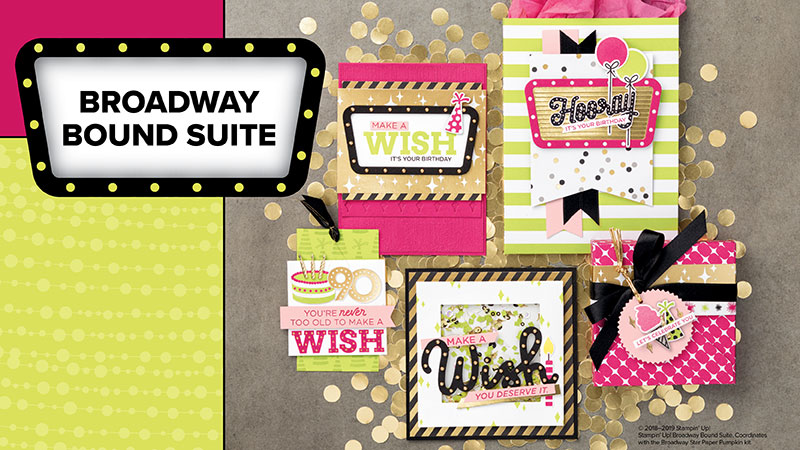
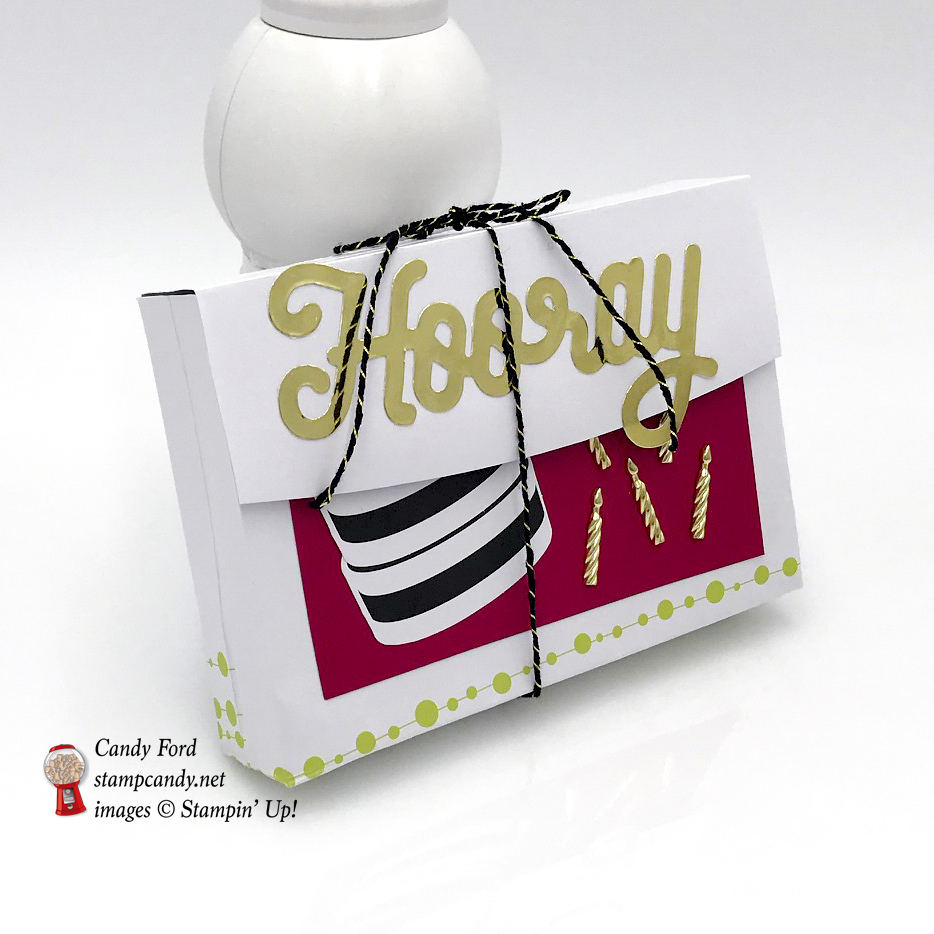
It’s time for the APPT (A Paper Pumpkin Thing) Blog Hop for June. This month’s PP kit, called Broadway Star, coordinates with the new Broadway Bound suite in the annual catalog, and it is a winner winner chicken dinner! It’s all so fun and bright and cheery. You can’t help but smile. For today’s hop I made some small note cards and a holder to store them in.
There are so many different things you can make using this kit, especially when you combine it with the products in the suite. I decided to keep it rather simple. The Candle Embellishments are the only thing from the suite I used on my projects. I didn’t even use a stamp, even though the ones in the PP kit and the ones in the suite are terrific.
This is the Paper Pumpkin kit…
…and this is the suite from the catalog.
Here’s what I made:
Here’s what I did:
Cut and scored with my Stampin’ Trimmer:
cut 3 black striped and 3 green cards down to 4-1/2″ x 6-3/4″, making sure to keep the score line centered, so once the cards are folded they measure 4-1/2″ x 3-3/8″ – in other words, cut 1″ x 8-1/2″ strip off the long side, and cut 7/8″ off each end
scored one of the envelopes 1/2″ in from either side and 1/2″ in from the bottom, then burnished the folds with a bone folder
Cut using Paper Snips:
cut away the outer edges of the envelope flap, that fall outside the score lines
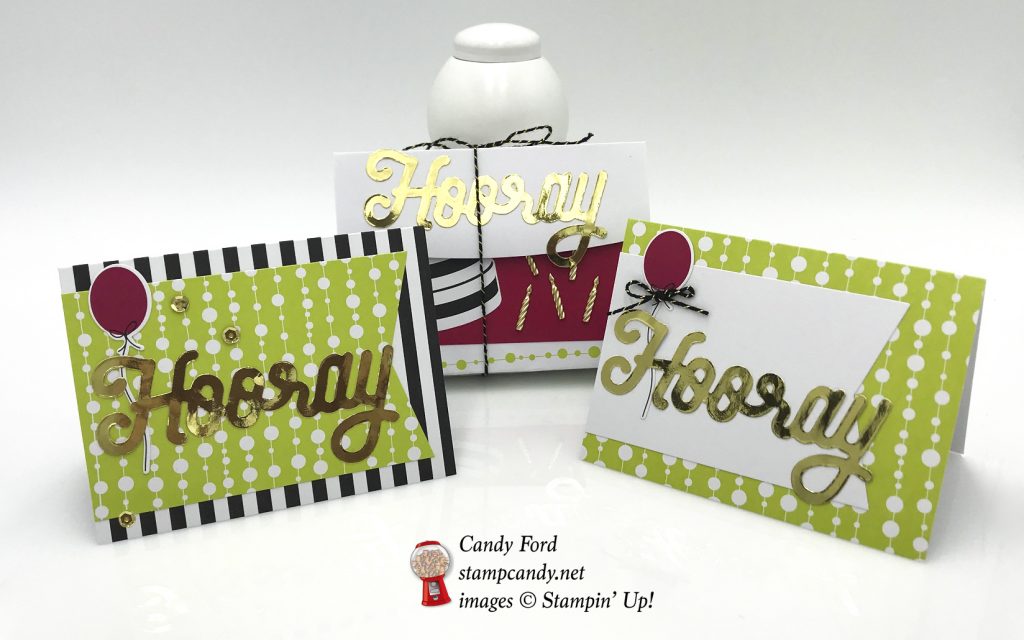
Assembled the cards:
burnished the fold in the card bases with a Bone Folder
banners applied onto the front of the card bases (green onto the black card, and white onto the green card)
balloon applied to the left side of the card front
gold Hooray applied to the banner
tied bows with the black & gold twine from the kit and adhered them to the balloons on the green cards using a rolled up glue dot
applied self stick sequins to the front of the black & white cards
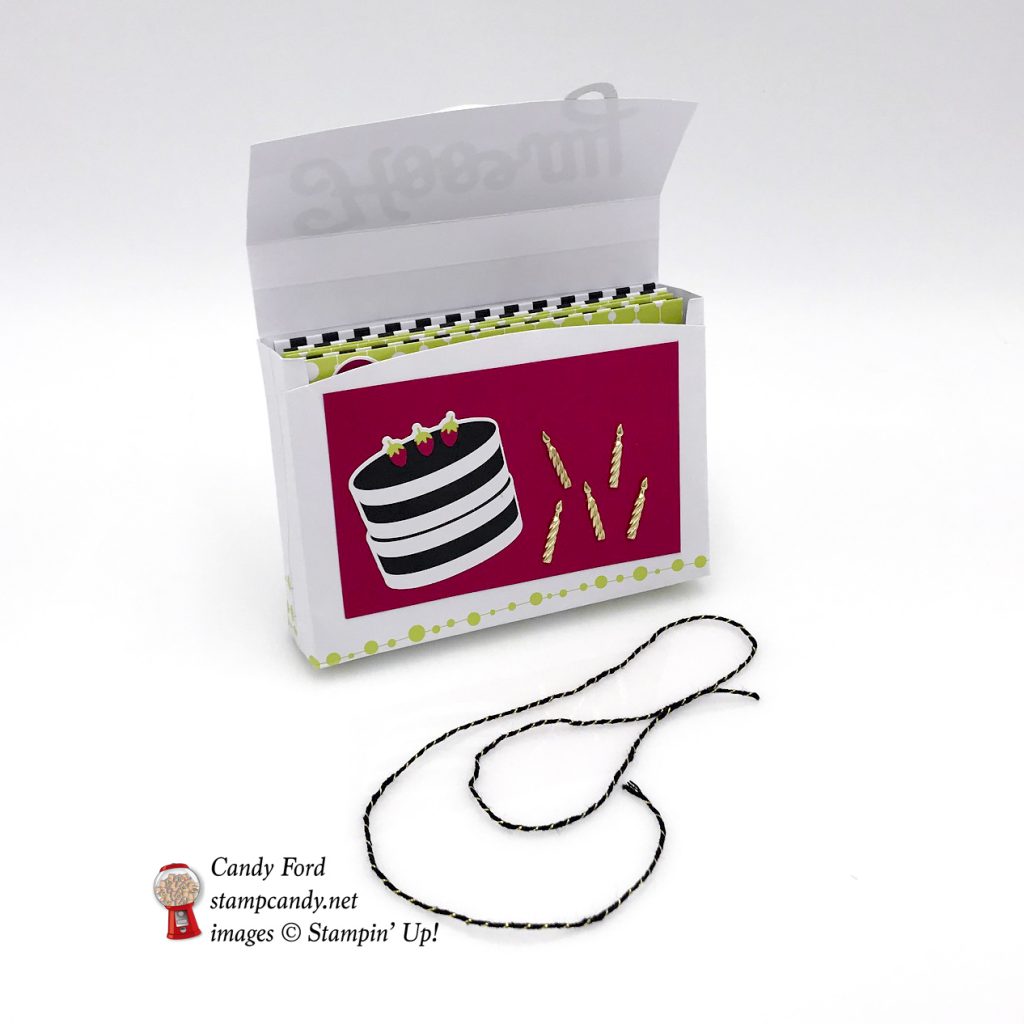
Assembled the holder:
applied a self stick red layer onto the front of the envelope
glued two cakes together to make a taller cake, then glued them onto the red layer
applied 5 gold candles onto the red layer
applied a self stick gold Hooray onto the front of the flap
used an Embossing Buddy to powder the bits of the Hooray that stick out from the flap, so they wouldn’t be sticky
with one hand inside the envelope and one hand outside, flattened the sides and bottom until they were square
tucked under the points at the bottom corners and glued them to the bottom of the holder
put the cards in the holder and tied it closed with a piece of the black & gold twine
Here’s the APPT hop:
You can follow the list, or just click on Next to go to the next stop on the hop!
Here are today’s colors:
You can click on each one to see all the products that come in that color!
Click on these images for more details and to purchase.
Here’s how to get Paper Pumpkin:
The easiest, and least expensive, way to subscribe to Paper Pumpkin is with a 12 month prepaid subscription. There are also 6-month, 3-month, and 1-month prepaid subscriptions. Click on the images below to purchase. Or you can CLICK HEREto subscribe on a month-to-month basis.
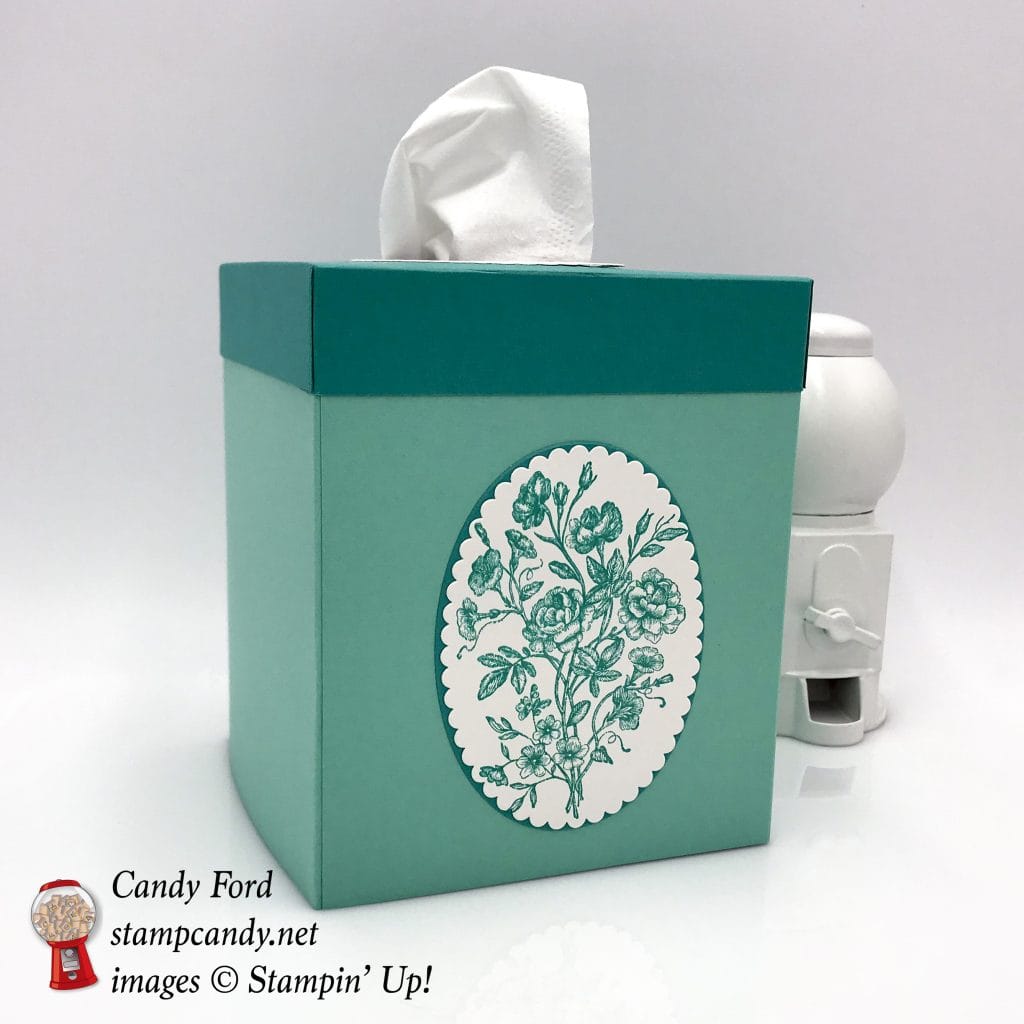
I can’t seem to get enough of the Very Vintage host stamp set. Especially the large floral image I’ve used today…..and the last few days. At least today’s project is a little different in that it isn’t even a card. It’s a tissue box cover. I like to make at least one whenever a new catalog comes out.
A tissue box cover comes in really handy when you want to match the decor of your room, or when you order a case of what you think are solid color boxes of tissues but instead receive a case with cartoon characters on them. Nothing against the cartoon characters, but they aren’t what I had planned on.
Here’s what I made:
Here’s what I did:
Cut and scored with my Stampin’ Trimmer:
Coastal Cabana card stock (CS) cut to 9-1/2″ x 5-1/4″, then scored at 4-1/2″ and 9″ (2 pieces)
Bermuda Bay CS cut to 6-9/16″ x 6-9/16″, and scored 1″ from each of the four edges
Stamped with the Very Vintage stamp set:
floral image into Bermuda Bay ink onto a scrap of Whisper White CS
Die cut using the Layering Ovals Framelits:
stamped image using a scalloped oval die
a scrap of Bermuda Bay CS using a large plain oval die
a scrap of Whisper White CS using a plain oval die and a larger scalloped oval die
a hole in the Bermuda Bay box top using a plain oval die
NOTE: the box top is wider than the Big Shot platform, so I folded in two opposite sides and used them to center the die
Cut using Paper Snips:
one score line at each corner of the Bermuda Bay box top to create tabs
Assembled the cover:
folded and burnished the score lines with a Bone Folder
glued the skinny tab on each Coastal Cabana piece onto the inside of the other one, to create the main box
glued the tabs onto the inside of the adjacent sides of the box top
glued the die cut Whisper White oval frame around the hole in the box top
the stamped image onto the die cut Bermuda Bay CS oval
slipped the box top over the box, gluing the inside of the box top sides to the outside of the box sides
glued the Bermuda Bay CS oval onto the front of the box, centering it between the bottom edge of the box top and bottom edge of the box
Here are today’s colors:
You can click on each one to see all the products that come in that color!