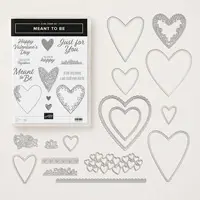
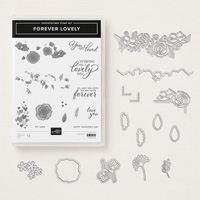
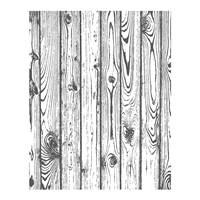
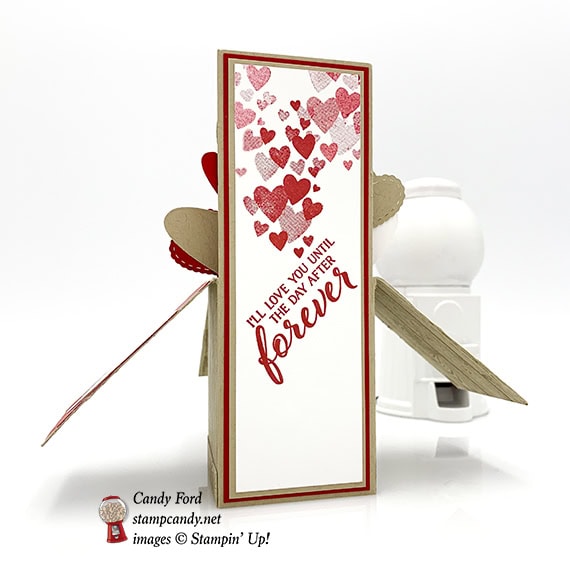
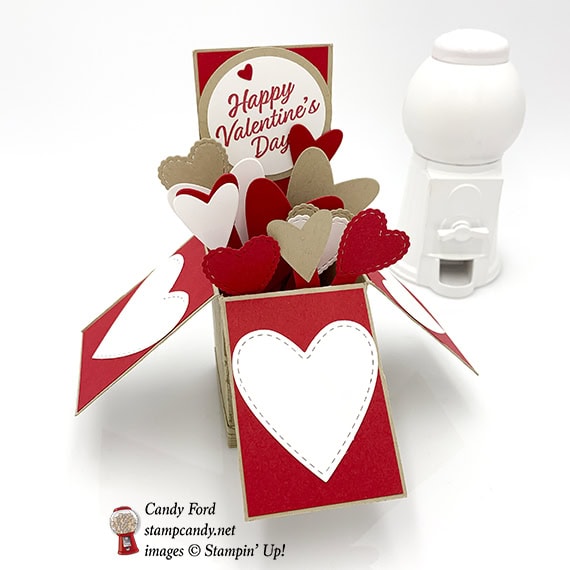
I know it’s a day past, but I have one more Valentine to share with you. It’s the one I made for my sweet hubby. It’s a card that becomes a box with hearts exploding out of it. The Hardwood background stamp creates the wooden box, and the Meant to Be and Forever Lovely stamp sets provide the sentiments. All the hearts are cut using the Be Mine Framelits Dies (available bundled with the Meant to Be stamp set to save 10%.) The front sentiment is cut out using Circle Punches.
Here’s what I made:
S
Here’s what I did:
Cut and scored with my Stampin’ Trimmer:
Crumb Cake card stock (CS) cut to 8-1/2″ x 5-1/2″, then scored along the 8-1/2″ side at 2″, 4″, 6″ and 8″, and scored along the 5-1/2″ side at 2-3/4″ through all but the last 2″ section (see template below: score all lines, then cut along solid lines)
Real Red CS cut to 1-7/8″ x 2-5/8″ (3 pieces)
Real Red CS cut to 1-7/8″ x 5-3/8″ (2 pieces)
Whisper White CS cut to 1-3/4″ x 5-1/4″
Real Red CS cut to 1/2″ x 8″, then scored at 1/2″, 2-1/2″, 3″, 5″, 5-1/2″, and 7-1/2″
Real Red CS cut to 1/2″ x 3″ (one for each heart coming out of the box) You may need to shorten them as needed for each heart.
Stamped with the Hardwood stamp:
outside of the box in Crumb Cake ink
I missed the very bottom of the box, so I cut a 1/2″ strip of Crumb Cake CS, stamped it, and glued it around the bottom of the box to hide my booboo.
Stamped with the Meant to Be stamp set:
front sentiment in Real Red ink onto a scrap of Whisper White CS
Stamped with the Forever Lovely stamp set:
back sentiment and hearts onto the Whisper White CS layer
Die cut using the Be Mine Framelits:
assorted hearts from scraps of Real Red, Crumb Cake, and Whisper White CS, including 3 large Whisper White hearts for the box flaps
I cut one of the detailed hearts, but it was too large for the box. I did use the tiny heart that came out of it to glue onto the front sentiment.
Cut using Circle Punches (or you could use the Layering Circles Framelits Dies):
front sentiment using the 1-3/4″ punch
scrap of Crumc Bake CS using the 2″ punch
Assembled the Valentine:
burnished the folds in the card/box , and in the scored strip, with a Bone Folder
largest Real Red CS layers glued onto both sides of the back box
Whisper White CS layer glued onto the Real Red CS layer on the back
front sentiment glued onto the Crumb Cake CS circle
Crumb Cake CS circle glued onto the front side of the back of the box, at the top
1/2″ box flap glued onto the inside of the opposite end, to create the body of the box
folded down the three box flaps
folded the scored strip of CS and inserted it into the box, gluing the 1/2″ sections to the sides of the box. This provided spots to glue the small hearts.
a 3″ strip glued to each heart, then glued to a crosspiece inside the box, arranging the hearts as desired. Be sure the hearts don’t go too far out to the side or they will stick out the sides when the card is closed. Mine stick out just a little but, but they push in easily when it’s put into an envelope.
S
Here are today’s colors:
You can click on each one to see all the products that come in that color!
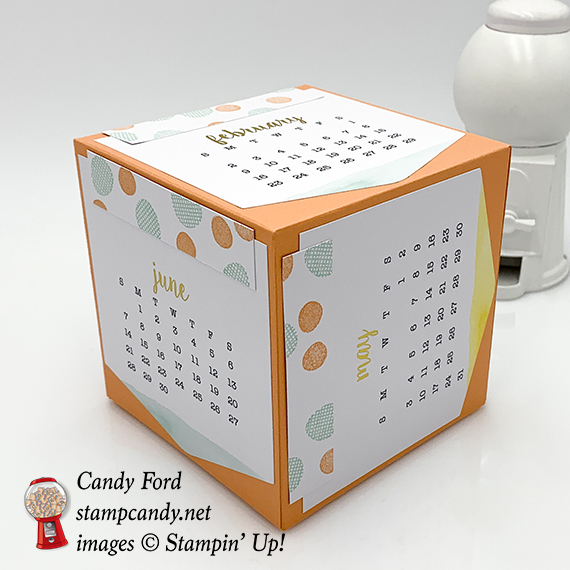
It’s time for the last A Paper Pumpkin Thing Blog Hop of the year! The December kit is called Day By Day and if featured a cute little calendar and a gift box it fits in. For my alternate projects I used some of the calendars to make birthday cards and some to make a calendar cube. I’ll send the cards to someone with a birthday or anniversary that month, and I’ll circle the date on the calendar – there’s a handy little circle stamp in the set just for this purpose! I’ve left the insides blank for now so I can stamp the appropriate sentiment in them later. I haven’t lined these yet either, but I’ll glue a piece of Whisper White card stock inside each one for the sentiment and handwritten note.
The kit makes an 18 month calendar: January 2019 – June 2020. You can make 3 cubes, 6 months each, or you can use some for cards. Get two kits and you can do both!
Here’s what I made:
I only got 3 cards made so far. For the first two I used only kit components on a card base. For the third one I also used a Gold Foil Sheet and some ribbon not in the kit.
The cube is 4″ x 4″ x 4″. I glued on the calendars going in all different directions.
Here you can see where the two boxes go together to make the cube.
Here’s what I did:
Cut and scored with my Stampin’ Trimmer:
12″ x 12″ Grapefruit Grove card stock (CS) scored at 4″ and 8″ in both directions
Grapefruit Grove CS cut to 11-7/8″ x 11-7/8″, then scored at 3-15/16″ from all four sides
Pool Party, Grapefruit Grove, and Gray Granite CS cut to 4-1/4″ x 11″, then scored in half at 5-1/2″
Gold Foil Sheet cut to 4″ x 5-1/4″
trimmed the sides off the sheets of white rectangular stickers (see below) – this gave me more stickers of the same length but different widths, some 1-1/8″ tall and some 3/4″ tall
trimmed some of the 1-1/8″ tall stickers to 3/4″ tall
trimmed the tops off the calendars for the cube and for one of the cards
Stamped with the Day By Day stamp set:
dots in Pool Party, Grapefruit Grove, and Gray Granite inks onto some of the stickers
Assembled the cards:
burnished the folds in the card bases with a Bone Folder
applied a stamped sticker onto two of the calendars, then glued them onto the front of the card bases
ran a 4″ piece of ribbon through the two holes and adhered the ends on the back
tied a 4″ piece of ribbon around the first piece of ribbon and trimmed the ends
adhered the first two calendars onto the fronts of the card bases using Stampin’ Dimensionals
gold foil layer glued onto the front of the third card base
calendar with the top trimmed away (to remove the holes) adhered onto the gold layer
a piece of Gray Granite ribbon adhered onto the calendar
a piece of gold ribbon adhered onto the Gray Granite ribbon
glued (or will glue) a 4″ x 5-1/4″ piece of Whisper White CS to the inside of each card base
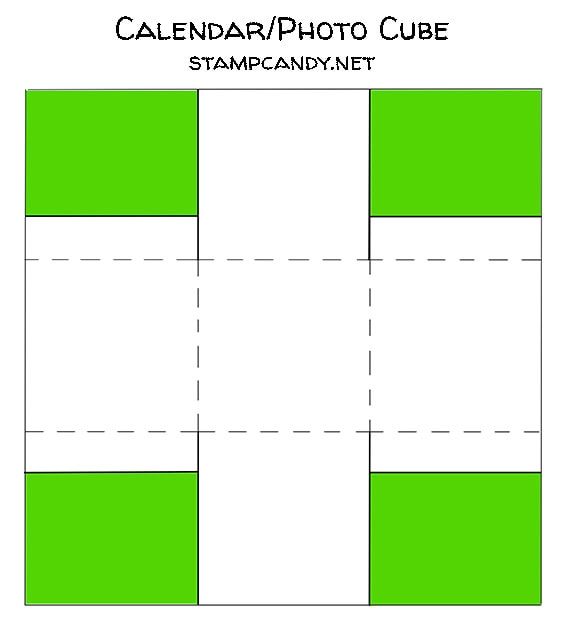
Assembled the cube:
burnished the folds in the two large Grapefruit Grove CS pieces with a Bone Folder
cut down one score line on each corner, only to the first score line it crosses
cut away most of the 4 corner panels (the green areas below) leaving a little for a tab
glued each tab to the inside of the adjacent side – this gave me two topless boxes
inserted the smaller box inside the larger box, open side first, and put a little adhesive just inside the seam where they met
glued the 6 calendars (I used January – June 2020) onto the 6 sides of the cube
applied a 3/4″ tall stamped sticker to each calendar
Here’s the hop:
Here are today’s colors:
You can click on each one to see all the products that come in that color!
Click on these images for more details and to purchase.
Oops! I realized the 1/8″ gold ribbon I used on the third card is retired. I substituted the 1/8″ gold cord below. Looks like I need to recheck my current products!
During the Year-End Closeout promotion, you can save on a selection of retiring and surplus items—while supplies last. Definitely place your orders sooner rather than later, because supplies are limited and the Year-End Closeout ends on January 2. After that, some of your favorite retiring items may be gone for good!
CLICK HERE to see all the Year-End Closeout items.
Here’s how to get your copy of the new catalogs:
Just click on this button and I’ll send you the new catalogs, along with a list of the bundles, the Designer Series Paper coordinating colors, and a handmade card!
Here’s how to shop 2019 Occasions/Sale-a-bration items now!
Become a Candy Heart!
Join my team and you can order the new products right now, instead of having to wait another month!
No selling required! I welcome Hobby Demos! (Hobby Demos join to get the discount for themselves.)
The Clear Tiny Treat Boxes make gift giving so easy. You can line it with paper, as I have today, or let the gift inside show through. I especially like to do that when the gift is colorful, like M&Ms. I decorated this one with a tag I made using the Candy Cane Season stamp set and Stitched Labels Framelits Dies.
Here’s what I made:
Here’s what I did:
Cut and scored with my Stampin’ Trimmer:
All is Bright Designer Series Paper (DSP) cut to 2″ x 8″, then scored at 2″, 4″, and 6″
DSP cut to 2″ x 6″, then scored at 2″ and 4″
Stamped with the Candy Cane Season stamp set:
sentiment in Garden Green ink onto a scrap of Whisper White card stock (CS)
Die cut using the Stitched Labels Framelits:
a scrap of Garden Green CS (largest layer)
sentiment (smallest layer)
Die cut using the Layering Circles Framelits:
a scrap of Real Red CS (middle layer)
Cut using the 1/2″ Circle Punch:
a semicircle from one end of the 8″ DSP, to match the rounded finger notch in the box
Assembled the project:
folds in the DSP pieces burnished with a Bone Folder
assembled the box
6″ DSP inserted into the box to line the two sides and the bottom
8″ DSP inserted into the box to line the front, bottom, back, and top, with the finger notch in the front
put treats/gift in the box and close the lid
sentiment glued onto the Real Red CS circle
Real Red CS circle glued onto the Garden Green CS circle
Garden Green CS circle adhered onto the top of the box using Stampin’ Dimensionals
Here are today’s colors:
You can click on each one to see all the products that come in that color!
The Year-End Closeout has officially begun! During this promotion, you will be able to save on a selection of retiring and surplus items—while supplies last. Definitely place your orders sooner rather than later, because supplies are limited and the Year-End Closeout ends on January 2. After that, some of your favorite retiring items may be gone for good!
CLICK HERE to see all the Year-End Closeout items.
Here’s how to get your copy of the new catalogs:
Just click on this button and I’ll send you the new catalogs, along with a list of the bundles, the Designer Series Paper coordinating colors, and a handmade card!
Here’s how to shop 2019 Occasions/Sale-a-bration items now!
Become a Candy Heart!
Join my team and you can order the new products right now, instead of having to wait another month!
No selling required! I welcome Hobby Demos! (Hobby Demos join to get the discount for themselves.)
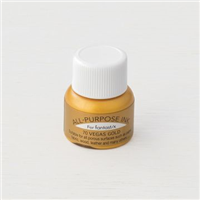
Today I’m sharing a fun little Takeout Treat Box I made for a group of stampers at my retreat last month. I used the Takeout Thinlits Dies to cut the box out of Broadway Bound Specialty Designer Series Paper. I tied a piece of Basic Black Solid Twine around the box, and the finishing touch is a little wooden element I painted with Vegas Gold Shimmer Paint, adhered using a Mini Glue Dot. Easy peasy quick and easy!
Here’s what I made:
Here’s what I did:
Die cut using the Takeout Thinlits:
two pieces of Broadway Bound Specialty Designer Series Paper (DSP)
Colored using a Stampin’ Sponge:
tree from the Festive Farmhouse Elements in Vegas Gold Shimmer Paint
Assembled the Takeout Treat Box:
burnished the folds in the DSP pieces with a Bone Folder
DSP pieces glued together on the bottom and up all four sides
inserted treats into the box, and closed the top
tied Basic Black Solid Twine around the box and tied it in a bow
adhered tree element using a Mini Glue Dot
Here are today’s colors:
You can click on each one to see all the products that come in that color!
The Year-End Closeout has officially begun! During this promotion, you will be able to save on a selection of retiring and surplus items—while supplies last. Definitely place your orders sooner rather than later, because supplies are limited and the Year-End Closeout ends on January 2. After that, some of your favorite retiring items may be gone for good!
CLICK HERE to see all the Year-End Closeout items.
Here’s how to get your copy of the new catalogs:
Just click on this button and I’ll send you the new catalogs, along with a list of the bundles, the Designer Series Paper coordinating colors, and a handmade card!
Here’s how to shop 2019 Occasions/Sale-a-bration items now!
Become a Candy Heart!
Join my team and you can order the new products right now, instead of having to wait another month!
No selling required! I welcome Hobby Demos! (Hobby Demos join to get the discount for themselves.)
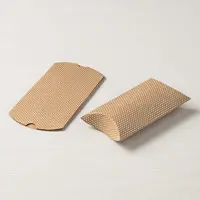
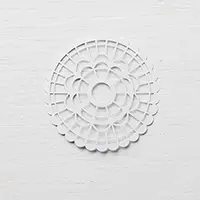
Happy Thanksgiving! Today I’m sharing with you a super duper quick and simple project. It has three pieces: a pillow box, a doily, and a piece of ribbon. That’s it! No stamping. No adhesive. The ribbon is the only thing you even need to cut. You can certainly dress it up all you want to, but when you need something in a hurry, this is the ticket.
Here’s what I made:
Here’s what I did:
Fold in one end of a pillow box.
Fill it with treats or a small gift and fold in the other end.
Wrap a piece of ribbon around the box and tie it in a knot on the front.
Slip a Pearlized Doily over the ends of the ribbon and over the knot, which will hold it in place.
Done!
Here are today’s colors:
You can click on each one to see all the products that come in that color!
(The boxes are kraft, but Crumb Cake is pretty close.)
Welcome to InKing Royalty’s October Blog Hop! This year’s Blog Hop themes are inspired by popular songs – this month’s song is “Monster Mash.” You can watch a video of the song at the bottom of this blog post. As you can guess, our Blog Hop today is filled with fun projects that are inspired by the spookiest night of the year – Halloween. We are excited to share our creations with you today! After you read my post, I hope you’ll hop over to the next person on the list at the base of this post.
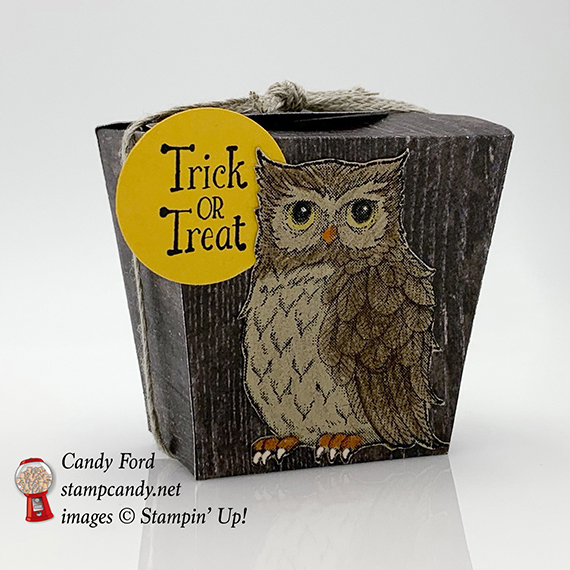
Here’s what I made:
Here’s what I did:
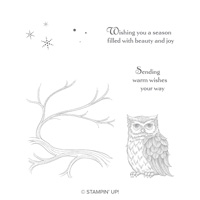
Stamped with the Still Night stamp set:
owl in Stazon black ink onto a scrap of Crumb Cake card stock (CS)
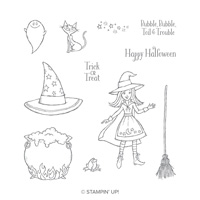
Stamped with the Cauldron Bubble stamp set:
sentiment in black ink onto a scrap of Crushed Curry CS
Die cut using the Takeout Thinlits:
two box pieces from Wood Textures Designer Series Paper (DSP)
Cut using the 1″ Circle Punch:
sentiment
Colored using Watercolor Pencils:
owl in Early Espresso, Basic Gray, Basic Black, Daffodil Delight, Pumpkin Pie, and Whisper White
Cut using Paper Snips:
fussy cut the owl (Seriously, Stampin’ Up!’s Paper Snips are the best scissors for fussy cutting paper!)
Assembled the card:
folded and burnished the score lines in the box pieces with a Bone Folder
the bottoms of the two box pieces glued to each other
flaps adhered to the inside of the adjacent sides of the box with Tear & Tape
sentiment “moon” and owl glued onto the front of the box
treats put inside, the closed the box
Braided Linen Trim tied around the box and tied in a knot
Here’s the Monster Mash hop:
Thank you for hopping along with us today. I hope you’ll hop to the next stop, Robin Myren at Songbird Designs by Robin. There’s a lot of inspiration to be found in this group, and you don’t want to miss any of it! If you get stuck during the Blog Hop, please use this line-up as a guide:


 S
S