Jun 15, 2020 | Cards, Gallery |
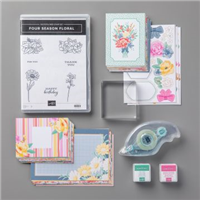
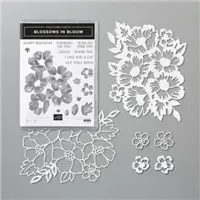
Have you seen the new Beginner Brochure from Stampin’ Up!? Even seasoned stampers will love these new products – some are in the Annual Catalog and some are exclusive to the Beginner Brochure. Today I used the items on page 5 of the brochure to create 10 cards with envelopes. Click here to see Stampin’ Up!’s video on this amazing kit. Talk about #simplestamping! They’re just stamps, ink, and paper. Of course, you can add items to them to make them even more spectacular, like embellishments, ribbons, Stampin’ Dimensionals, other ink colors, etc.
You can get everything I used (except the Bone Folder) using Item # 155422, or you can purchase them separately. You can see all the product options near the bottom of this post.
Click here to download the 2020-2021 Beginner Brochure pdf file, or click here to request that a copy be mailed to you. Click here to see Stampin’ Up!’s video on this amazing kit.
If you are reading this in email, some photos may appear blurry, or may not appear at all. Please click here to see the post on my blog.
S Beginner Beginner Beginner Beginner Beginner Beginner
Here’s what I made:

Here’s how to fold a card base:
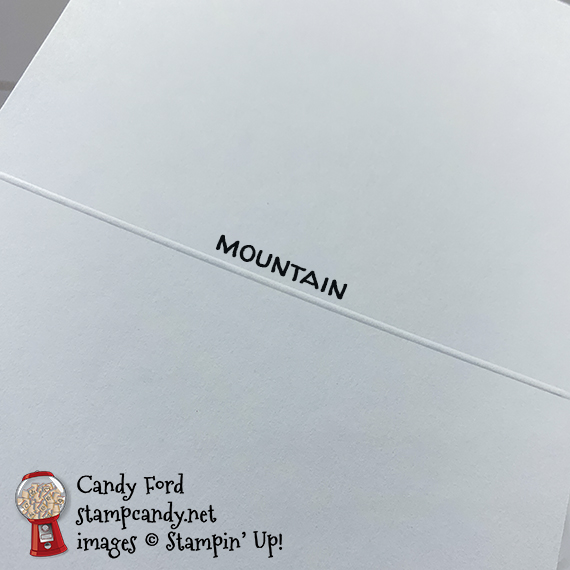
When a piece of card stock is scored, on one side there is a valley (where the paper in indented) and on the other side there is a mountain (where the paper sticks up.) For best results, fold the card so the valley is on the outside and the mountain is on the inside. Burnish the fold with a Bone Folder for a nice crisp fold. When you open the card, you will see a bead down the fold on the inside. This may seem counterintuitive, but you will get way fewer “paper hairs” and rips if you do it this way.

S
Here’s what I did:
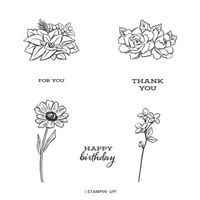
Stamped with the Four Season Floral stamp set:
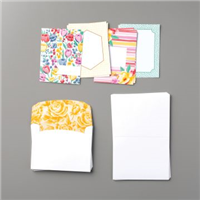
- various sentiments and flowers in Magenta Madness and Just Jade inks onto the layer cards included in the Flowers for Every Season Cards & More
- various flowers in Magenta Madness and Just Jade inks onto the fronts or the back flaps of the envelopes
Assembled the card:
- burnished the folds in the card bases with a Bone Folder
- stamped layer cards glued onto the fronts of the card bases
- That’s it!

S
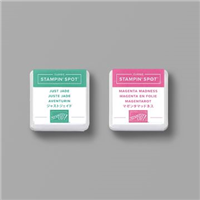
Here are the colors in the cards:
You can click on each one to see all the products that come in that color!
S
Here’s what I used:
Click on these images for more details and to purchase. If you are reading this post in email, the product images may not show up. Please click here to see the post on my blog.
Supply List. <— Click for a clickable and printable list of the products!
S
Here are some helpful links:
S
Thanks for stopping by today, and Sweet Stamping!
Jun 12, 2020 | Cards, Gallery |
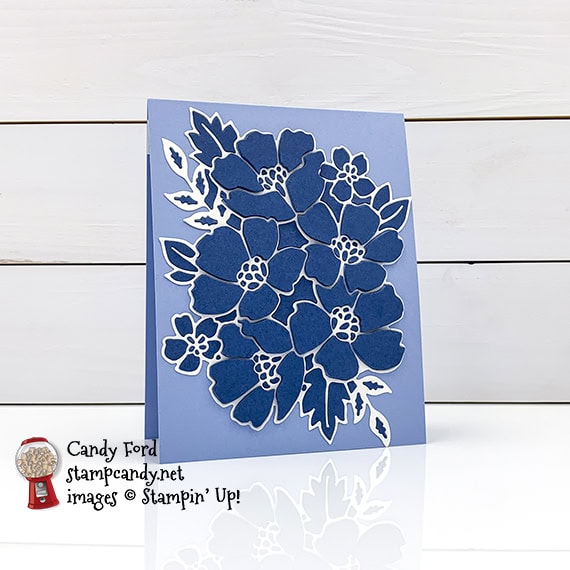
Okay, I know, I know. Enough already, right? I just can’t stop playing with these Many Layered Blossoms Dies. Today’s card is very much like the one I posted yesterday, but the colors are just so striking on this one, I had to share it. I again used the PPPS Technique from Kylie Bertucci, a Stampin’ Up! Demonstrator in Australia. Misty Moonlight, one of the new 2020-2022 In Colors, and Seaside Spray, one of the returning 2019-2021 In Colors, are so perfect together, especially when separated by Whisper White.
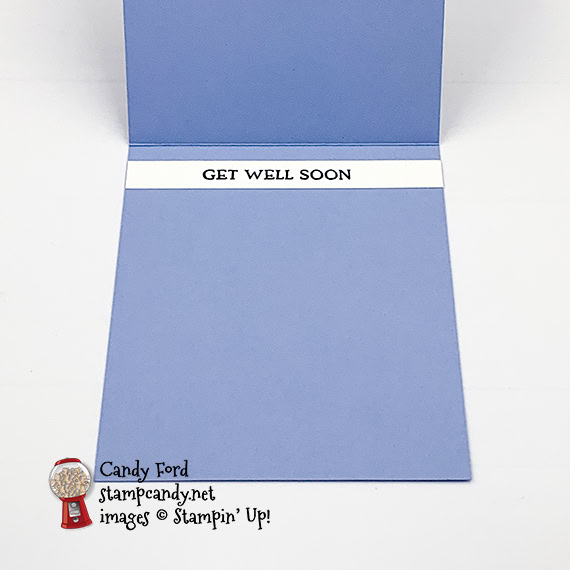
I love the front of this card so much that I didn’t even add a sentiment or any embellishments or other doodahs. The Get Well sentiment is on the inside of the card base. I stamped it onto a 1/2″ strip of Whisper White card stock, instead of onto the usual 4″ x 5-1/4″ piece, to let the Seaside Spray show. It’s still plenty light enough to write on.
If you are reading this in email, some photos may appear blurry, or may not appear at all. Please click here to see the post on my blog.
S Blossoms Dies Blossoms Dies Blossoms Dies Blossoms Dies
Here’s what I made:
S
Here’s what I did:
Cut and scored with my paper trimmer:
- Seaside Spray card stock (CS) cut to 4-1/4″ x 11″, then scored in half at 5-1/2″
- Whisper White CS cut to 4-1/4″ x 1/2″ for the inside of the card base
Stamped with the Blossoms in Bloom stamp set:
- sentiment in Misty Moonlight ink onto the Whisper White CS strip
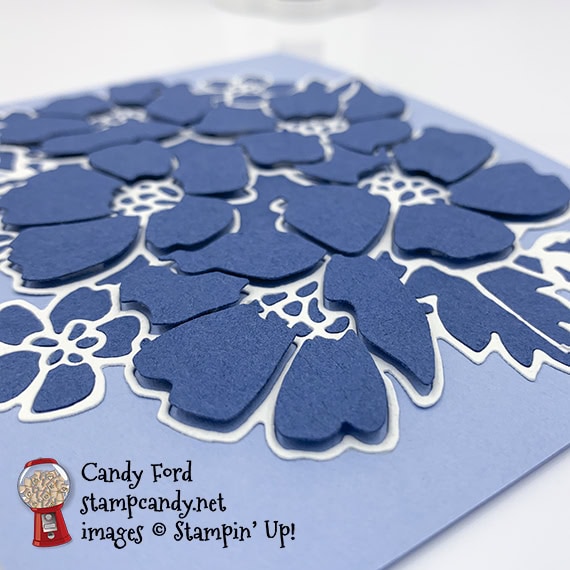
Cut using the Many Layered Blossoms Dies:
- a piece of Whisper White CS and a piece of Misty Moonlight CS cut using the large outline die
- a piece of Press n Seal plastic wrap burnished onto each die cut before removing it from the cutting plate, to keep all the pieces in place
Assembled the card:
- burnished the fold in the card base with a Bone Folder
- peeled the outline piece from the Misty Moonlight CS die cut
- on the back of the Misty Moonlight CS die cut, Stampin’ Dimensionals applied onto the backs of the large flowers petals, and glue applied onto the smaller pieces
- pressed the whole Misty Moonlight piece onto the front of the card base, then carefully peeled away the plastic wrap, making sure all the pieces stay stuck to the card base
- peeled the outline piece from the Whisper White CS die cut, then glued it onto the front of the card base, around the Misty Moonlight pieces, making sure it sticks to the card base (A sharp point, like a Take Your Pick Tool or a paper piercer, can help with this.)
- sentiment glued onto the inside of the card base
What I would do differently:
A word of advice on placing the little pieces of Misty Moonlight card stock in the flower centers: don’t. I mean, you can if you really want to, of course, but they are very fiddly little bits that can be a real pain to deal with, or even keep track of. I recommend allowing the background color to show through the flower centers, like I did on the card I posted yesterday. Or cut pieces of a different color CS the size of the whole flower centers and glue them to the backs of the flower centers.
Also like the card I posted yesterday, I ended up gluing down all of the filler pieces. I wish I had thought to leave them out and let the background show through. The pieces I’m talking about are the ones between the flowers that aren’t actually a part of the flowers or leaves. There are a couple of bigger ones in the middle of the cluster of flowers, and several small ones around the periphery.
S
Here are today’s colors:
You can click on each one to see all the products that come in that color!
S
Here’s what I used:
Click on these images for more details and to purchase. If you are reading this post in email, the product images may not show up. Please click here to see the post on my blog.
Supply List. <— Click for a clickable and printable list of the products!
S
Here are some helpful links:
S
Thanks for stopping by today, and Sweet Stamping!
Jun 11, 2020 | Blog Hop, Cards, Gallery, New Products |

Its a New Review for the 06-2020 OSAT Blog Hop! Today we are featuring brand new products from the brand new 2020-2021 Annual Catalog. I used the Many Layered Blossoms Dies and the PPPS Technique by Kylie Bertucci of Australia to create my card. I used three of the new In Colors: Cinnamon Cider, Bumblebee, and Just Jade.
What is the PPPST? Paper Piecing Press n Seal Technique. Press n Seal plastic wrap is slightly sticky on one side, and it makes paper piecing from intricate die cuts so much easier! It’s available in your local grocery store.
Be sure to hop around to all the stops to see all the great new projects! Use the line up below if you get lost.
If you are reading this in email, some photos may appear blurry, or may not appear at all. Please click here to see the post on my blog.
S 06-2020 OSAT 06-2020 OSAT 06-2020 OSAT 06-2020 OSAT 06-2020 OSAT
Here’s what I made:

S
Here’s what I did:
Cut and scored with my paper trimmer:
- Cinnamon Cider card stock (CS) cut to 4-1/4″ x 11″, then scored in half at 5-1/2″
- Whisper White CS cut to 4″ x 5-1/4″ for the inside of the card base
Stamped with the Itty Bitty Greetings stamp set:
- sentiment in black Memento ink onto a scrap of Just Jade CS
Cut using the Many Layered Blossoms Dies:
- a piece of Bumblebee CS using the large outline die
- a piece of Just Jade CS using the same die
- NOTE: before removing each die cut from the die cutting machine, burnish a piece of Press n Seal over it to keep all the pieces in place
Cut using the Classic Label Punch:
Assembled the card:
- burnished the fold in the card base with a Bone Folder
- removed the outline piece from the Bumblebee CS die cut
- onto the back of the Bumblebee CS die cut, applied Stampin’ Dimensionals onto the large flower petals, and glue onto the other pieces
- pressed the whole thing in place onto the front of the card base, then very gently peeled back the Press n Seal
- removed the outline piece from the Just Jade CS die cut, applied glue onto the back, and glued it around the Bumblebee CS pieces (A pointy tip, like a Take Your Pick Tool, is very helpful.)
- tied a piece of ribbon in a bow and adhered it onto the sentiment using a Mini Glue Dot
- adhered sentiment over flowers (I used a Mini Stampin’ Dimensional at the left end, and glued the rest of it onto the large petals.
- 3 pearls applied onto the front of the card base
- Whisper White CS glued onto the inside of the card base
What I would do differently:
- After looking at the photo, I think the bow seems a bit large. I would probably make it smaller.
- Maybe I’d emboss the background, probably with the Subtle embossing folder.
- Maybe I’d heat emboss the sentiment in white.
- How would you change this card?
S
Here’s the 06-2020 OSAT Blog Hop:
S
Here are today’s colors:
You can click on each one to see all the products that come in that color!
S
Here’s what I used:
Click on these images for more details and to purchase. If you are reading this post in email, the product images may not show up. Please click here to see the post on my blog.
Supply List <— Click for a clickable and printable list of the products!
S
Here are some helpful links:
S
Thanks for stopping by today, and Sweet Stamping!
Jun 10, 2020 | Cards, Gallery |
I guess you can tell I’m really enjoying playing with the new Many Layered Blossoms Dies. In the last week or so, I’ve posted several cards made with them. Well, today I’m sharing another gem made with these dies. I’ve also used the new In Color Bumblebee…again. But hey, look how great it goes with So Safffron! And don’t you just love the new Bumblebee Gingham Trim? I almost stamped the sentiment in Bumblebee, but thought I’d add just a pop of black to make it stand out from all the yellow. This card was really easy to make. The dies do all the work for you!
If you are reading this in email, some photos may appear blurry, or may not appear at all. Please click here to see the post on my blog.
S many layered many layered many layered many layered many layered
Here’s what I made:
S
Here’s what I did:
Cut and scored with my paper trimmer:
- Whisper White Thick card stock (CS) cut to 4-1/4″ x 11″, then scored in half at 5-1/2″
Stamped with the Itty Bitty Greetings stamp set:
- sentiment in black Memento ink onto a scrap of Whisper White Thick CS
Cut using the Many Layered Blossoms Dies:
- bottom layer from a piece of So Saffron CS
- top outline layer from a piece of Bumblebee CS
Cut using the Classic Label Punch:
Assembled the card:
- burnished the fold in the card base with a Bone Folder
- So Saffron die cut glued onto the front of the card base
- Bumblebee die cut glued onto the So Saffron die cut
- ribbon tied in a bow and adhered onto the sentiment using a Mini Glue Dot
- sentiment adhered over the die cuts using Mini Stampin’ Dimensionals
- 3 Bumblebee enamel dots applied onto the front of the card base
S
Here are today’s colors:
You can click on each one to see all the products that come in that color!
S
Here’s what I used:
Click on these images for more details and to purchase. If you are reading this post in email, the product images may not show up. Please click here to see the post on my blog.
Supply List. <— Click for a clickable and printable list of the products!
S
Here are some helpful links:
S
Thanks for stopping by today, and Sweet Stamping!
Jun 9, 2020 | Cards, Gallery |
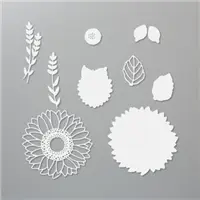
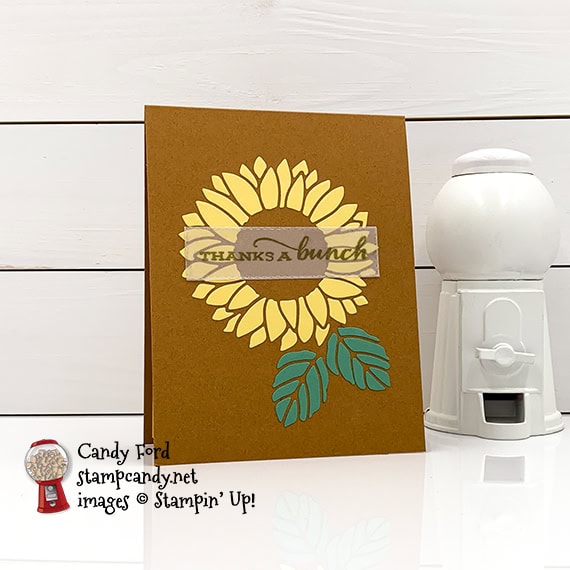
I used the Stitched Rectangles Dies along with the new Celebrate Sunflowers Bundle (Celebrate Sunflowers stamp set & Sunflowers Dies) to make todays thank you card. I glued the rectangular sentiment across the center of the flower. This is another card on which I used Press n Seal plastic wrap to keep all the little die cut pieces in place while I transferred them from the die cut machine to the card.
If you are reading this in email, some photos may appear blurry, or may not appear at all. Please click here to see the post on my blog.
S rectangles rectangles rectangles rectangles rectangles rectangles
Here’s what I made:
You can’t tell in the photo, but the sentiment is heat embossed in gold, so it’s shiny and metallic.
S
Here’s what I did:
Cut and scored with my paper trimmer:
- Cinnamon Cider card stock (CS) cut to 4-1/4″ x 11″, then scored in half at 5-1/2″
- So Saffron CS cut to 4″ x 5-1/4″ for the inside of the card base
Stamped with the Celebrate Sunflowers stamp set:
- sentiment in Versamark ink onto a scrap of Vellum, then heat embossed in gold
Cut using the Sunflowers Dies:
- detailed sunflower from a scrap of So Saffron CS
- 2 detailed leaves from a scrap of Just Jade CS
- Before lifting the die cut pieces from the die cutting machine, I pressed a piece of Press n Seal plastic wrap over each one so the pieces would stay in place.
Cut using the Stitched Rectangles Dies:
Assembled the card:
- burnished the fold in the card base with a Bone Folder
- glue applied onto the backs of the die cut flower (petals only) then the Press n Seal flipped over and the flower petals glued onto the front of the card base
- slowly and carefully peeled the Press n Seal away from the petals
- glue applied onto the backs of the die cut leaves (inner pieces only) then the Press n Seal flipped over and the leaf pieces glued onto the front of the card base
- slowly and carefully peeled the Press n Seal away from the leaves
- sentiment glued over the flower (I spread glue over the entire back of the vellum so no globs would be visible
- So Saffron CS glued onto the inside of the card base
S
Here are today’s main colors:
You can click on each one to see all the products that come in that color!
S
Here’s what I used:
Click on these images for more details and to purchase. If you are reading this post in email, the product images may not show up. Please click here to see the post on my blog.
Supply List. <— Click for a clickable and printable list of the products!
S
Press n Seal plastic wrap can be found in most grocery stores near the other plastic wraps and plastic bags.
S
Here are some helpful links:
S
Thanks for stopping by today, and Sweet Stamping!
Jun 8, 2020 | Blog Hop, Cards, Gallery, Holiday |

Welcome to the June 2020 Candy Hearts Blog Hop! Today we are sharing Patriotic themed projects to get ready for the 4th of July, which is Independence Day here in the United States. After reading my post, I hope you will hop to the next person on the list below. Be sure to check out ALL the great projects the Hearts have created for you today.
My card is very simple. Except for two little pieces of ribbon, it’s just card stock and ink. I made it in honor of all healthcare workers, and really everyone who wears a mask any time they are around other people. If you are patriotic and care about the people of your country, please wear a mask. It literally saves lives.
One week ago I lost a dear family member to COVID-19. Someone at her husband’s work had no symptoms and refused to wear a mask, and infected a bunch of people. By the time they found out he had it, it was too late. She died, and her husband is still in ICU. Please, please, please, even if you don’t think COVID-19 is real, please wear a mask. Remember, it isn’t to protect you, it’s to protect everyone else, especially the more vulnerable folks and the people who will go home to them. Thank you.
If you are reading this in email, some photos may appear blurry, or may not appear at all. Please click here to see the post on my blog.
S June 2020 Candy Hearts Blog Hop June 2020 Candy Hearts Blog Hop June 2020 Candy Hearts Blog Hop June 2020 Candy Hearts Blog Hop
Here’s what I made:


S
Here’s what I did:
Cut and scored with my Paper Trimmer:
- Whisper White Thick card stock (CS) cut to 5-1/2″ x 8-1/2″, then scored in half at 4-1/4″
- Whisper White CS layer cut to 5-1/8″ x 3-7/8″
- Real Red CS strips cut to 1/4″ x 7″ (about 7 or 8 pieces)
- Night of Navy CS strips cut to 1/4″ x 7″ (about 7 or 8 pieces)
- Whisper White CS cut to 3″ x 4″, then scored at 1/2″, 1″, 1-1/2″, 2-1/2″, 3″, and 3-1/2″ (I left 1/2″ at the top and bottom to fold under, but you can delete these bits if you want. Cut it to 3″ x 3″, then score at 1/2″, 1″, 2″, and 2-1/2″)
- Whisper White CS cut to 1/2″ x 1-1/2″, then scored in half at 1/4″ (2 pieces)
- ends of the 1/4″ strips trimmed from the edges of the background layer (see below)
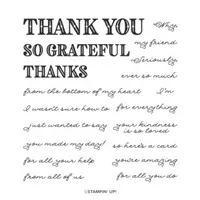
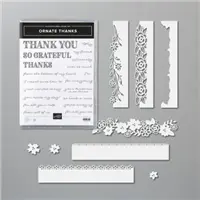
Stamped with the Ornate Thanks stamp set:
- THANKS in Real Red ink onto the top pleat of the mask
- for all you do in Night of Navy ink onto the bottom pleat of the mask
- The pleats are now, from the top down, in red, white, and blue!
Assembled the card:
- burnished the fold in the card base with a Bone Folder
- a Real Red CS strip and a Night of Navy CS strip glued side by side, at an angle, onto the middle area of the Whisper White CS layer, with the ends hanging off the side
- a CS strip laid next to them to make a space between the next red and navy strips, then removed the strip so the white shows through (OR you could cut Whisper White Thick CS strips and glue them between the others.)
- continued this until the layer was covered, then trimmed the excess pieces from the edges of the layer with the Paper Trimmer
- glued the layer onto the front of the card base
- burnished the folds in the 3″ x 4″ Whisper White CS and accordion folded to look like a mask
- burnished the folds in the 1/2″ x 1-1/2″ Whisper White CS pieces and glued them onto the ends of the mask
- adhered the ends of a piece of ribbon onto the back corners of the mask using Mini Glue Dots, one on each side
S
Here’s the June 2020 Candy Hearts Blog Hop:
Thank you for hopping with us today! Be sure to check out all the stops on the hop. Use this line up as a guide.
S
Here are today’s colors:
You can click on each one to see all the products that come in that color!
S
Here’s what I used:
Click on these images for more details and to purchase. If you are reading this post in email, the product images may not show up. Please click here to see the post on my blog.
Supply List. <— Click for a clickable and printable list of the products!
S
Here are some helpful links:
S
Thanks for stopping by today, and Sweet Stamping!